


 本文介绍了如何在Unity中使用Shader实现日式赛璐珞风格的卡通渲染,重点是顶点外扩描边和高光效果。通过新增Pass并调整顶点色,实现描边的平滑与相机距离无关的粗细。同时,通过控制顶点色和Lighting Settings调整阴影色,以匹配赛璐珞风格的暗部颜色变化。最后,展示了Shader的实际应用效果及完整代码。
上一篇传送门:
https://blog.csdn.net/qq_27534999/article/details/101080649
一、赛璐璐风格简介
有些人可能会问,什么是赛璐珞风格?
赛璐珞是一种合成树脂。最早在制作动画的时候,美国开始使用以赛璐珞制作的透明胶片,把人物画在胶片上面,背景画在纸上面,就可以做到很多不同的效果。
采用赛璐珞来制作的动画也叫“做赛璐珞动画”,在很长一个时期里面几乎是“手绘动画”的代名词。因为现在已经不用赛璐珞制作动画了,所以现在通常指有线稿和颜色的风格。以分层的方式作画(线稿层、明暗层、上色层、特效层)。
当然,具体风格依照动画不同,还是有所差异,这里仅挑选一个最经典的赛璐珞风格进行实现。
为了更直观的说明,这里以经典动画《星际牛仔》为例:
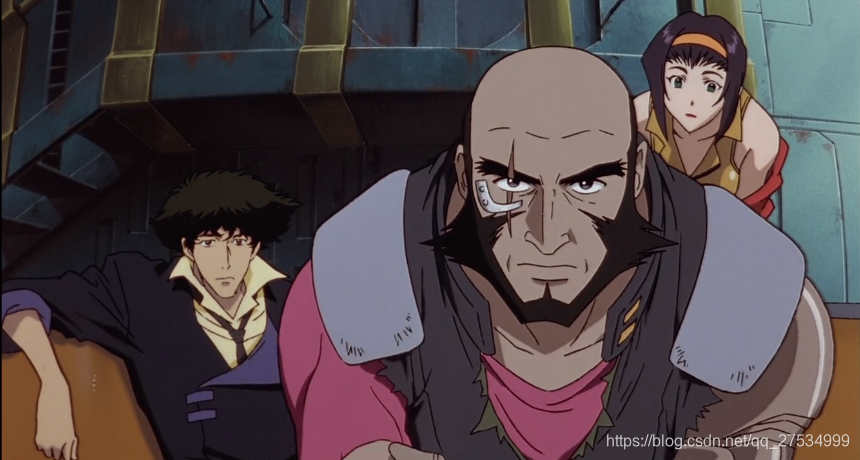
实际去看动画的话,可以发现人物有几个特征:
①黑色描边,较细且粗细均匀
②颜色平涂,并分为暗部亮部,暗部颜色根据环境不同会有所变化
③头发、金属、皮革等特殊部分会有高光、边缘光
④内部结构线、衬线
其中,第④点在本篇中暂时无法解决,一般的做法是直接画贴图上,不过会比较模糊,更好的办法以后再说吧嘻嘻 ~
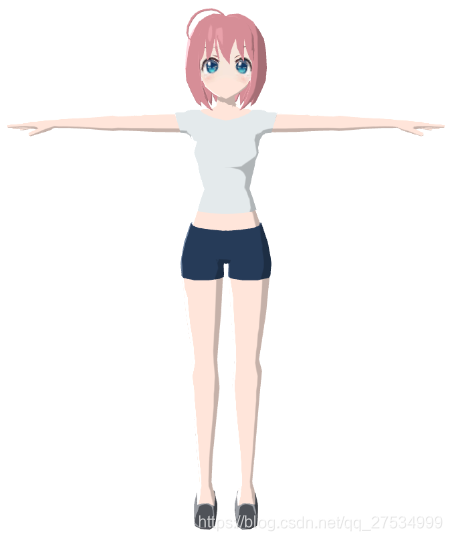
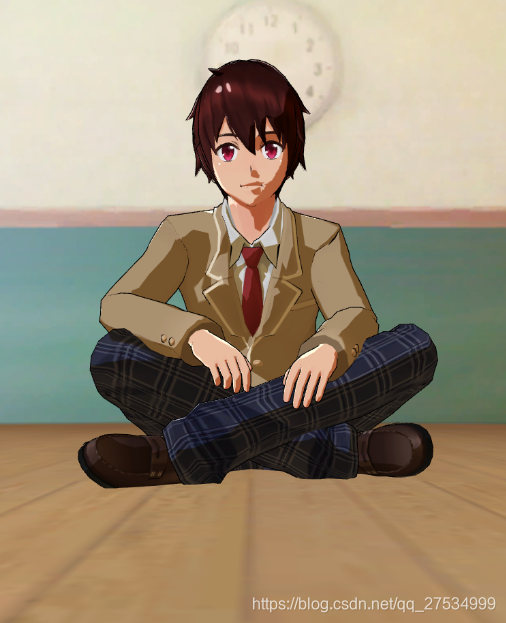
首先,本篇会在前几篇的基础上改进 Shader 以实现效果,这里先上最终的效果图:
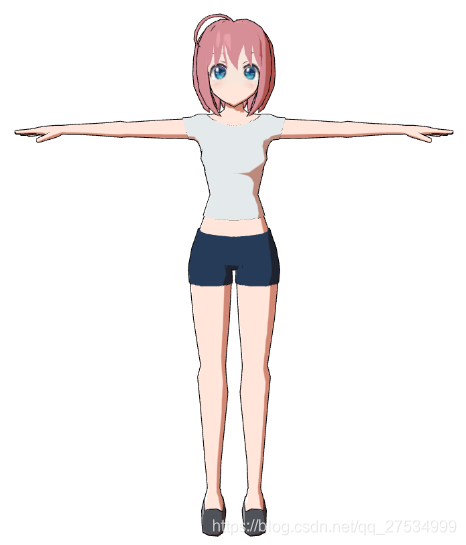
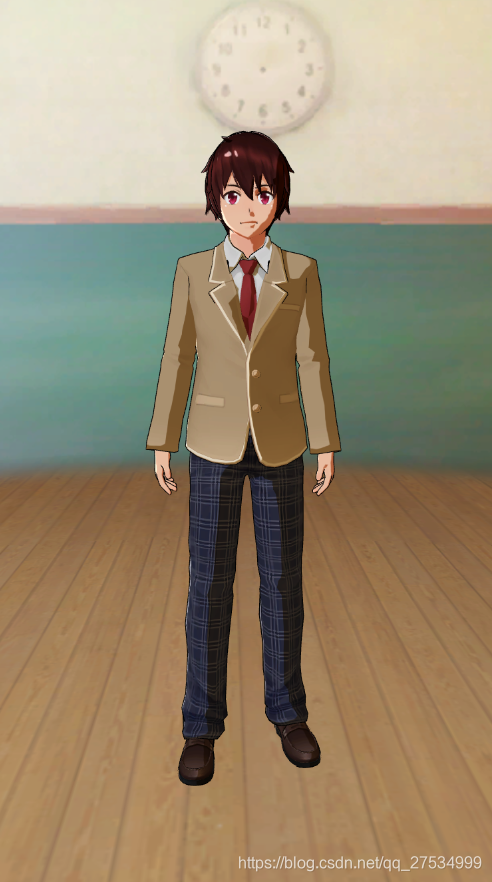
这边模型和背景比较简陋,可能效果不是很好,如果换更好的模型和背景的话效果会挺惊艳,个人感觉这种风格需要优秀美术资源配合才行,比如下图这样,也是用的相同 Shader:
有一点需要注意的是,这类赛璐珞风格渲染纹理不需要不要过多的细节,有时候多用单色色块反而效果会更好。
话不多说,那么接下来开始对之前的 Shader进行改造吧!
二、添加描边
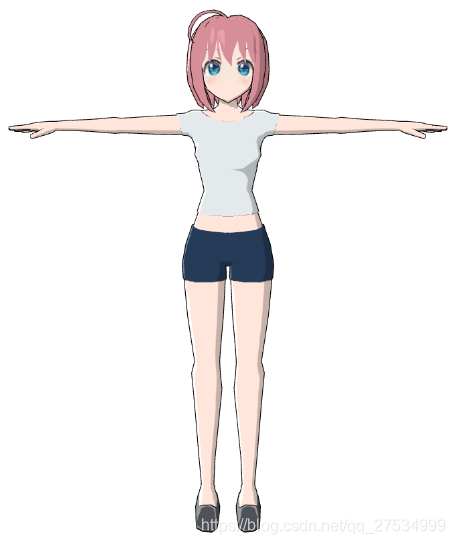
为了方便观察分析,我们还是用之前那个简陋的模型(初学者专用),到上一篇为止的效果如下图所示:
在上一篇 Shader 的基础上,我们来添加描边,这里用一种比较经典的描边方法——顶点外扩(又称法线外扩、Shell 法)。
顶点外扩的原理就是新增一个 Pass,这个 Pass 将模型的顶点沿着法线向外移动一定距离,然后用 Cull Front 剔除正面,残留下来的面正好作为描边。另外,为了让描边在远近都能保持粗细均匀,我们还需要添加一些针对相机距离的计算。
性能优化注意:描边 Pass 务必放在 原 Pass 之后,这样就可以享受 Early-Z 带来的优化,防止造成 OverDraw!
该 Pass 代码具体如下:
Pass
{
Cull Front
CGPROGRAM
#pragma vertex vert
#pragma fragment frag
// make fog work
#pragma multi_compile_fog
#include "UnityCG.cginc"
struct appdata
{
float4 vertex : POSITION;
float2 uv : TEXCOORD0;
float3 normal : NORMAL;
};
struct v2f
{
float2 uv : TEXCOORD0;
UNITY_FOG_COORDS(1)
float4 vertex : SV_POSITION;
};
sampler2D _MainTex;
float4 _MainTex_ST;
float _Outline;
fixed4 _OutlineColor;
v2f vert (appdata v)
{
v2f o;
//计算与相机的距离,用来保持描边粗细程度
float3 posView = mul(UNITY_MATRIX_MV,v.vertex).xyz;
float dis = length(posView);
float3 normal = v.normal;
//顶点沿法线挤出
v.vertex = v.vertex + float4(normalize(normal), 0) * _Outline * dis * 0.01;
o.vertex = UnityObjectToClipPos(v.vertex);
o.uv = TRANSFORM_TEX(v.uv, _MainTex);
UNITY_TRANSFER_FOG(o,o.vertex);
return o;
}
fixed4 frag (v2f i) : SV_Target
{
// apply fog
UNITY_APPLY_FOG(i.fogCoord, col);
return _OutlineColor;
}
ENDCG
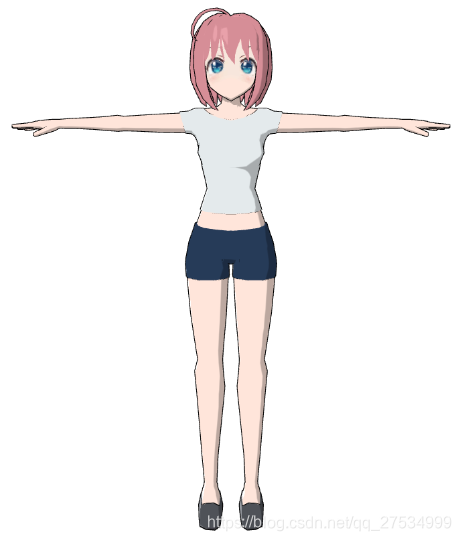
}效果如下:
三、高光
参考《星际牛仔》的赛璐珞风格,我们不想在皮肤、衣物上有高光,这里可以调整顶点色(详见第三篇)或参数来控制细节,去除皮肤、衣物的高光,或者给金属材质加上高光,,这里就不再赘述。
第三篇顶点色细节控制传送门:https://blog.csdn.net/qq_27534999/article/details/100985558
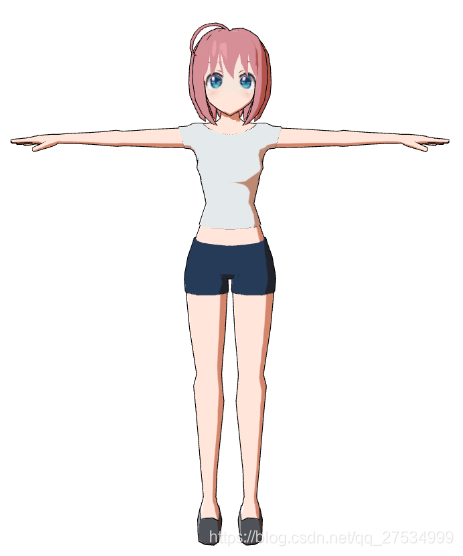
去掉了大部分的边缘光,只保留鞋子部分的,调整后效果如下:
貌似没有原来好看,但为了还原赛璐珞的平涂风格,先这样吧。
四、阴影色
目前为止阴影色只是单纯的降低明度,然而有时候我们需要让阴影色根据环境来改变,这里有几个办法:
1、直接定义一个阴影色属性:
比较简单,就不多说了,将原来的 Shadow Brightness 阴影亮度换成阴影色即可。
2、根据 Lightning Settings 环境光参数进行调整:
#include "Lighting.cginc"
...
//使用Gradient
fixed3 abientSky = unity_AmbientSky.rgb;
fixed3 abientEquator = unity_AmbientEquator.rgb;
fixed3 abientGround = unity_AmbientGround.rgb;
//使用Color
fixed3 ambient = UNITY_LIGHTMODEL_AMBIENT.rgb;
然后将 Shadow Brightness 阴影亮度换成相应变量即可。
调整后效果如下:
五、成果
另外,开头的另一张效果图,资源可在 Asset Store 免费下(TaichiCharacterPack)。
使用的是相同的Shader(没用顶点色控制),有兴趣的同学可以自己试试:
按惯例,放出完整 Shader 代码如下:
(直接用的话整个模型可能变得全白,这可能是因为模型没有刷顶点色,将 Shader 中 i.color 相关计算删除即可)
Shader "Custom/ToonShadingSimple_v4_SimpleCelluloid"
{
	Properties
	{
		[Header(Main)]
		_MainTex ("Texture", 2D) = "white" {}
		_Color ("Color", Color) = (1.0, 1.0, 1.0, 1.0)
		_ShadowColor ("ShadowColor", Color) = (1.0, 1.0, 1.0, 1.0)
		_RimColor ("RimColor", Color) = (1.0, 1.0, 1.0, 1.0)
		_ShadowThreshold ("ShadowThreshold", Range(-1.0, 1.0)) = 0.2
		//赛璐珞风格通常情况不使用边缘光,RimThreshold 可默认为1
		_RimThreshold ("RimThreshold", Range(0.0, 1.0)) = 1
		_RimPower ("RimPower", Range(0.0, 16)) = 4.0
		_Specular ("Specular", Color) = (1, 1, 1, 1)
		_SpecularScale("Specular Scale", Range(0, 0.1)) = 0.02
		_EdgeSmoothness("Edge Smoothness", Range(0,2)) = 2
		_Outline("Outline",Range(0,1))=0.1
		_OutlineColor("OutlineColor",Color)=(0,0,0,1)
	}
	SubShader
	{
		Tags { "RenderType"="Opaque" }
		LOD 100


		Pass
		{
			Cull Back
			Tags { "LightMode"="ForwardBase" }
			CGPROGRAM
			#pragma vertex vert
			#pragma fragment frag
			// make fog work
			#pragma multi_compile_fog

			#include "UnityCG.cginc"
			#include "Lighting.cginc"

			struct appdata
			{
				float4 vertex : POSITION;
				float2 uv : TEXCOORD0;
				float3 normal : NORMAL;
				fixed4 color : COLOR;

			};

			struct v2f
			{
				float2 uv : TEXCOORD0;
				float3 worldNormal : TEXCOORD1;
				float3 worldPos : TEXCOORD2;
				UNITY_FOG_COORDS(3)
				float4 vertex : SV_POSITION;
				fixed4 color : COLOR;
			};

			sampler2D _MainTex;
			float4 _MainTex_ST;
			fixed4 _Color;
			fixed4 _ShadowColor;
			fixed4 _RimColor;

			fixed _ShadowThreshold;
			fixed _RimThreshold;
			half _RimPower;
			half _EdgeSmoothness;
			fixed4 _Specular;
			fixed _SpecularScale;


			v2f vert (appdata v)
			{
				v2f o;
				o.vertex = UnityObjectToClipPos(v.vertex);
				o.uv = TRANSFORM_TEX(v.uv, _MainTex);
				o.worldNormal = mul(v.normal, (float3x3)unity_WorldToObject);
				o.worldPos = mul(unity_ObjectToWorld, v.vertex).xyz;
				o.color = v.color;
				UNITY_TRANSFER_FOG(o,o.vertex);
				return o;
			}

			fixed4 frag (v2f i) : SV_Target
			{
				//return i.color;
				fixed3 worldNormal = normalize(i.worldNormal); //法线 N
				fixed3 worldLightDir = normalize(UnityWorldSpaceLightDir(i.worldPos)); //光照方向 L
				fixed3 worldViewDir = normalize(UnityWorldSpaceViewDir(i.worldPos)); //视角方向 V
				fixed3 worldHalfDir = normalize(worldLightDir + worldViewDir); //高光计算用

				// sample the texture
				fixed4 col = tex2D(_MainTex, i.uv);
				fixed spec = dot(worldNormal, worldHalfDir)+(i.color.g-0.5)*2;
				// w值也可用一个较小的值代替,效果差别不大
				fixed w = fwidth(spec)*_EdgeSmoothness;
				fixed4 specular = _Specular * lerp(0,1,smoothstep(-w, w, spec+_SpecularScale-1)) * step(0.001, _SpecularScale);
				fixed diffValue = dot(worldNormal, worldLightDir)+(i.color.r-0.5)*4;
				fixed diffStep = smoothstep(-w+_ShadowThreshold, w+_ShadowThreshold, diffValue);
				fixed4 light = _LightColor0 * 0.5 + 0.5;
				fixed4 diffuse = light * col * (diffStep + (1 - diffStep) * _ShadowColor) * _Color;

				// 模仿参考文章的方法,感觉效果不是太好
				// fixed rimValue = 1 - dot(worldNormal, worldViewDir);
				// fixed rimStep = step(_RimThreshold, rimValue * pow(dot(worldNormal,worldLightDir), _RimPower));

				fixed rimValue = pow(1 - dot(worldNormal, worldViewDir)+(i.color.b-0.5)*2, _RimPower);
				fixed rimStep = smoothstep(-w+_RimThreshold, w+_RimThreshold, rimValue);

				fixed4 rim = light * rimStep * 0.5 * diffStep * _RimColor;
				fixed4 final = diffuse + rim + specular;

				// apply fog
				UNITY_APPLY_FOG(i.fogCoord, final);

				return  final;
			}
			ENDCG
		}

		//注意,描边 Pass 放后边,可享受 Early-Z 优化
		Pass
		{
			Cull Front
			CGPROGRAM
			#pragma vertex vert
			#pragma fragment frag
			// make fog work
			#pragma multi_compile_fog

			#include "UnityCG.cginc"

			struct appdata
			{
				float4 vertex : POSITION;
				float2 uv : TEXCOORD0;
				float3 normal : NORMAL;
			};

			struct v2f
			{
				float2 uv : TEXCOORD0;
				UNITY_FOG_COORDS(1)
				float4 vertex : SV_POSITION;
			};

			sampler2D _MainTex;
			float4 _MainTex_ST;
			float _Outline;
			fixed4 _OutlineColor;

			v2f vert (appdata v)
			{
				v2f o;
				//计算与相机的距离,用来保持描边粗细程度
                float3 posView = mul(UNITY_MATRIX_MV,v.vertex).xyz;
                float dis = length(posView);
				float3 normal = v.normal;
				//顶点沿法线挤出
				v.vertex = v.vertex + float4(normalize(normal), 0) * _Outline * dis * 0.01;
				o.vertex = UnityObjectToClipPos(v.vertex);
				o.uv = TRANSFORM_TEX(v.uv, _MainTex);
				UNITY_TRANSFER_FOG(o,o.vertex);
				return o;
			}

			fixed4 frag (v2f i) : SV_Target
			{
				// apply fog
				UNITY_APPLY_FOG(i.fogCoord, col);
				return _OutlineColor;
			}
			ENDCG
		}
	}
}
下一篇传送门:
下一篇还没想好要写啥,先这么放着吧
参考文章:
1、萌娘百科 - 赛璐珞
https://zh.moegirl.org/%E8%B5%9B%E7%92%90%E7%8F%9E
2、【NPR】漫谈轮廓线的渲染
https://blog.csdn.net/candycat1992/article/details/45577749


 2313
2313


 到【灌水乐园】发言


