


在上一篇文章中,我们实现了Tag和InputAction的数据对应,后面,我们会通过InputAction触发对应的Tag,然后在GameplayAbility身上设置对应的Tag,然后通过Tag遍历角色身上的所有应用的技能去激活。为了实现这个功能,我们需要增加自定义输入控件,通过此控件增加函数实现输入触发对应Tag触发,数据已经有了,这一篇的内容为创建一个用于增加自定义绑定事件的Component,以及在PlayerController上面使用新的绑定事件。
查看源代码中的绑定
在之前,我们实现了绑定wasd键位,实现了角色的移动功能,使用的是一个Action绑定的事件,然后触发移动事件,我们独立计算出角色移动的法向并设置移动。
在设置输入函数中,我们获取到了增强输入组件,然后通过增强输入的组件去实现的Action触发自定义的移动函数去计算。
void APlayerControllerBase::SetupInputComponent()
{
	Super::SetupInputComponent();

	UEnhancedInputComponent* EnhancedInputComponent = CastChecked<UEnhancedInputComponent>(InputComponent); //获取到增强输入组件

	EnhancedInputComponent->BindAction(MoveAction, ETriggerEvent::Triggered, this, &APlayerControllerBase::Move); //绑定移动事件
}
我们查看源码

我们发现它还有一个模版式的绑定方法,无需直接定义准确格式,只需要定义基础格式即可

我们在实现自定义绑定时,需要实现多种绑定,所以接下来,我们也使用这种方式去实现。
创建EnhancedInputComponent
接下来,我们将创建一个基于EnhancedInputComponent的类,来替换掉默认的EnhancedInputComponent类,然后可以从PlayerController里调用它的自定义函数。
首先添加c++类,选择EnhancedInputComponent
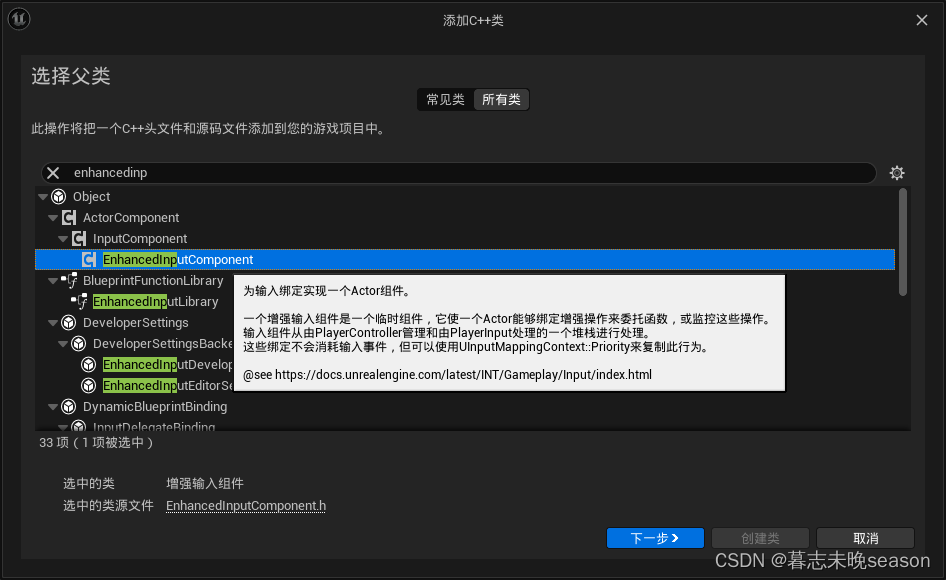
命个名,这个取名InputComponentBase

打开编辑器,在类里面,添加一个公共函数,用于绑定技能的InputAction,我们这里使用模版函数,模板函数允许用户为特定的类型实例化该函数。定义的时候不需要固定参数的确定类型,只需要确定基础类型即可。
在参数这里,我们可以将整个DataAsset传入,然后遍历整个参数列表,进行事件绑定
public:
	template<class UserClass, typename PressedFuncType, typename ReleasedFuncType, typename HoldFuncType>
	void BindAbilityAction(const UInputConfig* InputConfig, UserClass* Object, PressedFuncType PressedFunc, ReleasedFuncType ReleasedFunc, HoldFuncType HoldFunc);
在函数实现这里,我们首先判断InputConfig是否设置,没有设置将直接触发断点
check(InputConfig);
然后遍历AbilityInputActions这个变量,这个变量是我们在面板设置了数据列表的变量
for(const FInputActionStruct& Action : InputConfig->AbilityInputActions)
然后判断,每个参数,如果InputAction和InputTag都有效,才可以进行下一步
if(Action.InputAction && Action.InputTag.IsValid())
然后就是判断函数是否设置,设置后,就可以进行绑定
BindAction函数参数分别是InputAction,触发事件的阶段,对象,触发的事件,(如果需要传参数,后面将参数传入,回调函数实现那里也需要设置对应类型的参数获取才可以)
if(PressedFunc)
{
	BindAction(Action.InputAction, ETriggerEvent::Started, Object, PressedFunc, Action.InputTag);
}
可以触发的事件设置这里,查看内部定义,是一个枚举,所以我们需要通过::获取,每个参数的意义:
- None 不会触发
- Triggered 将在每一帧触发
- Started 在事件开始时触发,Triggered也可能在同一帧触发,但是Started会在它之前触发
- Ongoing 操作正在进行,但是还没到某个设置的阈值的阶段,可以定义为正在进行,还未完成
- Canceled 可以定义为Ongoing 的事件在还未完成时取消了操作
- Completed 从Triggered 状态转换为None时触发,或者Ongoing 状态完成时触发
/**
* Trigger events are the Action's interpretation of all Trigger State transitions that occurred for the action in the last tick
*/
UENUM(BlueprintType, meta = (Bitflags, UseEnumValuesAsMaskValuesInEditor = "true"))
enum class ETriggerEvent : uint8
{
	// No significant trigger state changes occurred and there are no active device inputs
	None		= (0x0)		UMETA(Hidden),
	// Triggering occurred after one or more processing ticks
	Triggered	= (1 << 0),	// ETriggerState (None -> Triggered, Ongoing -> Triggered, Triggered -> Triggered)

	// An event has occurred that has begun Trigger evaluation. Note: Triggered may also occur this frame, but this event will always be fired first.
	Started		= (1 << 1),	// ETriggerState (None -> Ongoing, None -> Triggered)

	// Triggering is still being processed. For example, an action with a "Press and Hold" trigger
	// will be "Ongoing" while the user is holding down the key but the time threshold has not been met yet.
	Ongoing		= (1 << 2),	// ETriggerState (Ongoing -> Ongoing)

	// Triggering has been canceled. For example,  the user has let go of a key before the "Press and Hold" time threshold.
	// The action has started to be evaluated, but never completed.
	Canceled	= (1 << 3),	// ETriggerState (Ongoing -> None)

	// The trigger state has transitioned from Triggered to None this frame, i.e. Triggering has finished.
	// Note: Using this event restricts you to one set of triggers for Started/Completed events. You may prefer two actions, each with its own trigger rules.
	// Completed will not fire if any trigger reports Ongoing on the same frame, but both should fire. e.g. Tick 2 of Hold (= Ongoing) + Pressed (= None) combo will raise Ongoing event only.
	Completed	= (1 << 4),	// ETriggerState (Triggered -> None)
};
ENUM_CLASS_FLAGS(ETriggerEvent)
下面就是我们完成的整个函数定义的实现代码。
template <class UserClass, typename PressedFuncType, typename ReleasedFuncType, typename HoldFuncType>
void UInputComponentBase::BindAbilityAction(const UInputConfig* InputConfig, UserClass* Object,
	PressedFuncType PressedFunc, ReleasedFuncType ReleasedFunc, HoldFuncType HoldFunc)
{
	check(InputConfig);

	for(const FInputActionStruct& Action : InputConfig->AbilityInputActions)
	{
		if(Action.InputAction && Action.InputTag.IsValid())
		{
			if(PressedFunc)
			{
				BindAction(Action.InputAction, ETriggerEvent::Started, Object, PressedFunc, Action.InputTag);
			}

			if(HoldFunc)
			{
				BindAction(Action.InputAction, ETriggerEvent::Triggered, Object, HoldFunc, Action.InputTag);
			}

			if(ReleasedFunc)
			{
				BindAction(Action.InputAction, ETriggerEvent::Completed, Object, ReleasedFunc, Action.InputTag);
			}
		}
	}
}
在PlayerController中使用
上面,我们实现了自定义的绑定函数,可以绑定三种状态下的回调事件的函数:按下,悬停,抬起。
接下来,我们将在PlayerController里面使用并实现对Action的绑定,首先,我们需要一个变量,可以在UE里设置使用InputConfig,这样,也方便我们切换数据
	UPROPERTY(EditDefaultsOnly, Category="Input")
	TObjectPtr<UInputConfig> InputConfig;
然后增加三个函数,用于绑定到事件中
	void AbilityInputTagPressed(FGameplayTag InputTag);
	void AbilityInputTagReleased(FGameplayTag InputTag);
	void AbilityInputTagHold(FGameplayTag InputTag);
在函数实现里面,我先做测试性的打印,使用GEngine->AddOnScreenDebugMessage(Key, TimeToDisplay, Color, String)函数,它的参数为:
- key 作为打印的标示,如果设置为-1,将正常显示,如果设置一个大于0的整数,每次打印将替换之前相同key的打印
- TimeToDisplay 在运行时的显示时间
- Color 打印时使用的颜色
- String 打印的内容
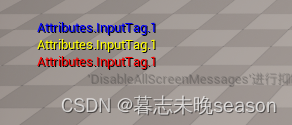
GEngine->AddOnScreenDebugMessage(1, 3.f, FColor::Red, *InputTag.ToString());
我们将其不同的事件打印的内容也作区分,键位按下时红色,抬起时蓝色,按住时黄色
void APlayerControllerBase::AbilityInputTagPressed(FGameplayTag InputTag)
{
	GEngine->AddOnScreenDebugMessage(1, 3.f, FColor::Red, *InputTag.ToString());
}

void APlayerControllerBase::AbilityInputTagReleased(FGameplayTag InputTag)
{
	GEngine->AddOnScreenDebugMessage(2, 3.f, FColor::Blue, *InputTag.ToString());
}

void APlayerControllerBase::AbilityInputTagHold(FGameplayTag InputTag)
{
	GEngine->AddOnScreenDebugMessage(3, 3.f, FColor::Yellow, *InputTag.ToString());
}
最后,我们将修改输入设置,将类型转换为我们创建的自定义组件类型,然后调用之前写好的自定义绑定函数。这里的&ThisClass::指定引用当前类里面的成员函数,也可以和绑定Move时一样写类名称
void APlayerControllerBase::SetupInputComponent()
{
	Super::SetupInputComponent();

	UInputComponentBase* EnhancedInputComponent = CastChecked<UInputComponentBase>(InputComponent); //获取到增强输入组件

	EnhancedInputComponent->BindAction(MoveAction, ETriggerEvent::Triggered, this, &APlayerControllerBase::Move); //绑定移动事件

	EnhancedInputComponent->BindAbilityAction(InputConfig, this, &ThisClass::AbilityInputTagPressed,&ThisClass::AbilityInputTagReleased, &ThisClass::AbilityInputTagHold);
}
测试输入绑定
运行UE,打开项目设置,在输入一项中,找到默认类这一项,上面会有两项,默认输入类,默认输入组件类

将第二项修改为我们自定义的输入组件类

接着打开PlayerController蓝图,发现多了InputConfig一项
在这里,将我们上一篇文章中创建的InputConfig数据设置上

接着就可以运行了,然后测试我们添加的那六个tag标签是否都可以打印出来(鼠标左右键+数字1234)
首先鼠标左键按住,会将Pressed和hold打印出来
按住不松手三秒,会发现hold事件还在

松手事,会触发Released事件
我们这样可以多测试几次,查看是否都没有问题


 1117
1117


 被折叠的 条评论
为什么被折叠?
被折叠的 条评论
为什么被折叠?
 到【灌水乐园】发言


