


 本文详细介绍了如何在Ubuntu系统中配置树莓派Pico的开发环境,包括获取SDK和示例程序、安装编译工具链、编译blink程序、下载固件、使用Picoprobe进行SWD接口调试以及通过VScode进行集成开发。同时,文章还提到了利用Picoprobe和OpenOCD进行在线调试及GDB的使用方法。
树莓派Pico在Ubuntu中的开发环境配置
树莓派Pico开发环境配置
一、获取sdk和examples
从GitHub获取pico-sdk sdk和pico-examples 例程,将它们放置到新建的pico文件夹中。
$ cd ~
$ mkdir pico
$ cd pico
下载sdk和例程仓库
$ git clone -b master https://github.com/raspberrypi/pico-sdk.git
$ cd pico-sdk
$ git submodule update --init
$ cd ..
$ git clone -b master https://github.com/raspberrypi/pico-examples.git
二、获取编译工具链
$ sudo apt update
$ sudo apt install cmake gcc-arm-none-eabi libnewlib-arm-none-eabi build-essential libstdc++-arm-none-eabi-newlib
三、编译例程中的blink程序
添加PICO_SDK_PATH环境变量
$ export PICO_SDK_PATH= ~/pico/pico-sdk
$ cd ~
$ vim .bashrc  //可以查看PICO_SDK_PATH已添加
在pico-examples 中新建build文件
$ cd ~/pico/pico-examples
$ mkdir build
$ cd build
运行cmake指令构建项目
$ cmake ..
此时,cmake 在build文件中为所有的pico-examples例程构建了项目,此时,若直接执行make命令,将会对所有例程进行编译。我们只需要编译blink工程,直接切换到build/blink目录下,执行make指令即可。
$ cd blink
$ make
Scanning dependencies of target ELF2UF2Build
Scanning dependencies of target boot_stage2_original
[ 0%] Creating directories for 'ELF2UF2Build'
.
.
.
[100%] Linking CXX executable blink.elf
[100%] Built target blink
在blink目录下生成了如下文件
$ ls
blink.bin  blink.dis  blink.elf  blink.elf.map  blink.hex  blink.uf2  CMakeFiles  cmake_install.cmake  elf2uf2  Makefile
• blink.elf 用于调试器的下载文件
• blink.uf2 可以直接拖拽到RP2040 USB模拟出的存储设备中的文件
四、下载固件到Pico
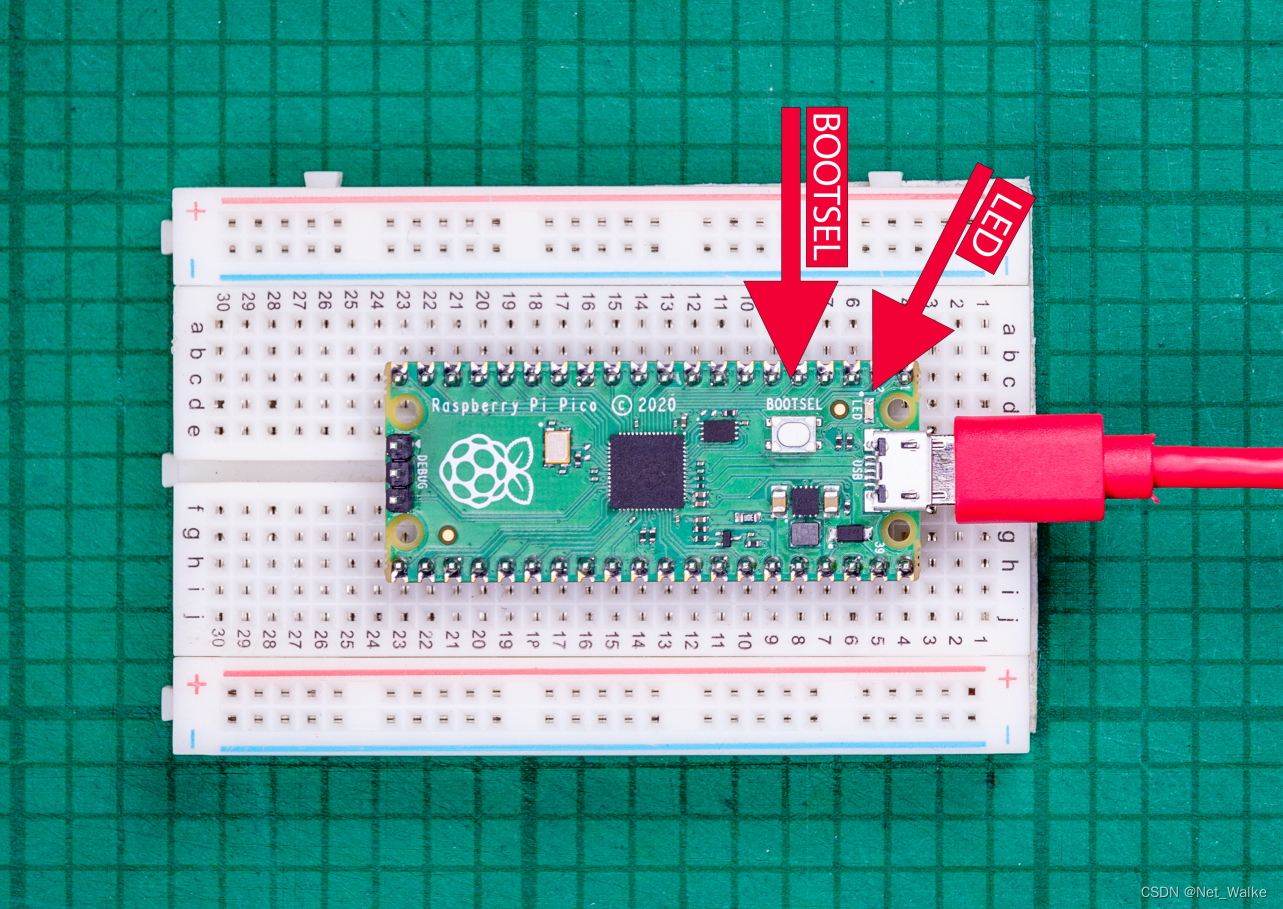
1、最方便快捷的方法就是使Pico挂载为一个USB存储设备,把.uf2的固件拖到Pico模拟出的USB存储设备中,之后,Pico会自动上电运行所下载的固件。为了使Pico进入USB存储设备模式,在上电之前,需要长按BOOTSEL按键,直到Pico在电脑上提示出现一个USB存储设备。
五、使用Picoprobe按SWD接口调试程序
1、安装OpenOCD (Open On-Chip Debugger) 开源调试软件
$ cd ~/pico
$ sudo apt install automake autoconf build-essential texinfo libtool libftdi-dev libusb-1.0-0-dev pkg-config
$ git clone https://github.com/raspberrypi/openocd.git --branch rp2040 --depth=1 --no-single-branch
$ cd openocd
$ ./bootstrap
$ ./configure --enable-picoprobe
$ make -j4
$ sudo make install
下载、编译完成之后,在 openocd/src 目录下会生成一个openocd的可执行文件;
在openocd/src路径下执行
$ ./openocd -v
Open On-Chip Debugger 0.11.0-g8e3c38f (2023-05-09-00:50)
Licensed under GNU GPL v2
For bug reports, read
	http://openocd.org/doc/doxygen/bugs.html
表明 openocd 调试软件已安装成功。
2、下载Picoprobe代码,编译下载到pico中,作为Picoprobe调试器。
$ cd ~/pico
$ git clone https://github.com/raspberrypi/picoprobe.git
$ cd picoprobe
$ mkdir build
$ cd build
$ cmake ..
$ make -j4
在build目录下便生成Picoprobe的固件 — picoprobe.uf2,把该固件通过上面四中的方式烧录到作为调试器的pico板中,此时,该pico则变为了调试器picoprobe,可用于接下来烧录和调试其他RP2040单片机。
接线方式按如下所示:
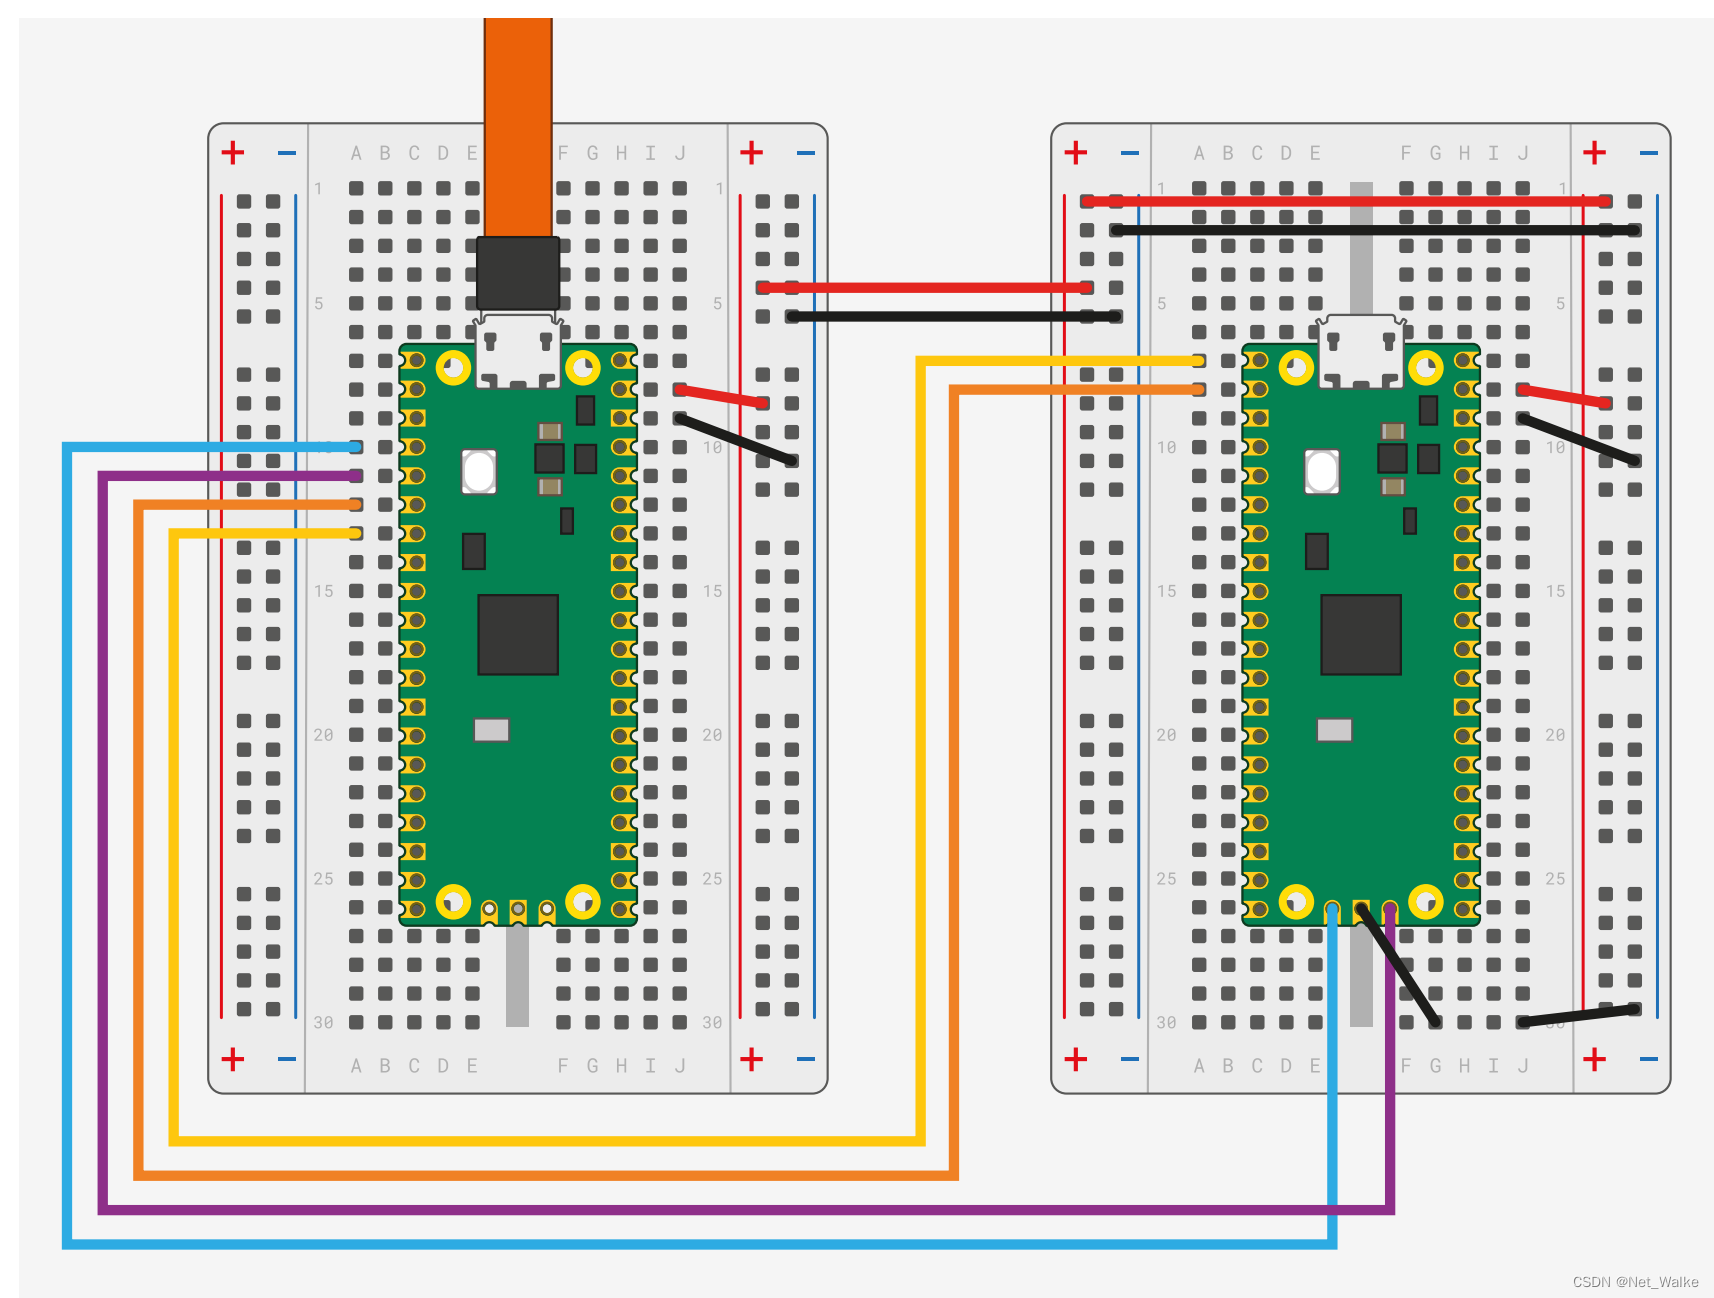
Pico A GND -> Pico B GND
Pico A GP2 -> Pico B SWCLK
Pico A GP3 -> Pico B SWDIO
Pico A GP4/UART1 TX -> Pico B GP1/UART0 RX
Pico A GP5/UART1 RX -> Pico B GP0/UART0 TX
其中把两个设备的串口相连,是为了两个设备能够使用串口互相通信,如果不需要使用串口,则可以不接,就只需要接SWCLK、SWDIO、VCC和GND四根线。
3、查看Picoprobe的串口可以使用指令:
$ sudo minicom -D /dev/ttyACM0 -b 115200
在调试 hello_usb 打印例程的时候,便可以查看到Pico B设备打印过来的串口信息;
4、使用openocd,通过Picoprobe在线调试程序
- 查看当前usb设备
$ lsusb
Bus 002 Device 043: ID 2e8a:000c Raspberry Pi Picoprobe (CMSIS-DAP)
可以看到,Picoprobe已经连接到ubuntu中。
- 更改Picoprobe设备读写的权限
sudo chmod 777 /dev/bus/usb/002/043
- 选择编译好的blink程序,在 ~/pico/pico-examples/build/blink 目录下执行:
$ openocd -f interface/cmsis-dap.cfg -f target/rp2040.cfg -s tcl -c "adapter speed 5000" -c "program blink.elf verify reset exit"
.
.
.
** Programming Finished **
** Verify Started **
target halted due to debug-request, current mode: Thread
xPSR: 0x01000000 pc: 0x00000138 msp: 0x20041f00
target halted due to debug-request, current mode: Thread
xPSR: 0x01000000 pc: 0x00000138 msp: 0x20041f00
** Verified OK **
** Resetting Target **
shutdown command invoked

$
至此,blink程序固件便通过Picoprobe调试器下载到了Pico B中,可以看到Pico B板载的 led(GPIO25) 闪烁。
- 安装调试器GDB
$ sudo apt install gdb-multiarch
- 使用openocd 和GDB在线调试
选择要调试的程序,并确保编译为Debug模式;
以hello world 串口为例:
$ cd ~/pico/pico-examples/
$ rm -rf build
$ mkdir build
$ cd build
$ export PICO_SDK_PATH=../../pico-sdk
$ cmake -DCMAKE_BUILD_TYPE=Debug ..
$ cd hello_world/serial
$ make -j4
首先在终端运行openocd调试程序,执行:
$ openocd -f interface/cmsis-dap.cfg -f target/rp2040.cfg -s tcl -c "adapter speed 5000"
.
.
.
Info : SWD DLPIDR 0x10000001
Info : rp2040.core0: hardware has 4 breakpoints, 2 watchpoints
Info : rp2040.core1: hardware has 4 breakpoints, 2 watchpoints
Info : starting gdb server for rp2040.core0 on 3333
Info : Listening on port 3333 for gdb connections
保持openocd终端开启,在 hello world 串口例程下,执行debug:
$ cd ~/pico/pico-examples/build/hello_world/serial
$ gdb-multiarch hello_serial.elf
.
.
.
For bug reporting instructions, please see:
<https://www.gnu.org/software/gdb/bugs/>.
Find the GDB manual and other documentation resources online at:
    <http://www.gnu.org/software/gdb/documentation/>.

For help, type "help".
Type "apropos word" to search for commands related to "word"...
Reading symbols from hello_serial.elf...
(gdb)
使GDB连接到OpenOCD
(gdb) target remote localhost:3333
把hello_serial.elf固件下载到Pico B flash中。
(gdb) load
Loading section .boot2, size 0x100 lma 0x10000000
Loading section .text, size 0x4538 lma 0x10000100
Loading section .rodata, size 0xf7c lma 0x10004638
Loading section .binary_info, size 0x28 lma 0x100055b4
Loading section .data, size 0x244 lma 0x100055dc
Start address 0x100001e8, load size 22560
Transfer rate: 3 KB/sec, 3760 bytes/write.
(gdb)
至此,你可以使用gdb的指令进行调试程序,设置断点等;
如需要退出gdb调试,则执行命令:
(gdb) quit
六、VScode的使用
上面,已经完成了RP2040的编译和调试,在vscode中也是一样的,只不过,不需要我们每一步操作都输入命令来执行,只需要在vscode中配置好之后,即可按图形化的设置执行。
1、安装vscode和扩展组件
$ sudo apt update
$ sudo apt install code
$ code --install-extension marus25.cortex-debug
$ code --install-extension ms-vscode.cmake-tools
$ code --install-extension ms-vscode.cpptools
运行vscode
再次设置pico sdk环境变量,确保在vscode中可以正确找到;
$ export PICO_SDK_PATH=~/pico/pico-sdk
$ code
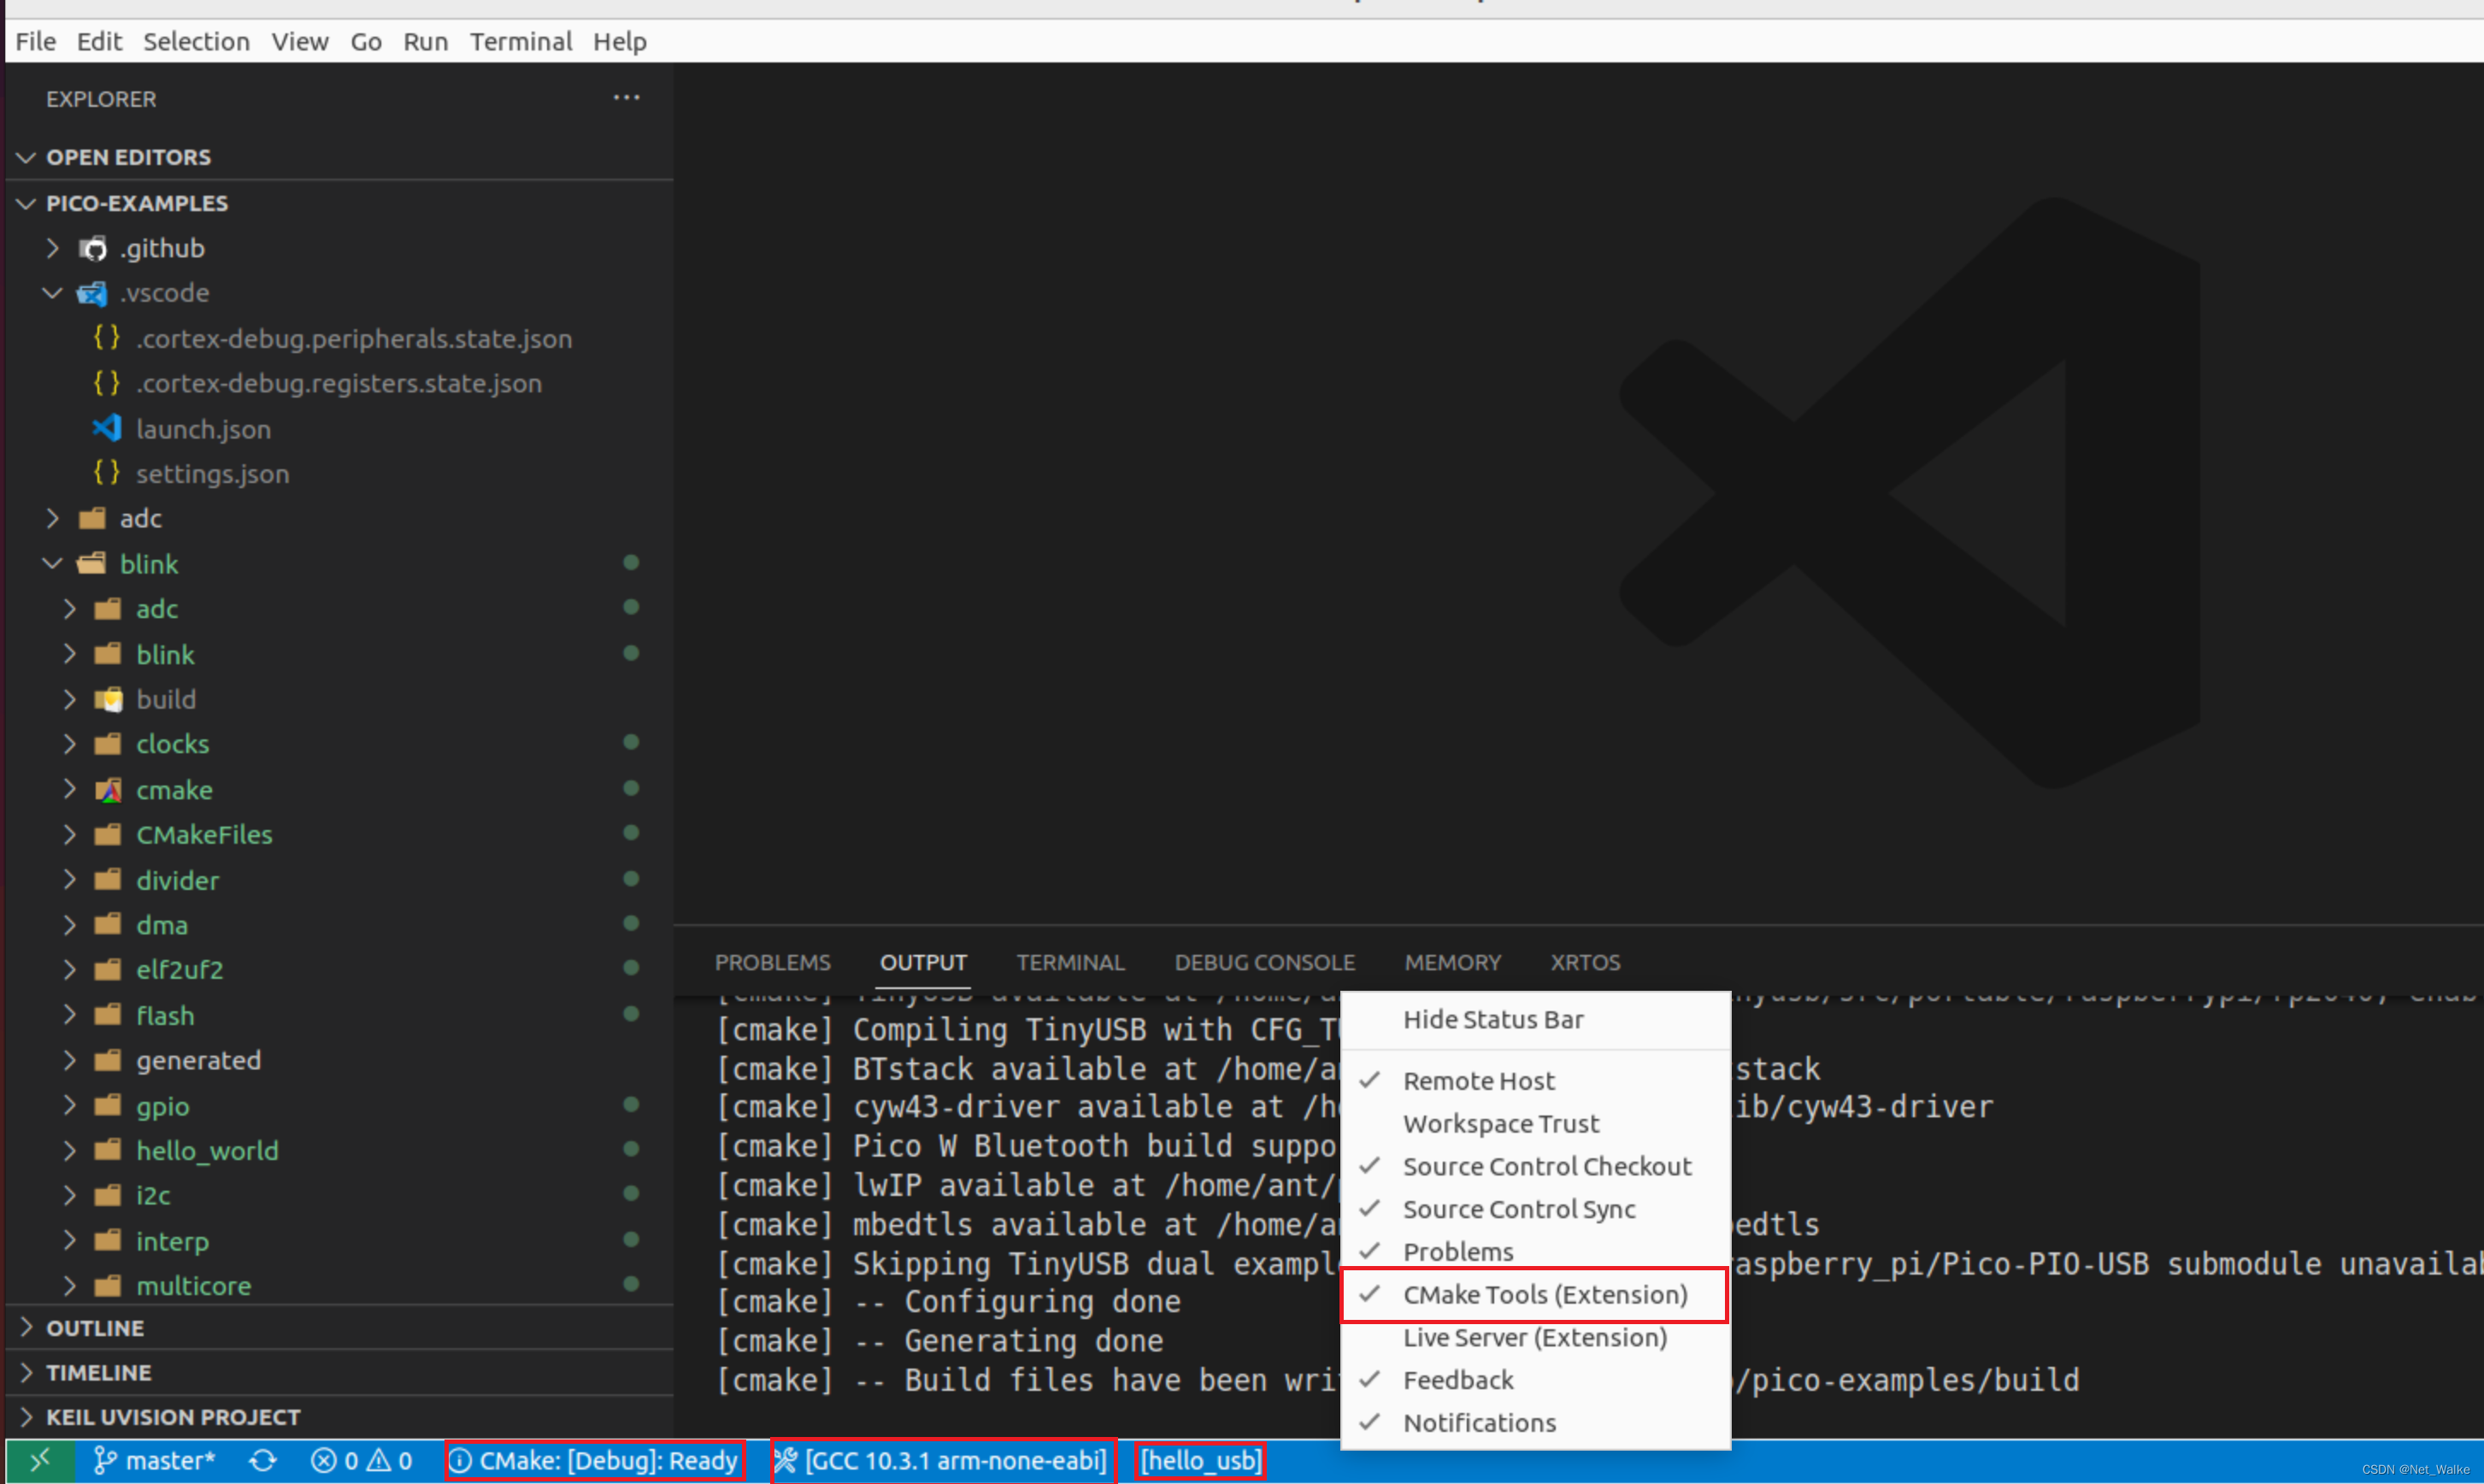
2、打开pico-example例程文件夹,打开底部cmake扩展工具。选择编译器,编译选项为 Debug 模式,选择hello_usb工程进行编译。
3、vscode中的debug json文件设置
$ cd ~/pico/pico-examples
$ mkdir .vscode
$ cp ide/vscode/launch-raspberrypi-swd.json .vscode/launch.json
$ cp ide/vscode/settings.json .vscode/settings.json
更改launch.json文件如下:
{
    "version": "0.2.0",
    "configurations": [
        {
            "name": "Pico Debug",
            "cwd": "${workspaceRoot}",
            "executable": "${command:cmake.launchTargetPath}",
            "request": "launch",
            "type": "cortex-debug",
            "servertype": "openocd",
            // This may need to be "arm-none-eabi-gdb" for some previous builds
            "gdbPath" : "gdb-multiarch",
            "device": "RP2040",

            "configFiles": [
                // This may need to be "interface/picoprobe.cfg" for some previous builds
                "/interface/cmsis-dap.cfg",
                "target/rp2040.cfg"
            ],
            "svdFile": "${env:PICO_SDK_PATH}/src/rp2040/hardware_regs/rp2040.svd",
            "runToEntryPoint": "main",
            "serverArgs": [
                "-c", "adapter speed 5000"
            ],
            // Work around for stopping at main on restart
            "postRestartCommands": [
                "break main",
                "continue"
            ]
        }
    ]
}
settings.json 如下:
{
    "cmake.generator": "Unix Makefiles",
    "cmake.environment": {
        "PICO_SDK_PATH": "~/pico/pico-sdk"
    },
    // These settings tweaks to the cmake plugin will ensure
    // that you debug using cortex-debug instead of trying to launch
    // a Pico binary on the host
    "cmake.statusbar.advanced": {
        "debug": {
            "visibility": "hidden"
        },
        "launch": {
            "visibility": "hidden"
        },
        "build": {
            "visibility": "hidden"
        },
        "buildTarget": {
            "visibility": "hidden"
        }
    },
    "cmake.buildBeforeRun": true,
    "C_Cpp.default.configurationProvider": "ms-vscode.cmake-tools"
}
进行debug模式 (ctrl + shift + d ),如下图所示:

七、自动生成项目工程
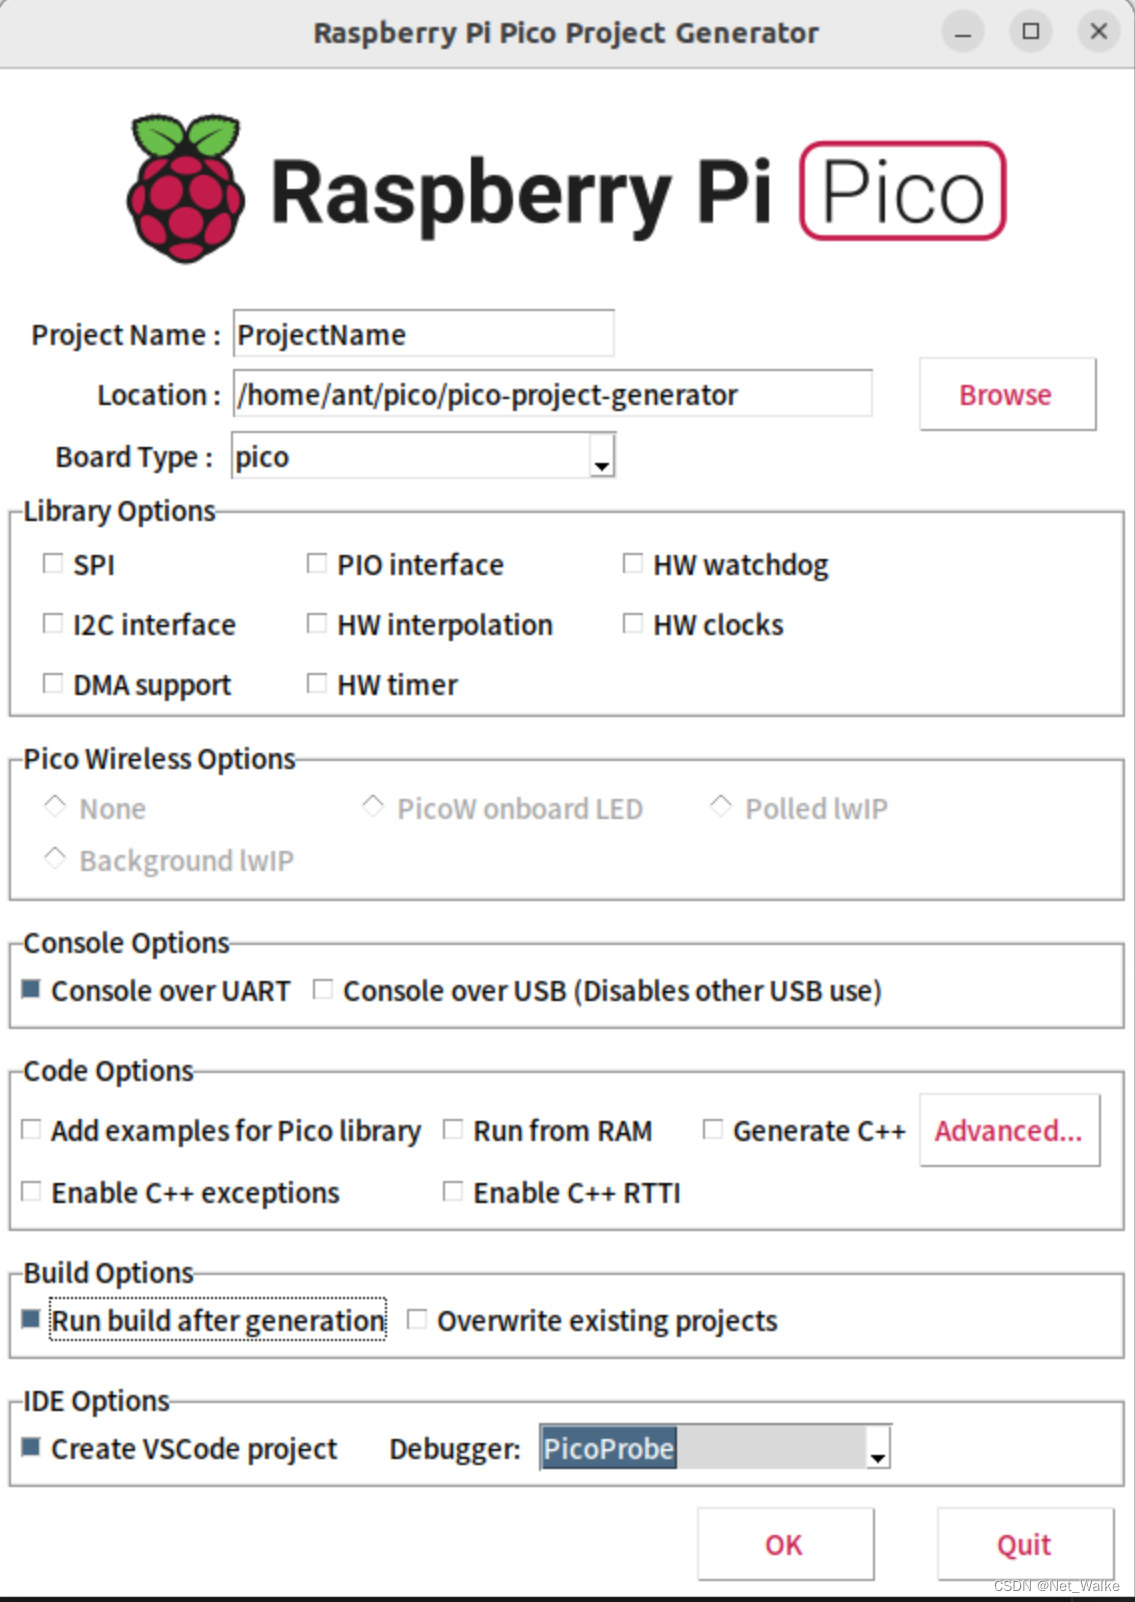
使用pico project generator 脚本,可以完成基础的硬件配置,生成所需的项目工程;
$ git clone https://github.com/raspberrypi/pico-project-generator.git
$ cd pico-project-generator
$ ./pico_project.py -g
执行之后,如下图所示,可以根据需求,配置相应的设置;
本文来自于官方指导手册《Getting started with Raspberry Pi Pico》文档总结,具体的细节,可以查看相应的文档和官方信息。
树莓派官网
Raspberry Pi Debug Probe


 2750
2750

 被折叠的 条评论
为什么被折叠?
被折叠的 条评论
为什么被折叠?
 到【灌水乐园】发言


