


目录
1. DWR/MSCA/LSK注意力机制
1) DWRSeg(Rethinking Efficient Acquisition of Multi-scale Contextual Information for Real-time Semantic Segmentation)
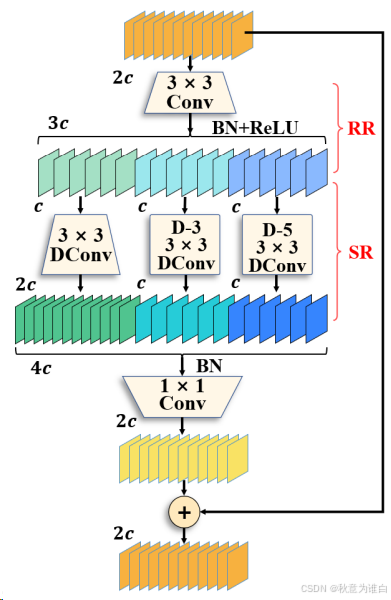
DWR结构如下图所示:该模块用于提取网络高层的特征,多分支结构用于扩展感受野,其中每个分支采用不同空洞率的空洞深度卷积,加强不同尺度特征提取能力。
源码:
class DWR(nn.Module):

    # DWRSeg: https://arxiv.org/pdf/2212.01173

    def __init__(self, dim) -> None:
        super().__init__()

        self.conv_3x3 = Conv(dim, dim // 2, 3)
        self.conv_3x3_d1 = Conv(dim // 2, dim, 3, d=1)
        self.conv_3x3_d3 = Conv(dim // 2, dim // 2, 3, d=3)
        self.conv_3x3_d5 = Conv(dim // 2, dim // 2, 3, d=5)
        self.conv_1x1 = Conv(dim * 2, dim, k=1)

    def forward(self, x):

        conv_3x3 = self.conv_3x3(x)
        x1, x2, x3 = self.conv_3x3_d1(conv_3x3), self.conv_3x3_d3(conv_3x3), self.conv_3x3_d5(conv_3x3)
        x_out = torch.cat([x1, x2, x3], dim=1)
        x_out = self.conv_1x1(x_out) + x
        return x_out

class DWRAttention(nn.Module):


    def __init__(self, in_channels, out_channels):
        super().__init__()

        self.conv = Conv(in_channels, out_channels, 1)
        self.dcnv3 = DWR(out_channels)
        self.bn = nn.BatchNorm2d(out_channels)
        self.gelu = nn.GELU()

    def forward(self, x):

        x = self.conv(x)
        x = self.dcnv3(x)
        x = self.gelu(self.bn(x))
        return x
2)MSCAAttention (SegNeXt: Rethinking Convolutional Attention Design for Semantic Segmentation, NeurIPS 2022)
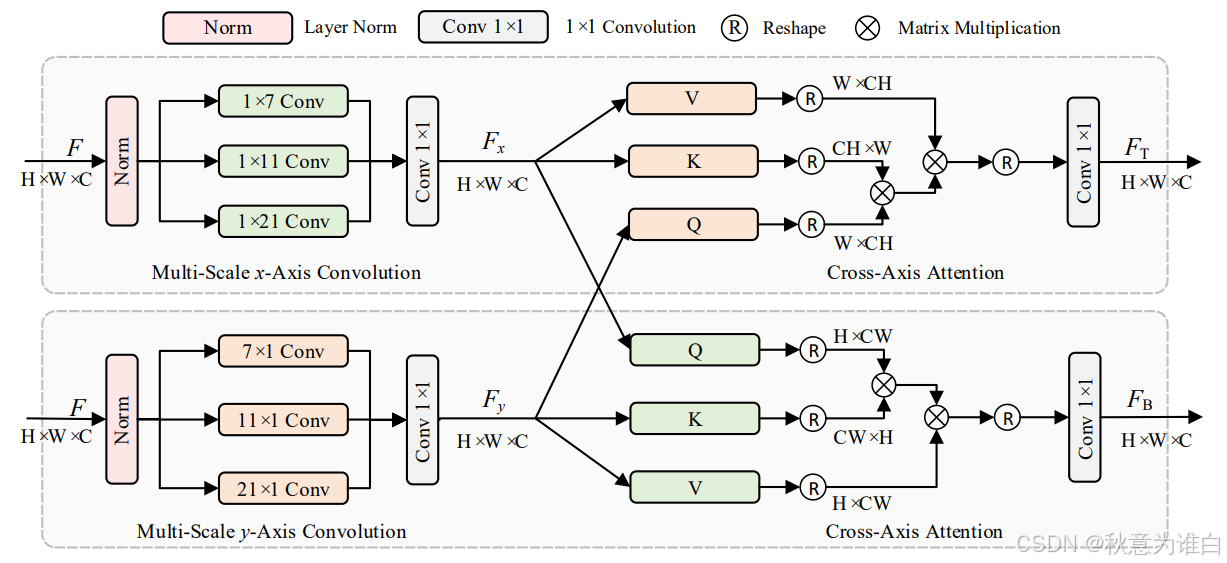
多尺度轴注意力(MSCAAttention, Multi-scale Cross-axis Attention)解码器的详细结构:包含两个并行路径,每个路径都包含多尺度(不同卷积核大小)的一维卷积和交叉轴关注来聚合空间信息(注意,没有在解码器中添加任何激活函数)。这里1x1卷积的目的是捕获多尺度特征表示。
源码:
class MSCAAttention(nn.Module):
    # SegNext NeurIPS 2022    # https://arxiv.org/pdf/2209.08575.pdf
    def __init__(self, dim):
        super().__init__()
        self.conv0 = nn.Conv2d(dim, dim, 5, padding=2, groups=dim)
        self.conv0_1 = nn.Conv2d(dim, dim, (1, 7), padding=(0, 3), groups=dim)
        self.conv0_2 = nn.Conv2d(dim, dim, (7, 1), padding=(3, 0), groups=dim)


        self.conv1_1 = nn.Conv2d(dim, dim, (1, 11), padding=(0, 5), groups=dim)
        self.conv1_2 = nn.Conv2d(dim, dim, (11, 1), padding=(5, 0), groups=dim)


        self.conv2_1 = nn.Conv2d(dim, dim, (1, 21), padding=(0, 10), groups=dim)
        self.conv2_2 = nn.Conv2d(dim, dim, (21, 1), padding=(10, 0), groups=dim)

        self.conv3 = nn.Conv2d(dim, dim, 1)

    def forward(self, x):
        u = x.clone()
        attn = self.conv0(x)
        attn_0 = self.conv0_1(attn)
        attn_0 = self.conv0_2(attn_0)
        attn_1 = self.conv1_1(attn)
        attn_1 = self.conv1_2(attn_1)
        attn_2 = self.conv2_1(attn)
        attn_2 = self.conv2_2(attn_2)
        attn = attn + attn_0 + attn_1 + attn_2
        attn = self.conv3(attn)
        return attn * u
3) LSKNet(Large Selective Kernel Network for Remote Sensing Object Detection, ICCV2023)
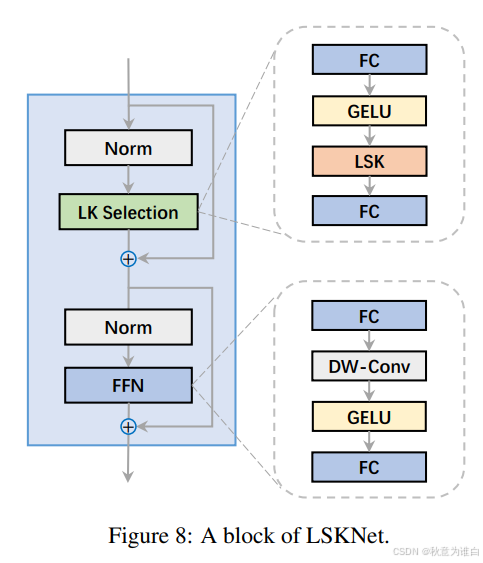
- 大型核选择(LK Selection)子块:能够动态地调整网络的感受野,以便根据需要捕获不同尺度的上下文信息。这使得网络能够根据遥感图像中对象的不同尺寸和复杂性调整其处理能力。
- 前馈网络(FFN)子块:用于通道混合和特征精炼。它由一个完全连接的层、一个深度卷积、一个GELU激活函数以及第二个完全连接的层组成。这些组件一起工作,提高了特征的质量,并为分类和检测提供了必要的信息。
- 这两个子块共同构成LSKNet块,能够提供大范围的上下文信息,同时保持对细节的敏感度
源码:
class FFN(nn.Module):
    # LSKNet: ICCV2023  # https://arxiv.org/pdf/2303.09030.pdf
    def __init__(self, in_features, hidden_features=None, out_features=None, act_layer=nn.GELU, drop=0.):
        super().__init__()
        out_features = out_features or in_features
        hidden_features = hidden_features or in_features
        self.fc1 = nn.Conv2d(in_features, hidden_features, 1)
        self.dwconv = DWConv_(hidden_features)
        self.act = act_layer()
        self.fc2 = nn.Conv2d(hidden_features, out_features, 1)
        self.drop = nn.Dropout(drop)

    def forward(self, x):
        x = self.fc1(x)
        x = self.dwconv(x)
        x = self.act(x)
        x = self.drop(x)
        x = self.fc2(x)
        x = self.drop(x)
        return x

class LSKBlock(nn.Module):
    def __init__(self, dim):
        super(LSKBlock, self).__init__()

        # self.norm = nn.BatchNorm2d(dim)
        self.conv0 = nn.Conv2d(dim, dim, 5, padding=2, groups=dim)
        self.conv_spatial = nn.Conv2d(dim, dim, 7, stride=1, padding=9, groups=dim, dilation=3)
        self.conv1 = nn.Conv2d(dim, dim // 2, 1)
        self.conv2 = nn.Conv2d(dim, dim // 2, 1)
        self.conv_squeeze = nn.Conv2d(2, 2, 7, padding=3)
        self.conv = nn.Conv2d(dim // 2, dim, 1)

    def forward(self, x):
        attn1 = self.conv0(x)
        attn2 = self.conv_spatial(attn1)

        attn1 = self.conv1(attn1)
        attn2 = self.conv2(attn2)

        attn = torch.cat([attn1, attn2], dim=1)
        avg_attn = torch.mean(attn, dim=1, keepdim=True)
        max_attn, _ = torch.max(attn, dim=1, keepdim=True)
        agg = torch.cat([avg_attn, max_attn], dim=1)
        sig = self.conv_squeeze(agg).sigmoid()
        attn = attn1 * sig[:, 0, :, :].unsqueeze(1) + attn2 * sig[:, 1, :, :].unsqueeze(1)
        attn = self.conv(attn)
        return x * attn

class LSKModule(nn.Module):
    def __init__(self, d_model):
        super(LSKModule, self).__init__()
        self.proj_1 = nn.Conv2d(d_model, d_model, 1)
        self.act = nn.GELU()
        self.spatial_gating_unit = LSKBlock(d_model)
        self.proj_2 = nn.Conv2d(d_model, d_model, 1)

    def forward(self, x):
        shorcut = x.clone()
        x = self.proj_1(x)
        x = self.act(x)
        x = self.spatial_gating_unit(x)
        x = self.proj_2(x)
        x = x + shorcut
        return x

class LSKAttention(nn.Module):
    def __init__(self, dim, mlp_ratio=4, drop=0., drop_path=0, act_layer=nn.GELU, norm_cfg=None):
        super(LSKAttention, self).__init__()
        self.norm1 = nn.BatchNorm2d(dim)
        self.norm2 = nn.BatchNorm2d(dim)
        self.attn = LSKModule(dim)
        self.drop_path = nn.Identity()
        mlp_hidden_dim = int(dim * mlp_ratio)
        self.FFN = FFN(in_features=dim, hidden_features=mlp_hidden_dim, act_layer=act_layer, drop=drop)
        layer_scale_init_value = 1e-2
        self.layer_scale_1 = nn.Parameter(
            layer_scale_init_value * torch.ones((dim)), requires_grad=True
        )
        self.layer_scale_2 = nn.Parameter(
            layer_scale_init_value * torch.ones((dim)), requires_grad=True
        )

    def forward(self, x):
        x = x + self.drop_path(self.layer_scale_1.unsqueeze(-1).unsqueeze(-1) * self.attn(self.norm1(x)))
        x = x + self.drop_path(self.layer_scale_2.unsqueeze(-1).unsqueeze(-1) * self.FFN(self.norm2(x)))
        return x
2. 如何在yolov8中添加注意力模块
1) 在ultralytics-main/ultralytics/nn/modules/conv.py中添加DWR注意力模块:

2) 注意力机制的注册和调用:
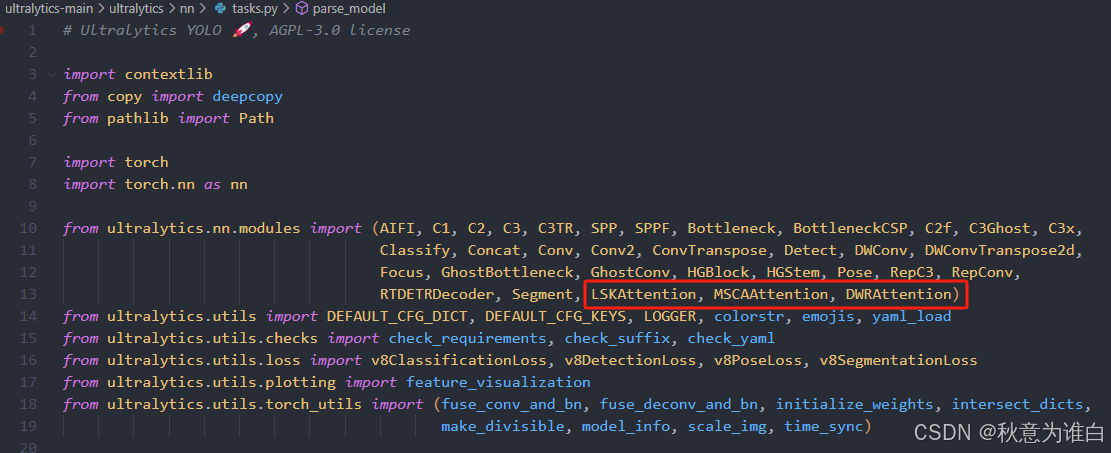
① 在ultralytics-main/ultralytics/nn/modules/__init__.py中注册引用DWR注意力机制:
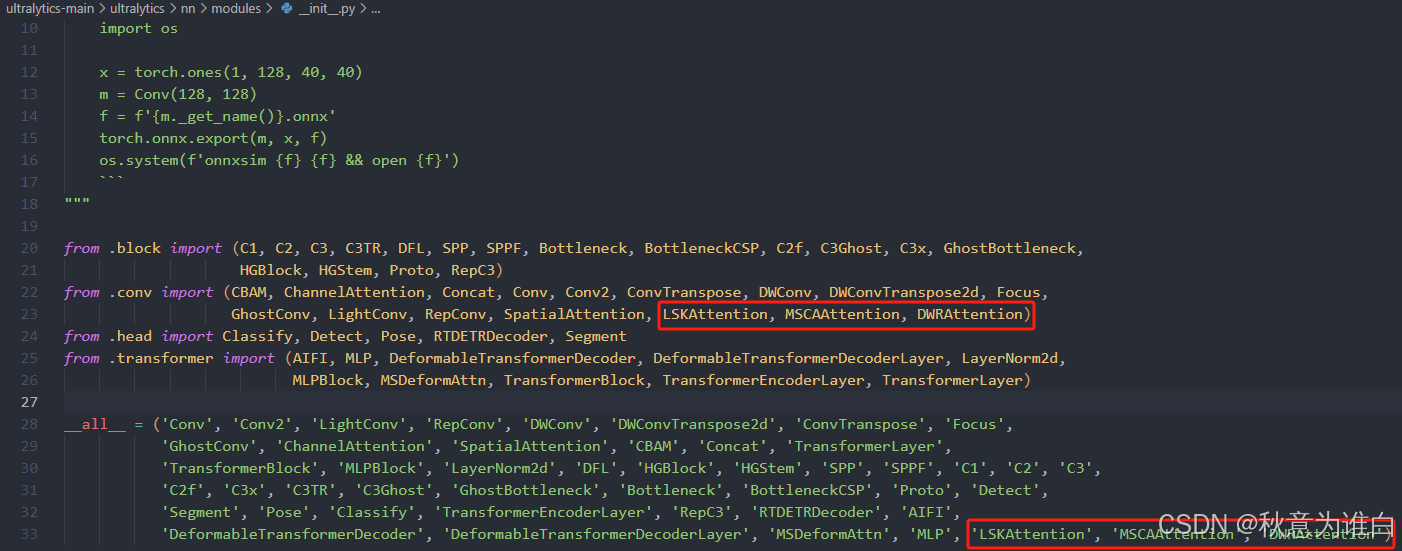
② 在ultralytics-main/ultralytics/nn/tasks.py中引用:
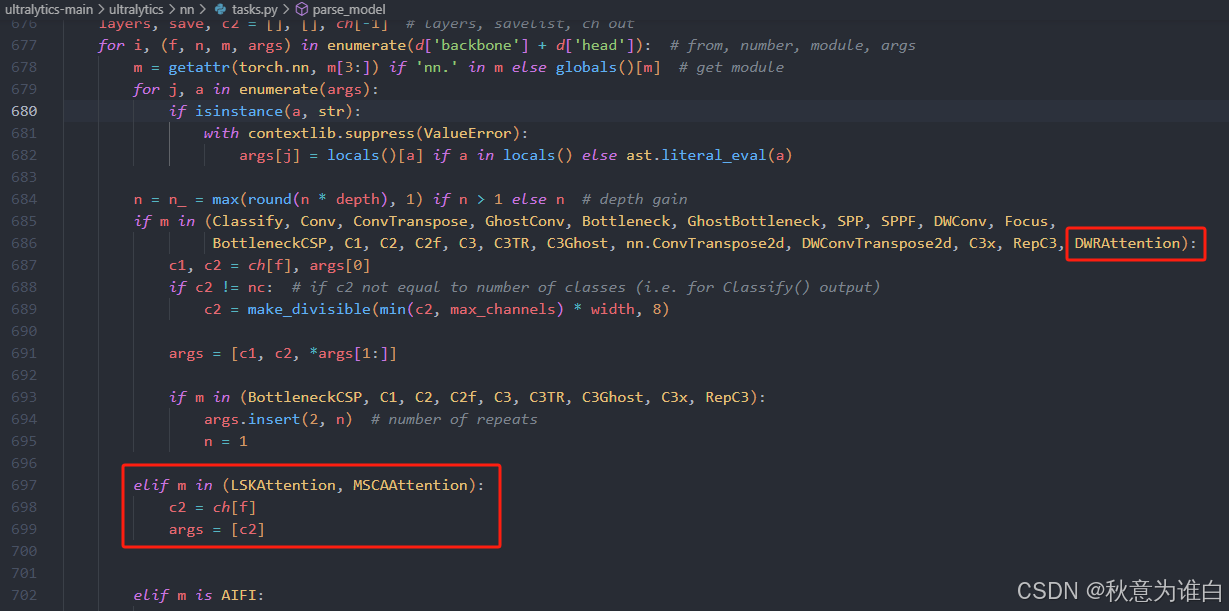
③ 在tasks.py的parse_model函数中写入调用方式:
3) 修改yaml配置文件
在 ultralytics-main/ultralytics/models/v8/yolov8s-p6-attention.yaml配置文件:
# Ultralytics YOLO 🚀, AGPL-3.0 license
# YOLOv8 object detection model with P3-P5 outputs. For Usage examples see https://docs.ultralytics.com/tasks/detect

# Parameters
nc: 80  # number of classes
scales: # model compound scaling constants, i.e. 'model=yolov8n.yaml' will call yolov8.yaml with scale 'n'
  # [depth, width, max_channels]
  n: [0.33, 0.25, 1024]  # YOLOv8n summary: 225 layers,  3157200 parameters,  3157184 gradients,   8.9 GFLOPs
  s: [0.33, 0.50, 1024]  # YOLOv8s summary: 225 layers, 11166560 parameters, 11166544 gradients,  28.8 GFLOPs
  m: [0.67, 0.75, 768]   # YOLOv8m summary: 295 layers, 25902640 parameters, 25902624 gradients,  79.3 GFLOPs
  l: [1.00, 1.00, 512]   # YOLOv8l summary: 365 layers, 43691520 parameters, 43691504 gradients, 165.7 GFLOPs
  x: [1.00, 1.25, 512]   # YOLOv8x summary: 365 layers, 68229648 parameters, 68229632 gradients, 258.5 GFLOPs

# YOLOv8.0n backbone
backbone:
  # [from, repeats, module, args]
  - [-1, 1, Conv, [64, 3, 2]]  # 0-P1/2
  - [-1, 1, Conv, [128, 3, 2]]  # 1-P2/4
  - [-1, 3, C2f, [128, True]]
  - [-1, 1, Conv, [256, 3, 2]]  # 3-P3/8
  - [-1, 6, C2f, [256, True]]
  - [-1, 1, Conv, [512, 3, 2]]  # 5-P4/16
  - [-1, 6, C2f, [512, True]]
  - [-1, 1, Conv, [1024, 3, 2]]  # 7-P5/32
  - [-1, 3, C2f, [1024, True]]
  - [-1, 1, SPPF, [1024, 5]]  # 9

# YOLOv8.0n head
head:
  - [-1, 1, nn.Upsample, [None, 2, 'nearest']]
  - [[-1, 6], 1, Concat, [1]]  # cat backbone P4
  - [-1, 3, C2f, [512]]  # 12

  - [-1, 1, nn.Upsample, [None, 2, 'nearest']]
  - [[-1, 4], 1, Concat, [1]]  # cat backbone P3
  - [-1, 1, DWRAttention, [256]]
  - [-1, 3, C2f, [256]]  # 15 (P3/8-small)

  - [-1, 1, Conv, [256, 3, 2]]
  - [[-1, 12], 1, Concat, [1]]  # cat head P4
  - [-1, 1, DWRAttention, [512]]
  - [-1, 3, C2f, [512]]  # 18 (P4/16-medium)

  - [-1, 1, Conv, [512, 3, 2]]
  - [[-1, 9], 1, Concat, [1]]  # cat head P5
  - [-1, 1, DWRAttention, [1024]]
  - [-1, 3, C2f, [1024]]  # 21 (P5/32-large)

  - [[16, 20, 24], 1, Detect, [nc]]  # Detect(P3, P4, P5)
# Ultralytics YOLO 🚀, AGPL-3.0 license
# YOLOv8 object detection model with P3-P5 outputs. For Usage examples see https://docs.ultralytics.com/tasks/detect
# Parameters
nc: 80 # number of classes
scales: # model compound scaling constants, i.e. 'model=yolov8n.yaml' will call yolov8.yaml with scale 'n'
# [depth, width, max_channels]
n: [0.33, 0.25, 1024] # YOLOv8n summary: 225 layers, 3157200 parameters, 3157184 gradients, 8.9 GFLOPs
s: [0.33, 0.50, 1024] # YOLOv8s summary: 225 layers, 11166560 parameters, 11166544 gradients, 28.8 GFLOPs
m: [0.67, 0.75, 768] # YOLOv8m summary: 295 layers, 25902640 parameters, 25902624 gradients, 79.3 GFLOPs
l: [1.00, 1.00, 512] # YOLOv8l summary: 365 layers, 43691520 parameters, 43691504 gradients, 165.7 GFLOPs
x: [1.00, 1.25, 512] # YOLOv8x summary: 365 layers, 68229648 parameters, 68229632 gradients, 258.5 GFLOPs
# YOLOv8.0n backbone
backbone:
# [from, repeats, module, args]
- [-1, 1, Conv, [64, 3, 2]] # 0-P1/2
- [-1, 1, Conv, [128, 3, 2]] # 1-P2/4
- [-1, 3, C2f, [128, True]]
- [-1, 1, Conv, [256, 3, 2]] # 3-P3/8
- [-1, 6, C2f, [256, True]]
- [-1, 1, Conv, [512, 3, 2]] # 5-P4/16
- [-1, 6, C2f, [512, True]]
- [-1, 1, Conv, [1024, 3, 2]] # 7-P5/32
- [-1, 3, C2f, [1024, True]]
- [-1, 1, SPPF, [1024, 5]] # 9
# YOLOv8.0n head
head:
- [-1, 1, nn.Upsample, [None, 2, 'nearest']]
- [[-1, 6], 1, Concat, [1]] # cat backbone P4
- [-1, 3, C2f, [512]] # 12
- [-1, 1, nn.Upsample, [None, 2, 'nearest']]
- [[-1, 4], 1, Concat, [1]] # cat backbone P3
- [-1, 3, C2f, [256]] # 15 (P3/8-small)
- [-1, 1, Conv, [256, 3, 2]]
- [[-1, 12], 1, Concat, [1]] # cat head P4
- [-1, 3, C2f, [512]] # 18 (P4/16-medium)
- [-1, 1, Conv, [512, 3, 2]]
- [[-1, 9], 1, Concat, [1]] # cat head P5
- [-1, 3, C2f, [1024]] # 21 (P5/32-large)
- [15, 1, MSCAAttention, []] # 22
- [18, 1, MSCAAttention, []] # 23
- [21, 1, MSCAAttention, []] # 24
- [[22, 23, 24], 1, Detect, [nc]] # Detect(P3, P4, P5)# Ultralytics YOLO 🚀, AGPL-3.0 license
# YOLOv8 object detection model with P3-P5 outputs. For Usage examples see https://docs.ultralytics.com/tasks/detect
# Parameters
nc: 80 # number of classes
scales: # model compound scaling constants, i.e. 'model=yolov8n.yaml' will call yolov8.yaml with scale 'n'
# [depth, width, max_channels]
n: [0.33, 0.25, 1024] # YOLOv8n summary: 225 layers, 3157200 parameters, 3157184 gradients, 8.9 GFLOPs
s: [0.33, 0.50, 1024] # YOLOv8s summary: 225 layers, 11166560 parameters, 11166544 gradients, 28.8 GFLOPs
m: [0.67, 0.75, 768] # YOLOv8m summary: 295 layers, 25902640 parameters, 25902624 gradients, 79.3 GFLOPs
l: [1.00, 1.00, 512] # YOLOv8l summary: 365 layers, 43691520 parameters, 43691504 gradients, 165.7 GFLOPs
x: [1.00, 1.25, 512] # YOLOv8x summary: 365 layers, 68229648 parameters, 68229632 gradients, 258.5 GFLOPs
# YOLOv8.0n backbone
backbone:
# [from, repeats, module, args]
- [-1, 1, Conv, [64, 3, 2]] # 0-P1/2
- [-1, 1, Conv, [128, 3, 2]] # 1-P2/4
- [-1, 3, C2f, [128, True]]
- [-1, 1, LSKAttention, []] # add-lsk
- [-1, 1, Conv, [256, 3, 2]] # 3-P3/8
- [-1, 6, C2f, [256, True]]
- [-1, 1, LSKAttention, []] # add-lsk
- [-1, 1, Conv, [512, 3, 2]] # 5-P4/16
- [-1, 6, C2f, [512, True]]
- [-1, 1, LSKAttention, []] # add-lsk
- [-1, 1, Conv, [1024, 3, 2]] # 7-P5/32
- [-1, 3, C2f, [1024, True]]
- [-1, 1, LSKAttention, []] # add-lsk
- [-1, 1, SPPF, [1024, 5]] # 9
# YOLOv8.0n head
head:
- [-1, 1, nn.Upsample, [None, 2, 'nearest']]
- [[-1, 9], 1, Concat, [1]] # cat backbone P4
- [-1, 3, C2f, [512]] # 12
- [-1, 1, nn.Upsample, [None, 2, 'nearest']]
- [[-1, 6], 1, Concat, [1]] # cat backbone P3
- [-1, 3, C2f, [256]] # 15 (P3/8-small)
- [-1, 1, Conv, [256, 3, 2]]
- [[-1, 16], 1, Concat, [1]] # cat head P4
- [-1, 3, C2f, [512]] # 18 (P4/16-medium)
- [-1, 1, Conv, [512, 3, 2]]
- [[-1, 13], 1, Concat, [1]] # cat head P5
- [-1, 3, C2f, [1024]] # 21 (P5/32-large)
- [[19, 22, 25], 1, Detect, [nc]] # Detect(P3, P4, P5)补充说明:以上是添加在网络的不同位置的配置文件,不同的模块之间可以相互替换,上述修改对我的项目能起到一定的优化作用,但不一定对其它数据也可以实现涨点效果,建议多次尝试选择最适合自己的任务的方式,但需要注意head中的concat层是否准确。


 7万+
7万+

 被折叠的 条评论
为什么被折叠?
被折叠的 条评论
为什么被折叠?
 到【灌水乐园】发言


