


 文章介绍了如何在VSCode和VS2022环境下配置OnnxRuntime进行YOLOV7模型的CPU推理,包括环境设置、模型转换和C++代码实现。作者提到了OnnxRuntime在CPU加速上的优势,并指出可能存在内存泄漏问题,以及对模型输入输出的处理方法。
- 背景
最近在尝试将Pytorch模型部署为Cmodel并讨论推理框架的速度优势,作为VSCode配置之LibTorch(GPU)极简配置 & VS2022 LibTorch(GPU)验证的姊妹篇,本篇将基于VSCode和VS2022环境进行OnnxRuntime环境的配置和验证。(注:为快速验证,这里仅配置了CPU推理,目前了解的情况是,OnnxRuntime在CPU推理上的加速比较友好,TensorRT在GPU环境加速比较友好,具体可能跟模型、实测结果有关,后续可能会进一步补充验证) - 软件环境
OnnxRuntime 1.14.1 版本(可选的)
VSCode+CMake
VS Studio 2022
参考代码:参考代码:yolov7-opencv-onnxrun-cpp-py - VSCode + OnnxRuntime CPU版本配置
1)测试代码 (整体结构参考之前的推理框架)
#include <fstream>
#include <sstream>
#include <iostream>
#include <opencv2/imgproc.hpp>
#include <opencv2/highgui.hpp>
//#include <cuda_provider_factory.h>
#include <onnxruntime_cxx_api.h>

using namespace std;
using namespace cv;
using namespace Ort;

struct Net_config
{
	float confThreshold; // Confidence threshold
	float nmsThreshold;  // Non-maximum suppression threshold
	string modelpath;
};

typedef struct BoxInfo
{
	float x1;
	float y1;
	float x2;
	float y2;
	float score;
	int label;
} BoxInfo;

class YOLOV7
{
public:
	YOLOV7(Net_config config);
	void detect(Mat& frame);
private:
	int inpWidth;
	int inpHeight;
	int nout;
	int num_proposal;
	vector<string> class_names;
	int num_class;

	float confThreshold;
	float nmsThreshold;
	vector<float> input_image_;
	void normalize_(Mat img);
	void nms(vector<BoxInfo>& input_boxes);

	Env env = Env(ORT_LOGGING_LEVEL_ERROR, "YOLOV7");
	Ort::Session* ort_session = nullptr;
	SessionOptions sessionOptions = SessionOptions();
	vector<char*> input_names = {"images"};
	vector<char*> output_names = {"output"};
	vector<vector<int64_t>> input_node_dims; // >=1 outputs
	vector<vector<int64_t>> output_node_dims; // >=1 outputs
};

YOLOV7::YOLOV7(Net_config config)
{
	this->confThreshold = config.confThreshold;
	this->nmsThreshold = config.nmsThreshold;

	string classesFile = "coco.names";
	string model_path = config.modelpath;
	std::wstring widestr = std::wstring(model_path.begin(), model_path.end());
	//OrtStatus* status = OrtSessionOptionsAppendExecutionProvider_CUDA(sessionOptions, 0);
	//sessionOptions.SetGraphOptimizationLevel(ORT_ENABLE_BASIC);
	ort_session = new Session(env, widestr.c_str(), sessionOptions);
	size_t numInputNodes = ort_session->GetInputCount();
	size_t numOutputNodes = ort_session->GetOutputCount();
	AllocatorWithDefaultOptions allocator;
	for (int i = 0; i < numInputNodes; i++)
	{
		// input_names.push_back((ort_session->GetInputNameAllocated(i, allocator)).get());
		Ort::TypeInfo input_type_info = ort_session->GetInputTypeInfo(i);
		auto input_tensor_info = input_type_info.GetTensorTypeAndShapeInfo();
		auto input_dims = input_tensor_info.GetShape();
		input_node_dims.push_back(input_dims);
	}
	for (int i = 0; i < numOutputNodes; i++)
	{
		// output_names.push_back(ort_session->GetOutputNameAllocated(i, allocator).get());
		Ort::TypeInfo output_type_info = ort_session->GetOutputTypeInfo(i);
		auto output_tensor_info = output_type_info.GetTensorTypeAndShapeInfo();
		auto output_dims = output_tensor_info.GetShape();
		output_node_dims.push_back(output_dims);
	}
	this->inpHeight = input_node_dims[0][2];
	this->inpWidth = input_node_dims[0][3];
	this->nout = output_node_dims[0][2];
	this->num_proposal = output_node_dims[0][1];

	ifstream ifs(classesFile.c_str());
	string line;
	while (getline(ifs, line)) this->class_names.push_back(line);
	this->num_class = class_names.size();
}

void YOLOV7::normalize_(Mat img)
{
	//    img.convertTo(img, CV_32F);
	int row = img.rows;
	int col = img.cols;
	this->input_image_.resize(row * col * img.channels());
	for (int c = 0; c < 3; c++)
	{
		for (int i = 0; i < row; i++)
		{
			for (int j = 0; j < col; j++)
			{
				float pix = img.ptr<uchar>(i)[j * 3 + 2 - c];
				this->input_image_[c * row * col + i * col + j] = pix / 255.0;
			}
		}
	}
}

void YOLOV7::nms(vector<BoxInfo>& input_boxes)
{
	sort(input_boxes.begin(), input_boxes.end(), [](BoxInfo a, BoxInfo b) { return a.score > b.score; });
	vector<float> vArea(input_boxes.size());
	for (int i = 0; i < int(input_boxes.size()); ++i)
	{
		vArea[i] = (input_boxes.at(i).x2 - input_boxes.at(i).x1 + 1)
			* (input_boxes.at(i).y2 - input_boxes.at(i).y1 + 1);
	}

	vector<bool> isSuppressed(input_boxes.size(), false);
	for (int i = 0; i < int(input_boxes.size()); ++i)
	{
		if (isSuppressed[i]) { continue; }
		for (int j = i + 1; j < int(input_boxes.size()); ++j)
		{
			if (isSuppressed[j]) { continue; }
			float xx1 = (max)(input_boxes[i].x1, input_boxes[j].x1);
			float yy1 = (max)(input_boxes[i].y1, input_boxes[j].y1);
			float xx2 = (min)(input_boxes[i].x2, input_boxes[j].x2);
			float yy2 = (min)(input_boxes[i].y2, input_boxes[j].y2);

			float w = (max)(float(0), xx2 - xx1 + 1);
			float h = (max)(float(0), yy2 - yy1 + 1);
			float inter = w * h;
			float ovr = inter / (vArea[i] + vArea[j] - inter);

			if (ovr >= this->nmsThreshold)
			{
				isSuppressed[j] = true;
			}
		}
	}
	// return post_nms;
	int idx_t = 0;
	input_boxes.erase(remove_if(input_boxes.begin(), input_boxes.end(), [&idx_t, &isSuppressed](const BoxInfo& f) { return isSuppressed[idx_t++]; }), input_boxes.end());
}

void YOLOV7::detect(Mat& frame)
{
	Mat dstimg;
	resize(frame, dstimg, Size(this->inpWidth, this->inpHeight));
	this->normalize_(dstimg);
	array<int64_t, 4> input_shape_{ 1, 3, this->inpHeight, this->inpWidth };

	auto allocator_info = MemoryInfo::CreateCpu(OrtDeviceAllocator, OrtMemTypeCPU);
	Value input_tensor_ = Value::CreateTensor<float>(allocator_info, input_image_.data(), input_image_.size(), input_shape_.data(), input_shape_.size());

	// 开始推理
	vector<Value> ort_outputs = ort_session->Run(RunOptions{ nullptr }, &input_names[0], &input_tensor_, 1, output_names.data(), output_names.size());   // 开始推理
	/generate proposals
	vector<BoxInfo> generate_boxes;
	float ratioh = (float)frame.rows / this->inpHeight, ratiow = (float)frame.cols / this->inpWidth;
	int n = 0, k = 0; ///cx,cy,w,h,box_score, class_score
	const float* pdata = ort_outputs[0].GetTensorMutableData<float>();
	for (n = 0; n < this->num_proposal; n++)   ///特征图尺度
	{
		float box_score = pdata[4];
		if (box_score > this->confThreshold)
		{
			int max_ind = 0;
			float max_class_socre = 0;
			for (k = 0; k < num_class; k++)
			{
				if (pdata[k + 5] > max_class_socre)
				{
					max_class_socre = pdata[k + 5];
					max_ind = k;
				}
			}
			max_class_socre *= box_score;
			if (max_class_socre > this->confThreshold)
			{
				float cx = pdata[0] * ratiow;  ///cx
				float cy = pdata[1] * ratioh;   ///cy
				float w = pdata[2] * ratiow;   ///w
				float h = pdata[3] * ratioh;  ///h

				float xmin = cx - 0.5 * w;
				float ymin = cy - 0.5 * h;
				float xmax = cx + 0.5 * w;
				float ymax = cy + 0.5 * h;

				generate_boxes.push_back(BoxInfo{ xmin, ymin, xmax, ymax, max_class_socre, max_ind });
			}
		}
		pdata += nout;
	}

	// Perform non maximum suppression to eliminate redundant overlapping boxes with
	// lower confidences
	nms(generate_boxes);
	for (size_t i = 0; i < generate_boxes.size(); ++i)
	{
		int xmin = int(generate_boxes[i].x1);
		int ymin = int(generate_boxes[i].y1);
		rectangle(frame, Point(xmin, ymin), Point(int(generate_boxes[i].x2), int(generate_boxes[i].y2)), Scalar(0, 0, 255), 2);
		string label = format("%.2f", generate_boxes[i].score);
		label = this->class_names[generate_boxes[i].label] + ":" + label;
		putText(frame, label, Point(xmin, ymin - 5), FONT_HERSHEY_SIMPLEX, 0.75, Scalar(0, 255, 0), 1);
	}
}

int main()
{
	Net_config YOLOV7_nets = { 0.3, 0.5, "model/yolov7_640x640.onnx" };
	YOLOV7 net(YOLOV7_nets);
	string imgpath = "inference/bus.jpg";
	Mat srcimg = imread(imgpath);
	net.detect(srcimg);

	static const string kWinName = "Deep learning object detection in ONNXRuntime";
	namedWindow(kWinName, WINDOW_NORMAL);
	imshow(kWinName, srcimg);
	waitKey(0);
	destroyAllWindows();
}
2)CMakeLists.txt (编译方法参见另一篇博客[VSCode配置之Opencv4x终极奥义](https://blog.csdn.net/qq_37172182/article/details/121933824?spm=1001.2014.3001.5502))
# cmake needs this line
SET(CMAKE_BUILD_TYPE "Release")
# # Define project name
# PROJECT(CppTemplate)

include_directories("D:/path/to/your/opencv/build/include" "D:/path/to/your/opencv/build/include/opencv2")
include_directories("D:/path/to/your/Microsoft.ML.OnnxRuntime.1.14.1/build/native/include")

#指定dll的lib所在路径
link_directories("D:/path/to/your/opencv/build/x64/vc15/lib")
link_directories("D:/path/to/your/Microsoft.ML.OnnxRuntime.1.14.1/runtimes/win-x64/native")

include_directories(OpenCV_INCLUDE_DIRS)
set(CMAKE_PREFIX_PATH D:/libtorch_gpu/libtorch/share/cmake/Torch/)
find_package( Torch REQUIRED)

add_executable(onnxruntime_yolov7 onnxruntime_yolov7.cpp)
target_link_libraries(onnxruntime_yolov7 opencv_world460 onnxruntime)
。
3)输出结果

-
VS2022 OnnxRuntime版本配置
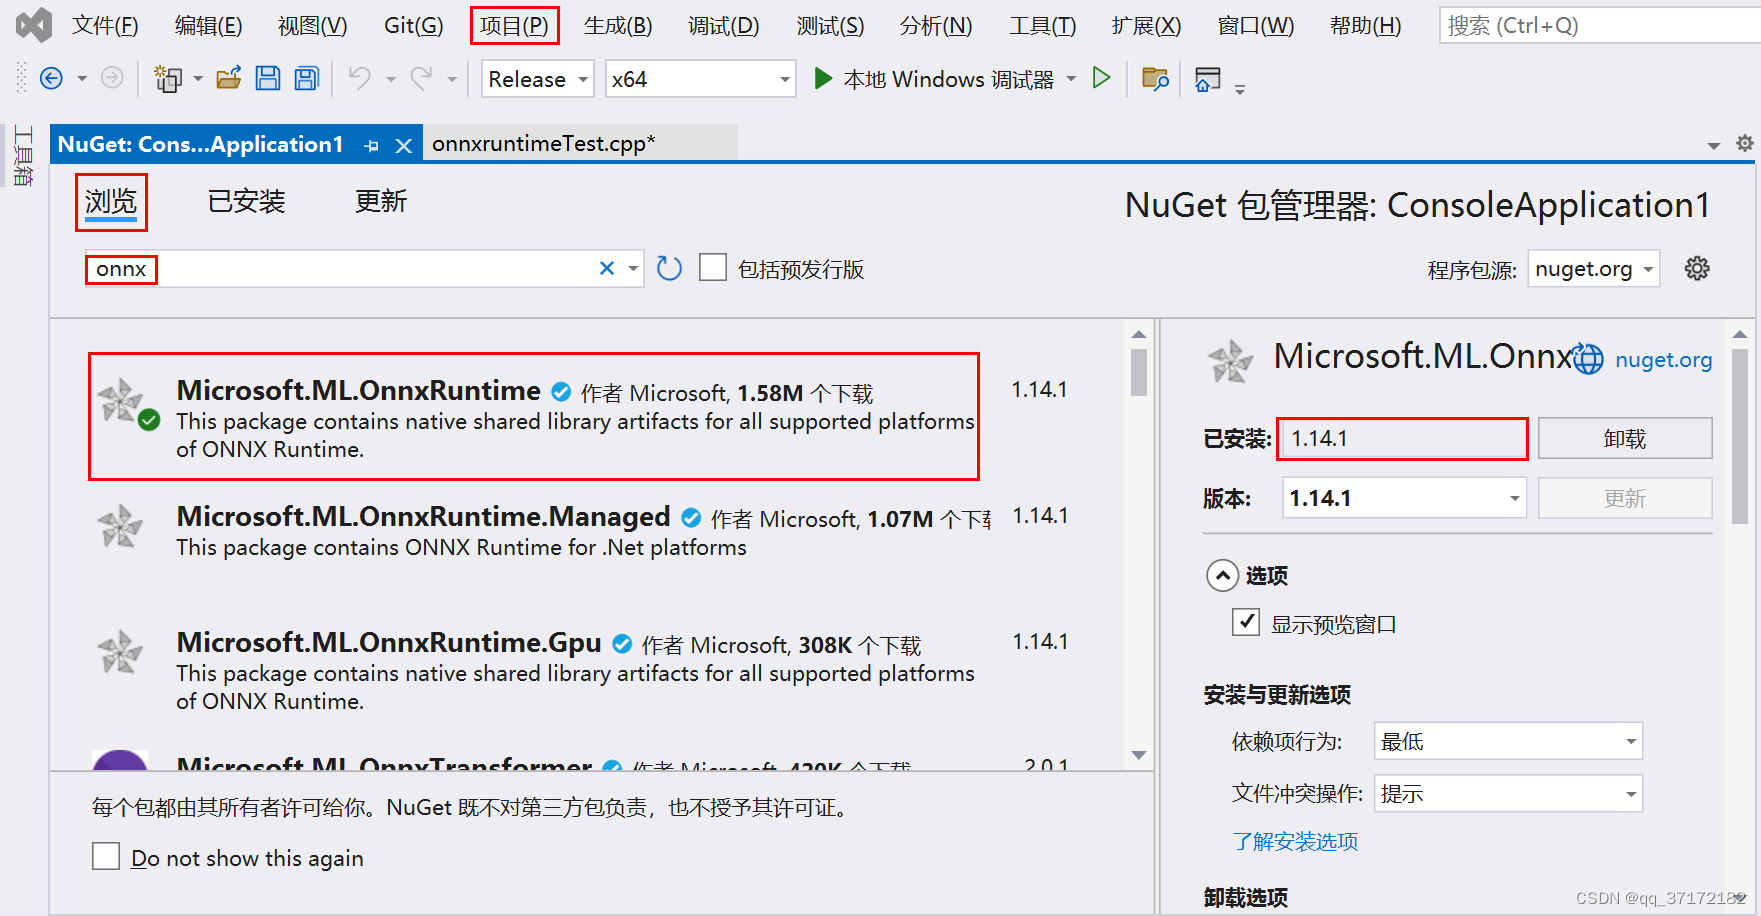
1)快速配置方法:项目 -> 管理NuGet程序包,即可快速安装OnnxRuntime(见下图)
【注:之所以在开头说OnnxRuntime的安装是可选的,是因为这里会自动下载一份OnnxRuntime在项目目录的package里面,VSCode通过配置CMakeFiles.txt获取相应路径即可】
2)输出结果

-
小结
可能存在的问题:
1. OpenCV4.5.x调用.onnx文件forward失败;解决方案: 1) 修改yolov7源码:model/common.py #52 return torch.cat([x[..., ::2, ::2], x[..., 1::2, ::2], x[..., ::2, 1::2], x[..., 1::2, 1::2]], 1) def forward(self, x): return Contract(gain=2).(x) 2) 导出命令(不含nms和grid):python export.py --weights ./yolov7.pt --img-size 640 640- 运行过程报错异常;
ort_session->GetInputName(i, allocator) ort_session->GetOutputName(i, allocator) 修改为: ort_session->GetInputNameAllocated(i, allocator)).get() ort_session->GetOutputNameAllocated(i, allocator)).get() 仍然存在内存泄漏的风险,最直接的解决方案是使用Netron查看.onnx模型的输入和输出- 推理时间评估;
需要进一步深入了解Onnxruntime的加速设置方法、快速读取模型等流程,最终考虑将LibTorch、OpenCV、OnnxRuntime、TensorRT各种平台做综合对比。


 579
579


 被折叠的 条评论
为什么被折叠?
被折叠的 条评论
为什么被折叠?
 到【灌水乐园】发言


