


Qt--canvas画图(5.12)
1 介绍
画布项目允许绘制直线和曲线、简单和复杂的形状、图形和引用的图形图像。它还可以添加文本、颜色、阴影、渐变和模式,并执行低级像素操作。画布输出可以保存为图像文件或序列化为URL。
2 使用流程
- 装载画笔或者填充模式
- 创建绘制路径
- 使⽤画笔或者填充绘制路径
3 简单示例
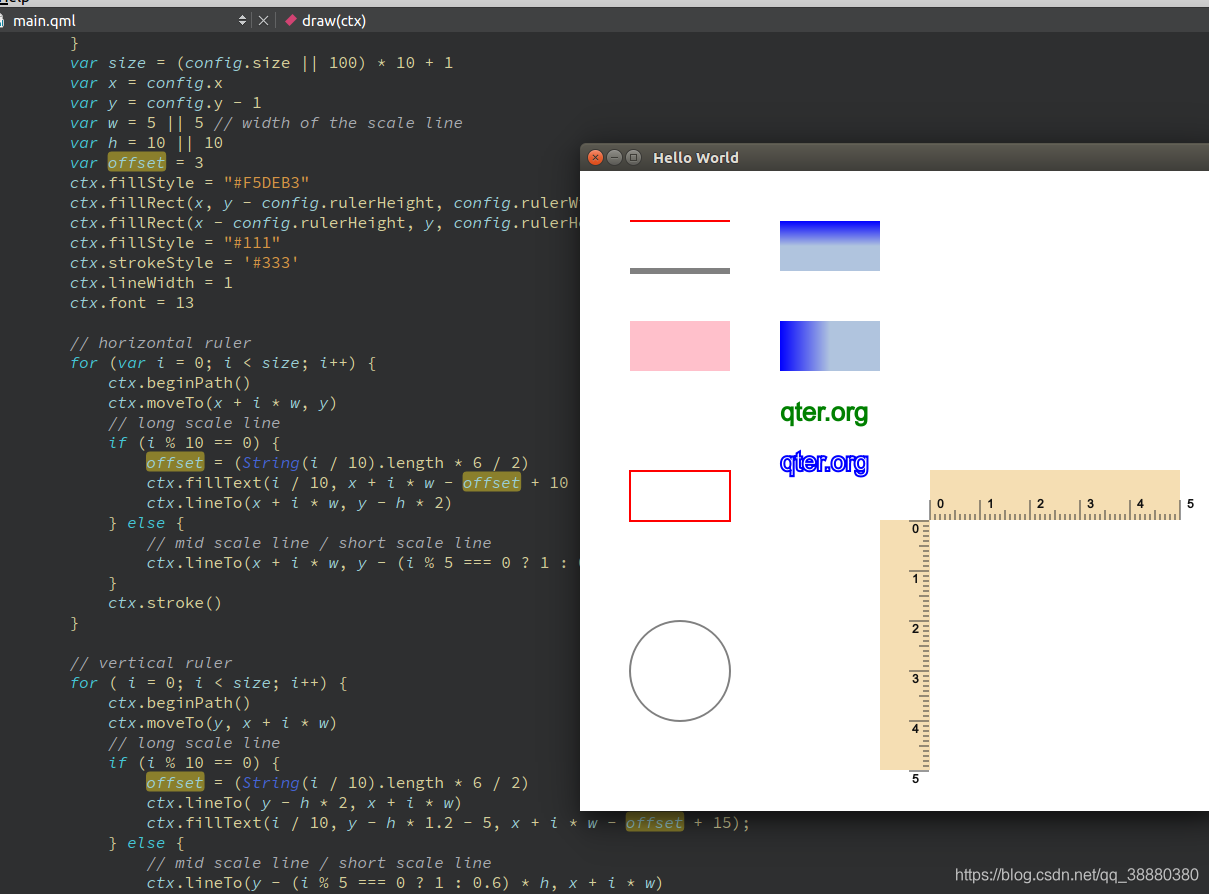
3.1 简单线、图形、文本、渐变、尺子
注: ctx.closePath();画直线使用时会出问题,线变长
import QtQuick 2.12
import QtQuick.Window 2.12

Window {
    visible: true
    width: 640
    height: 640
    title: qsTr("Hello World")

    Canvas {
        id: mycanvas
        width: parent.width
        height: parent.height
        onPaint: {
            var ctx = getContext("2d");

            // a red short line
            ctx.strokeStyle = "red"
            ctx.lineWidth = 2
            ctx.beginPath()
            ctx.moveTo(50, 50)
            ctx.lineTo(150, 50)
            ctx.stroke()
            ctx.beginPath()

            ctx.strokeStyle = "grey"
            ctx.lineWidth = 6
            ctx.moveTo(50, 100)
            ctx.lineTo(150, 100)
            ctx.stroke()
            ctx.beginPath()

            ctx.lineWidth = 2

            // 填充
            ctx.fillStyle = "pink";
            ctx.fillRect(50, 150, 100, 50);

            // 描边
            ctx.strokeStyle = "red";
            ctx.strokeRect(50, 300, 100, 50);

            // 画圆
            ctx.strokeStyle = "grey";
            ctx.arc(100, 500, 50, 0, Math.PI*2);
            ctx.stroke();

            // 渐变
            var gradient = ctx.createLinearGradient(0, 50, 0, 100)
            gradient.addColorStop(0, "blue")
            gradient.addColorStop(0.5, "lightsteelblue")
            ctx.fillStyle = gradient
            ctx.fillRect(200, 50, 100, 50)

            gradient = ctx.createLinearGradient(200, 0, 300, 0)
            gradient.addColorStop(0, "blue")
            gradient.addColorStop(0.5, "lightsteelblue")
            ctx.fillStyle = gradient
            ctx.fillRect(200, 150, 100, 50)

            // 文本
            ctx.fillStyle = "green"
            ctx.strokeStyle = "blue"
            ctx.fontSize = 20
            ctx.font = "bold 26px Arial"
            var text = "qter.org";
            context.fillText(text, 200, 250)
            context.strokeText(text, 200, 300)

            ctx.font = "bold 12px Arial"
            draw(ctx)
        }
    }


    function draw(ctx ) {
        var config = {
            rulerWidth: 250,
            rulerHeight: 50,
            size: 5, // the total num of scale
            x: 350,
            y: 350,
            w: 5, // scale line interval
            h: 10 // base length of the scale line
        }
        var size = (config.size || 100) * 10 + 1
        var x = config.x
        var y = config.y - 1
        var w = 5 || 5 // width of the scale line
        var h = 10 || 10
        var offset = 3
        ctx.fillStyle = "#F5DEB3"
        ctx.fillRect(x, y - config.rulerHeight, config.rulerWidth, config.rulerHeight);
        ctx.fillRect(x - config.rulerHeight, y, config.rulerHeight, config.rulerWidth);
        ctx.fillStyle = "#111"
        ctx.strokeStyle = '#333'
        ctx.lineWidth = 1
        ctx.font = 13

        // horizontal ruler
        for (var i = 0; i < size; i++) {
            ctx.beginPath()
            ctx.moveTo(x + i * w, y)
            // long scale line
            if (i % 10 == 0) {
                offset = (String(i / 10).length * 6 / 2)
                ctx.fillText(i / 10, x + i * w - offset + 10 , y - h * 1.2);
                ctx.lineTo(x + i * w, y - h * 2)
            } else {
                // mid scale line / short scale line
                ctx.lineTo(x + i * w, y - (i % 5 === 0 ? 1 : 0.6) * h)
            }
            ctx.stroke()
        }

        // vertical ruler
        for ( i = 0; i < size; i++) {
            ctx.beginPath()
            ctx.moveTo(y, x + i * w)
            // long scale line
            if (i % 10 == 0) {
                offset = (String(i / 10).length * 6 / 2)
                ctx.lineTo( y - h * 2, x + i * w)
                ctx.fillText(i / 10, y - h * 1.2 - 5, x + i * w - offset + 15);
            } else {
                // mid scale line / short scale line
                ctx.lineTo(y - (i % 5 === 0 ? 1 : 0.6) * h, x + i * w)
            }
            ctx.stroke()
        }

    }
}
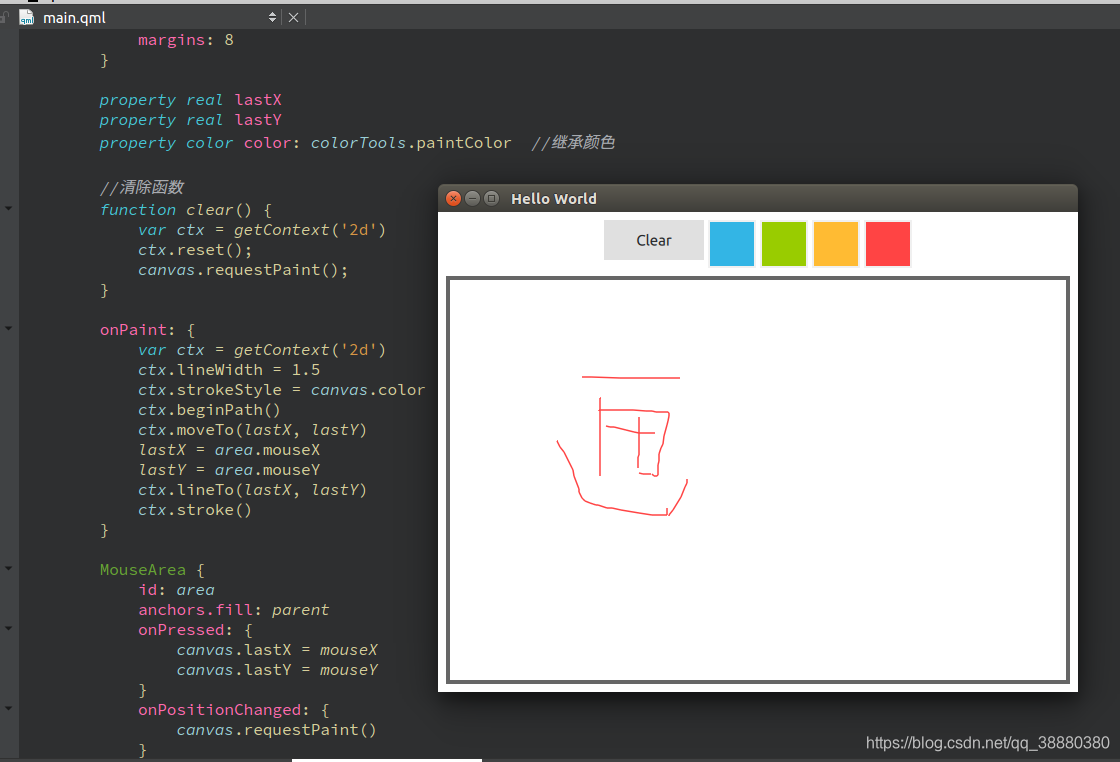
3.2 选色绘画(转【参2】)
import QtQuick 2.12
import QtQuick.Window 2.12
import QtQuick.Controls 2.12

Window {
    visible: true
    width: 640
    height: 480
    title: qsTr("Hello World")

    //定位元素,画四个带颜色的正方形
    Row {
        id: colorTools
        anchors {
            horizontalCenter: parent.horizontalCenter
            top: parent.top
            topMargin: 8
        }

        property color paintColor: "#33B5E5"
        spacing: 4

        //清楚按钮
        Button {
            text: "Clear"
            onClicked: {
                canvas.clear()
            }
        }

        //绑定点击更换颜色
        Repeater {
            model: ["#33B5E5", "#99CC00", "#FFBB33", "#FF4444"]

            Rectangle {
                id: colorSquare;
                width: 48; height: 48
                color: modelData
                signal clicked
                property bool active: false
                border.color: active? "#666666" : "#f0f0f0"
                border.width: 2

                MouseArea {
                    id: area1
                    anchors.fill :parent
                    onClicked: {
                        colorTools.paintColor = color
                    }

                }
            }
        }
    }

    //画框
    Rectangle{
        anchors.fill: canvas
        border.color: "#666"
        border.width: 4;
    }

    Canvas {
        id: canvas
        anchors {
            left: parent.left
            right: parent.right
            top: colorTools.bottom
            bottom: parent.bottom
            margins: 8
        }

        property real lastX
        property real lastY
        property color color: colorTools.paintColor  //继承颜色

        //清除函数
        function clear() {
            var ctx = getContext('2d')
            ctx.reset();
            canvas.requestPaint();
        }

        onPaint: {
            var ctx = getContext('2d')
            ctx.lineWidth = 1.5
            ctx.strokeStyle = canvas.color
            ctx.beginPath()
            ctx.moveTo(lastX, lastY)
            lastX = area.mouseX
            lastY = area.mouseY
            ctx.lineTo(lastX, lastY)
            ctx.stroke()
        }

        MouseArea {
            id: area
            anchors.fill: parent
            onPressed: {
                canvas.lastX = mouseX
                canvas.lastY = mouseY
            }
            onPositionChanged: {
                canvas.requestPaint()
            }
        }
    }
}
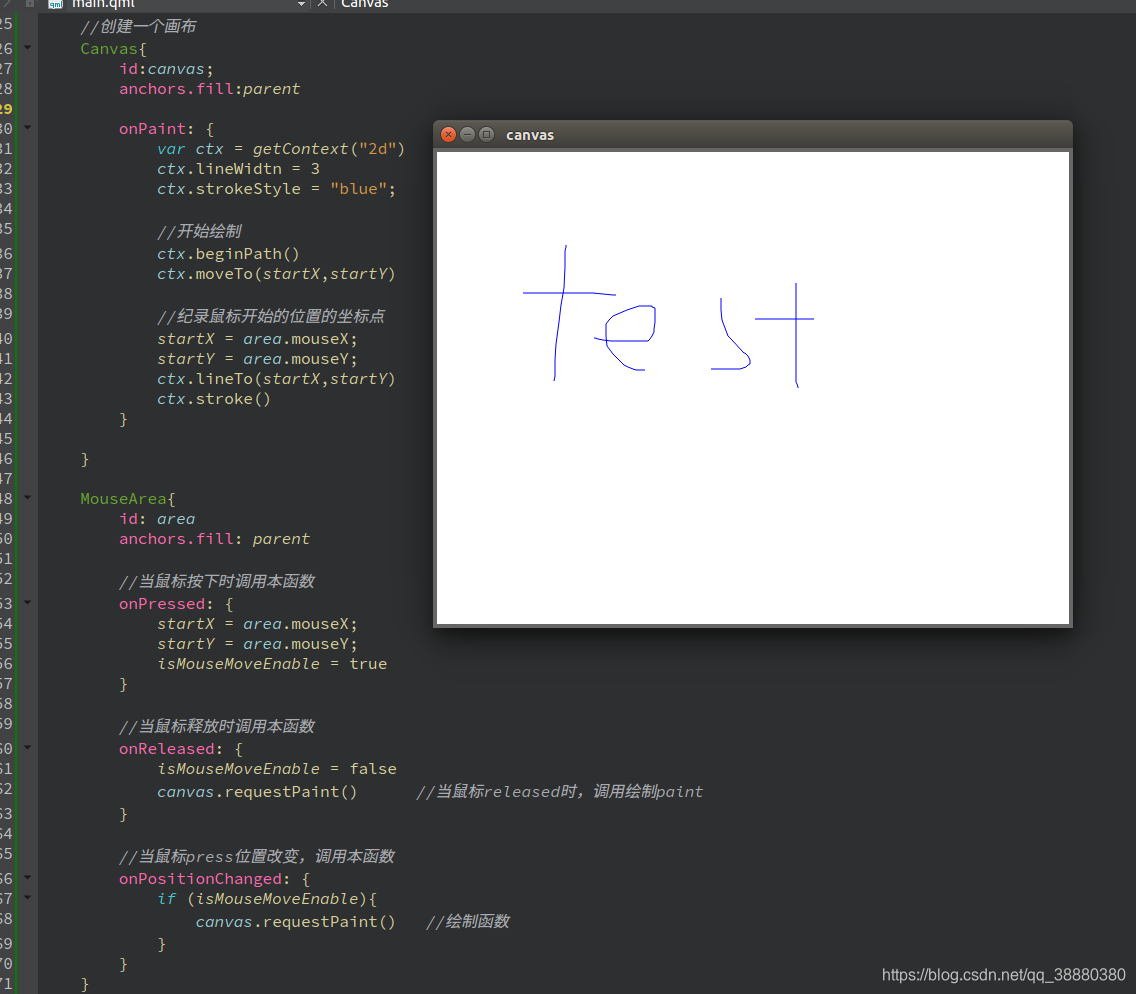
3.3 简单鼠标绘制(转【参2】)
import QtQuick 2.12
import QtQuick.Window 2.12
import QtQuick.Controls 2.12

Window{
    id: root
    width: 640
    height: 480
    visible: true

    //鼠标点击坐标位置
    property real startX     //储存鼠标开始时的坐标
    property real startY
    property real stopX      //储存鼠标结束时的坐标
    property real stopY
    property bool isMouseMoveEnable: false

    //在root上画一个方框
    Rectangle{
        anchors.fill: canvas
        border.color: "#666"
        border.width: 4;
    }

    //创建一个画布
    Canvas{
        id:canvas;
        anchors.fill:parent

        onPaint: {
            var ctx = getContext("2d")
            ctx.lineWidtn = 3
            ctx.strokeStyle = "blue";

            //开始绘制
            ctx.beginPath()
            ctx.moveTo(startX,startY)

            //纪录鼠标开始的位置的坐标点
            startX = area.mouseX;
            startY = area.mouseY;
            ctx.lineTo(startX,startY)
            ctx.stroke()
        }

    }

    MouseArea{
        id: area
        anchors.fill: parent

        //当鼠标按下时调用本函数
        onPressed: {
            startX = area.mouseX;
            startY = area.mouseY;
            isMouseMoveEnable = true
        }

        //当鼠标释放时调用本函数
        onReleased: {
            isMouseMoveEnable = false
            canvas.requestPaint()      //当鼠标released时,调用绘制paint
        }

        //当鼠标press位置改变,调用本函数
        onPositionChanged: {
            if (isMouseMoveEnable){
                canvas.requestPaint()   //绘制函数
            }
        }
    }
}
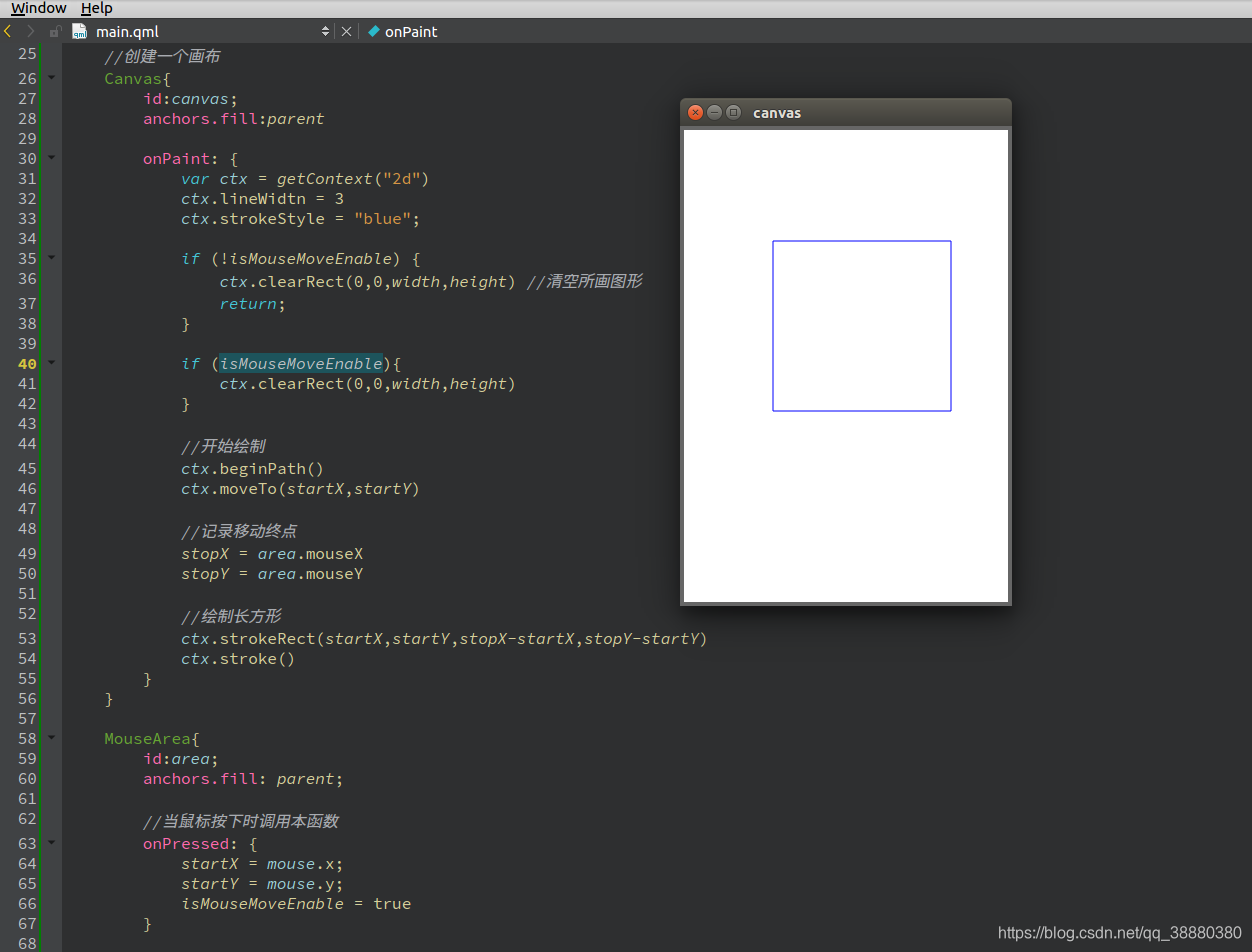
3.4 绘制长方形(转【参2】)
import QtQuick 2.12
import QtQuick.Window 2.12
import QtQuick.Controls 2.12

Window{
    id: root
    width: 640
    height: 480
    visible: true

    //鼠标点击坐标位置
    property real startX     //储存鼠标开始时的坐标
    property real startY
    property real stopX      //储存鼠标结束时的坐标
    property real stopY
    property bool isMouseMoveEnable: false //是否允许鼠标移动绘制事件

    //在root上画一个方框
    Rectangle{
        anchors.fill: canvas
        border.color: "#666"
        border.width: 4;
    }

    //创建一个画布
    Canvas{
        id:canvas;
        anchors.fill:parent

        onPaint: {
            var ctx = getContext("2d")
            ctx.lineWidtn = 3
            ctx.strokeStyle = "blue";

            if (!isMouseMoveEnable) {
                ctx.clearRect(0,0,width,height) //清空所画图形
                return;
            }

            if (isMouseMoveEnable){
                ctx.clearRect(0,0,width,height)
            }

            //开始绘制
            ctx.beginPath()
            ctx.moveTo(startX,startY)

            //记录移动终点
            stopX = area.mouseX
            stopY = area.mouseY

            //绘制长方形
            ctx.strokeRect(startX,startY,stopX-startX,stopY-startY)
            ctx.stroke()
        }
    }

    MouseArea{
        id:area;
        anchors.fill: parent;

        //当鼠标按下时调用本函数
        onPressed: {
            startX = mouse.x;
            startY = mouse.y;
            isMouseMoveEnable = true
        }

        //当鼠标press位置改变,调用本函数
        onPositionChanged: {
            if (isMouseMoveEnable){
                canvas.requestPaint()   //绘制函数
            }
        }
    }
}
参考
1、Qt–Canvas QML Type
2、Qt-quick(qml) Canvas用法及鼠标绘制图形
3、鼠标画图
4、QML画图-Canvas画基本图形
5、canvas arc()方法详解
6、Qt:在QML中自定义贝塞尔动画曲线
7、HTML canvas fillText() 方法
8、HTML canvas createLinearGradient() 方法
9、用qml画坐标
10、QML之CANVAS实现标尺(刻度尺)方案
11、在QML中使用Canvas
12、QML 画布Canvas–2D绘图(上)
13、提高canvas性能技巧
14、bezier curve or quadratic curve


 被折叠的 条评论
为什么被折叠?
被折叠的 条评论
为什么被折叠?
 到【灌水乐园】发言


