


参考代码:Colab
作业PPT: slide
作业所需的数据:data
作业说明:video
作业提交评分:kaggle
1. 作业任务描述
1.1 用BERT做QA的基本原理
Extraction-based QA:
假设问题的答案均出现在原文中
输入文档和问题(均被tokenliazation),输出为答案在文章中的位置(token的位置)
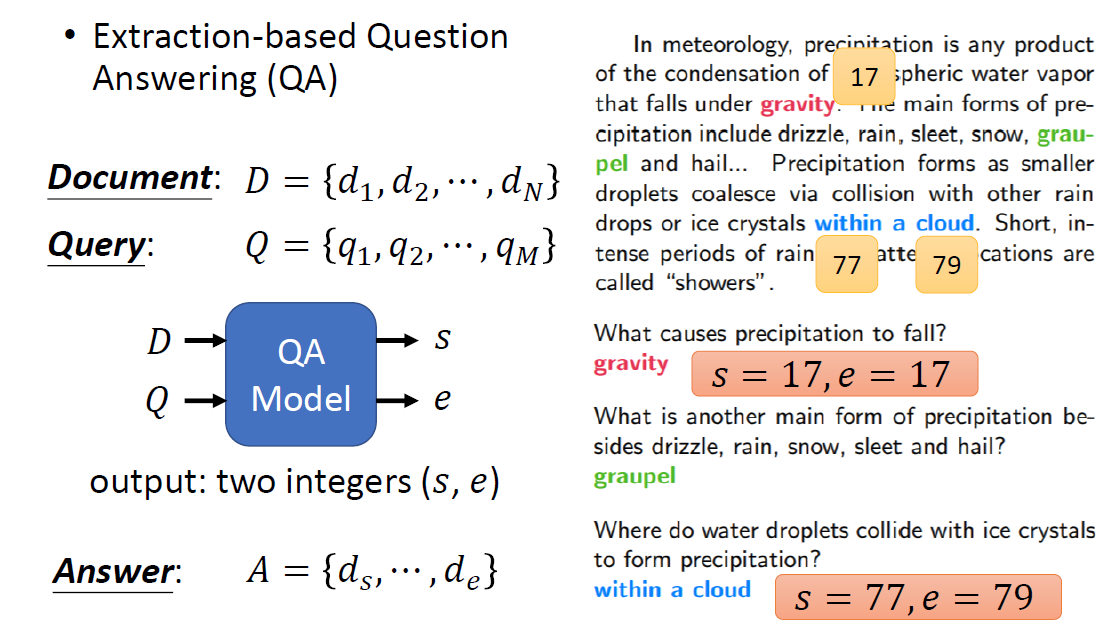
BERT的输入如下图所示:
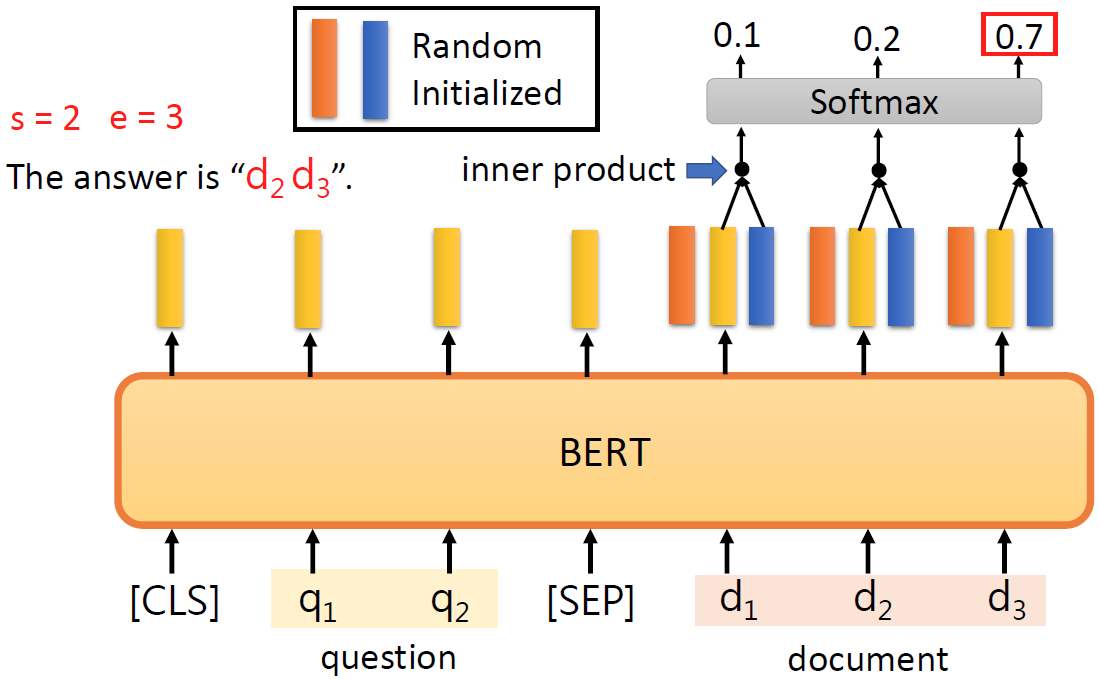
文章的每个词汇的embedding都分别与图中红色和蓝色的vector做点积,并经过softmax,看哪个词汇得到的分数最高(评估每个单词为start token和end token的概率)。得到最高值的词汇,分别是答案的开始和结束的token。如果start token的下标>end token的下标则无解。
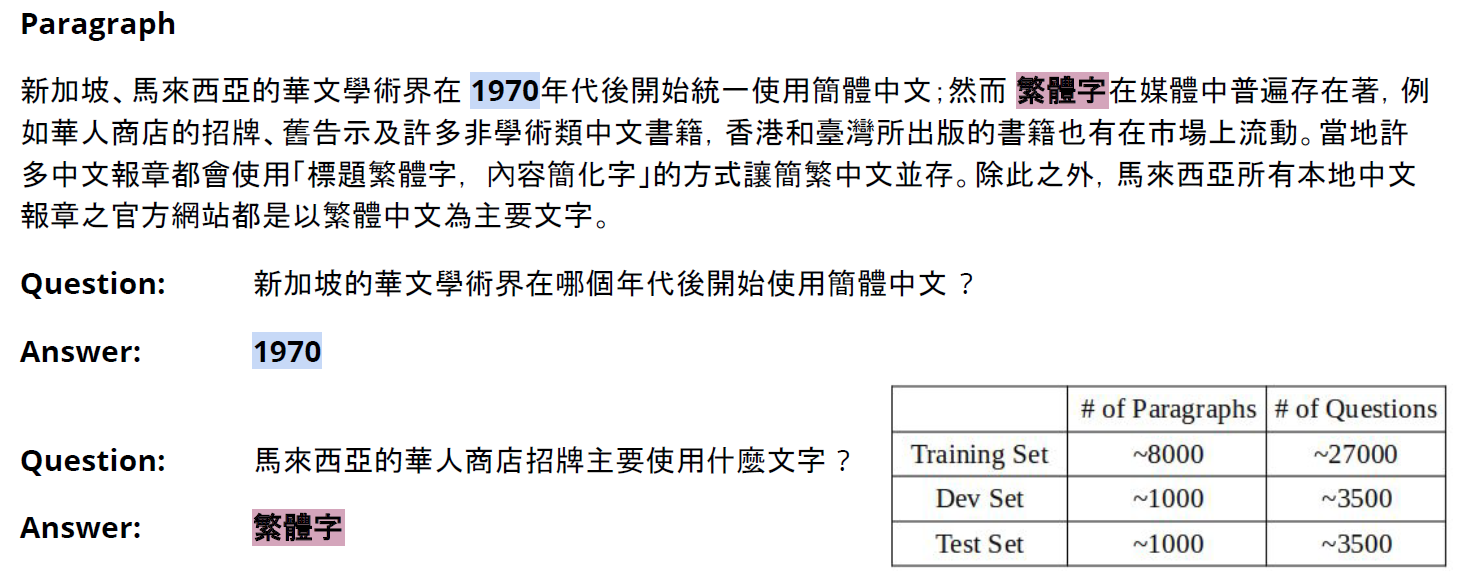
1.2 数据描述
训练集为一个json文件,question字段存储一个问题对象的list。
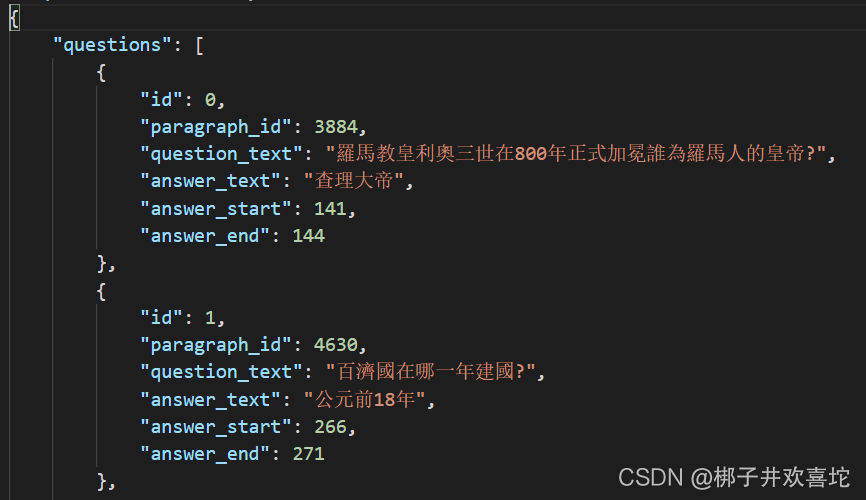
paragraphs字段为一个文本的list,每一行存储一篇原文。

1.3 需要注意的问题
在本作业中,我们将问题的token序列和包含答案的原文的token序列一起输入BERT,而BERT模型输入序列的最大长度为512。
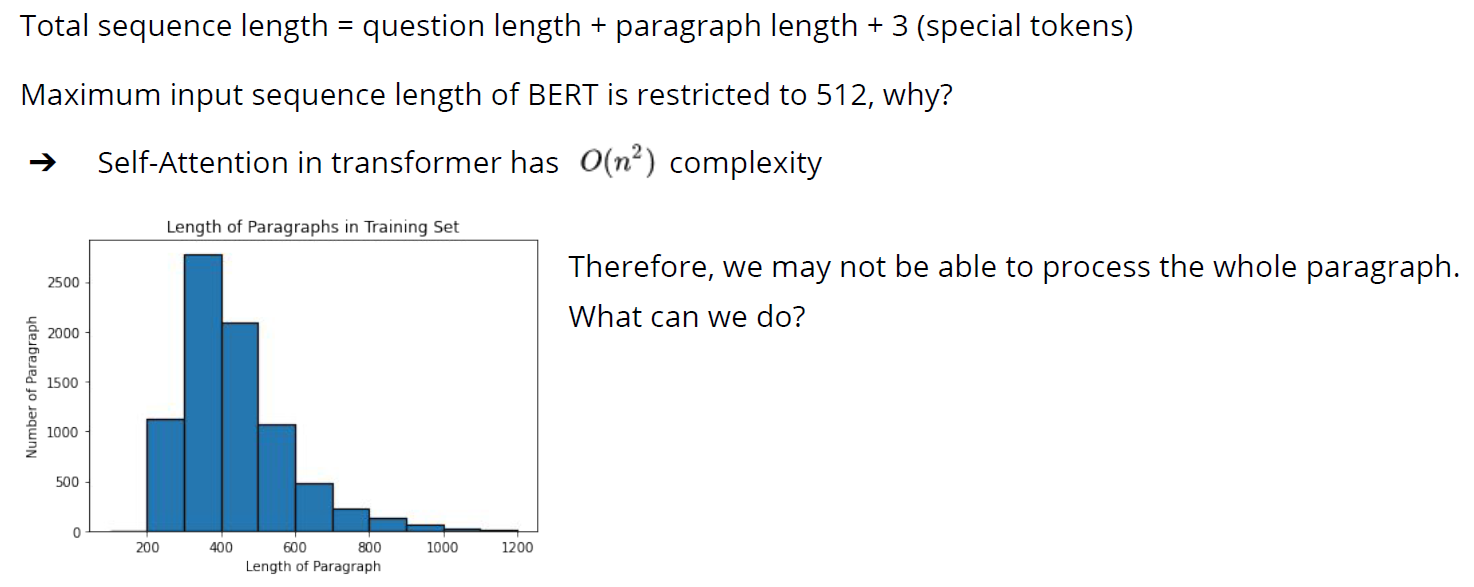
为了解决这个问题,因为在训练中我们知道答案地位置,我们简单地假设用来回答给定问题的原文信息,一定在答案的附近。当原文的长度超过512时,以答案为中心,将原文切分不同的窗口,分别在其中预测答案的开始和结束位置。当然这会带来新的问题,我们会在改进部分中说明。
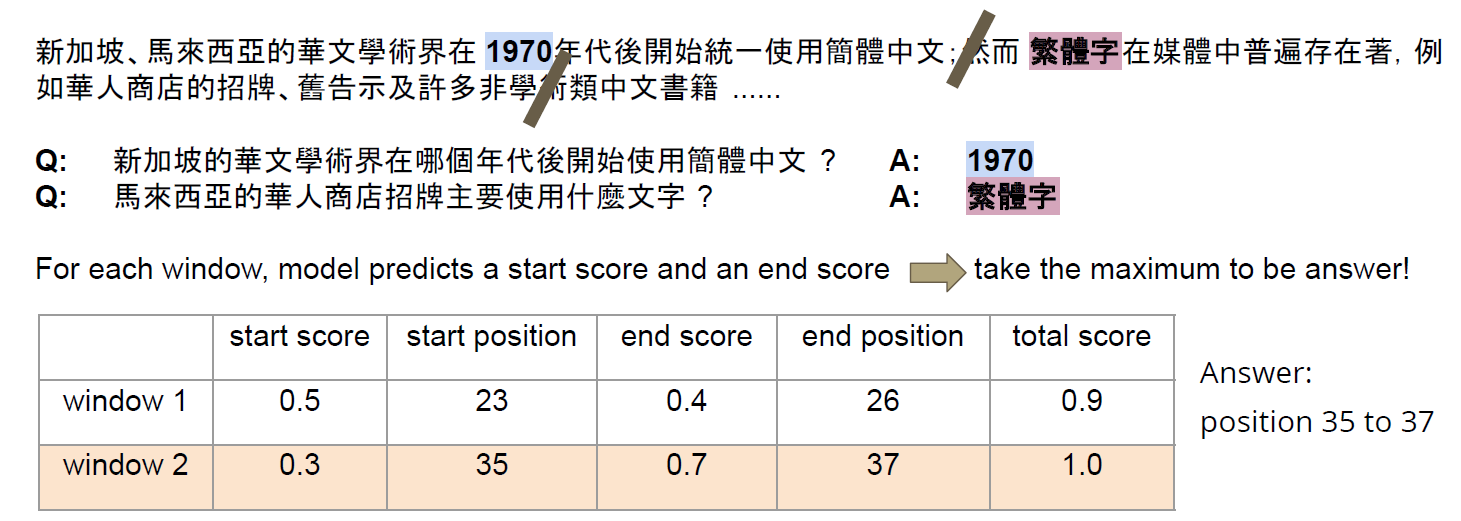
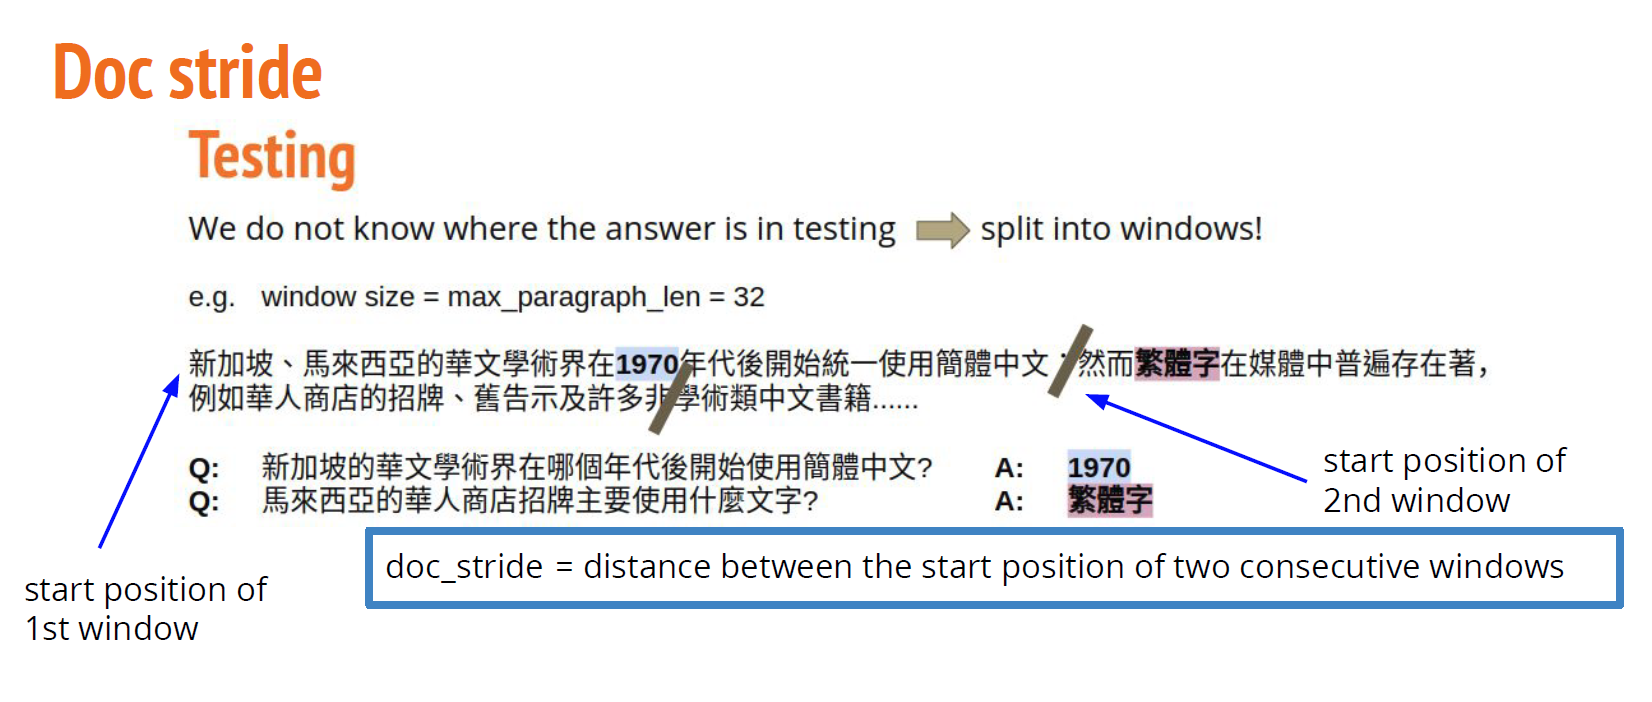
如下图所示,在测试阶段,我们不知道答案会在哪一个window中,需要在每一个window中预测答案的开始结束下标,计算得分,并取最大的那一个。
2. 必备前置知识
2.1 tokenizer
huggingface文档
tokenizer的基本作用是将原文本进行数据预处理
from transformers import AutoTokenizer
tokenizer = AutoTokenizer.from_pretrained('bert-base-cased')
常规的BERT模型的tokenizer会输出一个字典,包含’input_ids’,‘token_type_ids’和’attention_mask’。
(不同的模型输出不同,如DistilBERT的输出就不包含’token_type_ids’)
>>> encoded_input = tokenizer("Hello, I'm a single sentence!")
>>> print(encoded_input)

{
	'input_ids': [101, 138, 18696, 155, 1942, 3190, 1144, 1572, 13745, 1104, 159, 9664, 2107, 102],
	'token_type_ids': [0, 0, 0, 0, 0, 0, 0, 0, 0, 0, 0, 0, 0, 0],
	'attention_mask': [1, 1, 1, 1, 1, 1, 1, 1, 1, 1, 1, 1, 1, 1]
 }
第一个参数的含义非常简单
- inputs_ids: 对应于我们输入的句子中每个token的索引。
我们可以将tokenizer的输出解码得到原本的句子。
>>> tokenizer.decode(encoded_input["input_ids"])
"[CLS] Hello, I'm a single sentence! [SEP]"
可以发现,tokenizer自动添加了一些BERT期望的特殊标记,如[CLS], [SEP]。可以通过传递add_special_tokens=False来禁用此行为(仅当您自己添加了这些特殊标记时才建议这样做)。
下面介绍 token_type_ids
有时候我们需要输入一对句子到模型中,比如评估一对句子是否相似,或者做question-answering任务。
对于BERT模型,输入形式为**[CLS] Sequence A [SEP] Sequence B [SEP]**
>>> encoded_input = tokenizer("How old are you?", "I'm 6 years old")
>>> print(encoded_input)
{'input_ids': [101, 1731, 1385, 1132, 1128, 136, 102, 146, 112, 182, 127, 1201, 1385, 102],
 'token_type_ids': [0, 0, 0, 0, 0, 0, 0, 1, 1, 1, 1, 1, 1, 1],
 'attention_mask': [1, 1, 1, 1, 1, 1, 1, 1, 1, 1, 1, 1, 1, 1]}
token_type_ids向模型指出输入的哪一部分对应于第一句,哪一部分对应于第二句。
以本次作业举例:
question = '问题的答案是?'
paragraph = '问题的答案是42'
encoded = chi_tokenizer.encode(question, paragraph)
encoded_plus = chi_tokenizer.encode_plus(question, paragraph)
decoded = chi_tokenizer.decode(encoded)
decoded_plus = chi_tokenizer.decode(encoded_plus['input_ids'])
print(encoded)
print(encoded_plus)
print(decoded)
print(decoded_plus)
输出
[101, 7309, 7579, 4638, 5031, 3428, 3221, 8043, 102, 7309, 7579, 4638, 5031, 3428, 3221, 8239, 102]
{
'input_ids': [101, 7309, 7579, 4638, 5031, 3428, 3221, 8043, 102, 7309, 7579, 4638, 5031, 3428, 3221, 8239, 102],   				 	'token_type_ids': [0, 0, 0, 0, 0, 0, 0, 0, 0, 1, 1, 1, 1, 1, 1, 1, 1],
'attention_mask': [1, 1, 1, 1, 1, 1, 1, 1, 1, 1, 1, 1, 1, 1, 1, 1, 1]
}
[CLS] 问 题 的 答 案 是 ? [SEP] 问 题 的 答 案 是 42 [SEP]
[CLS] 问 题 的 答 案 是 ? [SEP] 问 题 的 答 案 是 42 [SEP]
3. 基础版本代码
首先助教讲解了一份作业的toy demo,掌握这部分内容有助于理解正式的作业参考代码。
3.1 A toy example for HW7 Bert QA
(1)导入所需的包
!pip install transformers==4.5.0
import torch
from transformers import AdamW, BertTokenizerFast, BertForQuestionAnswering
(2)加载Model和Tokenizer
可用的预训练模型列表: https://huggingface.co/models
# model_name can be either: models in huggingface model hub or models saved using save_pretrained
model_name = 'bert-base-chinese'
model = BertForQuestionAnswering.from_pretrained(model_name)
chi_tokenizer = BertTokenizerFast.from_pretrained('bert-base-chinese')
eng_tokenizer = BertTokenizerFast.from_pretrained('bert-base-cased')
(3)用Tokenizer分词
chi_paragraph = '问题的答案是42'
tokens = chi_tokenizer.tokenize(chi_paragraph)
print(tokens)
chi_tokenizer.convert_tokens_to_ids(tokens)
输出:
['问', '题', '的', '答', '案', '是', '42']
[7309, 7579, 4638, 5031, 3428, 3221, 8239]
eng_paragraph = 'The answer to the question is 42.'
tokens = eng_tokenizer.tokenize(eng_paragraph)
print(tokens)
eng_tokenizer.convert_tokens_to_ids(tokens)
输出:
['The', 'answer', 'to', 'the', 'question', 'is', '42', '.']
[1109, 2590, 1106, 1103, 2304, 1110, 3565, 119]
(4)Encode and Decode
question = '问题的答案是?'
paragraph = '问题的答案是42'
encoded = chi_tokenizer.encode(question, paragraph)
encoded_plus = chi_tokenizer.encode_plus(question, paragraph)
decoded = chi_tokenizer.decode(encoded)
decoded_plus = chi_tokenizer.decode(encoded_plus['input_ids'])
print(encoded)
print(encoded_plus)
print(decoded)
print(decoded_plus)
输出:
[101, 7309, 7579, 4638, 5031, 3428, 3221, 8043, 102, 7309, 7579, 4638, 5031, 3428, 3221, 8239, 102]
{
	'input_ids': [101, 7309, 7579, 4638, 5031, 3428, 3221, 8043, 102, 7309, 7579, 4638, 5031, 3428, 3221, 8239, 102],
	'token_type_ids': [0, 0, 0, 0, 0, 0, 0, 0, 0, 1, 1, 1, 1, 1, 1, 1, 1],
	'attention_mask': [1, 1, 1, 1, 1, 1, 1, 1, 1, 1, 1, 1, 1, 1, 1, 1, 1]
}
[CLS] 问 题 的 答 案 是 ? [SEP] 问 题 的 答 案 是 42 [SEP]
[CLS] 问 题 的 答 案 是 ? [SEP] 问 题 的 答 案 是 42 [SEP]
(5)模型输入
return_tensors这个参数表示:如果设置,将返回张量,而不是python整数列表。
可接受值为:
- ‘tf’: Return TensorFlow tf.constant objects.
- ‘pt’: Return PyTorch torch.Tensor objects.
- ‘np’: Return Numpy np.ndarray objects.
inputs = chi_tokenizer(question, paragraph, return_tensors='pt')
# Indices of input sequence tokens in the vocabulary
print('Input ids:      ', inputs['input_ids'])
# Segment token indices to indicate first and second portions of the inputs. Indices are selected in [0, 1]
print('Token type ids: ', inputs['token_type_ids'])
# Mask to avoid performing attention on padding token indices. Mask values selected in [0, 1]
print('Attention mask: ', inputs['attention_mask'])
输出:
Input ids:       tensor([[ 101, 7309, 7579, 4638, 5031, 3428, 3221, 8043,  102, 7309, 7579, 4638,
         5031, 3428, 3221, 8239,  102]])
Token type ids:  tensor([[0, 0, 0, 0, 0, 0, 0, 0, 0, 1, 1, 1, 1, 1, 1, 1, 1]])
Attention mask:  tensor([[1, 1, 1, 1, 1, 1, 1, 1, 1, 1, 1, 1, 1, 1, 1, 1, 1]])
(6)Testing(中文)
- start_logits: 表示预测的答案的开头为输入的token的概率得分(未经过softmax)
- end_logits: 表示预测的答案的开头为输入的token的概率得分(未经过softmax)
question = '问题的答案是?'
paragraph = '问题的答案是42'
inputs = chi_tokenizer(question, paragraph, return_tensors='pt')

with torch.no_grad():
    output = model(**inputs)
# output = model(input_ids=inputs['input_ids'], token_type_ids=inputs['token_type_ids'], attention_mask=inputs['attention_mask'])

print("start_logits: ")
print(output.start_logits)

print("end_logits: ")
print(output.end_logits)

start = torch.argmax(output.start_logits) # 返回dim维度上张量最大值的索引。
end = torch.argmax(output.end_logits)
print("start position: ", start.item()) # 一个元素张量可以用x.item()得到元素值
print("end position:   ", end.item())

# 获取预测的start和end的token的id
predict_id = inputs['input_ids'][0][start : end + 1]
print("predict_id:     ", predict_id)
# 根据id解码出原文
predict_answer = chi_tokenizer.decode(predict_id)
print("predict_answer: ", predict_answer)
输出:
start_logits:
tensor([[0.2367, 0.0053, 0.5719, 0.5851, 0.9732, 0.5694, 0.2992, 0.0743, 0.4991,
         0.8124, 0.6211, 0.8512, 1.0712, 0.7570, 0.6720, 0.0945, 0.4991]])
end_logits:
tensor([[-0.0972, -0.3593, -0.1517, -0.5554, -0.3928, -0.1403, -0.4841, -0.4113,
         -0.0454, -0.2405,  0.1035, -0.3529, -0.2633, -0.0343, -0.3512,  0.1362,
         -0.0454]])
start position:  12
end position:    15
predict_id:      tensor([5031, 3428, 3221, 8239])
predict_answer:  答 案 是 42
(7)Training (中文)
对于QA,损失是模型预测和正确答案的交叉熵之和
# 指定正确答案的开始结束位置,15
output = model(**inputs, start_positions=torch.tensor([16]), end_positions=torch.tensor([16]))
print("loss: ", output.loss)

optimizer = AdamW(model.parameters(), lr=1e-4)
output.loss.backward()
optimizer.step()
3.2 Simple版本参考代码
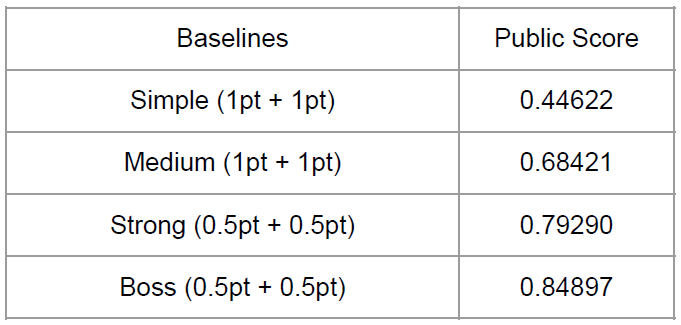
课程提供的simple版本的代码可以直接运行,train一遍在valid集上的准确度为0.492,在test集上的准确度为0.44622。
4. 改进项
根据助教的讲解,Simple版本的代码有很多可以改进的地方。
4.1 线性学习率下降
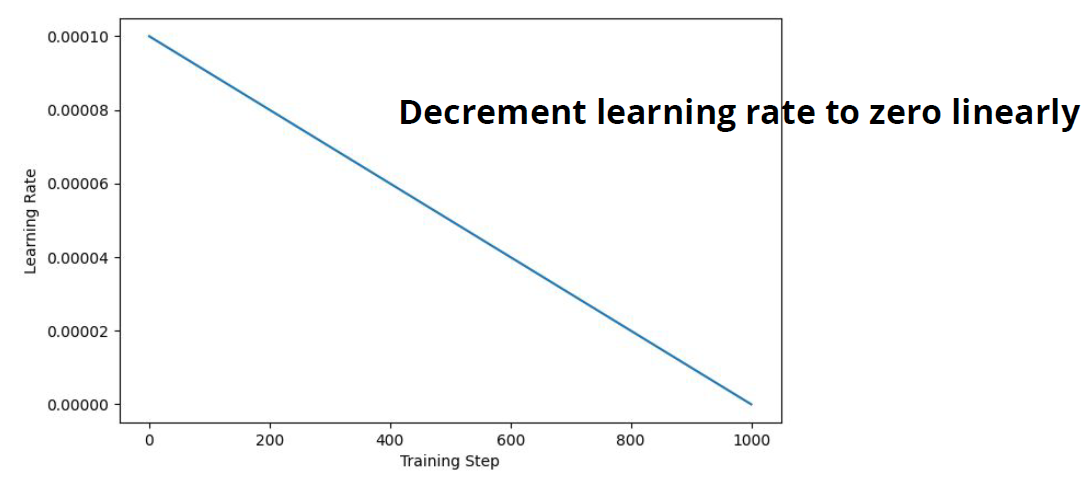
简单做法
##### TODO: Apply linear learning rate decay #####
optimizer.param_groups[0]["lr"] -= learning_rate/(total_step * num_epoch)
还可以参考huggingface官方文档
也可以采取其它的策略如warmup
4.2 窗口的大小
注意窗口大小是作用于valid集和test集上的,在训练集上,我们知道答案的位置。
对于训练集,设置一个max_paragraph_len,只输入以答案为中心,左右两侧长度为max_paragraph_len // 2的文本。
当然,超过[0, len(tokenized_paragraph))范围的文本要被裁掉。
# A single window is obtained by slicing the portion of paragraph containing the answer
mid = (answer_start_token + answer_end_token) // 2
# 要满足条件 0 <= paragraph_start <= len(tokenized_paragraph) - self.max_paragraph_len
paragraph_start = max(0, min(mid - self.max_paragraph_len // 2, len(tokenized_paragraph) -self.max_paragraph_len))
paragraph_end = paragraph_start + self.max_paragraph_len
而对于valid和test集,由于我们不知道答案的位置,因此从下标0开始,划分不同的窗口。
窗口的大小为max_paragraph_len,每次窗口的起点前进doc_stride。
# Paragraph is split into several windows, each with start positions separated by step "doc_stride"
for i in range(0, len(tokenized_paragraph), self.doc_stride):

    # Slice question/paragraph and add special tokens (101: CLS, 102: SEP)
    input_ids_question = [101] + tokenized_question.ids[:self.max_question_len] + [102]
    input_ids_paragraph = tokenized_paragraph.ids[i : i + self.max_paragraph_len] + [102]

    # Pad sequence and obtain inputs to model
    input_ids, token_type_ids, attention_mask = self.padding(input_ids_question, input_ids_paragraph)

    input_ids_list.append(input_ids)
    token_type_ids_list.append(token_type_ids)
    attention_mask_list.append(attention_mask)
在Simple版本的代码中,doc_stride和max_paragraph_len设置为相同的值,因为每个窗口之间是不重叠的。
但这样会导致一个问题,比如答案恰好在窗口的边缘,或者答案被两个窗口分割,模型就看不到答案。
因此需要使用重叠的窗口。
做法比较简单,让doc_stride小于max_paragraph_len,这样每个窗口必然与前一个窗口有交集。
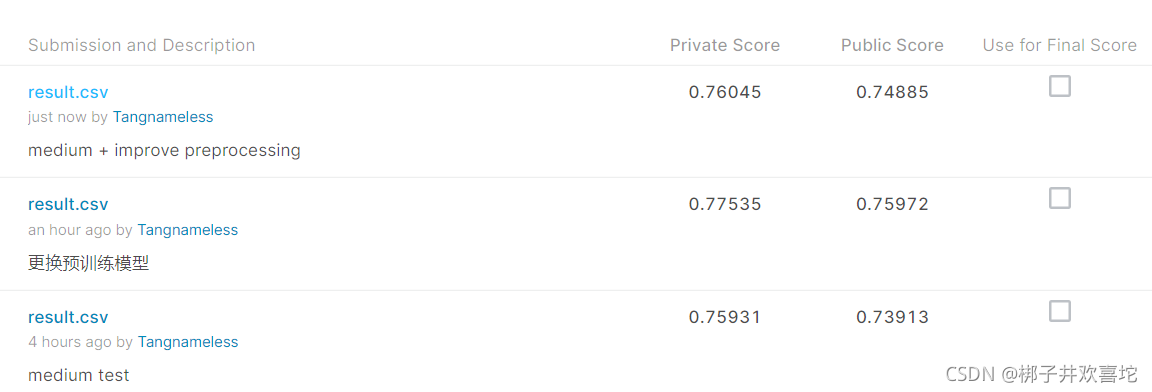
4.3 Medium小结
设置一个线性学习率下降,修改doc_stride=200,max_paragraph_len=300。
训练一个epoch以后,模型在验证集上的准确率为0.772。
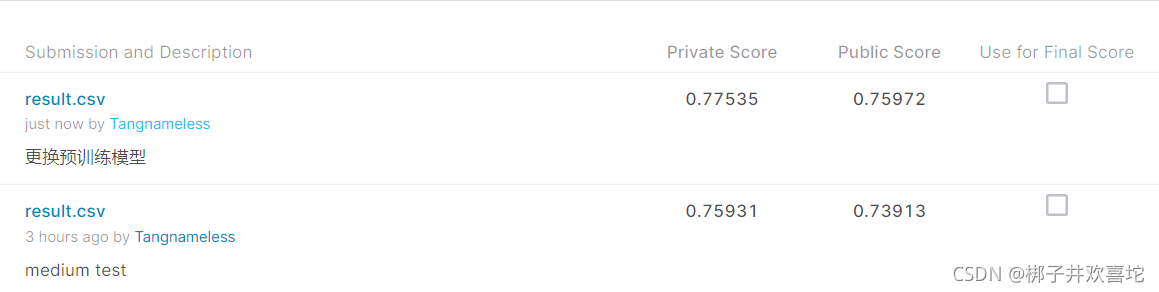
在kaggle上提交进行测试,结果已经超过了课件中Medium的标准。
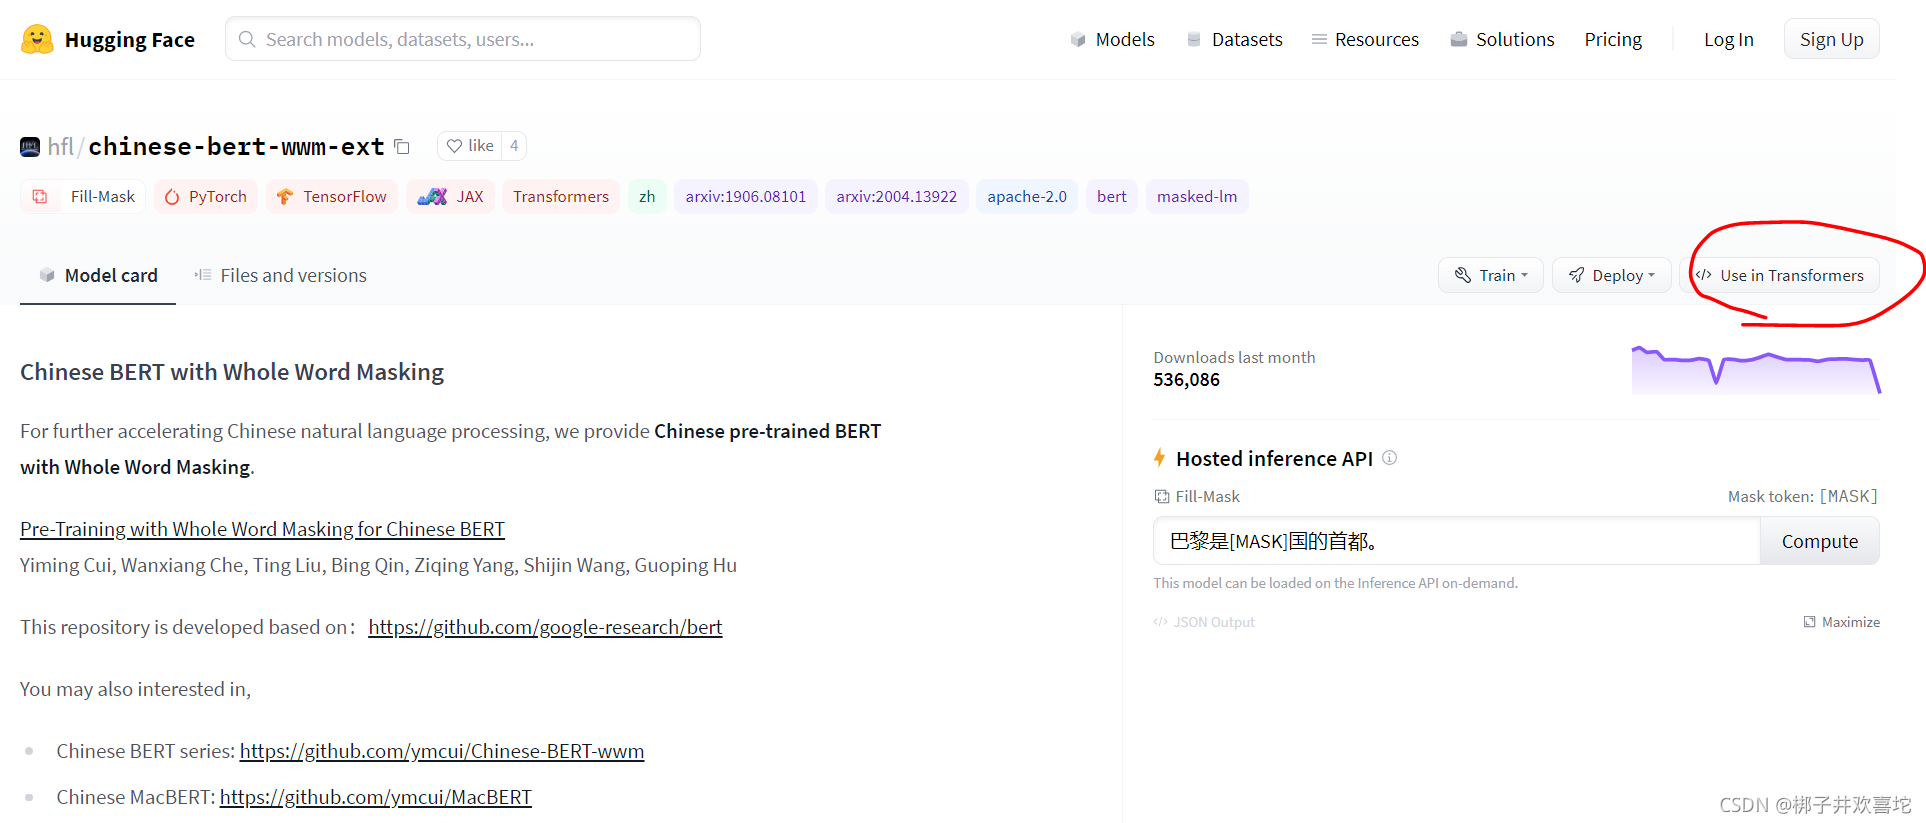
4.4 使用其它的预训练模型
助教提示使用其它的中文BERT模型可以提升准确率
比如使用chinese-bert-wwm-ext
model = BertForQuestionAnswering.from_pretrained("hfl/chinese-bert-wwm-ext").to(device)
tokenizer = BertTokenizerFast.from_pretrained("hfl/chinese-bert-wwm-ext")
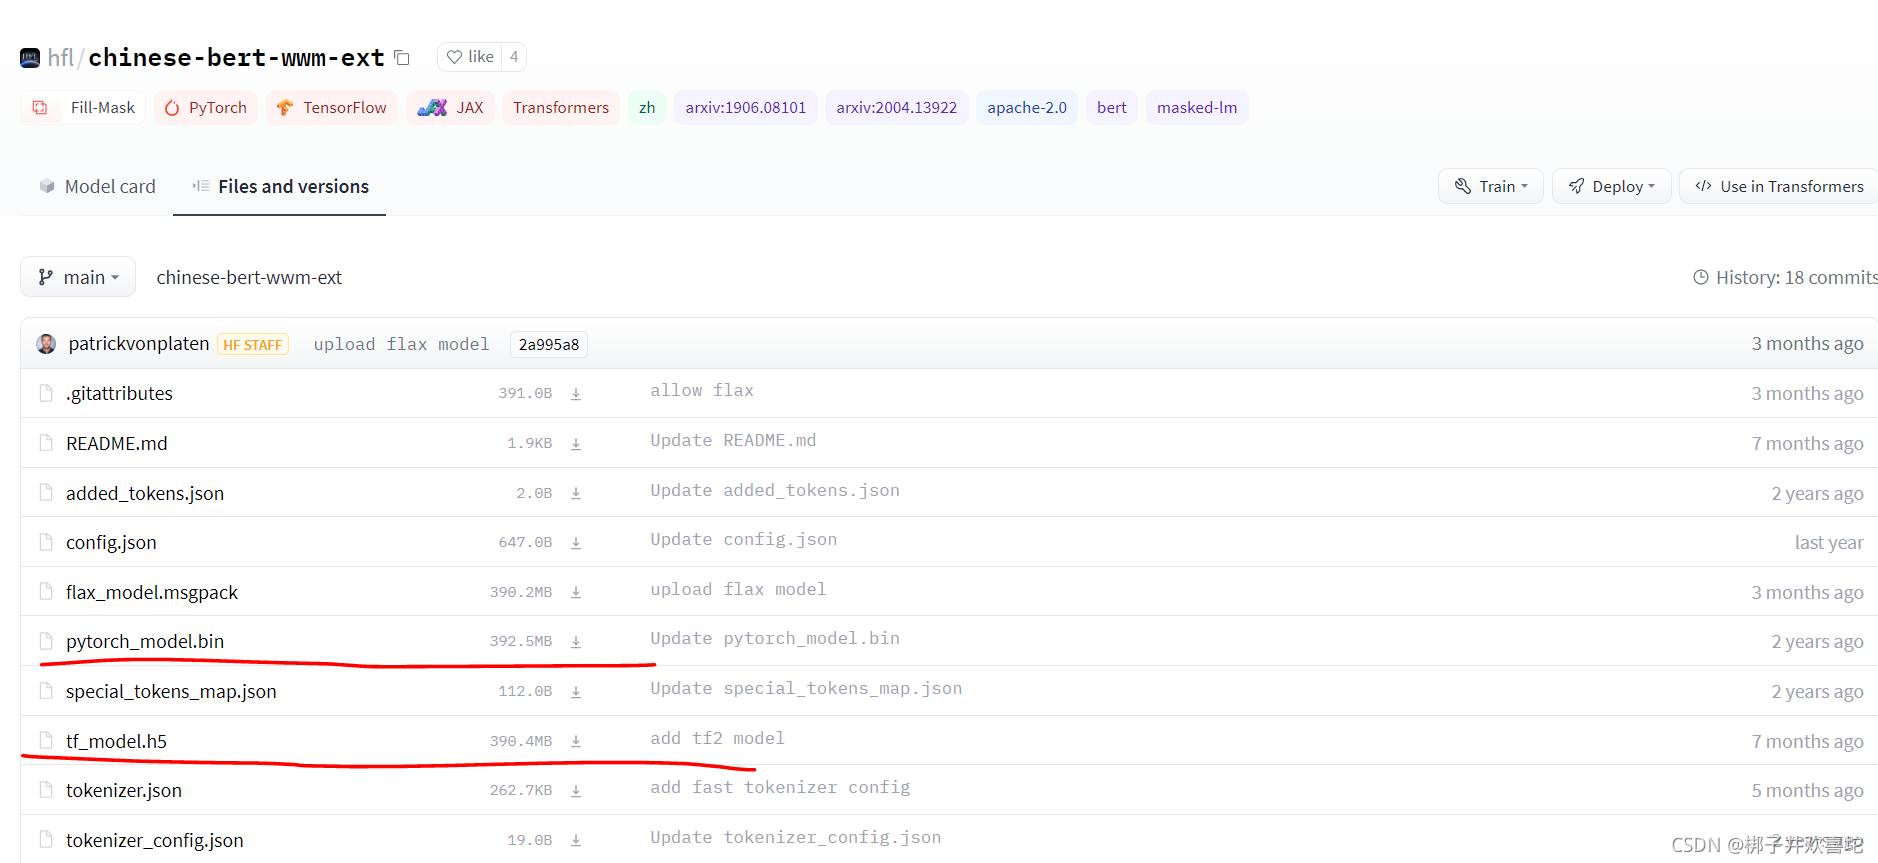
上面的代码在第一次调用时会自动下载预训练模型,下面介绍一下怎么自己下载预训练模型。
(1)打开模型的网页,点击Use in Transformers
(2)使用git命令clone模型
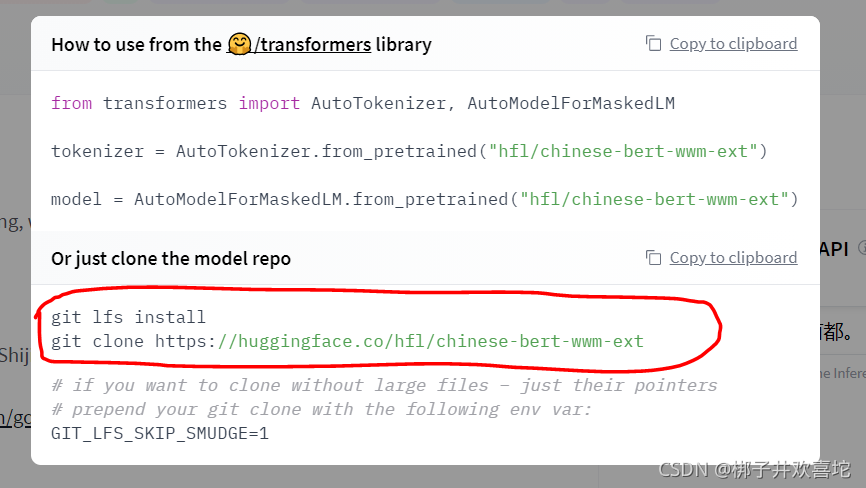
这样操作会下载所有的相关模型,你也可以点击Files and versions,手动下载Pytorch or Tensorflow版本的模型。
| 模型 | medium基础上在valid集上的准确率 |
|---|---|
| hfl/chinese-bert-wwm-ext | 0.760 |
| bert-base-chinese | 0.772 |
| luhua/chinese_pretrain_mrc_roberta_wwm_ext_large | 0.775 |
实际使用的预训练模型是luhua/chinese_pretrain_mrc_roberta_wwm_ext_large,模型见https://huggingface.co/luhua/chinese_pretrain_mrc_roberta_wwm_ext_large
性能上的提升不是特别显著。
4.5 改进训练集的预处理
4.2中,对于训练集文章的输入处理存在一定的问题,由于我们总是输入以答案为中心,长度为max_paragraph_len的一段原文,可能会让模型错误地学习到,答案总是在输入的窗口的中心位置。
这里我们简单的做一个打乱,在训练集输入时,让答案出现在一个max_paragraph_len长度的文本中的随机位置。
4.6 改进postprocessing
最后一个问题是,当我们预测的end_index < start_index时,会得不到答案。
但实际上,训练集和测试集中每个问题都是有答案的。
如何改进这个问题?
在评估函数中稍微做一些修改,只有在start_index <= end_index,且概率之和更大时,才更新我们的答案。
# Replace answer if calculated probability is larger than previous windows
if prob > max_prob and start_index <= end_index:
    max_prob = prob
    answer = tokenizer.decode(data[0][0][k][start_index : end_index + 1])

最终做了各种改进,但是在public数据集上的准确度还是没有达到strong的要求,可能代码还是存在各种各样的问题。


 1100
1100


 被折叠的 条评论
为什么被折叠?
被折叠的 条评论
为什么被折叠?
 到【灌水乐园】发言


