


欢迎学习yolo、ncnn系列相关文章,从训练、模型转换、精度分析,评估到部署Android端,推荐好资源:
一、YoloV5训练自己数据集并测试
二、ncnn编译和安装
三、onnx模型转ncnn模型并推理可执行程序(resnet18例子)
四、yolov5-6.0Pyotorch模型转onxx模型再转ncnn模型部署
五、训练自己YOLOv5模型转ncnn模型并部署到Android手机端

总结了快速上手Yolov5训练自己制作的数据集的方法,步骤都很详细,学者耐心看。
文章目录
一、准备好Yolov5框架
我提供了一个已经调试好的源码包,后面的教程也都是基于我自己提供的源码包讲解的,学习者自行下载,下载源码包的方法为:文章末扫码到公众号中回复关键字:目标检测YoloV5。获取下载链接。
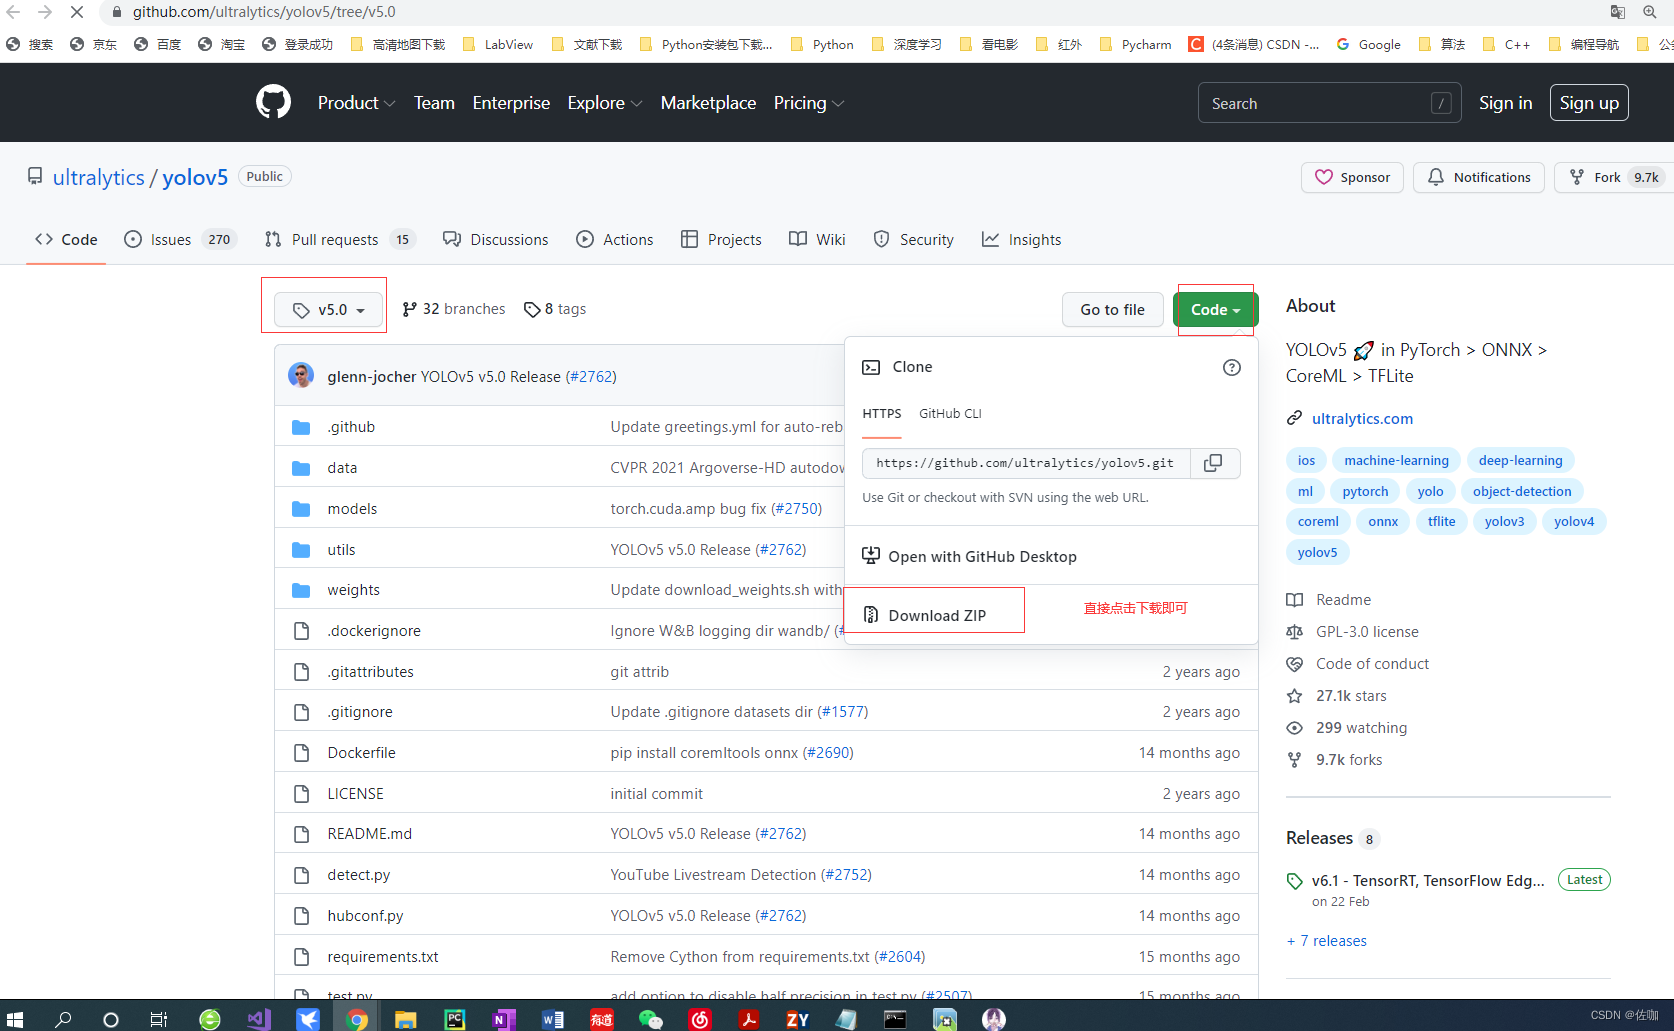
当然也可以下载官方给出最原始的Yolov5框架,在Github上下载,下载链接为:官网
打开链接后的样纸见下,下载5.0,对应的就是yolov5框架:
二、关于数据集的问题
Yolov5训练用的数据集格式是yolo格式,Yolov3训练用的数据集格式是VOC格式,这是两种训练模型使用数据集不同的地方,关于数据集格式的选择,我推荐VOC格式,在打标签的时候就直接制作为VOC数据集格式,后期可以用一段代码就直接将VOC数据集转换为yolo数据集,特别的方便,这样就可以打一次标签的数据集用在多种训练模型上,省事。
VOC数据集的制作详见我另外的一篇博客,里面我详细介绍了VOC数据集的制作,链接为:VOC数据集制作
三、VOC格式数据集转yolo格式数据集
VOC格式数据集转yolo格式数据集,还是采用Yolov3存放数据集的文件,将包含VOC数据集的文件直接复制到Yolov5的根目录下,运行下面代码就可以直接将VOC格式数据集转为yolo格式数据集,代码会自动的分出训练集,验证集,分配比例可以自定义设置。怎么复制文件?见下:
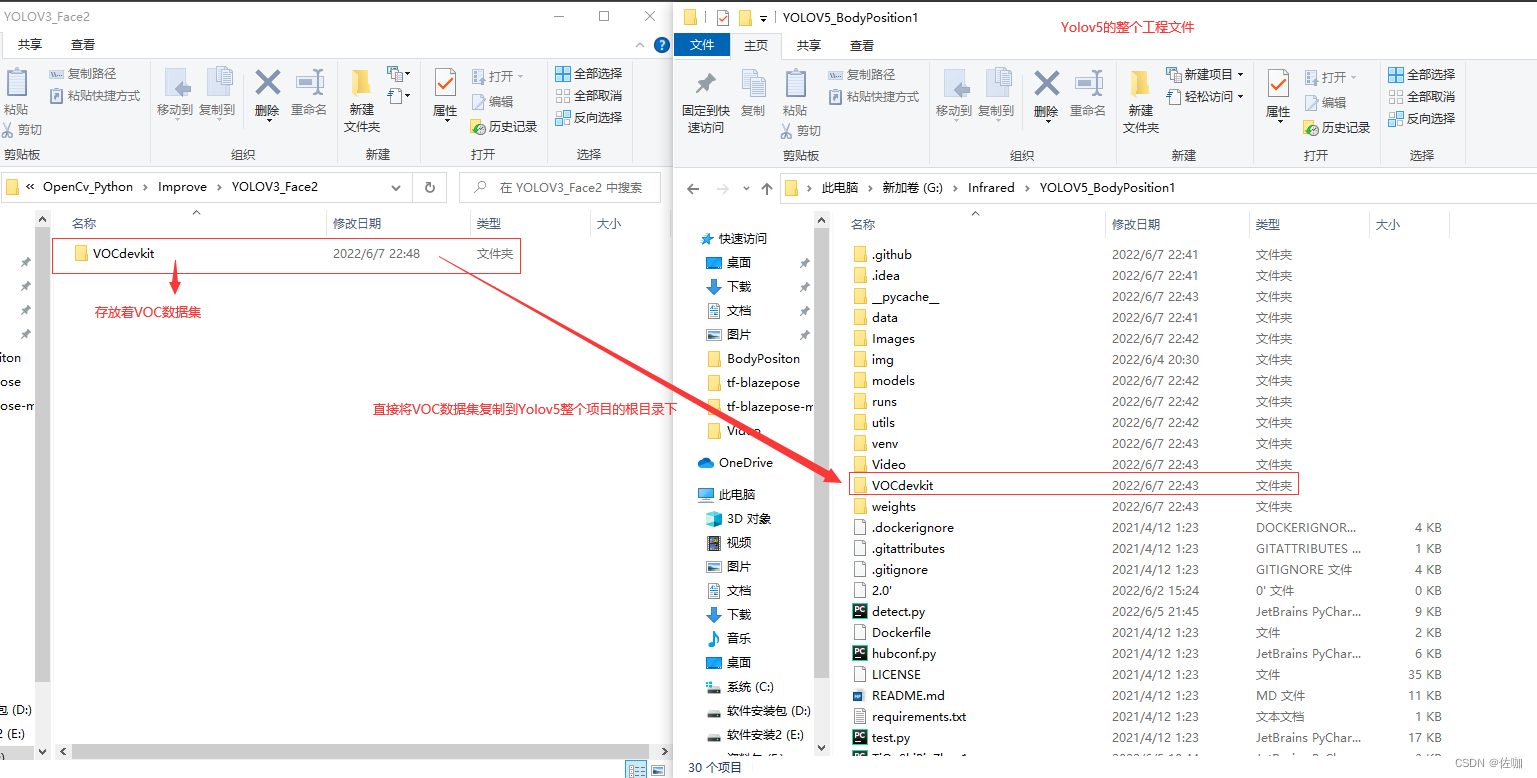
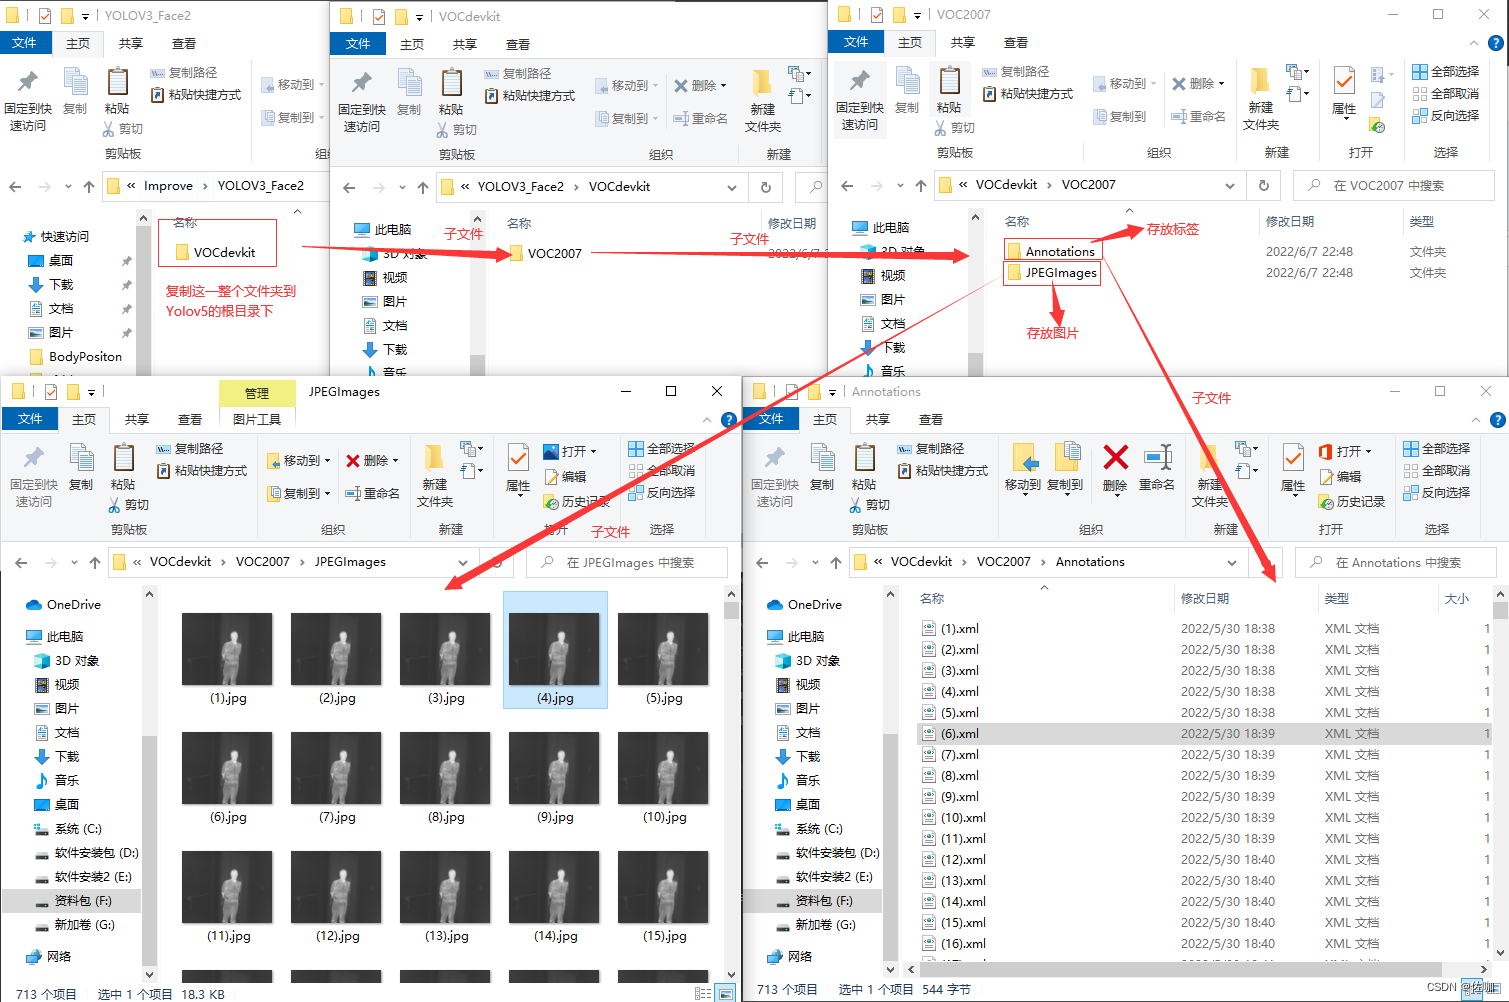
在文件VOCdevkit中包含的内容见下:
在Yolov5项目中直接运行以下代码,就可以将VOC格式数据集转为yolo格式数据集了,代码见下:
import xml.etree.ElementTree as ET
import pickle
import os
from os import listdir, getcwd
from os.path import join
import random
from shutil import copyfile

classes = ["Before a whole","After a whole","Chest former","Chest after","Raise hand before","Raise hand after","Global left position","Global right position","Front face","Left face","Right face"]        ##这里要写好标签对应的类
# classes=["ball"]

TRAIN_RATIO = 80     #表示将数据集划分为训练集和验证集,按照2:8比例来的


def clear_hidden_files(path):
    dir_list = os.listdir(path)
    for i in dir_list:
        abspath = os.path.join(os.path.abspath(path), i)
        if os.path.isfile(abspath):
            if i.startswith("._"):
                os.remove(abspath)
        else:
            clear_hidden_files(abspath)


def convert(size, box):
    dw = 1. / size[0]
    dh = 1. / size[1]
    x = (box[0] + box[1]) / 2.0
    y = (box[2] + box[3]) / 2.0
    w = box[1] - box[0]
    h = box[3] - box[2]
    x = x * dw
    w = w * dw
    y = y * dh
    h = h * dh
    return (x, y, w, h)


def convert_annotation(image_id):
    in_file = open('VOCdevkit/VOC2007/Annotations/%s.xml' % image_id)
    out_file = open('VOCdevkit/VOC2007/YOLOLabels/%s.txt' % image_id, 'w')
    tree = ET.parse(in_file)
    root = tree.getroot()
    size = root.find('size')
    w = int(size.find('width').text)
    h = int(size.find('height').text)

    for obj in root.iter('object'):
        difficult = obj.find('difficult').text
        cls = obj.find('name').text
        if cls not in classes or int(difficult) == 1:
            continue
        cls_id = classes.index(cls)
        xmlbox = obj.find('bndbox')
        b = (float(xmlbox.find('xmin').text), float(xmlbox.find('xmax').text), float(xmlbox.find('ymin').text),
             float(xmlbox.find('ymax').text))
        bb = convert((w, h), b)
        out_file.write(str(cls_id) + " " + " ".join([str(a) for a in bb]) + '\n')
    in_file.close()
    out_file.close()


wd = os.getcwd()
wd = os.getcwd()
data_base_dir = os.path.join(wd, "VOCdevkit/")
if not os.path.isdir(data_base_dir):
    os.mkdir(data_base_dir)
work_sapce_dir = os.path.join(data_base_dir, "VOC2007/")
if not os.path.isdir(work_sapce_dir):
    os.mkdir(work_sapce_dir)
annotation_dir = os.path.join(work_sapce_dir, "Annotations/")
if not os.path.isdir(annotation_dir):
    os.mkdir(annotation_dir)
clear_hidden_files(annotation_dir)
image_dir = os.path.join(work_sapce_dir, "JPEGImages/")
if not os.path.isdir(image_dir):
    os.mkdir(image_dir)
clear_hidden_files(image_dir)
yolo_labels_dir = os.path.join(work_sapce_dir, "YOLOLabels/")
if not os.path.isdir(yolo_labels_dir):
    os.mkdir(yolo_labels_dir)
clear_hidden_files(yolo_labels_dir)
yolov5_images_dir = os.path.join(data_base_dir, "images/")
if not os.path.isdir(yolov5_images_dir):
    os.mkdir(yolov5_images_dir)
clear_hidden_files(yolov5_images_dir)
yolov5_labels_dir = os.path.join(data_base_dir, "labels/")
if not os.path.isdir(yolov5_labels_dir):
    os.mkdir(yolov5_labels_dir)
clear_hidden_files(yolov5_labels_dir)
yolov5_images_train_dir = os.path.join(yolov5_images_dir, "train/")
if not os.path.isdir(yolov5_images_train_dir):
    os.mkdir(yolov5_images_train_dir)
clear_hidden_files(yolov5_images_train_dir)
yolov5_images_test_dir = os.path.join(yolov5_images_dir, "val/")
if not os.path.isdir(yolov5_images_test_dir):
    os.mkdir(yolov5_images_test_dir)
clear_hidden_files(yolov5_images_test_dir)
yolov5_labels_train_dir = os.path.join(yolov5_labels_dir, "train/")
if not os.path.isdir(yolov5_labels_train_dir):
    os.mkdir(yolov5_labels_train_dir)
clear_hidden_files(yolov5_labels_train_dir)
yolov5_labels_test_dir = os.path.join(yolov5_labels_dir, "val/")
if not os.path.isdir(yolov5_labels_test_dir):
    os.mkdir(yolov5_labels_test_dir)
clear_hidden_files(yolov5_labels_test_dir)

train_file = open(os.path.join(wd, "yolov5_train.txt"), 'w')
test_file = open(os.path.join(wd, "yolov5_val.txt"), 'w')
train_file.close()
test_file.close()
train_file = open(os.path.join(wd, "yolov5_train.txt"), 'a')
test_file = open(os.path.join(wd, "yolov5_val.txt"), 'a')
list_imgs = os.listdir(image_dir)  # list image files
prob = random.randint(1, 100)
print("Probability: %d" % prob)
for i in range(0, len(list_imgs)):
    path = os.path.join(image_dir, list_imgs[i])
    if os.path.isfile(path):
        image_path = image_dir + list_imgs[i]
        voc_path = list_imgs[i]
        (nameWithoutExtention, extention) = os.path.splitext(os.path.basename(image_path))
        (voc_nameWithoutExtention, voc_extention) = os.path.splitext(os.path.basename(voc_path))
        annotation_name = nameWithoutExtention + '.xml'
        annotation_path = os.path.join(annotation_dir, annotation_name)
        label_name = nameWithoutExtention + '.txt'
        label_path = os.path.join(yolo_labels_dir, label_name)
    prob = random.randint(1, 100)
    print("Probability: %d" % prob)
    if (prob < TRAIN_RATIO):  # train dataset
        if os.path.exists(annotation_path):
            train_file.write(image_path + '\n')
            convert_annotation(nameWithoutExtention)  # convert label
            copyfile(image_path, yolov5_images_train_dir + voc_path)
            copyfile(label_path, yolov5_labels_train_dir + label_name)
    else:  # test dataset
        if os.path.exists(annotation_path):
            test_file.write(image_path + '\n')
            convert_annotation(nameWithoutExtention)  # convert label
            copyfile(image_path, yolov5_images_test_dir + voc_path)
            copyfile(label_path, yolov5_labels_test_dir + label_name)
train_file.close()
test_file.close()
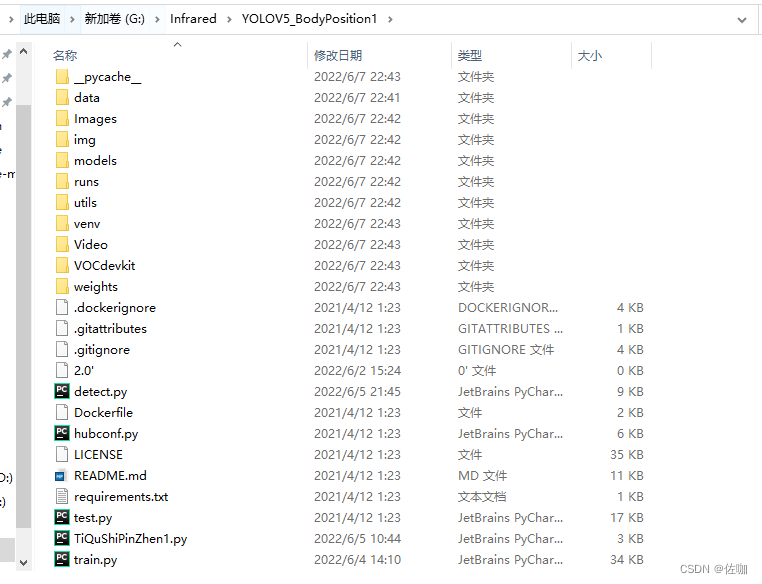
运行上面代码后,新转换得到的yolo数据集见下:
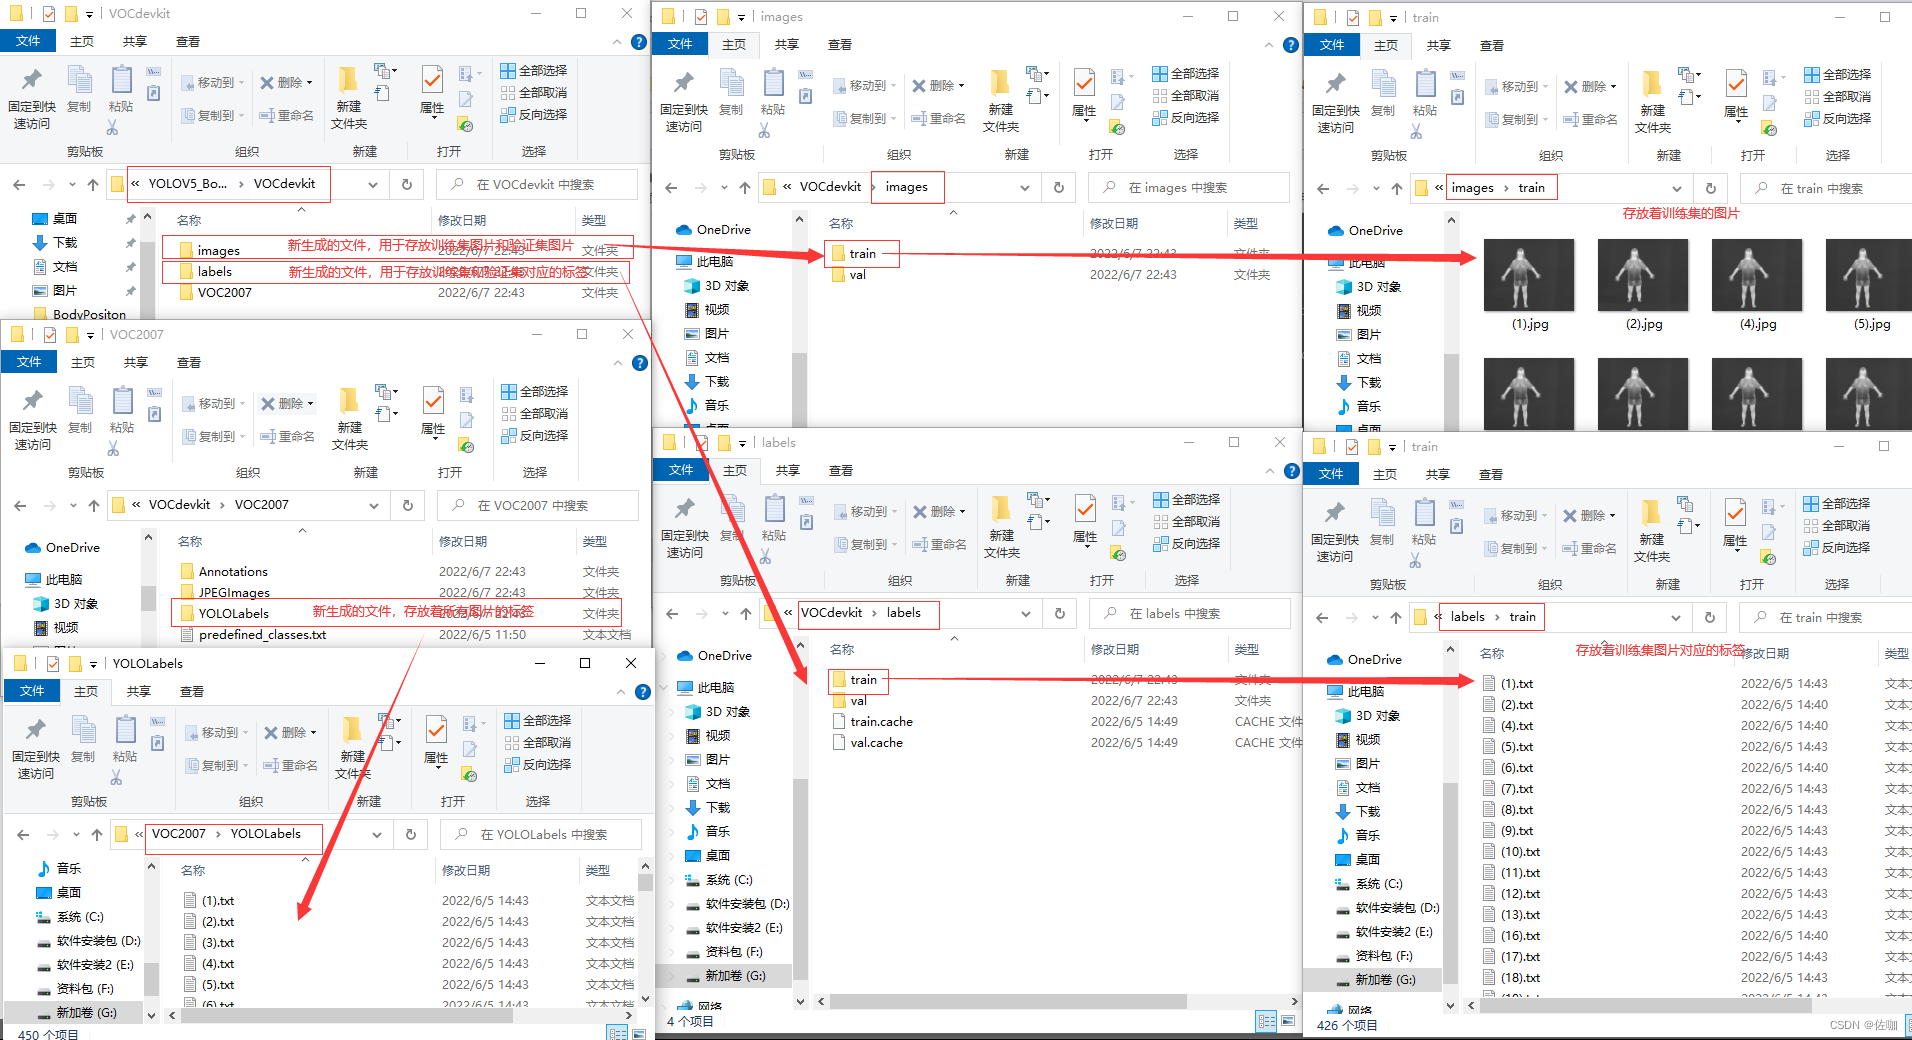
上图中,我已经标明了哪个文件中存放训练用的数据集,验证集和哪个文件存放标签等的对应文件位置。
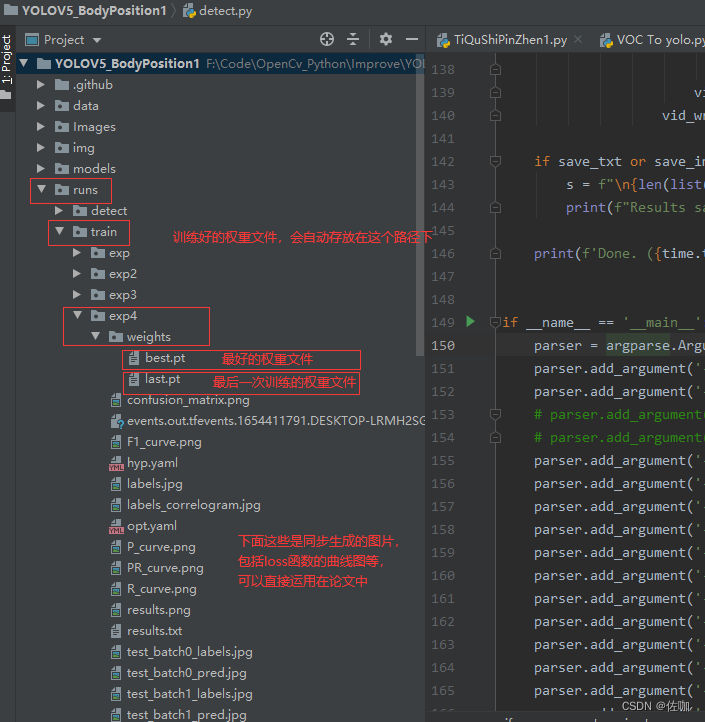
四、训练模型
数据集制作好后就可以开始训练我们自己的模型了,这里我提供一个我自己已经调试通的源码包,建议学习者下载后按照我下面的步骤调试,训练成功的概率也较大些,我也是在官方的原始框架基础上进行改进后运行的,中间也有很多坑,这些坑在我代码中已经补好了,学习者可以放心下载使用,另外我的源码包中还提供了数据集,学习者可以直接使用。
下载好解压后的文件夹样纸见下:
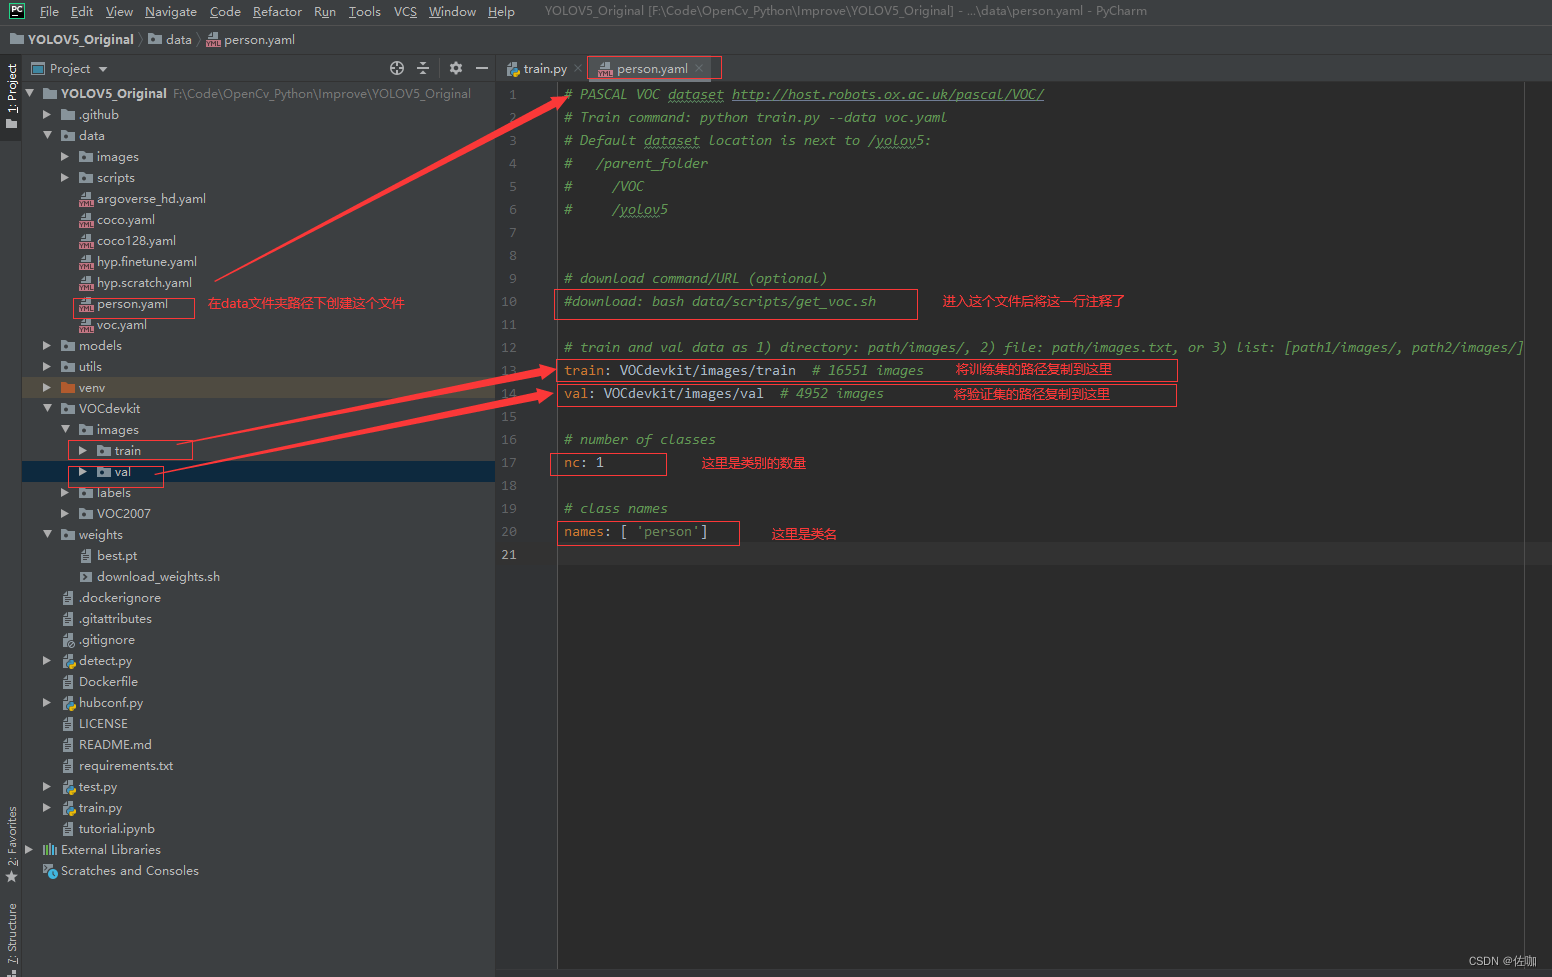
在正式开始训练前需要修改一些地方,见下:
(1)修改data里配置文件的参数:
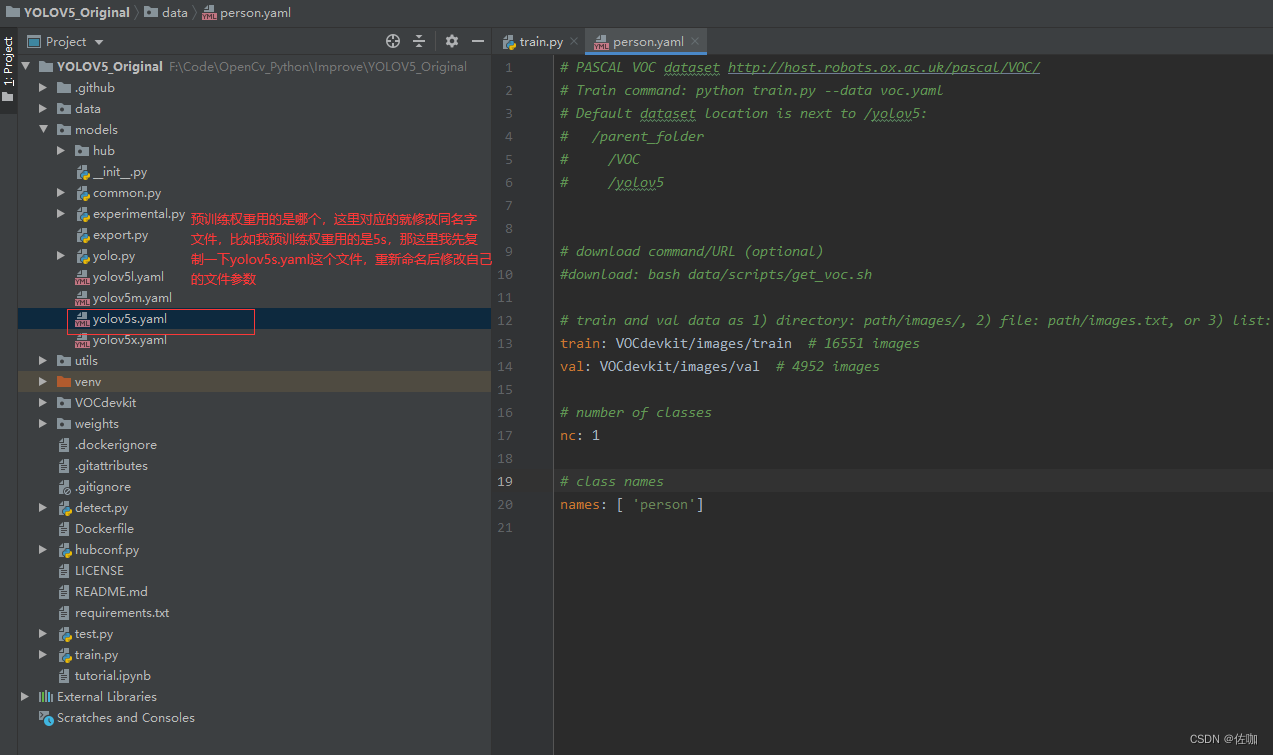
(2)修改models文件中的配置文件:

(3)配置文件修改好后,修改train.py文件中的参数:
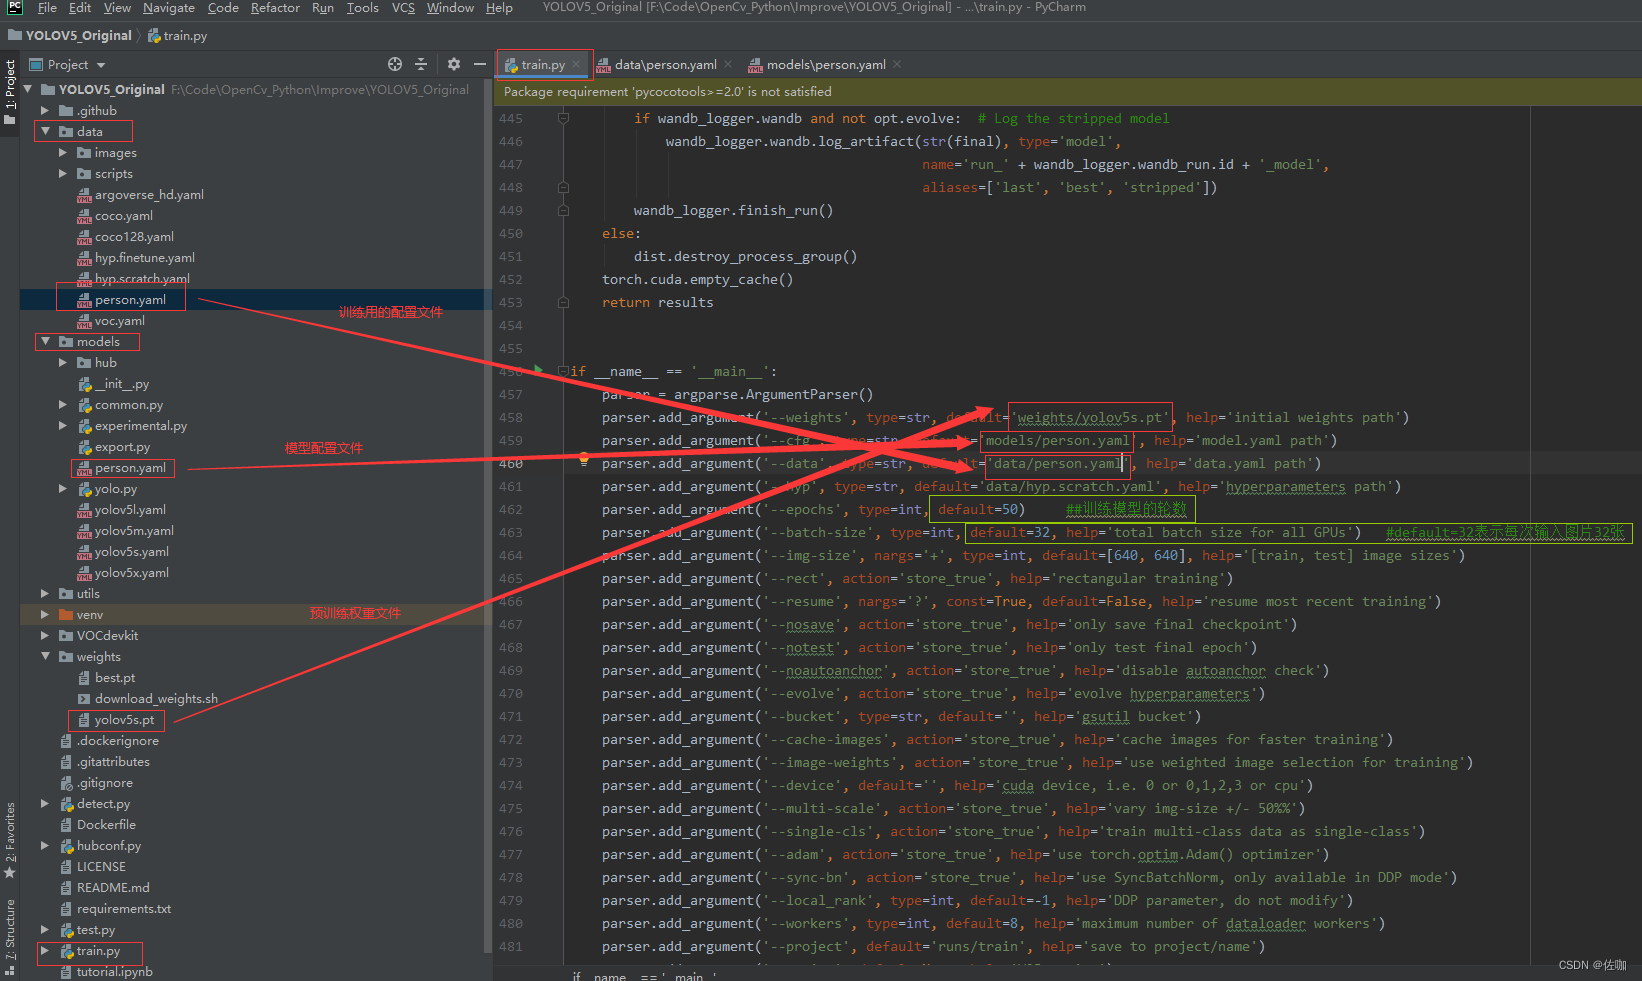
修改好以上参数后就可以直接运行train.py文件开始训练了。
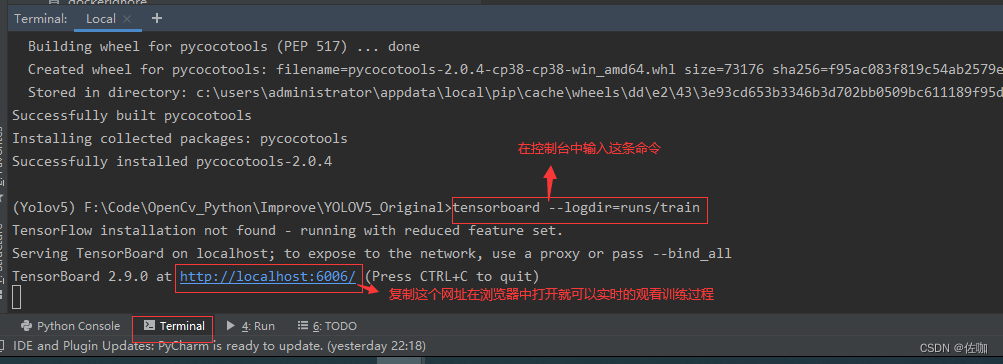
五、启用tensorboard查看训练过程的参数变化情况
在控制面板终端输入以下命令,运行后会生成一个网址,打开这个网址就可以实时查看训练过程的变化了,见下:
tensorboard --logdir=runs
如果打开网址的端口被占用了,也可以自定义端口号,输入以下命令:
tensorboard --logdir=runs --port==6007
打开生成网址后的样纸见下,从图中就可以看到每一轮训练过程的变化情况:

六、在训练时可能会遇到的问题
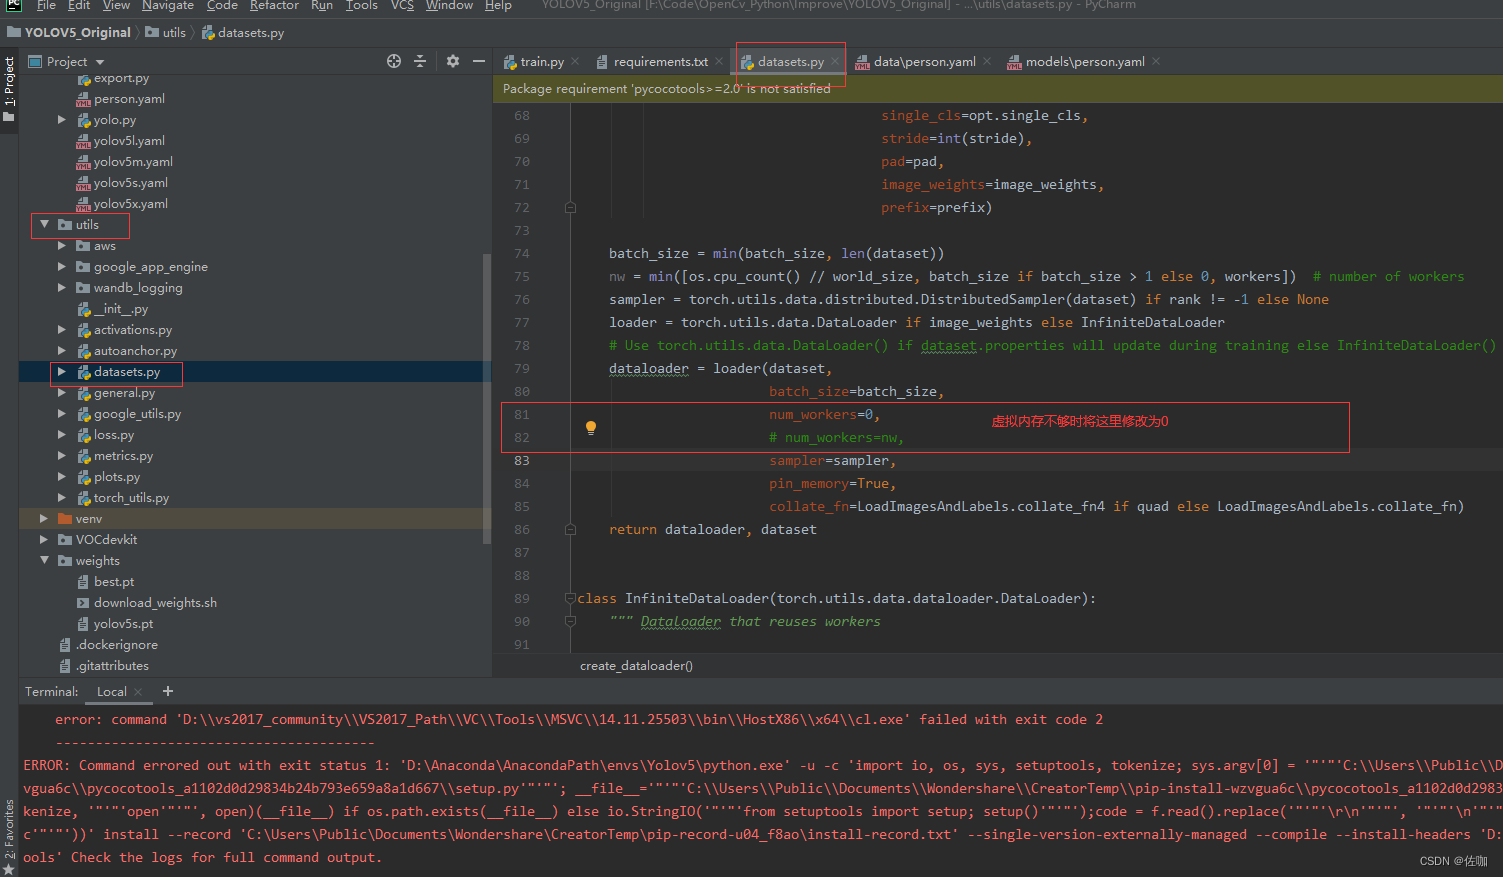
6.1 虚拟内存不够
问题1:虚拟内存不够,解决方法见下:
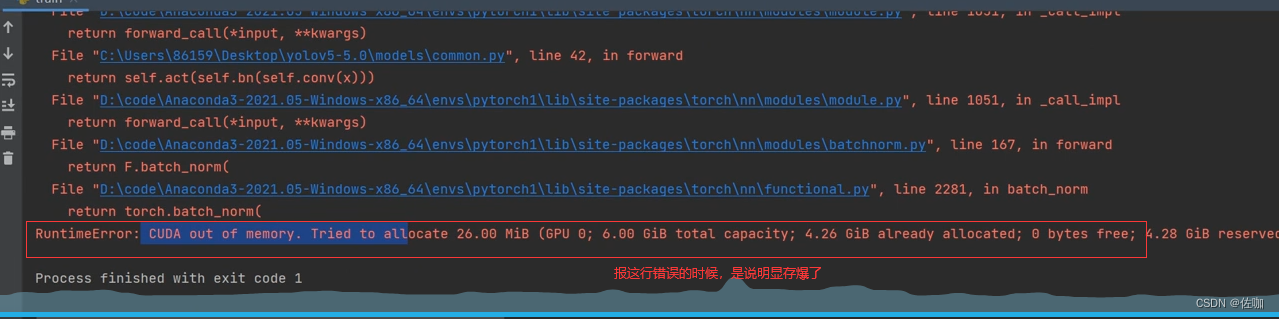
6.2 显存溢出
问题2:显存爆了(溢出了),解决办法修改batch-size,电脑配置一般的话就改小一些,见下:

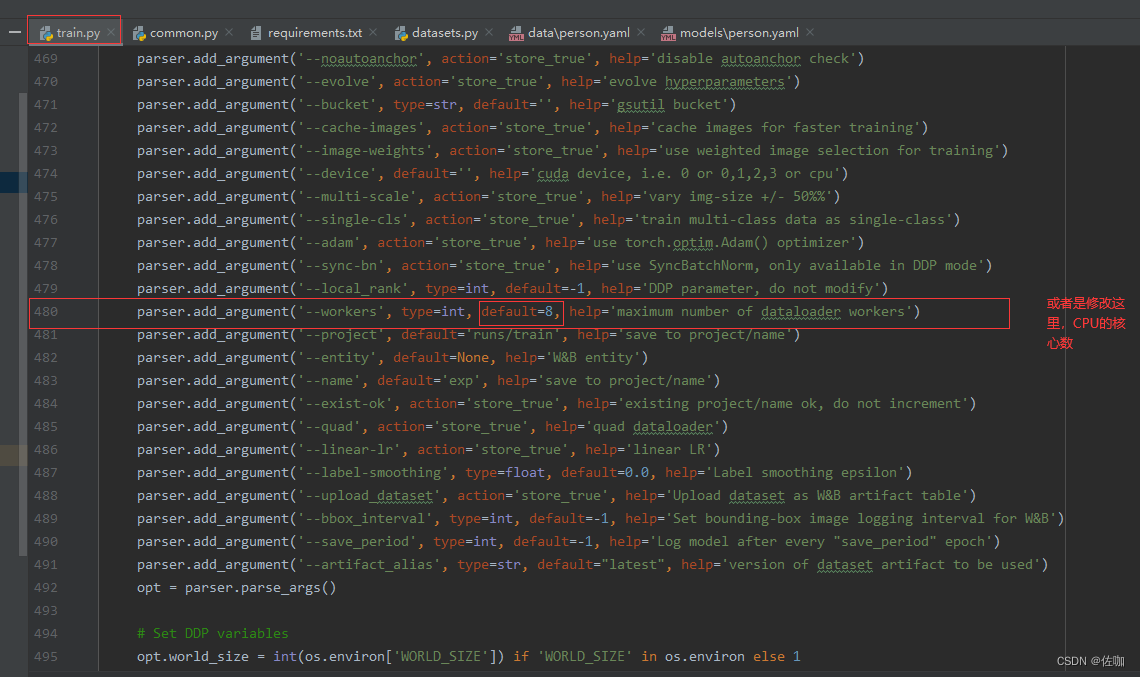
或者也可以通过下面的办法解决,修改CPU的核心数,配置高的话可以改高一点,训练的快,配置低的话改低一点就不会溢出了:
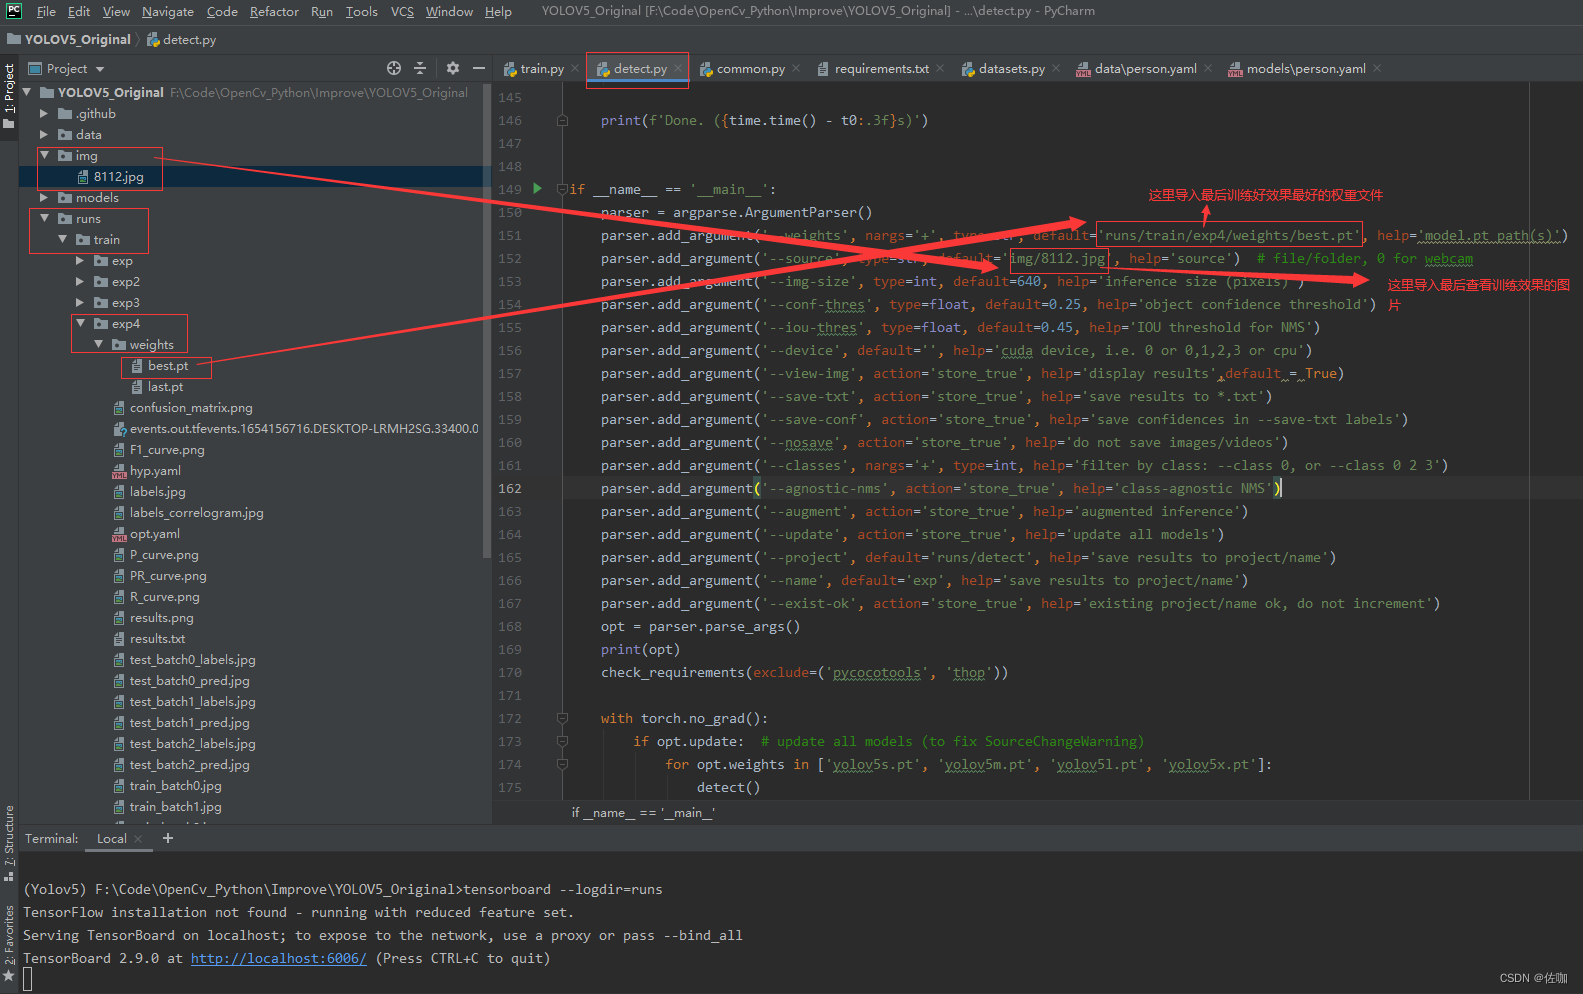
七、检测训练好的模型
训练完成后,用训练好的模型检测图片或视频。
7.1 图片检测
修改文件detect.py中的一些参数,见下:
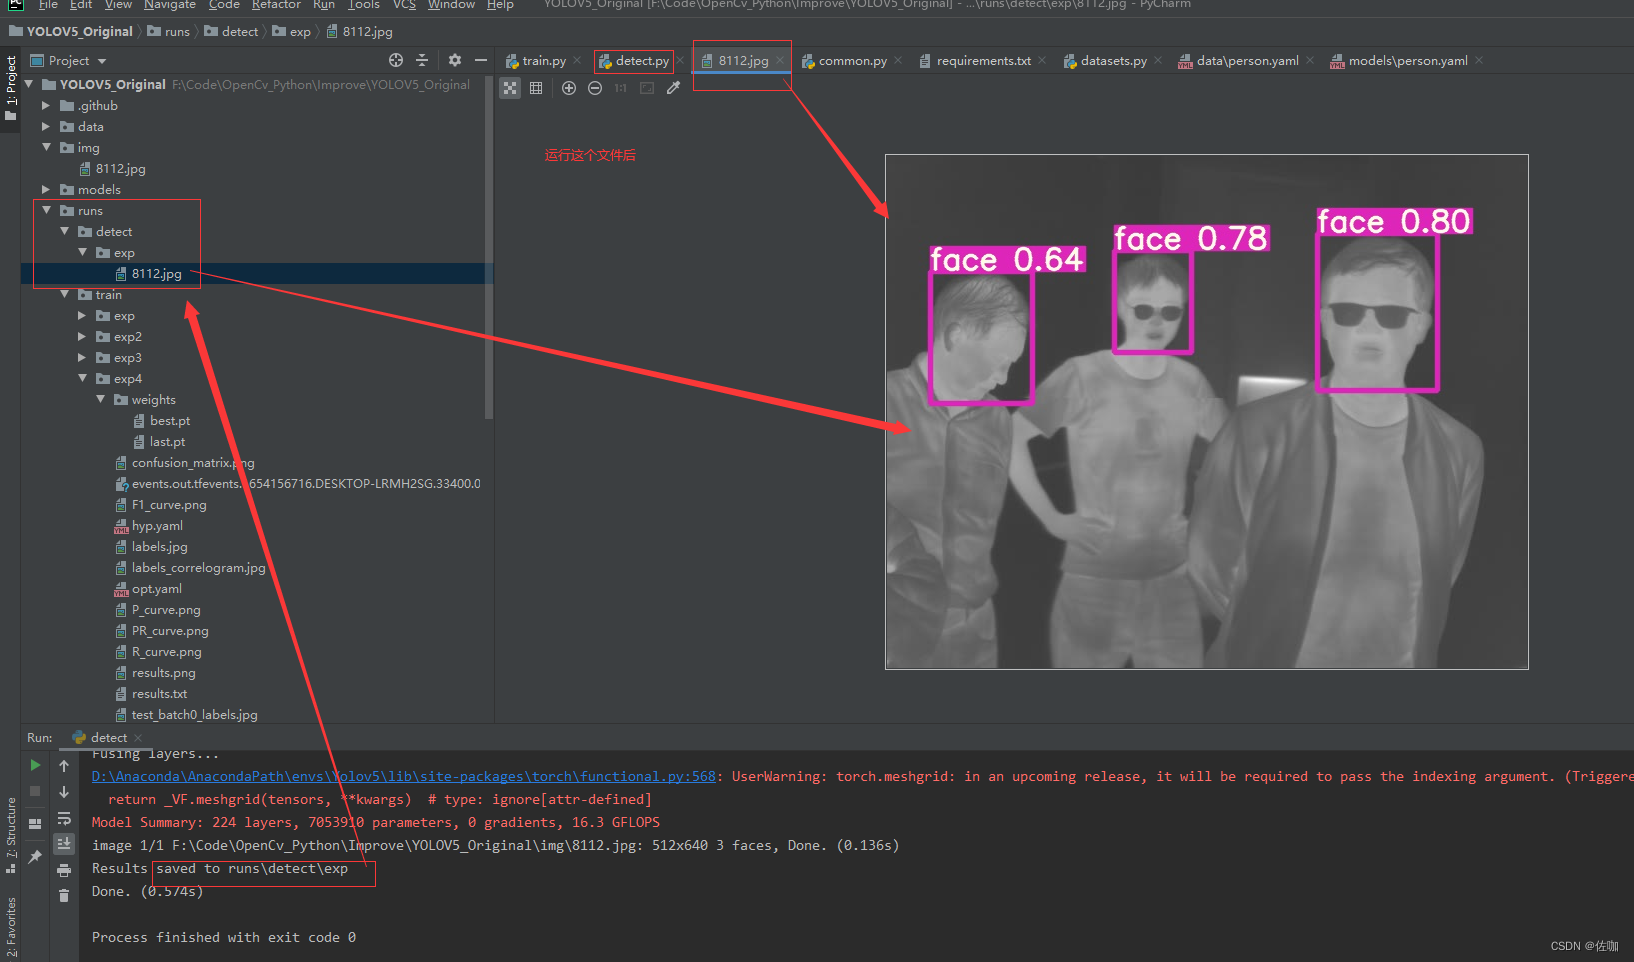
运行上面修改后的detect.py文件,检测好后会将检测结果存放到runs–>detect–>exp路径下,到这个路径下查看训练好的模型检测的检测结果,如下:
7.2 视频实时检测
需要修改的参数见下:
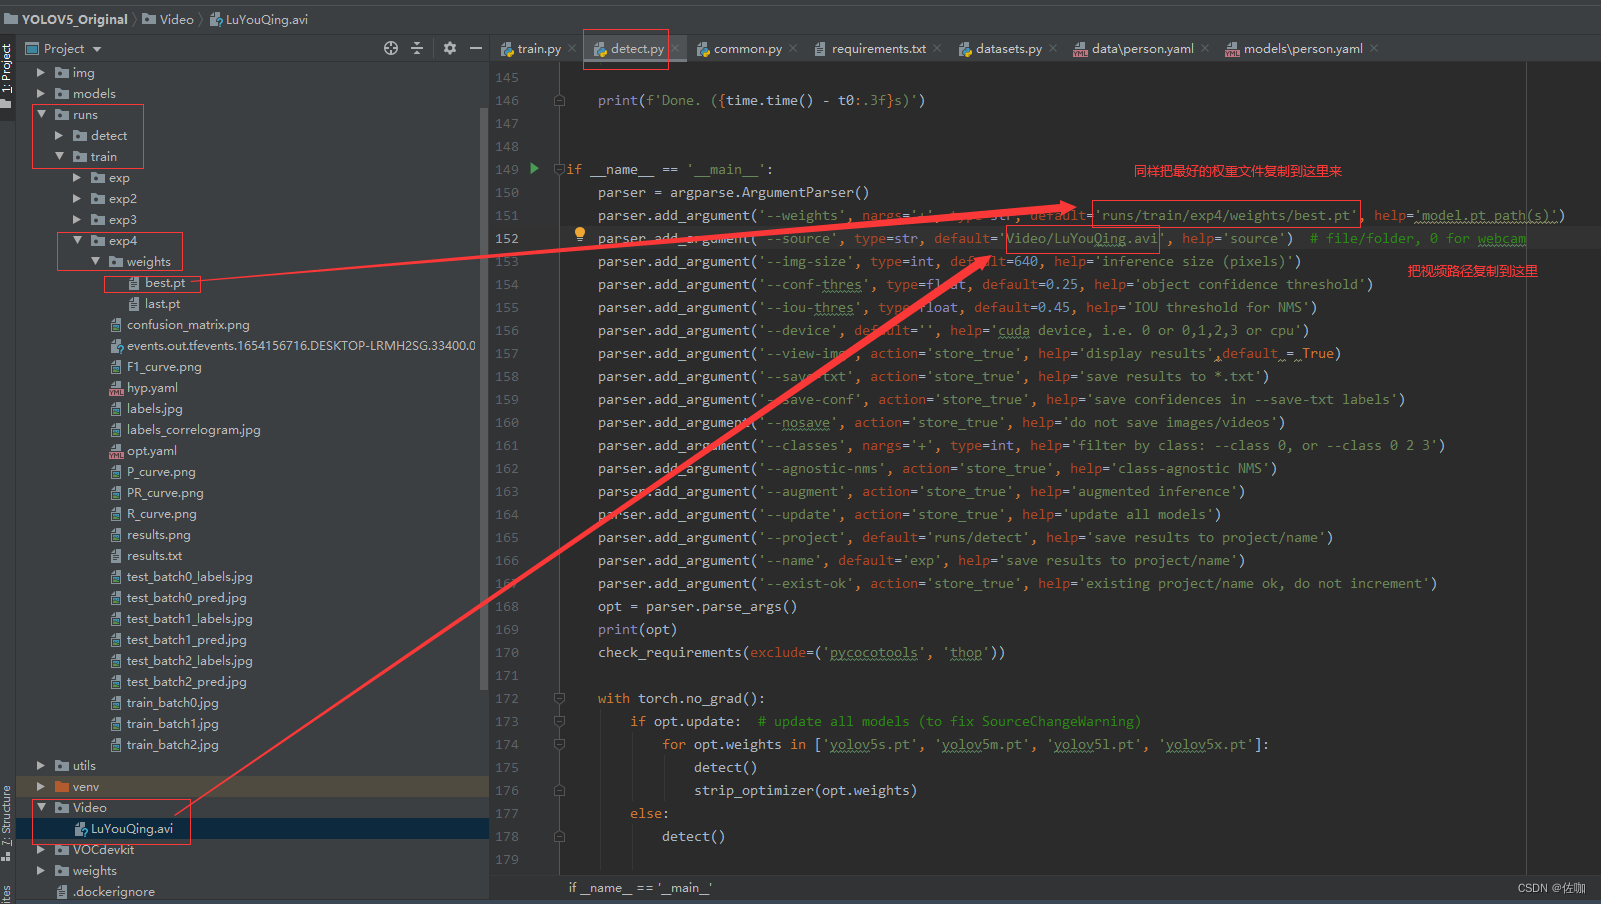
检测结果同样会存在路径runs–>detect–>exp下,按照提示去查看即可。
7.2.1 电脑摄像头报错问题
补:在调用电脑自带摄像头时可能会报一个错误,见下:
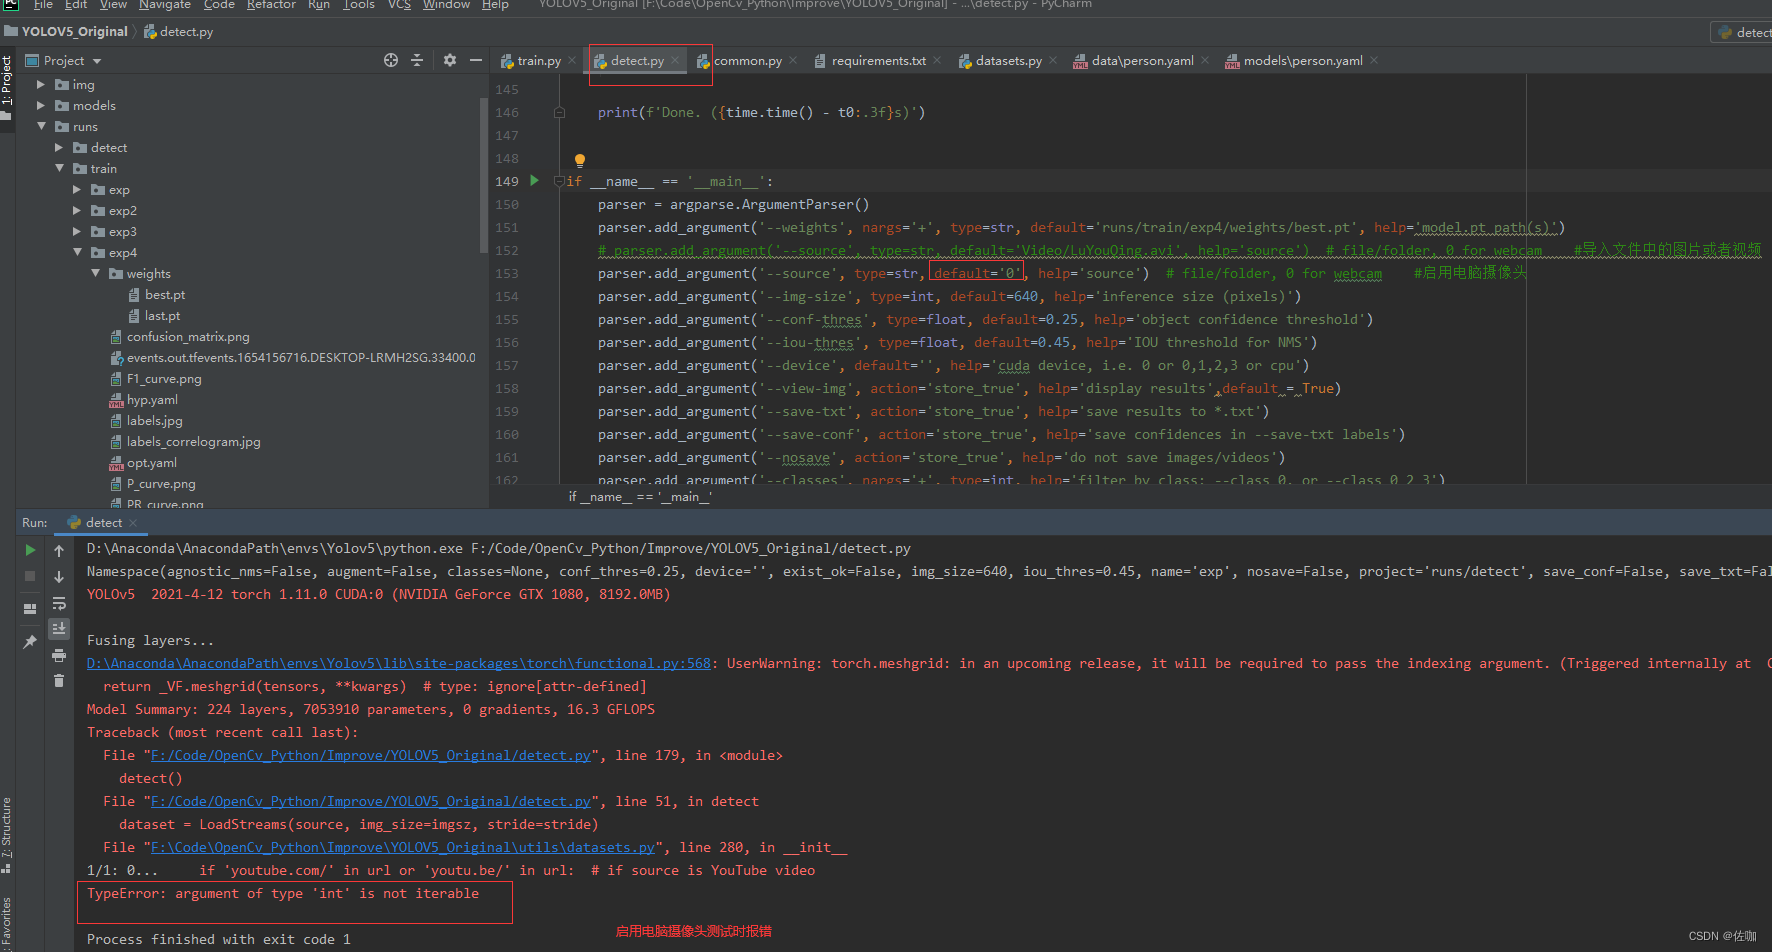
解决方法,修改utils中文件datasets.py文件中280行代码,见下:
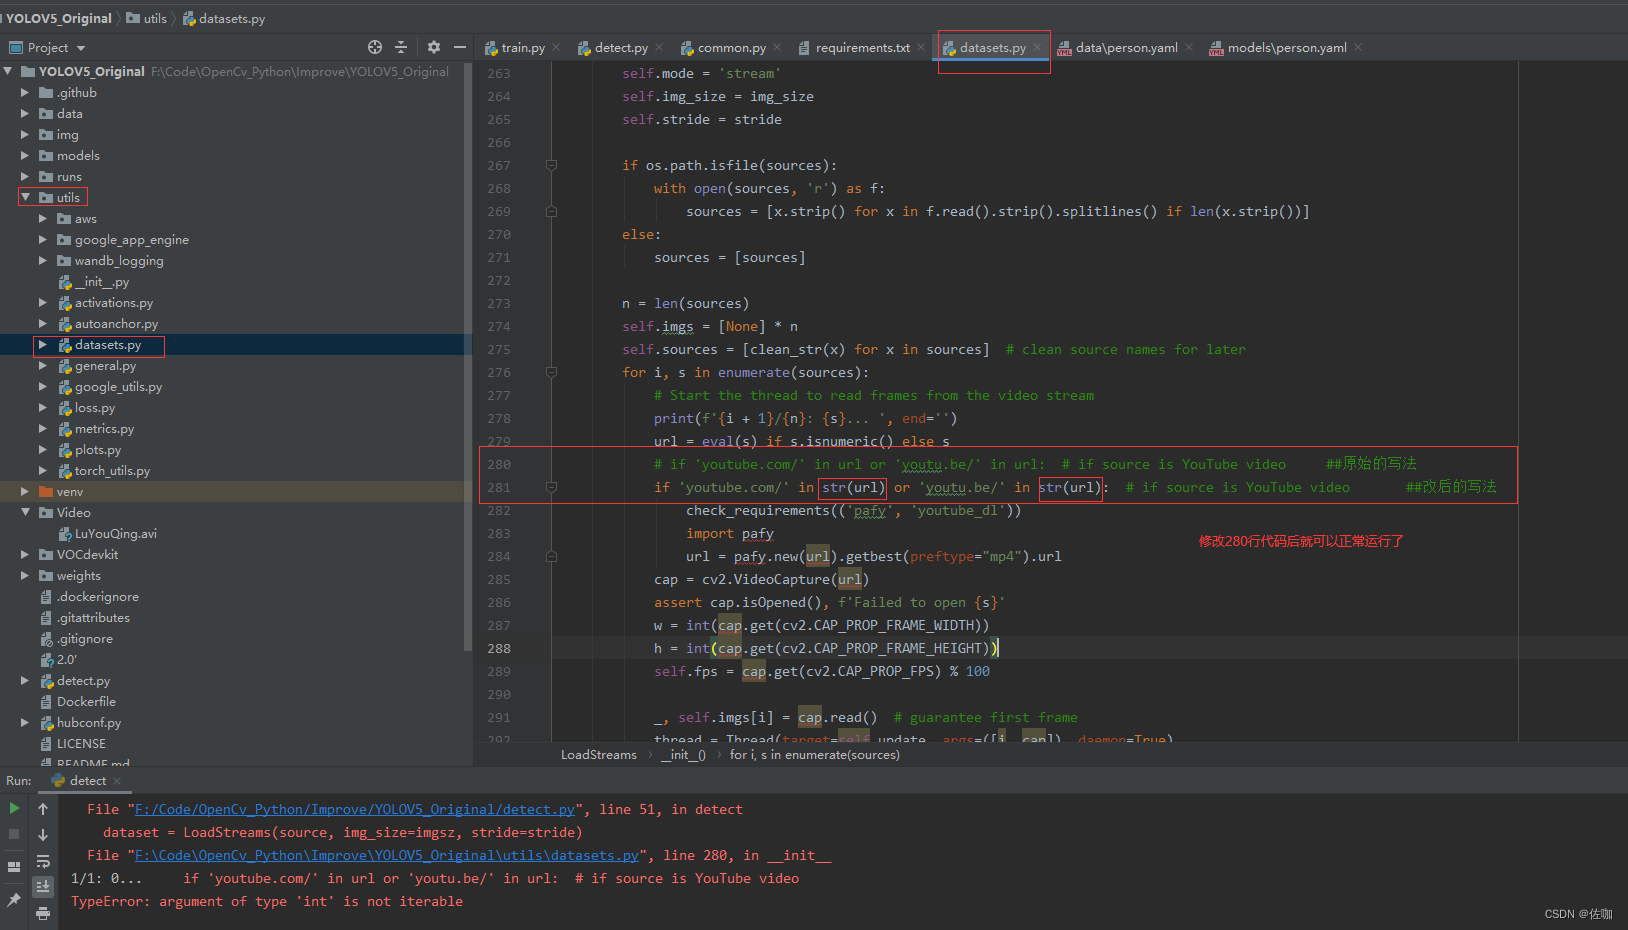
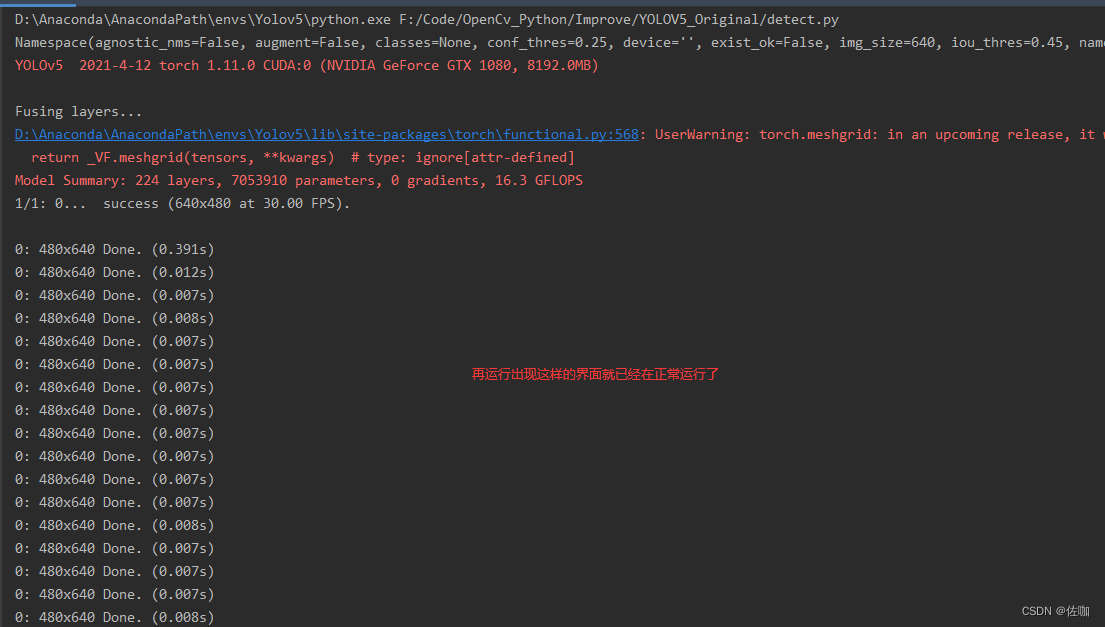
修改好后再运行代码,就可以正常调用电脑自带摄像头检测了,如下:
八、总结
以上就是使用Yolov5训练自己制作的数据集快速上手的方法,提前准备好数据集,只需要修改源码包中的几个文件参数就可以训练使用了。
想学习YoloV3的,可以看另外一篇博文:YoloV3。
总结不易,多多支持,谢谢!


 1886
1886


 被折叠的 条评论
为什么被折叠?
被折叠的 条评论
为什么被折叠?
 到【灌水乐园】发言


