


姿态估计获取的关键点详解:YOLOv8-pose(1)- 关键点检测数据集格式详解+快速训练+预测结果详解
前言
对姿态估计获取的关键点(不限于YOLOv8)进行可视化和使用(包括用于网络训练等)。
绘制效果举例(由于gif限制在5MB,压缩导致模糊):
上左:原始图像检测框+关键点连线;上右:上左去除背景。
下左:根据关键点优化的绘图效果;下右:仅需最重要的几个关键点可以表示动作。

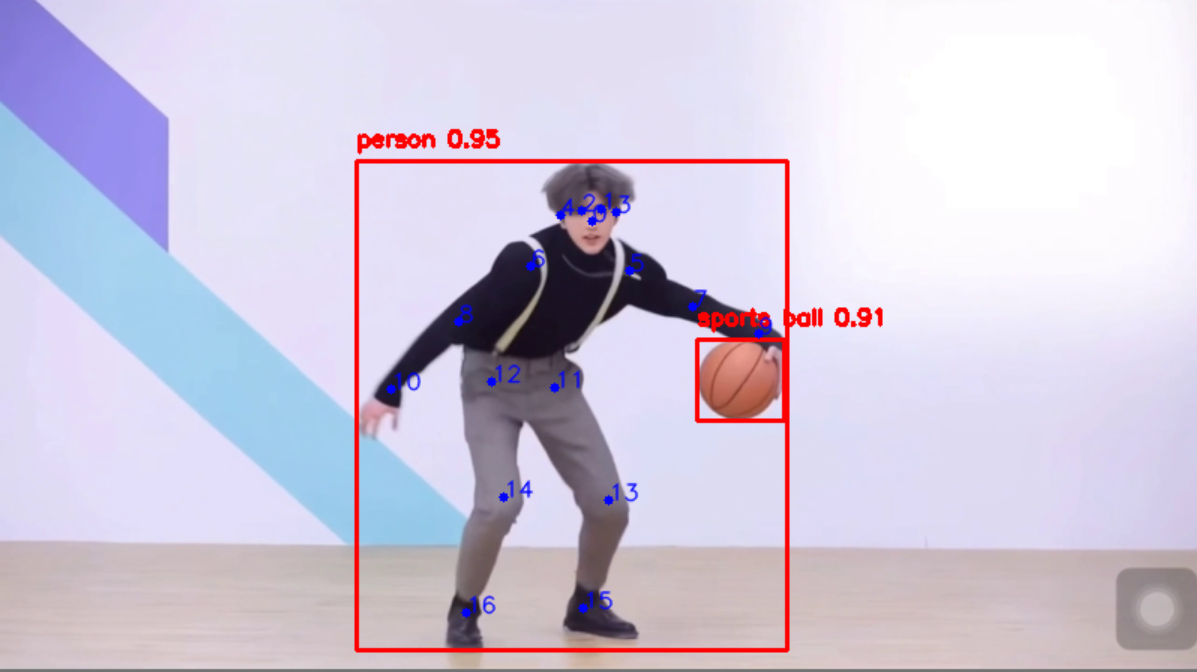
1.关键点序号
COCO_keypoint_indexes = {
    0: 'nose',
    1: 'left_eye',
    2: 'right_eye',
    3: 'left_ear',
    4: 'right_ear',
    5: 'left_shoulder',
    6: 'right_shoulder',
    7: 'left_elbow',
    8: 'right_elbow',
    9: 'left_wrist',
    10: 'right_wrist',
    11: 'left_hip',
    12: 'right_hip',
    13: 'left_knee',
    14: 'right_knee',
    15: 'left_ankle',
    16: 'right_ankle'
}
在图上显示:
2.连线绘制
有了关键点的序号,对一个bach中,可以获取到第 i 张图片的第 j 个目标 的第 k 个点:det_res[i].keypoitns[j].xy[k]。然后对两个点,只需调用cv2.line,即可绘制出一条直线。对此可以将两两一组点组成一个元组,所有需要绘制的元组保存为一个元组connections:
当connections=((9, 7), (7, 5), (5, 6), (6, 8), (8, 10)),绘制了手臂:

当connections=((2, 4), (1, 3), (10, 8), (8, 6), (6, 5), (5, 7), (7, 9), (6, 12), (12, 14), (14, 16), (5, 11), (11, 13), (13, 15)),绘制了身体骨架:

3.绘制代码
代码存放在:工程文件根目录/tests_det下:
绘制脚本文件 ikun_utils.py:
import os
import cv2
import numpy as np
from ultralytics.models.yolo.detect.predict import DetectionPredictor
from ultralytics.models.yolo.pose.predict import PosePredictor


def get_video(video_path, read_from_camera=False):
    # 获取视频流
    if read_from_camera:  # 使用摄像头获取视频
        v_cap = cv2.VideoCapture(0)
    else:
        assert os.path.isfile(video_path), "Video path in method get_video() is error. "
        v_cap = cv2.VideoCapture(video_path)

    return v_cap


def resize_and_pad(frame, target_size=(800, 800), pad_color=(114, 114, 114), is_pad=False):
    # 将画面调整到指定大小
    h, w, _ = frame.shape
    target_w, target_h = target_size

    # 计算缩放比例
    scale = min(target_w / w, target_h / h)
    new_w = int(w * scale)
    new_h = int(h * scale)

    # 缩放图像
    resized_frame = cv2.resize(frame, (new_w, new_h), interpolation=cv2.INTER_AREA)

    if is_pad:
        padded_frame = np.full((target_h, target_w, 3), pad_color, dtype=np.uint8)  # 创建填充后的图像

        # 计算填充位置
        top = (target_h - new_h) // 2
        bottom = top + new_h
        left = (target_w - new_w) // 2
        right = left + new_w

        # 将缩放后的图像放置在填充后的图像上
        padded_frame[top:bottom, left:right] = resized_frame

        return padded_frame

    return resized_frame


def plot_bbox(image, det_res, color=(0, 0, 255), offset=(0, 0)):
    # 根据检测结果绘制图像
    for i, bbox in enumerate(det_res.boxes.xyxy):
        x1, y1, x2, y2 = list(map(int, bbox))
        conf = det_res.boxes.conf[i]
        cls = det_res.boxes.cls[i]
        label = f'{det_res.names[int(cls)]} {float(conf):.2f}'

        # 绘制边界框和标签
        cv2.rectangle(image, (x1 + offset[0], y1 + offset[1]), (x2 + offset[0], y2 + offset[1]), color, 2)
        cv2.putText(image, label, (x1 + offset[0], y1 + offset[1] - 10), cv2.FONT_HERSHEY_SIMPLEX, 0.5, color, 2)

    return image


_connections = ((2, 4), (1, 3), (10, 8), (8, 6), (6, 5), (5, 7), (7, 9), (6, 12), (12, 14), (14, 16), (5, 11), (11, 13),
                (13, 15))


def plot_keypoints(image, keypoints, connections=_connections, line_color=(60, 179, 113), point_color=(255, 0, 0),
                   offset=(0, 0), show_idx=False):
    if keypoints is not None:
        for data in keypoints.xy:
            if len(data) == 0:
                continue

            if connections is not None:
                for start_idx, end_idx in connections:
                    sta_point = data[start_idx]
                    end_point = data[end_idx]
                    if (sta_point[0] > 0 or sta_point[1] > 0) and (end_point[0] > 0 and end_point[1] > 0):  # 忽略无效点
                        cv2.line(image, (int(sta_point[0] + offset[0]), int(sta_point[1] + offset[1])),
                                 (int(end_point[0] + offset[0]), int(end_point[1] + offset[1])), line_color, 2)

            for idx, point in enumerate(data):
                x, y = point[:2]
                if x > 0 or y > 0:  # 忽略无效点
                    cv2.circle(image, (int(x + offset[0]), int(y + offset[1])), 5, point_color, -1)

                    if show_idx:
                        cv2.putText(image, str(idx), (int(x + offset[0]), int(y + offset[1])),
                                    cv2.FONT_HERSHEY_SIMPLEX, 0.5, point_color, 1, cv2.LINE_AA)

    return image


def move_point_to_circle(x1, y1, x2, y2, xc, yc, r):
    if not (x1 > 0 and y1 > 0 and x2 > 0 and y2 > 0):
        return 0, 0

    x1, y1, x2, y2 = list(map(int, [x1, y1, x2, y2]))

    y1_r = int(abs(yc - np.sqrt(abs((r - x1 + xc) * (-r - x1 + xc)))))
    y2_r = int(abs(y2 - 0.1 * abs(yc - y1_r)))

    return y1_r, y2_r


def plot_polish_keypoint(image, det_res, keypoints):
    for i, bbox in enumerate(det_res.boxes.xywh):
        if det_res.boxes.cls[i] == 0:
            continue

        xc, yc = list(map(int, bbox[:2]))
        cv2.circle(image, (xc, yc), 15, (20, 105, 210), 30)

    if keypoints is not None:
        for data in keypoints.xy:
            if len(data) == 0:
                continue

            hand = ((10, 8), (8, 6), (6, 5), (5, 7), (7, 9))
            leg = ((16, 14), (14, 12), (12, 11), (11, 13), (13, 15))

            for start_idx, end_idx in hand:
                sta_point = data[start_idx]
                end_point = data[end_idx]
                if (sta_point[0] > 0 or sta_point[1] > 0) and (end_point[0] > 0 and end_point[1] > 0):  # 忽略无效点
                    cv2.line(image, (int(sta_point[0]), int(sta_point[1])),
                             (int(end_point[0]), int(end_point[1])), (10, 10, 10), 5)

            for start_idx, end_idx in leg:
                sta_point = data[start_idx]
                end_point = data[end_idx]
                if (sta_point[0] > 0 or sta_point[1] > 0) and (end_point[0] > 0 and end_point[1] > 0):  # 忽略无效点
                    cv2.line(image, (int(sta_point[0]), int(sta_point[1])),
                             (int(end_point[0]), int(end_point[1])), (200, 200, 200), 5)

            x6_0, x5_0, x12_0, x11_0 = int(data[6][0]), int(data[5][0]), int(data[12][0]), int(data[11][0])
            x6_1, x5_1, x12_1, x11_1 = int(data[6][1]), int(data[5][1]), int(data[12][1]), int(data[11][1])

            if 0 < x6_0 < x5_0 and 0 < x12_0 < x11_0:
                pts = np.array([[x6_0, x6_1], [x5_0, x5_1], [x11_0, x11_1], [x12_0, x12_1]])
                pts = pts.reshape((-1, 1, 2))
                cv2.fillPoly(image, [pts], (30, 30, 30))

                ra = 0.8
                x1, x2 = int(ra * x6_0 + (1 - ra) * x5_0), int(ra * x12_0 + (1 - ra) * x11_0)
                x3, x4 = int((1 - ra) * x6_0 + ra * x5_0), int((1 - ra) * x12_0 + ra * x11_0)
                y1, y2 = int(ra * x6_1 + (1 - ra) * x5_1), int(ra * x12_1 + (1 - ra) * x11_1)
                y3, y4 = int((1 - ra) * x6_1 + ra * x5_1), int((1 - ra) * x12_1 + ra * x11_1)

                cv2.line(image, (x1, y1), (x2, y2), (220, 220, 220), 5)
                cv2.line(image, (x3, y3), (x4, y4), (220, 220, 220), 5)

            elif 0 < x5_0 < x6_0 and 0 < x11_0 < x12_0:
                pts = np.array([[x5_0, x5_1], [x6_0, x6_1], [x12_0, x12_1], [x11_0, x11_1]])
                pts = pts.reshape((-1, 1, 2))
                cv2.fillPoly(image, [pts], (30, 30, 30))

                x_c = int((x5_0 + x6_0 + x11_0 + x12_0) / 4)
                y_c = int((x5_1 + x6_1 + x11_1 + x12_1) / 4)
                cv2.circle(image, (x_c, y_c), 5, (192, 192, 192), -1)

                cv2.line(image, (x5_0, x5_1), (x_c, y_c), (220, 220, 220), 5)
                cv2.line(image, (x6_0, x6_1), (x_c, y_c), (220, 220, 220), 5)

                x_c_2, y_c_2 = int((x12_0 + x11_0) / 2), int((x12_1 + x11_1) / 2)
                cv2.line(image, (x_c_2, y_c_2), (x_c, y_c), (220, 220, 220), 5)

            color = (255, 0, 0)

            for idx in (5, 6, 7, 8, 9, 10, 11, 12, 13, 14, 15, 16):
                x, y = int(data[idx][0]), int(data[idx][1])

                if x > 0 or y > 0:  # 忽略无效点
                    cv2.circle(image, (int(x), int(y)), 5, color, -1)

            for i in range(5):
                x, y = int(data[0][0]), int(data[0][1])

                if x == 0 and y == 0:
                    if (data[5][0] > 0 or data[5][1] > 0) and (data[6][0] > 0 or data[6][1] > 0):
                        x = int((data[5][0] + data[6][0]) / 2)
                        y = int((data[5][1] + data[6][1]) / 2 + abs(data[5][0] - data[6][0]))

                    for idx in (5, 6, 7, 8, 9, 10, 11, 12, 13, 14, 15, 16):
                        y_temp = int(data[idx][1])  # 身体上的点在头上面,说明检测不准确,头就不画了
                        if y_temp > y:
                            x, y = 0, 0
                            break

                if x > 0 and y > 0:
                    r = 20
                    cv2.circle(image, (x, y), r, (140, 230, 240), 10)
                    y_5 = [0, 0, 0, 0, 0]

                    y_5[2], y_5[4] = move_point_to_circle(data[2][0], data[2][1], data[4][0], data[4][1], x, y, r)
                    y_5[1], y_5[3] = move_point_to_circle(data[1][0], data[1][1], data[3][0], data[3][1], x, y, r)

                    if all(y_5[1:]) > 0:
                        for idx in (1, 2, 3, 4):
                            cv2.circle(image, (int(data[idx][0]), y_5[idx]), 5, (114, 114, 114), -1)

            hair = ((2, 4), (1, 3))

            for start_idx, end_idx in hair:
                sta_point = data[start_idx]
                end_point = data[end_idx]
                if (sta_point[0] > 0 or sta_point[1] > 0) and (end_point[0] > 0 and end_point[1] > 0):  # 忽略无效点
                    cv2.line(image, (int(sta_point[0]), int(sta_point[1])),
                             (int(end_point[0]), int(end_point[1])), (100, 100, 100), 10)

    return image


def plot_keypoints_simple(image, det_res, keypoints):
    for i, bbox in enumerate(det_res.boxes.xywh):
        if det_res.boxes.cls[i] == 0:
            continue

        xc, yc = list(map(int, bbox[:2]))
        cv2.circle(image, (xc, yc), 5, (20, 105, 210), -1)

    if keypoints is not None:
        for data in keypoints.xy:
            if len(data) == 0:
                continue

            for idx in (10, 6, 5, 9, 16, 15):
                x, y = int(data[idx][0]), int(data[idx][1])

                if x > 0 or y > 0:  # 忽略无效点
                    cv2.circle(image, (int(x), int(y)), 5, (255, 0, 0), -1)

    return image


_overrides_ren_pose = {"task": "pose",
                       "mode": "predict",
                       "model": r'../weights/yolov8l-pose.pt',
                       "save": False,
                       "verbose": False,
                       "classes": [0],
                       "iou": 0.5,
                       "conf": 0.3
                       }

_overrides_ren_det = {"task": "det",
                      "mode": "predict",
                      "model": r'../weights/yolov8m.pt',
                      "save": False,
                      "verbose": False,
                      "classes": [0, 32],
                      "iou": 0.5,
                      "conf": 0.5
                      }

predictor_ren_pose = PosePredictor(overrides=_overrides_ren_pose)
predictor_ren_det = DetectionPredictor(overrides=_overrides_ren_det)
绘制视频显示、保存文件 ikun_video.py:
import cv2
import os
import numpy as np
from datetime import datetime
from ikun_utils import (get_video, resize_and_pad, plot_bbox, plot_keypoints, predictor_ren_det, predictor_ren_pose,
                        plot_polish_keypoint, plot_keypoints_simple)


def base_plot(video_path, save_dir=None):
    """基础绘制"""
    cap = get_video(video_path)

    if save_dir is not None:
        if not os.path.isdir(save_dir):
            raise ValueError("指定的保存路径不存在。")

        width = int(cap.get(cv2.CAP_PROP_FRAME_WIDTH))
        height = int(cap.get(cv2.CAP_PROP_FRAME_HEIGHT))
        fps = cap.get(cv2.CAP_PROP_FPS)

        fourcc = cv2.VideoWriter_fourcc(*'mp4v')  # 编码格式
        current_time = datetime.now().strftime('%Y-%m-%d-%H-%M')
        video_plot_save_path = os.path.join(save_dir, "base_plot_" + current_time + ".mp4")
        out = cv2.VideoWriter(video_plot_save_path, fourcc, fps, (width, height))  # 初始化视频写入器

    while cap.isOpened():
        ret, frame = cap.read()
        if not ret or cv2.waitKey(1) & 0xFF == ord('q'):
            break

        # TODO: 写入时候需要注释掉,否则会导致写入的视频大小后resize后的大小不一致
        # frame = resize_and_pad(frame, is_pad=False)

        img_rgb = cv2.cvtColor(frame, cv2.COLOR_BGR2RGB)
        pose_ren = predictor_ren_pose(img_rgb)[0]
        det_ball = predictor_ren_det(img_rgb)[0]

        # 画出人的检测框并显示
        image_show = plot_bbox(frame, det_ball)
        image_show = plot_keypoints(image_show, pose_ren.keypoints)

        if save_dir is not None:
            out.write(image_show)

        cv2.imshow('Image', image_show)

    cap.release()
    if save_dir is not None:
        out.release()
    cv2.destroyAllWindows()


def no_background_plot(video_path, save_dir=None, background_color=(255, 255, 255)):
    """基础绘制"""
    cap = get_video(video_path)

    if save_dir is not None:
        if not os.path.isdir(save_dir):
            raise ValueError("指定的保存路径不存在。")

        width = int(cap.get(cv2.CAP_PROP_FRAME_WIDTH))
        height = int(cap.get(cv2.CAP_PROP_FRAME_HEIGHT))
        fps = cap.get(cv2.CAP_PROP_FPS)

        fourcc = cv2.VideoWriter_fourcc(*'mp4v')  # 编码格式
        current_time = datetime.now().strftime('%Y-%m-%d-%H-%M')
        video_plot_save_path = os.path.join(save_dir, "no_background_plot_" + current_time + ".mp4")
        out = cv2.VideoWriter(video_plot_save_path, fourcc, fps, (width, height))  # 初始化视频写入器

    while cap.isOpened():
        ret, frame = cap.read()
        if not ret or cv2.waitKey(1) & 0xFF == ord('q'):
            break

        # TODO: 写入时候需要注释掉,否则会导致写入的视频大小后resize后的大小不一致
        # frame = resize_and_pad(frame, is_pad=False)

        img_rgb = cv2.cvtColor(frame, cv2.COLOR_BGR2RGB)
        pose_ren = predictor_ren_pose(img_rgb)[0]
        det_ball = predictor_ren_det(img_rgb)[0]

        # 画出人的检测框并显示
        no_background_frame = np.full(frame.shape, background_color, dtype=np.uint8)
        image_show = plot_bbox(no_background_frame, det_ball)
        image_show = plot_keypoints(image_show, pose_ren.keypoints)

        if save_dir is not None:
            out.write(image_show)

        cv2.imshow('Image', image_show)

    cap.release()
    if save_dir is not None:
        out.release()
    cv2.destroyAllWindows()


def polish_plot(video_path, save_dir=None, background_color=(255, 255, 255)):
    """基础绘制"""
    cap = get_video(video_path)

    if save_dir is not None:
        if not os.path.isdir(save_dir):
            raise ValueError("指定的保存路径不存在。")

        width = int(cap.get(cv2.CAP_PROP_FRAME_WIDTH))
        height = int(cap.get(cv2.CAP_PROP_FRAME_HEIGHT))
        fps = cap.get(cv2.CAP_PROP_FPS)

        fourcc = cv2.VideoWriter_fourcc(*'mp4v')  # 编码格式
        current_time = datetime.now().strftime('%Y-%m-%d-%H-%M')
        video_plot_save_path = os.path.join(save_dir, "polish_plot_" + current_time + ".mp4")
        out = cv2.VideoWriter(video_plot_save_path, fourcc, fps, (width, height))  # 初始化视频写入器

    while cap.isOpened():
        ret, frame = cap.read()
        if not ret or cv2.waitKey(1) & 0xFF == ord('q'):
            break

        # TODO: 写入时候需要注释掉,否则会导致写入的视频大小后resize后的大小不一致
        # frame = resize_and_pad(frame, is_pad=False)

        img_rgb = cv2.cvtColor(frame, cv2.COLOR_BGR2RGB)
        pose_ren = predictor_ren_pose(img_rgb)[0]
        det_ball = predictor_ren_det(img_rgb)[0]

        # 画出人的检测框并显示
        no_background_frame = np.full(frame.shape, background_color, dtype=np.uint8)
        image_show = plot_polish_keypoint(no_background_frame, det_ball, pose_ren.keypoints)

        if save_dir is not None:
            out.write(image_show)

        cv2.imshow('Image', image_show)

    cap.release()
    if save_dir is not None:
        out.release()
    cv2.destroyAllWindows()


def simple_plot(video_path, save_dir=None, background_color=(255, 255, 255)):
    """基础绘制"""
    cap = get_video(video_path)

    if save_dir is not None:
        if not os.path.isdir(save_dir):
            raise ValueError("指定的保存路径不存在。")

        width = int(cap.get(cv2.CAP_PROP_FRAME_WIDTH))
        height = int(cap.get(cv2.CAP_PROP_FRAME_HEIGHT))
        fps = cap.get(cv2.CAP_PROP_FPS)

        fourcc = cv2.VideoWriter_fourcc(*'mp4v')  # 编码格式
        current_time = datetime.now().strftime('%Y-%m-%d-%H-%M')
        video_plot_save_path = os.path.join(save_dir, "simple_" + current_time + ".mp4")
        out = cv2.VideoWriter(video_plot_save_path, fourcc, fps, (width, height))  # 初始化视频写入器

    while cap.isOpened():
        ret, frame = cap.read()
        if not ret or cv2.waitKey(1) & 0xFF == ord('q'):
            break

        # TODO: 写入时候需要注释掉,否则会导致写入的视频大小后resize后的大小不一致
        # frame = resize_and_pad(frame, is_pad=False)

        img_rgb = cv2.cvtColor(frame, cv2.COLOR_BGR2RGB)
        pose_ren = predictor_ren_pose(img_rgb)[0]
        det_ball = predictor_ren_det(img_rgb)[0]

        # 画出人的检测框并显示
        no_background_frame = np.full(frame.shape, background_color, dtype=np.uint8)
        image_show = plot_keypoints_simple(no_background_frame, det_ball, pose_ren.keypoints)

        if save_dir is not None:
            out.write(image_show)

        cv2.imshow('Image', image_show)

    cap.release()
    if save_dir is not None:
        out.release()
    cv2.destroyAllWindows()


if __name__ == '__main__':
    video_path = r"KUN_dance.mp4"
    # base_plot(video_path, save_dir=None)  # 设置save_dir='./', 保存到当前目录
    # no_background_plot(video_path)
    # polish_plot(video_path, './')
    simple_plot(video_path, './')
4.绘制代码详解
4.1 ikun_utils
get_video:获取视频流(路径/摄像头)。
resize_and_pad:将图片等比例resize到指定大小(如果长度不够,可以选择填充)。
plot_bbox:给检测结果绘制目标矩形框。
plot_keypoints:对COCO人体姿态绘制基本的连线。
move_point_to_circle:绘制kunkun的头发,因为眼睛的关键点连线像中分发型 ,将点平移到表示脸的圆上(这个圆由鼻子关键点为中心,20像素为半径画出)
plot_polish_keypoints:获取下图的关键点绘制:
通关利用关键点{5, 6, 11, 12} 绘制中心黑色“衣服”,并用坐标计算正反面“背带裤”。篮球使用yolov8检测模型,COCO数据集中的标签32表示“球类”,用xywh以xy为中心画圆。

plot_keypoints_simple:选择个比较重要的关键点进行绘制。
4.2 ikun_video
base_plot:绘制结果对应引言中上左。
no_background_plot:绘制结果对应引言中上右。

polish_plot:绘制结果对应引言中下左。
simple_plot:绘制结果对应引言中下右。
5.关键点的使用
5.1 获取其他“关键”点、目标区域
由plot_polish_keypoints可知,可以画出“中分发型”、“背带裤”等,可以利用其他的点计算出连接点。
如下图,利用“两个箭头”所指的点组成的“小臂向量”,延长“小臂向量”长度,可以获取“手部区域”。同理,还能获取“头部区域”、“脚部”区域等。

5.2 用于网络训练和模拟数据

如上图,仅使用少数几个点,则可以观察出“一些特征”,像坤坤跳、打篮球、转身等。所以,在行为动作识别时,排除“外观特征”的影响,可以仅使用姿态坐标来进行网络训练。
动作识别不需要全部关键点:可以剔除“检测不稳定、置信度低”的关键点;或者使用“主成分分析”等降维方法,获取主要特征;甚至,可以看作点云,用PointNet来提特征。(由此我估计,并不需要加入旋转损失,设计的网络MLP+MaxPooling即可。)
此外,由于仅需关键点,可以实现大量的数据模拟,而不需要实际数据:比如模拟手的姿态“1”,只需获取一个“突出”的指尖,下图从左到右,分别表示“用食指表示1”,“用中指表示1”、“用无名指表示1”。通过这样模拟数据,相比获取手部再提取关键点的操作,将会简单非常多。


 8964
8964

 被折叠的 条评论
为什么被折叠?
被折叠的 条评论
为什么被折叠?
 到【灌水乐园】发言


