


numpy
视频链接
创建 array
- np.array([1,2,3,4])
- np.zeros( (3,2) )
- np.ones( (2,4) )
- np.linspace(0,1,5) 第三个数,是个数
- np.random.rand(2,4)
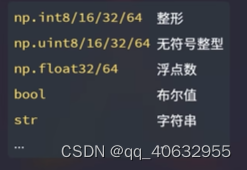
- 属性:
- shape
- dtype 默认是np.float64
- np.zeros((4,2,dtype=np.int32))
- 转化数据类型 a.astype(int)
操作:
- np.dot(a,b) 点乘
- np.sqrt(a) 批量计算
- np.sin(a)
- np.log(a)
- np.power(a,2) 指数
- a*5 a+b (广播机制)
- a.min()
- a.max()
- a.argmin()
- a.argmax()
- a.sum( axis=0)
- a.mean()
- np.median(a)
- a.var() # 方差
- a.std() # 方差
- 访问元素
- 高级索引返回的是数组的副本(深拷贝),而切片操作返回的是数组视图(浅拷贝),视图也可说是引用吧
- 切片索引
- a[1,2] 、a[1][2]访问第1行第2列的数据,逗号是区分维度的
- a[0,0:2] 冒号是切片索引,左闭右开
- a[…,1] 、a[:,1] 三个点代表该维度的所有元素, 这里表示取第1列所有元素
- a[[1,2],1] 取1,2行的第1列元素
- a[0:9:2] 第三个是跨度
- 数组索引 (列表[],np,bool)
- a[a<3] # boo
# 列表索引
x = np.array([[1,  2],  [3,  4],  [5,  6]])
#[0,1,2]代表行索引;[0,1,0]代表列索引
y = x[[0,1,2],[0,1,0]]
>>> [1  4  5]
# np 索引
import numpy as np
b = np.array([[ 0, 1, 2],
              [ 3, 4, 5],
              [ 6, 7, 8],
              [ 9,10,11]])
r = np.array([[0,0],[3,3]])    #取两行,
c = np.array([[0,2],[0,2]])    #对应行按索引取两个
# 也可
#r = np.array([[0],[3]])
#c = np.array([[0,2]])
#获取四个角的元素
c = b[r,c]
print(c)
# print(b[[[0,0], [3,3]], [[0,2], [0,2]]]) #一样的
>>> [[ 0  2]
 [ 9 11]]
- numpy 操作图片
## numpy 融合图片
from PIL import Image
import numpy as np
im = Image.open('test.jpg').resize((400,400))
#im.show()
im_arr = np.array(im)
# print(im_arr.shape)   # (400, 400, 3)   opencv也是,只是3里面的顺序不一样,在tensor里是要把3移到前面的
im2 = np.array(Image.open('test2.jpg').resize((400,400)))
im_blend=im_arr*0.4+im2*0.6
im_blend = im_blend.astype(np.uint8)
Image.fromarray(im_blend).show()


## 图片操作
from PIL import Image
import numpy as np
im = np.array(Image.open('test.jpg').resize((400,400)))
# im 高、宽
im_downsample = im[::3,::3,:]# 图片下采样
Image.fromarray(im_downsample).show()
im_flipped=im[::-1,:,:]  # 图片上下翻转
Image.fromarray(im_flipped).show()
im_croped =im[150:250,150:250,:] # 图片裁剪
Image.fromarray(im_croped).show()
matplotlib
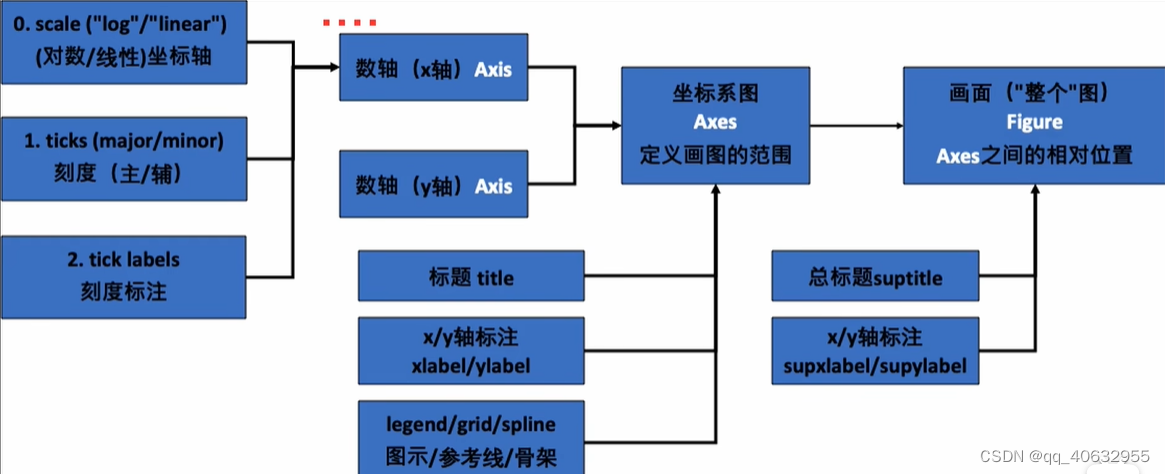
- 图结构
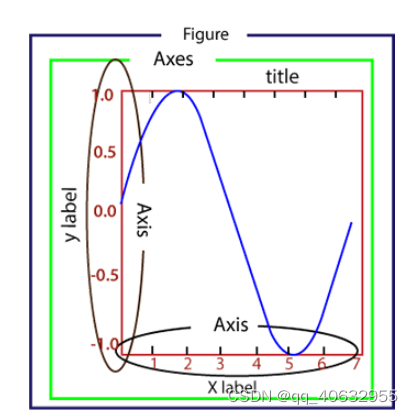
- Axis:指单个数轴
- Axes:指坐标系(例如:二维图像由两个数轴(Axis)构成)
- Figure:指整个画面(可以包含多个坐标系(Axes))
- Artist:画面中所有可以看到的东西(数轴/图示/边框/每条线,都属于 Artist 对象
Artist的主要元素

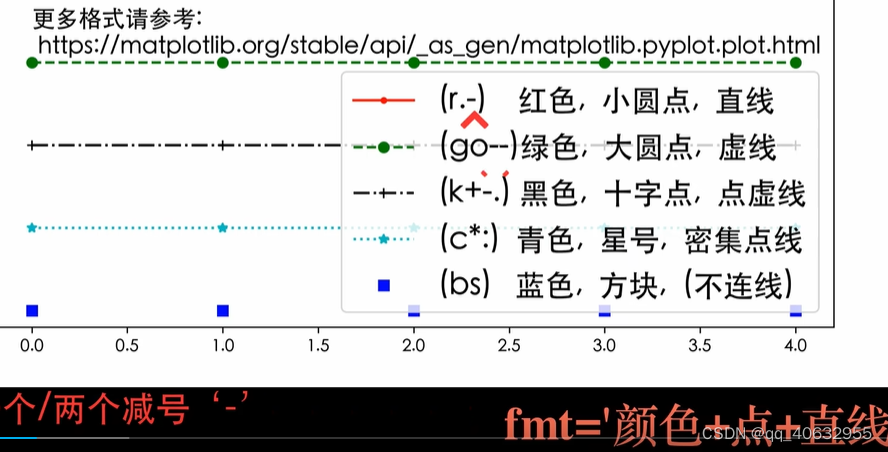
plot 折线marker
- 画一张图(用plt 直接画)
import numpy as np
import matplotlib.pyplot as plt
import matplotlib
### 一些基本设置

# 常用字体 https://blog.csdn.net/lemonbit/article/details/121433603
matplotlib.rcParams['font.family'] = ['SimHei']
matplotlib.rcParams['axes.unicode_minus'] = False   # 步骤二(解决坐标轴负数的负号显示问题)
# 设置图片清晰度(200dpi: 200像素每英寸)
matplotlib.rcParams['figure.dpi'] = 200

# 常用风格 plt.style.available
# https://blog.csdn.net/weixin_45920673/article/details/118438893
# https://matplotlib.org/stable/gallery/style_sheets/style_sheets_reference.html
plt.style.use('fast')


### 初始化数据
seasons = [1,2,3,4]   # 季度
stock1 = [4,8,2,6]    # 股票1每个季度对应的股价
stock2 = [10,12,5,3]  # 股票2每个季度对应的股价

# 转化数据为Numpy数组(可跳过)
seasons = np.array(seasons)
stock1 = np.array(stock1)
stock2 = np.array(stock2)

# 画出两个股价的折现图
plt.plot(seasons, stock1, "ro--", label="股票代码: abc")  # ro--不指定其中一个,就不画出来
plt.plot(seasons, stock2, "b^--", label="股票代码: def")

## 改进
plt.title("折线图")
plt.xlabel("季度")
plt.ylabel("平均股价")
# 添加图例
plt.legend()
# 设置x/y坐标刻度
plt.xticks([1, 2, 3, 4])
plt.yticks(np.arange(2, 13, 1))

# 图的某部分缩进
# plt.xlim(2.5, 4.5)
# plt.ylim(1.5, 6.5)

# 添加网格与辅助线
plt.grid()

# plt.savefig("images/pic1_1.png")
plt.show()
- 画多张图:使用类似Matlab的语法(也是用plt画)
# matlab 语法
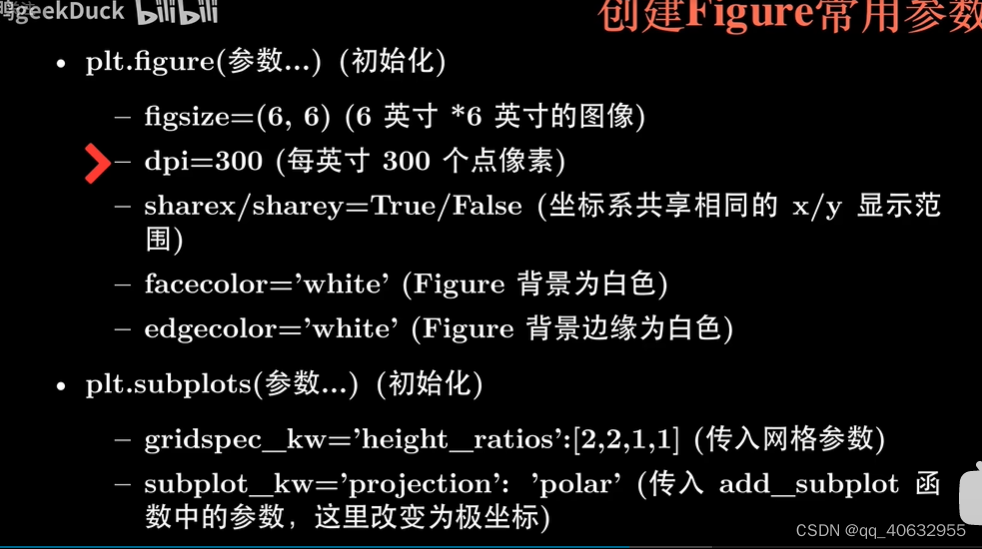
plt.figure(figsize=(9,3)) # 这个是英寸单位
plt.subplot(211)
plt.bar(seasons, stock1, "ro--")
plt.subplot(212)
plt.plot(seasons,stock2,"b^--")
plt.show()
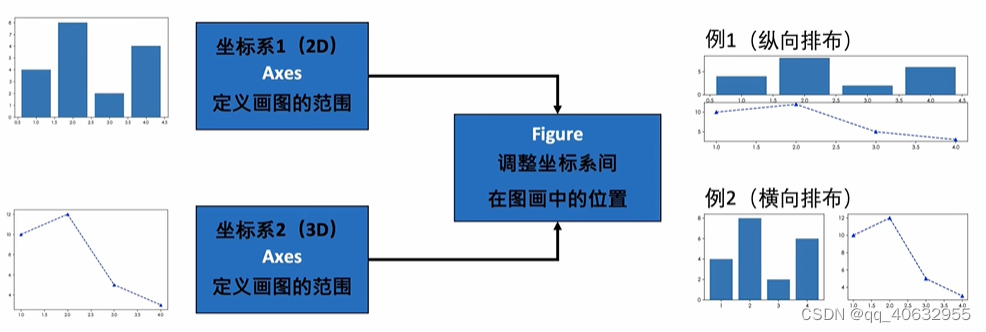
- 画多张图:使用python 面向对象,基于axes
# 面向对象OOP精确语法
fig,axes = plt.subplots(2,1,figsize=(6,6))
axes[0].bar(seasons, stock1)
axes[1].plot(seasons, stock2,"b^--")
plt.show()


# 画4个
# 面向对象(Object-oriented programming)精确语法
fig, axes = plt.subplots(2, 2, figsize=(6, 6),
                        facecolor="grey",  # 画面背景改为灰色
                        sharex=True, sharey=True)  # 共享xy轴坐标系
axes[0, 0].bar(seasons, stock1)
axes[0, 1].plot(seasons, stock2, "b^--")
ax = axes[1, 0]
ax.plot(seasons, stock2-stock1, "--", color="black")    # 不同的点画在一张图上
ax.scatter(seasons, stock2-stock1,
           s=[10, 20, 50, 100],
           c=['r', 'b', 'c', 'y'])
ax.set_ylabel("差价(股票1-股票2)")
axes[0, 0].set_title("股票1")
axes[0, 1].set_title("股票2")

# 可以删除最后一个坐标系
axes[1, 1].remove()
axes[0, 0].plot(seasons, stock1, 'r+-')
fig.suptitle("股票分析图")
fig.supylabel("股价")
fig.supxlabel("季度")
# plt.savefig("images/pic2_5.png", facecolor=fig.get_facecolor()) # 注: 保存图片
plt.tight_layout() # 保持内容紧凑
plt.show()

- 常用工作流程 参见
- 查询所有画图整体风格
- 字体设置,公式编写
- 包装成函数
pandas

- 创建表格
- 字典、csv
- 行和列,都可以作为Series
- Series 的属性,name ,values,index
- 根据索引查找数据
- 选择一列
- workout[‘calories’] Series
- workout[[‘calories’]] DataFrame
- titanic[[‘Sex’, ‘PassengerId’]]
- loc 根据索引选取数据
- workout.loc[‘day1’, :] # 行,列
- workout.loc[[‘day1’], :] # 保留DataFrame格式
- iloc 根据位置选取数据,从0开始编号,左闭右开
- workout.iloc[0, :]
- workout.iloc[[0], :]
- .at[]: 访问单独数据
- workout.at[‘day1’, ‘calories’]
- 选择一列
- 删除一些列的方法,简化:
- 判空:Series对象.isnull()
- 设置索引:dataframe对象.set_index(“列名”)
- 转化时间格式:pd.to_datetime(pd.to_datetime(data_r[“时间”]).dt.strftime(‘%Y/%m’))
文件流
- 文件对象可迭代,都是读的字符串(str,bytes)
- var_name = open(filename[mode, [bufsize]])
- 模式:a 附加,“+“同时支持输入、输出操作,如r+、w+、a+
- 文件都以二进制存储,但读取会有文本模式和二进制模式,文本模式要指定编码格式,二进制不需要
- f1.readlines() # 返回整个文件所有行,包括字符串,并生成列表
- f1.readline() # 返回文件的一行
- f1.name
- f1.read(14) # 指定读出14个字节,若不给参数则默认读出所有字节
- f1.write(‘new line.\n’) # 写进去,注意打开模式
- f4.writelines(l2) # 列表的每个元素要有‘\n’
with open('./test.txt',mode='wb') as f:
    print('heool',file=f) # a bytes-like object is required, not 'str'
    print(b'hell',file=f)
# 说明只能接收字节(不是字符)类的对象,而不是字符串

#file:  a file-like object (stream); defaults to the current sys.stdout.
#说明标准输出也是文件

print("hello".encode('utf-8'))    #  b'hello'
- Unicode 是“字符集”,UTF-8 是“编码规则”。
“字符集”的意思是:为每一个“字符‘”分配一个唯一的 ID(学名为码位 / 码点 / Code Point);“你好世界” :对应unicode_id:Unicode: \u4f60\u597d\u4e16\u754c
“编码规则”的意思是:将“码位”转换为字节序列的规则(编码/解码 可以理解为 加密/解密 的过程)。 - 在 Python 中,有 2 种常用的字符串类型,分别为 str 和 bytes 类型,其中 str 用来表示 Unicode 字符,bytes 用来表示二进制数据。str 类型和 bytes 类型之间就需要使用 encode() 和 decode() 方法进行转换。
- 字符编码问题-链接
- python 读写多行文件
with open('test.txt','rt') as f:
    for i in f:
        print(i,end='')


with open('test.txt','wt') as f:
    for i in a:
        f.write(i)   # i只能是字符串
        f.write('\n')

with open('test.txt','rt') as f:
    lines = f.readlines()
    for i in lines:  # 读取的i也包含‘\n’
        print(i.strip())
OS 模块
- 将linux或c语言的一些目录操作封装成文件管理系统
- 目录相关函数
- os.mkdir(‘…/day6/dir’) # 创建文件夹
- os.makedirs():创建多级目录
- os.rmdir():删除文件目录
- os.removedirs():删除多级文件目录
- os.listdir() # 获取当前文件夹下所有文件名
- os.getcwd() # 获取当前路径,注意linux的系统是/,而win系统是\,使用了转义
- os.chdir(‘…’) # 相当于cd到其他路径,‘…’表示上一级,‘.’表示当前级
- os.chdir(‘day6’) # ‘day6’ 是文件夹名字
- 文件相关函数
- os.remove() # 删除文件
- os.rename():重命名
import os  #(包括子目录里面的文件)
for root,dirs, files in os.walk(os.getcwd()):
    print(root)
    print(dirs)
    print(files)
- 文件路径(os.path)相关函数
- os.path.dirname(cwd) #文件目录名 就是所处位置的文件夹的路径
- os.path.basename(cwd) # 文件基名 就是所处位置的文件夹的名字,不是路径
- os.path.join(dir1, file1)
- os.path.split() # 返回dirname(), basename()元组
- 判断查询
- exists(): 判断指定文件是否存在
- isdir(): 判断指定的路径是否为目录
- # if os.path.isfile(filename):
python 注释类型
- Callable
可调用类型,常用于注解一个方法。声明时需要按照Callable[[Arg1Type, Arg2Type, …], ReturnType],将参数类型和返回值类型都注解出来
读取图片
def cv_imread(filePath): #读取中文路径的图片
    cv_img=cv2.imdecode(np.fromfile(filePath,dtype=np.uint8),cv2.IMREAD_UNCHANGED)
    #imdecode读取的图像默认会按BGR通道来排列图像矩阵,如果后续需要RGB可以通过如下转换
    #cv_img=cv2.cvtColor(cv_img,cv2.COLOR_BGR2RGB)
类
- 实例的初始化可以通过调用类来创建,如:net = my_CNN()
self.__class__.__name__
self.__class__ # 实例指向对应的类,__name__ 调用了其他的类属性(类名)


#  __dict__属性:
# 类.__dict__ 查看对象内部所有属性名和属性值组成的字典(包括属性成员和方法成员)
#实例.__dict__ 返回实例的属性,没有类的属性

# dir(实例 or 类)   # 实例和类的属性有不同的地方,比如,实例多了__class__
# 判断是否是Iterable

import collections
if isinstance(e, collections.Iterable):
    # e is iterable
# 判断一个类是否是另一个类的子类
print(issubclass(ChiClass, ParClass))
>>>
True

# 判断一个对象是否是另一个类的实例
print(isinstance(x, ChiClass))
>>>
True

# 判断一个对象是否拥有指定的属性
print(hasattr(x, 'name'))
>>>
True

# 获取一个对象的指定属性,也能删除一个属性delattr()
print(getattr(x, 'name'))
>>>
jackko

# 设置一个对象的指定属性
print(getattr(x, 'name'))
print(setattr(x, 'name', 'anney')) # 没有返回值
print(getattr(x, 'name'))
>>>
jackko
None
anney
-
super()
- 在子类中找出其父类以便于调用其属性
-
内的特殊方法
__call__(),- 每一个类的函数都有,函数可调用
- 也可以
对象名.()
对象
sys.getrefcount(name) # 显示对象的引用次数
type 类型
- 集合 set
if {}:
>>> false
- 字符串 str,bytes两种类型
- 可变与不可变类型:
- 可变:list 、dict 、set
- 不可变:如数值、字符串、元组
- 组合数据类型
- 序列类型:字符串、列表、元组、集合和字典 ,支持迭代
- 集合类型:集合set,支持迭代 set(iteration)
- 映射类型:字典,key-value集合,可变对象
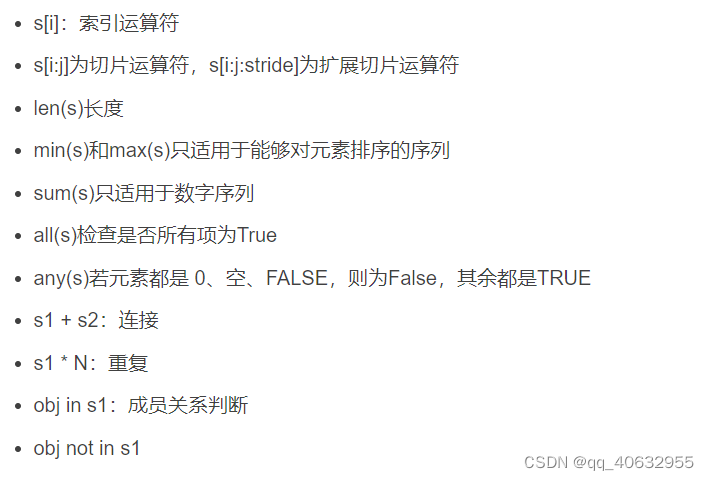
- 所有序列都支持的方法
- 可迭代对象包括:
- 序列类型:list, str, tuple
- 非序列类型:dict, file
- 用户自定义包含__iter__()或__getitem__()方法的类
- for循环可用于任何可迭代对象:
- for循环开始时,会通过迭代协议传递给iter()内置函数,从而能够从可迭代对象中获得一个迭代器,返回的对象含有需要的__next__()方法
i1 = l1.__iter__()  # iter(l1) # 等价于
print(i1)  # 返回一个迭代器对象,每次使用循环时,系统自动创建迭代器,来遍历每个元素
print(i1.__next__())
print(i1.__next__())
print(i1.__next__()) # 注意:迭代器不可逆,要想再迭代就要创建新的迭代器
>>>
<list_iterator object at 0x000001449EEA60B8>
1
2
3
字符串
- s.join(t) 使用s作为分隔符 和并t的字符串
- s.split([sep [, maxsplit]]) 使用sep作为分隔符对 划分s的字符串
- s.strip([chrs]) 删掉chrs开头和结尾的空白或字符
- s.find() 是否包含子串 -1 index 方法报异常
- s.startswith() ture false
- s.endswith() ture false
-
- 执行拼接
列表
- 支持在原处修改,不改变id
- 修改的是引用,而不是对象.(就是不能在去取对象后 对 对象内部修改,不支持 [][], 否则创建新的对象)
- 增加:append仅添加一个对象、extend将添加的对象的每个元素都一一并入列表中、insert
- 查找:index count
- 删除:pop,若不给参数则默认弹出删除最后一个元素,remove,del a[1:4]
- 逆序:reverse()
- 排序:sort()
- 复制:
- l2 = l1 注意这种是赋值,指向同一对象,并非新建对象
- l2 = l1[:] 这种复制是生成新的对象
import copy
l2 = copy.deepcopy(l1) 这种也是生成新对象
- in 、 not in
- [i+5 for i in l2]
- print(l2)
l2[1:3] = [] # 把1、2设为空
print(l2)
print(l2[1])
>>>
[1, 32, 3, 'xyz', 5]
[1, 'xyz', 5]
xyz


print(l2)
l2[1:] = ['m',  'n', 'r'] # 1:是指从下标1到最后,包括最后
print(l2)
>>>
[1, 'xyz', 5]
[1, 'm', 'n', 'r']


print(id(l2))
print(l2)
del(l2[1:])
print(l2)
>>>
2507620552392
[1, 'm', 'n', 'r']
[1]
元组
- 创建:
- (),记得要加“,” ,否则可能python 不认为它是元组
- tuple(data)
- t = ‘x’, ‘y’, ‘z’ 定义元组可以省去括号
- t1 + t2 会将元素合并,变成新元组
- t1 * N 把元组重复N遍
字典
- 定义:
- { }
- d3 = dict(name=‘Jackko’, age=24, gender=‘m’) # 定义字典,注意key都是字符串类型或数字类型
- d1.clear() # 清空字典的元素
- d1.copy()
- d2.popitem() # 弹出最后一个(也许是随机弹出)键-值元组
- d1.update(d2) # 合并字典,若有相同的key,则以参数中的字典为准,覆盖掉旧的
- zip(‘xyz’, ‘123’) # 将序列一一对应组成元组,返回的是对象,节省内存。需要用list()来查看
zip('xyz', '123') # 将序列一一对应组成元组,返回的是对象,节省内存。需要用list()来查看
print(list((zip('xyz', '123'))))
print(list((zip('xyzm', '123')))) # 只会一一对应,多的不要
print(list((zip('xyz', '1234'))))
>>>
[('x', '1'), ('y', '2'), ('z', '3')]
[('x', '1'), ('y', '2'), ('z', '3')]
[('x', '1'), ('y', '2'), ('z', '3')]

d4 = dict(zip('xyz', '123')) # 构建字典
print(d4)
>>>
{'x': '1', 'y': '2', 'z': '3'}
集合
- 可变的set()和不可变的frozenset()
- 不支持:索引、元素获取、切片
- 创建:
- set()
- set([1, 2, 3])
- s1 & s2 # 交集,返回的是集合
- s1 | s2 # 求并集
- s1.update(s3) # 合并
- s1.add(“Jerry”)
操作符、运算符
- 比较操作符:<、>、<=、>=、!=、==
- 成员操作符:in 、not in,用于测试成员关系 、所有序列都支持包括字符串
- 逻辑运算符:and、 or、 not
- 三元运算:A = X if Y else Z
is 是判断引用对象的地址是否相同
- 两个对象比较
- 值比较:对象中的数据是否相同
- 身份比较:两个变量名引用的是否为同一对象
- 类型比较:两个对象的类型是否相同
- all(s)检查是否所有项为True
- any(s)若元素都是 0、空、FALSE,则为False,其余都是TRUE
- 索引
- 索引运算:[i]
- 切片运算:[i:j]
- 扩展切片:[i:j:stride] (切片的结果会生成新的对象)
- 内置函数
- min()、max()、len()、dir() 查看自带方法
num1 = 5
num2 = 5
print(num1 == num2) # 但未必证明是同一对象
>>> True
print(num1 is num2) # 这才是同一对象
>>> True
print(type(num1) is type(num2))
>>> True
print(id(num1) == id(num2))
>>> True
print(type(type(num)))  # type也是一个类型
>>> <class 'type'>
print(type(str)) # str ,等以及自定义的class类型,都是type类型,因为没有实例化
>>> <class 'type'>
编码风格
每个模块文件、类、函数开头都可以用" “或”“” “”“写文件描述,可以使用”.doc"来查看
print(str.__doc__)
-
模块(py文件)、类或函数的第一条语句是一个字符串的话,该字符串就成为文档字符串
可以使用__doc__属性引用 -
dir() 打印对象自带方法
-
id() 对象内存地址
-
help (dict.fromkeys)
显式/强制类型转换
- str() 将非字符型数据转换为字符串 ,用eval(“{ }”) ,即转变成字典类型
- int():转为整数
- float():转为浮点数
- list(s):将字符串s转为列表
- tuple(s):将字符串s转换为元组 ()
- set(s):将字符串s转换为集合 { }
- dict(d):创建字典,其中d必须是(key, value)的元组序列 { }
str2 = "hello world"
l1 = list(str2)
print(l1)
>>> ['h', 'e', 'l', 'l', 'o', ' ', 'w', 'o', 'r', 'l', 'd']

str3 = str(l1) # 把整个列表当做一个串来用
print(str3)
>>> ['h', 'e', 'l', 'l', 'o', ' ', 'w', 'o', 'r', 'l', 'd']

print(type(str3))
>>> <class 'str'>

t1 = tuple(str2)
print(t1)
>>> ('h', 'e', 'l', 'l', 'o', ' ', 'w', 'o', 'r', 'l', 'd')

s1 = set(str2)
print(s1)
>>> {'e', 'h', 'l', 'o', 'd', 'w', 'r', ' '}

l3 = [('a', 1), ('b', 11), ('c', 45)]
d1 = dict(l3)
print(d1)
>>> {'a': 1, 'b': 11, 'c': 45}

num5 = 49
c1 = chr(num5)
print(type(c1))
>>> <class 'str'>

print(c1) # 因为49对应的ASCII码就是1
>>> 1

s1 = '3'
asc1 = ord(s1)
print(asc1)  # 因为ASCII码是3的对应整数是51
>>> 51

num6 = 12
a = hex(num6)
b = bin(num6)
c = oct(num6)
print(a, b, c)
>>> 0xc 0b1100 0o14
函数
- 匿名函数:lambda args: expression
f=(lambda x,y,z=10: x+y+z)f(3,4)
l3 = [ (lambda x: x*2), (lambda y: y*3)]
for i in l3:
    print(i(4)) # 函数调用,注意l3是列表,所以i代表两个lambda表达式
>>>
8
12
- 闭包:函数里定义函数
def f1(x):
    def f2(y):
        return y ** x
    return f2

print(f1(3))
a1 = f1(3) # 注意,a1是一个函数,x是3
- 函数参数
-
位置参数:从左到右,精准匹配
-
关键字参数:“name=value”
- 先放所有的位置参数,再放所有的关键字参数
-
可变参数:
- 一个*是收集位置参数,返回元组
- 两个*是收集关键字参数,返回字典类型
f10(x=1, y=2, z=9)--> {‘x’: 1, ‘y’: 2, ‘z’: 9}
-
可变参数解包
-
# 可变参数解包:在调用函数时使用,刚好和可变参数相反,这是分解参数
l1 = ['Sun', 'Mon', 'Tus']
def f14(x, y, z):
    print(x, y, z)
f14(*l1) # 元素个数需要和函数参数匹配

l2 = ['a', 'b']
d1 = {'k1':1, 'k2':2, 'k3':3}
def f16(x, *y, **z):
    print(x)
    print(y)
    print(z)
f16(m, *l2, **d1)
>>>
3
('a', 'b')
{'k1': 1, 'k2': 2, 'k3': 3}
- 函数式编程
- 定义:函数可以接受函数当作输入和输出,由纯函数组成,相互独立,对于相同的输入,总有相同的输出
- python支持有限的函数式编程功能,如
- 过滤器
filter(function,iterable)一一排查,需要bool ,return的对象,需要 list - 映射器
map(function,iterable,…)一一对应,return的对象,需要 list reduce()做累积操作
- 过滤器
- 使用链接
循环
- for循环可用于任何可迭代对象:
- for循环开始时,会通过迭代协议传递给iter()内置函数,从而能够从可迭代对象中获得一个迭代器,返回的对象含有需要的__next__()方法
l1 = [0, 1, 2, 3, 4, 5, 6]
l2 = ["Sun", "Mon", "Tue", "Wed", "Thu", "Fri", "Sat"]
# 使用zip来将并排元素配成元组,并行遍历
for (k, v) in zip(l1, l2):
for i in l1:
d1 = {0: 'Sun', 1: 'Mon', 2: 'Tue'}
for k, v in d1.items():
[i for i in list1 if i.endswith('.ipynb')]
[(i, j) for i in l1 for j in l2 if j != 1]
生成器
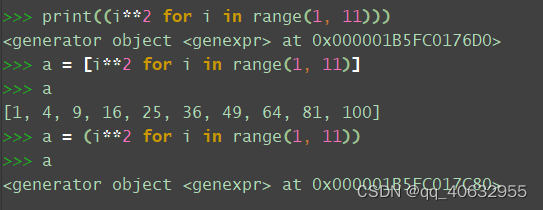
- 生成器表达式
序列过长,并且每次只需要获取一个元素时,应当考虑使用生成器表达式而不是列表解析,生成器表达式的语法就是把列表解析的[]换成()
print((i**2 for i in range(1, 11))) # 注意返回的是生成器对象
g1 = (i**2 for i in range(1, 11))
print(g1.__next__())
print(g1.__next__())
print(g1.__next__())
print(g1.__next__())
>>>
<generator object <genexpr> at 0x000001449EE0CCF0>
1
4
9
16

# 生成1到10的平方
for i in (j**2 for j in range(1, 11)):
    print(i)
>>>
1
4
9
16
25
36
49
64
81
100
-
range 也是生成器
-
enumerate 枚举生成器
- for i,value in enumerate(url):
-
生成器
- 含有yield的函数
- 并在下一次执行next() 方法时继续运行
- 因为yield可以返回,所以不需要写return语句
# 也可以使用含有yield的函数来生成
def gen_num(x):
    i = 1
    while i <= x:
        yield i**2 # 遇到yield就返回其后面的信息
        i += 1

g1 = gen_num(10) # 返回的是生成器对象
print(type(g1))

# print(next(g1)) # 输出一个

for i in g1:
    print(i)
>>>
<class 'generator'>
1
4
9
16
25
36
49
64
81
100
装饰器(decorator)
- 装饰器本身就是一个函数,用于装饰其他函数
- 一般接受一个函数对象作为参数,以对其进行增强
- 使用闭包定义一个装饰器,通过@来引用装饰器
def deco(func):
    def wrapper(x):
        print("please say something:")
        func(x)
        print("No zuo no die.")
    return wrapper

@deco
def show(x):
    print(x)

show("I am from Mars.") # 原来函数只说一句话,现在将其增强为说三句话
>>>
please say something:
I am from Mars.
No zuo no die
模块
- 一个文件
- 也是对象
- 搜索模块文件
import sys
print(sys.path)  # # 第一个就是程序主目录,当前路径


 473
473


 被折叠的 条评论
为什么被折叠?
被折叠的 条评论
为什么被折叠?
 到【灌水乐园】发言


