


文章目录
- 【PyQt界面开发的两种方式】
- 一、PyQt
- 二、PyQt 与 Qt 的蒙娜丽莎
- 三、PyQt 布局管理器(Layout Manager)
- 3.1、简介
- 3.2、类型
- 3.3、项目实战
- 应用程序对象 QApplication + 主窗口类 QMainWindow + 所有用户界面对象的基类 QWidget
- (1)函数详解:layout.addWidget()
- (2)函数详解:layout.addLayout()
- 3.2.0、添加伸缩项 layout.addStretch:控制组件之间的间距
- 3.2.1、垂直布局管理器 QVBoxLayout:按照从上到下的顺序排列组件
- 3.2.2、水平布局管理器 QHBoxLayout:按照从左到右的顺序排列组件
- 3.2.3、网格布局管理器 QGridLayout:指定每个组件的位置(行 + 列)
- 3.2.4、表单布局管理器 QFormLayout:对齐标签和输入框
- 3.2.5、堆叠布局管理器 QStackedLayout:在一个窗口中,管理多个窗口,但同一时刻只能显示一个窗口(如:选项卡界面)
- 四、PyQt 常用组件
- 4.1、简介
- 4.2、操作类 QAction:菜单栏 QMenuBar + 工具栏 QToolBar + 状态栏 QStatusBar
- 4.3、对话框类 Dialog:输入 QInputDialog + 颜色 QColorDialog + 字体 QFontDialog + 文件选择 QFileDialog + 进度 QProgressDialog + 消息 QMessageBox
- 4.4、属性设置(窗口+组件):位置 + 尺寸 + 颜色 + 连接到槽 + 图标
- 4.5、显示文本 QLabel:Hello, PyQt!
- 4.6、按钮 QPushButton:用户登录界面
- 4.7、单选按钮 QRadioButton
- 4.8、按钮分组和管理 QButtonGroup:默认互斥
- 4.9、文本框 QLineEdit + QTextEdit(单行 + 多行)
- 4.10、下拉框 QComboBox:创建一个下拉框并添加选项
- 4.11、复选框 QCheckBox:获取勾选状态
- 4.12、分组框 QGroupBox:将其他小部件放置在其中
- 4.13、日志框 QTextEdit:获取当前时间 + 设置文本颜色
- 4.14、消息提示框 QMessageBox:信息 / 询问 / 警告 / 错误
- 4.15、滑动条 QSlider:获取滑动条点击前后的值
- 4.16、进度条 QProgressBar:创建一个进度条窗口(0~100%)
- 4.17、滚动条 QScrollArea:支持垂直和水平滚动
- 4.18、分割线 QFrame
- 4.19、动态调整子部件大小 QSplitter
- 4.20、选项卡界面 QTabWidget
- 其余功能
【PyQt界面开发的两种方式】
- 可视化UI —— 适用于需要高度自定义或复杂交互的应用
PyQt5 保姆级教程(从入门到精通)
PyQt5 小白从零开始(汇总篇)
PyQt5 快速上手(基础知识)
PyQt5 快速入门(bilibili视频教程)- 编程式UI —— 适用于界面相对简单或不需要频繁更改的项目
详细介绍了每个组件的属性,可以当作百科书学习一波
(1)可视化 UI —— 基于 Qt Designer 创建界面
可视化UI:基于 Qt Designer 的界面创建(可视化编辑工具:组件拖放、属性设置、布局管理等)
- 方式一:在 PyQt 应用程序中加载.ui 文件。
- 方式二:将 .ui 文件转换为 .py 文件,从而直接在 Python 代码中使用。
.ui文件:仅包含界面设计的代码.py文件:
- (编程式UI )包含界面设计 + 算法逻辑的代码
- (在 .py 中调用 .ui )仅包含算法逻辑的代码
(2)编程式 UI —— 基于 Python 代码创建界面
编程式UI(手写UI):通过 Python 代码创建用户界面,不依赖可视化编辑工具。
- 优点:
- 灵活性与动态性:可以随时动态创建、修改或删除组件,满足特定需求。
定制化:精确控制每个组件的属性、样式和行为,实现高度定制的界面设计。版本控制:界面定义保存在代码中,便于跟踪和管理变化。跨平台:跨平台:使用 Python 创建的界面可在不同操作系统上运行,因 PyQt 支持跨平台特性。- 缺点:
可读性差: 对于不熟悉代码的人,布局和配置不易理解难以预览:需要运行程序才能看到界面,而可视化编辑器可实时预览。时间消耗:编写更多代码以定义布局、样式和复杂界面。
界面优化:(编程式 UI)切换到(可视化 UI)
- 结合使用:
可视化UI + 编程式UI
- (1)创建 .ui 文件:
- 使用 Qt Designer 创建 .ui 文件
- 根据需要添加并布局界面组件(按钮、标签、文本框等)。
- 将与 main.py 文件中界面相关的代码(如信号连接、控件初始化等)转换为 UI 组件,通过拖放和属性设置来完成设计。
- (2)编辑和保存 .ui 文件:
- 在 Qt Designer 中编辑完成后,保存文件为 .ui 格式。该文件将包含界面设计的结构和属性,但不包括任何算法逻辑。
- (3).ui 文件转 .py 文件:
- 在命令行中,使用 pyuic 工具将 .ui 文件转换为 .py 文件:
pyuic5 -x your_ui_file.ui -o your_ui_file.py。该命令会生成一个 Python 文件(your_ui_file.py),其中包含界面设计的 Python 代码。- (4)整合代码:
- 打开 main.py 文件,找到与算法逻辑相关的代码(例如数据处理、事件响应等)。
- 将这些逻辑代码移植到刚生成的 your_ui_file.py 文件中,确保将逻辑与界面代码分开。
- 在 main.py 中导入新的 UI 文件,并创建界面实例:
from your_ui_file import Ui_MainWindow注意:仅在 .ui 文件中保留静态的界面设计,不包括任何与界面相关的算法逻辑。这样可以确保 UI 的清晰和可维护性。
一、PyQt
PyQt官网首页:https://www.riverbankcomputing.com/software/pyqt/
通过 pip 安装 PyQt:pip install pyqt5
PyQt定义
(1)是Python编程语言的一个GUI(图形用户界面)工具包,它允许开发人员使用Python语言创建桌面应用程序。PyQt提供了许多用于创建丰富多样的用户界面的类和功能,以及用于处理用户输入和交互的工具。
(2)是基于Qt库的Python封装,Qt是一个流行的C++框架,用于开发跨平台的应用程序。
PyQt版本
提供了与Qt应用程序框架的Python绑定。每个版本的PyQt都是为不同的Qt版本而设计的。 目前PyQt只支持两个版本:
- PyQt6:仅支持Python 3.6及更高版本,仅支持 Qt6 版本。(1)模块名称变更:在PyQt6中,模块名称进行了更改,以更好地与标准Qt模块名称匹配。例如,QtWidgets模块在PyQt6中被称为QtWidgets,而不是PyQt5.QtWidgets。(2)新特性:PyQt6引入了一些新特性,改进了现有功能,以适应Qt6的变化。这包括新的信号和槽语法等。(3)与PyQt5不同,PyQt6不再支持Qt4。
- PyQt5:仅支持Python 2.7和Python 3.x,仅支持 Qt5 版本。但Python 2在2020年已不再得到官方支持。(
广泛使用)PyQt5是最广泛使用的版本,许多应用程序和项目都在使用它。- PyQt4:主要支持Python 2.x,仅支持 Qt4 版本。尽管它也有一个用于Python 3的版本,但相对较少使用。(
已经过时)不再得到官方支持,因此不建议在新项目中使用它。
二、PyQt 与 Qt 的蒙娜丽莎
Qt 和 PyQt 是用于创建图形用户界面(GUI)的工具包,它们提供了丰富的类和功能,可以用于开发跨平台的桌面应用程序。
Qt(跨平台的C++应用程序开发框架):
(1)Qt是由挪威公司Trolltech(现在是Qt公司的一部分)开发。它最初是为了解决C++开发人员在不同平台上编写重复代码的问题而设计的。
(2)支持多种操作系统(跨平台):Windows、macOS、Linux、iOS、Android等,因此可以实现跨平台的开发和部署。
(3) 用户交互和事件:Qt是一个面向对象的框架,使用信号和槽机制来处理用户交互和事件。
PyQt(Qt的Python绑定,使用Python语言调用和使用Qt框架的功能):
(1)PyQt由Riverbank Computing公司开发和维护。
(2)支持多种操作系统(跨平台):因为PyQt是基于Qt的,并且可以在各种操作系统上运行。
(3)用户交互和事件:PyQt使用Qt的信号和槽机制来处理用户交互和事件,同时也支持Python的语法和特性。备注:PyQt同时支持Qt Designer(图形界面设计器),开发者可以通过Qt Designer可视化设计界面,然后将其转换为Python代码。
Qt 和 PyQt 的区别:
- 编程语言:Qt是C++编写,而PyQt是Qt的Python编写。
- 开发体验:PyQt相对于Qt更容易上手,Python代码通常比C++代码更简洁和易读。
- 性能差异:由于Qt是用C++编写的,其性能可能比PyQt稍微好一些。然而,对于大多数应用程序而言,性能差异并不明显,而开发效率更重要。
- 应用领域:由于Qt和PyQt都是用于GUI开发的,因此它们在各种应用领域中都有广泛的应用,包括桌面应用程序、嵌入式系统、游戏开发、数据可视化等。
- 生态系统:Qt拥有广泛的C++社区和生态系统,可以找到更多的第三方库和资源。相比之下,PyQt稍逊一筹。
三、PyQt 布局管理器(Layout Manager)
3.1、简介
布局管理器(Layout Manager):用于在图形用户界面(GUI)中管理窗口中部件(Widget)布局的工具。通过容器的方式来布置和管理部件的位置和大小,而无需手动计算和设置每个部件的位置(但支持)。
自动布局:根据容器的大小和约束,自动排列和调整部件的位置和大小。这样,当窗口大小改变时,部件的布局也会自动调整,无需手动修改。支持多种类型:水平布局、垂直布局、网格布局等。支持容器嵌套:可以将多个布局管理器嵌套在一起,从而实现复杂的布局设计。- 可扩展性:布局管理器通常具有一定的可扩展性,允许开发者编写自定义的布局管理器,以满足特定的布局需求。
- 与部件关联:布局管理器通常与部件相关联,开发者可以将部件添加到布局管理器中,并指定部件在布局中的位置和大小。
- 事件处理:一些布局管理器还可以处理部件的事件,例如调整大小事件、重绘事件等,以便实现更高级的交互功能。
- 跨平台性兼容性:布局管理器通常是跨平台的,可以在不同的操作系统上使用,并且能够保持一致的布局效果。
3.2、类型
盒子布局管理器 QBoxLayout:无法单独使用,其是QVBoxLayout和QHBoxLayout的基类,具体用法参考垂直和水平布局管理器。垂直布局管理器 QVBoxLayout:将部件 从上到下(垂直的) 排列在一列中。水平布局管理器 QHBoxLayout:将部件 从左到右(水平的) 排列在一行中。网格布局管理器 QGridLayout:将部件 指定位置(行 + 列) 排列在一个网格中。
- 如:在同一行中,指定多个部件的位置布局:[3 3 3] to [33 3] 表示将111格式变换为112格局。
表单布局管理器 QFormLayout:对齐标签和输入框。常用于创建表单式的用户界面。堆叠布局管理器 QStackedLayout:管理多个窗口部件,但同一时刻只能显示一个布局管理器,可以通过界面切换以显示不同的部件。如:选项卡界面。
3.3、项目实战
应用程序对象 QApplication + 主窗口类 QMainWindow + 所有用户界面对象的基类 QWidget
(1)管理子部件 / 子布局
(2)将子部件 / 子布局添加到主布局中(main_layout)
(3)设置中央小部件及其布局 —— 将主布局设置为 QWidget 的布局
import sys
from PyQt5.QtCore import Qt
from PyQt5.QtWidgets import QApplication, QMainWindow, QWidget, QPushButton, QLabel, QVBoxLayout


class MyWindow(QMainWindow):
    """自定义窗口类,继承自 QMainWindow"""
    def __init__(self):
        super().__init__()  # 调用父类 QMainWindow 的构造函数
        self.initUI()  # 调用自定义初始化方法来设置窗口的 UI 元素

    def initUI(self):
        """初始化 UI 元素的方法"""
        self.setWindowTitle("封装的 QWidget 示例")  # 设置窗口标题
        self.setFixedSize(400, 300)  # 设置窗口大小
        ############################################################################################
        """(1)管理子部件 / 子布局"""
        self.label = QLabel("这是一个标签", self)  # 创建按钮
        self.button = QPushButton("点击我", self)  # 创建标签
        self.button.clicked.connect(self.on_click)  # 将按钮点击事件与槽函数连接
        ############################################################################################
        """(2)将子部件 / 子布局添加到主布局中(main_layout)"""
        # (1)自定义布局
        main_layout = QVBoxLayout()  # 创建垂直布局
        main_layout.addWidget(self.label, alignment=Qt.AlignCenter)  # 将标签添加到布局(居中对齐)
        main_layout.addWidget(self.button, alignment=Qt.AlignCenter)  # 将按钮添加到布局(居中对齐)
        ############################################################################################
        """(3)设置中央小部件及其布局"""
        widget = QWidget()  # 创建一个 QWidget 容器,用于承载其他部件和布局。
        widget.setLayout(main_layout)  # 将布局设置为 QWidget 的布局
        self.setCentralWidget(widget)  # 将 QWidget 设置为 QMainWindow 主窗口的中心部件,确保布局和控件显示在窗口中。

    def on_click(self):
        """按钮点击事件处理函数"""
        self.label.setText("按钮被点击了!")


if __name__ == '__main__':
    """即使不需要处理参数,也必须传递此参数(sys.argv),以保持与操作系统兼容。"""
    app = QApplication(sys.argv)  # 创建一个 QApplication 应用程序对象,sys.argv 用于获取命令行参数。
    window = MyWindow()  # 实例化自定义窗口类
    window.show()  # 显示创建的窗口
    sys.exit(app.exec_())  # 进入应用程序的事件循环,等待用户交互,程序将在事件循环中持续运行,直到手动关闭。
    # (1)app.exec_() 开始事件循环,等待用户事件(如点击、键盘输入等)。
    # (2)sys.exit() 确保程序正常退出。

"""
# QApplication 是一个应用程序对象,负责管理应用程序的控制流和主要设置。它是所有 GUI 应用程序的基础,必须在任何 GUI 元素创建之前初始化。
# QMainWindow 是一个主窗口类,是一个特殊类型的 QWidget。支持添加菜单栏、工具栏、状态栏和中央小部件。它提供了一个结构化框架,适合复杂的应用程序开发。
# QWidget 是所有用户界面对象的基类,几乎所有的部件都派生自 QWidget。可以作为一个容器,用于放置其他部件或布局。

在一个典型的 PyQt 应用程序中:
        (1)首先创建 QApplication
        (2)然后是 QMainWindow
        (3)最后在 QMainWindow 中,使用 QWidget 作为中央小部件来承载其他控件。
"""
(1)函数详解:layout.addWidget()
"""#############################################################################################
# 函数功能:将控件添加到布局中,支持自定义对齐方式和布局管理。
# 函数说明:layout.addWidget(widget, *args, alignment=None)
# 参数说明:
#         - widget:需要添加到布局中的控件对象,例如 QPushButton、QLabel 等。
#         - *args:
#           - 若使用网格布局 (QGridLayout),应指定以下参数:
#               - row:控件所在的行号(从 0 开始)。
#               - column:控件所在的列号(从 0 开始)。
#               - rowspan:控件占据的行数(可选,默认为 1)。
#               - colspan:控件占据的列数(可选,默认为 1)。
#           - 若使用其他布局(如 QVBoxLayout、QHBoxLayout),无需指定额外参数。控件按照布局顺序自动排列。
#         - alignment:控件的对齐方式(可选),适用于所有布局类型,包括:
#           - 垂直对齐:
#               - Qt.AlignTop(顶部对齐)
#               - Qt.AlignBottom(底部对齐)
#               - Qt.AlignVCenter(垂直居中)
#           - 水平对齐:
#               - Qt.AlignLeft(左对齐)
#               - Qt.AlignRight(右对齐)
#               - Qt.AlignHCenter(水平居中)
#           - 完全居中:
#               - Qt.AlignCenter(水平和垂直都居中)
#
# 注意事项:对于不同布局类型(如 QVBoxLayout、QHBoxLayout、QGridLayout),
#       参数要求略有不同,请根据布局类型正确使用。
#############################################################################################"""
(2)函数详解:layout.addLayout()
"""#############################################################################################
# 函数功能:将子布局嵌套到主布局中,以实现更复杂的界面布局。
# 函数说明:layout.addLayout(sub_layout, *args, alignment=None)
# 参数说明:
#         - sub_layout:需要嵌套到主布局中的子布局对象,例如 QVBoxLayout、QHBoxLayout 或 QGridLayout。
#         - *args:
#             - QVBoxLayout / QHBoxLayout:
#                 - 无需额外参数,子布局按照添加顺序自动排列。
#             - QGridLayout:
#                 - row:子布局所在的行号(从 0 开始)。
#                 - column:子布局所在的列号(从 0 开始)。
#                 - rowspan(可选):子布局占据的行数,默认为 1。
#                 - colspan(可选):子布局占据的列数,默认为 1。
#         - alignment:子布局的对齐方式(可选),适用于所有布局类型,包括:
#             - 垂直对齐:
#                 - Qt.AlignTop(顶部对齐)
#                 - Qt.AlignBottom(底部对齐)
#                 - Qt.AlignVCenter(垂直居中)
#             - 水平对齐:
#                 - Qt.AlignLeft(左对齐)
#                 - Qt.AlignRight(右对齐)
#                 - Qt.AlignHCenter(水平居中)
#             - 完全居中:
#                 - Qt.AlignCenter(水平和垂直都居中)
#
# 示例用法:
#     1. 垂直布局中嵌套水平布局:
#         main_layout = QVBoxLayout()
#         sub_layout = QHBoxLayout()
#         main_layout.addLayout(sub_layout, alignment=Qt.AlignTop)  # 子布局顶部对齐
#
#     2. 网格布局中嵌套子布局:
#         main_layout = QGridLayout()
#         sub_layout = QVBoxLayout()
#         main_layout.addLayout(sub_layout, 0, 1, alignment=Qt.AlignCenter)  # 第 0 行第 1 列,居中对齐
#         main_layout.addLayout(sub_layout, 1, 0, 1, 2)  # 第 1 行第 0 列,占 1 行 2 列
#
# 注意事项:
#     1. 嵌套布局时,确保子布局已经添加了控件或其他子布局,否则界面可能无法正常显示。
#     2. 对于 QVBoxLayout 和 QHBoxLayout,子布局的排列顺序按照添加顺序处理。
#     3. 对于 QGridLayout,子布局需要指定行列位置,以及是否需要跨行或跨列。
#############################################################################################"""
3.2.0、添加伸缩项 layout.addStretch:控制组件之间的间距

import sys
from PyQt5.QtWidgets import QApplication, QMainWindow, QVBoxLayout, QHBoxLayout, QPushButton, QLabel, QWidget, QSlider


class MainWindow(QMainWindow):
    def __init__(self):
        super().__init__()
        VBox_layout = QVBoxLayout()
        HBox_Layout = QHBoxLayout()

        """(1)若在部件之前及之后分别添加伸缩项 ———— 组件居中"""
        VBox_layout.addStretch(1)

        slider = QSlider()
        slider.setFixedHeight(500)
        label1 = QLabel("Label 1")
        label2 = QLabel("Label 2")
        label3 = QLabel("Label 3")

        """(2)若在部件之前添加伸缩项,部件跟在伸缩项的后面 ———— 组件置于底部"""
        VBox_layout.addStretch(8)

        HBox_Layout.addWidget(slider)
        VBox_layout.addWidget(label1)
        VBox_layout.addWidget(label2)
        VBox_layout.addWidget(label3)
        HBox_Layout.addLayout(VBox_layout)

        """(3)若在部件之后添加伸缩项,部件被伸缩项顶在前面 ———— 组件置于顶部"""
        VBox_layout.addStretch(1)

        central_widget = QWidget()
        central_widget.setLayout(HBox_Layout)
        self.setCentralWidget(central_widget)


if __name__ == "__main__":
    app = QApplication(sys.argv)
    window = MainWindow()
    window.show()
    sys.exit(app.exec_())

"""##########################################################################
函数简介:在布局中创建一个弹性空间,用于调整布局中各个部件的间距,以实现更好的分布和对齐效果。
函数说明:layout.addStretch()
输入参数:
        伸缩项的权重为0(默认),这意味着它不会占用任何额外的空间。
        伸缩项的权重为1(常用),将会根据权重在布局中占据一部分空间,从而将其他部件推向布局的边缘。
        备注:若为其余数字,则权重值越大,伸缩空间越大。
##########################################################################"""
3.2.1、垂直布局管理器 QVBoxLayout:按照从上到下的顺序排列组件
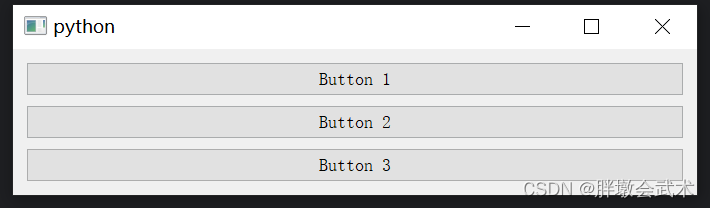
import sys
from PyQt5.QtWidgets import QApplication, QMainWindow, QVBoxLayout, QWidget, QPushButton

class MainWindow(QMainWindow):
    def __init__(self):
        super().__init__()
        vbox = QVBoxLayout()
        button1 = QPushButton("Button 1")
        button2 = QPushButton("Button 2")
        button3 = QPushButton("Button 3")
        vbox.addWidget(button1)
        vbox.addWidget(button2)
        vbox.addWidget(button3)

        central_widget = QWidget()
        central_widget.setLayout(vbox)
        self.setCentralWidget(central_widget)

if __name__ == "__main__":
    app = QApplication(sys.argv)
    window = MainWindow()
    window.show()
    sys.exit(app.exec_())
3.2.2、水平布局管理器 QHBoxLayout:按照从左到右的顺序排列组件
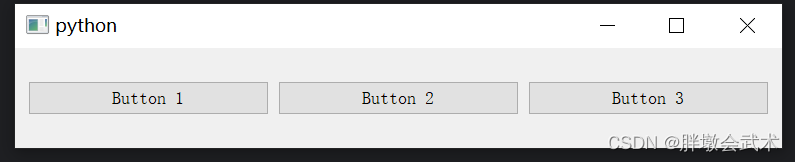
import sys
from PyQt5.QtWidgets import QApplication, QMainWindow, QWidget, QHBoxLayout, QPushButton

class MainWindow(QMainWindow):
    def __init__(self):
        super().__init__()
        hbox = QHBoxLayout()
        button1 = QPushButton("Button 1")
        button2 = QPushButton("Button 2")
        button3 = QPushButton("Button 3")
        hbox.addWidget(button1)
        hbox.addWidget(button2)
        hbox.addWidget(button3)

        central_widget = QWidget()
        central_widget.setLayout(hbox)
        self.setCentralWidget(central_widget)

if __name__ == "__main__":
    app = QApplication(sys.argv)
    window = MainWindow()
    window.show()
    sys.exit(app.exec_())
3.2.3、网格布局管理器 QGridLayout:指定每个组件的位置(行 + 列)
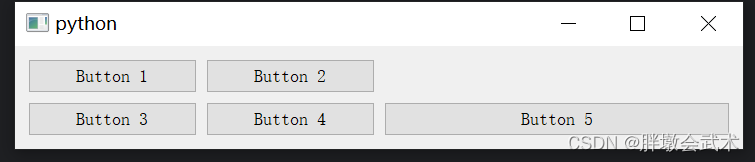
import sys
from PyQt5.QtWidgets import QApplication, QMainWindow, QWidget, QGridLayout, QPushButton

class MainWindow(QMainWindow):
    def __init__(self):
        super().__init__()
        grid_layout = QGridLayout()
        button1 = QPushButton("Button 1")
        button2 = QPushButton("Button 2")
        button3 = QPushButton("Button 3")
        button4 = QPushButton("Button 4")
        button5 = QPushButton("Button 5")
        grid_layout.addWidget(button1, 0, 0)        # 第一行第一列
        grid_layout.addWidget(button2, 0, 1)        # 第一行第二列
        grid_layout.addWidget(button3, 1, 0)        # 第二行第一列
        grid_layout.addWidget(button4, 1, 1)        # 第二行第二列
        grid_layout.addWidget(button5, 1, 2, 1, 2)  # 第二行的第三和第四列

        central_widget = QWidget()
        central_widget.setLayout(grid_layout)
        self.setCentralWidget(central_widget)

if __name__ == "__main__":
    app = QApplication(sys.argv)
    window = MainWindow()
    window.show()
    sys.exit(app.exec_())
3.2.4、表单布局管理器 QFormLayout:对齐标签和输入框
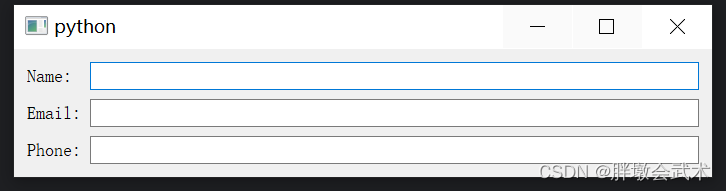
import sys
from PyQt5.QtWidgets import QApplication, QMainWindow, QWidget, QFormLayout, QLineEdit, QLabel

class MainWindow(QMainWindow):
    def __init__(self):
        super().__init__()
        form_layout = QFormLayout()
        label1 = QLabel("Name:")
        name_input = QLineEdit()
        label2 = QLabel("Email:")
        email_input = QLineEdit()
        label3 = QLabel("Phone:")
        phone_input = QLineEdit()
        form_layout.addRow(label1, name_input)
        form_layout.addRow(label2, email_input)
        form_layout.addRow(label3, phone_input)

        central_widget = QWidget()
        central_widget.setLayout(form_layout)
        self.setCentralWidget(central_widget)

if __name__ == "__main__":
    app = QApplication(sys.argv)
    window = MainWindow()
    window.show()
    sys.exit(app.exec_())
3.2.5、堆叠布局管理器 QStackedLayout:在一个窗口中,管理多个窗口,但同一时刻只能显示一个窗口(如:选项卡界面)


import sys
from PyQt5.QtWidgets import QApplication, QMainWindow, QWidget, QPushButton, QLabel, QVBoxLayout, QStackedLayout

class MainWindow(QMainWindow):
    def __init__(self):
        super().__init__()
        self.setWindowTitle("Stacked Layout Example")

        self.stacked_layout = QStackedLayout()
        page1 = self.create_page("Page 1 Content", "Switch to Page 2")
        page2 = self.create_page("Page 2 Content", "Switch to Page 1")
        self.stacked_layout.addWidget(page1)
        self.stacked_layout.addWidget(page2)

        central_widget = QWidget()
        central_widget.setLayout(self.stacked_layout)
        self.setCentralWidget(central_widget)

    def create_page(self, content_text, switch_button_text):
        layout = QVBoxLayout()
        content_label = QLabel(content_text)
        switch_button = QPushButton(switch_button_text)
        switch_button.clicked.connect(self.switch_page)
        layout.addWidget(content_label)
        layout.addWidget(switch_button)

        page = QWidget()
        page.setLayout(layout)
        return page

    def switch_page(self):
        # 切换页面
        current_index = self.stacked_layout.currentIndex()
        next_index = (current_index + 1) % 2  # 切换到下一页(循环切换)
        self.stacked_layout.setCurrentIndex(next_index)

if __name__ == "__main__":
    app = QApplication(sys.argv)
    window = MainWindow()
    window.show()
    sys.exit(app.exec_())
四、PyQt 常用组件
在 GUI 编程中,术语"组件"、"部件"和"控件"通常用于指代用户界面的基本构建块。术语在不同的 GUI 框架和文档中会略有不同,但可以互换使用。
4.1、简介
PyQt提供了丰富的组件(也称为控件或部件),用于构建图形用户界面。
| 组件(Widget) | 简介 | |
|---|---|---|
| 窗口组件 | QWidget | 所有用户界面对象的基类,用于创建窗口和部件。 |
| QMainWindow | 主窗口的类,通常用作应用程序的主界面。 | |
| 基础组件 | QLabel | 显示文本或图像。 |
| QLineEdit | 输入单行文本。 | |
| QTextEdit | 输入多行文本。 | |
| QSpinBox | (数字)整数输入框。 | |
| QDoubleSpinBox | (数字)浮点数输入框。 | |
| QPushButton | 按钮。 | |
| QRadioButton | 单选按钮。在多个选项中进行单选。 | |
| QCheckBox | 复选框。在多个选项中进行多选 | |
| QGroupBox | 分组框。将其他小部件放置在其中 | |
| QSlider | 滑动条。 | |
| QTabWidget | 选项卡界面。 | |
| QComboBox | 下拉列表框。 | |
| 对话框类 - 组件 | QDialog | 自定义对话框 |
| QInputDialog | 获取用户输入对话框 | |
| QFontDialog | 字体对话框。 | |
| QColorDialog | 颜色对话框。 | |
| QProgressDialog | 进度对话框。 | |
| QFileDialog | 打开文件/文件夹对话框。 | |
| QMessageBox | 消息提示框。 | |
| 菜单类 - 组件 | QMenu | 菜单。 |
| QMenuBar | 菜单栏。 | |
| QToolBar | 工具栏。 | |
| QStatusBar | 状态栏。 | |
| QProgressBar | 进度条。 | |
| 绘图类 - 组件 | QGraphicsScene | 管理2D图形项的场景。 |
| QGraphicsView | 显示二维图形和图像。 | |
| QGraphicsItem | 在QGraphicsScene中显示图形项。 | |
| QTableView | 显示表格数据。 | |
| QTreeWidget | 显示树形数据。 | |
| QListWidget | 显示列表数据。 | |
| QCalendarWidget | 显示日历。 | |
| QDockWidget | 创建可停靠的面板。 | |
| QSplitter | 在界面中创建可调整大小的分割区域。 | |
| QScrollArea | 显示超过容器尺寸的内容,并支持滚动查看。 |
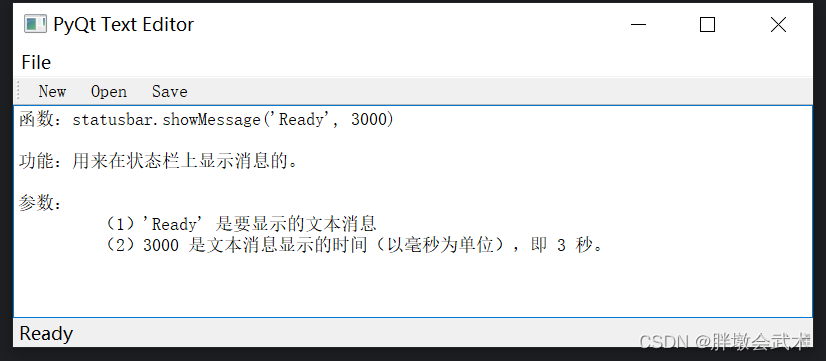
4.2、操作类 QAction:菜单栏 QMenuBar + 工具栏 QToolBar + 状态栏 QStatusBar
QAction:用于表示用户界面中某个操作的类。它常与菜单、工具栏或按钮一起使用,以便用户执行特定的操作。
import sys
from PyQt5.QtWidgets import QApplication, QMainWindow, QMenu, QMenuBar, QToolBar, QStatusBar, QAction, QTextEdit, \
    QFileDialog


class MyWindow(QMainWindow):
    def __init__(self):
        super().__init__()
        ###################################################
        # (1)创建菜单栏,并添加一个菜单
        menubar = self.menuBar()
        file_menu = menubar.addMenu('File')

        # (2)创建操作类,农添加到菜单栏
        new_action = QAction('New', self)
        open_action = QAction('Open', self)
        save_action = QAction('Save', self)
        exit_action = QAction('Exit', self)
        file_menu.addAction(new_action)
        file_menu.addAction(open_action)
        file_menu.addAction(save_action)
        file_menu.addSeparator()  # 分隔线
        file_menu.addAction(exit_action)

        # (3)连接菜单项和工具按钮的槽函数
        new_action.triggered.connect(self.newFile)
        open_action.triggered.connect(self.openFile)
        save_action.triggered.connect(self.saveFile)
        exit_action.triggered.connect(self.exitApp)
        ###################################################
        # (1)创建工具栏
        toolbar = self.addToolBar('Toolbar')

        # (2)在工具栏中,添加工具按钮
        new_button = toolbar.addAction('New')  # 用于清空(当前)文本编辑框
        open_button = toolbar.addAction('Open')  # 用于打开txt文本并添加到文本编辑框
        save_button = toolbar.addAction('Save')  # 用于保存文本编辑框到txt文本

        # (3)连接菜单项和工具按钮的槽函数
        new_button.triggered.connect(self.newFile)
        open_button.triggered.connect(self.openFile)
        save_button.triggered.connect(self.saveFile)
        ###################################################
        # (1)创建状态栏
        statusbar = self.statusBar()

        # (2)在状态栏中显示消息: 'Ready' 是要显示的文本消息,3000 是消息显示的时间(以毫秒为单位),即3秒。
        statusbar.showMessage('Ready', 3000)
        ###################################################
        # 创建文本编辑框
        self.text_edit = QTextEdit(self)
        self.setCentralWidget(self.text_edit)  # 将文本编辑框设置为主窗口的中心组件

    def newFile(self):
        self.text_edit.clear()  # 清空文本编辑框

    def openFile(self):
        try:
            # 打开文件对话框 ———— 选择txt文件并读取内容,然后显示在文本编辑框中
            file_dialog = QFileDialog(self)
            file_path, _ = file_dialog.getOpenFileName()
            if file_path:
                with open(file_path, 'r', encoding='utf-8') as file:
                    file_contents = file.read()
                    self.text_edit.setPlainText(file_contents)
        except Exception as e:
            print(f"Error opening file: {str(e)}")

    def saveFile(self):
        try:
            # 保存文件对话框 ———— 将文本编辑框中的内容保存到txt文件中
            file_dialog = QFileDialog(self)
            file_path, _ = file_dialog.getSaveFileName()
            if file_path:
                with open(file_path, 'w') as file:
                    file_contents = self.text_edit.toPlainText()
                    file.write(file_contents)
        except Exception as e:
            print(f"Error saving file: {str(e)}")

    def exitApp(self):
        self.close()


if __name__ == '__main__':
    app = QApplication(sys.argv)
    window = MyWindow()
    window.setWindowTitle('PyQt Text Editor')
    window.setGeometry(100, 100, 800, 300)
    window.show()
    sys.exit(app.exec_())
4.3、对话框类 Dialog:输入 QInputDialog + 颜色 QColorDialog + 字体 QFontDialog + 文件选择 QFileDialog + 进度 QProgressDialog + 消息 QMessageBox
输入对话框QInputDialog + 颜色对话框QColorDialog + 字体对话框QFontDialog + 文件选择对话框QFileDialog + 进度对话框QProgressDialog + 消息对话框QMessageBox

import sys
from PyQt5.QtWidgets import QApplication, QMainWindow, QVBoxLayout, QWidget, QPushButton, QLabel, QInputDialog, QColorDialog, QFontDialog, QFileDialog, QProgressDialog, QMessageBox
from PyQt5.QtCore import Qt
from PyQt5.QtGui import QColor


class MainWindow(QMainWindow):
    def __init__(self):
        super().__init__()
        self.initUI()

    def initUI(self):
        self.setWindowTitle("Dialogs Example")
        self.setGeometry(100, 100, 400, 300)

        layout = QVBoxLayout()

        # 输入对话框按钮
        input_btn = QPushButton("Input Dialog")
        input_btn.clicked.connect(self.show_input_dialog)
        layout.addWidget(input_btn)

        # 颜色对话框按钮
        color_btn = QPushButton("Color Dialog")
        color_btn.clicked.connect(self.show_color_dialog)
        layout.addWidget(color_btn)

        # 字体对话框按钮
        font_btn = QPushButton("Font Dialog")
        font_btn.clicked.connect(self.show_font_dialog)
        layout.addWidget(font_btn)

        # 打开文件对话框按钮
        open_file_btn = QPushButton("Open File Dialog")
        open_file_btn.clicked.connect(self.show_file_dialog)
        layout.addWidget(open_file_btn)

        # 进度对话框按钮
        progress_btn = QPushButton("Progress Dialog")
        progress_btn.clicked.connect(self.show_progress_dialog)
        layout.addWidget(progress_btn)

        # 消息框按钮
        message_btn = QPushButton("Message Box")
        message_btn.clicked.connect(self.show_message_box)
        layout.addWidget(message_btn)

        # 标签用于显示结果
        self.result_label = QLabel()
        layout.addWidget(self.result_label)

        central_widget = QWidget()
        central_widget.setLayout(layout)
        self.setCentralWidget(central_widget)

    def show_input_dialog(self):
        text, ok = QInputDialog.getText(self, "Input Dialog", "Enter something:")
        if ok and text:
            self.result_label.setText(f"Input: {text}")
        else:
            self.result_label.setText("Input Dialog Canceled")

    def show_color_dialog(self):
        color = QColorDialog.getColor(QColor(255, 0, 0), self, "Color Dialog")
        if color.isValid():
            self.result_label.setStyleSheet(f"background-color: {color.name()}")
            self.result_label.setText(f"Selected Color: {color.name()}")

    def show_font_dialog(self):
        font, ok = QFontDialog.getFont(self)
        if ok:
            self.result_label.setFont(font)
            self.result_label.setText(f"Selected Font: {font.family()}, {font.pointSize()}pt")

    def show_file_dialog(self):
        file_name, _ = QFileDialog.getOpenFileName(self, "Open File Dialog", "", "All Files (*);;Text Files (*.txt)")
        if file_name:
            self.result_label.setText(f"Selected File: {file_name}")

    def show_progress_dialog(self):
        progress_dialog = QProgressDialog("Processing...", "Cancel", 0, 100, self)
        progress_dialog.setWindowModality(Qt.WindowModal)
        progress_dialog.setWindowTitle("Progress Dialog")

        for i in range(100):
            progress_dialog.setValue(i)
            if progress_dialog.wasCanceled():
                break

        self.result_label.setText("Progress Dialog Completed")

    def show_message_box(self):
        msg_box = QMessageBox()
        msg_box.setIcon(QMessageBox.Information)
        msg_box.setWindowTitle("Message Box")
        msg_box.setText("This is an information message box.")
        msg_box.setStandardButtons(QMessageBox.Ok | QMessageBox.Cancel)
        result = msg_box.exec_()

        if result == QMessageBox.Ok:
            self.result_label.setText("Message Box: Ok button clicked")
        else:
            self.result_label.setText("Message Box: Cancel button clicked")


if __name__ == "__main__":
    app = QApplication(sys.argv)
    window = MainWindow()
    window.show()
    sys.exit(app.exec_())
4.4、属性设置(窗口+组件):位置 + 尺寸 + 颜色 + 连接到槽 + 图标
import sys
from PyQt5.QtWidgets import QApplication, QMainWindow, QPushButton, QLabel, QSizePolicy
from PyQt5.QtCore import Qt
from PyQt5.QtGui import QIcon
class MainWindow(QMainWindow):
def __init__(self):
super().__init__()
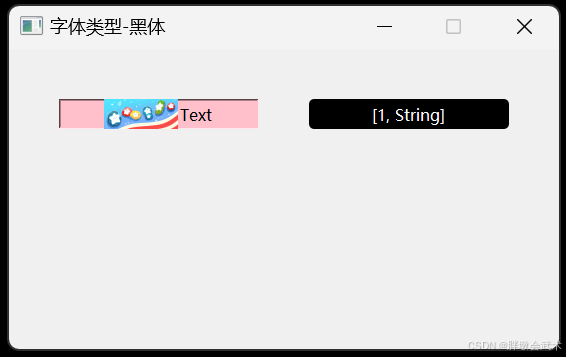
self.setWindowTitle("字体类型-黑体") # 设置窗口标题
self.move(100, 200) # 设置窗口的初始位置:self.move(x, y)
self.resize(500, 500) # 设置窗口的初始大小:self.resize(width, height)
self.setGeometry(800, 800, 550, 300) # 设置窗口的初始位置和尺寸:self.setGeometry(x, y, width, height)
# self.setFixedSize(1000, 650) # 设置窗口的固定大小,禁止用户调整窗口的大小。self.setFixedSize(width, height)
self.setMinimumSize(10, 10) # 设置窗口的最小尺寸,固定最小尺寸。self.setFixedSize(width, height)
self.setMaximumSize(1000, 1000) # 设置窗口的最大尺寸,固定最大尺寸。self.setMaximumSize(width, height)
self.setWindowOpacity(0.8) # 设置 80% 不透明度
self.setWindowIcon(QIcon('image.jpg'))
####################################################################################################
self.button = QPushButton("button", self)
self.button.setGeometry(50, 50, 200, 30) # 设置按钮位置和尺寸(x, y, width, height)
# self.button.setFixedSize(300, 200) # 设置控件的尺寸
# self.button.setFixedHeight(100) # 设置控件的高度
# self.button.setFixedWidth(50) # 设置控件的宽度
self.button.setEnabled(True) ##启用或禁用控件
self.button.setVisible(True) ##设置控件的可见性
self.button.setCheckable(False) # 使按钮具有“按下 / 未按下”状态,用于切换型按钮。
self.button.setFlat(True) # 设置按钮的样式是否扁平化,不显示边框。
self.button.setText("Text") # 设置按钮上的文本内容。
# self.button.clicked.connect(self.on_button_click) # 点击按钮时触发事件
####################################################################################################
# 信号连接到槽,并传递参数。
# 错误代码:self.open_function_window(1, "String") 会在 connect 方法调用时立即执行,而不是在按钮点击时执行。
# 原因分析:connect 方法需要一个函数对象(即函数名),但这里通过调用 self.open_function_window,将其返回值(通常为 None)传递给了 connect。
# 解决方法:可以使用 lambda 函数 或 functools.partial 来传递参数,确保函数在按钮点击时才执行:
# (1)self.button1.clicked.connect(lambda: self.open_function_window(1, "String"))
#
# (2)from functools import partial
# self.button1.clicked.connect(partial(self.open_function_window, 1, "String"))
self.button.clicked.connect(lambda: self.on_button_click1(1, "String"))
####################################################################################################
self.button.setStyleSheet("background-color: pink; color: black; " # 设置背景颜色 + 字体颜色
"font-family: 'Microsoft YaHei'; font-size: 16px; " # 设置字体类型(如黑体) # 字体大小
) # 设置控件边框:"border: 1px solid black; border-radius: 1px;"
self.button.setIcon(QIcon("image.jpg")) ##设置按钮的图标
self.button.setIconSize(self.button.size()) ##调整图标大小为按钮的大小
self.button.setToolTip("这是一个按钮") ##设置鼠标悬停时的提示文本
self.button.setShortcut("Ctrl+X") ##为按钮设置快捷键。
self.button.setCursor(Qt.PointingHandCursor) ##将鼠标指针改为手指形状
####################################################################################################
self.label = QLabel("这是一个标签", self)
self.label.setGeometry(300, 50, 200, 30) # 设置标签位置和尺寸(x, y, width, height)
self.label.setStyleSheet("background-color: black; color: white; font-size: 16px; border-radius: 5px;")
self.label.setAlignment(Qt.AlignCenter) ##设置标签的文字居中(默认左对齐)Qt.AlignLeft, Qt.AlignRight, Qt.AlignCenter。
self.label.setWordWrap(True) # 设置是否允许标签文本自动换行。
self.label.setToolTip("tooltip") # 设置悬停时的提示文本。
self.label.setOpenExternalLinks(True) # 如果标签包含超链接,设置是否在浏览器中打开。
self.label.setScaledContents(True) # 设置图像是否自动缩放以适应标签大小。
# self.label.setSizePolicy(QSizePolicy.Policy, QSizePolicy.Policy) # 设置按钮的大小策略,控制按钮在布局中如何拉伸或收缩。
# from PyQt5.QtGui import QFont
# self.label.setFont(QFont("Arial", 50, QFont.Bold)) # 设置标签属性:字体类型(Arial字体)、字体大小(12号)、加粗
# from PyQt5.QtGui import QPixmap
# self.label.setPixmap(QPixmap("image.jpg")) ##设置标签的图标
def on_button_click(self):
self.label.setText("button is clicked")
def on_button_click1(self, function_index, function_name):
self.label.setText(f"[{function_index}, {function_name}]")
if __name__ == '__main__':
app = QApplication(sys.argv)
app.setStyleSheet("QWidget { font-family: 'Microsoft YaHei'; font-size: 14px; }") # 设置全局样式表(字体类型-黑体、字体大小)
# app.setStyleSheet("""
# QPushButton {
# background-color: #3498db; /* 背景色 */
# color: white; /* 字体颜色 */
# border-radius: 10px; /* 圆角 */
# padding: 10px; /* 内边距 */
# font-size: 16px; /* 字体大小 */
# }
# QLabel {
# color: #2c3e50; /* 标签字体颜色 */
# font-weight: bold; /* 加粗 */
# border: 1px solid #bdc3c7; /* 边框 */
# }
# """)
window = MainWindow()
window.show()
sys.exit(app.exec_())
# self.checkbox.stateChanged.connect(self.function) # 将(复选框)信号连接到槽
# self.slider.valueChanged.connect(self.function) # 将(滑动条)信号连接到槽
# self.LineEdit.returnPressed.connect(self.function) # 将(单行-文本框)信号连接到槽
# self.text_edit.textChanged.connect(self.function) # 将(多行-文本框)信号连接到槽
# self.button.clicked.connect(self.function) # 将(按钮)信号连接到槽
# self.radiobutton.clicked.connect(self.function) # 将(单选按钮)信号连接到槽
4.5、显示文本 QLabel:Hello, PyQt!
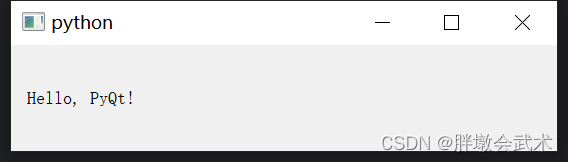
from PyQt5.QtWidgets import QApplication, QWidget, QLabel, QVBoxLayout

class MyApp(QWidget):
    def __init__(self):
        super().__init__()  # 调用父类的构造函数

        # 创建垂直布局管理器
        self.layout = QVBoxLayout()
        # 创建标签对象并添加到布局中
        self.label = QLabel('Hello, PyQt!')
        self.layout.addWidget(self.label)

        self.setLayout(self.layout)  # 设置布局到当前窗口
        self.show()  # 显示窗口

if __name__ == '__main__':
    import sys
    app = QApplication(sys.argv)  # 创建应用程序对象
    widget = MyApp()               # 创建窗口对象
    sys.exit(app.exec_())          # 运行应用程序
4.6、按钮 QPushButton:用户登录界面


import sys
from PyQt5.QtWidgets import QApplication, QWidget, QLabel, QLineEdit, QPushButton, QVBoxLayout, QHBoxLayout


class LoginWindow(QWidget):
    def __init__(self):
        super().__init__()
        self.setWindowTitle("Login Window")
        # 创建控件
        self.username_label = QLabel("Username:")
        self.username_edit = QLineEdit()

        self.password_label = QLabel("Password:")
        self.password_edit = QLineEdit()

        self.login_button = QPushButton("Login")
        self.login_button.clicked.connect(self.login)  # 连接按钮点击事件到槽函数
        self.result_label = QLabel("")

        # 将容器部件添加到主布局中
        layout = QVBoxLayout()  # 垂直布局管理器

        self.username_layout = QHBoxLayout()  # 水平布局管理器
        self.username_layout.addWidget(self.username_label)  # 将文本框添加到水平布局管理器中
        self.username_layout.addWidget(self.username_edit)  # 将按钮添加到水平布局管理器中
        layout.addLayout(self.username_layout)  # layout.addLayout

        self.password_layout = QHBoxLayout()  # 水平布局管理器
        self.password_layout.addWidget(self.password_label)  # 将文本框添加到水平布局管理器中
        self.password_layout.addWidget(self.password_edit)  # 将按钮添加到水平布局管理器中
        layout.addLayout(self.password_layout)  # layout.addLayout

        # 将登录按钮和结果标签添加到垂直布局中
        layout.addWidget(self.login_button)  # layout.addWidget
        layout.addWidget(self.result_label)  # layout.addWidget

        # 设置窗口的主布局
        self.setLayout(layout)

    def login(self):
        username = self.username_edit.text()
        password = self.password_edit.text()

        # 在这里可以编写登录验证逻辑,这里只是简单地判断用户名和密码是否为空
        if username == 'you' and password == '66':
            self.result_label.setText("Login successful!")
        else:
            self.result_label.setText("Please check username and password.")


if __name__ == "__main__":
    app = QApplication(sys.argv)
    window = LoginWindow()
    window.show()
    sys.exit(app.exec_())
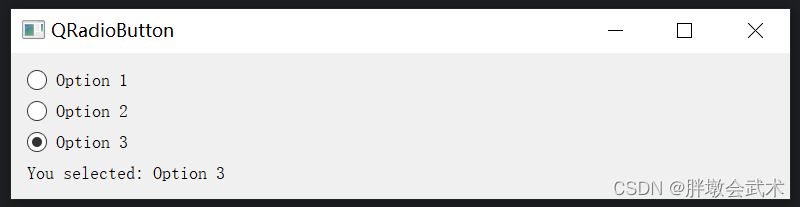
4.7、单选按钮 QRadioButton
import sys
from PyQt5.QtWidgets import QApplication, QLabel, QRadioButton, QVBoxLayout, QWidget


class RadioButtonExample(QWidget):
    def __init__(self):
        super().__init__()
        self.setWindowTitle('QRadioButton')
        ###############################################################
        # 创建文本
        self.label = QLabel("")
        self.label.setText("You selected: Option 1")  # 设置文本内容

        # 创建单选按钮
        self.radioButton1 = QRadioButton("Option 1")
        self.radioButton2 = QRadioButton("Option 2")
        self.radioButton3 = QRadioButton("Option 3")

        self.radioButton1.setChecked(True)  # 设置默认选项

        self.radioButton1.clicked.connect(self.on_radio_button_clicked)  # 将(输入框)信号连接到槽
        self.radioButton2.clicked.connect(self.on_radio_button_clicked)
        self.radioButton3.clicked.connect(self.on_radio_button_clicked)
        ###############################################################
        # 将单选按钮和标签添加到布局
        layout = QVBoxLayout()
        layout.addWidget(self.radioButton1)
        layout.addWidget(self.radioButton2)
        layout.addWidget(self.radioButton3)
        layout.addWidget(self.label)

        # 将布局设置为窗口的主布局
        self.setLayout(layout)

    def on_radio_button_clicked(self):
        """两种用法"""
        # 判断每个单选按钮的状态
        if self.radioButton1.isChecked():
            self.label.setText("You selected: Option 1")
        elif self.radioButton2.isChecked():
            self.label.setText("You selected: Option 2")
        elif self.radioButton3.isChecked():
            self.label.setText("You selected: Option 3")

    """# 方法二
    def on_radio_button_clicked(self):
        sender = self.sender()  # 获取点击的单选按钮
        self.label.setText("You selected: " + sender.text())  # 更新标签文本"""
    ##################################################################
    """在 PyQt 中,sender() 是 QObject 类的一个方法,用于获取发出信号的对象。
    当你在事件或信号处理函数(槽函数)中使用 sender(),它会返回发出该信号的对象。
    这个方法通常用于获取哪个控件触发了信号,特别是在多个控件共享一个槽函数时。"""


if __name__ == '__main__':
    app = QApplication(sys.argv)
    window = RadioButtonExample()
    window.show()
    sys.exit(app.exec_())
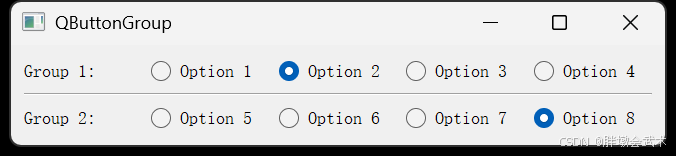
4.8、按钮分组和管理 QButtonGroup:默认互斥
在 PyQt 中,QButtonGroup 可以用于对一组按钮(包括单选按钮、复选框或普通按钮)进行分组和管理。特别是对于单选按钮,QButtonGroup 提供了一种简单的方式来实现互斥逻辑。
- 步骤:使用
QButtonGroup对多个QRadioButton分组,每个 QButtonGroup 可以包含多个 QRadioButton。- 备注:组内的按钮互斥,只有一个可以被选中,而不同组中的按钮是独立的。
import sys
from PyQt5.QtWidgets import (QApplication, QMainWindow, QVBoxLayout, QHBoxLayout, QWidget, QRadioButton, QButtonGroup, QLabel, QFrame)

class MainWindow(QMainWindow):
    def __init__(self):
        super().__init__()
        self.setWindowTitle("QButtonGroup")
        ##########################################################
        # 第一组按钮
        self.group1 = QButtonGroup(self)
        self.group1.setExclusive(True)  # 设置互斥(默认)

        radio1_1 = QRadioButton("Option 1")
        radio1_2 = QRadioButton("Option 2")
        radio1_3 = QRadioButton("Option 3")
        radio1_4 = QRadioButton("Option 4")

        # 将按钮加入第一组
        self.group1.addButton(radio1_1)
        self.group1.addButton(radio1_2)
        self.group1.addButton(radio1_3)
        self.group1.addButton(radio1_4)
        ##########################################################
        # 添加分隔线
        line = QFrame()
        line.setFrameShape(QFrame.HLine)
        line.setFrameShadow(QFrame.Sunken)
        ##########################################################
        # 第二组按钮
        self.group2 = QButtonGroup(self)
        self.group2.setExclusive(True)  # 设置互斥(默认)

        radio2_1 = QRadioButton("Option 5")
        radio2_2 = QRadioButton("Option 6")
        radio2_3 = QRadioButton("Option 7")
        radio2_4 = QRadioButton("Option 8")

        # 将按钮加入第二组
        self.group2.addButton(radio2_1)
        self.group2.addButton(radio2_2)
        self.group2.addButton(radio2_3)
        self.group2.addButton(radio2_4)
        ##########################################################
        group1_label = QLabel("Group 1:")
        group2_label = QLabel("Group 2:")

        # 第二组按钮布局
        group1_layout = QHBoxLayout()
        group1_layout.addWidget(group1_label)
        group1_layout.addWidget(radio1_1)
        group1_layout.addWidget(radio1_2)
        group1_layout.addWidget(radio1_3)
        group1_layout.addWidget(radio1_4)

        # 第一组按钮布局
        group2_layout = QHBoxLayout()
        group2_layout.addWidget(group2_label)
        group2_layout.addWidget(radio2_1)
        group2_layout.addWidget(radio2_2)
        group2_layout.addWidget(radio2_3)
        group2_layout.addWidget(radio2_4)
        ##########################################################
        # 创建主布局
        main_layout = QVBoxLayout()
        main_layout.addLayout(group1_layout)  # 添加第二组到布局
        main_layout.addWidget(line)
        main_layout.addLayout(group2_layout)  # 添加第二组到布局
        ##########################################################
        # 设置中央小部件及其布局
        central_widget = QWidget()
        central_widget.setLayout(main_layout)
        self.setCentralWidget(central_widget)


if __name__ == "__main__":
    app = QApplication(sys.argv)
    window = MainWindow()
    window.show()
    sys.exit(app.exec_())
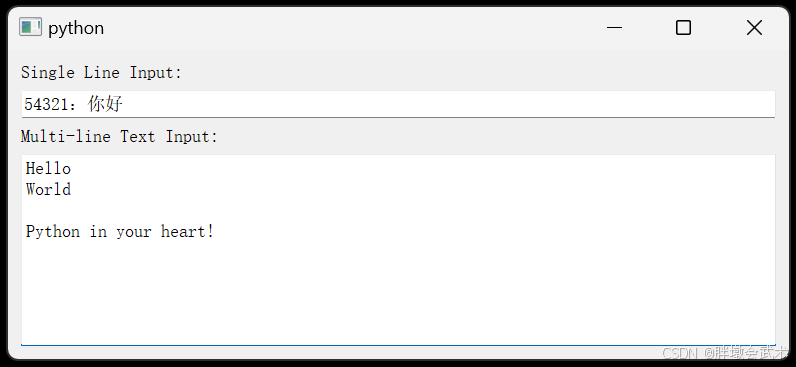
4.9、文本框 QLineEdit + QTextEdit(单行 + 多行)
import sys
from PyQt5.QtWidgets import QApplication, QMainWindow, QVBoxLayout, QWidget, QLabel, QLineEdit, QTextEdit


class MainWindow(QMainWindow):
    def __init__(self):
        super().__init__()

        layout = QVBoxLayout()

        # QLineEdit 示例
        self.line_edit = QLineEdit(self)
        self.line_edit.setPlaceholderText("Enter a number")
        self.line_edit.textChanged.connect(self.show_line_edit_text)

        # QTextEdit 示例
        self.text_edit = QTextEdit(self)
        self.text_edit.setPlaceholderText("Enter a number")
        self.text_edit.textChanged.connect(self.show_text_edit_text)

        layout.addWidget(QLabel("Single Line Input:"))
        layout.addWidget(self.line_edit)
        layout.addWidget(QLabel("Multi-line Text Input:"))
        layout.addWidget(self.text_edit)

        central_widget = QWidget()
        central_widget.setLayout(layout)
        self.setCentralWidget(central_widget)

    def show_line_edit_text(self, text):
        print("Line Edit Text:", text)

    def show_text_edit_text(self):
        text = self.text_edit.toPlainText()  # 获取 QTextEdit 的文本
        print("Text Edit Text:", text)


if __name__ == "__main__":
    app = QApplication(sys.argv)
    window = MainWindow()
    window.show()
    sys.exit(app.exec_())
(0)获取文本状态
(1)输入框2将根据输入框1的值,自动计算;
(2)若输入框2的值自定义,则自动计算功能不启用。

import sys
from PyQt5.QtWidgets import QApplication, QMainWindow, QLineEdit, QVBoxLayout, QWidget


class MainWindow(QMainWindow):
    def __init__(self):
        super().__init__()

        self.setWindowTitle("QLineEdit 信号示例")

        self.line_edit_1 = QLineEdit(self)
        self.line_edit_2 = QLineEdit(self)

        self.is_programmatic_change = False
        self.line_edit_1.textChanged.connect(self.on_text_changed)
        self.line_edit_2.textChanged.connect(self.on_text_2_changed)

        layout = QVBoxLayout()
        layout.addWidget(self.line_edit_1)
        layout.addWidget(self.line_edit_2)

        container = QWidget()
        container.setLayout(layout)
        self.setCentralWidget(container)

    def on_text_changed(self, text):
        try:
            value = int(text) + 1
            self.is_programmatic_change = True
            self.line_edit_2.setText(str(value))
            self.is_programmatic_change = False
        except ValueError:
            # 如果转换失败(例如输入的不是数字),则清空第二个文本框
            self.line_edit_2.clear()

    def on_text_2_changed(self, text):
        if self.is_programmatic_change:
            self.line_edit_2.setStyleSheet("color: grey;")
            print(f"输入框的值变化是由程序设置的,状态为{self.is_programmatic_change}")
        else:
            self.line_edit_2.setStyleSheet("color: black;")
            print(f"输入框的值变化是由用户手动输入的,状态为{self.is_programmatic_change}")


if __name__ == '__main__':
    app = QApplication(sys.argv)
    window = MainWindow()
    window.show()
    sys.exit(app.exec_())
(1)文本 - 校验器 QRegExpValidator :限制用户输入的文本(英文 / 数字)

import sys
from PyQt5.QtWidgets import QApplication, QMainWindow, QVBoxLayout, QWidget, QLineEdit
from PyQt5.QtCore import QRegExp
from PyQt5.QtGui import QRegExpValidator


class MainWindow(QMainWindow):
    def __init__(self):
        super().__init__()

        layout = QVBoxLayout()

        self.line_edit = QLineEdit(self)
        self.line_edit.setPlaceholderText("Enter English and numbers only")

        # english_only = QRegExp("[a-zA-Z]+")  # 创建一个正则表达式,用于匹配只包含英文字符的文本
        # numbers_only = QRegExp("[0-9]+")  # 创建一个正则表达式,用于匹配只包含数字的文本
        regex = QRegExp("[A-Za-z0-9]+")  # 创建一个正则表达式,只允许输入英文和数字

        validator = QRegExpValidator(regex)
        self.line_edit.setValidator(validator)

        layout.addWidget(self.line_edit)

        central_widget = QWidget()
        central_widget.setLayout(layout)
        self.setCentralWidget(central_widget)


if __name__ == "__main__":
    app = QApplication(sys.argv)
    window = MainWindow()
    window.show()
    sys.exit(app.exec_())

"""##########################################################################
函数功能:QRegExp 类是 Qt 中用于处理正则表达式的类。
函数说明:QRegExp(pattern: str,
                caseSensitivity: Qt.CaseSensitivity = Qt.CaseSensitive,
                syntax: QRegExp.PatternSyntax = QRegExp.RegExp)
输入参数:
        pattern             构造一个 QRegExp 对象,使用给定的正则表达式 pattern。
        caseSensitivity     指定是否区分大小写,默认为区分大小写。
        syntax              指定正则表达式的语法,默认为正则表达式语法。
"""

"""
函数功能:QRegExpValidator 类是 Qt 中用于输入验证的工具之一。它允许您使用正则表达式来限制用户在 QLineEdit 等控件中输入的文本。
函数说明:QRegExpValidator(regexp: QRegExp,
                         parent: QObject = None)
输入参数:
        regexp              构造一个 QRegExpValidator 对象,使用给定的正则表达式 regexp 进行验证。
        parent              用于设置对象的父级。
##########################################################################"""
(2)文本 - 校验器 QIntValidator + QDoubleValidator(整数 + 浮点数):限制用户输入的文本(数字)。

import sys
from PyQt5.QtWidgets import QApplication, QMainWindow, QVBoxLayout, QHBoxLayout, QWidget, QLabel, QLineEdit
from PyQt5.QtGui import QIntValidator, QDoubleValidator


class MainWindow(QMainWindow):
    def __init__(self):
        super().__init__()

        int_label = QLabel("Enter an int between [0, 100]:")
        int_label.setFixedWidth(350)  # 设置固定的宽度
        int_validator = QIntValidator(0, 100)       # 创建QIntValidator,设置范围:[0, 100]
        int_lineedit = QLineEdit()                  # 创建一个 QLineEdit 控件
        int_lineedit.setValidator(int_validator)    # 设置校验器
        # 将校验器应用到QLineEdit控件中,用于限制用户只能输入 0 到 100 之间的整数。

        double_label = QLabel("Enter an double between [0.0, 100.0]:")
        double_label.setFixedWidth(350)  # 设置固定的宽度
        double_validator = QDoubleValidator(0.0, 100.0, 2)       # 创建QDoubleValidator,设置范围:[0.0, 100.0],保留两位小数
        double_lineedit = QLineEdit()                         # 创建一个 QLineEdit 控件
        double_lineedit.setValidator(double_validator)           # 设置校验器
        # 将校验器应用到QDoubleValidator控件中,用于限制用户只能输入 0.0 到 100.0 之间的浮点数。

        # 布局管理器
        V_layout = QVBoxLayout()
        H1_layout = QHBoxLayout()
        H2_layout = QHBoxLayout()

        H1_layout.addWidget(int_label)
        H1_layout.addWidget(int_lineedit)
        H2_layout.addWidget(double_label)
        H2_layout.addWidget(double_lineedit)
        V_layout.addLayout(H1_layout)
        V_layout.addLayout(H2_layout)

        # 将布局应用于主窗口的中心区域
        central_widget = QWidget()
        central_widget.setLayout(V_layout)
        self.setCentralWidget(central_widget)


if __name__ == "__main__":
    app = QApplication(sys.argv)
    window = MainWindow()
    window.show()
    sys.exit(app.exec_())

"""##########################################################################
from PyQt5.QtGui import QIntValidator

函数简介:在输入框中,限制用户输入的内容必须是符合一定范围的整数。
函数说明:QIntValidator(bottom, top, parent=None)
输入参数:
        bottom:         校验的最小值。
        top:            校验的最大值。
        parent:         可选,父对象。

属性:   bottom():               获取校验的最小值。
        top():                  获取校验的最大值。
方法:   setBottom(bottom):      设置校验的最小值。
        setTop(top):            设置校验的最大值。
##########################################################################"""

"""##########################################################################
from PyQt5.QtGui import QDoubleValidator

函数简介:在输入框中,限制用户输入的内容必须是符合一定范围的整数。
函数说明:QDoubleValidator(bottom, top, decimals, parent=None)
输入参数:
        bottom:         浮点数的最小值,用户输入的浮点数不能小于该值。
        top:            浮点数的最大值,用户输入的浮点数不能大于该值。
        decimals:       小数位数,表示允许的小数点后的位数。
        parent:         可选参数,父级 QObject。

方法:   bottom():                       返回校验器设置的最小值。
        top():                          返回校验器设置的最大值。
        decimals():                     返回校验器设置的小数位数。
        setBottom(bottom: float):       设置校验器的最小值。
        setTop(top: float):             设置校验器的最大值。
        setDecimals(decimals: int):     设置校验器的小数位数。
##########################################################################"""
(3)文本 - 调节框 QSpinBox + QDoubleSpinBox(整数 + 浮点数):支持上下按钮调节

import sys
from PyQt5.QtWidgets import QApplication, QMainWindow, QVBoxLayout, QHBoxLayout, QWidget, QSpinBox, QDoubleSpinBox, QLabel


class MainWindow(QMainWindow):
    def __init__(self):
        super().__init__()

        # 使用 QSpinBox 限制整数范围
        QSpinBox_label = QLabel("int input:")
        int_spinbox = QSpinBox()
        int_spinbox.setRange(0, 100)  # 限制范围:[0, 100]

        # 使用 QDoubleSpinBox 限制浮点数范围
        QDoubleSpinBox_label = QLabel("double input:")
        double_spinbox = QDoubleSpinBox()
        double_spinbox.setRange(0.0, 100.0)  	# 限制范围:[0.0, 100.0]
        double_spinbox.setDecimals(2)  			# 保留2位小数

        # 布局管理器
        V_layout = QVBoxLayout()  	# 垂直布局
        H1_layout = QHBoxLayout()  	# 水平布局
        H2_layout = QHBoxLayout()  	# 水平布局

        H1_layout.addWidget(QSpinBox_label)
        H1_layout.addWidget(int_spinbox)
        V_layout.addLayout(H1_layout)
        H2_layout.addWidget(QDoubleSpinBox_label)
        H2_layout.addWidget(double_spinbox)
        V_layout.addLayout(H2_layout)

        # 将布局应用于主窗口的中心区域
        central_widget = QWidget()
        central_widget.setLayout(V_layout)
        self.setCentralWidget(central_widget)


if __name__ == "__main__":
    app = QApplication(sys.argv)
    window = MainWindow()
    window.show()
    sys.exit(app.exec_())
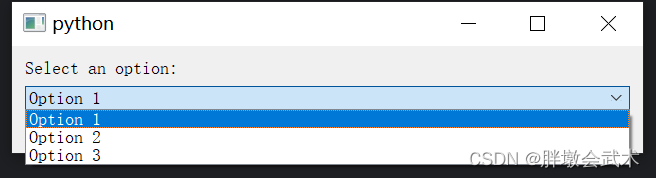
4.10、下拉框 QComboBox:创建一个下拉框并添加选项
import sys
from PyQt5.QtWidgets import QApplication, QMainWindow, QVBoxLayout, QWidget, QLabel, QComboBox


class MainWindow(QMainWindow):
    def __init__(self):
        super().__init__()

        label = QLabel("Select an option:")
        combo_box = QComboBox()
        combo_box.addItem("Option 1")
        combo_box.addItem("Option 2")
        combo_box.addItem("Option 3")
        combo_box.currentIndexChanged.connect(self.selection_changed)  # 连接选项变更事件
        self.result_label = QLabel("", self)

        layout = QVBoxLayout()
        layout.addWidget(combo_box)
        layout.addWidget(label)
        layout.addWidget(self.result_label)

        central_widget = QWidget()
        central_widget.setLayout(layout)
        self.setCentralWidget(central_widget)

    def selection_changed(self, index):
        selected_option = self.sender().currentText()
        self.result_label.setText(f"Selected: {selected_option}")


if __name__ == "__main__":
    app = QApplication(sys.argv)
    window = MainWindow()
    window.show()
    sys.exit(app.exec_())
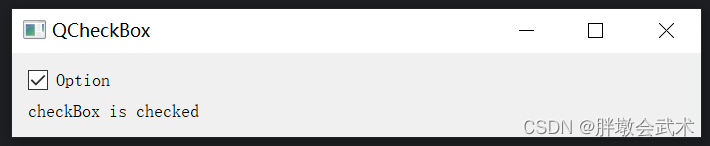
4.11、复选框 QCheckBox:获取勾选状态
import sys
from PyQt5.QtWidgets import QApplication, QLabel, QCheckBox, QVBoxLayout, QWidget


class CheckBoxExample(QWidget):
    def __init__(self):
        super().__init__()

        self.initUI()

    def initUI(self):
        self.setWindowTitle('QCheckBox')

        self.label = QLabel("")
        self.checkBox = QCheckBox("Option")

        layout = QVBoxLayout()
        layout.addWidget(self.checkBox)
        layout.addWidget(self.label)

        self.setLayout(layout)
        self.checkBox.clicked.connect(self.on_checkbox_clicked)

    def on_checkbox_clicked(self):
        if self.checkBox.isChecked():
            self.label.setText("checkBox is checked")
        else:
            self.label.setText("checkBox is unchecked")


if __name__ == '__main__':
    app = QApplication(sys.argv)
    window = CheckBoxExample()
    window.show()
    sys.exit(app.exec_())
4.12、分组框 QGroupBox:将其他小部件放置在其中
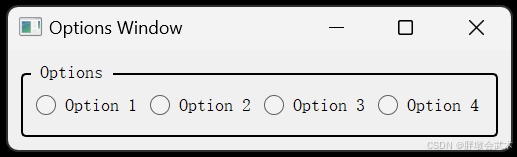
import sys
from PyQt5.QtWidgets import QApplication, QGroupBox, QMainWindow, QHBoxLayout, QRadioButton, QVBoxLayout, QWidget


class OptionsWindow(QMainWindow):
    def __init__(self):
        super().__init__()
        self.init_ui()

    def init_ui(self):
        self.setWindowTitle("Options Window")

        # 创建单选按钮布局
        layout = QHBoxLayout()
        radio_buttons = [QRadioButton(f"Option {i}") for i in range(1, 5)]
        for button in radio_buttons:
            layout.addWidget(button)

        # 创建组框并设置布局
        group_box_layout = QVBoxLayout()
        group_box_layout.addLayout(layout)

        group_box = QGroupBox("Options")
        group_box.setLayout(group_box_layout)

        # 设置组框线条宽度样式
        group_box.setStyleSheet("""
            QGroupBox {
                border: 2px solid black;
                border-radius: 5px;
                margin-top: 10px;
            }
            QGroupBox:title {
                subcontrol-origin: margin;
                left: 10px;
                padding: 0 5px;
            }
        """)

        # 创建主布局
        main_layout = QVBoxLayout()
        main_layout.addWidget(group_box)

        # 设置中心小部件
        central_widget = QWidget()
        central_widget.setLayout(main_layout)
        self.setCentralWidget(central_widget)


if __name__ == "__main__":
    app = QApplication(sys.argv)
    window = OptionsWindow()
    window.show()
    app.exec_()
4.13、日志框 QTextEdit:获取当前时间 + 设置文本颜色
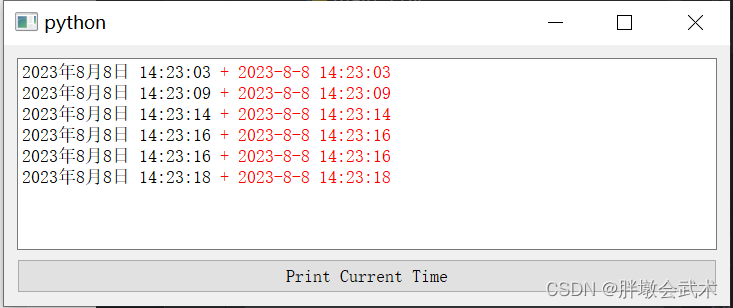
from PyQt5.QtWidgets import QApplication, QTextEdit, QVBoxLayout, QPushButton, QMainWindow, QWidget
from PyQt5.QtCore import Qt, QDateTime

class MainWindow(QMainWindow):
    def __init__(self):
        super().__init__()

        self.log_text_edit = QTextEdit()
        self.button = QPushButton("Print Current Time")
        self.button.clicked.connect(self.print_current_time)

        layout = QVBoxLayout()
        layout.addWidget(self.log_text_edit)
        layout.addWidget(self.button)

        widget = QWidget()
        widget.setLayout(layout)
        self.setCentralWidget(widget)

    def print_current_time(self):
        current_time1 = QDateTime.currentDateTime().toString(Qt.DefaultLocaleLongDate)  # 指定默认格式
        current_time2 = QDateTime.currentDateTime().toString("yyyy-M-d hh:mm:ss")  # 指定日期格式

        message = current_time1 + r'<font color="red"> + {}</font>'.format(current_time2)
        self.log_text_edit.append(message)

if __name__ == '__main__':
    app = QApplication([])
    window = MainWindow()
    window.show()
    app.exec()
from datetime import datetime

current_time = datetime.now()  # 获取当前时间
formatted_time = current_time.strftime("%Y-%m-%d %H:%M:%S")
print("Time:", formatted_time)  # 打印格式化后的时间
# Time: 2023-08-08 14:25:29
4.14、消息提示框 QMessageBox:信息 / 询问 / 警告 / 错误

import sys
from PyQt5.QtWidgets import QApplication, QMainWindow, QPushButton, QVBoxLayout, QWidget, QMessageBox


class MainWindow(QMainWindow):
    def __init__(self):
        super().__init__()

        info_button = QPushButton("Information")
        question_button = QPushButton("Question")
        warning_button = QPushButton("Warning")
        critical_button = QPushButton("Critical")
        info_button.clicked.connect(self.show_information)
        question_button.clicked.connect(self.show_question)
        warning_button.clicked.connect(self.show_warning)
        critical_button.clicked.connect(self.show_critical)

        layout = QVBoxLayout()
        layout.addWidget(info_button)
        layout.addWidget(question_button)
        layout.addWidget(warning_button)
        layout.addWidget(critical_button)

        widget = QWidget()
        widget.setLayout(layout)
        self.setCentralWidget(widget)

    def show_information(self):
        QMessageBox.information(self, "Information", "This is an information message.", QMessageBox.Ok, QMessageBox.Ok)

    def show_question(self):
        result = QMessageBox.question(self, "Question", "Do you want to proceed?", QMessageBox.Yes | QMessageBox.No, QMessageBox.No)
        if result == QMessageBox.Yes:
            print("User clicked Yes")
        else:
            print("User clicked No")

    def show_warning(self):
        QMessageBox.warning(self, "Warning", "This is a warning message.", QMessageBox.Ok, QMessageBox.Ok)

    def show_critical(self):
        QMessageBox.critical(self, "Critical", "This is a critical message.", QMessageBox.Ok, QMessageBox.Ok)


if __name__ == "__main__":
    app = QApplication(sys.argv)
    window = MainWindow()
    window.show()
    sys.exit(app.exec_())

"""##########################################################################
from PyQt5.QtWidgets import QMessageBox

函数简介:用于显示消息框、询问框、警告框等用户交互提示框的类。
函数说明:
        信息消息框        QMessageBox.information(parent, title, message, buttons, defaultButton)
        询问消息框        QMessageBox.question(parent, title, message, buttons, defaultButton)
        警告消息框        QMessageBox.warning(parent, title, message, buttons, defaultButton)
        严重错误消息框     QMessageBox.critical(parent, title, message, buttons, defaultButton)
输入参数:
        parent:         可选参数,父级窗口。
        title:          消息框的标题。
        message:        消息框中显示的消息文本。
        buttons:        消息框中显示的按钮类型,如 QMessageBox.Yes、QMessageBox.No 等。
        defaultButton:  可选参数,指定默认按钮。
##########################################################################"""

def show_warning(message=None):
    import tkinter as tk
    from tkinter import messagebox

    root = tk.Tk()
    root.withdraw()  # 隐藏主窗口
    messagebox.showwarning("Warning", message)
    root.destroy()  # 关闭主窗口


if __name__ == '__main__':
    show_warning(message="请仔细检查")
4.15、滑动条 QSlider:获取滑动条点击前后的值

from PyQt5.QtWidgets import QApplication, QMainWindow, QVBoxLayout, QWidget, QSlider, QLabel
from PyQt5.QtCore import Qt


class MainWindow(QMainWindow):
    def __init__(self):
        super().__init__()

        layout = QVBoxLayout()

        self.slider = QSlider()
        self.slider.setOrientation(Qt.Horizontal)
        self.slider.setRange(0, 100)
        layout.addWidget(self.slider)

        self.label = QLabel("Previous Value: 0, Current Value: 0")
        layout.addWidget(self.label)

        self.previous_value = 0
        self.slider.valueChanged.connect(self.slider_value_changed)

        central_widget = QWidget()
        central_widget.setLayout(layout)
        self.setCentralWidget(central_widget)

    def slider_value_changed(self, new_value):
        self.label.setText(f"Previous Value: {self.previous_value}, Current Value: {new_value}")
        self.previous_value = self.slider.value()
        # self.slider.value():获取的是点击slider之后的值,而不是当前slider显示的值


if __name__ == "__main__":
    app = QApplication([])
    window = MainWindow()
    window.show()
    app.exec_()
4.16、进度条 QProgressBar:创建一个进度条窗口(0~100%)
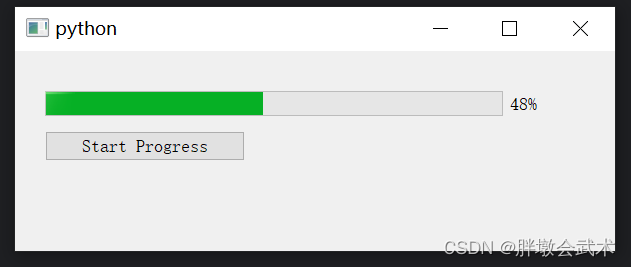
import sys
from PyQt5.QtWidgets import QApplication, QMainWindow, QPushButton, QProgressBar
from PyQt5.QtCore import QTimer

class MainWindow(QMainWindow):
    def __init__(self):
        super().__init__()

        # 设置窗口的几何属性
        self.setGeometry(100, 100, 600, 200)

        # 创建一个进度条并设置其几何属性
        self.progress_bar = QProgressBar(self)
        self.progress_bar.setGeometry(30, 40, 500, 25)

        # 创建一个 "Start Progress" 按钮
        start_button = QPushButton('Start Progress', self)
        # 连接按钮的点击事件到 startProgress 函数
        start_button.clicked.connect(self.startProgress)
        # 设置按钮的固定宽度和位置
        start_button.setFixedWidth(200)
        start_button.move(30, 80)

    def startProgress(self):
        # 初始化进度为0
        self.progress = 0
        # 创建一个定时器
        self.timer = QTimer(self)
        # 连接定时器的超时事件到 updateProgress 函数
        self.timer.timeout.connect(self.updateProgress)
        # 每0.1秒触发一次定时器
        self.timer.start(100)

    def updateProgress(self):
        # 增加进度
        self.progress += 1
        # 设置进度条的值
        self.progress_bar.setValue(self.progress)
        # 当进度达到100%时,停止定时器
        if self.progress >= 100:
            self.timer.stop()

if __name__ == '__main__':
    app = QApplication(sys.argv)
    window = MainWindow()
    window.show()
    sys.exit(app.exec_())
4.17、滚动条 QScrollArea:支持垂直和水平滚动
QScrollArea:用于处理内容超出可见区域时的滚动视图的一个组件。它允许用户在包含的区域内滚动内容,无论是单个小部件还是多个小部件的组合。常用于在显示长文本、图像库或复杂布局时。

from PyQt5.QtWidgets import QApplication, QMainWindow, QScrollArea, QWidget, QVBoxLayout, QHBoxLayout, QLabel

class MainWindow(QMainWindow):
    def __init__(self):
        super().__init__()

        self.setWindowTitle("QScrollArea with Horizontal and Vertical")
        self.setGeometry(100, 100, 400, 300)

        # 创建一个 QScrollArea
        scroll_area = QScrollArea(self)
        scroll_area.setWidgetResizable(True)  # 设置内容自适应大小
        ########################################################################
        # 创建一个水平布局,包含多个标签
        horizontal_layout = QHBoxLayout()

        # 添加多个标签以增加内容的宽度
        for i in range(20):
            label = QLabel(f"Label {i+1}", self)
            horizontal_layout.addWidget(label)
        ########################################################################
        # 创建一个 QWidget,作为滚动区域的内容
        content_widget = QWidget()
        content_layout = QVBoxLayout(content_widget)

        # 将水平布局添加到内容布局
        content_layout.addLayout(horizontal_layout)
        # 添加额外的标签以增加内容的高度
        for j in range(20):
            label = QLabel(f"Vertical Label {j+1}", self)
            content_layout.addWidget(label)

        # 将内容小部件添加到 QScrollArea
        scroll_area.setWidget(content_widget)
        # 将 QScrollArea 设置为主窗口的中心小部件
        self.setCentralWidget(scroll_area)
        ########################################################################

if __name__ == "__main__":
    app = QApplication([])
    window = MainWindow()
    window.show()
    app.exec_()
4.18、分割线 QFrame

import sys
from PyQt5.QtWidgets import QApplication, QMainWindow, QFrame, QVBoxLayout, QLabel, QWidget

class FrameExample(QMainWindow):
    def __init__(self):
        super().__init__()

        self.setWindowTitle("QFrame Example")
        self.setGeometry(100, 100, 300, 200)

        layout = QVBoxLayout()

        label1 = QLabel("Above the frame")
        layout.addWidget(label1)

        frame = QFrame()
        frame.setFrameShape(QFrame.HLine)  # 水平线
        frame.setFrameShadow(QFrame.Sunken)  # 阴影效果
        layout.addWidget(frame)

        label2 = QLabel("Below the frame")
        layout.addWidget(label2)

        container = QWidget()
        container.setLayout(layout)
        self.setCentralWidget(container)

if __name__ == "__main__":
    app = QApplication(sys.argv)
    window = FrameExample()
    window.show()
    sys.exit(app.exec_())
4.19、动态调整子部件大小 QSplitter

import sys
from PyQt5.QtWidgets import QApplication, QMainWindow, QSplitter, QTextEdit, QWidget, QVBoxLayout

class SplitterExample(QMainWindow):
    def __init__(self):
        super().__init__()

        self.setWindowTitle("QSplitter Example")
        self.setGeometry(100, 100, 400, 300)

        splitter = QSplitter()

        text_edit1 = QTextEdit("Text Edit 1")
        text_edit2 = QTextEdit("Text Edit 2")

        splitter.addWidget(text_edit1)
        splitter.addWidget(text_edit2)

        self.setCentralWidget(splitter)

if __name__ == "__main__":
    app = QApplication(sys.argv)
    window = SplitterExample()
    window.show()
    sys.exit(app.exec_())
4.20、选项卡界面 QTabWidget
(1)在一个窗口中显示多个页面
Tab控件:可以在一个窗口中显示多个页面,每个页面对应一个选项卡,用户可以通过点击选项卡来切换不同的页面。

from PyQt5.QtWidgets import QApplication, QMainWindow, QTabWidget, QWidget, QVBoxLayout, QLabel

class MyWindow(QMainWindow):
    def __init__(self):
        super().__init__()

        # 创建Tab控件
        self.tab_widget = QTabWidget()
        self.setCentralWidget(self.tab_widget)

        # 创建页面并添加到Tab控件中
        self.page1 = QWidget()
        self.page2 = QWidget()
        self.tab_widget.addTab(self.page1, "Page 1")
        self.tab_widget.addTab(self.page2, "Page 2")

        # 设置页面的布局和内容
        layout1 = QVBoxLayout()
        layout1.addWidget(QLabel("This is Page 1"))
        self.page1.setLayout(layout1)

        layout2 = QVBoxLayout()
        layout2.addWidget(QLabel("This is Page 2"))
        self.page2.setLayout(layout2)


if __name__ == "__main__":
    app = QApplication([])
    window = MyWindow()
    window.show()
    app.exec_()
(2)在主界面中,显示其他.py界面类文件
实现选项卡自动显示不同界面,可以在主界面的初始化过程中创建并添加不同的界面类实例,并根据选项卡的切换来显示相应的界面。

# main.py

import sys
from PyQt5.QtWidgets import QApplication, QMainWindow, QTabWidget, QVBoxLayout, QWidget, QPushButton
from other_file import OtherWindow  # 导入其他文件中的界面类

class MainWindow(QMainWindow):
    def __init__(self):
        super().__init__()
        self.setWindowTitle("Main Window")
        self.setGeometry(200, 200, 300, 200)

        # 创建一个QTabWidget控件
        self.tab_widget = QTabWidget(self)
        self.setCentralWidget(self.tab_widget)

        # 创建页面1和页面2
        self.page1 = QWidget()
        self.page2 = OtherWindow()  # 调用其他文件中的界面类

        # 将页面1和页面2添加到QTabWidget控件中
        self.tab_widget.addTab(self.page1, "Page 1")
        self.tab_widget.addTab(self.page2, "Page 2")


if __name__ == "__main__":
    app = QApplication(sys.argv)
    main_window = MainWindow()
    main_window.show()
    sys.exit(app.exec_())
# other_file.py

import sys
from PyQt5.QtWidgets import QApplication, QWidget, QLabel, QVBoxLayout, QHBoxLayout, QPushButton, QFileDialog


class OtherWindow(QWidget):
    def __init__(self):
        super().__init__()

        self.button = QPushButton("load:", self)
        self.button.clicked.connect(self.load_image)
        self.label = QLabel("")

        button_layout = QHBoxLayout()
        button_layout.addWidget(self.button)
        button_layout.addWidget(self.label)

        layout = QVBoxLayout()
        layout.addLayout(button_layout)  # 将button_layout布局添加到主布局中
        self.setLayout(layout)  # 设置窗口的主布局

    def load_image(self):
        self.folder_path = QFileDialog.getExistingDirectory(self, 'Select Folder', './')

        if self.folder_path:
            print('Selected Folder:', self.folder_path)
            self.label.setText(self.folder_path)


if __name__ == '__main__':
    app = QApplication(sys.argv)
    window = OtherWindow()
    window.show()
    sys.exit(app.exec_())
(3)在主界面中,显示其他.py界面类文件,并进行数据交互

# main.py

import sys
from PyQt5.QtWidgets import QApplication, QMainWindow, QTabWidget, QVBoxLayout, QWidget, QLineEdit, QPushButton, QHBoxLayout
from other_file import OtherWindow


class MainWindow(QMainWindow):
    def __init__(self):
        super().__init__()
        self.setWindowTitle("Main Window")
        self.setGeometry(200, 200, 300, 200)

        self.send_button = QPushButton("Send Parameter", self)  # 新建按钮,并设置初始参数
        self.send_button.clicked.connect(self.send_parameter)  # 使用connect方法将信号连接到槽
        self.send_button.setStyleSheet("background-color: black; color: white;")  # 设置按钮的背景和字体颜色
        self.input_line_edit = QLineEdit("Enter Parameter", self)  # 新建文本框,并设置初始参数
        #####################################################################
        # 创建一个QTabWidget控件
        self.tab_widget = QTabWidget(self)
        self.setCentralWidget(self.tab_widget)

        # 创建页面1和页面2
        self.page1 = QWidget()
        self.other_window = OtherWindow()  # 调用其他文件中的界面类

        # 将页面1和页面2添加到QTabWidget控件中
        self.tab_widget.addTab(self.page1, "Page 1")
        self.tab_widget.addTab(self.other_window, "Page 2")
        #####################################################################
        self.button_layout = QHBoxLayout()
        self.button_layout.addWidget(self.send_button)
        self.button_layout.addWidget(self.input_line_edit)

        layout = QVBoxLayout()
        layout.addLayout(self.button_layout)
        layout.addWidget(self.tab_widget)

        central_widget = QWidget()
        central_widget.setLayout(layout)
        self.setCentralWidget(central_widget)

    def send_parameter(self):
        parameter = self.input_line_edit.text()
        self.other_window.receive_parameter(parameter)  # 调用其他界面类other_window中的函数receive_parameter


if __name__ == "__main__":
    app = QApplication(sys.argv)
    window = MainWindow()
    window.show()
    sys.exit(app.exec_())
# other_file.py

from PyQt5.QtWidgets import QApplication, QWidget, QVBoxLayout, QHBoxLayout, QPushButton, QLabel
import sys

class OtherWindow(QWidget):
    def __init__(self):
        super().__init__()

        button_layout = QHBoxLayout()  # 水平布局管理器
        self.Received_button = QPushButton("Received Parameter", self)  # 新建按钮,并设置初始参数
        self.Received_button.setStyleSheet("background-color: black; color: white;")  # 设置按钮的背景和字体颜色
        self.label = QLabel("Hello from Other Window!")

        button_layout.addWidget(self.Received_button)
        button_layout.addWidget(self.label)

        layout = QVBoxLayout()
        layout.addLayout(button_layout)
        self.setLayout(layout)

    def receive_parameter(self, parameter):
        self.label.setText(f"{parameter}")

if __name__ == "__main__":
    app = QApplication(sys.argv)
    window = OtherWindow()
    window.show()
    sys.exit(app.exec_())
(4)界面布局:(主)选项卡 + (子)选项卡

import sys
from PyQt5.QtWidgets import QApplication, QWidget, QVBoxLayout, QTabWidget, QLabel


class MainWindow(QWidget):
    def __init__(self):
        super().__init__()

        # 设置窗口标题和初始大小
        self.setWindowTitle("主Tab和子Tab示例")
        self.setGeometry(100, 100, 800, 400)

        # 创建主Tab控件
        self.tab_widget = QTabWidget()

        # 创建三个主Tab
        self.tab1 = QWidget()
        self.tab2 = QWidget()
        self.tab3 = QWidget()

        # 将主Tab添加到QTabWidget中
        self.tab_widget.addTab(self.tab1, "主 Tab 1")
        self.tab_widget.addTab(self.tab2, "主 Tab 2")
        self.tab_widget.addTab(self.tab3, "主 Tab 3")

        # 创建第一个主Tab中的子Tab
        self.create_sub_tabs_for_tab1()

        # 创建其他两个主Tab的内容
        self.create_content_for_tab2()
        self.create_content_for_tab3()

        # 设置主布局
        main_layout = QVBoxLayout()
        main_layout.addWidget(self.tab_widget)
        self.setLayout(main_layout)

    def create_sub_tabs_for_tab1(self):
        # 清空现有的所有内容
        self.tab1_layout = QVBoxLayout()
        self.tab1.setLayout(self.tab1_layout)

        # 创建子Tab控件
        self.sub_tab_widget = QTabWidget()

        # 创建四个子Tab
        for i in range(1, 5):
            sub_tab = QWidget()
            sub_tab_layout = QVBoxLayout()
            sub_tab_layout.addWidget(QLabel(f"这是子 Tab {i} 的内容"))
            sub_tab.setLayout(sub_tab_layout)
            self.sub_tab_widget.addTab(sub_tab, f"子 Tab {i}")

        # 将子Tab控件添加到主Tab中
        self.tab1_layout.addWidget(self.sub_tab_widget)

    def create_content_for_tab2(self):
        layout = QVBoxLayout()
        layout.addWidget(QLabel("这是主 Tab 2 的内容"))
        self.tab2.setLayout(layout)

    def create_content_for_tab3(self):
        layout = QVBoxLayout()
        layout.addWidget(QLabel("这是主 Tab 3 的内容"))
        self.tab3.setLayout(layout)


if __name__ == '__main__':
    app = QApplication(sys.argv)
    window = MainWindow()
    window.show()
    sys.exit(app.exec_())
(5)界面布局:(左)面板 + (右)选项卡

import sys
from PyQt5.QtWidgets import QApplication, QWidget, QVBoxLayout, QHBoxLayout, QPushButton, QTabWidget, QLabel


class MainWindow(QWidget):
    def __init__(self):
        super().__init__()

        # (1)设置窗口标题和初始大小
        self.setWindowTitle("左侧面板和选项卡示例")
        self.setGeometry(100, 100, 800, 400)

        # (2)创建左侧按钮面板
        self.left_panel = QVBoxLayout()
        button1 = QPushButton("选项 1")  # 创建按钮
        button2 = QPushButton("选项 2")  # 创建按钮
        button3 = QPushButton("选项 3")  # 创建按钮
        self.left_panel.addWidget(button1)  # 添加到左侧面板
        self.left_panel.addWidget(button2)  # 添加到左侧面板
        self.left_panel.addWidget(button3)  # 添加到左侧面板
        self.left_panel.addStretch()  # 添加一个空白拉伸区域,以保证按钮在顶部排列

        # (3)创建选项卡
        self.tab_widget = QTabWidget()

        # (4)创建主布局,将左侧面板和选项卡添加到水平布局中
        main_layout = QHBoxLayout()
        main_layout.addLayout(self.left_panel, 1)  # 左侧占1份空间
        main_layout.addWidget(self.tab_widget, 4)  # 选项卡区域占4份空间
        self.setLayout(main_layout)

        # (5)初始界面将显示“选项 1”下的内容(默认不显示)
        self.create_tabs_for_option1()

        # (6)将按钮点击事件连接到相应的槽函数
        button1.clicked.connect(self.create_tabs_for_option1)  # 连接按钮点击事件
        button2.clicked.connect(self.create_content_for_option2)  # 连接按钮点击事件
        button3.clicked.connect(self.create_content_for_option3)  # 连接按钮点击事件

    def create_tabs_for_option1(self):
        self.tab_widget.clear()  # 清空现有的所有 Tabs
        self.tab_widget.tabBar().setVisible(True)  # 显示Tab标签栏

        # 创建 4 个子 Tab
        self.tab1 = QWidget()
        self.tab2 = QWidget()
        self.tab3 = QWidget()
        self.tab4 = QWidget()

        # 将子 Tab 添加到 QTabWidget 中
        self.tab_widget.addTab(self.tab1, "Tab 1")
        self.tab_widget.addTab(self.tab2, "Tab 2")
        self.tab_widget.addTab(self.tab3, "Tab 3")
        self.tab_widget.addTab(self.tab4, "Tab 4")

        # 设置每个 Tab 的布局和内容
        self.tab1_layout = QVBoxLayout()
        self.tab1_layout.addWidget(QLabel("这是 Tab 1 的内容"))
        self.tab1.setLayout(self.tab1_layout)

        self.tab2_layout = QVBoxLayout()
        self.tab2_layout.addWidget(QLabel("这是 Tab 2 的内容"))
        self.tab2.setLayout(self.tab2_layout)

        self.tab3_layout = QVBoxLayout()
        self.tab3_layout.addWidget(QLabel("这是 Tab 3 的内容"))
        self.tab3.setLayout(self.tab3_layout)

        self.tab4_layout = QVBoxLayout()
        self.tab4_layout.addWidget(QLabel("这是 Tab 4 的内容"))
        self.tab4.setLayout(self.tab4_layout)

    def create_content_for_option2(self):
        self.tab_widget.clear()  # 清空现有的所有 Tabs
        self.tab_widget.tabBar().setVisible(False)  # 隐藏Tab标签栏

        # 创建一个 Tab,显示单一界面内容
        single_tab = QWidget()  # 创建一个 QWidget 对象作为单个页面的容器
        layout = QVBoxLayout()  # 创建一个 QVBoxLayout 布局对象,用于垂直排列控件
        layout.addWidget(QLabel("这是选项 2 的内容"))  # 创建一个 QLabel 对象
        single_tab.setLayout(layout)  # 将布局设置为 single_tab 的主布局

        self.tab_widget.addTab(single_tab, "选项 2")  # 将页面添加到 QTabWidget 中

    def create_content_for_option3(self):
        self.tab_widget.clear()  # 清空现有的所有 Tabs
        self.tab_widget.tabBar().setVisible(False)  # 隐藏Tab标签栏

        # 创建一个 Tab,显示单一界面内容
        single_tab = QWidget()  # 创建一个 QWidget 对象作为单个页面的容器
        layout = QVBoxLayout()  # 创建一个 QVBoxLayout 布局对象,用于垂直排列控件
        layout.addWidget(QLabel("这是选项 3 的内容"))  # 创建一个 QLabel 对象
        single_tab.setLayout(layout)  # 将布局设置为 single_tab 的主布局

        self.tab_widget.addTab(single_tab, "选项 3")  # 将页面添加到 QTabWidget 中


if __name__ == '__main__':
    app = QApplication(sys.argv)
    window = MainWindow()
    window.show()
    sys.exit(app.exec_())
(6)界面布局:(主)界面 + (子)界面
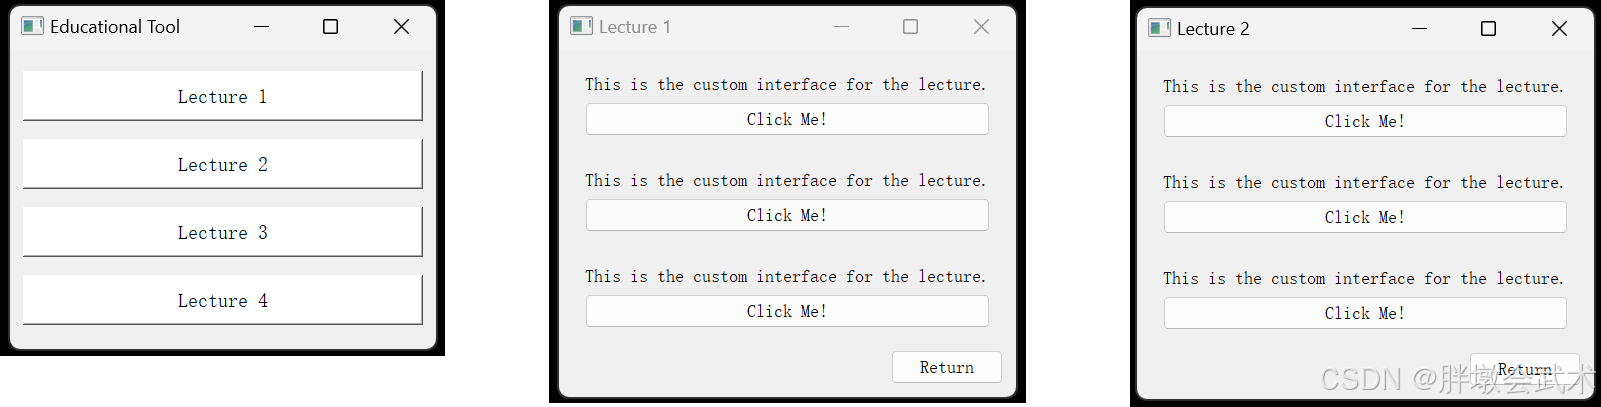
import sys
from PyQt5.QtWidgets import QApplication, QMainWindow, QPushButton, QVBoxLayout, QWidget, QHBoxLayout, QLabel
from PyQt5.QtCore import Qt


class MainWindow(QMainWindow):
    def __init__(self):
        super().__init__()
        self.initUI()

    def initUI(self):
        self.setWindowTitle("Educational Tool")
        self.resize(400, 300)

        # 创建四个按钮,改为通用型的教学名称
        self.button1 = QPushButton("Lecture 1", self)
        self.button1.clicked.connect(lambda: self.switch_to_window(self.lecture1_window))
        self.button1.setFixedSize(400, 50)
        self.button1.setStyleSheet("background-color: white; color: black; font-size: 20px;")

        self.button2 = QPushButton("Lecture 2", self)
        self.button2.clicked.connect(lambda: self.switch_to_window(self.lecture2_window))
        self.button2.setFixedSize(400, 50)
        self.button2.setStyleSheet("background-color: white; color: black; font-size: 20px;")

        self.button3 = QPushButton("Lecture 3", self)
        self.button3.clicked.connect(lambda: self.switch_to_window(self.lecture3_window))
        self.button3.setFixedSize(400, 50)
        self.button3.setStyleSheet("background-color: white; color: black; font-size: 20px;")

        self.button4 = QPushButton("Lecture 4", self)
        self.button4.clicked.connect(lambda: self.switch_to_window(self.lecture4_window))
        self.button4.setFixedSize(400, 50)
        self.button4.setStyleSheet("background-color: white; color: black; font-size: 20px;")

        # 主界面布局
        layout = QVBoxLayout()
        layout.addWidget(self.button1)  # , alignment=Qt.AlignCenter
        layout.addWidget(self.button2)
        layout.addWidget(self.button3)
        layout.addWidget(self.button4)

        # 设置主界面布局
        widget = QWidget()
        widget.setLayout(layout)
        self.setCentralWidget(widget)

        # 创建子界面
        self.lecture1_window = LectureWindow(self, "Lecture 1")
        self.lecture2_window = LectureWindow(self, "Lecture 2")
        self.lecture3_window = LectureWindow(self, "Lecture 3")
        self.lecture4_window = LectureWindow(self, "Lecture 4")

    def switch_to_window(self, target_window):
        """切换到指定窗口"""
        target_window.show()
        self.hide()


class BaseFunctionWindow(QMainWindow):
    def __init__(self, main_window, title):
        super().__init__()
        self.main_window = main_window
        self.setWindowTitle(title)
        self.resize(400, 300)

        # 功能标签
        self.label = QLabel(f"Welcome to {title}!", alignment=Qt.AlignCenter)

        # 返回按钮
        self.back_button = QPushButton("Return")
        self.back_button.clicked.connect(self.return_to_main_window)

        # 布局
        button_layout = QHBoxLayout()
        button_layout.addStretch()
        button_layout.addWidget(self.back_button)

        layout = QVBoxLayout()
        layout.addWidget(self.label)
        layout.addLayout(button_layout)

        central_widget = QWidget()
        central_widget.setLayout(layout)
        self.setCentralWidget(central_widget)

    def return_to_main_window(self):
        """返回主界面"""
        self.main_window.show()
        self.close()


class LectureWindow(BaseFunctionWindow):
    def __init__(self, main_window, lecture_title):
        super().__init__(main_window, lecture_title)

        # 自定义的子界面
        self.custom_widget1 = CustomWidget()
        self.custom_widget2 = CustomWidget()
        self.custom_widget3 = CustomWidget()

        # 返回按钮布局
        button_layout = QHBoxLayout()
        button_layout.addStretch()
        button_layout.addWidget(self.back_button)  # 重新添加返回按钮

        self.layout = QVBoxLayout()  # 创建一个垂直布局
        self.layout.addWidget(self.custom_widget1)  # 添加第一个自定义组件到布局
        self.layout.addWidget(self.custom_widget2)  # 添加第二个自定义组件到布局
        self.layout.addWidget(self.custom_widget3)  # 添加第二个自定义组件到布局
        self.layout.addLayout(button_layout)  # 返回按钮放置在底部

        central_widget = QWidget()
        central_widget.setLayout(self.layout)
        self.setCentralWidget(central_widget)


class CustomWidget(QWidget):
    def __init__(self):
        super().__init__()

        # 添加自定义界面的组件
        self.label = QLabel("This is the custom interface for the lecture.")
        self.label.setAlignment(Qt.AlignCenter)

        self.button = QPushButton("Click Me!")
        self.button.clicked.connect(self.on_button_click)

        # 布局
        layout = QVBoxLayout()
        layout.addWidget(self.label)
        layout.addWidget(self.button)
        self.setLayout(layout)

    def on_button_click(self):
        self.label.setText("Button clicked! Welcome to the lecture.")


def main():
    app = QApplication(sys.argv)
    main_window = MainWindow()
    main_window.show()
    sys.exit(app.exec_())


if __name__ == "__main__":
    main()
其余功能
(1)调用其他.py文件,并数据交互
共有两种方法:
- (1)
QProcess(process.start):需要依赖Qt库。实现与外部应用程序的交互、启动和管理等功能,更加灵活。适用于更复杂的交互和进程管理。- (2)
subprocess(subprocess.run):Python标准库提供的方法,更加简单方便。适用于在Python脚本中执行外部命令或脚本,并获取其结果。
测试文件.py
# other_file.py

# 在这里进行运算或其他处理
result = 42
# 将结果打印到控制台
print(result)
print("result =", result + 1)
print("result" + " + " + "result")
方法一:subprocess(subprocess.run)

# main.py

import sys
import subprocess

from PyQt5.QtWidgets import QApplication, QMainWindow, QVBoxLayout, QWidget, QPushButton, QLabel


class MainWindow(QMainWindow):
    def __init__(self):
        super().__init__()

        self.run_button = QPushButton("run .py")
        self.run_button.clicked.connect(self.run)
        self.run_label = QLabel("", self)

        layout = QVBoxLayout()
        layout.addWidget(self.run_button)
        layout.addWidget(self.run_label)

        central_widget = QWidget()
        central_widget.setLayout(layout)
        self.setCentralWidget(central_widget)

    def run(self):
        try:
        	#########################################################
        	# 若不确定other_file.py是否调用成功,可以使用绝对路径。
            # 不建议:调用.py文件
            # 建议:将py文件封装成一个函数,然后调用函数。
        	#########################################################
            result = subprocess.run(["python", "other_file.py"], capture_output=True, text=True, check=True)
            output = result.stdout.strip()  # 获取输出结果并去除首尾空格
            self.run_label.setText(output)
        except subprocess.CalledProcessError as e:
            self.run_label.setText(str(e))


if __name__ == "__main__":
    app = QApplication(sys.argv)
    window = MainWindow()
    window.show()
    sys.exit(app.exec_())

"""##########################################################################
import subprocess

函数简介:Python标准库subprocess模块中的一个函数,用于运行一个子进程并等待其完成。
		 可以执行系统命令或其他可执行文件,并可以通过参数来控制进程的行为和交互。
函数说明:subprocess.run(args, *, stdin=None, input=None, stdout=None,
		 				stderr=None, shell=False, cwd=None, timeout=None,
		 				check=False, encoding=None, errors=None, text=None,
		 				env=None, universal_newlines=None, start_new_session=False)
输入参数:
		args: 要运行的命令或可执行文件,以列表或字符串形式传递。如果shell=True,可以传递一个字符串,使用Shell运行命令。
		stdin: 用于传递子进程的标准输入的文件对象。
		input: 用于传递子进程的标准输入的字节或字符串数据。
		stdout: 用于接收子进程的标准输出的文件对象。
		stderr: 用于接收子进程的标准错误输出的文件对象。
		shell: 是否在Shell中运行命令。如果为True,可以使用通配符等Shell特性。
		cwd: 子进程的当前工作目录。
		timeout: 等待子进程完成的超时时间,如果子进程在此时间内未完成,将会被终止。
		check: 是否检查返回代码。如果为True,如果子进程返回的代码非零,将会引发CalledProcessError异常。
		encoding: 用于解码子进程输出的编码。
		errors: 用于处理解码错误的策略。
		text: 是否使用文本模式传递数据,相当于同时设置universal_newlines和encoding。
		env: 用于指定子进程的环境变量。
		universal_newlines: 是否使用通用换行符模式,相当于同时设置stdin、stdout和stderr的text参数。
		start_new_session: 是否在新的会话(session)中启动子进程。
输出参数:
		返回一个CompletedProcess对象,它包含有关子进程执行的信息,如返回代码、标准输出、标准错误等。
##########################################################################"""
方法二:QProcess(process.start)
# main.py

import sys
from PyQt5.QtWidgets import QApplication, QMainWindow, QVBoxLayout, QWidget, QPushButton, QLabel
from PyQt5.QtCore import QProcess

class MainWindow(QMainWindow):
    def __init__(self):
        super().__init__()

        self.run_button = QPushButton("run .py")
        self.run_button.clicked.connect(self.run)
        self.run_label = QLabel("", self)

        layout = QVBoxLayout()
        layout.addWidget(self.run_button)
        layout.addWidget(self.run_label)

        central_widget = QWidget()
        central_widget.setLayout(layout)
        self.setCentralWidget(central_widget)

    def run(self):
        # 清空结果标签
        self.run_label.setText("")
        #########################################################
        # (1)启动进程执行外部脚本
        process = QProcess()
        python_script = r'other_file.py'  # 注意:若不确定other_file.py是否调用成功,可以使用绝对路径。
        para1 = str(9)  # (1)传递参数只能是字符串(2)与外部脚本完成交互。
        process.start("python", [python_script, para1])
        process.waitForFinished(-1)  # 用于等待进程执行完成。传入参数-1表示无限等待

        # (2)进程的退出代码:(1)0表示进程成功执行完成;(2)非零值表示出现错误。
        exit_code = process.exitCode()
        if exit_code == 0:
            self.run_label.setText("调用【成功】,退出代码:{}".format(exit_code))
        else:
            self.run_label.setText("调用【失败】,退出代码:{}".format(exit_code))

if __name__ == "__main__":
    app = QApplication(sys.argv)
    window = MainWindow()
    window.show()
    sys.exit(app.exec_())

"""######################################################################################
# 函数介绍:QProcess 是 Qt 框架中用于创建和管理外部进程的类。它允许你启动外部应用程序,并与其进行通信。
# 常见方法:
#       (1)启动外部进程:         使用start()方法启动一个外部进程
#       (2)与进程通信:           使用write()方法向进程的标准输入写入数据,并使用readAllStandardOutput()和readAllStandardError()方法读取进程的标准输出和标准错误输出。
#       (2)等待进程执行完成:     使用waitForFinished()方法来等待进程执行完成
#       (3)获取进程退出代码:     使用exitCode()方法可以获取进程的退出代码
#       (4)支持信号与槽机制:     使用readyReadStandardOutput()信号在进程有标准输出可读时发出
#       (5)中断进程:            使用terminate()方法尝试终止进程的执行。不一定会立即停止进程,具体行为取决于操作系统和进程本身。
#
#               process = QProcess()
#               process.start("python", ["script.py", "arg1", "arg2"])
#               if process.waitForFinished():
#                   print("Process finished")
#               exit_code = process.exitCode()
#               if exit_code == 0:
#                   print("调用成功")
#               else:
#                   print("调用失败,退出代码:", exit_code)
#
#               process.write(b"input data")
#               output = process.readAllStandardOutput()
#               error_output = process.readAllStandardError()
#               process.readyReadStandardOutput.connect(handle_output)
#               process.terminate()
######################################################################################"""

"""######################################################################################
# 函数介绍:waitForFinished 是 QProcess 类的一个成员函数。用于阻塞当前线程,直到关联的进程完成执行为止。
# 函数说明:bool QProcess.waitForFinished(int msecs = 30000)
# 输入参数:     msecs:等待的时间(以毫秒为单位)。默认值是 30000 毫秒(30 秒)。如果设置为 -1,表示无限等待。
# 输出参数:     如果进程在给定的时间内完成执行,则返回 True,否则返回 False。
#
# (1)主要用于等待 QProcess 执行外部程序的过程完成。程序会阻塞当前线程,阻塞在当前行,直到被调用的进程执行完毕。
# (2)如果进程执行的时间很长,这会导致界面冻结,因为界面线程会被阻塞。
# (3)如果你需要在界面上显示进度或状态,或者想要允许用户继续操作界面,而不阻塞界面线程,可以考虑使用多线程、异步编程等技术,以避免界面的冻结。
######################################################################################"""
(2)在当前虚拟环境下,调用其他虚拟环境下的.py文件,并数据交互
import subprocess
import os

virtual_env_name = "tensorflow36"                               # (1)指定要激活的虚拟环境名称
cmd_activate_env = f"conda activate {virtual_env_name}"         # (2)构建激活虚拟环境的命令

script_path = r"deeplearning.py"                                # (3)指定.py文件路径
path = os.getcwd() + 'image.tif'                                # (4)指定.py文件参数
cmd_script_file = f"python {script_path} --image_path {path}"   # (5)构建调用.py文件的命令,包括传递参数

# (6)使用subprocess执行命令
###################################################################################
# 在Windows上,通过subprocess.run来激活一个Conda环境并不是一种有效的方式。
#       原因分析:因为conda activate命令会在一个新的子进程中执行,该子进程的环境变量变化不会影响到当前Python进程中运行的后续代码。
#       解决方法:将激活环境和执行py文件的命令,同时传递给subprocess.run。
###################################################################################
combined_cmd = f"{cmd_activate_env} && {cmd_script_file}"       # 组合两个命令并在子进程中执行
try:
    subprocess.run(combined_cmd, shell=True, check=True)
except subprocess.CalledProcessError as e:
    print(f"Error: {e}")

"""######################################################################
import argparse                             # 导入argparse模块

if __name__ == "__main__":
    parser = argparse.ArgumentParser()      # 创建解析对象
    parser.add_argument('--image_path')     # 添加命令行参数和选项
    args = parser.parse_args()              # 解析添加的参数
    image_path = args.image_path            # 获取添加的参数
######################################################################"""


 1999
1999

 被折叠的 条评论
为什么被折叠?
被折叠的 条评论
为什么被折叠?
 到【灌水乐园】发言


