


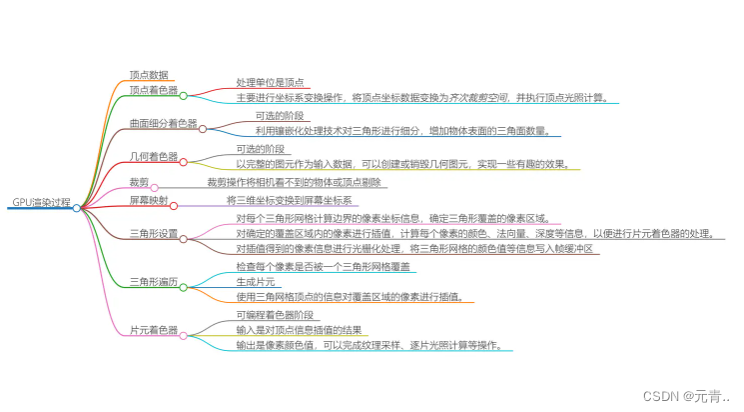
 本文详细介绍了GLSL中的step、mod、smoothstep、clamp、floor、fract和Dot函数,展示了它们在边缘检测、纹理映射和着色器中的实际应用,包括案例演示和功能解释。

1、step函数
在GLSL中,step()函数用于计算两个值之间的步长。它接受两个参数:第一个参数是阈值,第二个参数是切变方向。
step()函数的原型如下:
float step(float edge, float x)
vec2 step(vec2 edge, vec2 x)
vec3 step(vec3 edge, vec3 x)
vec4 step(vec4 edge, vec4 x)
vec2 step(float edge, vec2 x)
vec3 step(float edge, vec3 x)
vec4 step(float edge, vec4 x)
其中,edge是阈值,x是切变方向。
如果x大于edge,则step()函数返回1.0;如果x小于等于edge,则返回0.0。这个函数在着色器中常用于纹理映射、渐变和边缘检测等领域。
变化原理图是这样的:
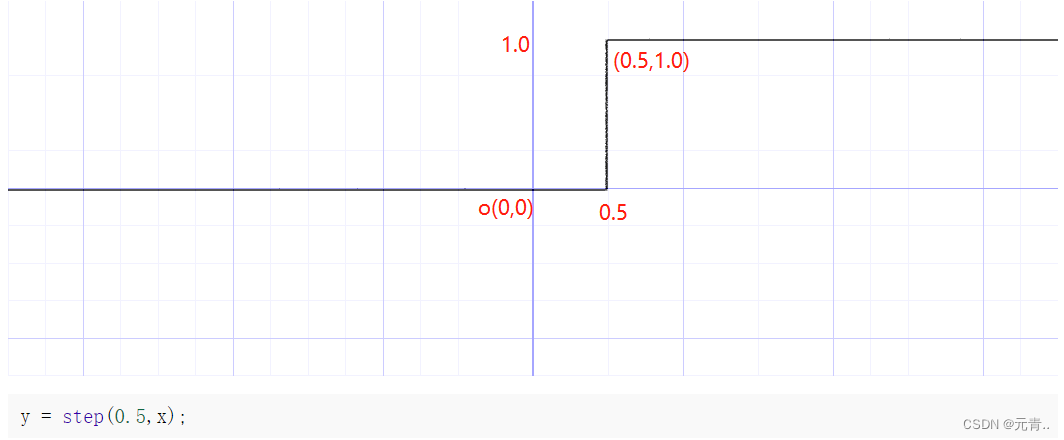
用途:一般用来做边缘检测,
下面一个案例
var material = new THREE.ShaderMaterial({
uniforms: {
time: { type: "f", value: 0 }
},
vertexShader:`
varying vec3 worldNormal;
varying vec3 v_position;
varying vec2 vUv;
uniform float time;
void main() {
vUv = uv;
v_position = position;// 注意,由于position是attribute类型,也就是系统传进来的,所以不能直接修改它的值。所以我们需要创建一个新对象,然后以这个新对象来操作变化
worldNormal = normalize(normal);
gl_Position = projectionMatrix * modelViewMatrix * vec4( v_position, 1.0 );
}`,
fragmentshader:`
varying vec3 worldNormal;
varying vec3 v_position;
varying vec2 vUv;
uniform float time;
#define PI2 6.28318530718
#define PI 3.1415926
void main() {
float alpha = 1.0 - step(0.5,distance(vUv,vec2(0.5)));
if(worldNormal.y>0.0){
gl_FragColor = vec4( 1.0,0.0,0.0, alpha );
} else {
gl_FragColor = vec4( 0.0, 1.0, 0.0, 1.0 );
}
}`
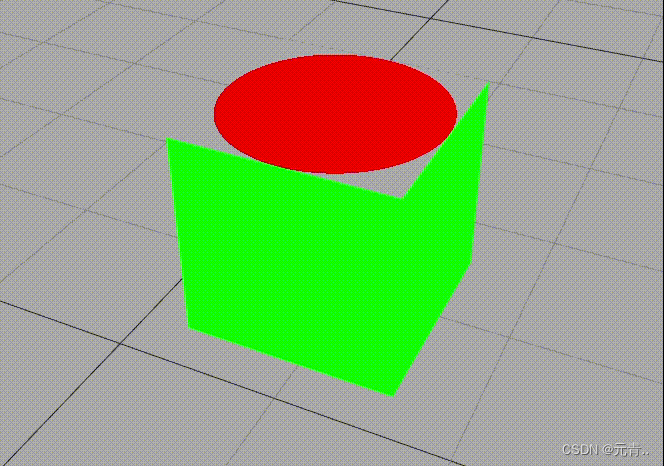
});效果:
利用step函数将一个面借助uv判断生成了半径为0.5的圆,超过半径0.5的部分材质设置为透明色
2、mod函数
float mod(float x, float y)
vec2 mod(vec2 x, vec2 y)
vec3 mod(vec3 x, vec3 y)
vec4 mod(vec4 x, vec4 y)
vec2 mod(vec2 x, float y)
vec3 mod(vec3 x, float y)
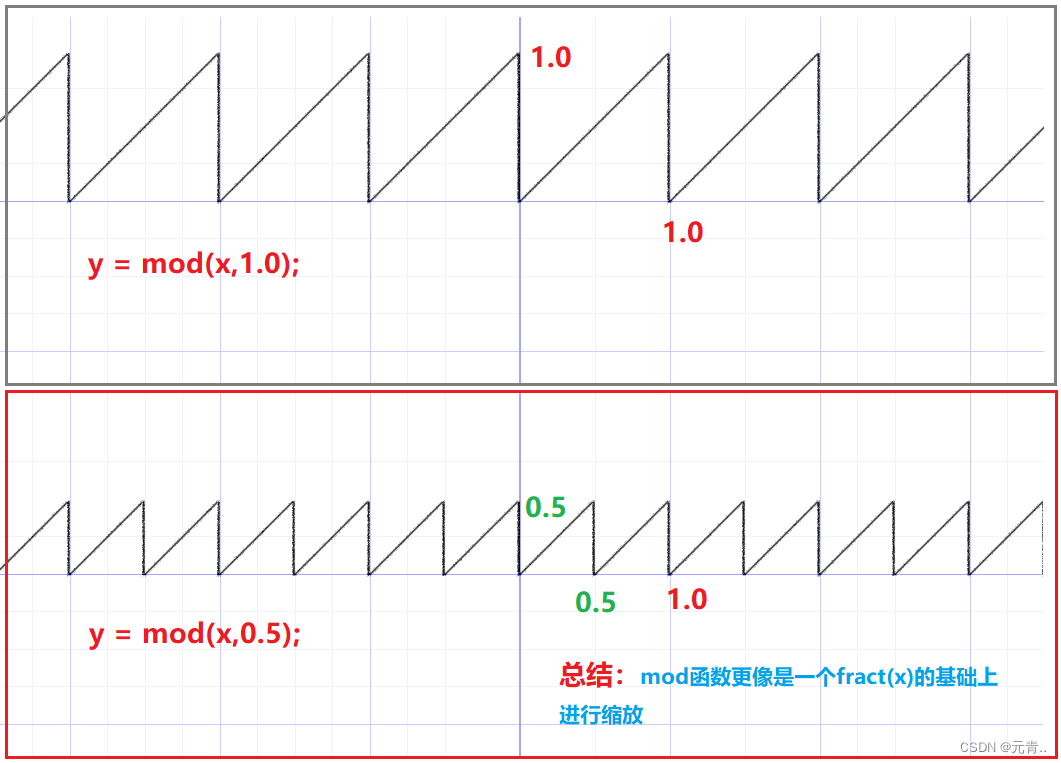
vec4 mod(vec4 x, float y) 说明:在GLSL中,mod(x, edge)函数用于计算x除以y的余数,计算为:y = x - edge * floor(x / edge)。它的波形是如下图:
 解释:
解释:
genType result = mod(genType x, genType edge);
原理是:
genType result = x - edge * floor(x/edge) // 说明:floor是一个向下取整的函数,比如floor(3.5) = 3.0
例如:
 edge = 1.0; 0<x<1:
     则:floor(x/edge) = 0;
     则 result = x;
edge = 1.0; 1<x<2:
    则:floor(x/edge) = 1;
    则 result = x-1;
edge = 1.0; 2<x<3:
    则:floor(x/edge) = 2;
    则 result = x-2;
它的波形图如下:
也就是说 mod(x,edge),可以这样理解:1、这个函数是锯齿状的重复的函数,他的远行可以看作是y = kx+b;这里k = 1,每个锯齿的间隔是edge 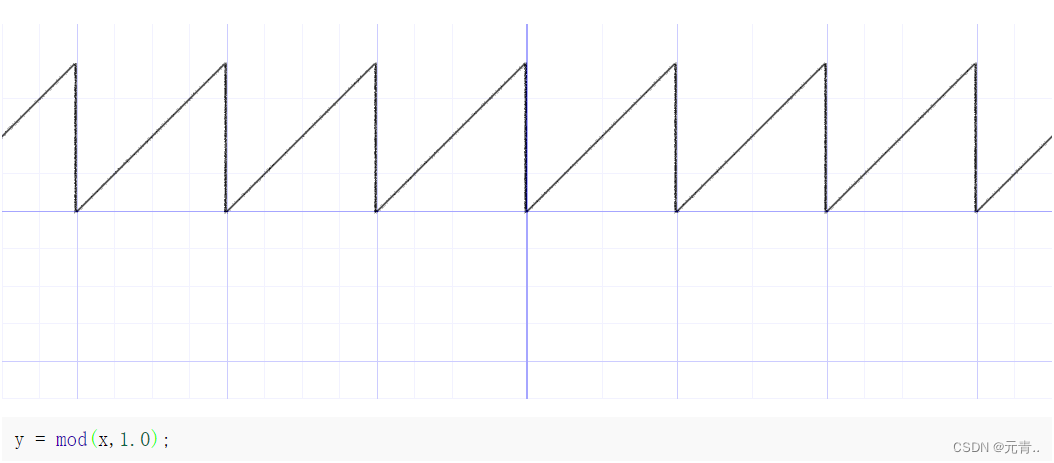
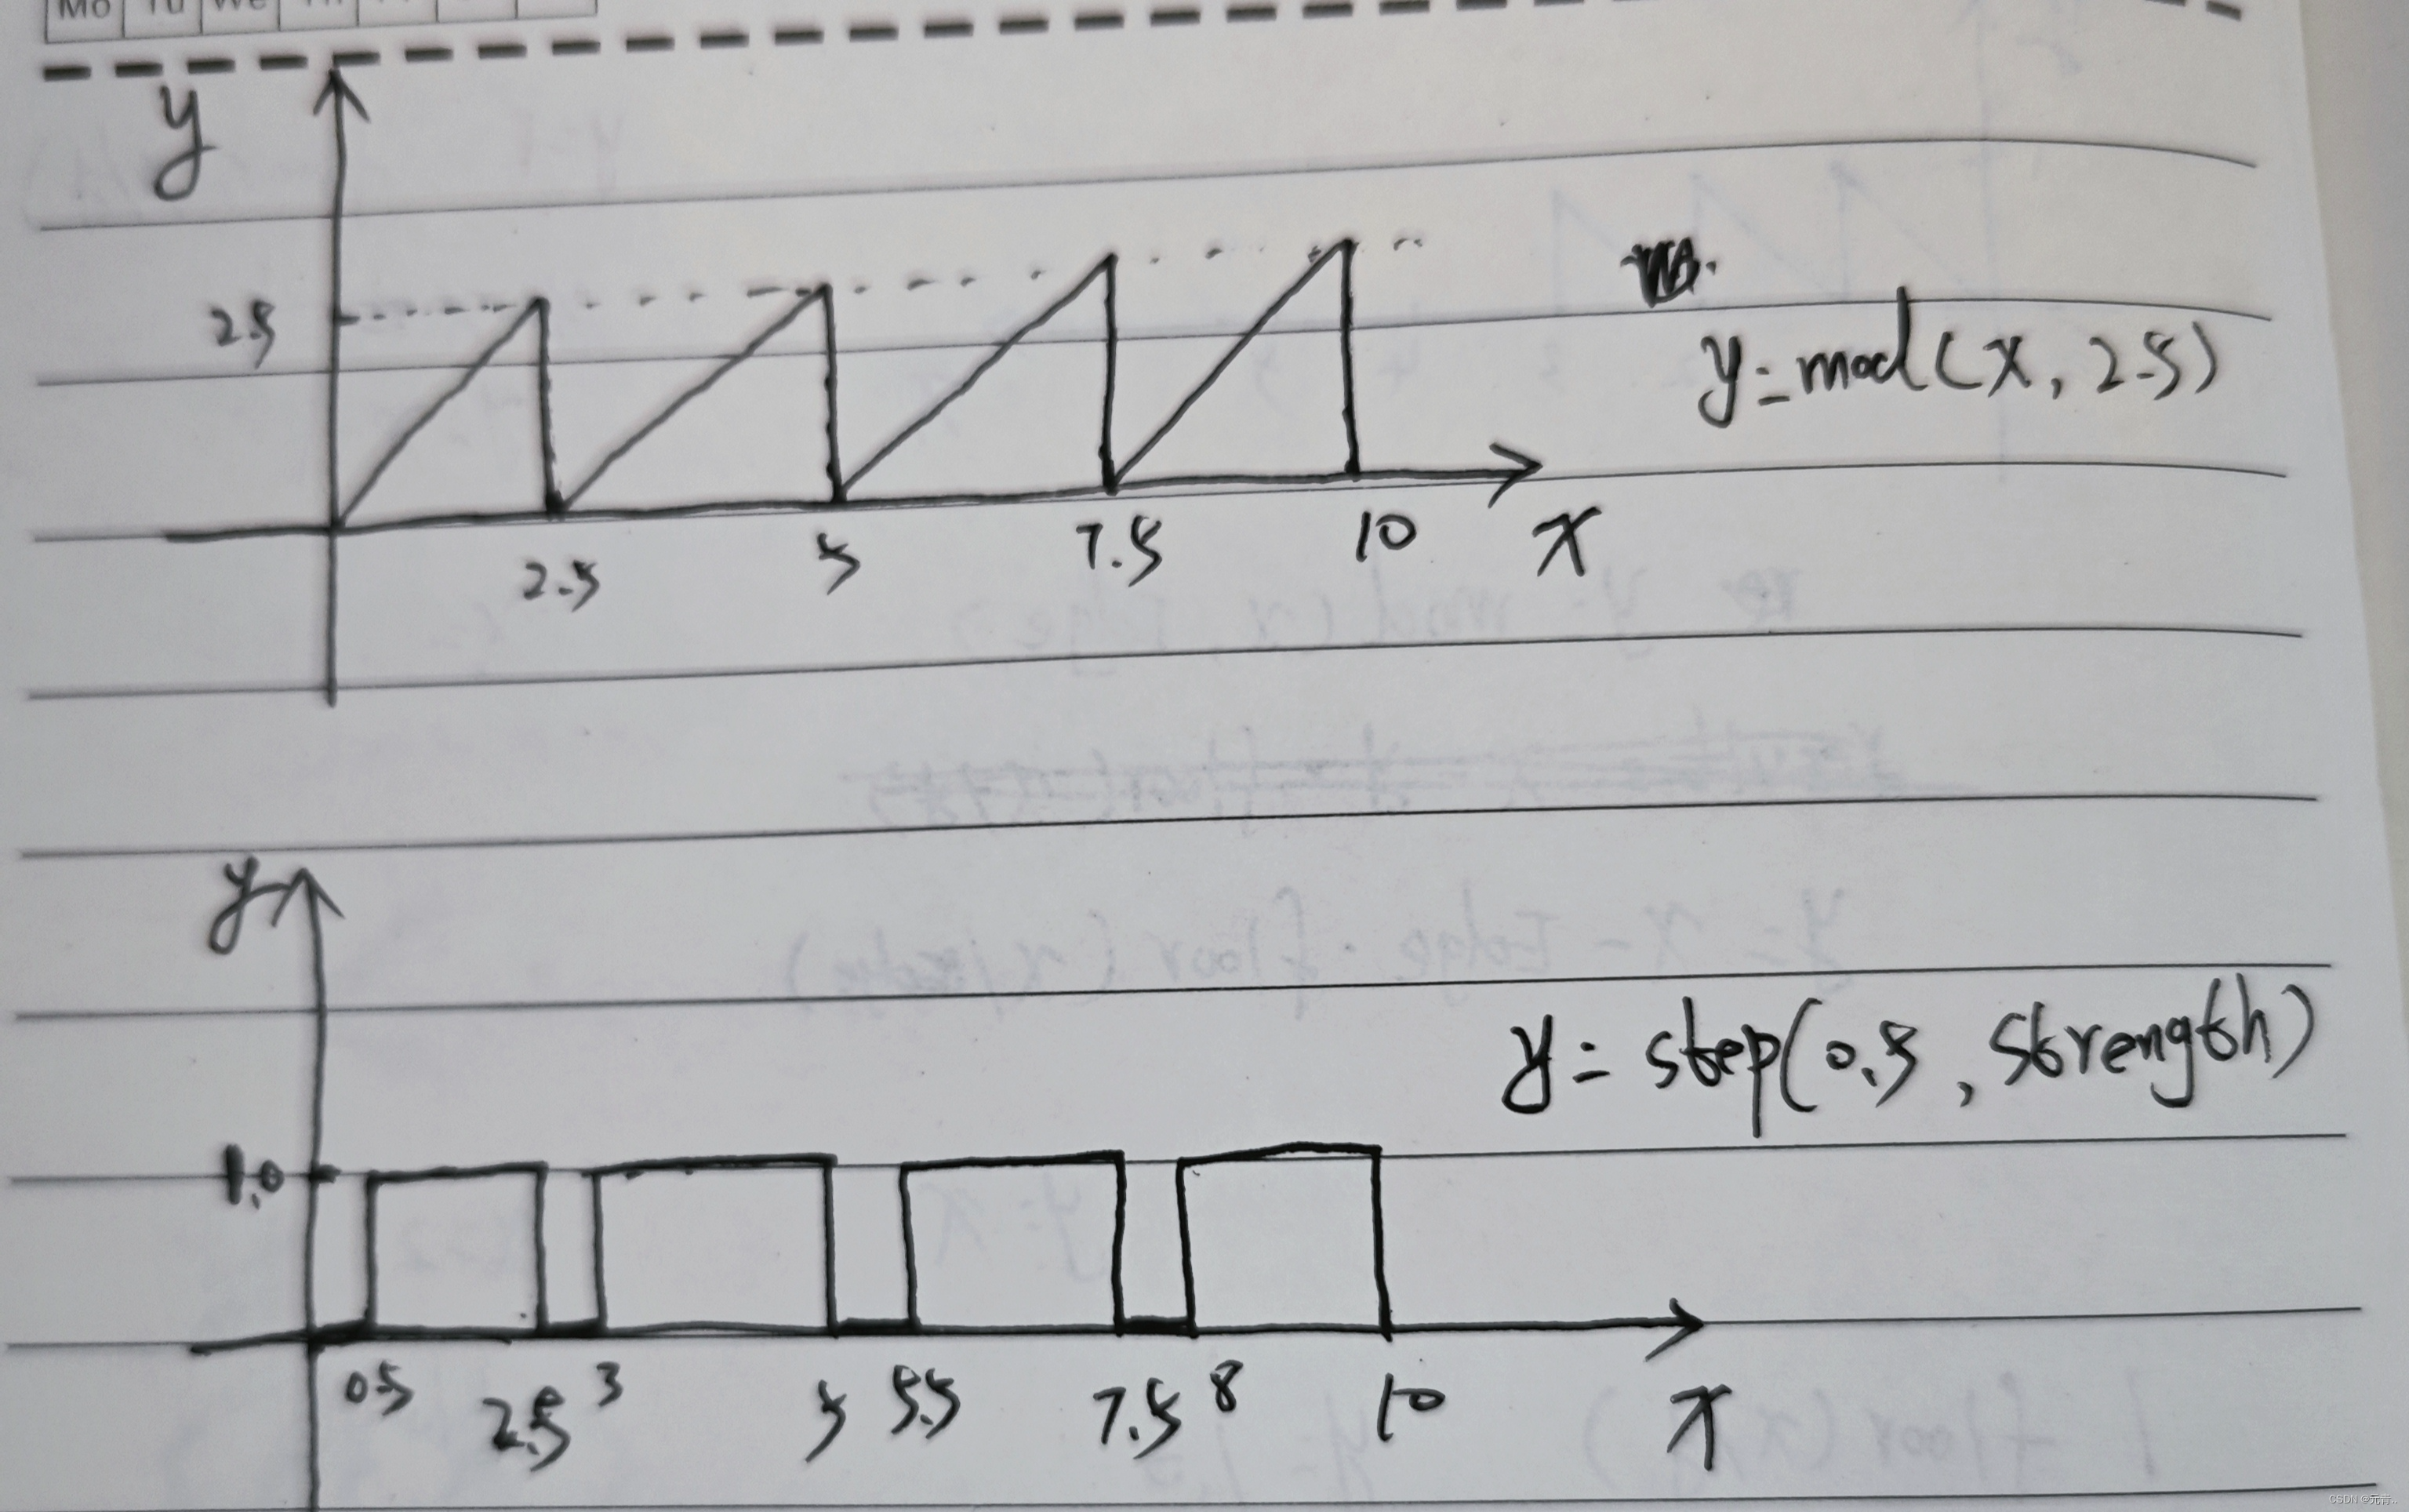
举个例子,将mod函数和step函数结合起来:
varying vec2 vUv;
void main() {
    float strength =  mod(vUv.y * 10.0 , 2.5) ;
    strength = step(0.5,strength);//0.5为边界值
    if(strength ==1.0){
        gl_FragColor =vec4(1.0,0.0,0.0,1);
    }else {
         gl_FragColor =vec4(0.0,0.0,1.0,0.3);
    }
}
这里我们分别画出mod(vUv.y * 10.0 , 2.5)函数和step(0.5,strength)函数的波形图:
 效果:
效果:

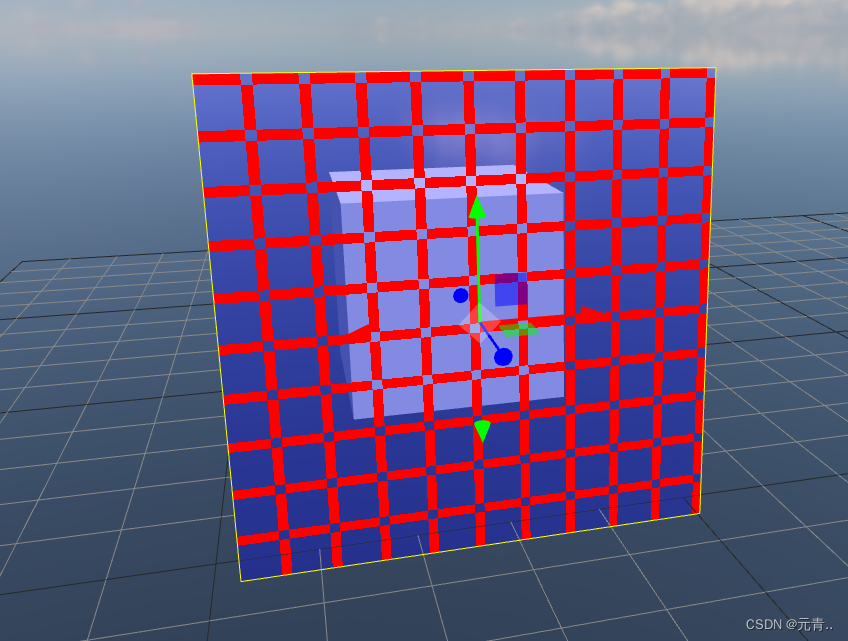
案例2:
varying vec2 vUv;
uniform float time;
void main() {

    float strength = step(0.8, mod(vUv.x * 10.0 , 1.0)) ;
    strength += step(0.8, mod(vUv.y * 10.0 , 1.0));
    if(strength ==1.0){
        gl_FragColor =vec4(1.0,0.0,0.0,1);
    }else {
         gl_FragColor =vec4(0.0,0.0,1.0,0.3);
    }
}
效果:
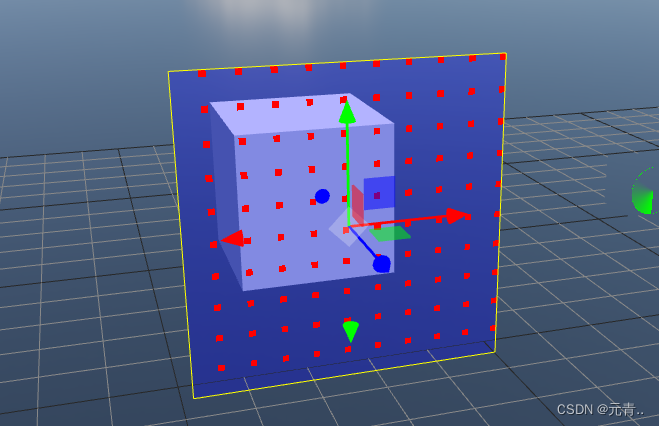
案例3:条纹相交(相交位置为1,不相交位置为0)
varying vec2 vUv;
uniform float time;
void main() {

    float strength = step(0.8, mod(vUv.x * 10.0 , 1.0)) ;
    strength *= step(0.8, mod(vUv.y * 10.0 , 1.0));
    if(strength ==1.0){
        gl_FragColor =vec4(1.0,0.0,0.0,1);
    }else {
         gl_FragColor =vec4(0.0,0.0,1.0,0.3);
    }
}
效果:
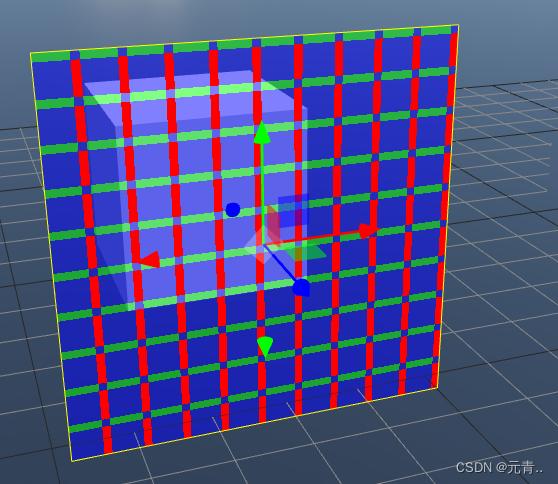
 案例4:条纹相减
varying vec2 vUv;
uniform float time;
void main() {

    float strength = step(0.8, mod(vUv.x * 10.0 , 1.0)) ;
    strength -= step(0.8, mod(vUv.y * 10.0 , 1.0));
    if(strength ==1.0){
        gl_FragColor =vec4(1.0,0.0,0.0,1);
    }else if(strength ==0.0) {
         gl_FragColor =vec4(0.0,0.0,1.0,0.5);
    } else if(strength <0.0) {
    gl_FragColor =vec4(0.0,1.0,0.0,0.5);}

}
效果:
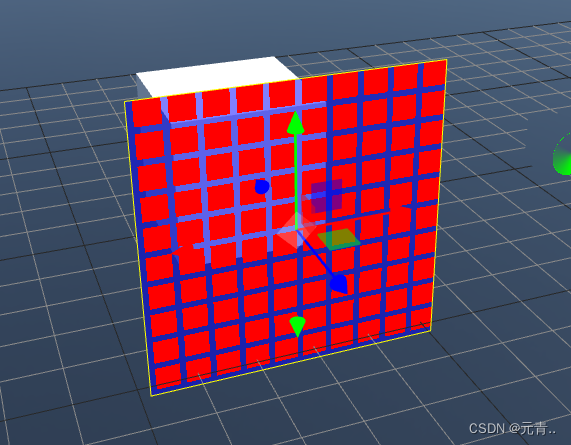
案例4:方块图形:
varying vec2 vUv;
uniform float time;
void main() {

    float strength = step(0.2, mod(vUv.x * 10.0 , 1.0)) ;
    strength *= step(0.2, mod(vUv.y * 10.0 , 1.0));
    if(strength ==1.0){
        gl_FragColor =vec4(1.0,0.0,0.0,1);
    }else if(strength ==0.0) {
         gl_FragColor =vec4(0.0,0.0,1.0,0.5);
    } else if(strength <0.0) {
    gl_FragColor =vec4(0.0,1.0,0.0,0.5);}
}
效果:
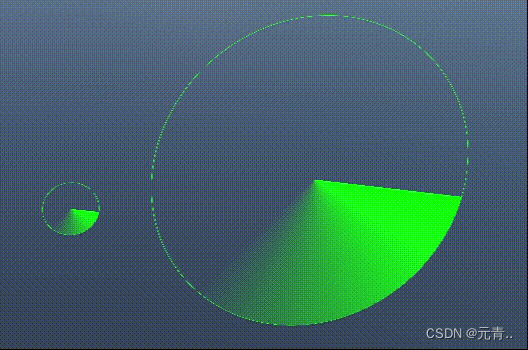
案例5: 雷达扫描效果
vertexShader:`
varying vec3 worldNormal;
varying vec2 v_position;
varying vec2 vUv;
uniform float time;
void main() {
    vUv = uv;
     v_position = vec2(position.x,position.y);
    worldNormal = normalize(normal);
    gl_Position = projectionMatrix * modelViewMatrix * vec4( position, 1.0 );
}
`
fragmentShader:`
varying vec3 worldNormal;
varying vec2 v_position;
varying vec2 vUv;
uniform float time;
#define PI2 6.28318530718
#define PI 3.1415926
void main() {
    vec3 u_color = vec3(0.0,1.0,0.0);
    float u_radius = 2.5;
    float d_opacity = 0.0;
    float u_opacity = 1.0;
    float angle = atan(vUv.x-0.5,vUv.y-0.5)+PI;
    float alpha =  1.0 - step(0.5,distance(vUv,vec2(0.5)));
    float angleT = mod(angle + time, PI2);
    float rgba = (angleT+3.14)/6.28;
    float width = PI;
    // 当前位置离中心位置
    float length = distance(vec2(0.0, 0.0), v_position);
    float bw = 0.01;
    if (length < u_radius && length > u_radius - bw) {
        float o = (length - (u_radius - bw)) / bw;
        d_opacity = sin(o * PI);
    }
    if (length < u_radius - bw / 1.1) {
        d_opacity = 1.0 - angleT / PI/0.7;
    }
    if (length > u_radius) { d_opacity = 0.0; }
    gl_FragColor = vec4(u_color, d_opacity * u_opacity);
}
`
function update( event ) {
    this.material.uniforms.time.value = event.time / 500.0;
}
效果:是动态图,但由于太大,所以这上面放的是个图片
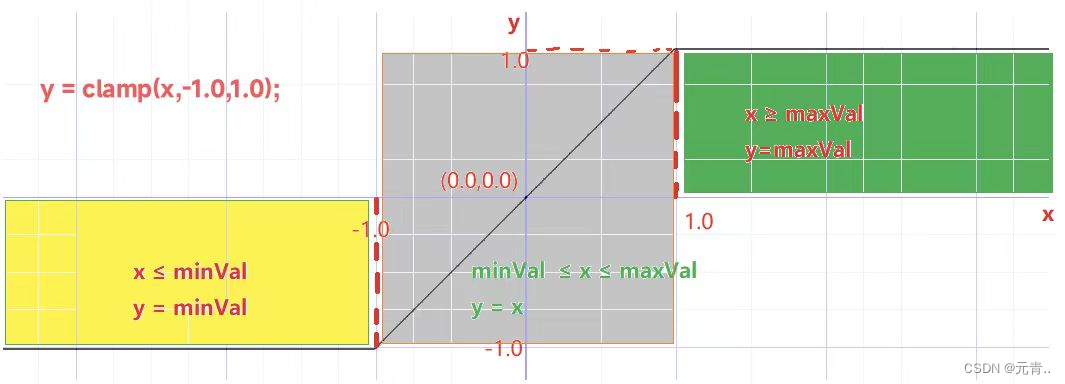
3、clamp函数
说明:将值限制在另外两个值之间
float clamp(float x, float minVal, float maxVal)
vec2 clamp(vec2 x, vec2 minVal, vec2 maxVal)
vec3 clamp(vec3 x, vec3 minVal, vec3 maxVal)
vec4 clamp(vec4 x, vec4 minVal, vec4 maxVal)

vec2 clamp(vec2 x, float minVal, float maxVal)
vec3 clamp(vec3 x, float minVal, float maxVal)
vec4 clamp(vec4 x, float minVal, float maxVal)
举例:vec2 clamp(vec2 x, float minVal, float maxVal)
说明:设置一个上限maxValue,和一个下线minVal,当x   maxValue时则等于maxVal,当x ≤ minVal时则等于minVal;当minVal  ≤ x ≤ maxVal 时,y = x;
y = clamp(x,-1.0,1.0);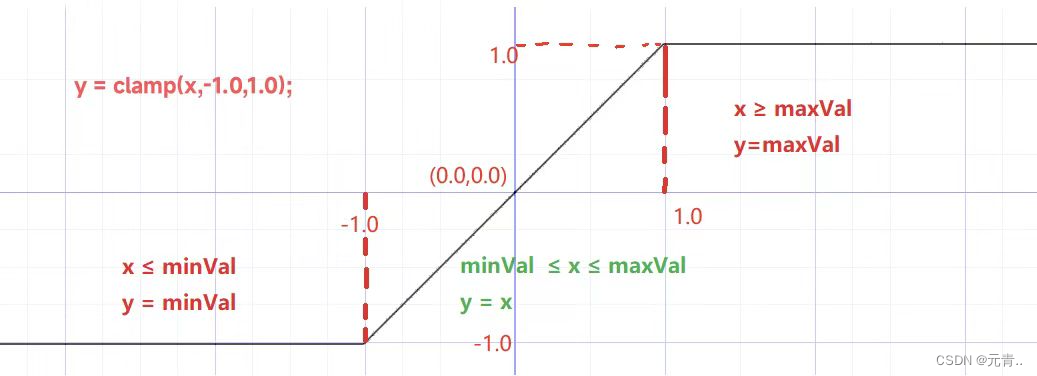
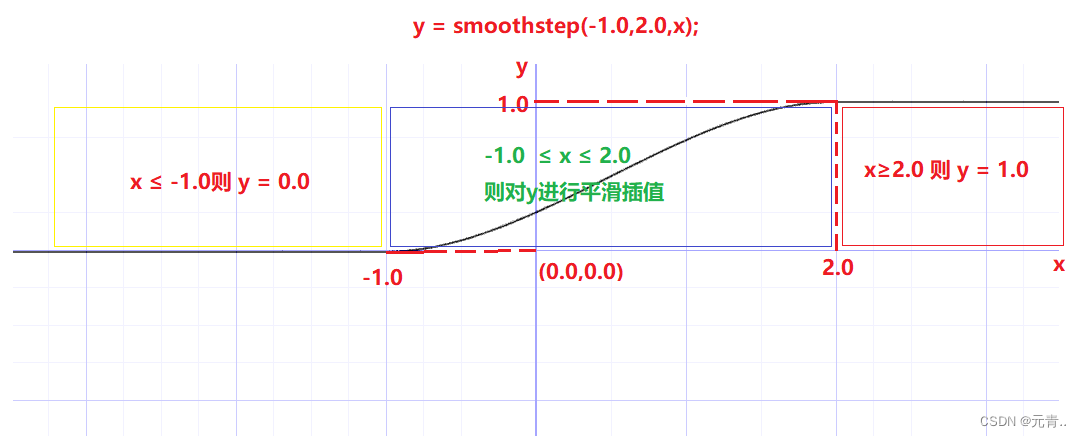
 4、smoothstep函数
float smoothstep(float edge0, float edge1, float x)
vec2 smoothstep(vec2 edge0, vec2 edge1, vec2 x)
vec3 smoothstep(vec3 edge0, vec3 edge1, vec3 x)
vec4 smoothstep(vec4 edge0, vec4 edge1, vec4 x)

vec2 smoothstep(float edge0, float edge1, vec2 x)
vec3 smoothstep(float edge0, float edge1, vec3 x)
vec4 smoothstep(float edge0, float edge1, vec4 x)
说明:smoothstep()0在和1之间执行平滑插值edge0 < x < edge1。这在需要平滑过渡的阈值函数的情况下非常有用。smoothstep()相当于:
 genType t;  /* Or genDType t; */
    t = clamp((x - edge0) / (edge1 - edge0), 0.0, 1.0);
    return t * t * (3.0 - 2.0 * t);
解释:smoothstep函数是对clamp函数的再次加工,当edge0 < x < edge1时,smoothstep()在0和1之间执行平滑埃尔米特插值。这在需要平滑过渡的阈值函数的情况下很有用。
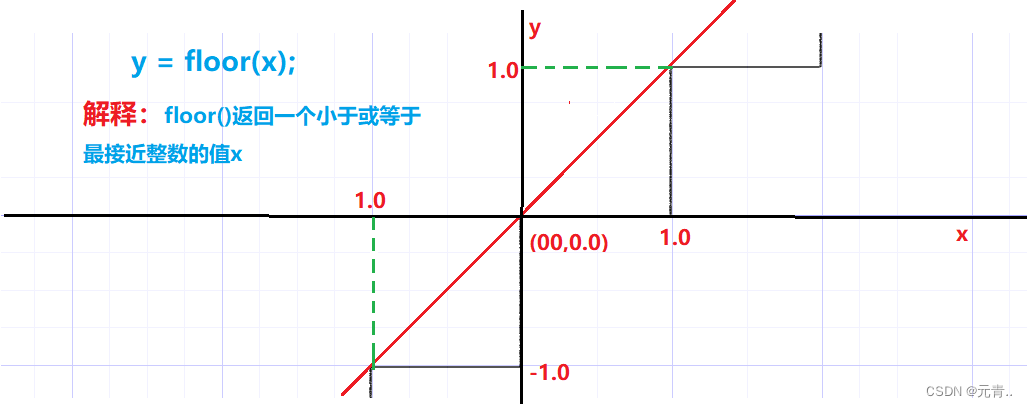
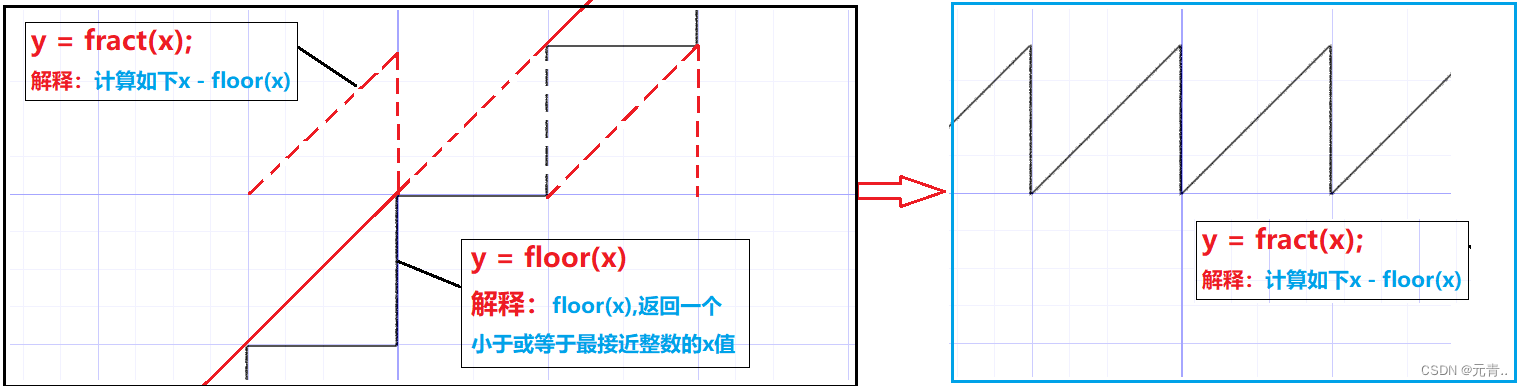
 5、floor函数
float floor(float x)
vec2 floor(vec2 x)
vec3 floor(vec3 x)
vec4 floor(vec4 x)
floor()返回一个等于小于或等于 的最接近整数的值x。
 6、fract函数
float fract(float x)
vec2 fract(vec2 x)
vec3 fract(vec3 x)
vec4 fract(vec4 x)
计算如下: y = x - floor(x)
 7、Dot函数
计算点积,返回两个向量的点积着色器和计算机图形学
参考链接
 https://blog.csdn.net/qq_32113133/article/details/102804974?utm_medium=distribute.pc_relevant.none-task-blog-2~default~baidujs_baidulandingword~default-0-102804974-blog-125807156.235^v38^pc_relevant_yljh&spm=1001.2101.3001.4242.1&utm_relevant_index=3


 1万+
1万+

 被折叠的 条评论
为什么被折叠?
被折叠的 条评论
为什么被折叠?
 到【灌水乐园】发言


