


目录
(1)发出主射线primary ray,并调用castRay()函数实现对每个像素着色;
提到优化,本次作业体现在渲染时长上面:spp取相同值的情况下,渲染时长越短当然效果是越好的!对于优化,这里有两个方面可以实现优化:
(1)较少循环的使用;
(2)使用多线程;
用循环VS不用循环
首先那不得不从代码本身结构去做优化,我们把目光聚焦在Bounds.hpp的IntersectP()函数上。
用循环:spp=2,t=5min
先看看最开始利用循环实现的代码:
inline bool Bounds3::IntersectP(const Ray& ray, const Vector3f& invDir,
                                const std::array<int, 3>& dirIsNeg) const
{
    // TODO test if ray bound intersects
    //判断包围盒Bounding Box与光线是否相交
    //tenter = max{tmin} texit = min{tmax}
    //先给个无穷初值
    double tenter = -std::numeric_limits<double>::infinity();
    double texit = std::numeric_limits<double>::infinity();
    for (int i = 0; i < 3; i++) {
        //求三个轴的tmin,tmax
        // invDir: ray direction(x,y,z), invDir=(1.0/x,1.0/y,1.0/z),
        double tmin = (pMin[i] - ray.origin[i]) * invDir[i];
        double tmax = (pMax[i] - ray.origin[i]) * invDir[i];
        //用dirIsNeg判断光线方向
        if (!dirIsNeg[i])//如果i<0,则在i轴光线方向为负,则从pmax进入,pmin离开,swap tmin和tmaxx
            std::swap(tmin, tmax);
        tenter = std::max(tenter,tmin);
        texit = std::min(texit, tmax);
    }
    return tenter < texit&& texit >= 0;
}
其他内容不变,spp=2时,渲染时长为5min。


不用循环:spp=2,t=1min
代码为:
inline bool Bounds3::IntersectP(const Ray& ray, const Vector3f& invDir,
                                const std::array<int, 3>& dirIsNeg) const
{
    Vector3f tmin = (pMin - ray.origin) * invDir;
    Vector3f tmax = (pMax - ray.origin) * invDir;
    if (dirIsNeg[0])
        std::swap(tmin.x, tmax.x);
    if (dirIsNeg[1])
        std::swap(tmin.y, tmax.y);
    if (dirIsNeg[2])
        std::swap(tmin.z, tmax.z);
    float texit = std::min(tmax.x, std::min(tmax.y, tmax.z));
    float tenter = std::max(tmin.x, std::max(tmin.y, tmin.z));
    return tenter <= texit&& texit >= 0;
}
spp=2,渲染时长为1min。


很直观的可以看到,两个结果没有任何差别,但时间就是缩短了整整4min!循环的使用大幅度延长了渲染时间,这点我在作业6最后也做了一些讨论:
GAMES101作业6-BVH完成全过程_flashinggg的博客-CSDN博客
多线程优化
多线程是在Render.cpp中实现的,可以先看看Render.cpp代码的思路是什么:
原Render.cpp思路
(1)发出主射线primary ray,并调用castRay()函数实现对每个像素着色;
这部分我在作业5里已经很详细地讲了如何计算方向,指路:
GAMES101作业5-从头到尾理解代码&Whitted光线追踪_flashinggg的博客-CSDN博客
//发射主射线primary ray
void Renderer::Render(const Scene& scene)
{
    //Image
    std::vector<Vector3f> framebuffer(scene.width * scene.height);
    //deg2rad() 度数->弧度
    float scale = std::tan(deg2rad(scene.fov * 0.5f));
    //aspect_radio=width/height
    float imageAspectRatio = scene.width / (float)scene.height;

    //eye(相机中心)定为(278,273,-800)
    Vector3f eye_pos(278, 273, -800);

    //遍历每个像素
    int m = 0;
    int spp = 16;
    sitd::cout << "SPP:" << spp << "\n";
    for (uint32_t j = 0; j < scene.height; ++j) {
        for (uint32_t i = 0; i < scene.width; ++i) {
            //发射primary ray 主射线
            float x = (2 * (i + 0.5) / (float)scene.width - 1) *
                      imageAspectRatio * scale;
            float y = (1 - 2 * (j + 0.5) / (float)scene.height) * scale;
            //这里相机中心位置eye已经在z负半轴/x,y正半轴的位置,这里将相机在世界空间eye_pos位置直接朝向[x负半轴45°,z轴正半轴]方向构建screen space,就省去了需要逆投影变换的过程,改变这个角度可以得到不同角度的渲染图~
            Vector3f dir = normalize(Vector3f(-x, y, 1));
            for (int k = 0; k < spp; k++){
                framebuffer[m] += scene.castRay(Ray(eye_pos, dir), 0) / spp;
            }
            m++;
        }
...
}
题外话:关于选取不同dir得到的渲染图,我渲了一个朝向z轴正半轴dir=(x,y,1),spp=4时的图,可以跟之前的对比看看。

(2)UpdateProgres()
...
            m++;
        }
        UpdateProgress(j / (float)scene.height);//j从0-99
    }
    UpdateProgress(1.f);//最后的100%
...
这就是一个global.hpp定义的函数
inline void UpdateProgress(float progress)
{
    int barWidth = 70;

    std::cout << "[";
    int pos = barWidth * progress;
    for (int i = 0; i < barWidth; ++i) {
        if (i < pos) std::cout << "=";
        else if (i == pos) std::cout << ">";
        else std::cout << " ";
    }
    std::cout << "] " << int(progress * 100.0) << " %\r";
    std::cout.flush();
};
目的很简单,输出=、>等符号为了让程序进程可视化:


(3)保存
没什么好讲的,就是保存结果,得到的是ppm类型的图,如果想看的话可以用PS打开或者在线转换图片类型就行。
...
    // save framebuffer to file
    FILE* fp = fopen("binary.ppm", "wb");
    (void)fprintf(fp, "P6\n%d %d\n255\n", scene.width, scene.height);
    for (auto i = 0; i < scene.height * scene.width; ++i) {
        static unsigned char color[3];
        color[0] = (unsigned char)(255 * std::pow(clamp(0, 1, framebuffer[i].x), 0.6f));
        color[1] = (unsigned char)(255 * std::pow(clamp(0, 1, framebuffer[i].y), 0.6f));
        color[2] = (unsigned char)(255 * std::pow(clamp(0, 1, framebuffer[i].z), 0.6f));
        fwrite(color, 1, 3, fp);
    }
    fclose(fp);
...
实现多线程的步骤
在实现之前,建议先看完以下两篇关于多线程的详解:(第二篇文章是基于java的)
C++11 多线程(std::thread)详解_sjc_0910的博客-CSDN博客_c++11线程
什么是多线程?如何实现多线程?_beidaol的博客-CSDN博客_多线程
利用多线程可以给image进行分块,每一部分同步进行路径追踪,来加速渲染进程。这里,Render()(程序)实现的渲染(进程)可以利用片段(thread)实现多个像素操作(多个线程)并发执行。
上面的说法不一定准确,但意思我觉得理解了就好,下面是实现步骤。
(1)首先要划分出不同的线程
很明显,要把每个像素都会进行的“发出主射线primary ray,并调用castRay()函数实现对像素着色”划分成N个线程。函数中,像素是对场景Scene的Width和Height逐行逐列进行选择的,其实划分线程的方式有三种:①.按照行划分;②.按照列划分;③.按照M行N列为区域划分。以下介绍将采用按照行划分的步骤进行。
已知场景大小:
...
class Scene
{
public:
    int width = 1280;
    int height = 960;
...这里线程数直接取能被960整除的数就行,这里我取线程数thred为20,同时我们要计算出每一线程包含的行数times,直接用height除以线程数即可,并创造一个大小为20的thread。注意,用代码给thread定义大小时,由于thread是右值引用,因此要么传递的值是const,要么给左值加上std::ref 或 std::cref(这点在参考文章中就有提到,一定要去先看那篇文章),这部分代码如下:
    const int thred = 20;
    int times = scene.height / thred ;
    std::thread th[thred];
(2)创建出每个线程执行的函数
这里基于源函数里里对场景逐行逐列对像素操作的代码,创造每个线程会进行的函数。需要注意的是,函数输入的值应是每个线程行数的范围,这个范围我们可以先定义成y_min和y_max。这里参考了参考文章中这段代码用到的lambda函数:
// Compiler: MSVC 19.29.30038.1
// C++ Standard: C++17
#include <iostream>
#include <thread>
using namespace std;
void doit() { cout << "World!" << endl; }
int main() {
	// 这里的线程a使用了 C++11标准新增的lambda函数
	// 有关lambda的语法,请参考我之前的一篇博客
	// https://blog.csdn.net/sjc_0910/article/details/109230162
	thread a([]{
		cout << "Hello, " << flush;
	}), b(doit);
	a.join();
	b.join();
	return 0;
}
用lambda可以实现在函数中定义且可以使用函数中变量的目的,这比在函数外部定义方便太多了!关于lambda的用法介绍可以看这篇文章作者的另一篇文章:C++11中Lambda的使用_sjc_0910的博客-CSDN博客_c++lambda头文件
先定义框架:
    auto castRayMultiThread = [&](uint32_t y_min, uint32_t y_max){
        ...
    };
接着实现遍历从y_min行到y_max行每一列的像素并实现操作;还有打印出进程的UpdateProgress也要加上去。还需定义一个变量progress以储存线程完成的次数,在每次上述循环完成后,progress+1,并引用打印出进程。
        for (uint32_t j = y_min; j < y_max; j++) {
            int m = j * scene.width;
            for (uint32_t i = 0; i < scene.width; i++) {
                float x = (2 * (i + 0.5) / (float)scene.width - 1) *
                    imageAspectRatio * scale;
                float y = (1 - 2 * (j + 0.5) / (float)scene.height) * scale;

                Vector3f dir = normalize(Vector3f(-x, y, 1));
                for (int k = 0; k < spp; k++) {
                    framebuffer[m] += scene.castRay(Ray(eye_pos, dir), 0) / spp;
                }
                m++;
            }
            process++;
            UpdateProgress(1.0 * process / scene.height);
}到这里还没有结束!通过参考文章我们了解到:多线程的执行是同时进行且没有次序的,这里我们就面临了两处多线程资源争抢的问题:
①.process:这是一个每个线程都要使用并且实现“process++”的变量;
②.UpdateProgress():每个线程都会用到以更新进程;
为了解决这个问题,我们可以用到的用:std::mutex互斥量 和 std::atomic.
如果用std::mutex,则代码需修改至如下:
...
                m++;
            }
            mtx.lock();
            process++;
            UpdateProgress(1.0 * process / scene.height);
            mtx.unlock();
...
别忘了在最前面加上定义:
std::mutex mtx;此外,atomic可以直接用来定义变量,作用跟mutex的一样,例如这里的process还可以在初始定义时就这样定义:
std::atomic_int process = 0;步骤(2)完整结果如下:
    int process = 0;
    auto castRayMultiThread = [&](uint32_t y_min, uint32_t y_max){
        for (uint32_t j = y_min; j < y_max; j++) {
            int m = j * scene.width;
            for (uint32_t i = 0; i < scene.width; i++) {
                float x = (2 * (i + 0.5) / (float)scene.width - 1) *
                    imageAspectRatio * scale;
                float y = (1 - 2 * (j + 0.5) / (float)scene.height) * scale;

                Vector3f dir = normalize(Vector3f(-x, y, 1));
                for (int k = 0; k < spp; k++) {
                    framebuffer[m] += scene.castRay(Ray(eye_pos, dir), 0) / spp;
                }
                m++;
            }
            mtx.lock();
            process++;
            UpdateProgress(1.0 * process / scene.height);
            mtx.unlock();
        }
    };
(3)分行进行步骤(2)函数的调用
这里就是与原代码完全不同的地方了,进行分行实现路径追踪。
    //分行进行路径追踪
    for (int i = 0; i < thred; i++) {//从第0个线程出发,一共有thred个线程
        th[i] = std::thread(castRayMultiThread, i * times, (i + 1) * times);
    }
注意:这里的i*times表示的是第i个线程行数起始值,(i+1)*times表示第i个线程行数的最大行,分别对应上述的y_min和y_max.
(4)别忘记thread需要执行的join
注意:没有执行join或detach的线程在程序结束时会引发异常,因此需要对每个线程都执行一次join.
    for (int i = 0; i < thred; i++) {
        th[i].join();
    }
(5)渲染进程结束
展示结束,直接调用UpdateProgress()函数即可,此时输入值为1,表示百分百。
UpdateProgress(1.f);另外,不要忘记在文件开头加入多线程使用的两个文件:
#include <mutex>
#include<thread>
到此为止,多线程实现过程就全部结束了。
多线程完整代码
这里贴出分行实现多线程完整的Renderer.cpp代码:
#include <fstream>
#include "Scene.hpp"
#include "Renderer.hpp"
#include <mutex>
#include<thread>

std::mutex mtx;

inline float deg2rad(const float& deg) { return deg * M_PI / 180.0; }

const float EPSILON = 0.001;

void Renderer::Render(const Scene& scene)
{
    std::vector<Vector3f> framebuffer(scene.width * scene.height);

    float scale = tan(deg2rad(scene.fov * 0.5));
    float imageAspectRatio = scene.width / (float)scene.height;
    Vector3f eye_pos(278, 273, -800);

    // change the spp value to change sample ammount
    int spp = 4;
    std::cout << "SPP: " << spp << "\n";

    int process = 0;
    const int thred = 20;
    int times = scene.height / thred;
    std::thread th[thred];

    auto castRayMultiThread = [&](uint32_t y_min, uint32_t y_max){
        for (uint32_t j = y_min; j < y_max; j++) {
            int m = j * scene.width;
            for (uint32_t i = 0; i < scene.width; i++) {
                float x = (2 * (i + 0.5) / (float)scene.width - 1) *
                    imageAspectRatio * scale;
                float y = (1 - 2 * (j + 0.5) / (float)scene.height) * scale;

                Vector3f dir = normalize(Vector3f(-x, y, 1));
                for (int k = 0; k < spp; k++) {
                    framebuffer[m] += scene.castRay(Ray(eye_pos, dir), 0) / spp;
                }
                m++;
            }
            mtx.lock();
            process++;
            UpdateProgress(1.0 * process / scene.height);
            mtx.unlock();
        }
    };

    //分行进行路径追踪
    for (int i = 0; i < thred; i++) {//从第0行出发,一共有0~by-1行
        th[i] = std::thread(castRayMultiThread, i * times, (i + 1) * times);
    }
    //每个线程执行join
    for (int i = 0; i < thred; i++) {
        th[i].join();
    }
    UpdateProgress(1.f);

    // 保存成ppm
    FILE* fp = fopen("binary.ppm", "wb");
    (void)fprintf(fp, "P6\n%d %d\n255\n", scene.width, scene.height);
    for (auto i = 0; i < scene.height * scene.width; ++i) {
        static unsigned char color[3];
        color[0] = (unsigned char)(255 * std::pow(clamp(0, 1, framebuffer[i].x), 0.6f));
        color[1] = (unsigned char)(255 * std::pow(clamp(0, 1, framebuffer[i].y), 0.6f));
        color[2] = (unsigned char)(255 * std::pow(clamp(0, 1, framebuffer[i].z), 0.6f));
        fwrite(color, 1, 3, fp);
    }
    fclose(fp);
}
多线程前后结果对比
不得不说,利用多线程提速还是很可观的!
不用多线程:
spp==60,用时55min

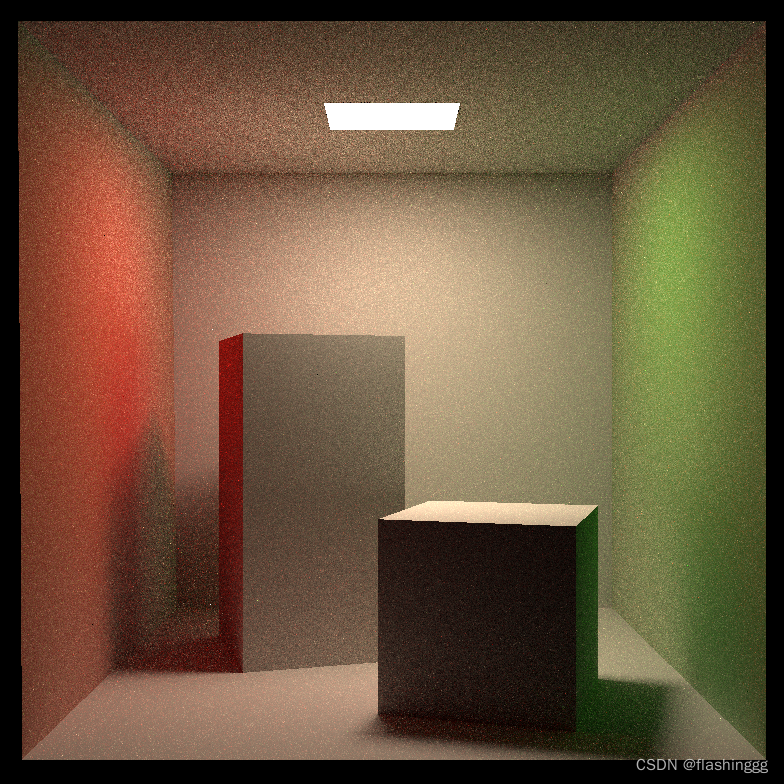
用多线程加速后
spp==256,用时36min


在spp取256>60的情况下,用时缩短了接近一半,可见多线程提速还是十分可观的!
但其实,多线程实现的方式也是会影响渲染结果的,这里出的图用的多线程方法其实是我用分块的方法出的图。按行or按列多线程渲染出的图,当spp比较小时,图会出现如下情况:(spp=2)

会有一点点的割裂感,目前还没仔细研究出现这种问题的原因,以后有机会会继续深入了解~
破案了!这个问题是EPSILON的取值问题,EPSILON=0.001时问题就解决啦!!!上面的完整代码EPSILON的取值也已经改过来了。


 1341
1341


 被折叠的 条评论
为什么被折叠?
被折叠的 条评论
为什么被折叠?
 到【灌水乐园】发言


