


 博主在人脸识别项目中使用facenet开源框架和LFW人脸数据集进行测试。介绍了facenet原理,LFW数据集情况,包括其图片和txt文档内容。测试过程涵盖图像路径提取、用MTCNN模型进行人脸检测与对比、绘制ROC曲线,最后给出完整代码和测试结果,阈值1.1时准确率为93.48%。
近期,做人脸识别项目,用到了facenet这个开源框架,并使用LFW人脸数据集进行了测试。现将该过程总结如下:
1 facenet简介
GitHub地址:https://github.com/davidsandberg/facenet.git
facenet的原理就是基于同一人脸总是比不同人脸更相似这一先验知识,然后利用传统卷积神经网络特征提取,利用三元损失函数进行训练。最终,将人脸映射到特征空间后,同一身份的人脸距离较近,不同身份的人脸距离较远。模型的输出是一个512维的向量(原来是128维)。
算法详情可参考其论文:https://arxiv.org/pdf/1503.03832.pdf。
2 LFW数据集简介
网盘链接: https://pan.baidu.com/s/1qOrFv_8RhIhUJvAmwE8p0g 提取码: kfwh
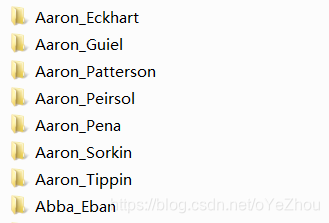
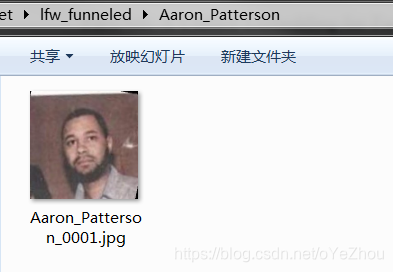
LFW数据集是对5000多人在自然场景下采集的共13000多张图像。lfw_funneled文件夹中每个子文件夹代表一个人,其中包含其若干张同一身份不同场景下的照片,有的只有一张,有的有多张。
lfw_funneled中还包含了几个txt文档,这里面记录了这些人脸的不同组合,我们使用其中的pairs.txt中的组合进行人脸比对测试。
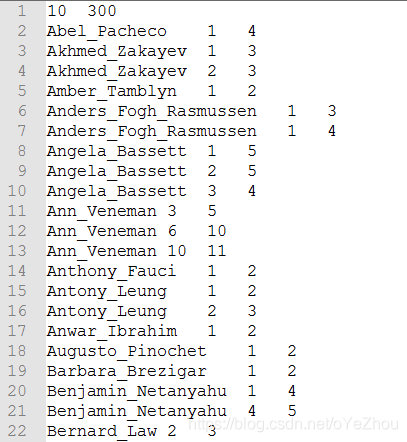
pairs.txt里面包含了6000对人脸,3000对同一身份,3000对不同身份。文档第一行的10 300代表正负样本以300的数量依次罗列,重复10次,因此共10*(300对正样本+300对负样本)= 6000对人脸。
3 测试过程
3.1 图像路径提取
首先,我们根据pairs.txt进行图片路径的提取:
-
def get_img_pairs_list(pairs_txt_path,img_path):
-
""" 指定图片组合及其所在文件,返回各图片对的绝对路径
-
Args:
-
pairs_txt_path:图片pairs文件,里面是6000对图片名字的组合
-
img_path:图片所在文件夹
-
return:
-
img_pairs_list:深度为2的list,每一个二级list存放的是一对图片的绝对路径
-
"""
-
file = open(pairs_txt_path)
-
img_pairs_list,labels = [],[]
-
while
1:
-
img_pairs = []
-
line = file.readline().replace(
'\n',
'')
-
if line ==
'':
-
break
-
line_list = line.split(
'\t')
-
if len(line_list) ==
3:
-
# 图片路径示例:
-
# 'C:\Users\thinkpad1\Desktop\image_set\lfw_funneled\Tina_Fey\Tina_Fey_0001.jpg'
-
img_pairs.append(img_path+
'\\'+line_list[
0]+
'\\'+line_list[
0]+
'_'+(
'000'+line_list[
1])[
-4:]+
'.jpg')
-
img_pairs.append(img_path+
'\\'+line_list[
0]+
'\\'+line_list[
0]+
'_'+(
'000'+line_list[
2])[
-4:]+
'.jpg')
-
labels.append(
1)
-
elif len(line_list) ==
4:
-
img_pairs.append(img_path+
'\\'+line_list[
0]+
'\\'+line_list[
0]+
'_'+(
'000'+line_list[
1])[
-4:]+
'.jpg')
-
img_pairs.append(img_path+
'\\'+line_list[
2]+
'\\'+line_list[
2]+
'_'+(
'000'+line_list[
3])[
-4:]+
'.jpg')
-
labels.append(
0)
-
else:
-
continue
-
-
img_pairs_list.append(img_pairs)
-
return img_pairs_list,labels
利用上述代码,即可提取所有人类对的绝对路径,返回一个路径list及其标签(1或0)。
3.2 人脸检测、对比
获取到人脸对的图片路径及标签之后,在使用facenet将其转化为512维的向量之前,需要先对图像进行人脸提取,即截取其中的人脸区域。这里用到了MTCNN模型,用于检测出人脸并将人脸区域单独提出来,然后就可以利用facenet进行人脸特征向量的转化了。得到这对人脸的特征向量之后,求其欧氏距离,即可根据该距离判断其是否为同一身份了。提取及比对过程如下(其中模型model是MTCNN的参数,在facenet的GitHub项目的“facenet/src/models/”路径下已有;model_facenet模型因为比较大,需要单独下载,点击下载:链接: https://pan.baidu.com/s/1ty7NfBYIretHhnZwwl2dTg 提取码: g3jy):
-
def face_verification(img_pairs_list):
-
model =
'./model/'
-
model_facenet =
r'XXX\XXX\20180402-114759.pb'
# 模型在你电脑中的路径
-
# mtcnn相关参数
-
minsize=
40
-
threshold=[
0.4,
0.5,
0.6]
# pnet、rnet、onet三个网络输出人脸的阈值,大于阈值则保留,小于阈值则丢弃
-
factor =
0.709
# scale factor
-
-
# 创建mtcnn网络
-
with tf.Graph().as_default():
-
sess=tf.Session()
-
with sess.as_default():
-
pnet,rnet,onet=detect_face.create_mtcnn(sess, model)
-
-
margin =
44
-
image_size =
160
-
-
with tf.Graph().as_default():
-
-
with tf.Session()
as sess:
-
-
# 根据模型文件载入模型
-
facenet.load_model(model_facenet)
-
# 得到输入、输出等张量
-
images_placeholder = tf.get_default_graph().get_tensor_by_name(
"input:0")
-
embeddings = tf.get_default_graph().get_tensor_by_name(
"embeddings:0")
-
phase_train_placeholder = tf.get_default_graph().get_tensor_by_name(
"phase_train:0")
-
-
# 设置可视化进度条相关参数
-
jd =
'\r %2d%%\t [%s%s]'
-
bar_num_total =
50
-
total_num = len(img_pairs_list)
-
result, dist = [],[]
-
-
for i
in range(len(img_pairs_list)):
-
-
# 画进度条
-
if i%round(total_num/bar_num_total) ==
0
or i == total_num
-1:
-
bar_num_alright = round(bar_num_total*i/total_num)
-
alright =
'#'*bar_num_alright
-
not_alright =
'□'*(bar_num_total-bar_num_alright)
-
percent = (bar_num_alright/bar_num_total)*
100
-
print(jd % (percent,alright,not_alright),end=
'')
-
-
# 读取一对人脸图像
-
img_pairs = img_pairs_list[i]
-
img_list = []
-
img1 = cv2.imread(img_pairs[
0])
-
img2 = cv2.imread(img_pairs[
1])
-
-
img_size1 = np.asarray(img1.shape)[
0:
2]
-
img_size2 = np.asarray(img2.shape)[
0:
2]
-
-
# 检测该对图像中的人脸
-
bounding_box1,_1=detect_face.detect_face(img1,minsize,pnet,rnet,onet,threshold,factor)
-
bounding_box2,_2=detect_face.detect_face(img2,minsize,pnet,rnet,onet,threshold,factor)
-
-
# 未检测到人脸,则将结果标为-1,后续计算准确率时排除
-
if len(bounding_box1)<
1
or len(bounding_box2)<
1:
-
result.append(
-1)
-
dist.append(
-1)
-
continue
-
-
# 将图片1加入img_list
-
det = np.squeeze(bounding_box1[
0,
0:
4])
-
bb = np.zeros(
4, dtype=np.int32)
-
bb[
0] = np.maximum(det[
0]-margin/
2,
0)
-
bb[
1] = np.maximum(det[
1]-margin/
2,
0)
-
bb[
2] = np.minimum(det[
2]+margin/
2, img_size1[
1])
-
bb[
3] = np.minimum(det[
3]+margin/
2, img_size1[
0])
-
cropped = img1[bb[
1]:bb[
3],bb[
0]:bb[
2],:]
-
aligned = cv2.resize(cropped, (image_size, image_size))
-
prewhitened = facenet.prewhiten(aligned)
-
img_list.append(prewhitened)
-
-
# 将图片2加入img_list
-
det = np.squeeze(bounding_box2[
0,
0:
4])
-
bb = np.zeros(
4, dtype=np.int32)
-
bb[
0] = np.maximum(det[
0]-margin/
2,
0)
-
bb[
1] = np.maximum(det[
1]-margin/
2,
0)
-
bb[
2] = np.minimum(det[
2]+margin/
2, img_size2[
1])
-
bb[
3] = np.minimum(det[
3]+margin/
2, img_size2[
0])
-
cropped = img2[bb[
1]:bb[
3],bb[
0]:bb[
2],:]
-
aligned = cv2.resize(cropped, (image_size, image_size))
-
prewhitened = facenet.prewhiten(aligned)
-
img_list.append(prewhitened)
-
-
images = np.stack(img_list)
-
-
# 将两个人脸转化为512维的向量
-
feed_dict = { images_placeholder: images, phase_train_placeholder:
False }
-
emb = sess.run(embeddings, feed_dict=feed_dict)
-
-
# 计算两个人脸向量的距离
-
ed = np.sqrt( np.sum( np.square( np.subtract(emb[
0], emb[
1]) ) ) )
-
dist.append(ed)
-
# 根据得出的人脸间的距离,判断是否属于同一个人
-
if ed<=
1.1:
-
result.append(
1)
-
else:
-
result.append(
0)
-
return result,dist
上述代码可以实现在某一指定阈值下,进行人脸比对,得出对比结果存于result中,用于后续计算准确率;同时,为了画出ROC曲线,这里还返回了,所有人脸对的欧氏距离,存于dist中。
实际上,上述result是dist在某一个阈值下的截面数据,通过设置不同阈值,即可根据dist得出不同的result,下面正是利用这个原理画出的ROC曲线。
3.3 ROC曲线
根据3.2得出的每对人脸的欧氏距离,还有3.1得出的各对人脸样本的标签,即可画出计算出ROC曲线所需指标:TPR、FPR。
代码如下:
-
def roc(dist,labels):
-
TP_list,TN_list,FP_list,FN_list,TPR,FPR = [],[],[],[],[],[]
-
for t
in range(
180):
-
threh =
0.1+t*
0.01
-
-
TP,TN,FP,FN =
0,
0,
0,
0
-
for i
in range(len(dist)):
-
if labels[i]==
1
and dist[i]!=
-1:
-
if dist[i]<threh:
-
TP +=
1
-
else:
-
FN +=
1
-
elif labels[i]==
0
and dist[i]!=
-1:
-
if dist[i]>=threh:
-
TN +=
1
-
else:
-
FP +=
1
-
TP_list.append(TP)
-
TN_list.append(TN)
-
FP_list.append(FP)
-
FN_list.append(FN)
-
TPR.append(TP/(TP+FN))
-
FPR.append(FP/(FP+TN))
-
return TP_list,TN_list,FP_list,FN_list,TPR,FPR
4 完整代码
-
# -*- coding: utf-8 -*-
-
"""
-
Created on Fri Mar 22 09:59:41 2019
-
-
@author: Leon
-
内容:
-
人脸验证准确率测试
-
样本:LFW人脸集,共6000对人脸,中3000对同一身份、3000对不同身份。
-
-
"""
-
import numpy
as np
-
import cv2
-
import tensorflow
as tf
-
import matplotlib.pyplot
as plt
-
# facenet 和 detect_face 均在facenet项目文件中,这里是直接将其放到测试脚本同一路径下了,也可以安装facenet,然后调用之
-
import facenet
-
import align.detect_face
as detect_face
-
-
def face_verification(img_pairs_list):
-
model =
'./model/'
-
model_facenet =
r'XXX\XXX\20180402-114759.pb'
-
# mtcnn相关参数
-
minsize=
40
-
threshold=[
0.4,
0.5,
0.6]
# pnet、rnet、onet三个网络输出人脸的阈值,大于阈值则保留,小于阈值则丢弃
-
factor =
0.709
# scale factor
-
-
# 创建mtcnn网络
-
with tf.Graph().as_default():
-
sess=tf.Session()
-
with sess.as_default():
-
pnet,rnet,onet=detect_face.create_mtcnn(sess, model)
-
-
margin =
44
-
image_size =
160
-
-
with tf.Graph().as_default():
-
-
with tf.Session()
as sess:
-
-
# 根据模型文件载入模型
-
facenet.load_model(model_facenet)
-
# 得到输入、输出等张量
-
images_placeholder = tf.get_default_graph().get_tensor_by_name(
"input:0")
-
embeddings = tf.get_default_graph().get_tensor_by_name(
"embeddings:0")
-
phase_train_placeholder = tf.get_default_graph().get_tensor_by_name(
"phase_train:0")
-
-
# 设置可视化进度条相关参数
-
jd =
'\r %2d%%\t [%s%s]'
-
bar_num_total =
50
-
total_num = len(img_pairs_list)
-
result, dist = [],[]
-
-
for i
in range(len(img_pairs_list)):
-
-
# 画进度条
-
if i%round(total_num/bar_num_total) ==
0
or i == total_num
-1:
-
bar_num_alright = round(bar_num_total*i/total_num)
-
alright =
'#'*bar_num_alright
-
not_alright =
'□'*(bar_num_total-bar_num_alright)
-
percent = (bar_num_alright/bar_num_total)*
100
-
print(jd % (percent,alright,not_alright),end=
'')
-
-
# 读取一对人脸图像
-
img_pairs = img_pairs_list[i]
-
img_list = []
-
img1 = cv2.imread(img_pairs[
0])
-
img2 = cv2.imread(img_pairs[
1])
-
-
img_size1 = np.asarray(img1.shape)[
0:
2]
-
img_size2 = np.asarray(img2.shape)[
0:
2]
-
-
# 检测该对图像中的人脸
-
bounding_box1,_1=detect_face.detect_face(img1,minsize,pnet,rnet,onet,threshold,factor)
-
bounding_box2,_2=detect_face.detect_face(img2,minsize,pnet,rnet,onet,threshold,factor)
-
-
# 未检测到人脸,则将结果标为-1,后续计算准确率时排除
-
if len(bounding_box1)<
1
or len(bounding_box2)<
1:
-
result.append(
-1)
-
dist.append(
-1)
-
continue
-
-
# 将图片1加入img_list
-
det = np.squeeze(bounding_box1[
0,
0:
4])
-
bb = np.zeros(
4, dtype=np.int32)
-
bb[
0] = np.maximum(det[
0]-margin/
2,
0)
-
bb[
1] = np.maximum(det[
1]-margin/
2,
0)
-
bb[
2] = np.minimum(det[
2]+margin/
2, img_size1[
1])
-
bb[
3] = np.minimum(det[
3]+margin/
2, img_size1[
0])
-
cropped = img1[bb[
1]:bb[
3],bb[
0]:bb[
2],:]
-
aligned = cv2.resize(cropped, (image_size, image_size))
-
prewhitened = facenet.prewhiten(aligned)
-
img_list.append(prewhitened)
-
-
# 将图片2加入img_list
-
det = np.squeeze(bounding_box2[
0,
0:
4])
-
bb = np.zeros(
4, dtype=np.int32)
-
bb[
0] = np.maximum(det[
0]-margin/
2,
0)
-
bb[
1] = np.maximum(det[
1]-margin/
2,
0)
-
bb[
2] = np.minimum(det[
2]+margin/
2, img_size2[
1])
-
bb[
3] = np.minimum(det[
3]+margin/
2, img_size2[
0])
-
cropped = img2[bb[
1]:bb[
3],bb[
0]:bb[
2],:]
-
aligned = cv2.resize(cropped, (image_size, image_size))
-
prewhitened = facenet.prewhiten(aligned)
-
img_list.append(prewhitened)
-
-
images = np.stack(img_list)
-
-
# 将两个人脸转化为512维的向量
-
feed_dict = { images_placeholder: images, phase_train_placeholder:
False }
-
emb = sess.run(embeddings, feed_dict=feed_dict)
-
-
# 计算两个人脸向量的距离
-
ed = np.sqrt( np.sum( np.square( np.subtract(emb[
0], emb[
1]) ) ) )
-
dist.append(ed)
-
# 根据得出的人脸间的距离,判断是否属于同一个人
-
if ed<=
1.1:
-
result.append(
1)
-
else:
-
result.append(
0)
-
return result,dist
-
-
def get_img_pairs_list(pairs_txt_path,img_path):
-
""" 指定图片组合及其所在文件,返回各图片对的绝对路径
-
Args:
-
pairs_txt_path:图片pairs文件,里面是6000对图片名字的组合
-
img_path:图片所在文件夹
-
return:
-
img_pairs_list:深度为2的list,每一个二级list存放的是一对图片的绝对路径
-
"""
-
file = open(pairs_txt_path)
-
img_pairs_list,labels = [],[]
-
while
1:
-
img_pairs = []
-
line = file.readline().replace(
'\n',
'')
-
if line ==
'':
-
break
-
line_list = line.split(
'\t')
-
if len(line_list) ==
3:
-
# 图片路径示例:
-
# 'C:\Users\thinkpad1\Desktop\image_set\lfw_funneled\Tina_Fey\Tina_Fey_0001.jpg'
-
img_pairs.append(img_path+
'\\'+line_list[
0]+
'\\'+line_list[
0]+
'_'+(
'000'+line_list[
1])[
-4:]+
'.jpg')
-
img_pairs.append(img_path+
'\\'+line_list[
0]+
'\\'+line_list[
0]+
'_'+(
'000'+line_list[
2])[
-4:]+
'.jpg')
-
labels.append(
1)
-
elif len(line_list) ==
4:
-
img_pairs.append(img_path+
'\\'+line_list[
0]+
'\\'+line_list[
0]+
'_'+(
'000'+line_list[
1])[
-4:]+
'.jpg')
-
img_pairs.append(img_path+
'\\'+line_list[
2]+
'\\'+line_list[
2]+
'_'+(
'000'+line_list[
3])[
-4:]+
'.jpg')
-
labels.append(
0)
-
else:
-
continue
-
-
img_pairs_list.append(img_pairs)
-
return img_pairs_list,labels
-
-
def roc(dist,labels):
-
TP_list,TN_list,FP_list,FN_list,TPR,FPR = [],[],[],[],[],[]
-
for t
in range(
180):
-
threh =
0.1+t*
0.01
-
-
TP,TN,FP,FN =
0,
0,
0,
0
-
for i
in range(len(dist)):
-
if labels[i]==
1
and dist[i]!=
-1:
-
if dist[i]<threh:
-
TP +=
1
-
else:
-
FN +=
1
-
elif labels[i]==
0
and dist[i]!=
-1:
-
if dist[i]>=threh:
-
TN +=
1
-
else:
-
FP +=
1
-
TP_list.append(TP)
-
TN_list.append(TN)
-
FP_list.append(FP)
-
FN_list.append(FN)
-
TPR.append(TP/(TP+FN))
-
FPR.append(FP/(FP+TN))
-
return TP_list,TN_list,FP_list,FN_list,TPR,FPR
-
-
if __name__ ==
'__main__':
-
pairs_txt_path =
'C:/Users/thinkpad1/Desktop/image_set/lfw_funneled/pairs.txt'
-
img_path =
'C:/Users/thinkpad1/Desktop/image_set/lfw_funneled'
-
img_pairs_list,labels = get_img_pairs_list(pairs_txt_path,img_path)
-
-
result,dist = face_verification(img_pairs_list)
-
-
num_right, num_total =
0,
0
-
num_total = len([r
for r
in result
if r !=
-1])
-
num_right = len([result[i]
for i
in range(len(result))
if result[i] == labels[i]])
-
-
print(
"人脸验证测试完毕")
-
print(
"阈值为1.1,共%d对人脸,准确率%2.4f%%"%(num_total, round(
100*num_right/num_total,
4)))
-
-
TP_list,TN_list,FP_list,FN_list,TPR,FPR = roc(dist,labels)
-
plt.plot(FPR,TPR,label=
'Roc')
-
plt.plot([
0,
1], [
0,
1],
'--', color=(
0.6,
0.6,
0.6), label=
'Luck')
-
plt.xlabel(
'FPR')
-
plt.ylabel(
'TPR')
-
plt.legend()
-
-
plt.plot(np.linspace(
0.1,
1.89,
180),TP_list,label=
'TP')
-
plt.plot(np.linspace(
0.1,
1.89,
180),TN_list,label=
'TN')
-
plt.plot(np.linspace(
0.1,
1.89,
180),FP_list,label=
'FP')
-
plt.plot(np.linspace(
0.1,
1.89,
180),FN_list,label=
'FN')
-
plt.legend()
5 测试结果
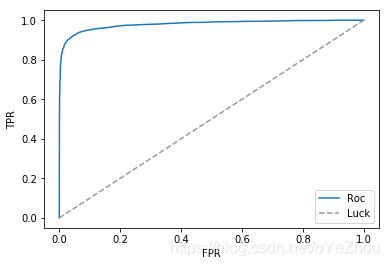
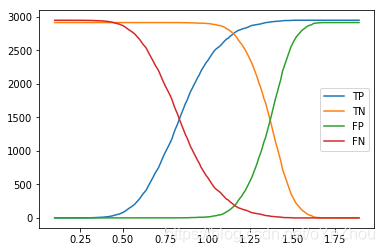
在阈值1.1下测试准确率为93.48%,这里没有达到其宣称的99%+的准确率。

利用每对人脸距离,通过设置不同距离阈值,画出ROC曲线,如下图(左),将TP,TN,FP,FN的曲线也画出来,可以佐证阈值在1.1时,达到最好的分类效果(TP、TN最大,FP、FN最小)。


 2万+
2万+

 被折叠的 条评论
为什么被折叠?
被折叠的 条评论
为什么被折叠?
 到【灌水乐园】发言


