


| 1️⃣作业要求 |
|---|
给定一幅灰度图像,使用任意方法将其变成一幅彩色图像,并尽量使得添加的色彩显得较为真实。
| 2️⃣核心代码 |
|---|
这里我们是直接调用了eccv16和siggraph17的模型,运行程序时会自动下载这两个model文件,然后经过对图像的预处理之后,放入模型中进行上色,最后输出上色后的图像。
import argparse
import matplotlib
import matplotlib.pyplot as plt
from colorizers import *
matplotlib.use('TKAgg')

parser = argparse.ArgumentParser()
parser.add_argument('-i','--img_path', type=str, default='imgs/ansel_adams3.jpg')
parser.add_argument('--use_gpu', action='store_true', help='whether to use GPU')
parser.add_argument('-o','--save_prefix', type=str, default='saved', help='will save into this file with {eccv16.png, siggraph17.png} suffixes')
opt = parser.parse_args()

# 加载上色器
colorizer_eccv16 = eccv16(pretrained=True).eval()
colorizer_siggraph17 = siggraph17(pretrained=True).eval()
if(opt.use_gpu):
	colorizer_eccv16.cuda()
	colorizer_siggraph17.cuda()

# default size to process images is 256x256
# grab L channel in both original ("orig") and resized ("rs") resolutions
img = load_img("imgs/test2.jpg")
(tens_l_orig, tens_l_rs) = preprocess_img(img, HW=(256,256))
if(opt.use_gpu):
	tens_l_rs = tens_l_rs.cuda()

# colorizer outputs 256x256 ab map
# resize and concatenate to original L channel
img_bw = postprocess_tens(tens_l_orig, torch.cat((0*tens_l_orig,0*tens_l_orig),dim=1))
out_img_eccv16 = postprocess_tens(tens_l_orig, colorizer_eccv16(tens_l_rs).cpu())
out_img_siggraph17 = postprocess_tens(tens_l_orig, colorizer_siggraph17(tens_l_rs).cpu())

plt.imsave('%s_eccv16.png'%opt.save_prefix, out_img_eccv16)
plt.imsave('%s_siggraph17.png'%opt.save_prefix, out_img_siggraph17)

plt.figure(figsize=(16,4))
plt.subplot(1,4,1)
plt.imshow(img,aspect='auto')
plt.title('Original')
plt.axis('off')

plt.subplot(1,4,2)
plt.imshow(img_bw,aspect='auto')
plt.title('Input')
plt.axis('off')

plt.subplot(1,4,3)
plt.imshow(out_img_eccv16,aspect='auto')
plt.title('Output (ECCV 16)')
plt.axis('off')
#
plt.subplot(1,4,4)
plt.imshow(out_img_siggraph17,aspect='auto')
plt.title('Output (SIGGRAPH 17)')
plt.axis('off')
plt.show()
| 3️⃣实验结果 |
|---|
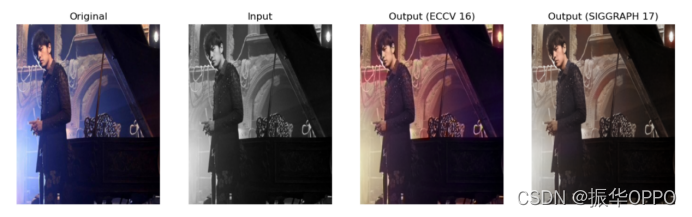
对随机选取的三张测试图片进行上色。首先第一张就是我们输入的原图,然后将输入的原图转为灰度图像,也就是第二张图片。接着我们使用16年ECCV的网络模型进行上色预测,得到处理后的结果,即第三张图片,最后我们使用17年siggraph快速着色器模型进行自动上色,得到第四张图的结果。通过对比可以看出,上色结果和原图相似度还是十分高的,而且没有任何违和感,效果很鲁棒。
💖test1是周董,周董衣服及钢琴颜色完全相同,只是背景灯光不同而已。
💝test2是蓝天白云,自然景物的还原度是最高的,几乎和原图无差别。(我估计GAN中的辨别器Discriminator都识别不出来这是上色的假图片。)

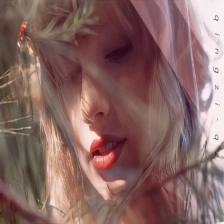
💘test3是Taylor Swift,老霉依旧很美,上色后,和原图比起来,只是缺少些靓丽感。

| ⭐实验源码+报告⭐ |
|---|
在计算机视觉领域,人类在直觉上看来十分自然的事情,在计算机视觉中却非常困难。图像在计算机里只是一个数值矩阵。这个矩阵里面表达着什么东西,计算机毫无概念,这也正是现在机器学习要解决的问题。


 1万+
1万+


 被折叠的 条评论
为什么被折叠?
被折叠的 条评论
为什么被折叠?
 到【灌水乐园】发言


