


文章目录
一.比较不同位深度BMP文件
从网页上下载一张彩色图片,查看该图片信息,显示位深度24

通过电脑画图程序和PS软件,分别将该图片保存为 32位、16位彩色和256色、16色、单色的位图(BMP)文件。
得到以下图片

分别查看这些图片信息
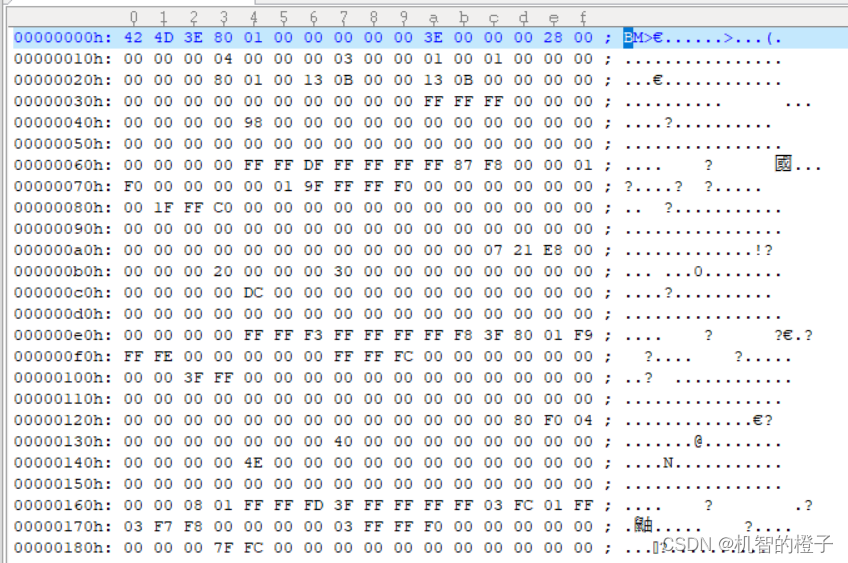
- 首先是32位彩色图colorful_32c.bmp
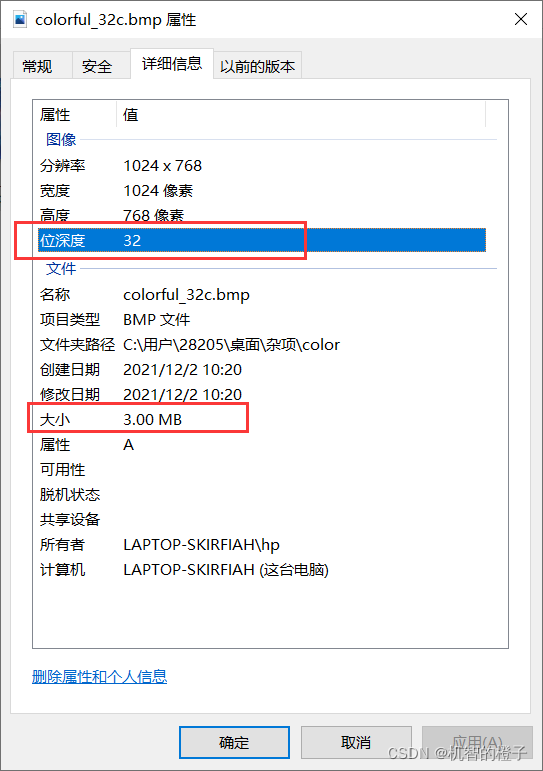
信息显示图片大小为3MB,位图大小计算:1024×768×32/8/1024=3072KB=3145728字节,这是不包含文件头信息的大小。
使用UltraEdit打开图片,查看文件头信息:
- 16位彩色图colorful_16c.bmp

信息显示图片大小为1.5MB,位图大小计算:1024×768×16/8/1024=1536KB=1572864字节,这是不包含文件头信息的大小。
使用UltraEdit打开图片,查看文件头信息:

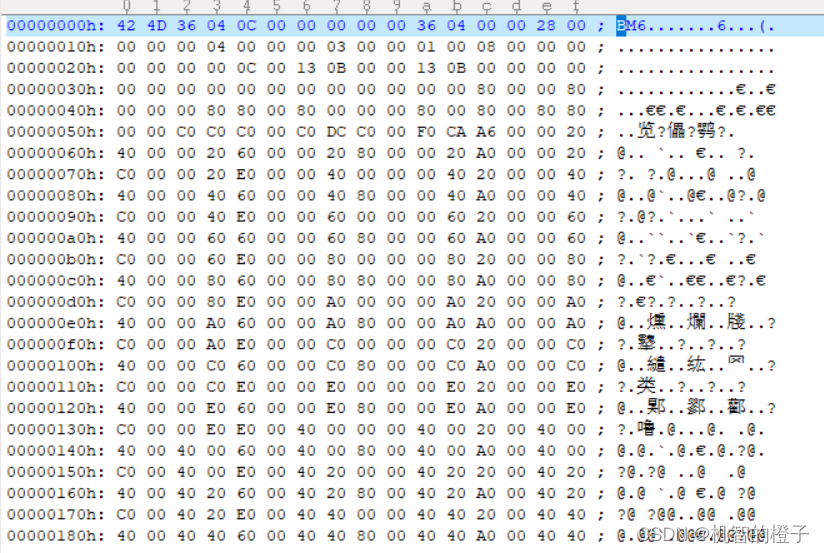
- 256色位图colorful_256.bmp
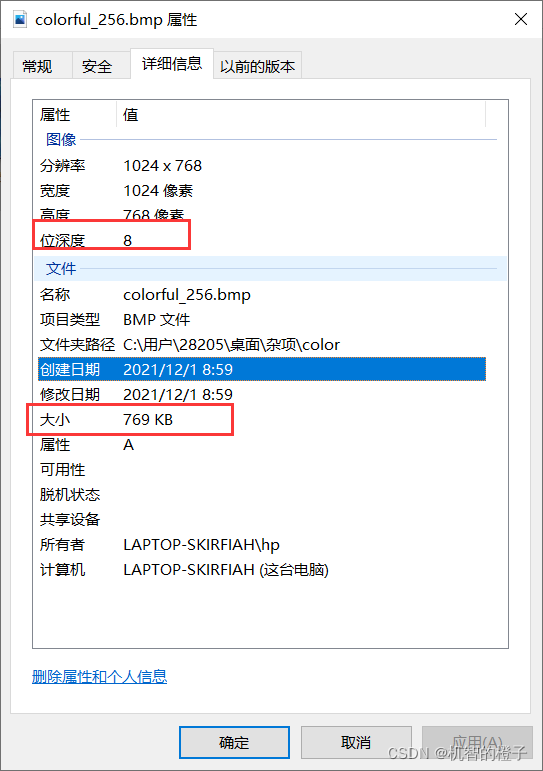
信息显示图片大小为769KB,位图大小计算:1024×768×8/8/1024=768KB=786432字节,这是不包含文件头信息的大小。
使用UltraEdit打开图片,查看文件头信息:
- 16色位图colorful_16.bmp
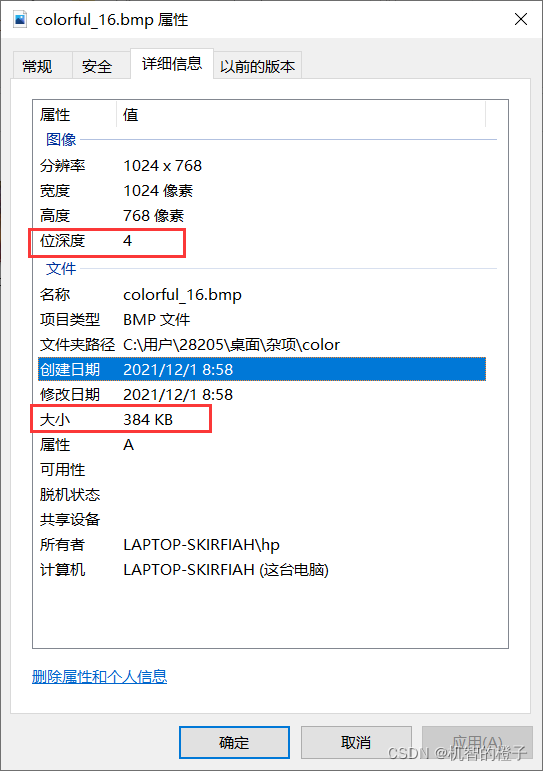
信息显示图片大小为384KB,位图大小计算:1024×768×4/8/1024=384KB=393216字节,这是不包含文件头信息的大小。
使用UltraEdit打开图片,查看文件头信息:

- 单色位图colorful_sanse.bmp
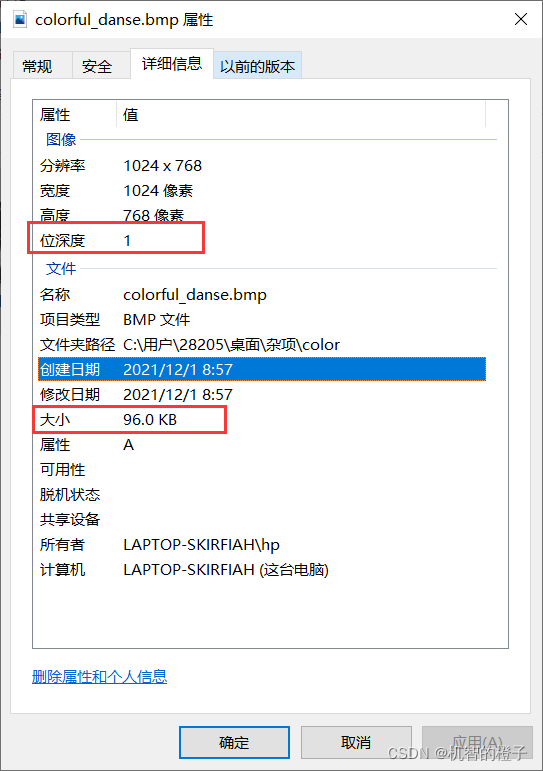
信息显示图片大小为96KB,位图大小计算:1024×768×1/8/1024=96KB=98304字节,这是不包含文件头信息的大小。
使用UltraEdit打开图片,查看文件头信息:
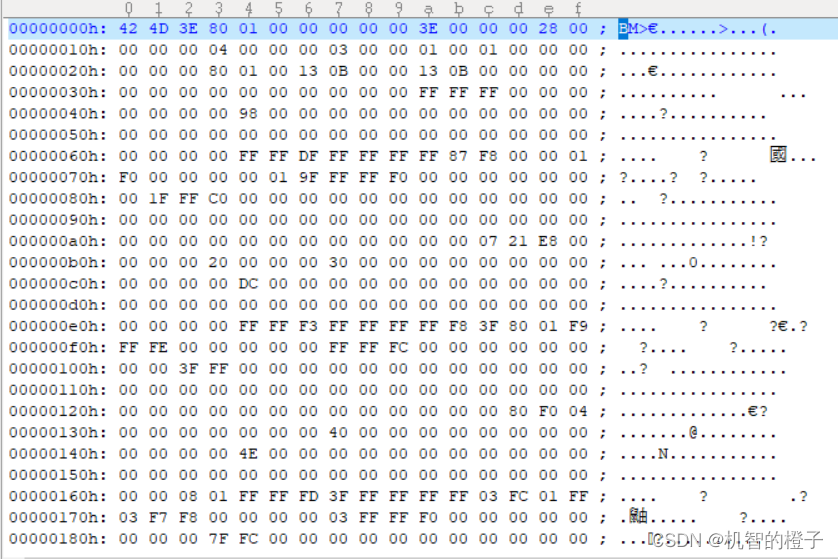
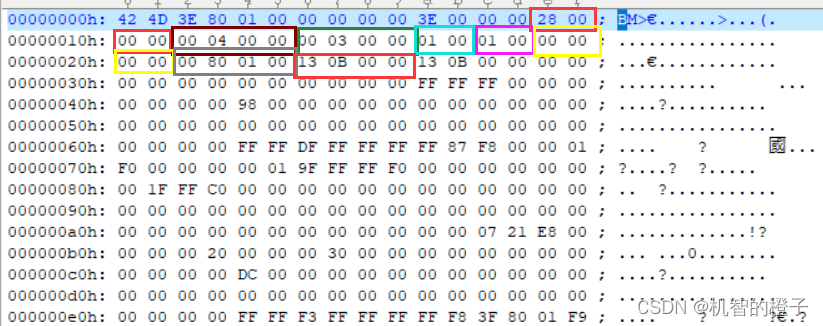
分析文件头标准编码(以colorful_sanse.bmp为例)
位图文件头(BITMAPFILEHEADER)
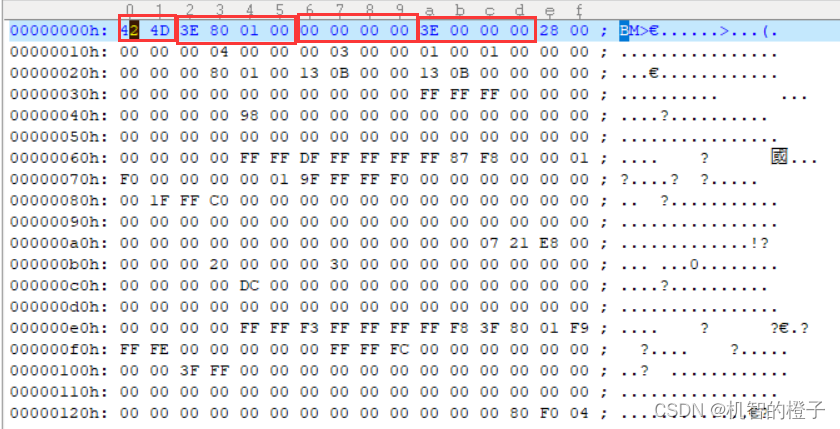
位图文件头分4部分,共14字节:
| 名称 | 占用空间 | 内容 | 实际数据 |
|---|---|---|---|
| bfType | 2字节 | 标识,就是“BM”二字 | BM |
| bfSize | 4字节 | 整个BMP文件的大小 | 0x0001803e(98366)【与右键查看图片属性里面的大小值一样】 |
| bfReserved1/2 | 4字节 | 保留字,没用 | 0 |
| bfOffBits | 4字节 | 偏移数,即 位图文件头+位图信息头+调色板 的大小 | 0x3e(62) |
注意,Windows的数据是倒着念的,这是PC电脑的特色。如果一段数据为50 1A 25 3C,倒着念就是3C 25 1A50,即0x3C251A50。因此,如果bfSize的数据为3e 80 01 00,实际上就成了0x0001803e,也就是0x1803e。
位图信息头(BITMAPINFOHEADER )
位图信息头共40字节:
| 名称 | 占用空间 | 内容 | 实际数据 |
|---|---|---|---|
| biSize | 4字节 | 位图信息头的大小,为40 | 0x28(40) |
| biWidth | 4字节 | 位图的宽度,单位是像素 | 0x400(1024) |
| biHeight | 4字节 | 位图的高度,单位是像素 | 0x300(768) |
| biPlanes | 2字节 | 固定值1 | 1 |
| biBitCount | 2字节 | 每个像素的位数1-黑白图,4-16色,8-256色,24-真彩色 | 0x10(16) |
| biCompression | 4字节 | 压缩方式,BI_RGB(0)为不压缩 | 0 |
| biSizeImage | 4字节 | 位图全部像素占用的字节数,BI_RGB时可设为0 | 0x018000 |
| biXPelsPerMeter | 4字节 | 水平分辨率(像素/米) | 0x0b13 |
| biYPelsPerMeter | 4字节 | 垂直分辨率(像素/米) | 0x0b13 |
| biClrUsed | 4字节 | 位图使用的颜色数如果为0,则颜色数为2的biBitCount次方 | 0 |
| biClrImportant | 4字节 | 重要的颜色数,0代表所有颜色都重要 | 0 |
作为真彩色位图,我们主要关心的是biWidth和biHeight这两个数值,两个数值告诉我们图像的尺寸。biSize,biPlanes,biBitCount这几个数值是固定的。想偷懒的话,其它的数值可以一律用0来填充。
将原图colorful的PNG文件分别转换为BMP,JPG,GIF
比较大小:
原图PNG大小为962,731 字节
BMP大小:2,359,350 字节,压缩比:-245%
JPG大小:552,030 字节,压缩比:57%
GIF大小:512,870 字节,压缩比:53%
二.用奇异只分解对图片进行降维处理
打开Anaconda中的Spyder
运行代码:
import numpy as np
import os
from PIL import Image
import matplotlib.pyplot as plt
import matplotlib as mpl
from pprint import pprint


def restore1(sigma, u, v, K):  # 奇异值、左特征向量、右特征向量
    m = len(u)
    n = len(v[0])
    a = np.zeros((m, n))
    for k in range(K):
        uk = u[:, k].reshape(m, 1)
        vk = v[k].reshape(1, n)
        a += sigma[k] * np.dot(uk, vk)
    a[a < 0] = 0
    a[a > 255] = 255
    # a = a.clip(0, 255)
    return np.rint(a).astype('uint8')


def restore2(sigma, u, v, K):  # 奇异值、左特征向量、右特征向量
    m = len(u)
    n = len(v[0])
    a = np.zeros((m, n))
    for k in range(K+1):
        for i in range(m):
            a[i] += sigma[k] * u[i][k] * v[k]
    a[a < 0] = 0
    a[a > 255] = 255
    return np.rint(a).astype('uint8')


if __name__ == "__main__":
    A = Image.open("C:\\Users\\28205\\Documents\\Tencent Files\\2820535964\\FileRecv\\xz.jpg", 'r')
    print(A)
    output_path = r'C:\\Users\\28205\\Documents\\Tencent Files\\2820535964\\FileRecv\\SVD_Output'
    if not os.path.exists(output_path):
        os.mkdir(output_path)
    a = np.array(A)
    print(a.shape)
    K = 50
    u_r, sigma_r, v_r = np.linalg.svd(a[:, :, 0])
    u_g, sigma_g, v_g = np.linalg.svd(a[:, :, 1])
    u_b, sigma_b, v_b = np.linalg.svd(a[:, :, 2])
    plt.figure(figsize=(11, 9), facecolor='w')
    mpl.rcParams['font.sans-serif'] = ['simHei']
    mpl.rcParams['axes.unicode_minus'] = False
    for k in range(1, K+1):
        print(k)
        R = restore1(sigma_r, u_r, v_r, k)
        G = restore1(sigma_g, u_g, v_g, k)
        B = restore1(sigma_b, u_b, v_b, k)
        I = np.stack((R, G, B), axis=2)
        Image.fromarray(I).save('%s\\svd_%d.png' % (output_path, k))
        if k <= 12:
            plt.subplot(3, 4, k)
            plt.imshow(I)
            plt.axis('off')
            plt.title('奇异值个数:%d' % k)
    plt.suptitle('SVD与图像分解', fontsize=20)
    plt.tight_layout()
    # plt.subplots_adjust(top=0.9)
    plt.show()
打开文件:

当奇异值越少,图片越模糊。
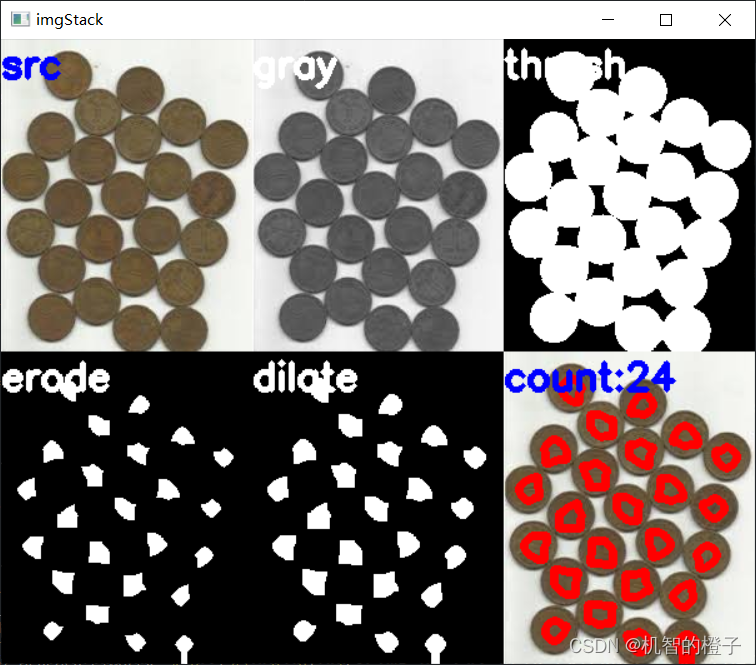
三.采用图像的开闭运算,检测出2个样本图像中硬币、细胞的个数
处理过程:读取图片–>转为灰度图片–>二值化–>腐蚀–>膨胀–>找中心点–>标识–>显示
硬币:
代码:
import cv2
import numpy as np

def stackImages(scale, imgArray):
    """
        将多张图像压入同一个窗口显示
        :param scale:float类型,输出图像显示百分比,控制缩放比例,0.5=图像分辨率缩小一半
        :param imgArray:元组嵌套列表,需要排列的图像矩阵
        :return:输出图像
    """
    rows = len(imgArray)
    cols = len(imgArray[0])
    rowsAvailable = isinstance(imgArray[0], list)
    width = imgArray[0][0].shape[1]
    height = imgArray[0][0].shape[0]
    if rowsAvailable:
        for x in range(0, rows):
            for y in range(0, cols):
                if imgArray[x][y].shape[:2] == imgArray[0][0].shape[:2]:
                    imgArray[x][y] = cv2.resize(imgArray[x][y], (0, 0), None, scale, scale)
                else:
                    imgArray[x][y] = cv2.resize(imgArray[x][y], (imgArray[0][0].shape[1], imgArray[0][0].shape[0]),
                                                None, scale, scale)
                if len(imgArray[x][y].shape) == 2: imgArray[x][y] = cv2.cvtColor(imgArray[x][y], cv2.COLOR_GRAY2BGR)
        imageBlank = np.zeros((height, width, 3), np.uint8)
        hor = [imageBlank] * rows
        hor_con = [imageBlank] * rows
        for x in range(0, rows):
            hor[x] = np.hstack(imgArray[x])
        ver = np.vstack(hor)
    else:
        for x in range(0, rows):
            if imgArray[x].shape[:2] == imgArray[0].shape[:2]:
                imgArray[x] = cv2.resize(imgArray[x], (0, 0), None, scale, scale)
            else:
                imgArray[x] = cv2.resize(imgArray[x], (imgArray[0].shape[1], imgArray[0].shape[0]), None, scale, scale)
            if len(imgArray[x].shape) == 2: imgArray[x] = cv2.cvtColor(imgArray[x], cv2.COLOR_GRAY2BGR)
        hor = np.hstack(imgArray)
        ver = hor
    return ver


#读取图片
src = cv2.imread("C:/Users/28205/Documents/Tencent Files/2820535964/FileRecv/1.png")
img = src.copy()

#灰度
img_1 = cv2.cvtColor(img, cv2.COLOR_BGR2GRAY)

#二值化
ret, img_2 = cv2.threshold(img_1, 127, 255, cv2.THRESH_BINARY_INV + cv2.THRESH_OTSU)

#腐蚀
kernel = np.ones((20, 20), int)
img_3 = cv2.erode(img_2, kernel, iterations=1)

#膨胀
kernel = np.ones((3, 3), int)
img_4 = cv2.dilate(img_3, kernel, iterations=1)

#找到硬币中心
contours, hierarchy = cv2.findContours(img_4, cv2.RETR_EXTERNAL, cv2.CHAIN_APPROX_NONE)[-2:]

#标识硬币
cv2.drawContours(img, contours, -1, (0, 0, 255), 5)

#显示图片
cv2.putText(img, "count:{}".format(len(contours)), (0, 30), cv2.FONT_HERSHEY_SIMPLEX, 1.0, (255, 0, 0), 3)
cv2.putText(src, "src", (0, 30), cv2.FONT_HERSHEY_SIMPLEX, 1.0, (255, 0, 0), 3)
cv2.putText(img_1, "gray", (0, 30), cv2.FONT_HERSHEY_SIMPLEX, 1.0, (255, 0, 0), 3)
cv2.putText(img_2, "thresh", (0, 30), cv2.FONT_HERSHEY_SIMPLEX, 1.0, (255, 0, 0), 3)
cv2.putText(img_3, "erode", (0, 30), cv2.FONT_HERSHEY_SIMPLEX, 1.0, (255, 0, 0), 3)
cv2.putText(img_4, "dilate", (0, 30), cv2.FONT_HERSHEY_SIMPLEX, 1.0, (255, 0, 0), 3)
imgStack = stackImages(1, ([src, img_1, img_2], [img_3, img_4, img]))
cv2.imshow("imgStack", imgStack)
cv2.waitKey(0)
效果:
细胞:
以上代码修改图片路径
#读取图片
src = cv2.imread("C:/Users/28205/Documents/Tencent Files/2820535964/FileRecv/2.png")
img = src.copy()
绘制图片时,修改一下字体颜色,否则字体颜色和背景一致无法辨别。
cv2.putText(img_2, "thresh", (0, 30), cv2.FONT_HERSHEY_SIMPLEX, 1.0, (0, 0, 0), 3)
cv2.putText(img_3, "erode", (0, 30), cv2.FONT_HERSHEY_SIMPLEX, 1.0, (0, 0, 0), 3)
cv2.putText(img_4, "dilate", (0, 30), cv2.FONT_HERSHEY_SIMPLEX, 1.0, (0, 0, 0), 3)
效果:

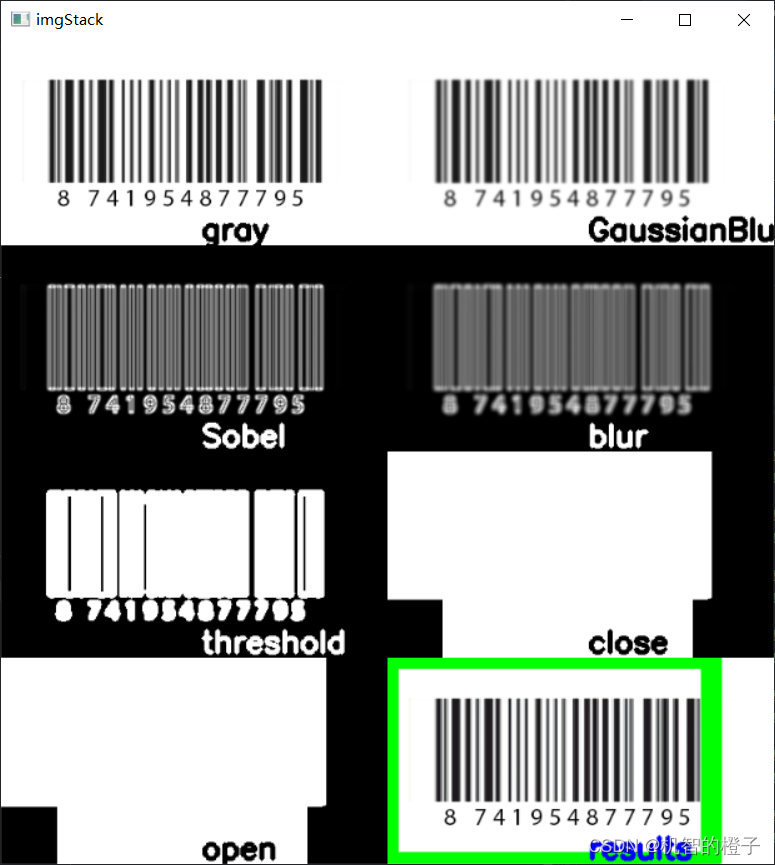
四.采用图像梯度、开闭、轮廓运算等,对图片中的条形码进行定位提取;再调用条码库获得条码字符
这里要用到imutils包和pyzbar包,打开Anaconda Prompt使用以下命令安装
pip install imutils

pip install pyzbar
代码:
import cv2
import numpy as np
import imutils
from pyzbar import pyzbar
def stackImages(scale, imgArray):
    """
        将多张图像压入同一个窗口显示
        :param scale:float类型,输出图像显示百分比,控制缩放比例,0.5=图像分辨率缩小一半
        :param imgArray:元组嵌套列表,需要排列的图像矩阵
        :return:输出图像
    """
    rows = len(imgArray)
    cols = len(imgArray[0])
    rowsAvailable = isinstance(imgArray[0], list)
    width = imgArray[0][0].shape[1]
    height = imgArray[0][0].shape[0]
    if rowsAvailable:
        for x in range(0, rows):
            for y in range(0, cols):
                if imgArray[x][y].shape[:2] == imgArray[0][0].shape[:2]:
                    imgArray[x][y] = cv2.resize(imgArray[x][y], (0, 0), None, scale, scale)
                else:
                    imgArray[x][y] = cv2.resize(imgArray[x][y], (imgArray[0][0].shape[1], imgArray[0][0].shape[0]),
                                                None, scale, scale)
                if len(imgArray[x][y].shape) == 2: imgArray[x][y] = cv2.cvtColor(imgArray[x][y], cv2.COLOR_GRAY2BGR)
        imageBlank = np.zeros((height, width, 3), np.uint8)
        hor = [imageBlank] * rows
        hor_con = [imageBlank] * rows
        for x in range(0, rows):
            hor[x] = np.hstack(imgArray[x])
        ver = np.vstack(hor)
    else:
        for x in range(0, rows):
            if imgArray[x].shape[:2] == imgArray[0].shape[:2]:
                imgArray[x] = cv2.resize(imgArray[x], (0, 0), None, scale, scale)
            else:
                imgArray[x] = cv2.resize(imgArray[x], (imgArray[0].shape[1], imgArray[0].shape[0]), None, scale, scale)
            if len(imgArray[x].shape) == 2: imgArray[x] = cv2.cvtColor(imgArray[x], cv2.COLOR_GRAY2BGR)
        hor = np.hstack(imgArray)
        ver = hor
    return ver


#读取图片
src = cv2.imread("C:\\Users\\28205\\Documents\\Tencent Files\\2820535964\\FileRecv\\txm.jpg")
img = src.copy()

#灰度
img_1 = cv2.cvtColor(img, cv2.COLOR_BGR2GRAY)

#高斯滤波
img_2 = cv2.GaussianBlur(img_1, (5, 5), 1)


#Sobel算子
sobel_x = cv2.Sobel(img_2, cv2.CV_64F, 1, 0, ksize=3)
sobel_y = cv2.Sobel(img_2, cv2.CV_64F, 0, 1, ksize=3)
sobel_x = cv2.convertScaleAbs(sobel_x)
sobel_y = cv2.convertScaleAbs(sobel_y)
img_3 = cv2.addWeighted(sobel_x, 0.5, sobel_y, 0.5, 0)

#均值方波
img_4 = cv2.blur(img_3, (5, 5))

#二值化
ret, img_5 = cv2.threshold(img_4, 127, 255, cv2.THRESH_BINARY + cv2.THRESH_OTSU)

#闭运算
kernel = np.ones((100, 100), int)
img_6 = cv2.morphologyEx(img_5, cv2.MORPH_CLOSE, kernel)

#开运算
kernel = np.ones((200, 200), int)
img_7 = cv2.morphologyEx(img_6, cv2.MORPH_OPEN, kernel)

#绘制条形码区域
contours = cv2.findContours(img_7, cv2.RETR_EXTERNAL, cv2.CHAIN_APPROX_SIMPLE)
contours = imutils.grab_contours(contours)
c = sorted(contours, key = cv2.contourArea, reverse = True)[0]
rect = cv2.minAreaRect(c)
box = cv2.cv.BoxPoints(rect) if imutils.is_cv2() else cv2.boxPoints(rect)
box = np.int0(box)
cv2.drawContours(img, [box], -1, (0,255,0), 20)

#显示图片信息
cv2.putText(img, "results", (200, 200), cv2.FONT_HERSHEY_SIMPLEX, 1.0, (255, 0, 0), 3)
cv2.putText(img_1, "gray", (200, 200), cv2.FONT_HERSHEY_SIMPLEX, 1.0, (0, 0, 0), 3)
cv2.putText(img_2, "GaussianBlur",(200, 200), cv2.FONT_HERSHEY_SIMPLEX, 1.0, (0, 0, 0), 3)
cv2.putText(img_3, "Sobel", (200, 200), cv2.FONT_HERSHEY_SIMPLEX, 1.0, (255, 0, 0), 3)
cv2.putText(img_4, "blur", (200, 200), cv2.FONT_HERSHEY_SIMPLEX, 1.0, (255, 0, 0), 3)
cv2.putText(img_5, "threshold", (200, 200), cv2.FONT_HERSHEY_SIMPLEX, 1.0, (255, 0, 0), 3)
cv2.putText(img_6, "close", (200, 200), cv2.FONT_HERSHEY_SIMPLEX, 1.0, (0, 0, 0), 3)
cv2.putText(img_7, "open", (200, 200), cv2.FONT_HERSHEY_SIMPLEX, 1.0, (0, 0, 0), 3)

#输出条形码
barcodes = pyzbar.decode(src)
for barcode in barcodes:
    barcodeData = barcode.data.decode("utf-8")
    cv2.putText(img, barcodeData, (200, 600), cv2.FONT_HERSHEY_SIMPLEX, 5.0, (0, 255, 0), 30)

#显示所有图片
imgStack = stackImages(0.8, ([img_1, img_2],[img_3,img_4],[img_5,img_6],[img_7,img]))
cv2.imshow("imgStack", imgStack)
cv2.waitKey(0)
其中:
cv2.putText(img, str(i), (123,456)), font, 2, (0,255,0), 3)
各参数依次是:图片,添加的文字,左上角坐标,字体,字体大小,颜色,字体粗细
显示图片时的排版:
imgStack = stackImages(0.8, ([img_1, img_2],[img_3,img_4],[img_5,img_6],[img_7,img]))
该语句中用"[]"括起来几张图片,一行就显示几张,前面的数字0.8表示图片大小,可自行修改。
运行效果:
五.总结
在检测图中细胞个数时,效果没有检测硬币那么好,这与图片中某些细胞颜色较浅,转换为灰度图片后,与周围颜色分辨不明显有关。


 2498
2498


 被折叠的 条评论
为什么被折叠?
被折叠的 条评论
为什么被折叠?
 到【灌水乐园】发言


