


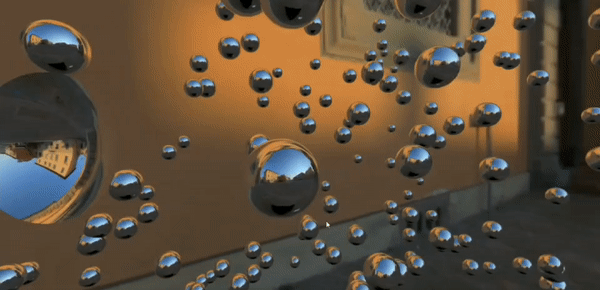
这个案例主要是使用CubeTextureLoader加载六张图片,并将其用作场景的背景。在场景中又创建很多小球,将加载的图片用作小球的环境贴图并给小球添加动画。具体效果如下:
首先需要搭建基础环境,场景、相机、渲染器和控制器,具体不太清楚的可以查看three.js基础案例day01。
1.使用CubeTextureLoader加载图片并作为场景背景
注:这六张图片是由顺序的,构成立方体贴图
  const urls = [
    // X轴正
    'static/textures/px.png',
    // X轴负
    'static/textures/nx.png',
    // y轴正
    'static/textures/py.png',
    // y轴父
    'static/textures/ny.png',
    // z轴正
    'static/textures/pz.png',
    // z轴负
    'static/textures/nz.png',
  ]
  textureCube = new THREE.CubeTextureLoader().load(urls)
  scene.background = textureCube
2. 创建多个小球
  const geomery = new THREE.SphereGeometry(0.2, 60, 60)
  const material = new THREE.MeshBasicMaterial({
    color: 0xffffff,
    side: THREE.DoubleSide,
    // 环境贴图
    envMap: textureCube,
  })
  for (let i = 0; i < count; i++) {
    const cube = new THREE.Mesh(geomery, material)
    cube.position.set(
      Math.random() * 20 - 10,
      Math.random() * 20 - 10,
      Math.random() * 20 - 10,
    )
    cube.scale.x = cube.scale.y = cube.scale.z = Math.random() + 1
    scene.add(cube)
3.让小球动起来
const timer = 0.0001 * Date.now()
for (let i = 0; i < count; i++) {
    // sphereArr这个是一个数组,里面存有所有的小球,在创建小球后push到sphereArr数组中
    const s = sphereArr[i]
    s.position.x = 5 * Math.cos(timer + i)
    s.position.y = 5 * Math.cos(timer + i * 1.1)
  }
全部代码:
<template>
  <div id="threeId" ref="elementRef"></div>
</template>

<script setup>
import * as THREE from 'three'
import { OrbitControls } from 'three/examples/jsm/controls/OrbitControls'
import { ref, onMounted } from 'vue'

let width, height, scene, camera, renderer, controls
let textureCube
let count = 300
let sphereArr = []
const elementRef = ref(null)

onMounted(() => {
  const element = elementRef.value
  width = element.offsetWidth
  height = element.offsetHeight
  initScene()
  initSceneBackground()
  initMeshes()
  render()
})

function initScene() {
  // 初始化场景: 创建场景,相机,物体,渲染器
  scene = new THREE.Scene()
  scene.background = new THREE.Color(0x888888)
  camera = new THREE.PerspectiveCamera(60, width / height, 1, 1000)
  camera.position.set(0, 2, 5)
  scene.add(camera)

  // 三维坐标
  // const axesHelper = new THREE.AxesHelper(40)
  // scene.add(axesHelper)

  renderer = new THREE.WebGLRenderer()
  renderer.setSize(width, height)
  elementRef.value.appendChild(renderer.domElement)
  controls = new OrbitControls(camera, renderer.domElement)
}
function initSceneBackground() {
  const urls = [
    'static/textures/px.png',
    'static/textures/nx.png',
    'static/textures/py.png',
    'static/textures/ny.png',
    'static/textures/pz.png',
    'static/textures/nz.png',
  ]
  textureCube = new THREE.CubeTextureLoader().load(urls)
  scene.background = textureCube
}
function initMeshes() {
  const geomery = new THREE.SphereGeometry(0.2, 60, 60)
  const material = new THREE.MeshBasicMaterial({
    color: 0xffffff,
    side: THREE.DoubleSide,
    // 环境贴图
    envMap: textureCube,
  })
  for (let i = 0; i < count; i++) {
    const cube = new THREE.Mesh(geomery, material)
    cube.position.set(
      Math.random() * 20 - 10,
      Math.random() * 20 - 10,
      Math.random() * 20 - 10,
    )
    cube.scale.x = cube.scale.y = cube.scale.z = Math.random() + 1
    scene.add(cube)
    sphereArr.push(cube)
  }
}
function render() {
  requestAnimationFrame(render)
  const timer = 0.0001 * Date.now()
  controls.update()
  renderer.render(scene, camera)
  for (let i = 0; i < count; i++) {
    const s = sphereArr[i]
    s.position.x = 5 * Math.cos(timer + i)
    s.position.y = 5 * Math.cos(timer + i * 1.1)
  }
}
</script>

<style lang="scss" scoped>
#threeId {
  width: 100%;
  height: 100%;
}
</style>


 1667
1667


 被折叠的 条评论
为什么被折叠?
被折叠的 条评论
为什么被折叠?
 到【灌水乐园】发言


