


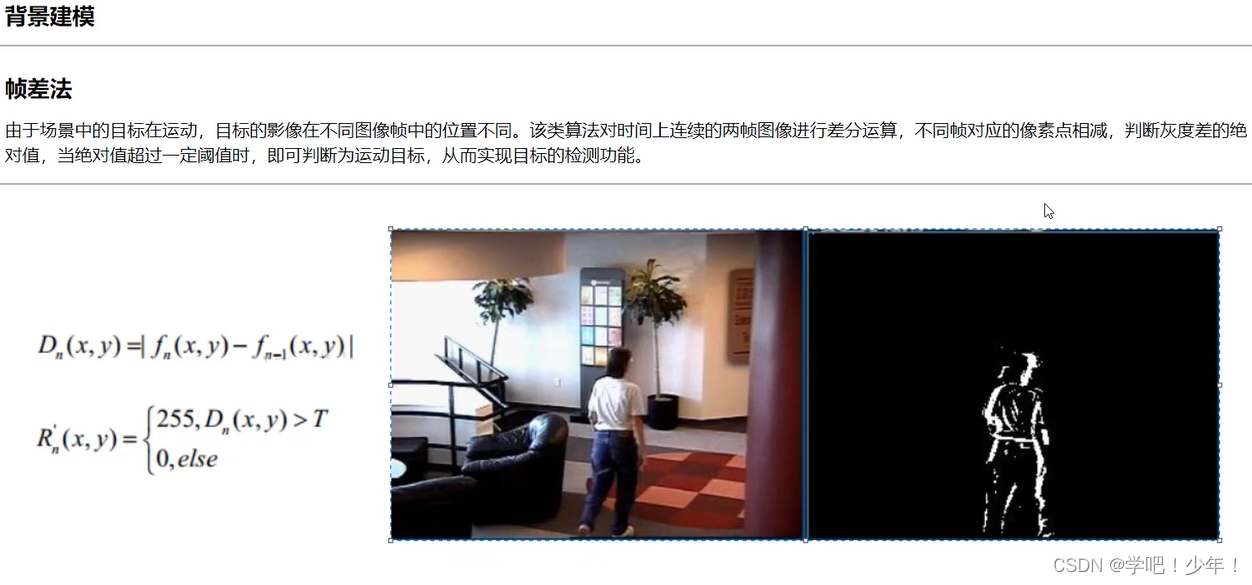
1.图像平滑处理
img:
"""
=============================================
    Time     :
    Auther   :
    File     :
    Function : 图像平滑处理
=============================================
"""

import cv2
import numpy as np

img = cv2.imread(r'F:\30_UndergraduateThesis\04_LearningOpencv\02BasicKnowledge\LenaNoise.png')
cv2.imshow('img', img)

# 均值滤波
# 简单的平均卷积操作
blur = cv2.blur(img, (3, 3))
cv2.imshow('blur', blur)

# 方框滤波
# 基本和均值一样,可以选择归一化
# box = cv2.boxFilter(img, -1, (3, 3), normalize=True) # 归一化
box = cv2.boxFilter(img, -1, (3, 3), normalize=False)
cv2.imshow('box', box)

# 高斯滤波
# 高斯模糊的卷积核里的数值是满足高斯分布,相当于更重视中间的
gaussian = cv2.GaussianBlur(img, (5, 5), 1)
cv2.imshow('gaussian', gaussian)

# 中值滤波
# 相当于中值代替
median = cv2.medianBlur(img, 5)  # 中值滤波
cv2.imshow('meidan', median)

# 展示所有
res = np.hstack((img, blur, gaussian, median))
cv2.imshow('result', res)

cv2.waitKey(0)
cv2.destroyAllWindows()
2.形态学操作
img:

2.1腐蚀操作
"""
=============================================
    Time     :
    Auther   :
    File     :
    Function : 形态学-腐蚀操作
=============================================
"""
import cv2
import numpy as np

img = cv2.imread(r'F:\30_UndergraduateThesis\04_LearningOpencv\02BasicKnowledge\dige.png')
cv2.imshow('img', img)

kernel = np.ones((3, 3), np.uint8)
erosion = cv2.erode(img, kernel, iterations=1)
cv2.imshow('erosion', erosion)

cv2.waitKey(0)
cv2.destroyAllWindows()
2.2膨胀操作
"""
=============================================
    Time     :
    Auther   :
    File     :
    Function : 形态学-膨胀操作
=============================================
"""
import cv2
import numpy as np

img = cv2.imread(r'F:\30_UndergraduateThesis\04_LearningOpencv\02BasicKnowledge\dige.png')
cv2.imshow('img', img)

kernel = np.ones((3, 3), np.uint8)
dige_erosion = cv2.erode(img, kernel, iterations=1)
cv2.imshow('dige_erosion', dige_erosion)

dige_dilate = cv2.dilate(dige_erosion, kernel, iterations=1)
cv2.imshow('dige_dilate', dige_dilate)

cv2.waitKey(0)
cv2.destroyAllWindows()
2.3 开运算与闭运算
"""
=============================================
    Time     :
    Auther   :
    File     :
    Function :开运算与闭运算
=============================================
"""
import cv2
import numpy as np

img = cv2.imread(r'F:\30_UndergraduateThesis\04_LearningOpencv\02BasicKnowledge\dige.png')
cv2.imshow('img', img)

# 开运算:先腐蚀,再膨胀
kernel = np.ones((5, 5), np.uint8)
opening = cv2.morphologyEx(img, cv2.MORPH_OPEN, kernel)
cv2.imshow('opening', opening)

# 闭运算:先膨胀,再腐蚀
closing = cv2.morphologyEx(img, cv2.MORPH_CLOSE, kernel)
cv2.imshow('closing', closing)

cv2.waitKey(0)
cv2.destroyAllWindows()
2.4梯度运算
"""
=============================================
    Time     :
    Auther   :
    File     :
    Function : 形态学-梯度运算
=============================================
"""
import cv2
import numpy as np

# 梯度=膨胀-腐蚀
img = cv2.imread(r'F:\30_UndergraduateThesis\04_LearningOpencv\02BasicKnowledge\dige.png')
kernel = np.ones((7, 7), np.uint8)
dilate = cv2.dilate(img, kernel, iterations=1)
erosion = cv2.erode(img, kernel, iterations=1)

res = np.hstack((dilate, erosion))
cv2.imshow('res', res)

gradient = cv2.morphologyEx(img, cv2.MORPH_GRADIENT, kernel)
cv2.imshow('gradient', gradient)

cv2.waitKey(0)
cv2.destroyAllWindows()
2.5礼帽与黑帽
"""
=============================================
    Time     :
    Auther   :
    File     :
    Function : 礼帽与黑帽
=============================================
"""
import cv2
import numpy as np

img = cv2.imread(r'F:\30_UndergraduateThesis\04_LearningOpencv\02BasicKnowledge\dige.png')
cv2.imshow('img', img)
# 礼帽: 原始输入 - 开运算结果
kernel = np.ones((7, 7), np.uint8)
tophat = cv2.morphologyEx(img, cv2.MORPH_TOPHAT, kernel)
cv2.imshow('tophat', tophat)

# 黑帽: 闭运算 - 原始输入
blackhat = cv2.morphologyEx(img, cv2.MORPH_BLACKHAT, kernel)
cv2.imshow('blackhat', blackhat)

cv2.waitKey(0)
cv2.destroyAllWindows()
3.图像梯度
3.1Sobel算子
"""
=============================================
    Time     :
    Auther   :
    File     :
    Function : 图像梯度-Sobel算子
=============================================
"""

import cv2

img = cv2.imread(r'F:\30_UndergraduateThesis\04_LearningOpencv\02BasicKnowledge\LenaNoise.png', cv2.IMREAD_GRAYSCALE)
cv2.imshow('img', img)

# 分开计算
sobelx = cv2.Sobel(img, -1, 1, 0, ksize=3)
sobelx = cv2.convertScaleAbs(sobelx)
sobely = cv2.Sobel(img, -1, 0, 1, ksize=3)
sobely = cv2.convertScaleAbs(sobely)
sobelxy = cv2.addWeighted(sobelx, 0.5, sobely, 0.5, 0)
cv2.imshow('sobelxy', sobelxy)

# 整体计算
sobelxy1 = cv2.Sobel(img, -1, 1, 1, ksize=3)
cv2.imshow('sobelxy1', sobelxy1)

cv2.waitKey(0)
cv2.destroyAllWindows()
3.2scharr算子和laplacian算子
"""
=============================================
Time :
Auther :
File :
Function : 图像梯度-scharr算子和laplacian算子
=============================================
"""
import cv2
import numpy as np
img = cv2.imread(r'F:\30_UndergraduateThesis\04_LearningOpencv\02BasicKnowledge\LenaNoise.png', cv2.IMREAD_GRAYSCALE)
# 不同算子的差异
sobelx = cv2.Sobel(img, -1, 1, 0, ksize=3)
sobelx = cv2.convertScaleAbs(sobelx)
sobely = cv2.Sobel(img, -1, 0, 1, ksize=3)
sobely = cv2.convertScaleAbs(sobely)
sobelxy = cv2.addWeighted(sobelx, 0.5, sobely, 0.5, 0)
scharrx = cv2.Scharr(img, -1, 1, 0)
scharrx = cv2.convertScaleAbs(scharrx)
scharry = cv2.Scharr(img, -1, 0, 1)
scharry = cv2.convertScaleAbs(scharry)
scharrxy = cv2.addWeighted(sobelx, 0.5, sobely, 0.5, 0)
laplacian = cv2.Laplacian(img, -1)
laplacian = cv2.convertScaleAbs(laplacian)
res = np.hstack((sobelxy, scharrxy, laplacian))
cv2.imshow('res', res)
cv2.waitKey(0)
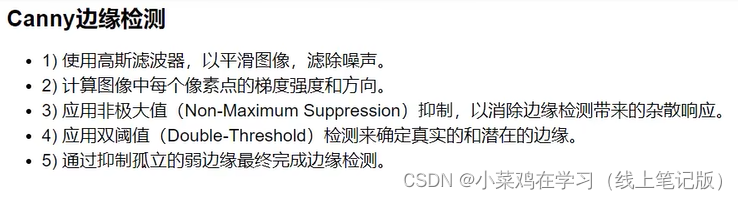
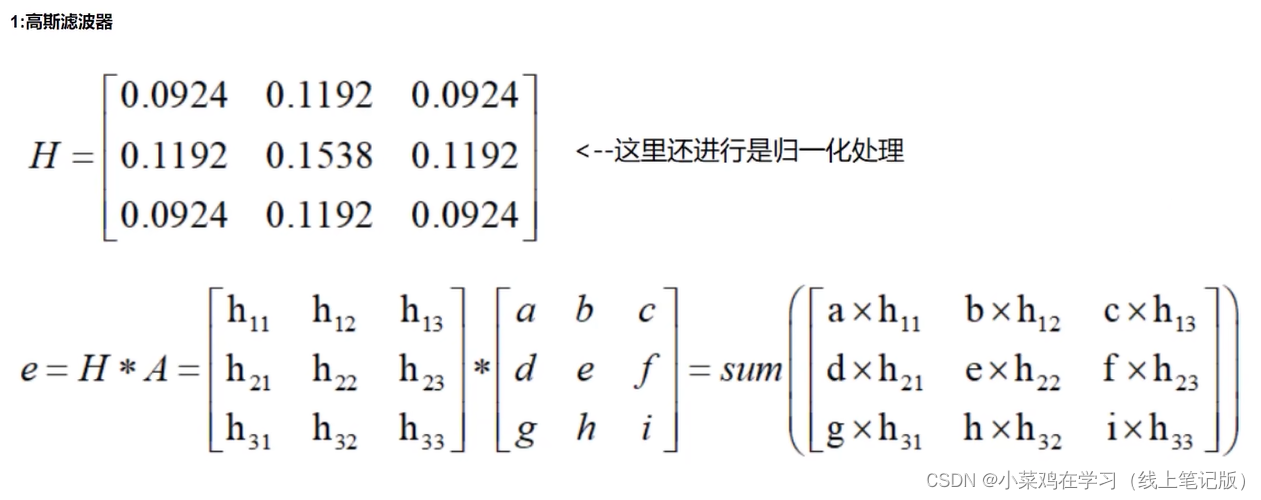
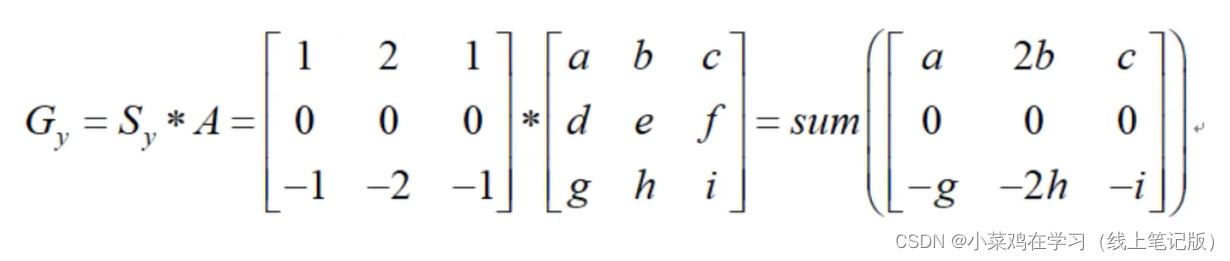
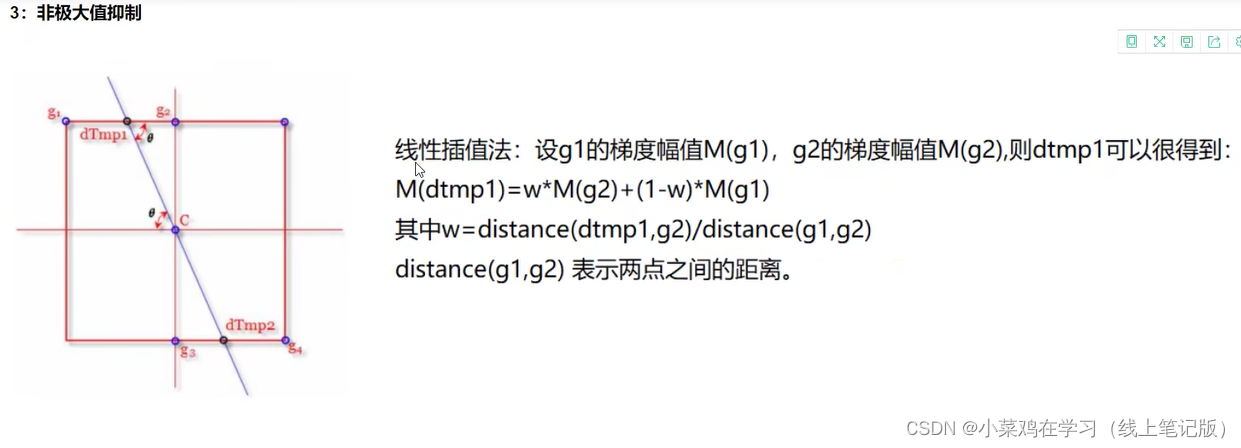
cv2.destroyAllWindows()4.Canny边缘检测


"""
=============================================
Time :
Auther :
File :
Function : 边缘检测
=============================================
"""
import cv2
import numpy as np
img = cv2.imread(r'F:\30_UndergraduateThesis\04_LearningOpencv\02BasicKnowledge\LenaNoise.png', cv2.IMREAD_GRAYSCALE)
v1 = cv2.Canny(img, 200, 300)
v2 = cv2.Canny(img, 50, 100)
res = np.hstack((v1, v2))
cv2.imshow('res', res)
cv2.waitKey(0)
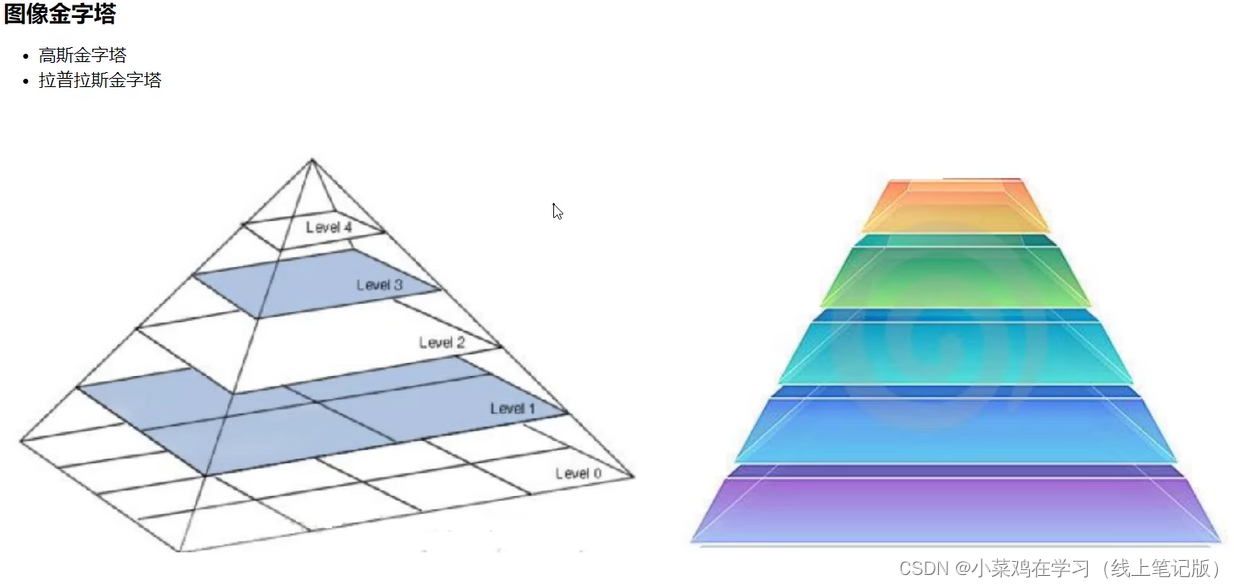
cv2.destroyAllWindows()5.图像金字塔
"""
=============================================
Time :
Auther :
File :
Function : 金字塔
=============================================
"""
import cv2
img = cv2.imread(r'F:\30_UndergraduateThesis\04_LearningOpencv\02BasicKnowledge\LenaNoise.png')
cv2.imshow('img', img)
print(img.shape)
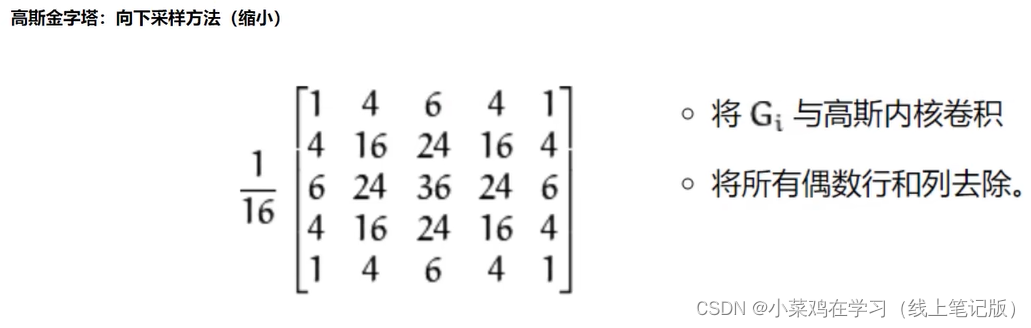
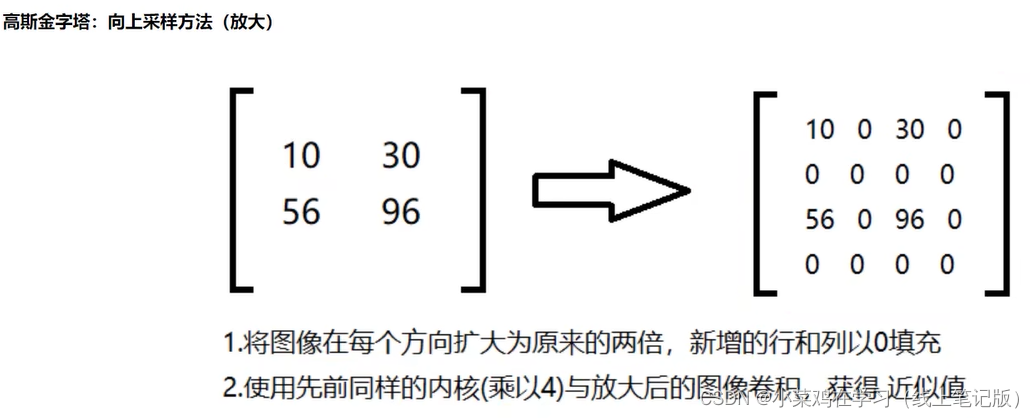
# 上采样
up = cv2.pyrUp(img)
cv2.imshow('up', up)
print(up.shape)
# 下采样
down = cv2.pyrDown(img)
cv2.imshow('down', down)
print(down.shape)
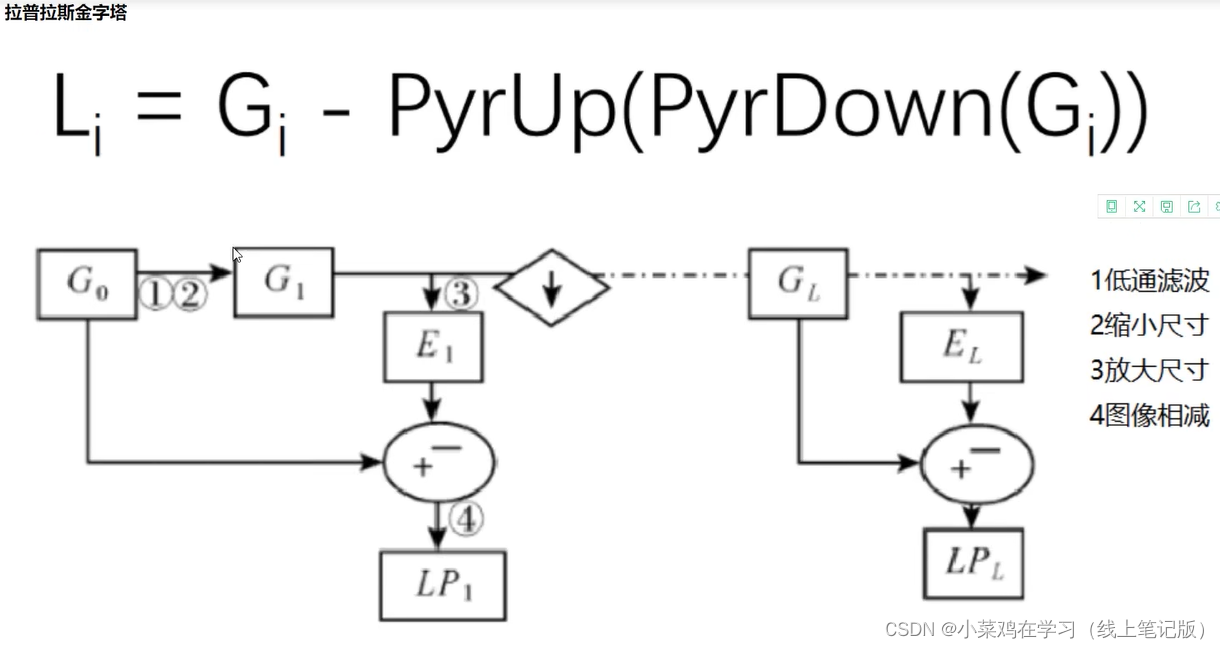
# 拉普拉斯金字塔
up = cv2.pyrUp(img)
up_down = cv2.pyrDown(up)
l_l = img - up_down
cv2.imshow('l_l', l_l)
cv2.waitKey(0)
cv2.destroyAllWindows()6.图像轮廓
6.1图像轮廓检测
img:
"""
=============================================
Time :
Auther :
File :
Function : 轮廓检测
=============================================
"""
import cv2
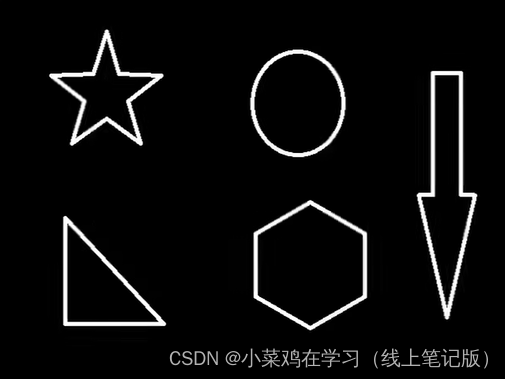
img = cv2.imread(r'F:\30_UndergraduateThesis\04_LearningOpencv\02BasicKnowledge\contours.png')
gray = cv2.cvtColor(img, cv2.COLOR_BGR2GRAY)
ret, thresh = cv2.threshold(gray, 127, 255, cv2.THRESH_BINARY)
cv2.imshow('thresh', thresh)
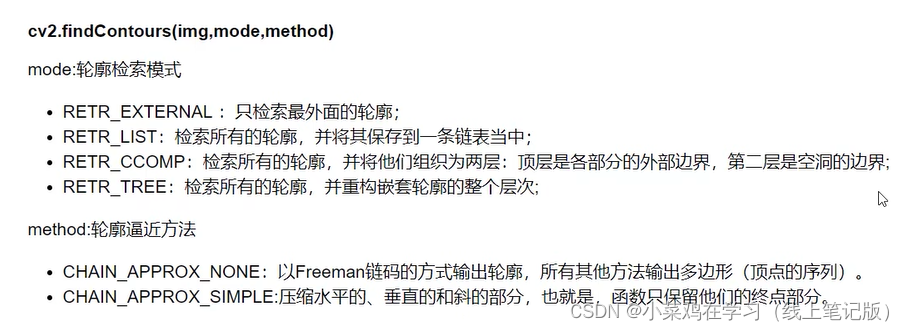
contours, hierarchy = cv2.findContours(thresh, cv2.RETR_TREE, cv2.CHAIN_APPROX_NONE)
# 传入绘制图像,轮廓,轮廓索引,颜色模式,线条厚度
# 注意需要copy,要不原图会变
draw_img = img.copy()
res = cv2.drawContours(draw_img, contours, -1, (0, 0, 255), 1)
cv2.imshow('res', res)
cv2.waitKey(0)
cv2.destroyAllWindows()6.2图像轮廓特征与近似
"""
=============================================
    Time     :
    Auther   :
    File     :
    Function : 轮廓特征与近似
=============================================
"""
import cv2

img = cv2.imread(r'F:\30_UndergraduateThesis\04_LearningOpencv\02BasicKnowledge\contours.png')

gray = cv2.cvtColor(img, cv2.COLOR_BGR2GRAY)
ret, thresh = cv2.threshold(gray, 127, 255, cv2.THRESH_BINARY)
contours, hierarchy = cv2.findContours(thresh, cv2.RETR_TREE, cv2.CHAIN_APPROX_NONE)
draw_img = img.copy()
draw_img1 = img.copy()
# cnt = contours[0]
# res = cv2.drawContours(draw_img, [cnt], -1, (0, 0, 255), 2)
# cv2.imshow('res', res)

for cnt in contours:
    res = cv2.drawContours(draw_img, [cnt], -1, (0, 0, 255), 2)
    cv2.imshow('res', res)

    epsilon = 0.01*cv2.arcLength(cnt, True)
    approx = cv2.approxPolyDP(cnt, epsilon, True)
    res1 = cv2.drawContours(draw_img1, [approx], -1, (0, 0, 255), 2)
    cv2.imshow('res1', res1)

# 矩形框
cnt = contours[3]
x, y, w, h = cv2.boundingRect(cnt)
img = cv2.rectangle(img, (x, y), (x+w, y+h), (0, 255, 0), 2)
cv2.imshow('img1', img)
area = cv2.contourArea(cnt)
x, y, w, h = cv2.boundingRect(cnt)
rect_area = w * h
extent = float(area)/rect_area
print('轮廓面积与边界矩形比', extent)
cv2.waitKey(0)
cv2.destroyAllWindows()
7.模板匹配
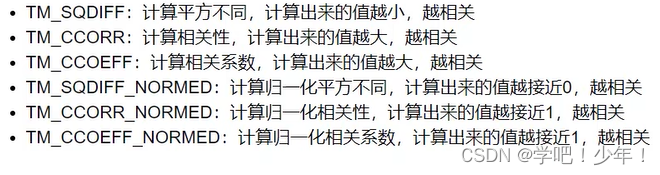
模板匹配和卷积原理很像,模板在原图像上从原点开始滑动,计算模板与(图像被模板覆盖的地方)的差别程度,这个差别程度的计算方法在opencv里有6种,然后将每次计算的结果放入一个矩阵里,作为结果输出。假如原图形是A * B大小,而模板是a * b大小,则测出结果的矩阵是(A - a + 1)x(B - b + 1)
"""
=============================================
    Time     :
    Auther   :
    File     :
    Function : 模板匹配
=============================================
"""

import cv2
import numpy as np

img_rgb = cv2.imread(r'F:\30_UndergraduateThesis\04_LearningOpencv\02BasicKnowledge\mario.png')
img_gray = cv2.cvtColor(img_rgb, cv2.COLOR_BGR2GRAY)
template = cv2.imread(r'F:\30_UndergraduateThesis\04_LearningOpencv\02BasicKnowledge\mario_coin.png', 0)
h, w = template.shape[:2]

res = cv2.matchTemplate(img_gray, template, cv2.TM_CCOEFF_NORMED)
threshold = 0.8
# 取匹配程度大于80%的坐标
loc = np.where(res >= threshold)
for pt in zip(*loc[::-1]):  # *号表示可选参数
    bottom_right = (pt[0] + w, pt[1] + h)
    cv2.rectangle(img_rgb, pt, bottom_right, (0, 0, 255), 2)

cv2.imshow('img_rgb', img_rgb)
cv2.waitKey(0)
cv2.destroyAllWindows()
8.直方图

"""
=============================================
    Time     :
    Auther   :
    File     :
    Function : 直方图
=============================================
"""
import os
import PySide2
import cv2
import matplotlib.pyplot as plt
import numpy as np

# dirname = os.path.dirname(PySide2.__file__)
# plugin_path = os.path.join(dirname, 'plugins', 'platforms')
# os.environ['QT_QPA_PLATFORM_PLUGIN_PATH'] = plugin_path

img = cv2.imread(r'F:\30_UndergraduateThesis\04_LearningOpencv\02BasicKnowledge\LenaNoise.png',
                 0)  # 0 表示灰度图
hist = cv2.calcHist([img], [0], None, [256], [0, 256])
print(hist.shape)
plt.hist(img.ravel(), 256)
plt.show()

color = ('b', 'g', 'r')
for i, col in enumerate(color):
    histr = cv2.calcHist([img], [0], None, [256], [0, 256])
    plt.plot(histr, color = col)
    plt.xlim([0, 256])

# 均衡化
equ = cv2.equalizeHist(img)
plt.hist(equ.ravel(), 256)
plt.show()

res = np.hstack((img, equ))
cv2.imshow('res', res)

# 自适应均衡化
clahe = cv2.createCLAHE(clipLimit=2.0, tileGridSize=(8, 8))
res_clahe = clahe.apply(img)
res = np.hstack((img, equ, res_clahe))
cv2.imshow('res', res)

cv2.waitKey(0)
cv2.destroyAllWindows()
9.傅里叶变换
"""
=============================================
    Time     :
    Auther   :
    File     :
    Function : 傅里叶变换
=============================================
"""
import cv2
import matplotlib.pyplot as plt
import numpy as np

img = cv2.imread(r'F:\30_UndergraduateThesis\04_LearningOpencv\02BasicKnowledge\LenaNoise.png', 0)
img_float32 = np.float32(img)

dft = cv2.dft(img_float32, flags=cv2.DFT_COMPLEX_OUTPUT)
dft_shift = np.fft.fftshift(dft)

rows, cols = img.shape
crow, ccol = int(rows/2), int(cols/2) # 中心位置

# 高通滤波
mask = np.ones((rows, cols, 2), np.uint8)
mask[crow-30:crow+30, ccol-30:ccol+30] = 0
# 低通滤波
mask = np.zeros((rows, cols, 2), np.uint8)
mask[crow-30:crow+30, ccol-30:ccol+30] = 1

# IDFT
fshift = dft_shift * mask
f_ishift = np.fft.fftshift(fshift)
img_back = cv2.idft(f_ishift)
img_back = cv2.magnitude(img_back[:, :, 0], img_back[:, :, 1])

plt.subplot(121)
plt.imshow(img, cmap='gray')
plt.title('Input Image')
plt.xticks([])
plt.yticks([])
plt.subplot(122)
plt.imshow(img_back, cmap='gray')
plt.title('Result')
plt.xticks([])
plt.yticks([])

plt.show()
10.图像特征-harris角点检测
"""
=============================================
    Time     :
    Auther   :
    File     :
    Function : harris检测
=============================================
"""
import cv2
import numpy as np

img = cv2.imread(r'F:\30_UndergraduateThesis\04_LearningOpencv\02BasicKnowledge\chess.png')
print('img.shape:', img.shape)
gray = cv2.cvtColor(img, cv2.COLOR_BGR2GRAY)
# gray = np.float32(gray)
dst = cv2.cornerHarris(gray, 2, 3, 0.04)
print('dst.shape:', dst.shape)

img[dst > 0.01*dst.max()] = [0, 0, 255]
cv2.imshow('dst', img)
cv2.waitKey(0)
cv2.destroyAllWindows()
11.sift函数使用
注:由于专利保护原因,高版本OpenCV无法使用
"""
=============================================
    Time     :
    Auther   :
    File     :
    Function : sift函数使用
=============================================
"""
import cv2
import numpy as np

img = cv2.imread(r'F:\30_UndergraduateThesis\04_LearningOpencv\02BasicKnowledge\chess.png')
gray = cv2.cvtColor(img, cv2.COLOR_BGR2GRAY)

sift = cv2.xfeatures2d.SIFT_create()
kp = sift.detect(gray, None)

img = cv2.drawKeypoints(gray, kp, img)

cv2.imshow('drawKeypoints', img)
cv2.waitKey(0)
cv2.destroyAllWindows()
12.背景建模
"""
=============================================
Time :
Auther :
File :
Function : 背景建模
=============================================
"""
import numpy as np
import cv2
# 经典的测试视频
cap = cv2.VideoCapture(r'F:\30_UndergraduateThesis\04_LearningOpencv\02BasicKnowledge\test.mp4')
# 形态学操作需要使用
kernel = cv2.getStructuringElement(cv2.MORPH_ELLIPSE, (3, 3))
# 创建混合高斯模型用于背景建模
fgbg = cv2.createBackgroundSubtractorMOG2()
while(True):
ret, frame = cap.read()
fgmask = fgbg.apply(frame)
# 形态学开运算去噪点
fgmask = cv2.morphologyEx(fgmask, cv2.MORPH_OPEN, kernel)
# 寻找视频中的轮廓
contours, hierarchy = cv2.findContours(fgmask, cv2.RETR_EXTERNAL, cv2.CHAIN_APPROX_SIMPLE)
for c in contours:
# 计算各轮廓的周长
perimeter = cv2.arcLength(c, True)
if perimeter > 188:
# 找到一个直矩形(不会旋转)
x, y, w, h = cv2.boundingRect(c)
# 画出这个矩形
cv2.rectangle(frame, (x, y), (x+w, y+h), (0, 255, 0), 2)
cv2.imshow('frame', frame)
cv2.imshow('fgmask', fgmask)
k = cv2.waitKey(150) & 0xff
if k == 27:
break
cap.release()
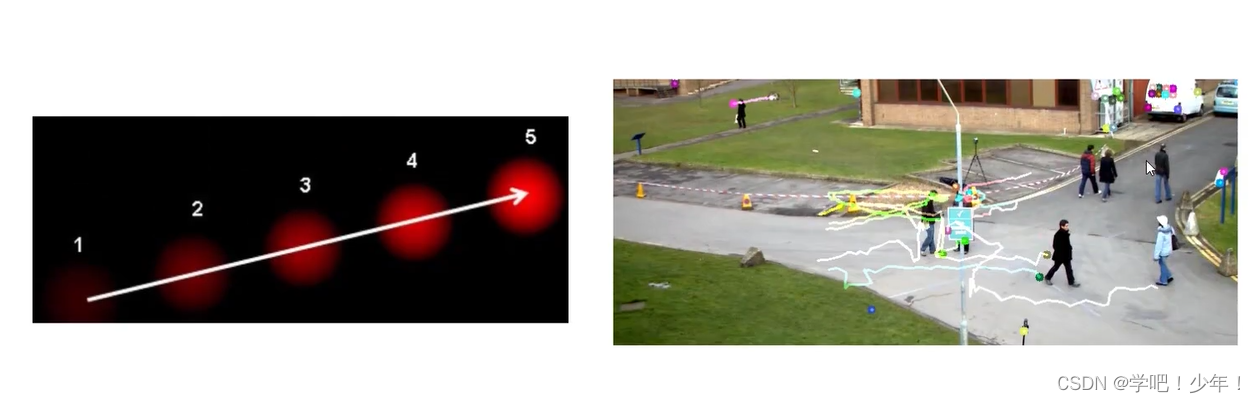
cv2.destroyAllWindows()14.光流估计
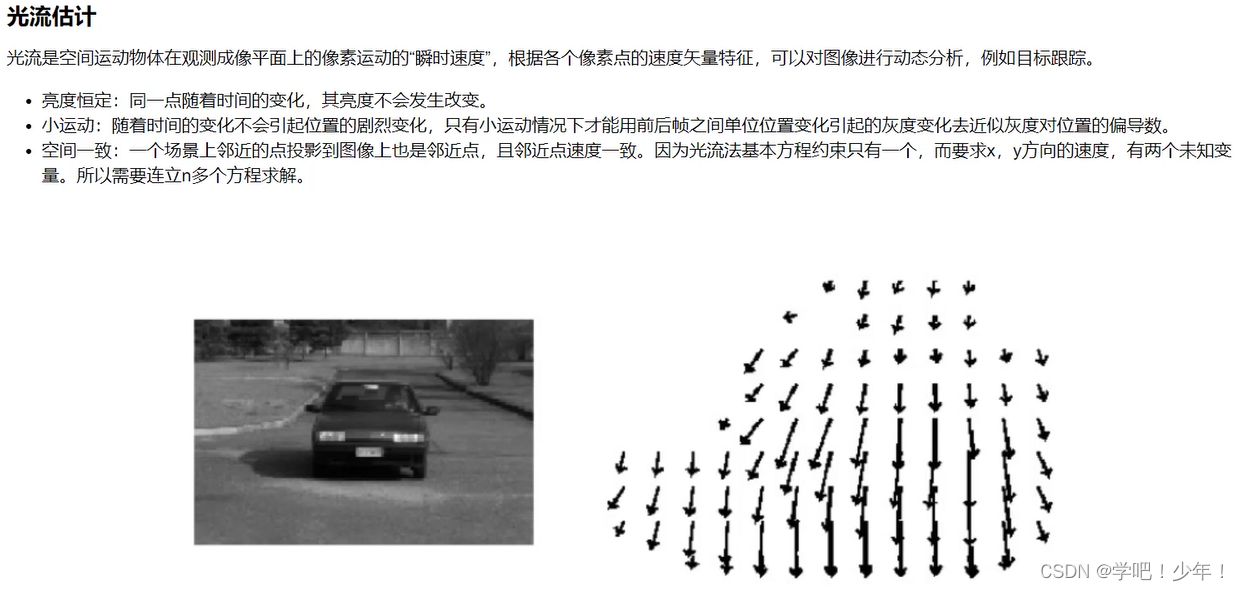
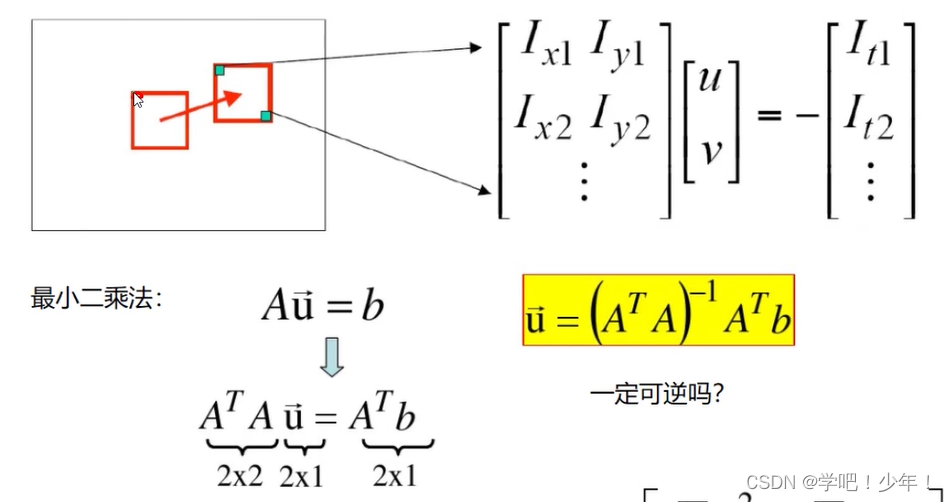
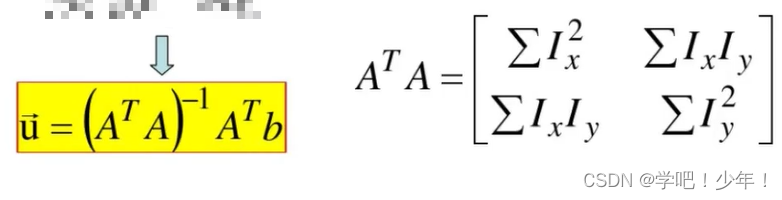
"""
=============================================
Time :
Auther :
File :
Function : 光流估计
=============================================
"""
import cv2
import numpy as np
# (1)获取数据
video = cv2.VideoCapture(r'F:\30_UndergraduateThesis\04_LearningOpencv\02BasicKnowledge\test.mp4')
# 获取第一帧图像
ret, frame_one = video.read()
gray_one = cv2.cvtColor(frame_one, cv2.COLOR_BGR2GRAY) # 变成灰度图
# 角点检测,参数:输入图像,角点最大数量,品质因子,距离
p0 = cv2.goodFeaturesToTrack(gray_one, mask=None, maxCorners=100, qualityLevel=0.3, minDistance=7)
# 创建一个mask
mask = np.zeros_like(frame_one) # 全0的画板,size和第一帧图像一样大
# 轨迹线条颜色随机,[0,255)之间,输出size为(100,3),三列对应颜色BGR
color = np.random.randint(0, 255, (100, 3))
# (3)视频处理
while True:
ret, frame = video.read() # 返回是否打开和每一帧的结果
frame_gray = cv2.cvtColor(frame, cv2.COLOR_BGR2GRAY)
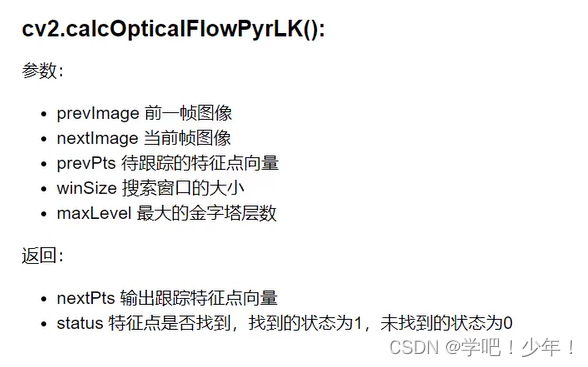
# 光流估计,需要传入前一帧和当前图像以及前一帧检测到的角点
# gray_one代表前一帧,frame_gray当前帧图像,p0前一帧的角点,winSize窗口大小,maxLevel金字塔层数
p1, st, err = cv2.calcOpticalFlowPyrLK(gray_one, frame_gray, p0, None, winSize=(15, 15), maxLevel=2)
# p1返回角点,st有些角点找到了有些没找到,err错误状态,用不上
# st==1 角点找到了
best_new = p1[st == 1] # 当前帧,所有找到的角点
best_old = p0[st == 1] # 前一帧的角点
# 绘制轨迹
for i, (new, old) in enumerate(zip(best_new, best_old)): # 返回角点的下标和值
a, b = new.ravel() # 拉成一维,a等于x列,b等于y列
c, d = old.ravel()
a, b, c, d = np.array([a, b, c, d]).astype('int32') # 输入的数据类型是整型
# 背景图mask,起点坐标(a,b),终点坐标(c,d),变成列表列格式tolist(),线宽为2
mask = cv2.line(mask, (a, b), (c, d), (color[i].tolist()), 2)
# 画板frame,圆心位置(a,b),圆半径5,'-1'代表实心圆
frame = cv2.circle(frame, (a, b), 5, color[i].tolist(), -1)
# 图像叠加
img = cv2.add(frame, mask)
# 图像展示
cv2.imshow('img', img)
k = cv2.waitKey(150) & 0xff # 每张图停留150毫秒后消失
if k == 27: # ESC键退出
break
# 更新
gray_one = frame_gray.copy() # 使下一次循环的前一帧变成当前帧图像
p0 = best_new.reshape(-1, 1, 2) # -1的作用在于自动计算
# 释放资源
cv2.destroyAllWindows()
video.release()


 413
413


 被折叠的 条评论
为什么被折叠?
被折叠的 条评论
为什么被折叠?
 到【灌水乐园】发言


