


目录
一、C语言工程简介

先将工程模板解压


include里是.h文件 src里是.c文件 start里面是.s启动文件
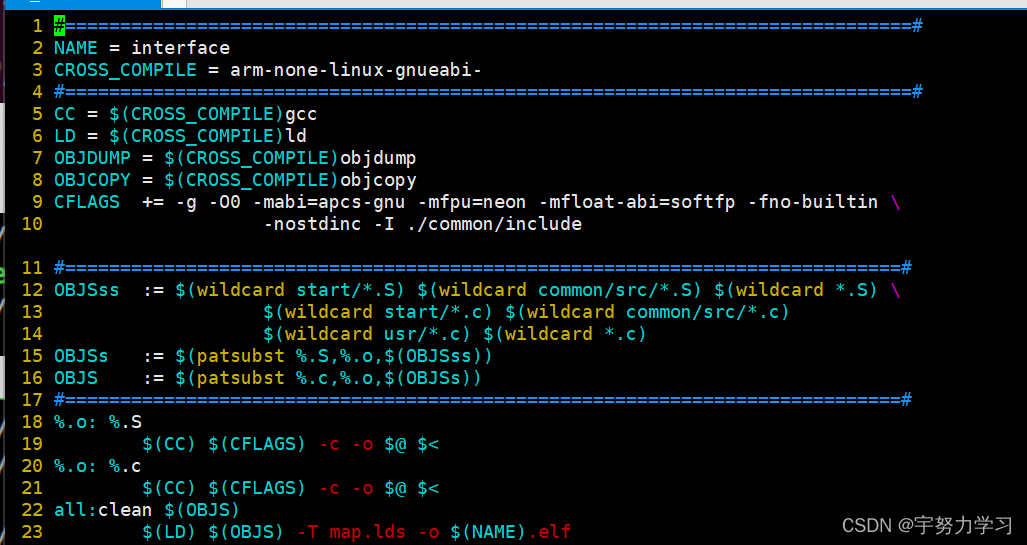

#=============================================================================#
NAME = interface
CROSS_COMPILE = arm-none-linux-gnueabi-
#=============================================================================#
CC = $(CROSS_COMPILE)gcc
LD = $(CROSS_COMPILE)ld
OBJDUMP = $(CROSS_COMPILE)objdump
OBJCOPY = $(CROSS_COMPILE)objcopy
CFLAGS += -g -O0 -mabi=apcs-gnu -mfpu=neon -mfloat-abi=softfp -fno-builtin \
-nostdinc -I ./common/include
#============================================================================#
OBJSss := $(wildcard start/*.S) $(wildcard common/src/*.S) $(wildcard *.S) \
$(wildcard start/*.c) $(wildcard common/src/*.c) \
$(wildcard usr/*.c) $(wildcard *.c)
OBJSs := $(patsubst %.S,%.o,$(OBJSss))
OBJS := $(patsubst %.c,%.o,$(OBJSs))
#============================================================================#
%.o: %.S
$(CC) $(CFLAGS) -c -o $@ $<
%.o: %.c
$(CC) $(CFLAGS) -c -o $@ $<
all:clean $(OBJS)
$(LD) $(OBJS) -T map.lds -o $(NAME).elf
$(OBJCOPY) -O binary $(NAME).elf $(NAME).bin
$(OBJDUMP) -D $(NAME).elf > $(NAME).dis
#============================================================================#
clean:
rm -rf $(OBJS) *.elf *.bin *.dis *.o
#============================================================================#
OBJDUMP是用来反汇编的,将二进制文件生成汇编代码。
map.lds是链接用的脚本文件告诉编译器C程序代码都放到哪儿段,代码段、数据段、BSS段在内存中的分部,程序的起始地址、对齐问题等。
二、启动代码分析
1 .text
2 .global _start
3 _start:
4 /*
5 * Vector table
6 */
7 b reset
8 b .
9 b .
10 b .
11 b .
12 b .
13 b .
14 b .
15
16 reset:
17 /*
18 * Set vector address in CP15 VBAR register
19 */
20 ldr r0, =_start
21 mcr p15, 0, r0, c12, c0, 0 @Set VBAR
22
23 /*
24 * Set the cpu to SVC32 mode, Disable FIQ/IRQ
25 */
26 mrs r0, cpsr
27 bic r0, r0, #0x1f
28 orr r0, r0, #0xd3
29 msr cpsr ,r0
30
31 /*
32 * Defines access permissions for each coprocessor
33 */
34 mov r0, #0xfffffff
35 mcr p15, 0, r0, c1, c0, 2
36
37 /*
38 * Invalidate L1 I/D
39 */
40 mov r0, #0 @Set up for MCR
41 mcr p15, 0, r0, c8, c7, 0 @Invalidate TLBs
42 mcr p15, 0, r0, c7, c5, 0 @Invalidate icache
43
44 /*
45 * Set the FPEXC EN bit to enable the FPU
46 */
47 mov r3, #0x40000000
48 fmxr FPEXC, r3
49
50 /*
51 * Disable MMU stuff and caches
52 */
53 mrc p15, 0, r0, c1, c0, 0
54 bic r0, r0, #0x00002000 @Clear bits 13 (--V-)
55 bic r0, r0, #0x00000007 @Clear bits 2:0 (-CAM)
56 orr r0, r0, #0x00001000 @Set bit 12 (---I) Icache
57 orr r0, r0, #0x00000002 @Set bit 1 (--A-) Align
58 orr r0, r0, #0x00000800 @Set bit 11 (Z---) BTB
59 mcr p15, 0, r0, c1, c0, 0
60
61 /*
62 * Initialize stacks
63 */
64 init_stack:
65 /*svc mode stack*/
66 msr cpsr, #0xd3
67 ldr sp, _stack_svc_end
68
69 /*undef mode stack*/
70 msr cpsr, #0xdb
71 ldr sp, _stack_und_end
72
73 /*abort mode stack*/
74 msr cpsr,#0xd7
75 ldr sp,_stack_abt_end
76
77 /*irq mode stack*/
78 msr cpsr,#0xd2
79 ldr sp, _stack_irq_end
80
81 /*fiq mode stack*/
82 msr cpsr,#0xd1
83 ldr sp, _stack_fiq_end
84
85 /*user mode stack, enable FIQ/IRQ*/
86 msr cpsr,#0x10
87 ldr sp, _stack_usr_end
88
89 /*Call main*/
90 b main
91
92 _stack_svc_end:
93 .word stack_svc + 512
94 _stack_und_end:
95 .word stack_und + 512
96 _stack_abt_end:
97 .word stack_abt + 512
98 _stack_irq_end:
99 .word stack_irq + 512
100 _stack_fiq_end:
101 .word stack_fiq + 512
102 _stack_usr_end:
103 .word stack_usr + 512
104
105 .data
106 stack_svc:
107 .space 512
108 stack_und:
109 .space 512
110 stack_abt:
111 .space 512
112 stack_irq:
113 .space 512
114 stack_fiq:
115 .space 512
116 stack_usr:
117 .space 512
6~14是异常向量表的位置b.就是跳转到自身相当于死循环
ldr r0, =_start
mcr p15, 0, r0, c12, c0, 0 @Set VBAR
将异常向量表存入 R0,然后将R0存入cp15的C12,总体作用就是转存异常向量表。
TLB和MMU都是和虚拟内存相关的东西,由于现在没有操作系统所以直接运行在物理内存条就行。
.space伪操作把512个字节占了,占的这些就是栈的位置。6个有栈指针的模式都有自己的栈空间。
92 _stack_svc_end:
93 .word stack_svc + 512
用来计算栈指针的起始位置,因为是满减栈,要从高往低压
三、C语言实现LED
void delay(unsigned int time)
{
	while(time --);
}
int main()
{
	/*设置GPX2CON将GPX2_7设置成输出*/
	*(unsigned int *)0x11000c40 = 0x10000000;
	while(1)
	{
		*(unsigned int *)0x11000c44 = 0x00000080;
		delay(1000000);
		*(unsigned int *)0x11000c44 = 0x00000000;
		delay(1000000);
	}

	return 0;
}
四、寄存器的封装方式
为了增强可读性、也为了安全,所以将寄存器封装一下以寄存器名字命名:
void delay(unsigned int time)
{
	while(time --);
}
#if 0
int main()
{
	/*设置GPX2CON将GPX2_7设置成输出*/
	*(unsigned int *)0x11000c40 = 0x10000000;
	while(1)
	{
		*(unsigned int *)0x11000c44 = 0x00000080;
		delay(1000000);
		*(unsigned int *)0x11000c44 = 0x00000000;
		delay(1000000);
	}

	return 0;
}
#endif

#define GPX2CON (*(unsigned int *)0x11000c40)
#define GPX2DAT (*(unsigned int *)0x11000c44)

int main()
{
	GPX2CON = 0x10000000;
	while(1)
	{
		GPX2DAT = 0x00000080;
		delay(1000000);
		GPX2DAT = 0x00000000;
		delay(1000000);
	}

	return 0;
}
通过观察手册我们可以发现描述一个引脚的四个寄存器他的空间是连续的,而同样连续空间的还有数组和结构体,诶一下就能想到我们在学习32时使用的库函数,32中的GPIO初始化结构体,我们是不是可以自己写一个呢。
void delay(unsigned int time)
{
	while(time --);
}
#if 0
int main()
{
	/*设置GPX2CON将GPX2_7设置成输出*/
	*(unsigned int *)0x11000c40 = 0x10000000;
	while(1)
	{
		*(unsigned int *)0x11000c44 = 0x00000080;
		delay(1000000);
		*(unsigned int *)0x11000c44 = 0x00000000;
		delay(1000000);
	}

	return 0;
}
#endif
#if 0
#define GPX2CON (*(unsigned int *)0x11000c40)
#define GPX2DAT (*(unsigned int *)0x11000c44)

int main()
{
	GPX2CON = 0x10000000;
	while(1)
	{
		GPX2DAT = 0x00000080;
		delay(1000000);
		GPX2DAT = 0x00000000;
		delay(1000000);
	}

	return 0;
}
#endif
typedef struct
{
	unsigned int CON;
	unsigned int DAT;
	unsigned int PUD;
	unsigned int DRV;
}gpx2;

#define GPX2 (*(gpx2 *)0x11000c40)

int main()
{
	GPX2.CON = 0x10000000;
	while(1)
	{
		GPX2.DAT = 0x00000080;
		delay(1000000);
		GPX2.DAT = 0x00000000;
		delay(1000000);
	}

	return 0;
}
既然一个可以写,那是不是我们可以将全部的寄存器都写好放到一个.h文件中呢。果然有将近3000行的库文件我们可以直接调用。
void delay(unsigned int time)
{
	while(time --);
}
#if 0
int main()
{
	/*设置GPX2CON将GPX2_7设置成输出*/
	*(unsigned int *)0x11000c40 = 0x10000000;
	while(1)
	{
		*(unsigned int *)0x11000c44 = 0x00000080;
		delay(1000000);
		*(unsigned int *)0x11000c44 = 0x00000000;
		delay(1000000);
	}

	return 0;
}
#endif
#if 0
#define GPX2CON (*(unsigned int *)0x11000c40)
#define GPX2DAT (*(unsigned int *)0x11000c44)

int main()
{
	GPX2CON = 0x10000000;
	while(1)
	{
		GPX2DAT = 0x00000080;
		delay(1000000);
		GPX2DAT = 0x00000000;
		delay(1000000);
	}

	return 0;
}
#endif
#if 0
typedef struct
{
	unsigned int CON;
	unsigned int DAT;
	unsigned int PUD;
	unsigned int DRV;
}gpx2;

#define GPX2 (*(gpx2 *)0x11000c40)

int main()
{
	GPX2.CON = 0x10000000;
	while(1)
	{
		GPX2.DAT = 0x00000080;
		delay(1000000);
		GPX2.DAT = 0x00000000;
		delay(1000000);
	}

	return 0;
}
#endif

#include "exynos_4412.h"

int main()
{
	GPX2.CON = 0x10000000;
	while(1)
	{
		GPX2.DAT = 0x00000080;
		delay(1000000);
		GPX2.DAT = 0x00000000;
		delay(1000000);
	}

	return 0;
}
五、寄存器操作的标准化
其实程序还有问题,因为我们操作的不够具体,每次操作不光操作LED2还操作了其它的位。
在修改代码前先做两个小题:

1.unsigned int a; 将a的第三位置1,其它位保持不变
a = a | (1 << 3)
2.unsigned int a; 将a的第三位置0, 其它位保持不变
a = a & (~(1 << 3))
3.unsigned int a; 将a的【7:4】位置为0101,其它位不变
a = a & (~(0xF << 4));
a = a | (0x5 << 4);
a = a &(~(0xF << 4)) | (0x5 << 4)

void delay(unsigned int time)
{
	while(time --);
}
#include "exynos_4412.h"

int main()
{
	GPX2.CON = GPX2.CON & (~(0xF << 28)) | (0x1 << 28);
	while(1)
	{
		GPX2.DAT = GPX2.DAT | (1 << 7);
		delay(1000000);
		GPX2.DAT = GPX2.DAT & (~(1 << 7));
		delay(1000000);
	}

	return 0;
}
六、流水灯
基本操作都学的差不多了,还等什么流水灯呀
LED2和LED3在上篇博客发了
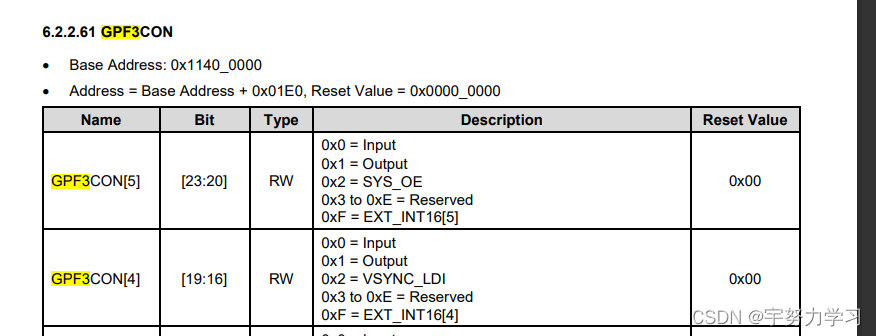
现在补全LED4和LED5的电路图和相关寄存器
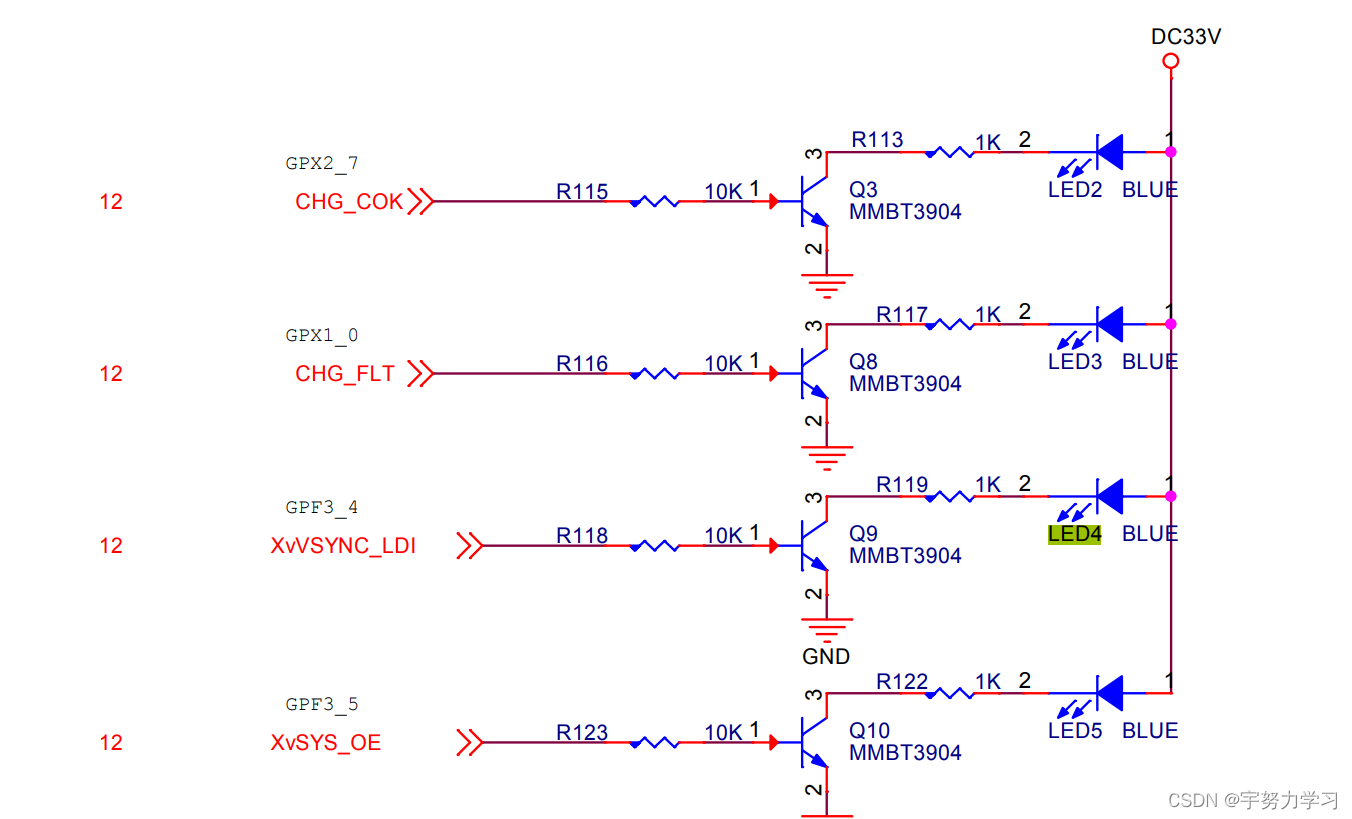
 正好这俩挨着

void delay(unsigned int time)
{
	while(time --);
}
#include "exynos_4412.h"

int main()
{
	GPX2.CON = GPX2.CON & (~(0xF << 28)) | (0x1 << 28);
	GPX1.CON = GPX1.CON & (~(0xF)) | (0x1);
	GPF3.CON = GPF3.CON & (~(0xFF << 16)) | (0x11 << 16);
	while(1)
	{
		GPX2.DAT = GPX2.DAT | (1 << 7);
		delay(1000000);
		GPX2.DAT = GPX2.DAT & (~(1 << 7));
		delay(1000000);
		GPX1.DAT = GPX1.DAT | 1;
		delay(1000000);
		GPX1.DAT = GPX1.DAT & (~1);
		delay(1000000);
		GPF3.DAT = GPF3.DAT | (1 << 4);
		delay(1000000);
		GPF3.DAT = GPF3.DAT & (~(1 << 4));
		delay(1000000);
		GPF3.DAT = GPF3.DAT | (1 << 5);
		delay(1000000);
		GPF3.DAT = GPF3.DAT & (~(1 << 5));
		delay(1000000);

	}

	return 0;
}


 808
808


 被折叠的 条评论
为什么被折叠?
被折叠的 条评论
为什么被折叠?
 到【灌水乐园】发言


