


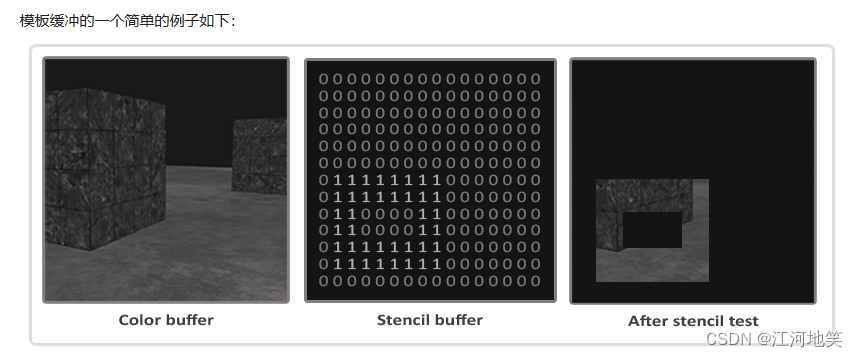
模板缓冲首先会被清除为0,之后在模板缓冲中使用1填充了一个空心矩形。场景中的片段将会只在片段的模板值为1的时候会被渲染(其它的都被丢弃了)。
模板缓冲操作允许我们在渲染片段时将模板缓冲设定为一个特定的值。通过在渲染时修改模板缓冲的内容,我们写入了模板缓冲。在同一个(或者接下来的)渲染迭代中,我们可以读取这些值,来决定丢弃还是保留某个片段。使用模板缓冲的时候你可以尽情发挥,但大体的步骤如下:
- 启用模板缓冲的写入。
- 渲染物体,更新模板缓冲的内容。
- 禁用模板缓冲的写入。
- 渲染(其它)物体,这次根据模板缓冲的内容丢弃特定的片段。
所谓的模板测试,实际上就是拿当前像素对应的Stencil Buffer里的值(StencilBufferValue)与StencilRef作比较的一个操作,然后根据比较的结果来判断是否通过测试,通过测试则保留当前像素,否则则丢弃。
stencil_testing.vs

#version 330 core
layout (location=0) in vec3 aPos;
layout(location=1) in vec2 aTexCoords;

out vec2 TexCoords;
uniform mat4 model;
uniform mat4 view;
uniform mat4 projection;

void main(){
	TexCoords=aTexCoords;
	gl_Position=projection*view*model*vec4(aPos,1.0f);
}


stencil_testing.fs

#version 330 core
out vec4 FragColor;

in vec2 TexCoords;

uniform sampler2D texture0;

void main(){
	FragColor=texture(texture0,TexCoords);
}


stencil_single_color.fs

#version 330 core
out vec4 FragColor;

void main(){
	FragColor= vec4(0.04, 0.28, 0.26, 1.0);
}
#include <glad/glad.h>
#include <GLFW/glfw3.h>
#include <glm/glm.hpp>
#include <glm/gtc/matrix_transform.hpp>
#include <glm/gtc/type_ptr.hpp>
#include "shader.h"
#include "camera.h"
#include "model.h"
#include <iostream>
void framebuffer_size_callback(GLFWwindow* window, int width, int height);
void mouse_callback(GLFWwindow* window, double xpos, double ypos);
void scroll_callback(GLFWwindow* window, double xoffset, double yoffset);
void processInput(GLFWwindow* window);
unsigned int loadTexture(const char* path);
// settings
const unsigned int SCR_WIDTH = 800;
const unsigned int SCR_HEIGHT = 600;
// camera
Camera camera(glm::vec3(0.0f, 0.0f, 3.0f));
float lastX = (float)SCR_WIDTH / 2.0;
float lastY = (float)SCR_HEIGHT / 2.0;
bool firstMouse = true;
// timing
float deltaTime = 0.0f;
float lastFrame = 0.0f;
int main()
{
// glfw: initialize and configure
// ------------------------------
glfwInit();
glfwWindowHint(GLFW_CONTEXT_VERSION_MAJOR, 3);
glfwWindowHint(GLFW_CONTEXT_VERSION_MINOR, 3);
glfwWindowHint(GLFW_OPENGL_PROFILE, GLFW_OPENGL_CORE_PROFILE);
#ifdef __APPLE__
glfwWindowHint(GLFW_OPENGL_FORWARD_COMPAT, GL_TRUE);
#endif
// glfw window creation
// --------------------
GLFWwindow* window = glfwCreateWindow(SCR_WIDTH, SCR_HEIGHT, "LearnOpenGL", NULL, NULL);
if (window == NULL)
{
std::cout << "Failed to create GLFW window" << std::endl;
glfwTerminate();
return -1;
}
glfwMakeContextCurrent(window);
glfwSetFramebufferSizeCallback(window, framebuffer_size_callback);
glfwSetCursorPosCallback(window, mouse_callback);
glfwSetScrollCallback(window, scroll_callback);
// tell GLFW to capture our mouse
glfwSetInputMode(window, GLFW_CURSOR, GLFW_CURSOR_DISABLED);
// glad: load all OpenGL function pointers
// ---------------------------------------
if (!gladLoadGLLoader((GLADloadproc)glfwGetProcAddress))
{
std::cout << "Failed to initialize GLAD" << std::endl;
return -1;
}
// configure global opengl state
// -----------------------------
glEnable(GL_DEPTH_TEST);
glDepthFunc(GL_LESS);
glEnable(GL_STENCIL_TEST);
glStencilFunc(GL_NOTEQUAL, 1, 0xFF);
glStencilOp(GL_KEEP, GL_KEEP, GL_REPLACE);
// build and compile shaders
// -------------------------
Shader shader("stencil_testing.vs", "stencil_testing.fs");
Shader shaderSingleColor("stencil_testing.vs", "stencil_single_color.fs");
// set up vertex data (and buffer(s)) and configure vertex attributes
// ------------------------------------------------------------------
float cubeVertices[] = {
// positions // texture Coords
-0.5f, -0.5f, -0.5f, 0.0f, 0.0f,
0.5f, -0.5f, -0.5f, 1.0f, 0.0f,
0.5f, 0.5f, -0.5f, 1.0f, 1.0f,
0.5f, 0.5f, -0.5f, 1.0f, 1.0f,
-0.5f, 0.5f, -0.5f, 0.0f, 1.0f,
-0.5f, -0.5f, -0.5f, 0.0f, 0.0f,
-0.5f, -0.5f, 0.5f, 0.0f, 0.0f,
0.5f, -0.5f, 0.5f, 1.0f, 0.0f,
0.5f, 0.5f, 0.5f, 1.0f, 1.0f,
0.5f, 0.5f, 0.5f, 1.0f, 1.0f,
-0.5f, 0.5f, 0.5f, 0.0f, 1.0f,
-0.5f, -0.5f, 0.5f, 0.0f, 0.0f,
-0.5f, 0.5f, 0.5f, 1.0f, 0.0f,
-0.5f, 0.5f, -0.5f, 1.0f, 1.0f,
-0.5f, -0.5f, -0.5f, 0.0f, 1.0f,
-0.5f, -0.5f, -0.5f, 0.0f, 1.0f,
-0.5f, -0.5f, 0.5f, 0.0f, 0.0f,
-0.5f, 0.5f, 0.5f, 1.0f, 0.0f,
0.5f, 0.5f, 0.5f, 1.0f, 0.0f,
0.5f, 0.5f, -0.5f, 1.0f, 1.0f,
0.5f, -0.5f, -0.5f, 0.0f, 1.0f,
0.5f, -0.5f, -0.5f, 0.0f, 1.0f,
0.5f, -0.5f, 0.5f, 0.0f, 0.0f,
0.5f, 0.5f, 0.5f, 1.0f, 0.0f,
-0.5f, -0.5f, -0.5f, 0.0f, 1.0f,
0.5f, -0.5f, -0.5f, 1.0f, 1.0f,
0.5f, -0.5f, 0.5f, 1.0f, 0.0f,
0.5f, -0.5f, 0.5f, 1.0f, 0.0f,
-0.5f, -0.5f, 0.5f, 0.0f, 0.0f,
-0.5f, -0.5f, -0.5f, 0.0f, 1.0f,
-0.5f, 0.5f, -0.5f, 0.0f, 1.0f,
0.5f, 0.5f, -0.5f, 1.0f, 1.0f,
0.5f, 0.5f, 0.5f, 1.0f, 0.0f,
0.5f, 0.5f, 0.5f, 1.0f, 0.0f,
-0.5f, 0.5f, 0.5f, 0.0f, 0.0f,
-0.5f, 0.5f, -0.5f, 0.0f, 1.0f
};
float planeVertices[] = {
// positions // texture Coords (note we set these higher than 1 (together with GL_REPEAT as texture wrapping mode). this will cause the floor texture to repeat)
5.0f, -0.5f, 5.0f, 2.0f, 0.0f,
-5.0f, -0.5f, 5.0f, 0.0f, 0.0f,
-5.0f, -0.5f, -5.0f, 0.0f, 2.0f,
5.0f, -0.5f, 5.0f, 2.0f, 0.0f,
-5.0f, -0.5f, -5.0f, 0.0f, 2.0f,
5.0f, -0.5f, -5.0f, 2.0f, 2.0f
};
// cube VAO
unsigned int cubeVAO, cubeVBO;
glGenVertexArrays(1, &cubeVAO);
glGenBuffers(1, &cubeVBO);
glBindVertexArray(cubeVAO);
glBindBuffer(GL_ARRAY_BUFFER, cubeVBO);
glBufferData(GL_ARRAY_BUFFER, sizeof(cubeVertices), &cubeVertices, GL_STATIC_DRAW);
glEnableVertexAttribArray(0);
glVertexAttribPointer(0, 3, GL_FLOAT, GL_FALSE, 5 * sizeof(float), (void*)0);
glEnableVertexAttribArray(1);
glVertexAttribPointer(1, 2, GL_FLOAT, GL_FALSE, 5 * sizeof(float), (void*)(3 * sizeof(float)));
glBindVertexArray(0);
// plane VAO
unsigned int planeVAO, planeVBO;
glGenVertexArrays(1, &planeVAO);
glGenBuffers(1, &planeVBO);
glBindVertexArray(planeVAO);
glBindBuffer(GL_ARRAY_BUFFER, planeVBO);
glBufferData(GL_ARRAY_BUFFER, sizeof(planeVertices), &planeVertices, GL_STATIC_DRAW);
glEnableVertexAttribArray(0);
glVertexAttribPointer(0, 3, GL_FLOAT, GL_FALSE, 5 * sizeof(float), (void*)0);
glEnableVertexAttribArray(1);
glVertexAttribPointer(1, 2, GL_FLOAT, GL_FALSE, 5 * sizeof(float), (void*)(3 * sizeof(float)));
glBindVertexArray(0);
// load textures
// -------------
std::string t1 = R"(C:\chenqi\LearnOpenGL\Data\container.jpg)";
std::string t2 = R"(C:\chenqi\LearnOpenGL\Data\wall.jpg)";
unsigned int cubeTexture = loadTexture(t1.c_str());
unsigned int floorTexture = loadTexture(t2.c_str());
// shader configuration
// --------------------
shader.use();
shader.setInt("texture1", 0);
// render loop
// -----------
while (!glfwWindowShouldClose(window))
{
// per-frame time logic
// --------------------
float currentFrame = static_cast<float>(glfwGetTime());
deltaTime = currentFrame - lastFrame;
lastFrame = currentFrame;
// input
// -----
processInput(window);
// render
// ------
glClearColor(0.1f, 0.1f, 0.1f, 1.0f);
glClear(GL_COLOR_BUFFER_BIT | GL_DEPTH_BUFFER_BIT | GL_STENCIL_BUFFER_BIT); // don't forget to clear the stencil buffer!
// set uniforms
shaderSingleColor.use();
glm::mat4 model = glm::mat4(1.0f);
glm::mat4 view = camera.GetViewMatrix();
glm::mat4 projection = glm::perspective(glm::radians(camera.Zoom), (float)SCR_WIDTH / (float)SCR_HEIGHT, 0.1f, 100.0f);
shaderSingleColor.setMat4("view", view);
shaderSingleColor.setMat4("projection", projection);
shader.use();
shader.setMat4("view", view);
shader.setMat4("projection", projection);
//像往常一样绘制地板,但不要将地板写入模板缓冲区,我们只关心容器。我们将其掩码设置为0x00以不写入模板缓冲区。
glStencilMask(0x00);
// floor
glBindVertexArray(planeVAO);
glBindTexture(GL_TEXTURE_2D, floorTexture);
shader.setMat4("model", glm::mat4(1.0f));
glDrawArrays(GL_TRIANGLES, 0, 6);
glBindVertexArray(0);//解绑
// 1st. 渲染过程,正常绘制对象,写入模板缓冲区
// --------------------------------------------------------------------
glStencilFunc(GL_ALWAYS, 1, 0xFF);//模板缓冲区的值 填充1
glStencilMask(0xFF);//随后的绘制操作中更新模板缓冲区的值。
// cubes
glBindVertexArray(cubeVAO);
glActiveTexture(GL_TEXTURE0);
glBindTexture(GL_TEXTURE_2D, cubeTexture);
model = glm::translate(model, glm::vec3(-1.0f, 0.0f, -1.0f));
shader.setMat4("model", model);
glDrawArrays(GL_TRIANGLES, 0, 36);
model = glm::mat4(1.0f);
model = glm::translate(model, glm::vec3(2.0f, 0.0f, 0.0f));
shader.setMat4("model", model);
glDrawArrays(GL_TRIANGLES, 0, 36);
//第二。渲染过程:现在绘制稍微缩放的对象版本,这一次禁用模板测试。
//因为模板缓冲区现在已经充满了几个1。缓冲区中为1的部分未绘制,因此仅绘制
//对象的大小差异,使其看起来像边框。
// -----------------------------------------------------------------------------------------------------------------------------
//这个调用设置了模板测试的条件。在这里,它配置为仅当模板缓冲区的值不等于参考值1时,片段才会通过测试。0xFF是用作掩码的位运算,它确保所有位都参与比较。
//之前两个正方体的模板缓冲值都是1,因此后续两个放大的正方体,渲染的时候,只有放大的部分(边框)可以渲染通过。
glStencilFunc(GL_NOTEQUAL, 1, 0xFF);
//此函数设置模板缓冲区中哪些位可以被写入。0x00表示禁止写入任何位,即在随后的绘制操作中不更新模板缓冲区的值。
glStencilMask(0x00);
glDisable(GL_DEPTH_TEST);
shaderSingleColor.use();
float scale = 1.1f;
// cubes 绘制立方体的三角形。由于模板测试和深度测试的配置,这将在原始立方体之外绘制一层,创建一个“轮廓”效果。
glBindVertexArray(cubeVAO);
glBindTexture(GL_TEXTURE_2D, cubeTexture);
model = glm::mat4(1.0f);
model = glm::translate(model, glm::vec3(-1.0f, 0.0f, -1.0f));
model = glm::scale(model, glm::vec3(scale, scale, scale));
shaderSingleColor.setMat4("model", model);
glDrawArrays(GL_TRIANGLES, 0, 36);
model = glm::mat4(1.0f);
model = glm::translate(model, glm::vec3(2.0f, 0.0f, 0.0f));
model = glm::scale(model, glm::vec3(scale, scale, scale));
shaderSingleColor.setMat4("model", model);
glDrawArrays(GL_TRIANGLES, 0, 36);
glBindVertexArray(0);
//这三句代码是在绘制完成带轮廓的物体后,将OpenGL的状态恢复到默认或适当的值,以便进行后续的渲染操作。
glStencilMask(0xFF);
glStencilFunc(GL_ALWAYS, 0, 0xFF);//该函数重置了模板测试函数,使得后续所有的渲染操作都会通过模板测试。
//开启深度测试。在渲染轮廓时,深度测试被临时禁用,以确保即使轮廓在其他物体后面也能被绘制。这里重新启用深度测试是为了恢复正常的渲染流程,
//其中渲染的片段会根据它们在场景中的深度(即离摄像机的距离)被绘制或被丢弃。这确保了之后绘制的对象如果被其他对象遮挡,就不会显示在它们前面。
glEnable(GL_DEPTH_TEST);
// glfw: swap buffers and poll IO events (keys pressed/released, mouse moved etc.)
// -------------------------------------------------------------------------------
glfwSwapBuffers(window);
glfwPollEvents();
}
// optional: de-allocate all resources once they've outlived their purpose:
// ------------------------------------------------------------------------
glDeleteVertexArrays(1, &cubeVAO);
glDeleteVertexArrays(1, &planeVAO);
glDeleteBuffers(1, &cubeVBO);
glDeleteBuffers(1, &planeVBO);
glfwTerminate();
return 0;
}
// process all input: query GLFW whether relevant keys are pressed/released this frame and react accordingly
// ---------------------------------------------------------------------------------------------------------
void processInput(GLFWwindow* window)
{
if (glfwGetKey(window, GLFW_KEY_ESCAPE) == GLFW_PRESS)
glfwSetWindowShouldClose(window, true);
if (glfwGetKey(window, GLFW_KEY_W) == GLFW_PRESS)
camera.ProcessKeyboard(FORWARD, deltaTime);
if (glfwGetKey(window, GLFW_KEY_S) == GLFW_PRESS)
camera.ProcessKeyboard(BACKWARD, deltaTime);
if (glfwGetKey(window, GLFW_KEY_A) == GLFW_PRESS)
camera.ProcessKeyboard(LEFT, deltaTime);
if (glfwGetKey(window, GLFW_KEY_D) == GLFW_PRESS)
camera.ProcessKeyboard(RIGHT, deltaTime);
}
// glfw: whenever the window size changed (by OS or user resize) this callback function executes
// ---------------------------------------------------------------------------------------------
void framebuffer_size_callback(GLFWwindow* window, int width, int height)
{
// make sure the viewport matches the new window dimensions; note that width and
// height will be significantly larger than specified on retina displays.
glViewport(0, 0, width, height);
}
// glfw: whenever the mouse moves, this callback is called
// -------------------------------------------------------
void mouse_callback(GLFWwindow* window, double xposIn, double yposIn)
{
float xpos = static_cast<float>(xposIn);
float ypos = static_cast<float>(yposIn);
if (firstMouse)
{
lastX = xpos;
lastY = ypos;
firstMouse = false;
}
float xoffset = xpos - lastX;
float yoffset = lastY - ypos; // reversed since y-coordinates go from bottom to top
lastX = xpos;
lastY = ypos;
camera.ProcessMouseMovement(xoffset, yoffset);
}
// glfw: whenever the mouse scroll wheel scrolls, this callback is called
// ----------------------------------------------------------------------
void scroll_callback(GLFWwindow* window, double xoffset, double yoffset)
{
camera.ProcessMouseScroll(static_cast<float>(yoffset));
}
// utility function for loading a 2D texture from file
// ---------------------------------------------------
unsigned int loadTexture(char const* path)
{
unsigned int textureID;
glGenTextures(1, &textureID);
int width, height, nrComponents;
unsigned char* data = stbi_load(path, &width, &height, &nrComponents, 0);
if (data)
{
GLenum format;
if (nrComponents == 1)
format = GL_RED;
else if (nrComponents == 3)
format = GL_RGB;
else if (nrComponents == 4)
format = GL_RGBA;
glBindTexture(GL_TEXTURE_2D, textureID);
glTexImage2D(GL_TEXTURE_2D, 0, format, width, height, 0, format, GL_UNSIGNED_BYTE, data);
glGenerateMipmap(GL_TEXTURE_2D);
glTexParameteri(GL_TEXTURE_2D, GL_TEXTURE_WRAP_S, GL_REPEAT);
glTexParameteri(GL_TEXTURE_2D, GL_TEXTURE_WRAP_T, GL_REPEAT);
glTexParameteri(GL_TEXTURE_2D, GL_TEXTURE_MIN_FILTER, GL_LINEAR_MIPMAP_LINEAR);
glTexParameteri(GL_TEXTURE_2D, GL_TEXTURE_MAG_FILTER, GL_LINEAR);
stbi_image_free(data);
}
else
{
std::cout << "Texture failed to load at path: " << path << std::endl;
stbi_image_free(data);
}
return textureID;
}1st
在OpenGL中,模板测试是一种像素级别的操作,用于控制像素是否应该被写入到帧缓冲区中。模板测试可以用于许多高级渲染技巧,比如轮廓绘制、镜子反射、阴影等。
这里的`glStencilFunc`和`glStencilMask`函数与模板测试有关:
1. **`glStencilFunc(GL_ALWAYS, 1, 0xFF);`**:这行代码设置模板测试的条件。在这个例子中,`GL_ALWAYS`表示模板测试总是通过。当模板测试通过时,对模板缓冲区的写入就会根据`glStencilOp`函数指定的操作来执行。`1`是参考值,用于模板测试;`0xFF`是一个掩码,它与参考值和模板缓冲区中的现有值进行AND操作,然后用于模板测试。因为这里使用的是`GL_ALWAYS`,所以参考值和掩码在本例中实际上不会影响测试的结果。
2. **`glStencilMask(0xFF);`**:这行代码设置了在模板缓冲区中可以写入的位。`0xFF`表示所有的位都可以被写入。如果设置了一个不同的掩码,那么只有掩码中的1对应的位才会在模板缓冲区中更新。
结合在一起,这两行代码的意思是:
- 每当绘制一个片段(像素)时,总是通过模板测试。
- 通过模板测试的片段会在模板缓冲区中写入参考值`1`(在本例中,因为掩码是`0xFF`,所以写入的就是`1`)。在后续的渲染通道中,通过更改`glStencilFunc`和`glStencilMask`的设置,可以实现只渲染模板缓冲区中特定值的片段,从而创建特效,比如在物体周围绘制轮廓。在这个例子中,接下来会使用`glStencilFunc(GL_NOTEQUAL, 1, 0xFF);`来只绘制那些在模板缓冲区中值不等于`1`的片段,从而实现轮廓的效果。
2st
在这段代码中,OpenGL的模板测试功能被用于渲染物体的轮廓。我会一步一步解释这些OpenGL函数的用途和它们如何协同工作:
1. **`glStencilFunc(GL_NOTEQUAL, 1, 0xFF);`**:这个调用设置了模板测试的条件。在这里,它配置为仅当模板缓冲区的值**不等于**参考值`1`时,片段才会通过测试。`0xFF`是用作掩码的位运算,它确保所有位都参与比较。
2. **`glStencilMask(0x00);`**:此函数设置模板缓冲区中哪些位可以被写入。`0x00`表示禁止写入任何位,即在随后的绘制操作中不更新模板缓冲区的值。
3. **`glDisable(GL_DEPTH_TEST);`**:这会暂时关闭深度测试。深度测试通常用于判断是否绘制一个片段(基于深度值)。禁用它可以确保后面绘制的物体(例如轮廓)即使在原始物体之后也能被绘制。
4. **`shaderSingleColor.use();`**:切换到单色着色器,这个着色器会使用固定颜色绘制物体,而不是物体的纹理或材质。
5. **设置模型变换**:将每个立方体的模型变换(`model`)设置为将其移动到世界空间中的特定位置并稍微放大(1.1倍),以便渲染比原始物体稍大的版本。
6. **`glDrawArrays(GL_TRIANGLES, 0, 36);`**:绘制立方体的三角形。由于模板测试和深度测试的配置,这将在原始立方体之外绘制一层,创建一个“轮廓”效果。
7. **恢复模板和深度测试状态**:完成轮廓绘制后,恢复模板缓冲区的写入并重新开启深度测试,以便后续的渲染操作能正常进行。
整个过程是这样的:
- 首先正常绘制物体,并在模板缓冲区写入值(在前一段代码中完成)。
- 然后设置模板测试,只在模板缓冲区值不等于参考值(本例中为`1`)的地方绘制,此时绘制的是放大的物体版本,这创建了轮廓。
- 由于禁用了深度测试,轮廓绘制在原始物体的上方,即便原始物体在场景中更靠前。
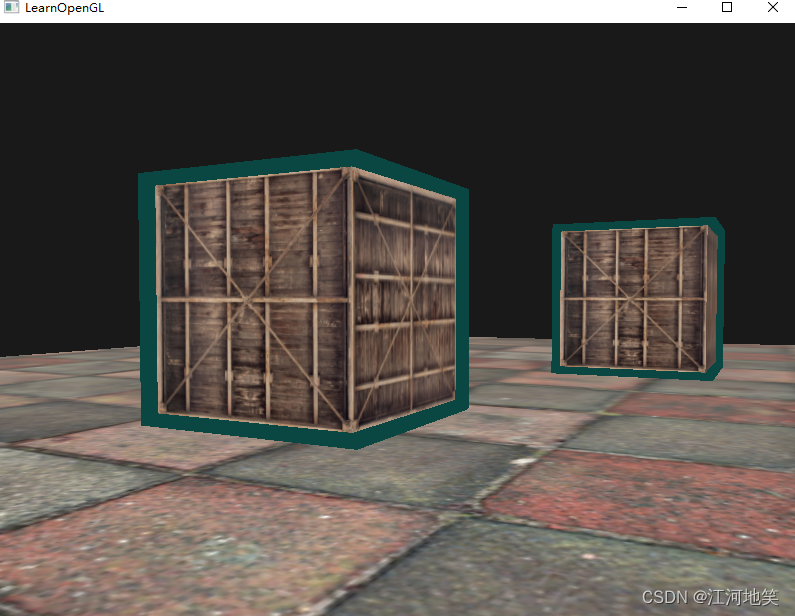
- 最后,恢复设置以便进行正常的渲染操作。
你可以看到这两个箱子的边框重合了,这通常都是我们想要的结果(想想策略游戏中,我们希望选择10个单位,合并边框通常是我们想需要的结果)。如果你想让每个物体都有一个完整的边框,你需要对每个物体都清空模板缓冲,并有创意地利用深度缓冲。


 688
688


 被折叠的 条评论
为什么被折叠?
被折叠的 条评论
为什么被折叠?
 到【灌水乐园】发言


