


一、了解CULane数据集
CULane:
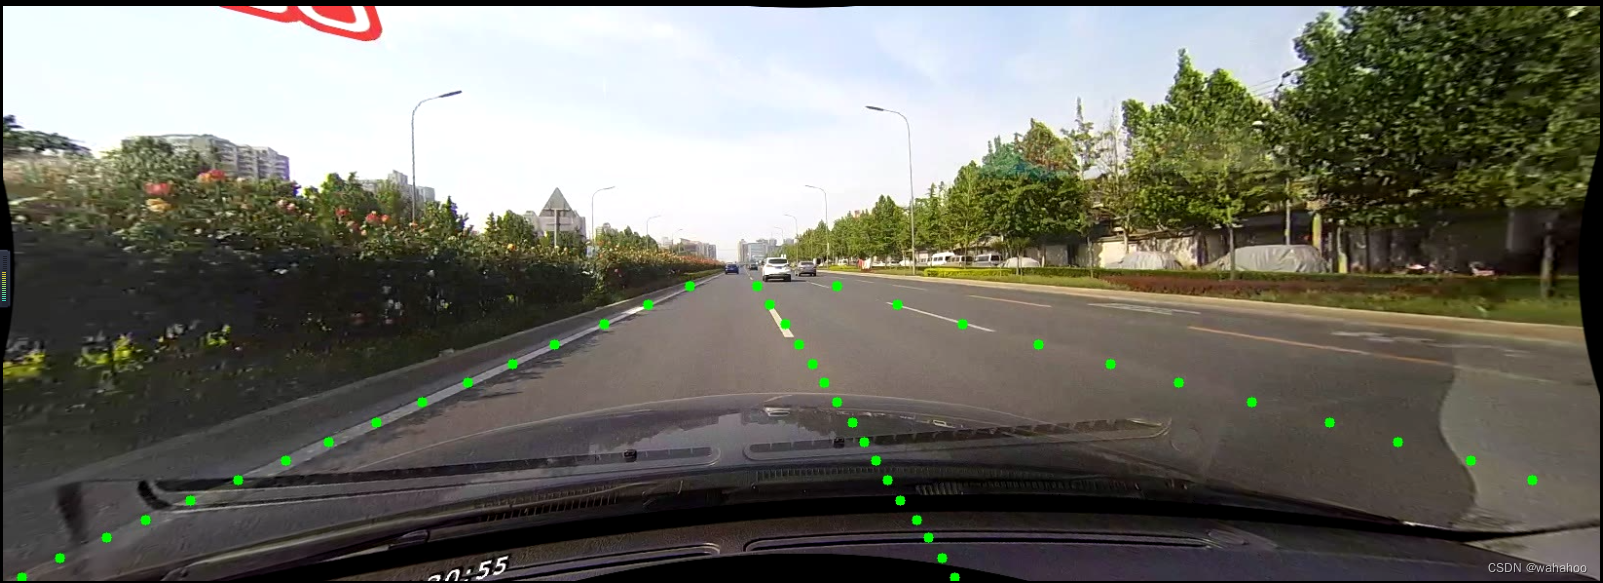
CULane是用于行车道检测学术研究的大规模具有挑战性的数据集。它由安装在六辆由北京不同驾驶员驾驶的不同车辆上的摄像机收集。收集了超过55小时的视频,并提取了133,235帧。数据示例如上所示。我们将数据集分为88880个训练集,9675个验证集和34680个测试集。测试集分为正常和8个挑战性类别,分别对应于上述9个示例。
百度飞桨里有人分享了,下载挺快的:CULane_数据集-飞桨AI Studio星河社区
数据集是文件夹.MP4里面但是截取的图片和标签
数据集文件夹应包括:
1.训练与验证的图像和注释:
- driver_23_30frame.tar.gz
- driver_161_90frame.tar.gz
- driver_182_30frame.tar.gz
对于每个图像,将有一个.txt注释文件,其中每个行给出车道标记关键点的x,y坐标。
2.测试图像和注释:
- driver_37_30frame.tar.gz
- driver_100_30frame.tar.gz
- driver_193_90frame.tar.gz
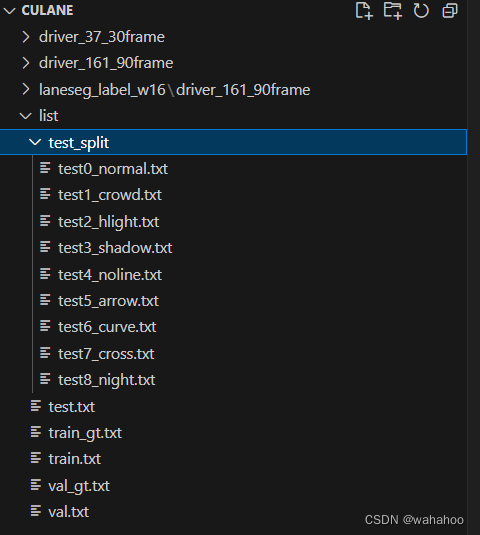
3.训练/验证/测试列表:
- list.tar.gz
对于用于训练的train_gt.txt,每行的格式为“输入图像,每个像素的标签,四个0/1数字,指示从左到右存在四个车道标记”。
4. Train&val的车道分段标签:
-laneseg_label_w16.tar.gz
,它是从原始注释生成的。
二、自制数据集
1、打标签
我使用的是一个网址:
Make Sense

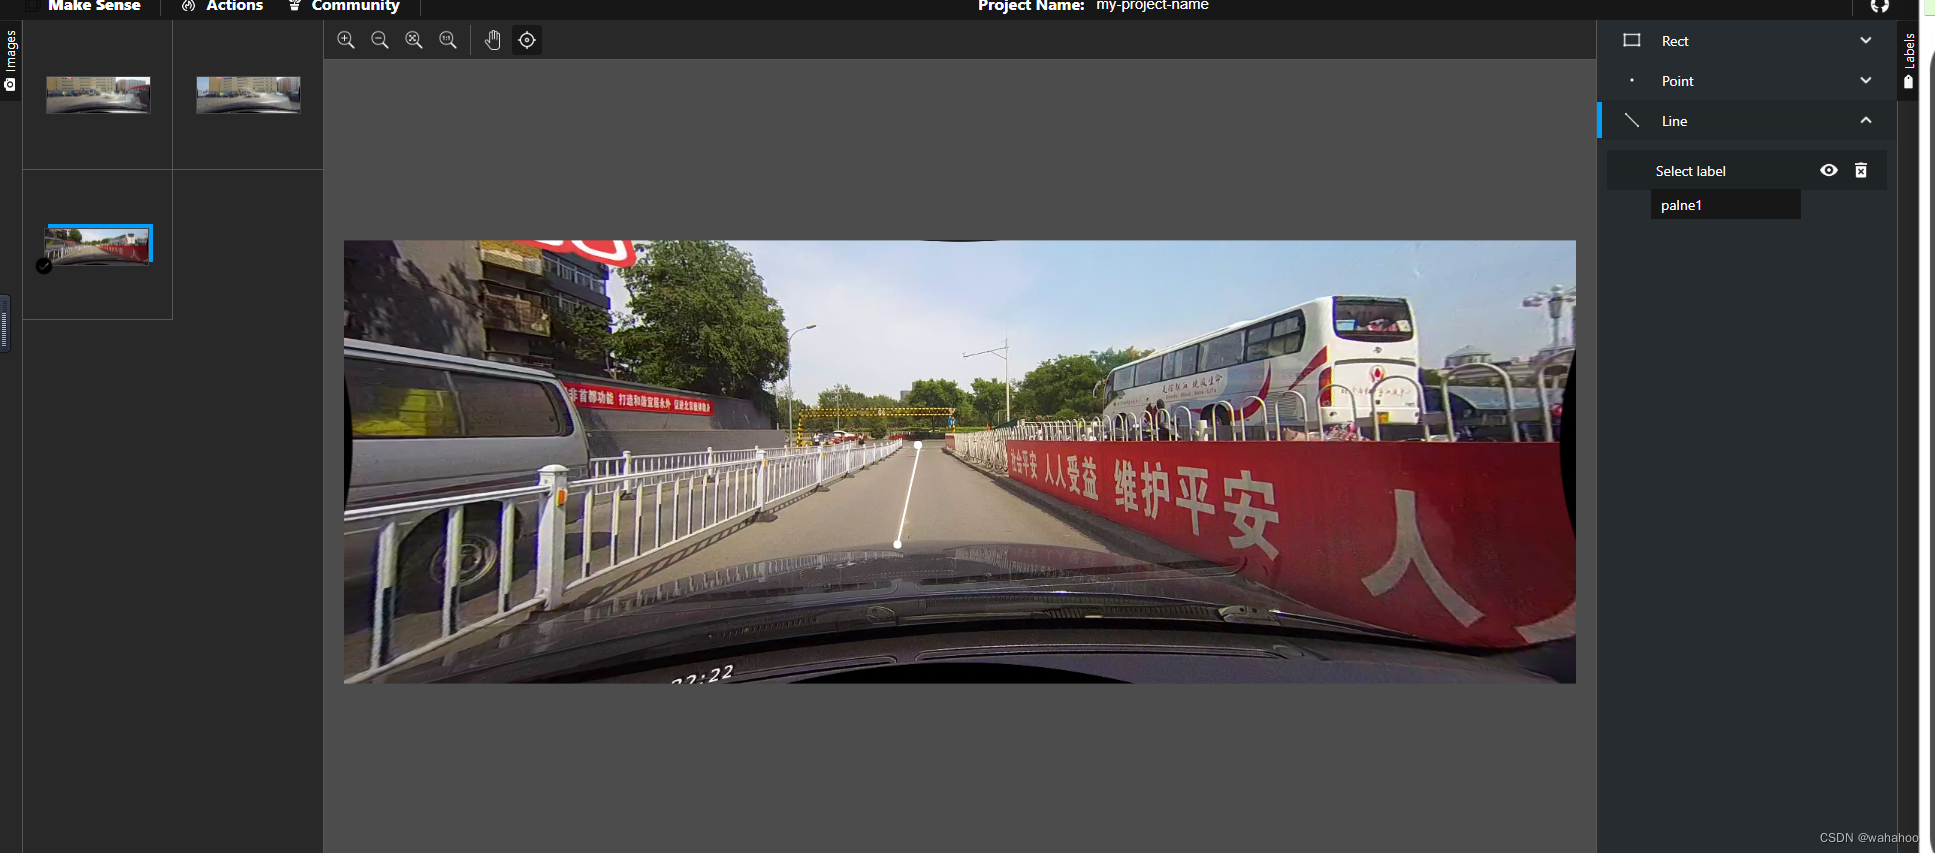
导出,得到了一个labels_my-project-name_2024-04-16-10-11-05.csv,csv文件,分别是标签,起始点和终点坐标,图像,图像尺寸。
如
plane1,397,453,3,283,an-00001.jpg,640,640
plane2,569,414,427,323,an-00002.jpg,640,640
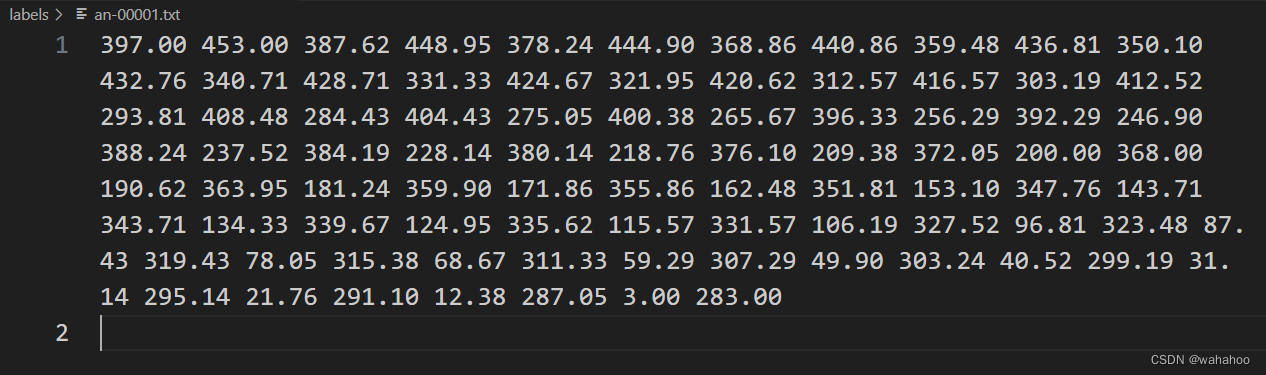
2、将csv文件转换为单个txt坐标点
'''
2024.4.17
author:wanghaoho
function:
将线标注的车道线转换为坐标点
'''
import csv
import os
def generate_points(start_point, end_point, interval=10):
"""
Generate points between start_point and end_point with given interval.
"""
x1, y1 = start_point
x2, y2 = end_point
points = []
# Calculate the total distance between start_point and end_point
total_distance = ((x2 - x1) ** 2 + (y2 - y1) ** 2) ** 0.5
# Calculate the number of intervals
num_intervals = int(total_distance / interval)
if num_intervals == 0:
return [(x1, y1), (x2, y2)]
# Calculate the step for x and y coordinates
x_step = (x2 - x1) / num_intervals
y_step = (y2 - y1) / num_intervals
# Generate points
for i in range(num_intervals + 1):
x = round(x1 + i * x_step, 2)
y = round(y1 + i * y_step, 2)
points.append((x, y))
return points
def read_csv(csv_file):
"""
Read start and end points from CSV file.
"""
lines_by_image = {}
with open(csv_file, 'r') as file:
reader = csv.reader(file)
for row in reader:
try:
label = row[0]
start_point = (float(row[1]), float(row[2]))
end_point = (float(row[3]), float(row[4]))
image_name = row[5]
if image_name not in lines_by_image:
lines_by_image[image_name] = {}
if label not in lines_by_image[image_name]:
lines_by_image[image_name][label] = []
lines_by_image[image_name][label].append((start_point, end_point))
except IndexError:
print(f"Error reading line: {row}")
return lines_by_image
def save_to_txt(lines_by_image):
"""
Save points to txt files for each image.
"""
for image_name, lines in lines_by_image.items():
txt_folder = 'labels'
os.makedirs(txt_folder, exist_ok=True)
txt_file = os.path.join(txt_folder, f"{os.path.splitext(image_name)[0]}.txt")
with open(txt_file, 'w') as f:
for label, points_list in lines.items():
combined_points = []
for start_point, end_point in points_list:
points = generate_points(start_point, end_point, interval=10)
combined_points.extend(points)
line_points = ' '.join([f"{x:.2f} {y:.2f}" for x, y in combined_points])
f.write(line_points + '\n')
# 示例用法
csv_file = 'labels_my-project-name_2024-04-16-10-11-05.csv'
lines_by_image = read_csv(csv_file)
save_to_txt(lines_by_image)
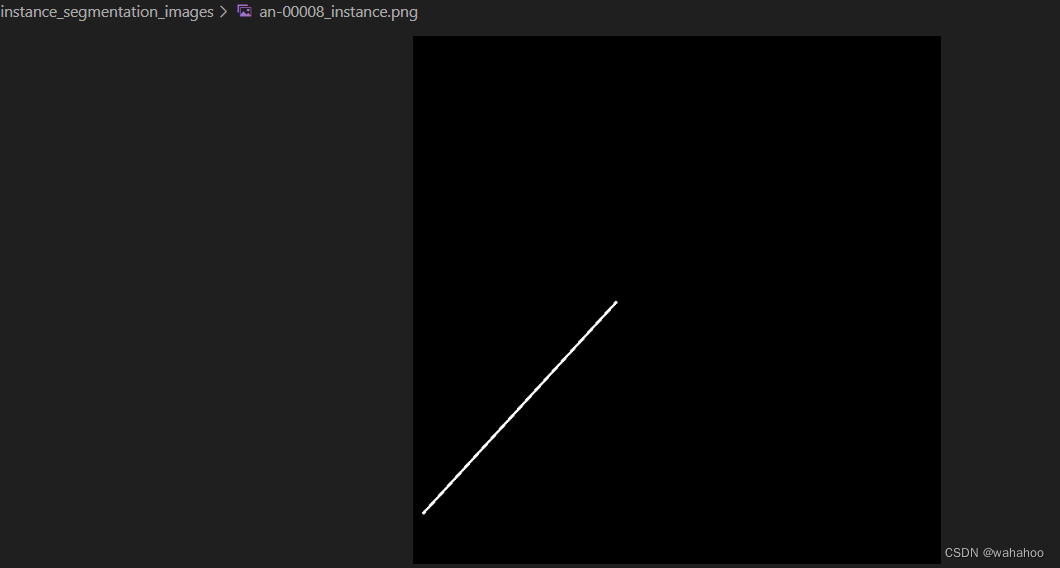
3、根据csv文件生成对应图像的实例分割图像
将给定的 CSV 文件中的每一行读取,然后根据文件名找到相应的图像文件,并根据 CSV 中的数据绘制实例分割图像。
'''
2024.4.17
author:wanghaoho
function:
根据 CSV 中的数据绘制实例分割图像
'''
import os
import csv
import cv2
import numpy as np
# 读取 CSV 文件并返回一个字典,键是图像文件名,值是对应的车道线坐标列表
def read_csv(csv_file):
lines_by_image = {}
with open(csv_file, 'r') as file:
reader = csv.reader(file)
for row in reader:
image_name = row[5]
if image_name not in lines_by_image:
lines_by_image[image_name] = []
start_point = (int(row[1]), int(row[2]))
end_point = (int(row[3]), int(row[4]))
lines_by_image[image_name].append((start_point, end_point))
return lines_by_image
# 根据给定的车道线坐标绘制实例分割图像
def draw_instance_segmentation(image, lines):
instance_image = np.zeros((image.shape[0], image.shape[1]), dtype=np.uint8)
for line in lines:
cv2.line(instance_image, line[0], line[1], (255), thickness=2) # 绘制车道线,这里设置线的厚度为2
return instance_image
# 主函数
def main(csv_file, images_dir, output_dir):
# 读取 CSV 文件中的数据
lines_by_image = read_csv(csv_file)
# 遍历每个图像及其对应的车道线坐标
for image_name, lines in lines_by_image.items():
# 读取图像
image_path = os.path.join(images_dir, image_name)
if not os.path.exists(image_path):
print(f"Image {image_name} not found.")
continue
image = cv2.imread(image_path)
# 根据车道线坐标绘制实例分割图像
instance_image = draw_instance_segmentation(image, lines)
# 保存实例分割图像
output_path = os.path.join(output_dir, os.path.splitext(image_name)[0] + '_instance.png')
cv2.imwrite(output_path, instance_image)
print(f"Instance segmentation image saved to {output_path}")
if __name__ == "__main__":
csv_file = "labels_my-project-name_2024-04-16-10-11-05.csv"
images_dir = "images" # 图像文件夹路径
output_dir = "instance_segmentation_images" # 实例分割图像保存路径
if not os.path.exists(output_dir):
os.makedirs(output_dir)
main(csv_file, images_dir, output_dir)
4、生成对应的txt路径文件
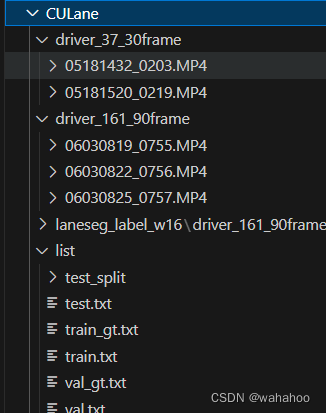
CUPlane数据集中需要的部分如图
4、 train.txt 和val.txt生成
这段代码的作用是将一个文件夹中的图像文件按照一定比例划分为训练集和验证集,并将它们的路径写入到对应的文本文件中。
import os
# 定义数据集文件夹路径
dataset_folder = r'plane' # 替换为您的数据集文件夹路径
# 定义输出文件
train_file = open('train.txt', 'w')
val_file = open('val.txt', 'w')
# 读取images文件夹中的所有.jpg图片文件
image_files = [f for f in os.listdir(os.path.join(dataset_folder, 'images')) if f.endswith('.jpg')]
# 用于记录当前处理到的图片编号
current_image_id = 0
# 遍历所有图像文件
for img_file in image_files:
# 获取图像路径
image_path = os.path.join(dataset_folder, 'images', img_file)
# 根据图像编号划分为训练集和验证集
if current_image_id < len(image_files) * 0.8: # 前80%为训练集,后20%为验证集
part = '10'
else:
part = '11'
# 写入train.txt或val.txt文件
if current_image_id < len(image_files) * 0.8:
train_file.write(f'{image_path}\n')
else:
val_file.write(f'{image_path}\n')
# 更新图片编号
current_image_id += 1
# 关闭文件
train_file.close()
val_file.close()


 2514
2514


 被折叠的 条评论
为什么被折叠?
被折叠的 条评论
为什么被折叠?
 到【灌水乐园】发言


