


一、案例
1. 创建功能包
使用 ROS 2 命令行工具创建一个新包:
ros2 pkg create \
 --build-type ament_cmake \
 --dependencies moveit_ros_planning_interface rclcpp \
 --node-name hello_moveit hello_moveit
2. 创建 ROS 节点和 Executor
#include <memory>

#include <rclcpp/rclcpp.hpp>
#include <moveit/move_group_interface/move_group_interface.h>

int main(int argc, char * argv[])
{
  // Initialize ROS and create the Node
  rclcpp::init(argc, argv);
  auto const node = std::make_shared<rclcpp::Node>(
    "hello_moveit",
    rclcpp::NodeOptions().automatically_declare_parameters_from_overrides(true)
  );

  // Create a ROS logger
  auto const logger = rclcpp::get_logger("hello_moveit");

  // Next step goes here

  // Shutdown ROS
  rclcpp::shutdown();
  return 0;
}
2.1 构建和运行
colcon build --mixin debug打开一个新终端,然后在该新终端中获取工作区环境脚本,以便我们可以运行我们的程序。
cd ~/ws_moveit2
source install/setup.bash
运行程序并查看输出:
ros2 run hello_moveit hello_moveit3. 使用 MoveGroupInterface 进行规划和执行
在显示“Next step goes here”的注释中,添加以下代码:
// Create the MoveIt MoveGroup Interface
using moveit::planning_interface::MoveGroupInterface;
auto move_group_interface = MoveGroupInterface(node, "panda_arm");

// Set a target Pose
auto const target_pose = []{
  geometry_msgs::msg::Pose msg;
  msg.orientation.w = 1.0;
  msg.position.x = 0.28;
  msg.position.y = -0.2;
  msg.position.z = 0.5;
  return msg;
}();
move_group_interface.setPoseTarget(target_pose);

// Create a plan to that target pose
auto const [success, plan] = [&move_group_interface]{
  moveit::planning_interface::MoveGroupInterface::Plan msg;
  auto const ok = static_cast<bool>(move_group_interface.plan(msg));
  return std::make_pair(ok, msg);
}();

// Execute the plan
if(success) {
  move_group_interface.execute(plan);
} else {
  RCLCPP_ERROR(logger, "Planing failed!");
}
3.1 构建和运行
colcon build --mixin debug打开一个新终端,然后在该新终端中获取工作区环境脚本,以便我们可以运行我们的程序。
cd ~/ws_moveit2
source install/setup.bash
运行程序并查看输出:
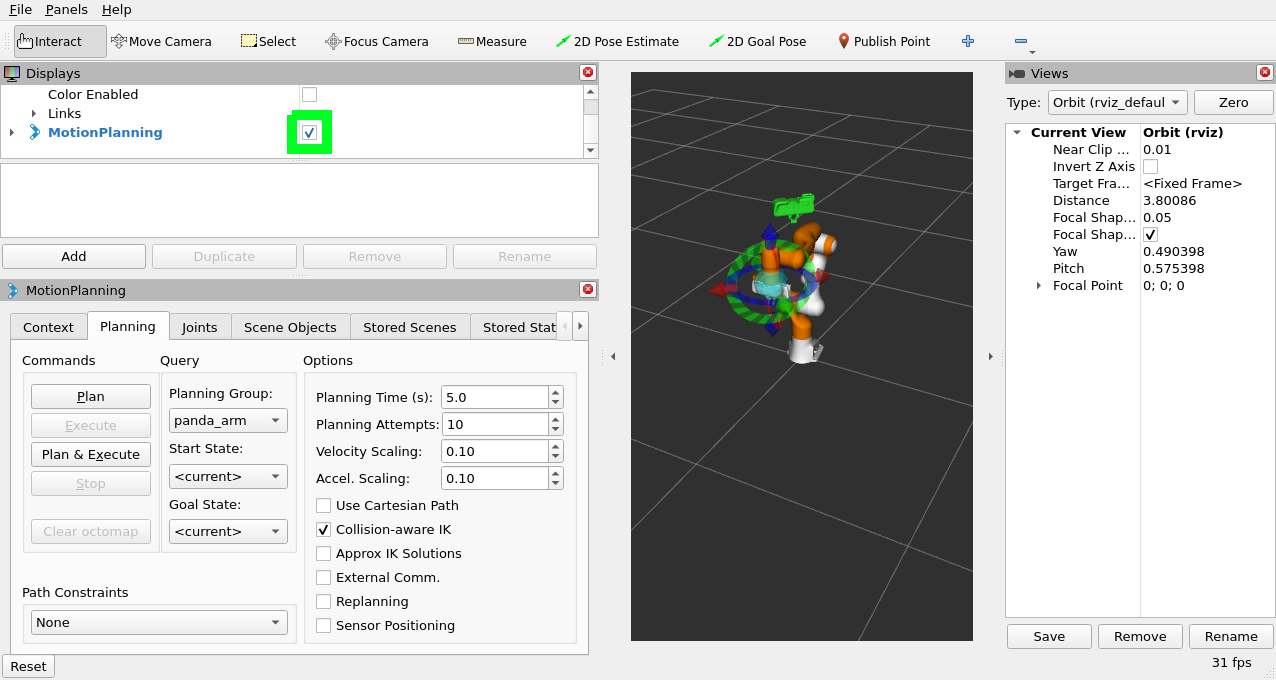
ros2 launch moveit2_tutorials demo.launch.py然后在窗口中,取消选中复选框 :DisplaysMotionPlanning/Planning RequestQuery Goal State
在第三个终端中,source 工作区并运行您的程序。
ros2 run hello_moveit hello_moveit 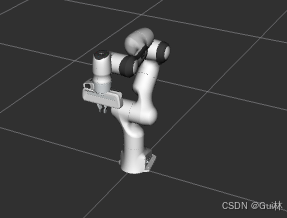
3.2 代码解释
我们做的第一件事是创建 MoveGroupInterface。这个对象将用于与 move_group 交互,这使我们能够规划和执行轨迹。 请注意,这是我们在此程序中创建的唯一可变对象。 另一件需要注意的事情是我们在此处创建的对象的第二个接口:. 那是机器人描述中定义的一组关节,我们将使用 this 进行操作。MoveGroupInterface"panda_arm"MoveGroupInterface
using moveit::planning_interface::MoveGroupInterface;
auto move_group_interface = MoveGroupInterface(node, "panda_arm");
然后,我们设置目标姿势和计划。请注意,仅设置目标姿势(通过 .起始姿势隐式是 joint state publisher 发布的位置,可以使用函数系列进行更改(但不在本教程中)。setPoseTargetMoveGroupInterface::setStartState*
关于下一节,还需要注意的另一件事是使用 lambda 来构建消息类型和规划。 这是现代 C++ 代码库中的一种模式,支持以更具声明性的样式进行编写。
// Set a target Pose
auto const target_pose = []{
  geometry_msgs::msg::Pose msg;
  msg.orientation.w = 1.0;
  msg.position.x = 0.28;
  msg.position.y = -0.2;
  msg.position.z = 0.5;
  return msg;
}();
move_group_interface.setPoseTarget(target_pose);

// Create a plan to that target pose
auto const [success, plan] = [&move_group_interface]{
  moveit::planning_interface::MoveGroupInterface::Plan msg;
  auto const ok = static_cast<bool>(move_group_interface.plan(msg));
  return std::make_pair(ok, msg);
}();
最后,如果规划成功,我们将执行我们的计划,否则我们将记录一个错误:
// Execute the plan
if(success) {
  move_group_interface.execute(plan);
} else {
  RCLCPP_ERROR(logger, "Planning failed!");
}
二、在 RViz 中可视化
1. 添加依赖项 moveit_visual_tools
将此行添加到 package.xml:
<depend>moveit_visual_tools</depend>再将此行添加到 CMakeLists.txt:
find_package(moveit_visual_tools REQUIRED)在 ament_target_dependencies 中添加下面信息:
ament_target_dependencies(
  hello_moveit
  "moveit_ros_planning_interface"
  "moveit_visual_tools"
  "rclcpp"
)
要验证是否正确添加了依赖项,请将所需的 include 添加到源文件中:hello_moveit.cpp
#include <moveit_visual_tools/moveit_visual_tools.h>要测试这一切是否有效,请在 workspace 目录中打开一个终端(记住在 opt 中获取您的 ROS 安装),然后使用 colcon 构建:
cd ~/ws_moveit2
colcon build --mixin debug
2. 创建一个 ROS 执行器并在线程上旋转节点
在初始化 MoveItVisualTools 之前,我们需要在 ROS 节点上启动一个执行程序。 这是MoveItVisualTools 与 ROS 服务和主题交互的方式。
#include <thread>  // <---- add this to the set of includes at the top

  ...

  // Create a ROS logger
  auto const logger = rclcpp::get_logger("hello_moveit");

  // We spin up a SingleThreadedExecutor so MoveItVisualTools interact with ROS
  rclcpp::executors::SingleThreadedExecutor executor; // 单线程执行器,按顺序处理回调
  executor.add_node(node); // 将节点加入执行器管理
  auto spinner = std::thread([&executor]() { executor.spin(); });

  // Create the MoveIt MoveGroup Interface
  ...

  // Shutdown ROS
  rclcpp::shutdown();  // <--- This will cause the spin function in the thread to return
  spinner.join();  // <--- Join the thread before exiting
  return 0;
}
在进行这些更改后,您应该重新构建工作区,以确保您没有任何语法错误。
3. 创建并初始化 MoveItVisualTools
接下来,我们将在构造 MoveGroupInterface 之后构造并初始化 MoveItVisualTools。
// Create the MoveIt MoveGroup Interface
using moveit::planning_interface::MoveGroupInterface;
auto move_group_interface = MoveGroupInterface(node, "panda_arm");

// Construct and initialize MoveItVisualTools
auto moveit_visual_tools = moveit_visual_tools::MoveItVisualTools{
    node, "panda_link0", rviz_visual_tools::RVIZ_MARKER_TOPIC, move_group_interface.getRobotModel()};
moveit_visual_tools.deleteAllMarkers();    // 清除 RViz 中我们从之前运行中留下的任何渲染状态
moveit_visual_tools.loadRemoteControl();  // 启用RViz按钮交互
我们将以下内容传递到构造函数中:ROS 节点、机器人的基本链接、要使用的标记主题(稍后会详细介绍)和机器人模型(我们从 move_group_interface 中获得)。 接下来,我们调用 delete all the markers,这将清除 RViz 中我们从之前运行中留下的任何渲染状态。 最后,我们加载远程控制。 Remote control 是一个非常简单的插件,它允许我们在 RViz 中有一个按钮来与我们的程序进行交互。
4. 为可视化编写闭包
构建和初始化后,我们现在创建一些闭包(可以访问当前范围内的变量的函数对象),我们稍后可以在程序中使用它们来帮助在 RViz 中呈现可视化。
// 三维空间文本标注
auto const draw_title = [&moveit_visual_tools](auto text) {
  auto const text_pose = [] {
    auto msg = Eigen::Isometry3d::Identity();
    msg.translation().z() = 1.0;
    return msg;
  }();
  moveit_visual_tools.publishText(text_pose, text, rviz_visual_tools::WHITE,
                                  rviz_visual_tools::XLARGE);
};

// 交互式暂停控制
auto const prompt = [&moveit_visual_tools](auto text) {
  moveit_visual_tools.prompt(text);
};

// 轨迹可视化
auto const draw_trajectory_tool_path =
    [&moveit_visual_tools,
     jmg = move_group_interface.getRobotModel()->getJointModelGroup(
         "panda_arm")](auto const trajectory) {
      moveit_visual_tools.publishTrajectoryLine(trajectory, jmg);
    };
三个闭包中的每一个都是通过引用捕获的,最后一个捕获一个指向我们正在规划的联合模型组对象的指针。 它们中的每一个都调用一个函数 on 来更改 RViz 中的某些内容。 第一个选项是在机器人底座上方一米处添加文本。 这是从高级别显示程序状态的有用方法。 第二个调用名为 . 此功能会阻止您的程序,直到用户按下 RViz 中的按钮。 这对于在调试时单步调试程序很有帮助。 最后一个绘制我们计划的轨迹的刀具路径。 这通常有助于从工具的角度理解规划的轨迹。
您可能会问自己,为什么我们要创建这样的 lambda,原因只是为了让后面的代码更易于阅读和理解。 作为您的编写软件,将您的功能分解为命名函数通常很有帮助,这些函数可以很容易地重用和自行测试。 您将在下一节中看到我们如何使用我们创建的这些函数。
5. 可视化程序的步骤
现在,我们将在程序中间扩充代码。 更新用于规划和执行的代码以包含以下新功能:
// Set a target Pose
auto const target_pose = [] {
  geometry_msgs::msg::Pose msg;
  msg.orientation.w = 1.0;
  msg.position.x = 0.28;
  msg.position.y = -0.2;
  msg.position.z = 0.5;
  return msg;
}();
move_group_interface.setPoseTarget(target_pose);

// Create a plan to that target pose
prompt("Press 'Next' in the RvizVisualToolsGui window to plan");
draw_title("Planning");
moveit_visual_tools.trigger();
auto const [success, plan] = [&move_group_interface] {
  moveit::planning_interface::MoveGroupInterface::Plan msg;
  auto const ok = static_cast<bool>(move_group_interface.plan(msg));
  return std::make_pair(ok, msg);
}();

// Execute the plan
if (success) {
  draw_trajectory_tool_path(plan.trajectory_);
  moveit_visual_tools.trigger();
  prompt("Press 'Next' in the RvizVisualToolsGui window to execute");
  draw_title("Executing");
  moveit_visual_tools.trigger();
  move_group_interface.execute(plan);
} else {
  draw_title("Planning Failed!");
  moveit_visual_tools.trigger();
  RCLCPP_ERROR(logger, "Planing failed!");
}
您很快就会注意到的一件事是,我们必须在每次调用后调用一个方法,以更改 RViz 中呈现的内容。 这样做的原因是,发送到 RViz 的消息会在您调用时进行批处理和发送,以减少标记主题的带宽。
最后,再次构建您的项目,以确保所有添加的代码都是正确的。
cd ~/ws_moveit2
source /opt/ros/humble/setup.bash
colcon build --mixin debug
6. 在 RViz 中启用可视化
打开新终端,获取工作区,然后启动打开 RViz 的演示启动文件。
cd ~/ws_moveit2
source install/setup.bash
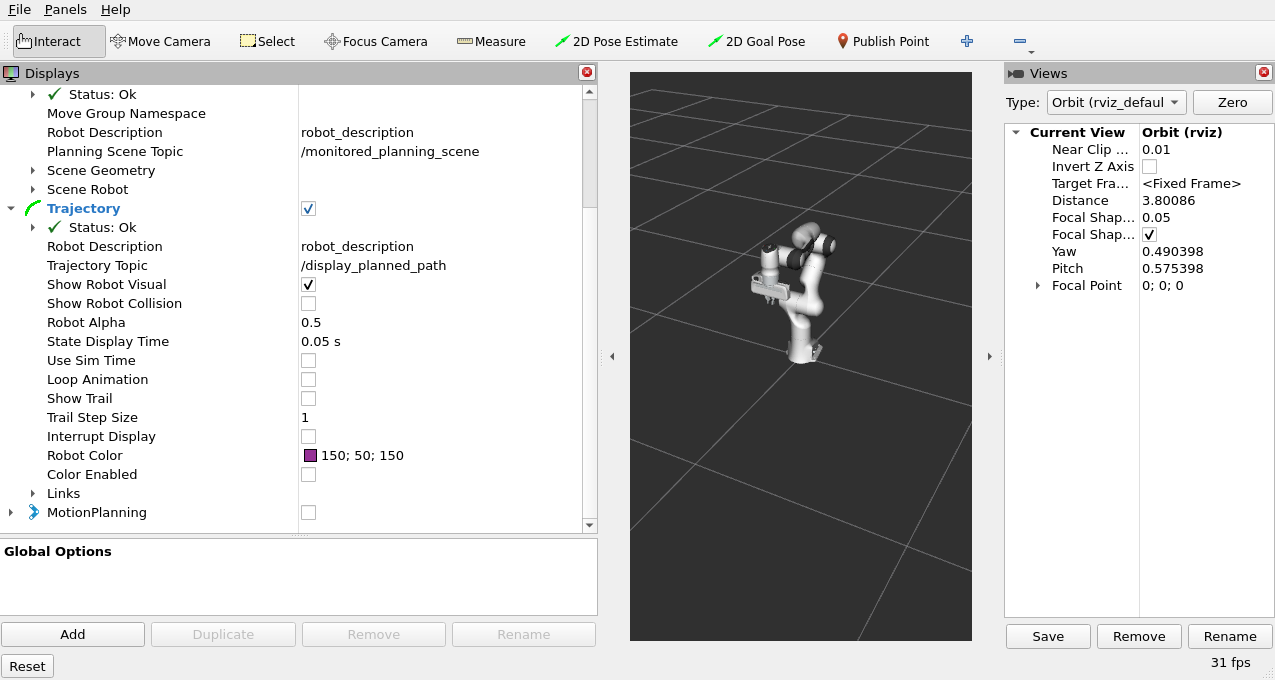
ros2 launch moveit2_tutorials demo.launch.py取消选中“Displays”选项卡中的“MotionPlanning”以隐藏它。 我们不打算在下一部分使用“MotionPlanning”插件。
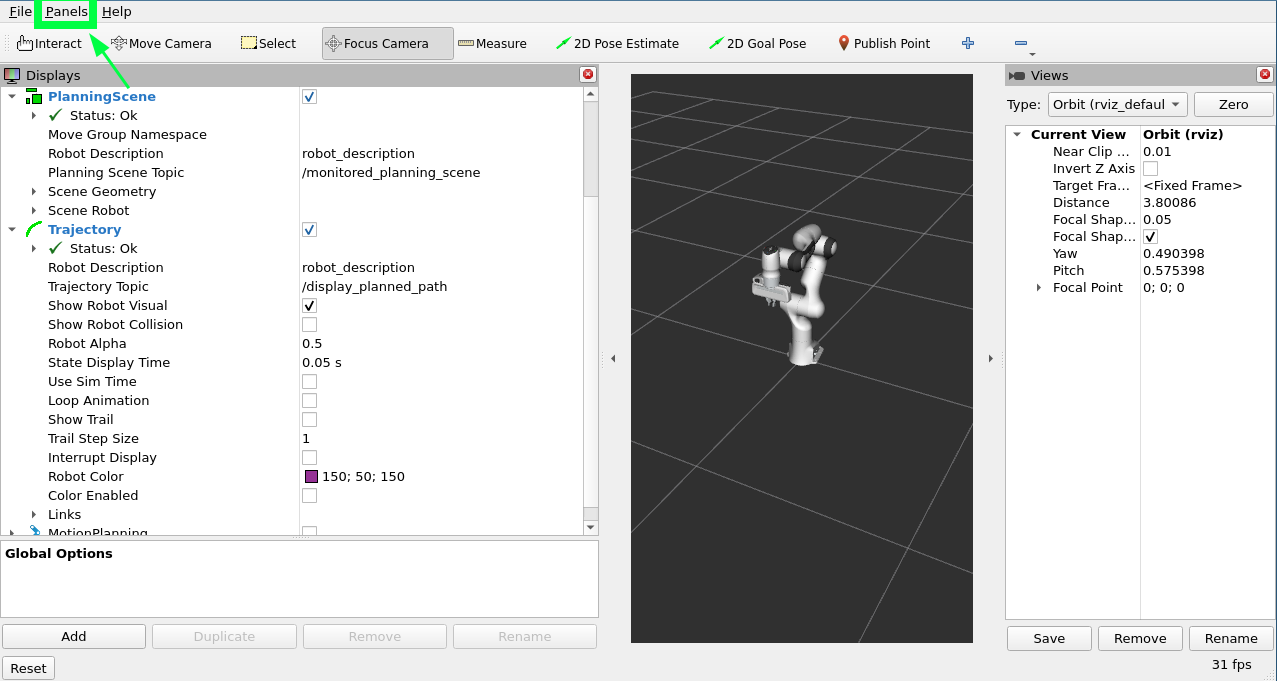
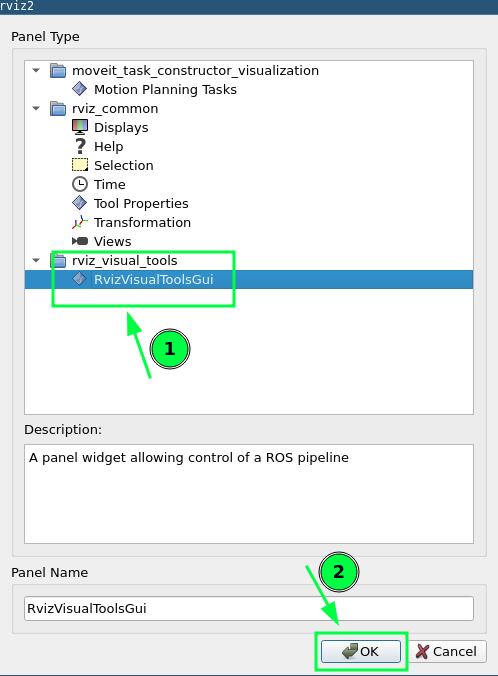
要添加按钮以与我们添加到程序中的提示进行交互,请使用 “Panels/Add New Panel” 菜单打开对话框:
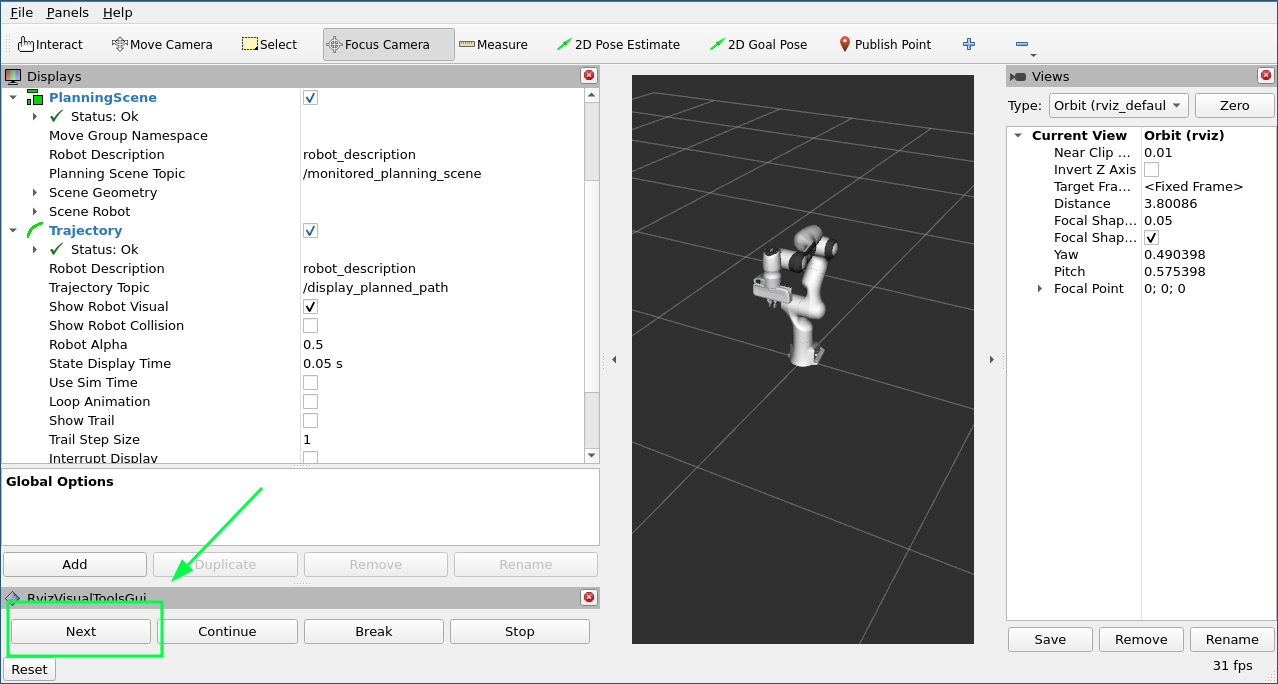
然后选择并单击 OK。 这将在左下角创建一个新面板,其中包含一个我们稍后将使用的按钮。RvizVisualToolsGuiNext
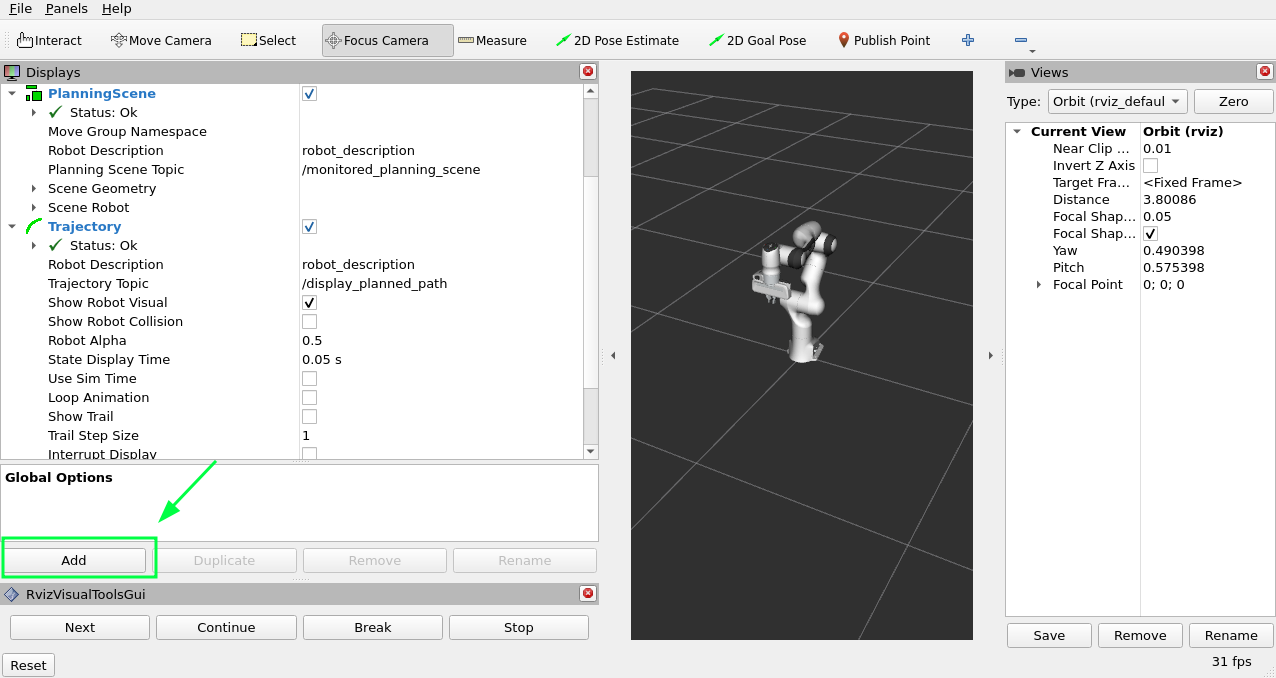
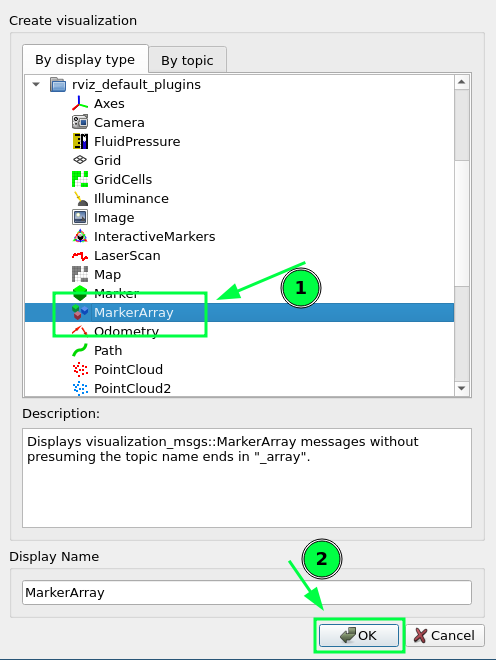
最后,我们需要添加Marker Array来呈现我们添加的可视化效果。 单击 “Displays” 面板中的 “Add” 按钮。
选择并单击 。
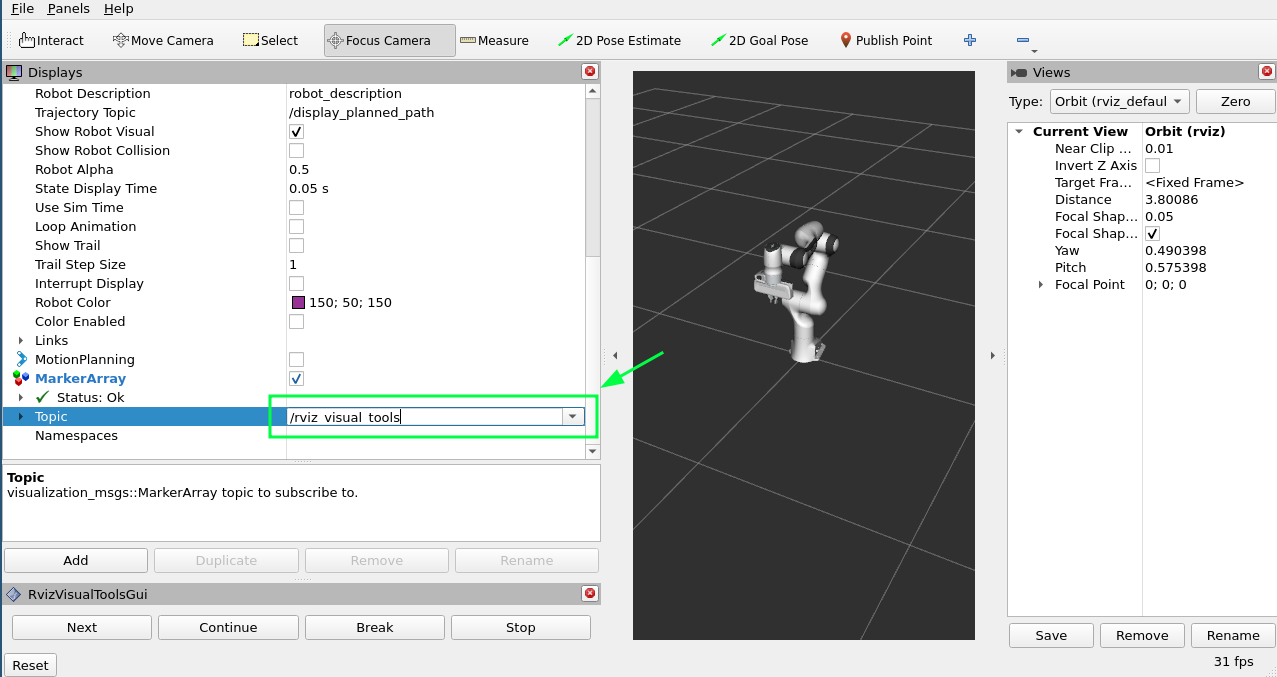
滚动到 Displays 面板中项目的底部,然后编辑新 Marker Array 正在使用的主题。/rviz_visual_tools
现在,您可以运行具有可视化效果的新程序。
7. 运行程序
在新终端中,转到工作区,获取工作区,然后运行 :hello_moveit
cd ~/ws_moveit2
source install/setup.bash
ros2 run hello_moveit hello_moveit
您会注意到您的程序已停止,并显示如下所示的日志:
[INFO] [1652822889.492940200] [hello_moveit.remote_control]: Waiting to continue: Press 'Next' in the RvizVisualToolsGui window to plan单击 RViz 中的按钮,查看您的应用程序进度。Next
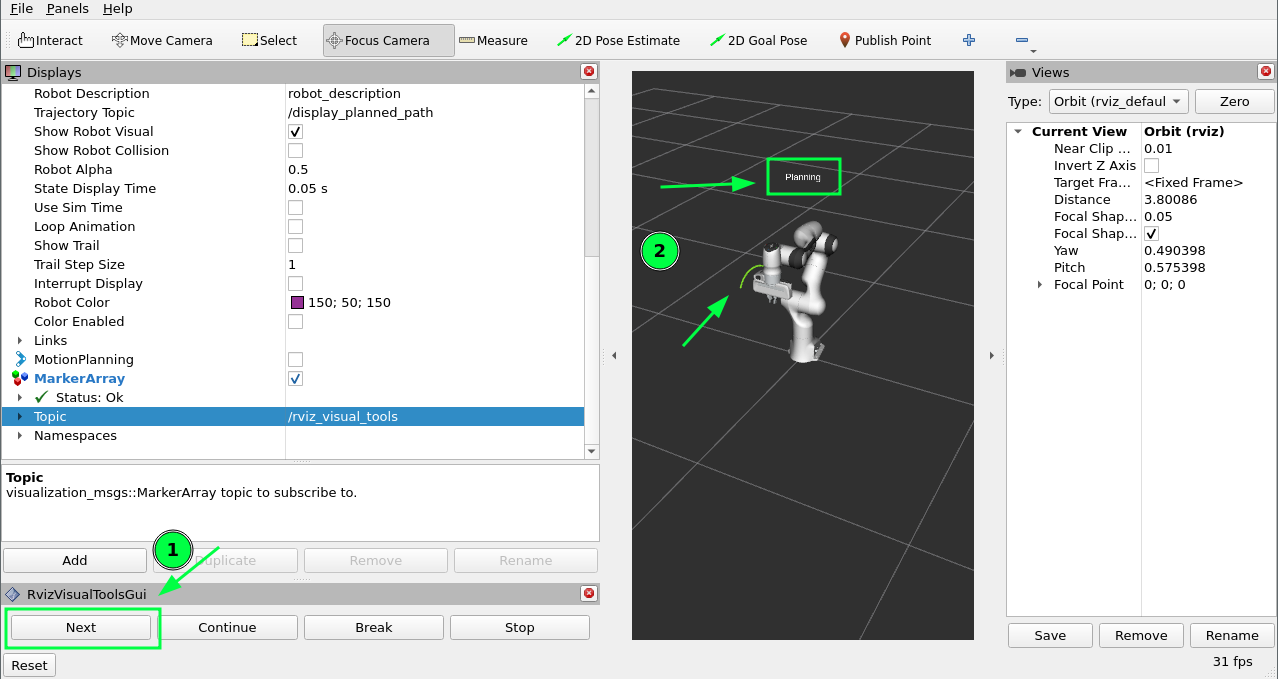
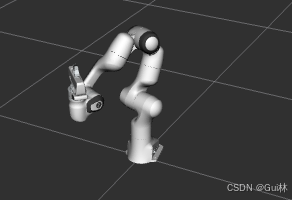
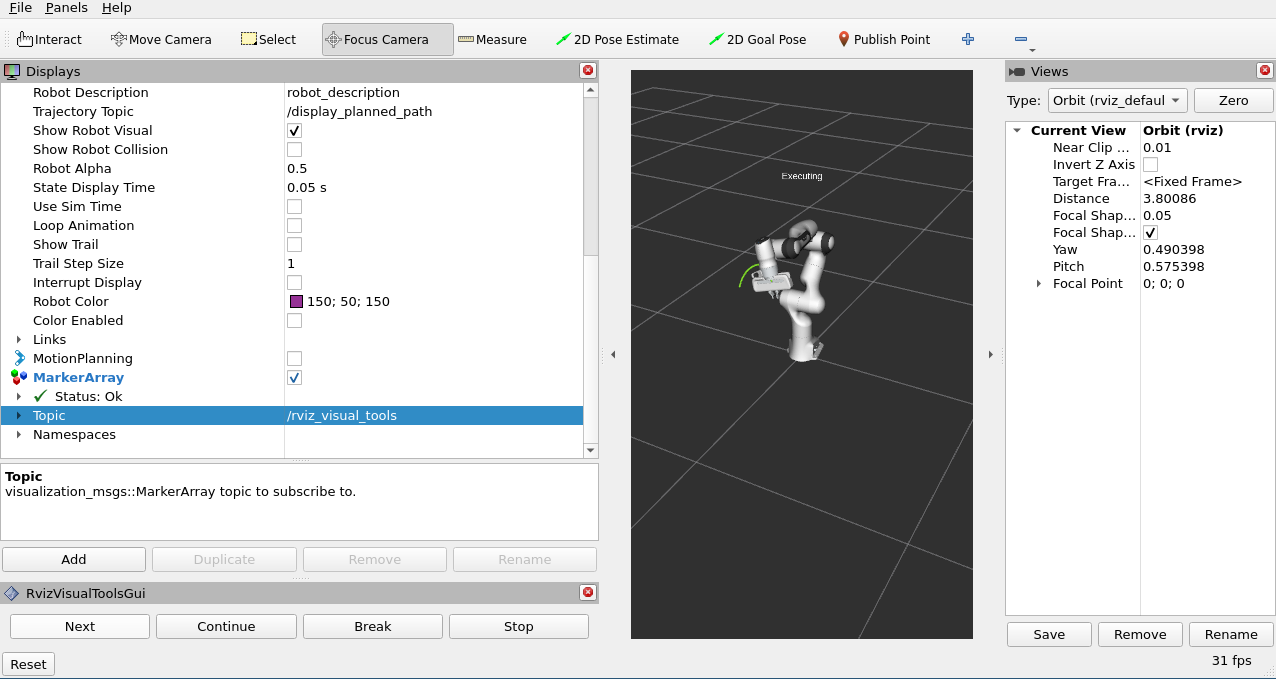
单击下一步按钮后,您将看到您的应用程序已规划,在机器人上方添加了标题,并绘制了一条表示工具路径的线。 要继续,请再次按下以查看您的机器人执行计划。Next
总结
您扩展了使用 MoveIt 编写的程序,以便与 RViz 中的 GUI 进行交互,从而允许您使用按钮逐步完成程序,在机器人上方呈现一些文本,并显示您规划的工具路径。


 2749
2749

 被折叠的 条评论
为什么被折叠?
被折叠的 条评论
为什么被折叠?
 到【灌水乐园】发言


