


Arduino全套零基础入门视频教程(适合0基础,含arduino项目保姆级教程)_哔哩哔哩_bilibili
Arduino全套零基础入门视频进阶教程(适合0基础,含arduino项目保姆级教程)_哔哩哔哩_bilibili
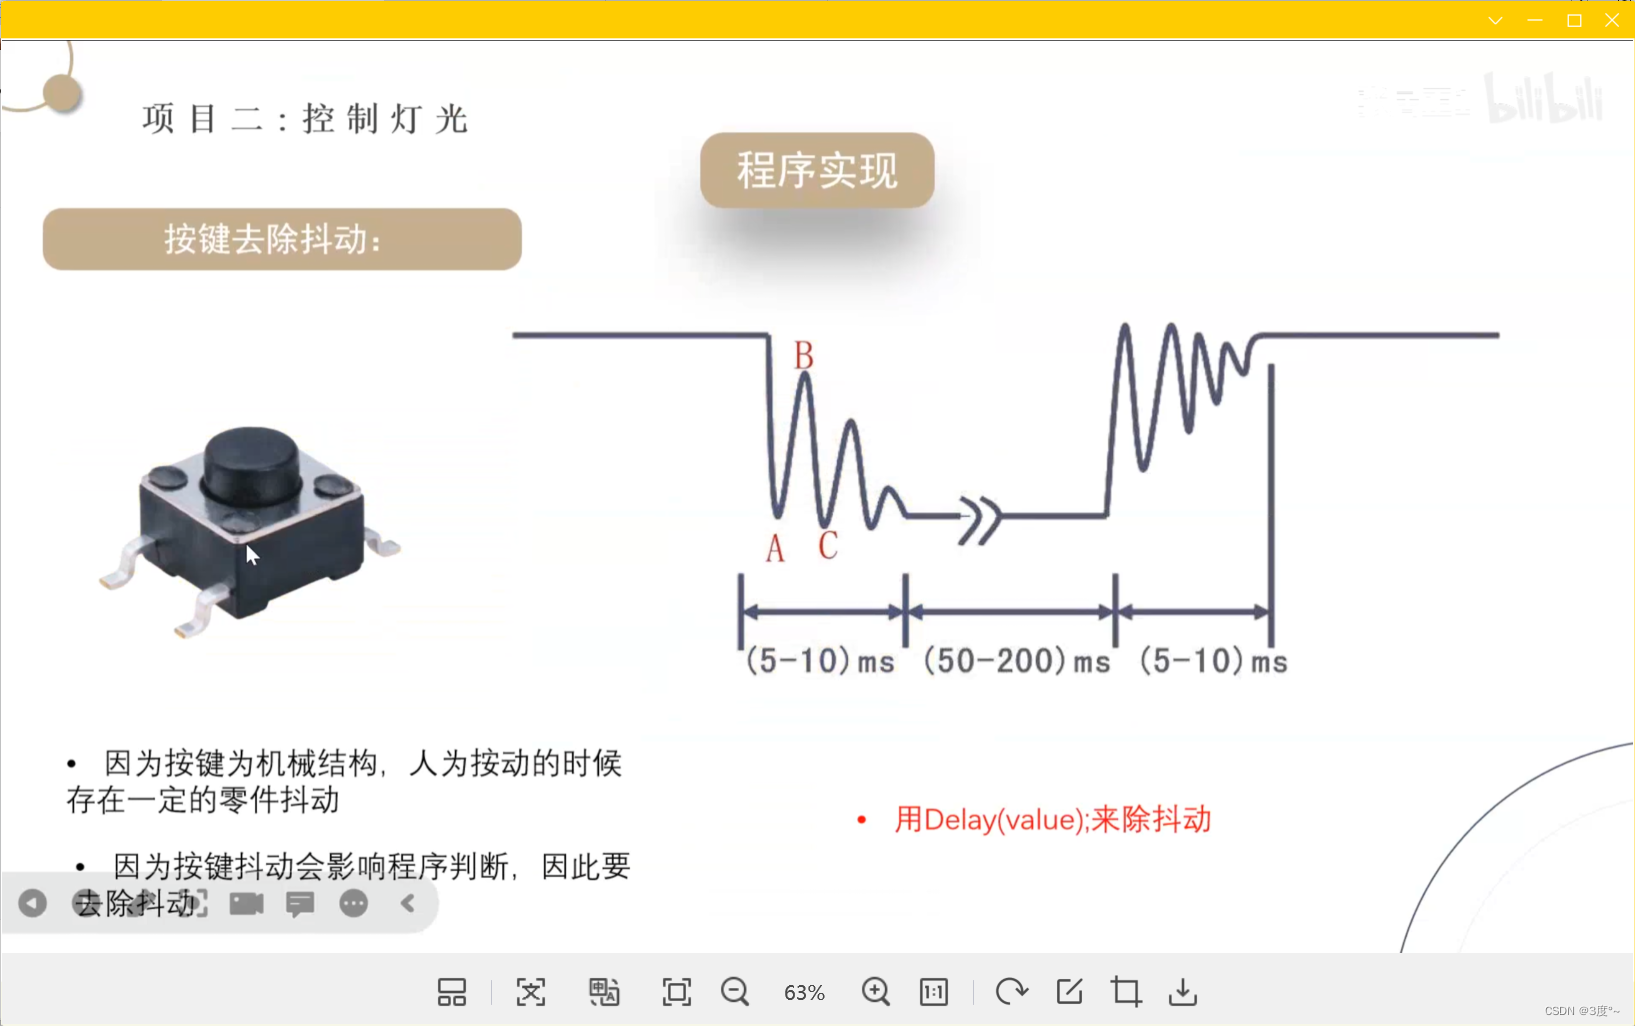
花式点灯1(Switch选择语句的学习)
#include <Arduino.h>

// put function declarations here:

void setup() {
  // put your setup code here, to run once:
  Serial.begin(115200);
  int value = 1;
  int a = 666;
  int b = 888;

  switch (value)
  {
  case 1:
    Serial.println(a);
    break;
  case 2:
    Serial.println(b);
    break;

  default:
    Serial.println("无满足条件");
    break;
  }


}

void loop() {
  // put your main code here, to run repeatedly:

}

// put function definitions here:
花式点灯2(循环语句的学习)
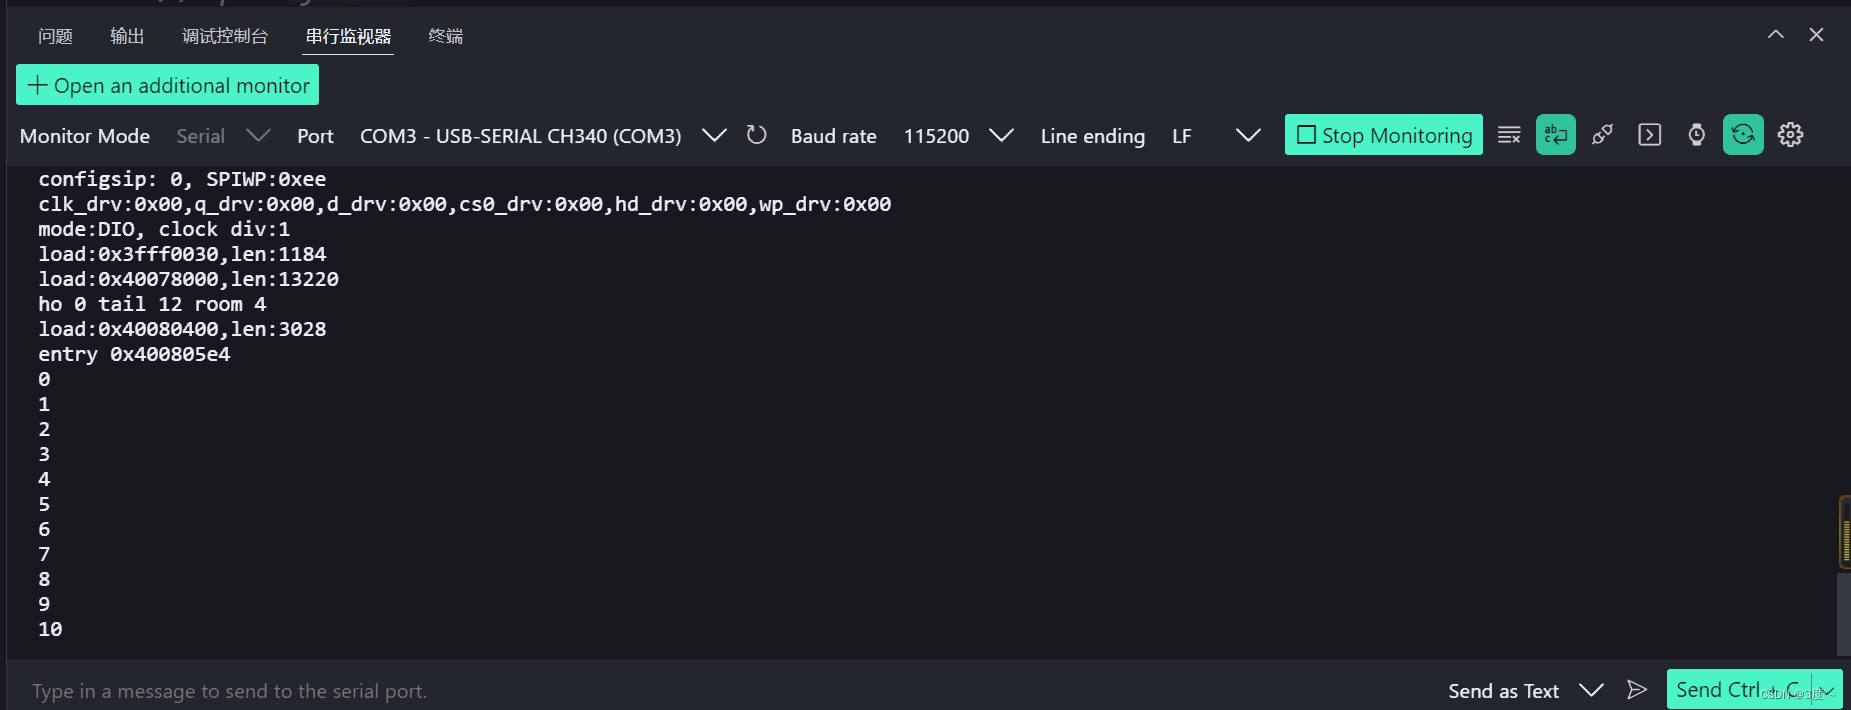
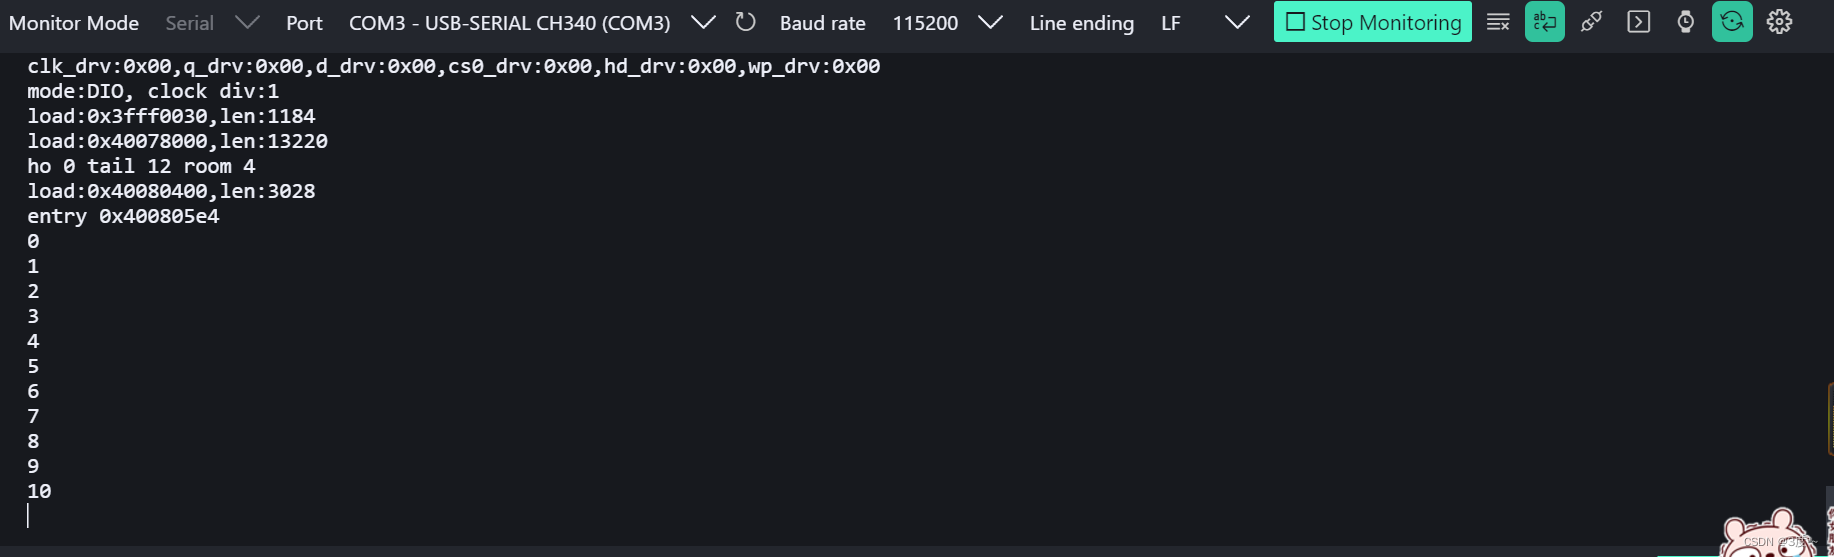
for循环
#include <Arduino.h>

// put function declarations here:

void setup() {
  // put your setup code here, to run once:
  Serial.begin(115200);
  // for循环的应用
  int i ;
  for ( i = 0; i <= 10; i++)
  {
    Serial.println(i);
  }


}

void loop() {
  // put your main code here, to run repeatedly:

}

// put function definitions here:
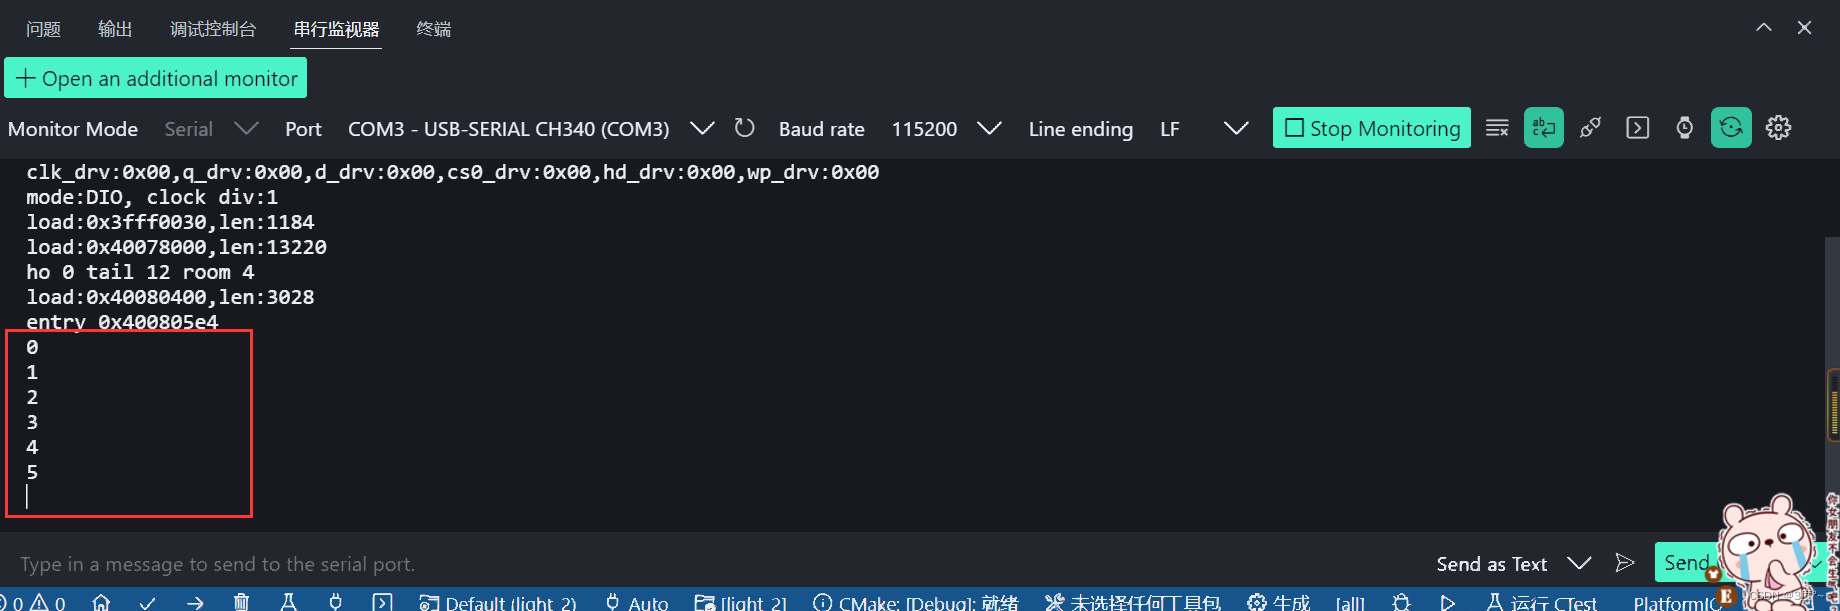
while循环
#include <Arduino.h>

// put function declarations here:

void setup() {
  // put your setup code here, to run once:
  Serial.begin(115200);
  int a = 0;
  while (a <= 10)
  {
    // 循环体
    Serial.println(a);
    // 循环变量变化式
    a++;
  }


}

void loop() {
  // put your main code here, to run repeatedly:

}

// put function definitions here:
do while 使用
#include <Arduino.h>

// put function declarations here:

void setup() {
  // put your setup code here, to run once:
  Serial.begin(115200);
  int a = 0;
  do
  {
    // 循环体
    Serial.println(a);
    // 循环变量表达式
    a++;
  }
   while (a == 10);

}

void loop() {
  // put your main code here, to run repeatedly:

}

// put function definitions here:

循环控制语句
#include <Arduino.h>

// put function declarations here:

void setup() {
  // put your setup code here, to run once:
  Serial.begin(115200);
  for (int a = 0; a<=10; a++)
  {
    Serial.println(a);
    if (a == 5)
    {
      break;
    }

  }

}

void loop() {
  // put your main code here, to run repeatedly:

}

// put function definitions here:
无限循环
#include <Arduino.h>

// put function declarations here:

void setup() {
  // put your setup code here, to run once:
  Serial.begin(115200);
  for (; ; )
  {
    Serial.println("123");

  }

}

void loop() {
  // put your main code here, to run repeatedly:

}

// put function definitions here:

花式点灯3 (闪灯)
for循环闪灯
#include <Arduino.h>

// put function declarations here:

void setup() {
  // put your setup code here, to run once:
  // 引脚模式设置(OUTPUT/INPUT)
  pinMode(2, OUTPUT);

}

void loop() {
  // put your main code here, to run repeatedly:
  for (int i = 0; i <= 10; i++)
  {
    // 数字输出:高1,低0
    digitalWrite(2, HIGH);   // 小鱼的开发板,HIGH电平灯熄灭
    delay(1000);
    digitalWrite(2, LOW);
    delay(1000);
  }
  delay(100000);  // 循环闪烁完成以后,灯处于LOW电平

}

// put function definitions here:
while循环闪灯
#include <Arduino.h>

// put function declarations here:

void setup() {
  // put your setup code here, to run once:
  // 引脚模式设置(OUTPUT/INPUT)
  pinMode(2, OUTPUT);

}

void loop() {
  // put your main code here, to run repeatedly:
  int a = 0;
  while (a <= 10) {
    // 数字输出:高1,低0
    digitalWrite(2, HIGH);   // 小鱼的开发板,HIGH电平灯熄灭
    delay(100);
    digitalWrite(2, LOW);
    delay(100);

    a++;
  }
  delay(100000);  // 循环闪烁完成以后,灯处于LOW电平

}

// put function definitions here:
do while循环闪灯
#include <Arduino.h>

// put function declarations here:

void setup() {
  // put your setup code here, to run once:
  // 引脚模式设置(OUTPUT/INPUT)
  pinMode(2, OUTPUT);

}

void loop() {
  // put your main code here, to run repeatedly:
  int a = 0;
  do
  {
    digitalWrite(2, HIGH);   // 小鱼的开发板,HIGH电平灯熄灭
    delay(100);
    digitalWrite(2, LOW);
    delay(100);

    a++;
  } while (a <= 10);


  delay(100000);  // 循环闪烁完成以后,灯处于LOW电平

}

// put function definitions here:
花式点灯4
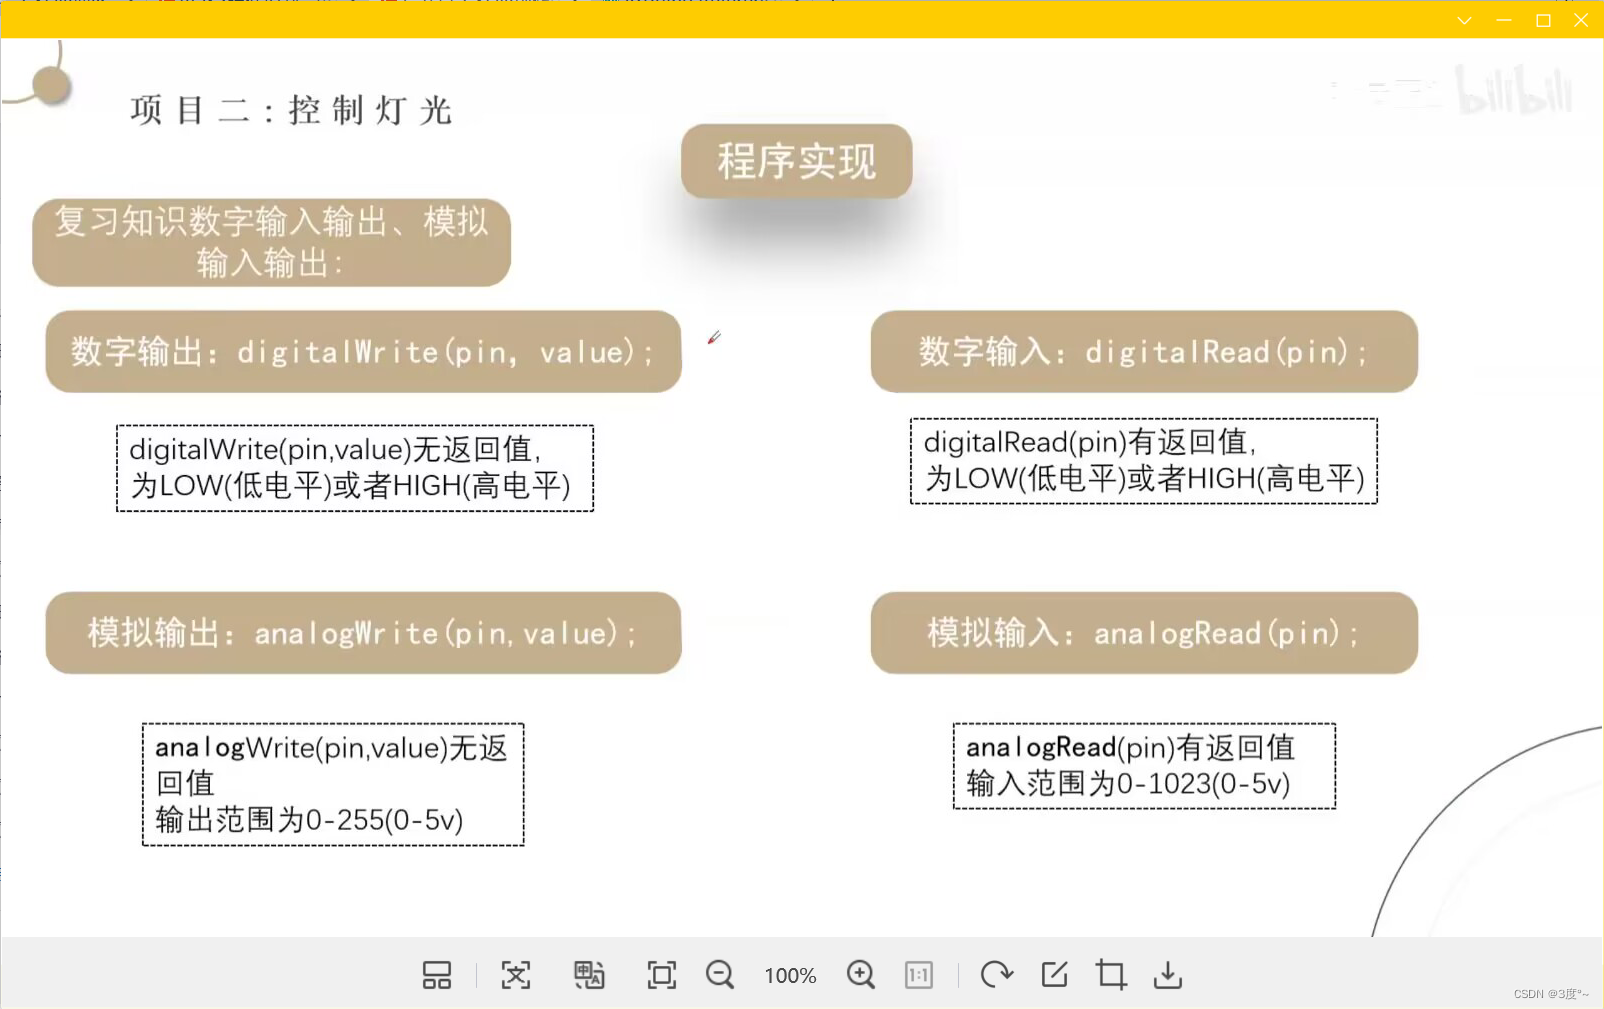
模拟输入:analogRead(pin)
模拟输出:analogWrite(pin, value)

花式点灯5(流水灯)
#include <Arduino.h>

// put function declarations here:
int delayTime = 1000;

void setup()
{
  // put your setup code here, to run once:
  Serial.begin(115200);
  for (int pin = 2; pin <= 6; pin++)
  {
    pinMode(pin, OUTPUT);
  }
}

void loop()
{
  // put your main code here, to run repeatedly:
  for (int pin = 2; pin <= 6; pin++)
  {
    digitalWrite(pin, HIGH);
    delay(delayTime);
    digitalWrite(pin, LOW);
    delay(delayTime);
  }
}

// put function definitions here: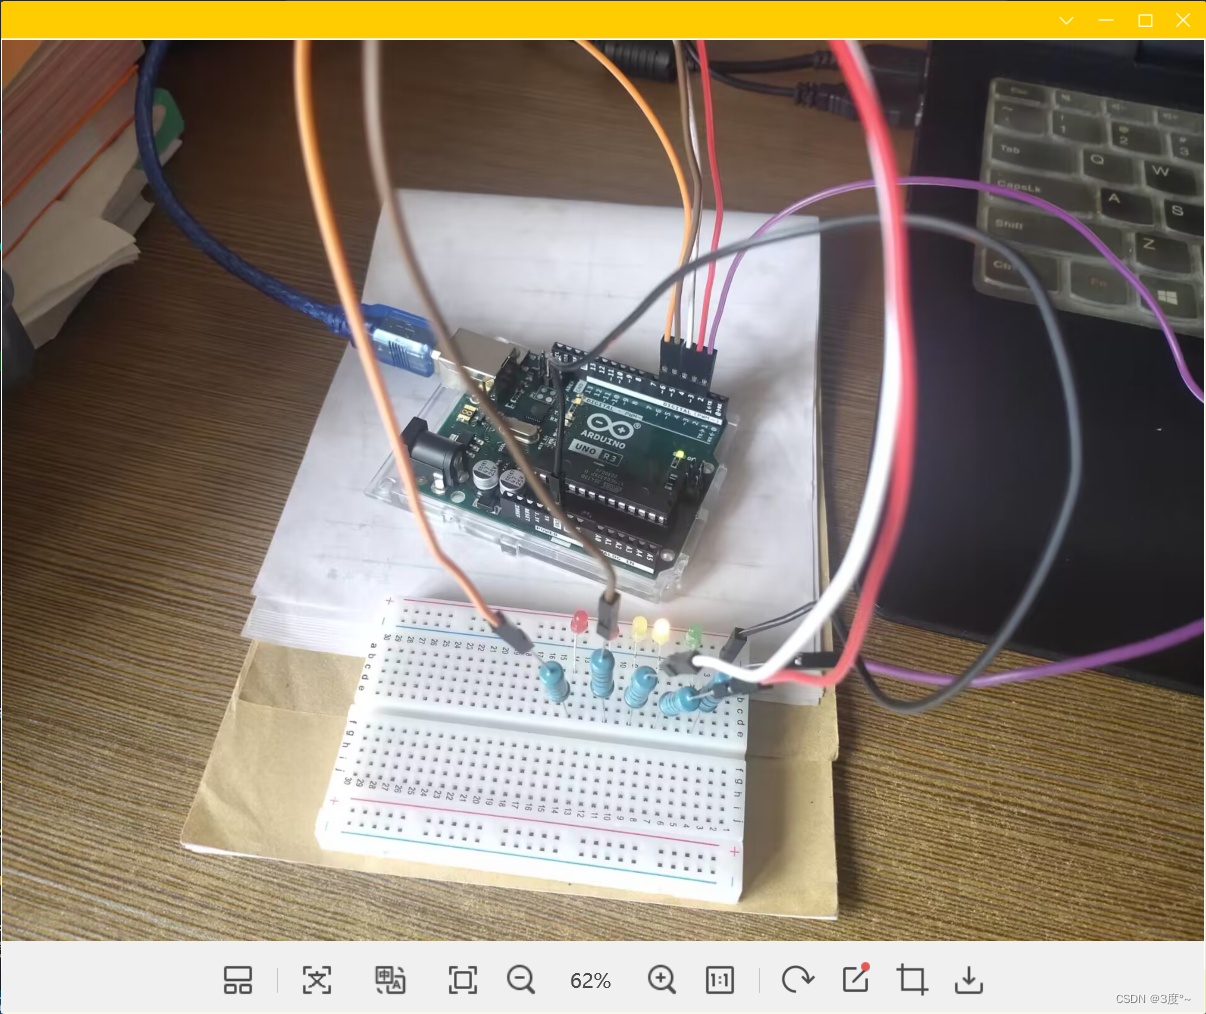
花式点灯6(呼吸灯)
#include <Arduino.h>

// put function declarations here:

void setup()
{
  // put your setup code here, to run once:
  pinMode(3, OUTPUT);
}

void loop()
{
  // put your main code here, to run repeatedly:
  while (1)
  {
    for (int value = 0; value <= 255; value++)
    {
      analogWrite(3, value);
      delay(5);
    }
    for (int value = 255; value >= 0; value--)
    {
      analogWrite(3, value);
      delay(5);
    }
  };
}

// put function definitions here:

进阶控制灯光1
进阶控制灯光 2
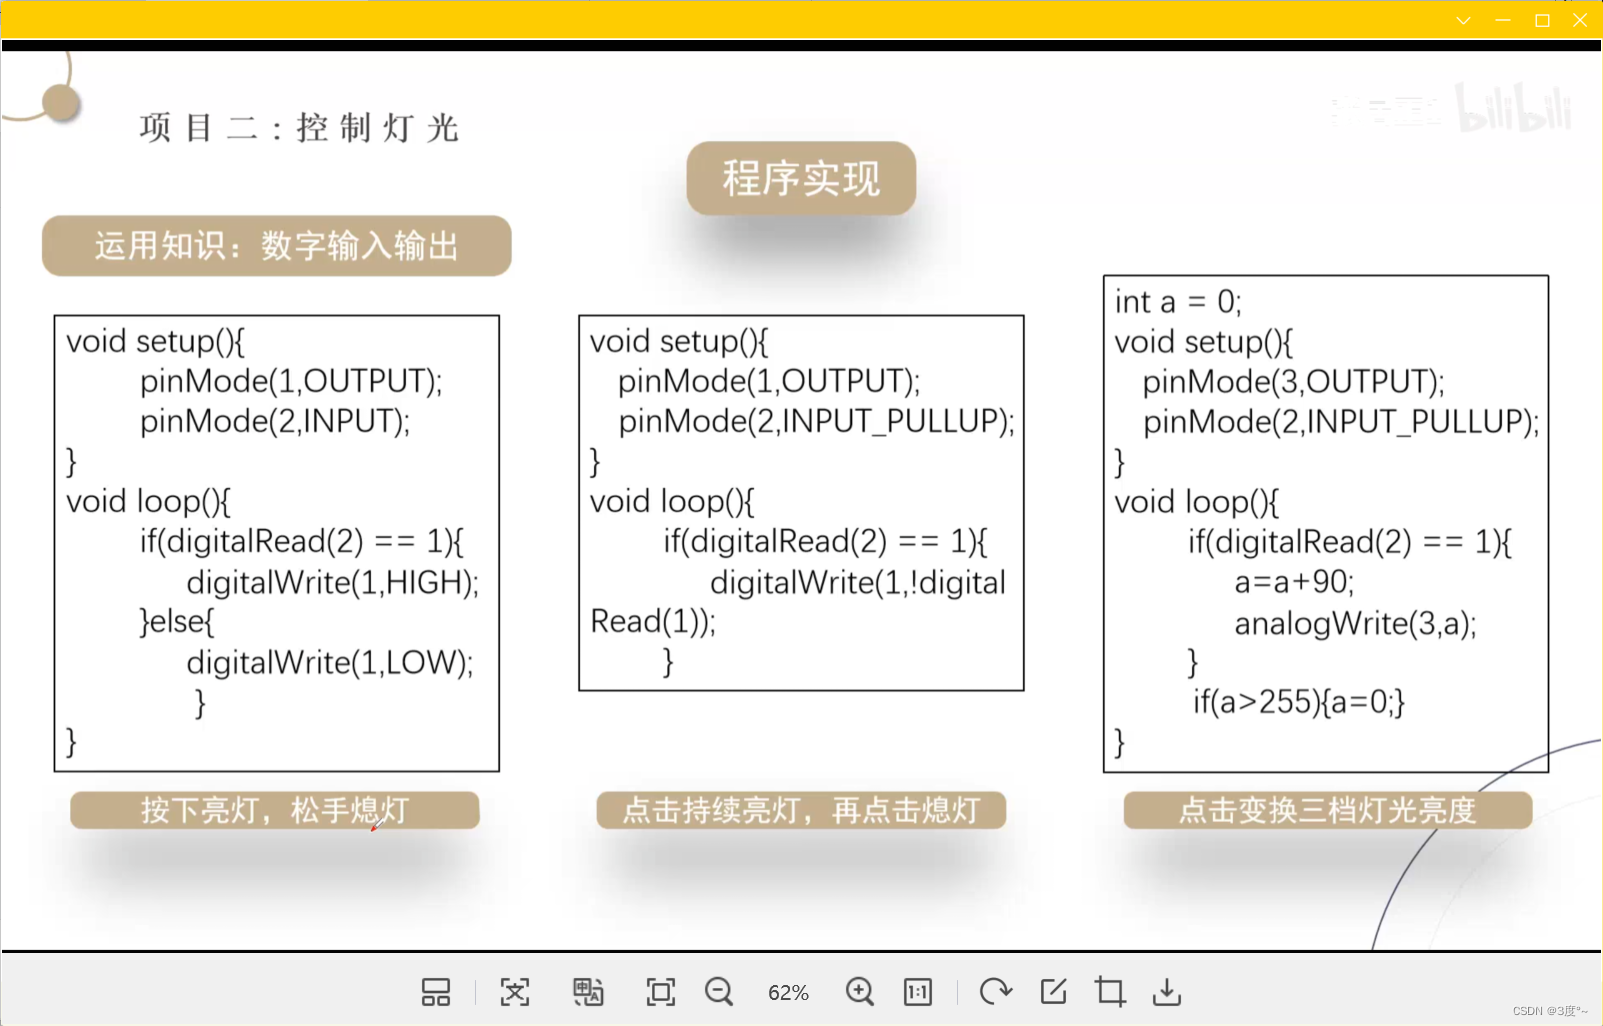
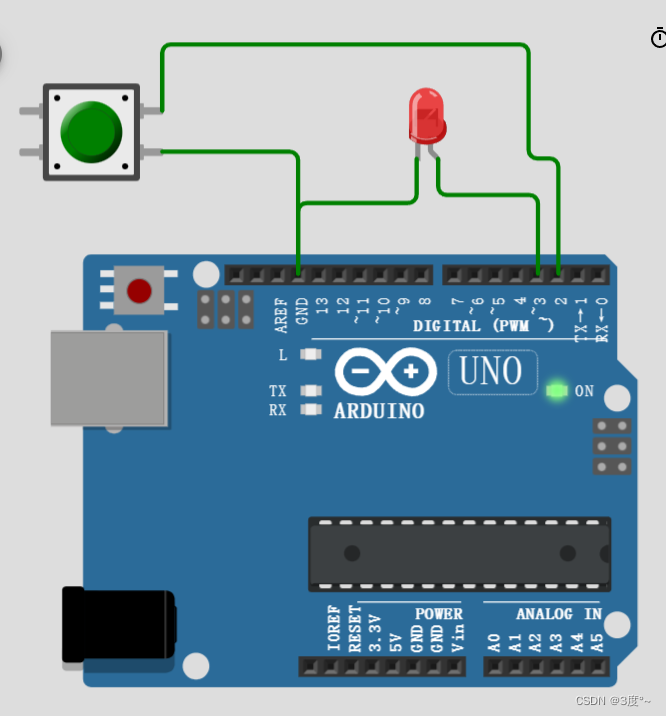
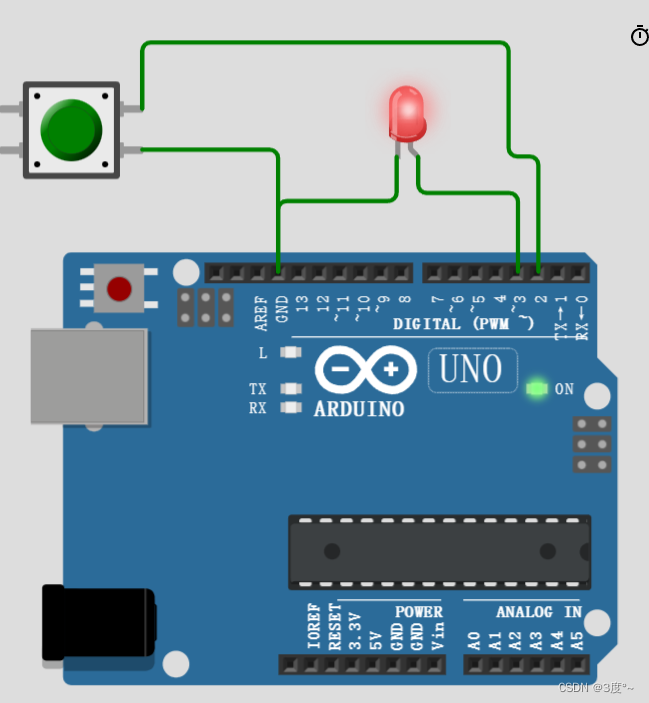
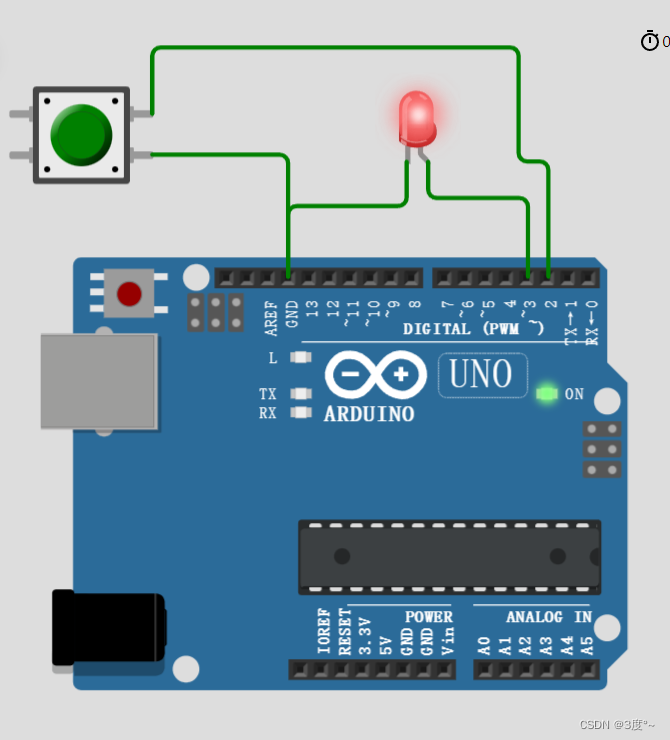
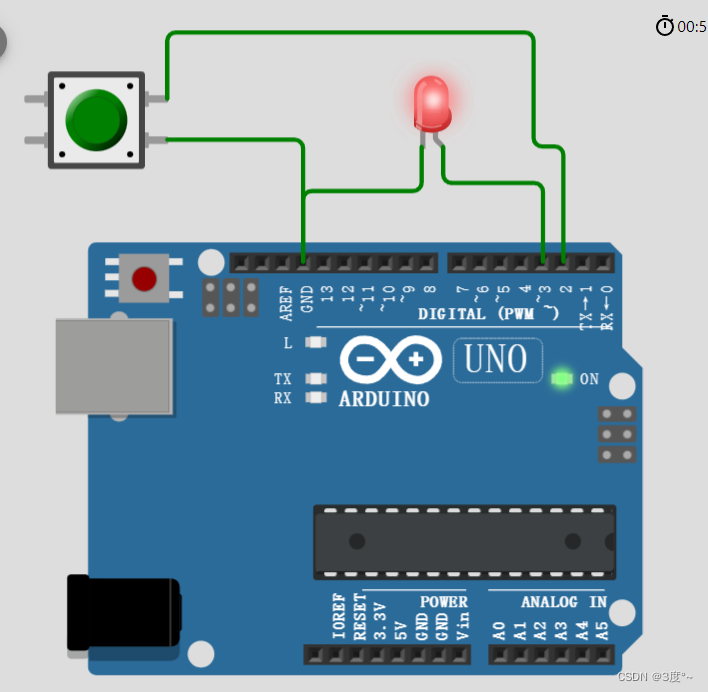
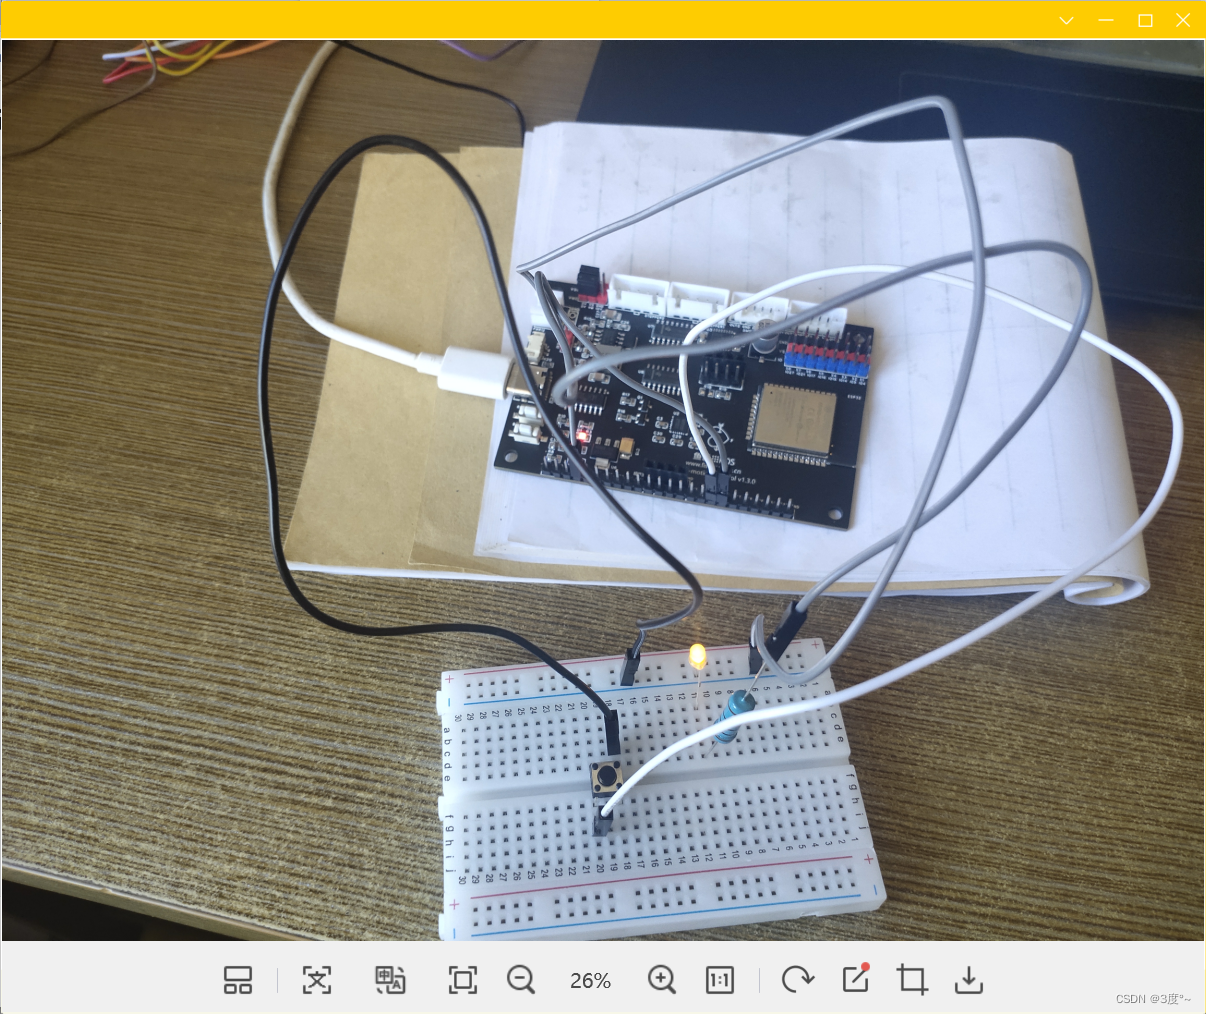
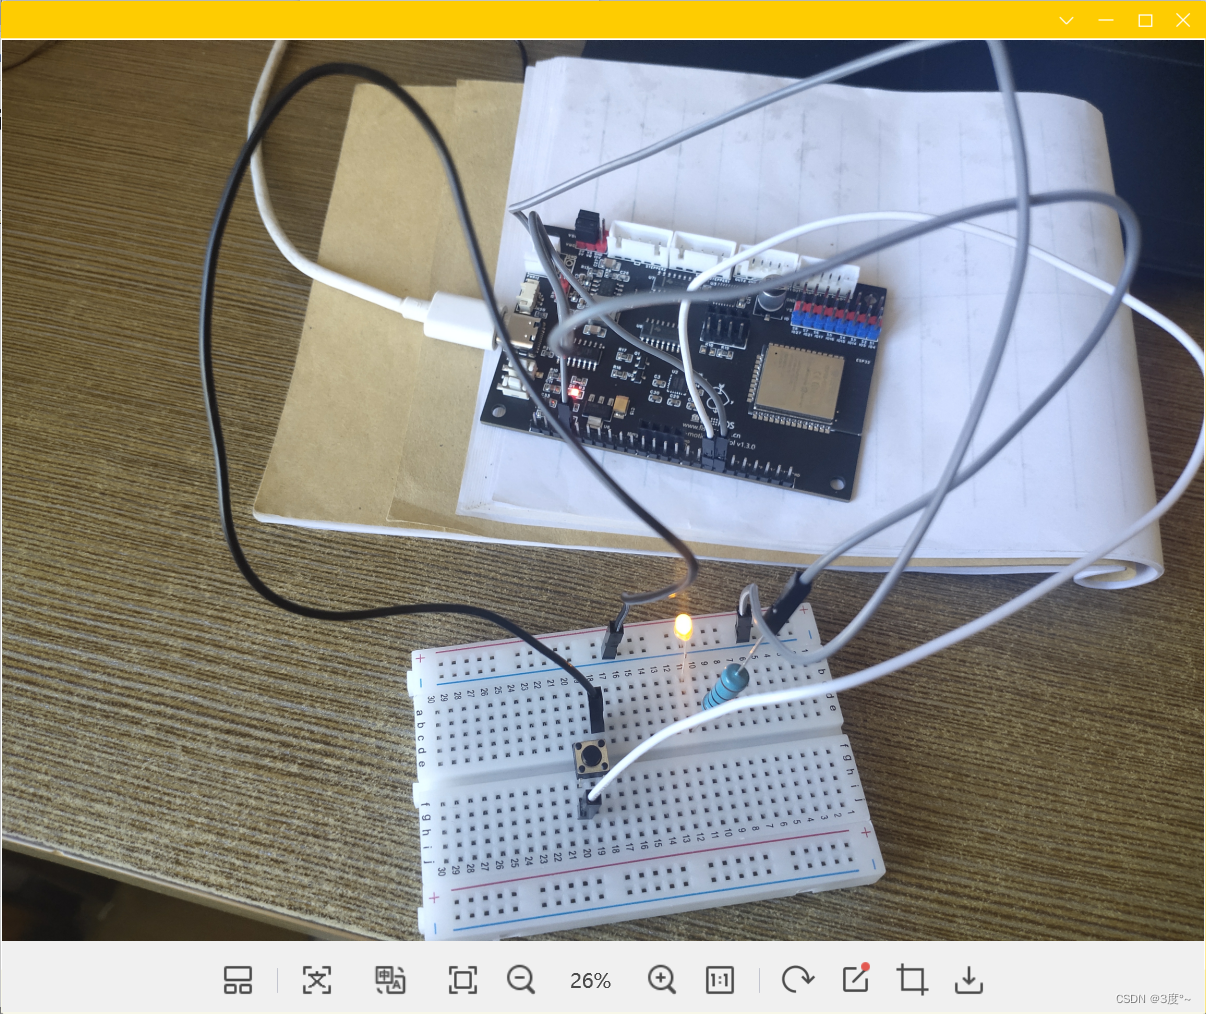
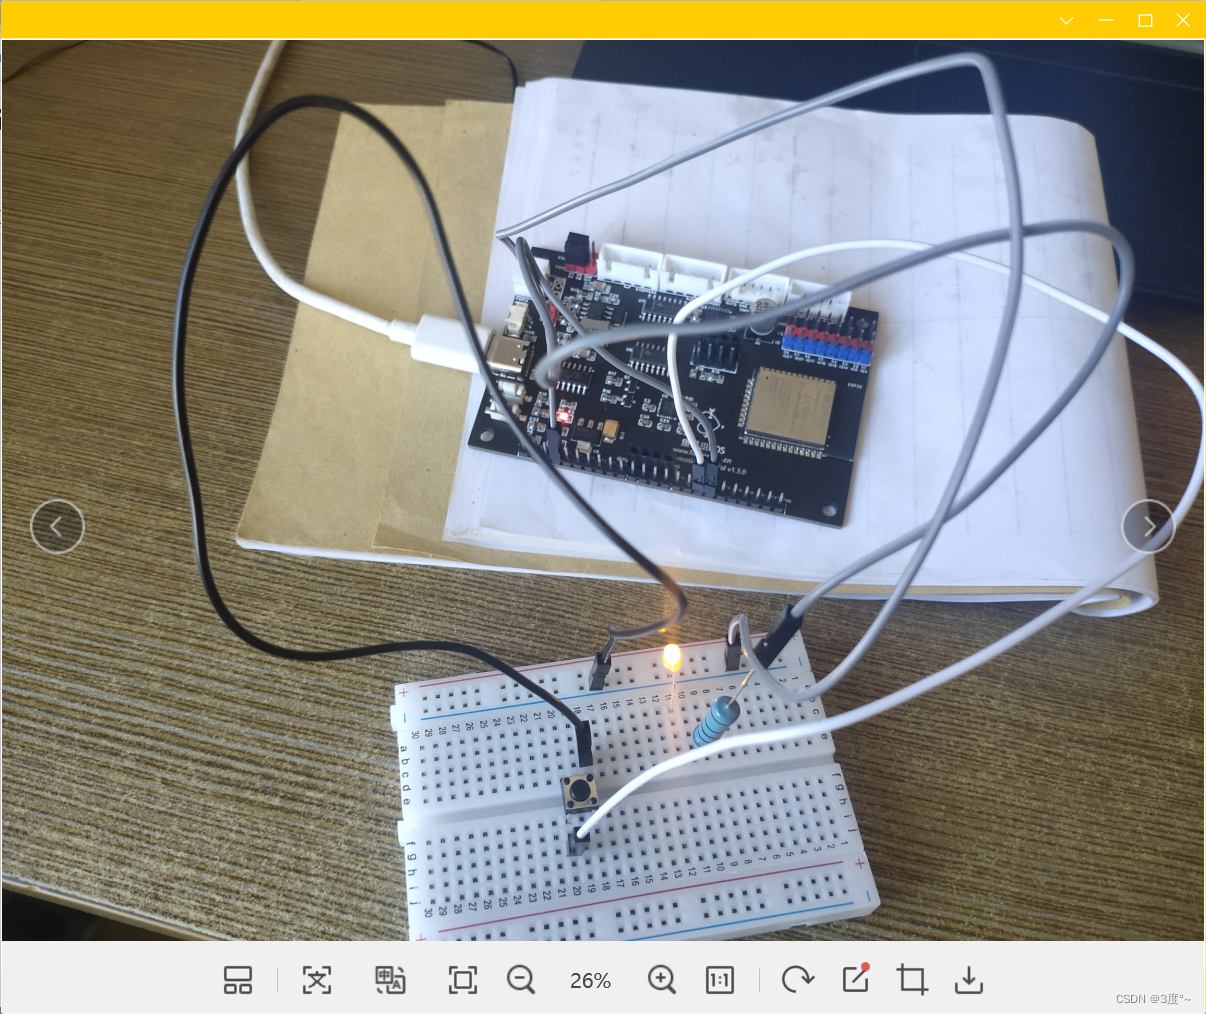
点击亮灯,松手熄灯
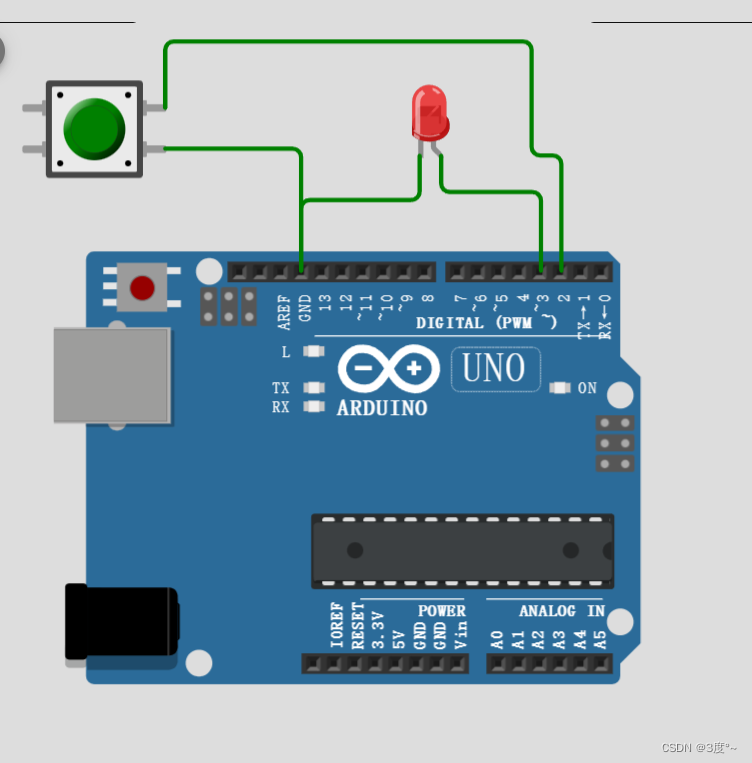
#include <Arduino.h>

// put function declarations here:
// 点击亮灯,松手熄灯
// 一个引脚用来点亮led
// 另一个引脚检测按键

int led = 16;
int botton = 15;

void setup()
{
  // put your setup code here, to run once:
  pinMode(led, OUTPUT);
  pinMode(botton, INPUT_PULLUP); //使用输入上拉模式,不然灯会一直闪烁
}

void loop()
{
  // put your main code here, to run repeatedly:
  while (1)
  {
    if (digitalRead(botton) == LOW) // 接地,相当于低电平
    {
      digitalWrite(led, HIGH);
    }
    else
    {
      digitalWrite(led, LOW);
    }
  }
}

// put function definitions here:
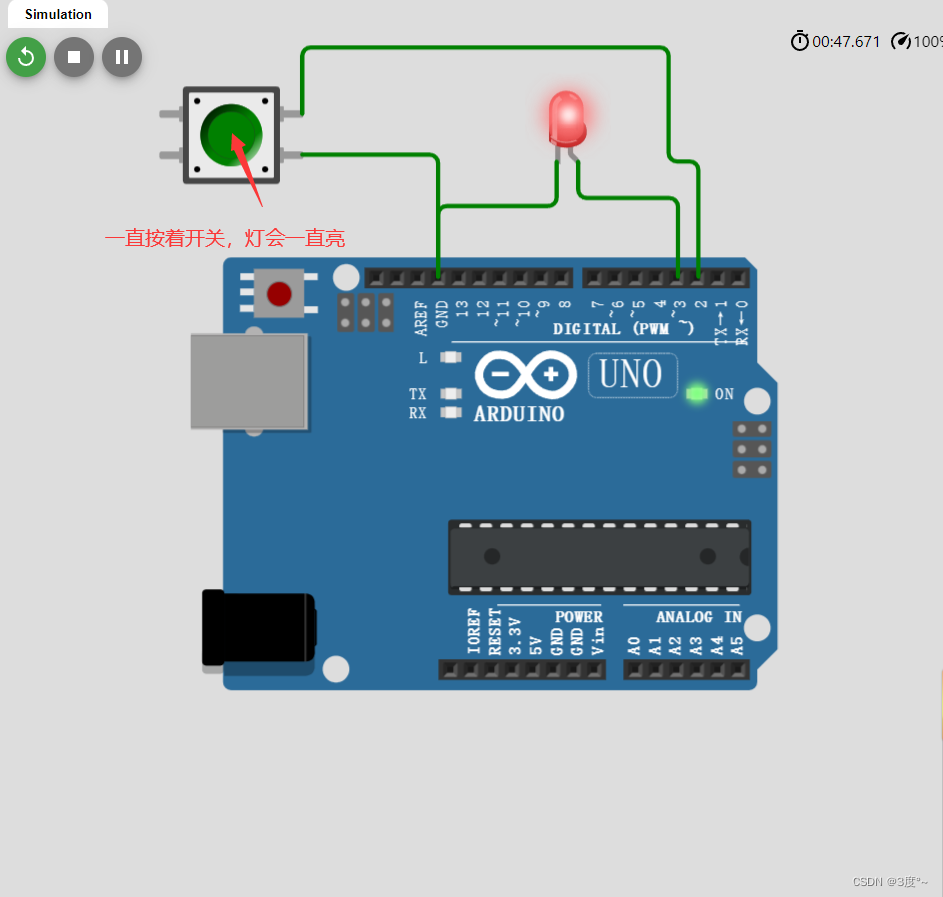
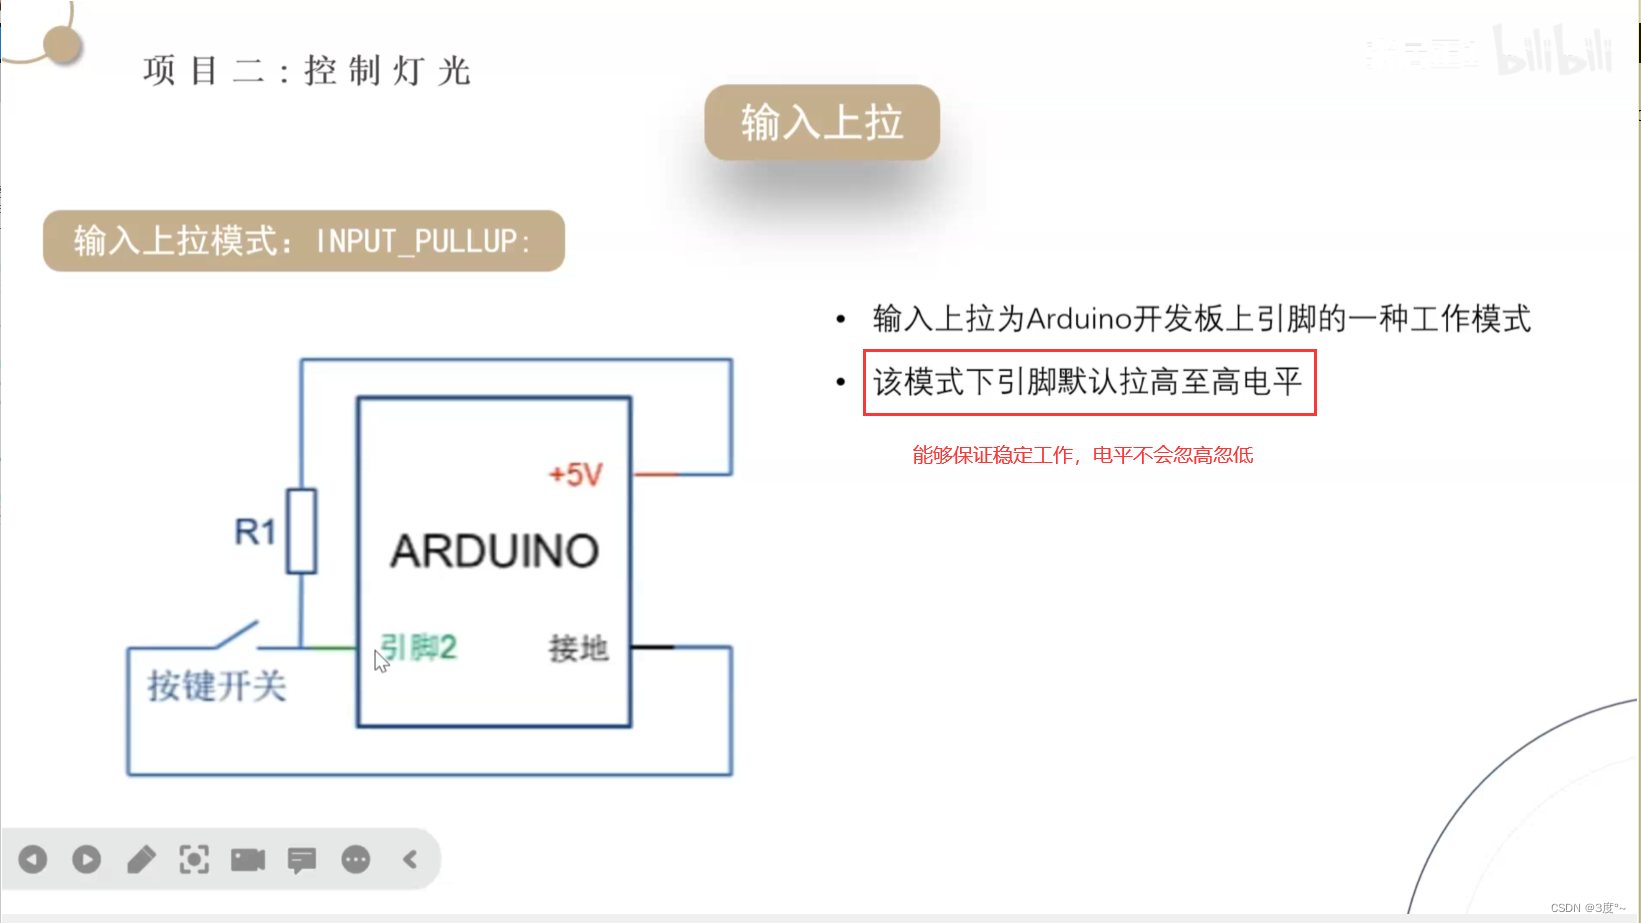
输入状态,会导致电平忽高忽低
进阶控制灯光3
点击持续亮灯,再点击熄灯
#include <Arduino.h>

// put function declarations here:
// 点击持续亮灯,再点击熄灯
// 一个引脚用来点亮led
// 另一个引脚检测按键

int led = 16;
int botton = 15;

void setup()
{
  // put your setup code here, to run once:
  pinMode(led, OUTPUT);
  pinMode(botton, INPUT_PULLUP); // 使用输入上拉模式,不然灯会一直闪烁
}

void loop()
{
  // put your main code here, to run repeatedly:
  while (1)
  {
    if (digitalRead(botton) == LOW) // 判断是否被按下了,接地,相当于低电平
    {
      delay(100); // 去抖动,防止误触
      if (digitalRead(botton) == LOW)
      {
        digitalWrite(led, !digitalRead(led)); // !HIGH = LOW
      }
    }
  }
}

// put function definitions here:
进阶控制灯光4
点击变换三挡亮度
#include <Arduino.h>

// put function declarations here:
// 点击变换三挡亮度
// 一个引脚用来点亮led
// 另一个引脚检测按键

int led = 16; // 要求能用模拟量输出
int botton = 15;
int value = 0;

void setup()
{
  // put your setup code here, to run once:
  pinMode(led, OUTPUT);
  pinMode(botton, INPUT_PULLUP); // 使用输入上拉模式,不然灯会一直闪烁
}

void loop()
{
  // put your main code here, to run repeatedly:
  while (1)
  {
    if (digitalRead(botton) == LOW) // 判断是否被按下了,接地,相当于低电平
    {
      delay(100); // 去抖动,防止误触
      if (digitalRead(botton) == LOW)
      {
        analogWrite(led, value); // 零档,熄灭档位(255/3 = 80)
        value = value + 80;      // 档位变高
      }
    }
    if (value > 255)
    {
      value = 0;
    }
  }
}

// put function definitions here:

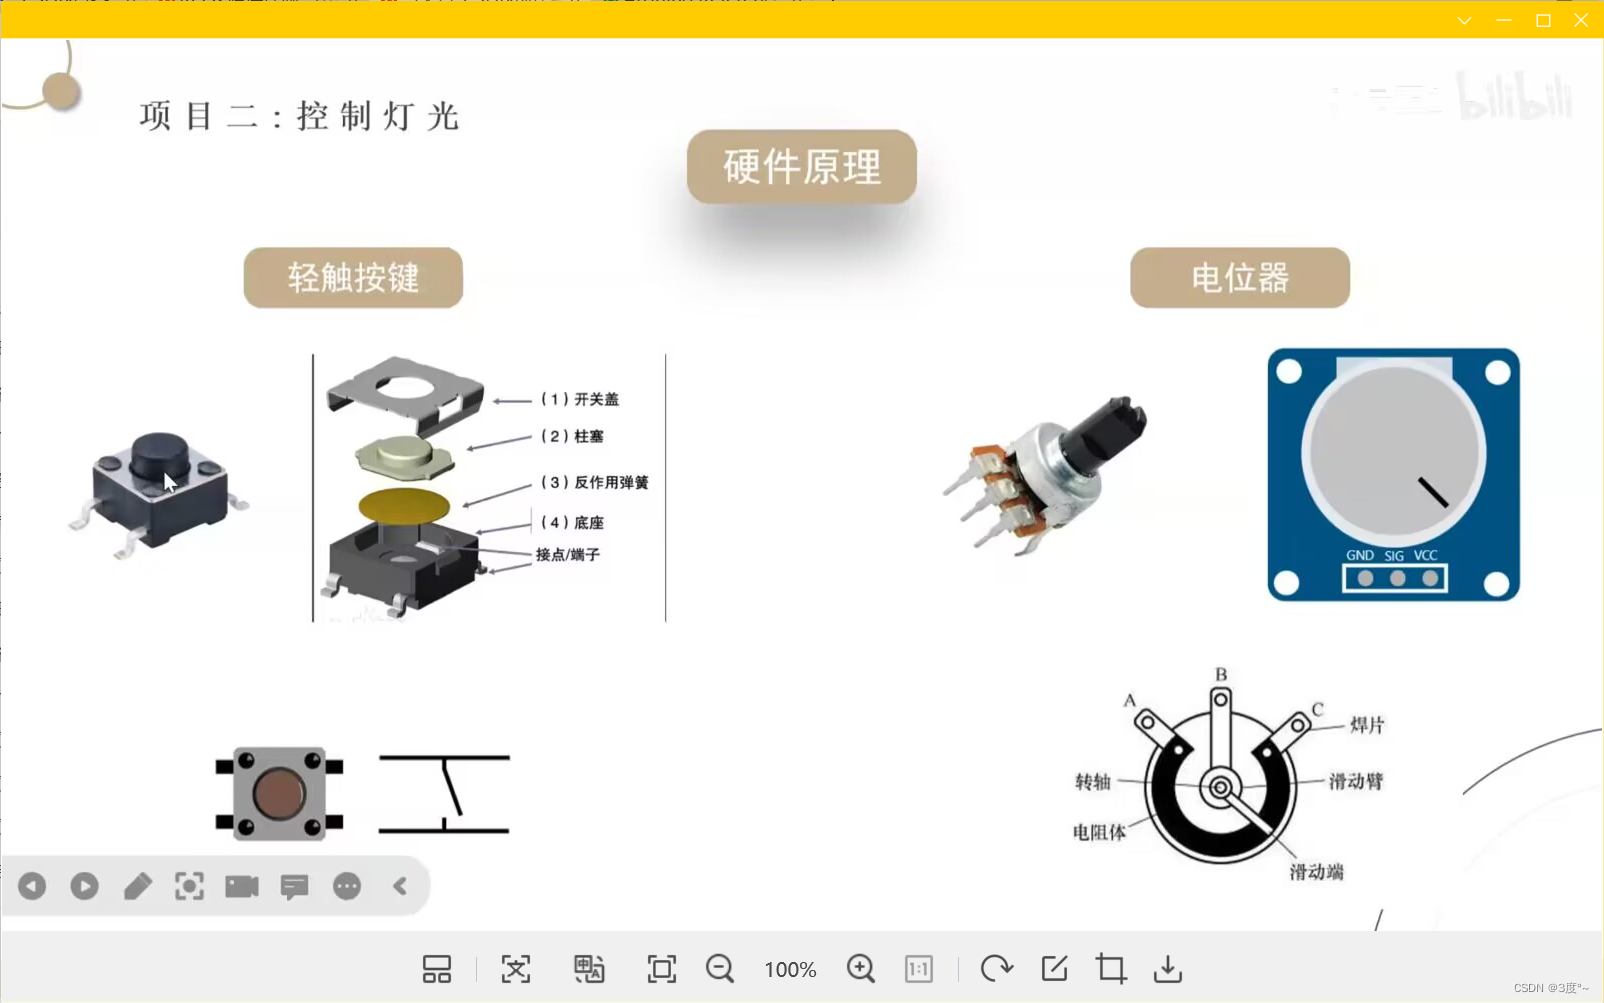
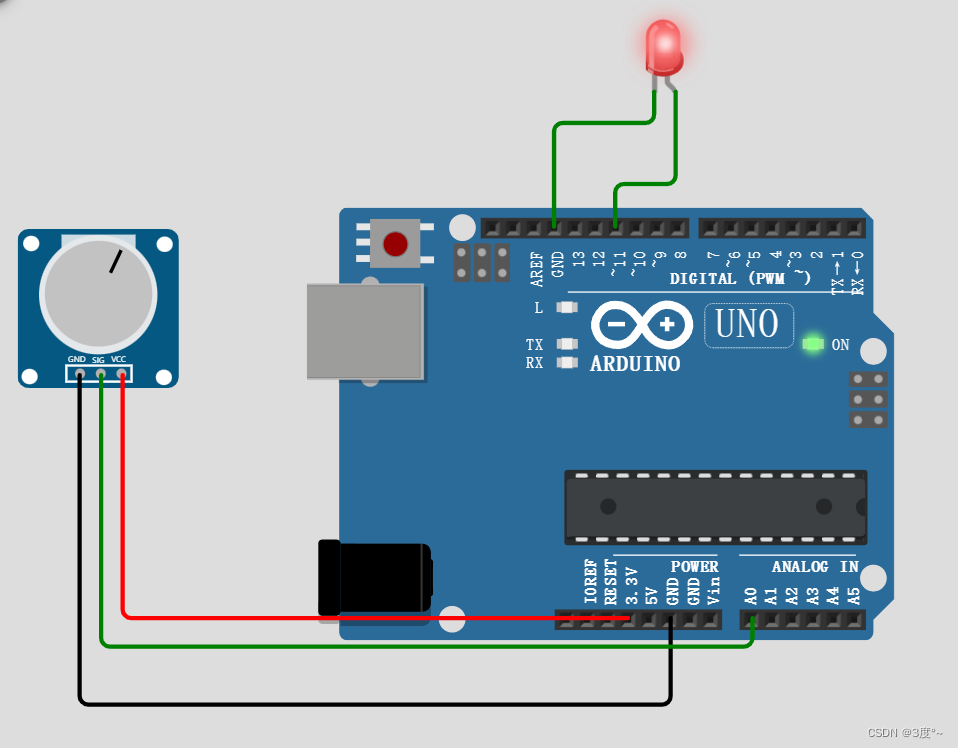
进阶控制灯光6(电位器)
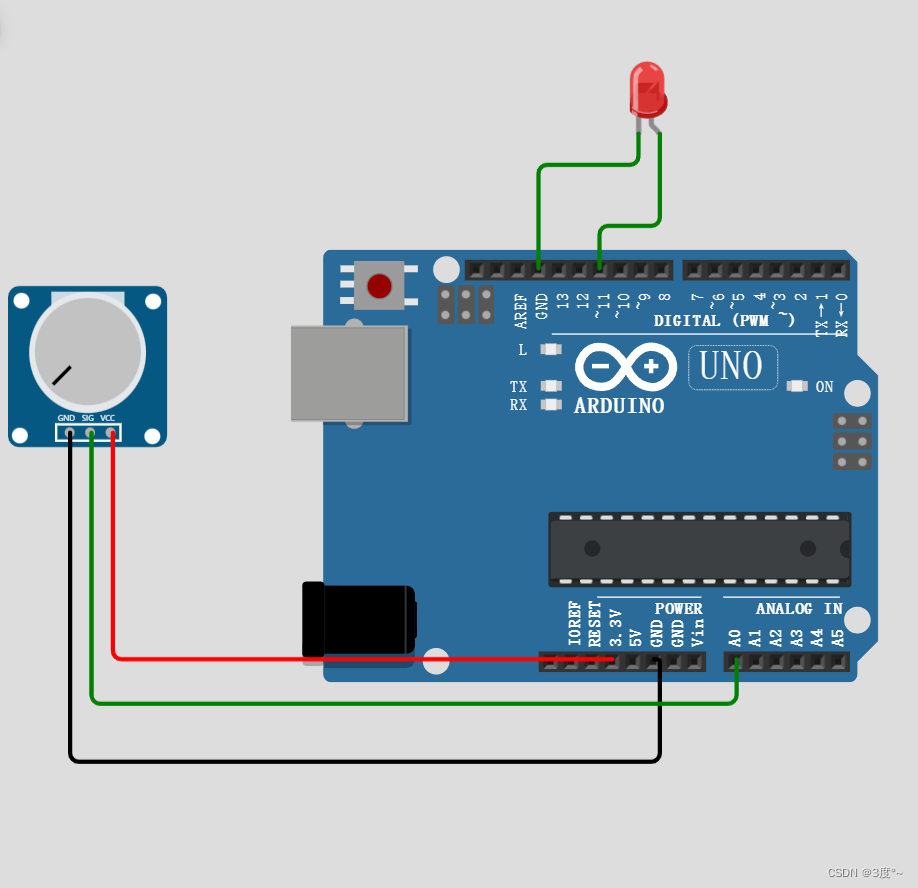
#include <Arduino.h>
// put function declarations here:
int led = 11; // 要求能用模拟量输出
int key = A0;
int value;
int ledValue;
void setup()
{
// put your setup code here, to run once:
pinMode(led, OUTPUT);
pinMode(key, INPUT);
}
void loop()
{
// put your main code here, to run repeatedly:
while (1)
{
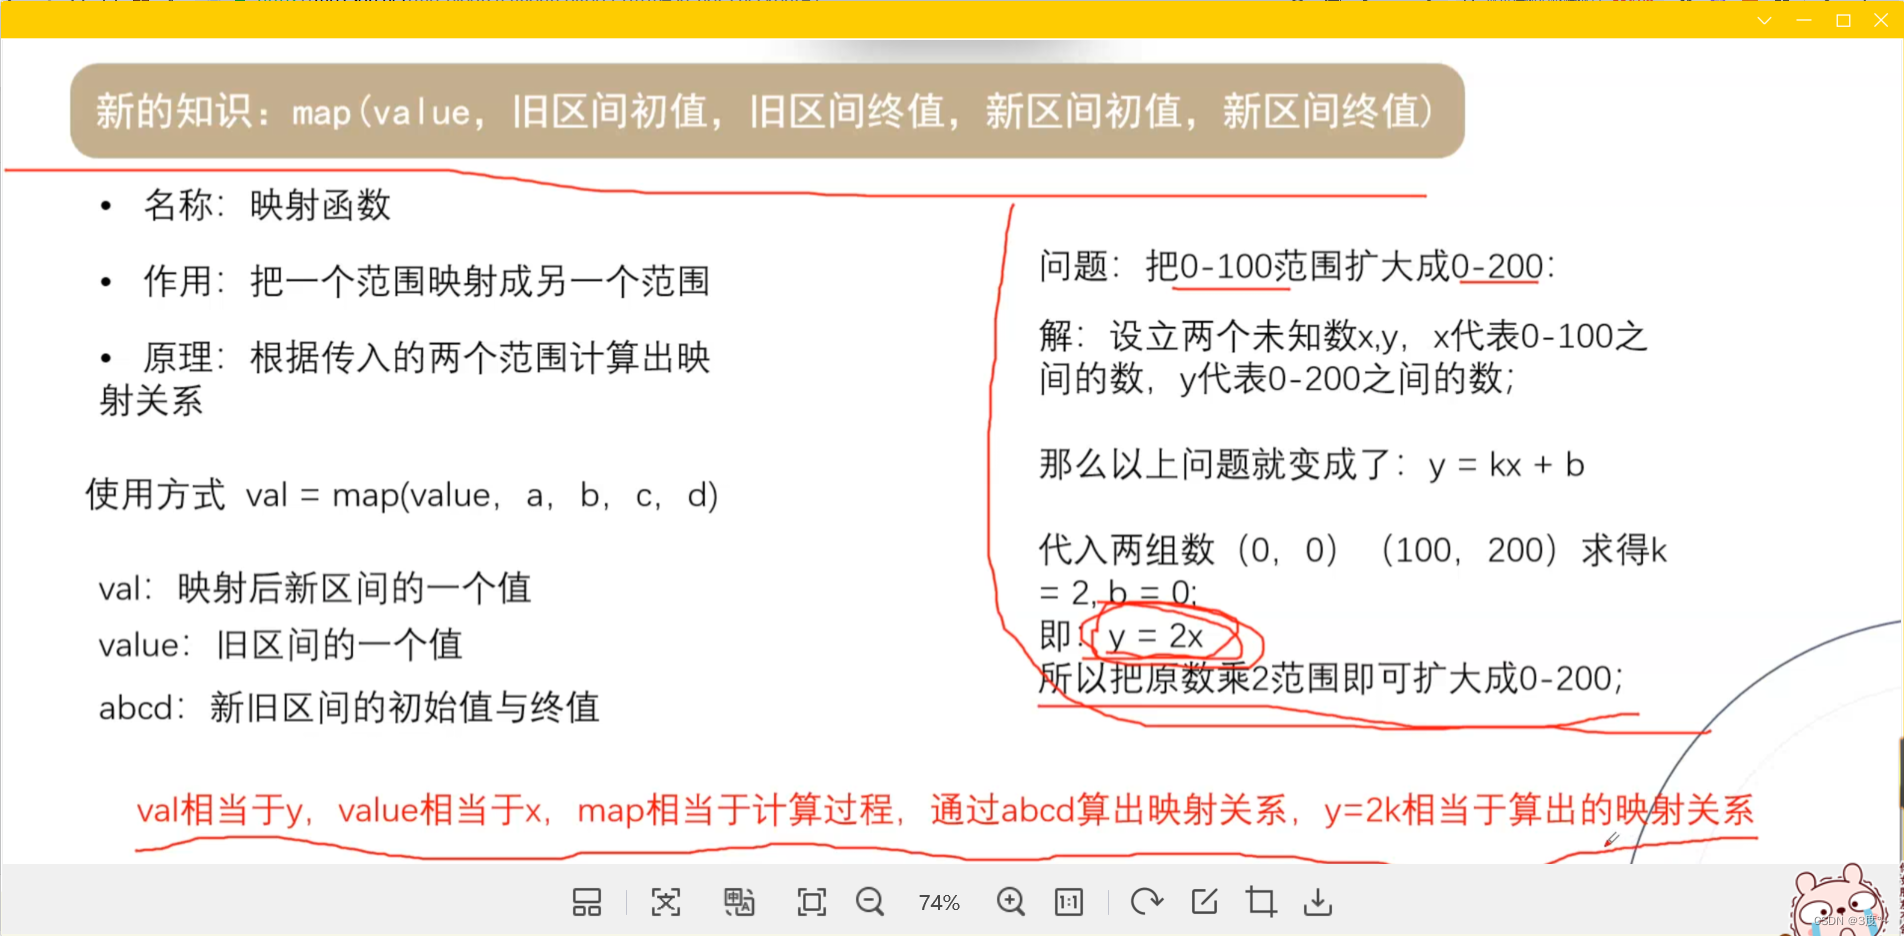
value = analogRead(key); // 返回0-1023
ledValue = map(value, 0, 1023, 0, 255);
analogWrite(led, ledValue); // 返回0-255
}
}
// put function definitions here:

串口通讯1

串口通讯2
#include <Arduino.h>

// put function declarations here:

void setup() {
  // put your setup code here, to run once:
  Serial.begin(115200);

  Serial.println("hello");
  Serial.println("A");
  Serial.println(123);
  Serial.println(1.23456789);
}

void loop() {
  // put your main code here, to run repeatedly:


}

// put function definitions here:

#include <Arduino.h>

// put function declarations here:

void setup() {
  // put your setup code here, to run once:
  Serial.begin(115200);
  Serial.println(2, BIN);  //二进制
  Serial.println(2, DEC);  //十进制

}

void loop() {
  // put your main code here, to run repeatedly:


}

// put function definitions here:
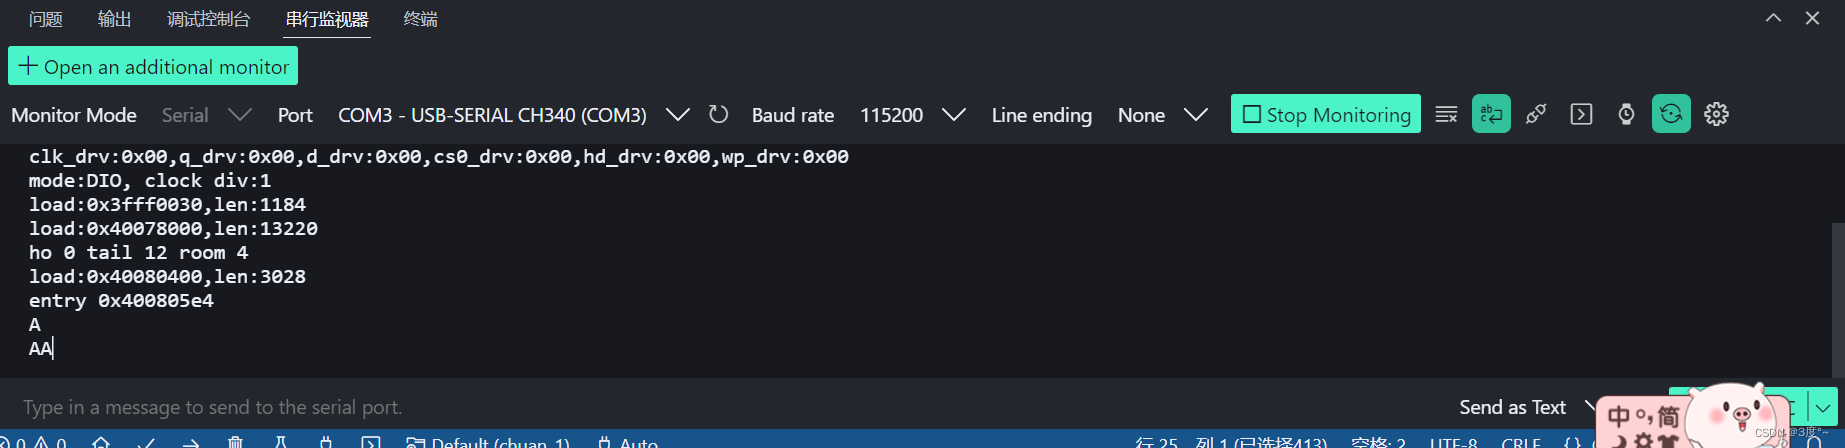
串行通讯3
ASCII码一览表,ASCII码对照表 (biancheng.net)
串行通讯4
#include <Arduino.h>
// put function declarations here:
void setup() {
// put your setup code here, to run once:
Serial.begin(115200);
// Serial.println(2, BIN); //二进制
// Serial.println(2, DEC); //十进制
// Serial.write("A\n");
// Serial.write(65 );
// Serial.write(0x41);
}
void loop() {
// put your main code here, to run repeatedly:
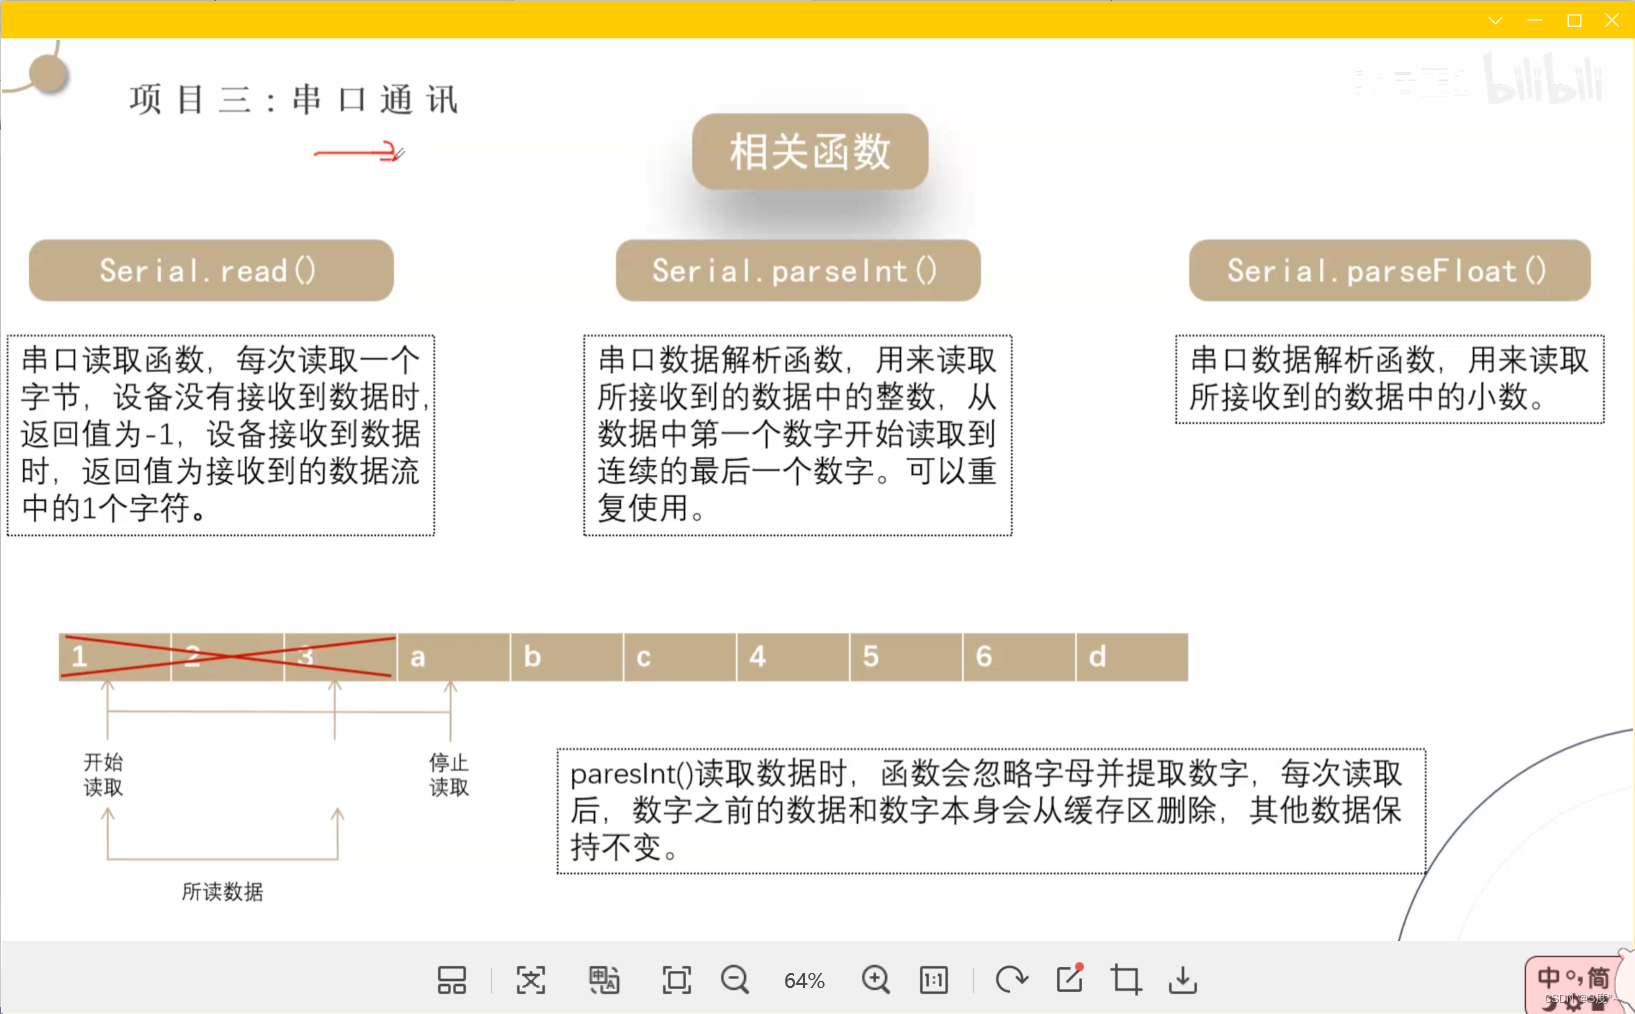
if (Serial.available()) // >0 可以不写
{
Serial.println(Serial.read()); // Serial.read()返回ASCII码
Serial.write(Serial.read()); // 要用Serial.write解析
}
}
// put function definitions here:
#include <Arduino.h>

// put function declarations here:

void setup()
{
  // put your setup code here, to run once:
  Serial.begin(115200);
  // Serial.println(2, BIN);  //二进制
  // Serial.println(2, DEC);  //十进制

  // Serial.write("A\n");
  // Serial.write(65 );
  // Serial.write(0x41);
}

void loop()
{
  // put your main code here, to run repeatedly:
  // if (Serial.available()) // >0 可以不写
  // {
  //   Serial.println(Serial.read()); // Serial.read()返回ASCII码
  //   Serial.write(Serial.read());   // 要用Serial.write解析
  // }

  if (Serial.available())
  {
    Serial.println(Serial.parseInt());
    Serial.println(Serial.parseFloat());

  }


}

// put function definitions here:

串行通讯5
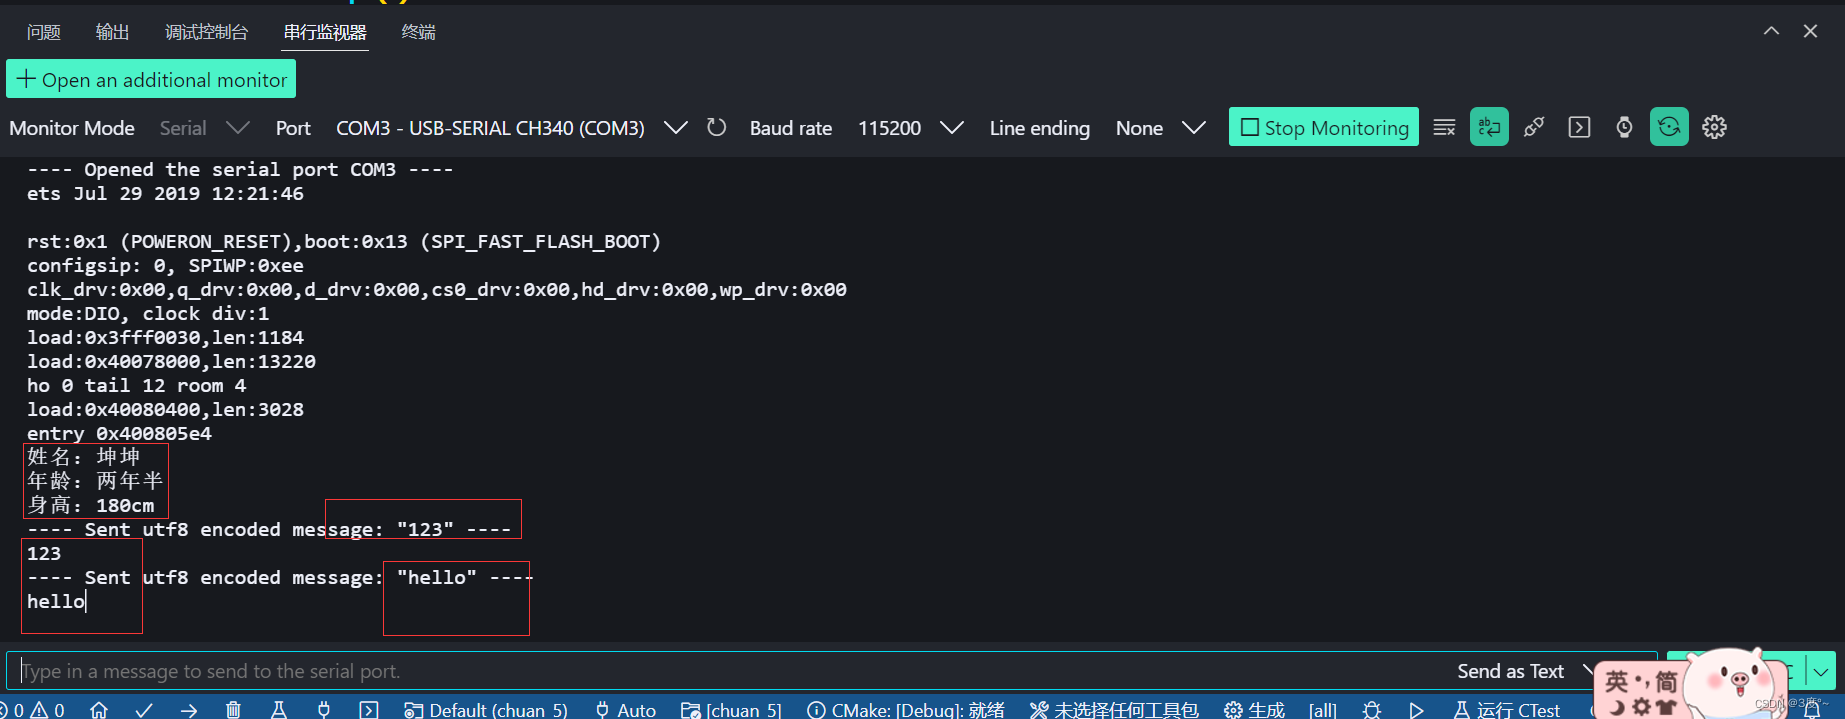
1、建立开发板与电脑的串口通讯连接,并向电脑输出自己的姓名、年龄、身高
#include <Arduino.h>

// put function declarations here:
// 1、建立开发板与电脑的串口通讯连接,并向电脑输出自己的姓名、年龄、身高
// 2、实现通过串口监视器给开发板发信息,开发板再把接收到的数据发回给电脑
// 3、实现加法计算器,如:电脑发送:“1+2”,开发版回答:”1+2=3“
// 4、实现电脑与开发板进行三句以上简单的对话。如:电脑发送:“a”,开发版回答:“Arduino”

void setup()
{
  // put your setup code here, to run once:
  // 题目一
  Serial.begin(115200);
  Serial.println("姓名:坤坤");
  Serial.println("年龄:两年半");
  Serial.println("身高:180cm");
}

void loop()
{
  // put your main code here, to run repeatedly:
  // 题目二
  if (Serial.available())
  {
    Serial.write(Serial.read());
  }

}

// put function definitions here:
2、实现通过串口监视器给开发板发信息,开发板再把接收到的数据发回给电脑
#include <Arduino.h>

// put function declarations here:
// 1、建立开发板与电脑的串口通讯连接,并向电脑输出自己的姓名、年龄、身高
// 2、实现通过串口监视器给开发板发信息,开发板再把接收到的数据发回给电脑
// 3、实现加法计算器,如:电脑发送:“1+2”,开发版回答:”1+2=3“
// 4、实现电脑与开发板进行三句以上简单的对话。如:电脑发送:“a”,开发版回答:“Arduino”

void setup()
{
  // put your setup code here, to run once:
  // 题目一
  Serial.begin(115200);
  Serial.println("姓名:坤坤");
  Serial.println("年龄:两年半");
  Serial.println("身高:180cm");
}

void loop()
{
  // put your main code here, to run repeatedly:
  // 题目二
  if (Serial.available())
  {
    Serial.write(Serial.read());
  }

}

// put function definitions here:

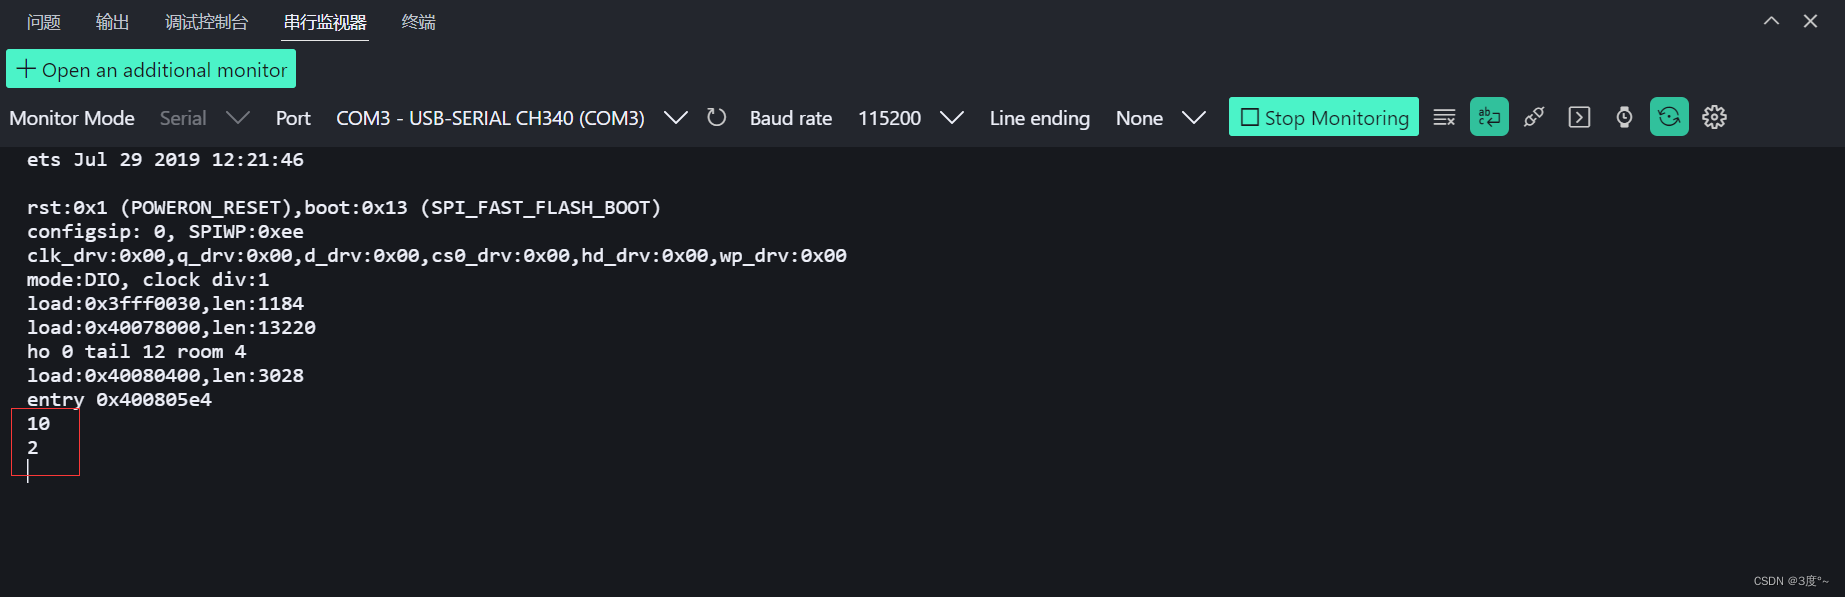
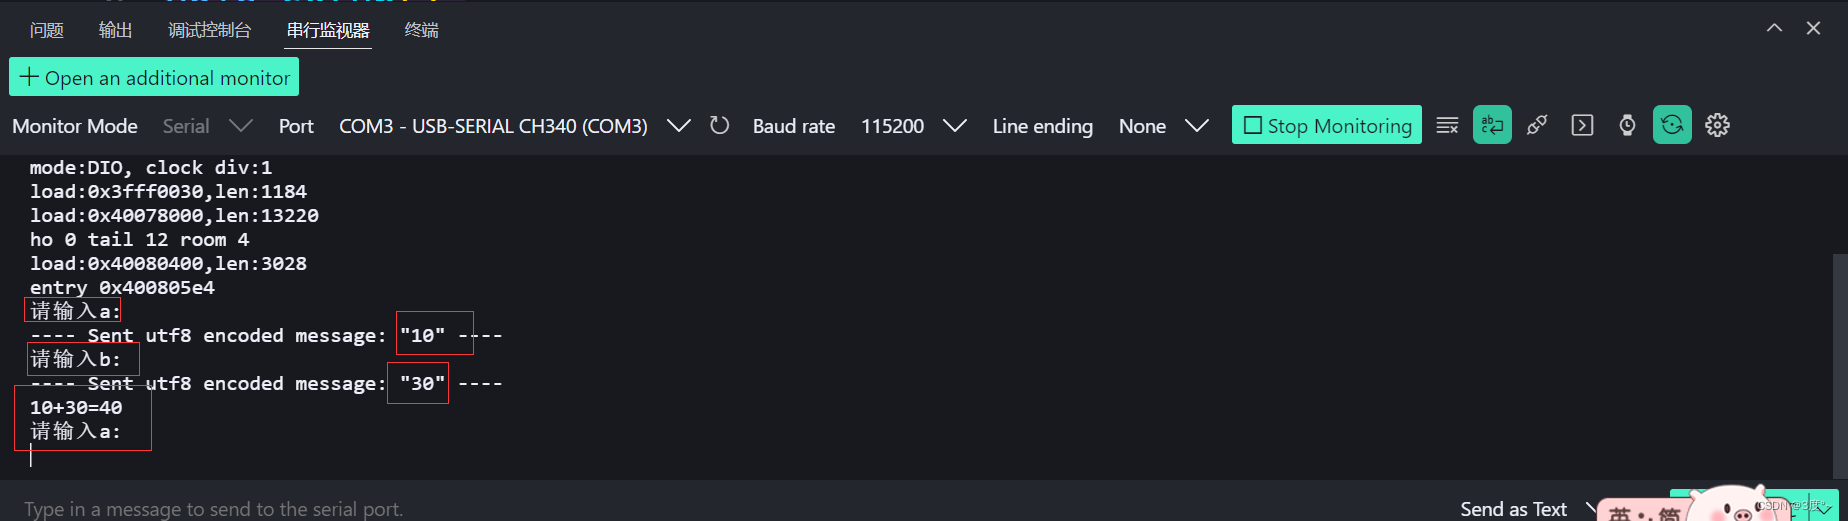
3、实现加法计算器,如:电脑发送:“1+2”,开发版回答:”1+2=3“
#include <Arduino.h>

// put function declarations here:
int a = 0;
int b = 0;
int c = 0;

void setup()
{
  // put your setup code here, to run once:
  Serial.begin(115200);
}

void loop()
{
  // put your main code here, to run repeatedly:
  Serial.println("请输入a:");
  while (!a)  // a不等于零
  {
    if (Serial.available())
    {
      a = Serial.parseInt();
    }
  }

  Serial.println("请输入b:");
  while (!b)
  {
    if (Serial.available())
    {
      b = Serial.parseInt();
    }
  }

  c = a + b;
  Serial.print(a);
  Serial.print("+");
  Serial.print(b);
  Serial.print("=");
  Serial.println(c);
  a = 0;
  b = 0;
}
4、实现电脑与开发板进行三句以上简单的对话。如:电脑发送:“a”,开发版回答:“Arduino”
#include <Arduino.h>

// put function declarations here:
int a = 0;
int b = 0;
int c = 0;

void setup()
{
  // put your setup code here, to run once:
  Serial.begin(115200);
}

void loop()
{
  // put your main code here, to run repeatedly:
  Serial.println("请选择(1,2,3):");
  while (!a)
  {
    if (Serial.available())
    {
      a = Serial.parseInt();
    }
  }
  if (a == 1)
  {
    Serial.println("你选择了1");
  }
  else if (a == 2)
  {
    Serial.println("你选择了2");
  }
  else if (a == 3)
  {
    Serial.println("你选择了3");
  }
  else
  {
    Serial.println("没有这个选项");
  }

  a = 0;
}

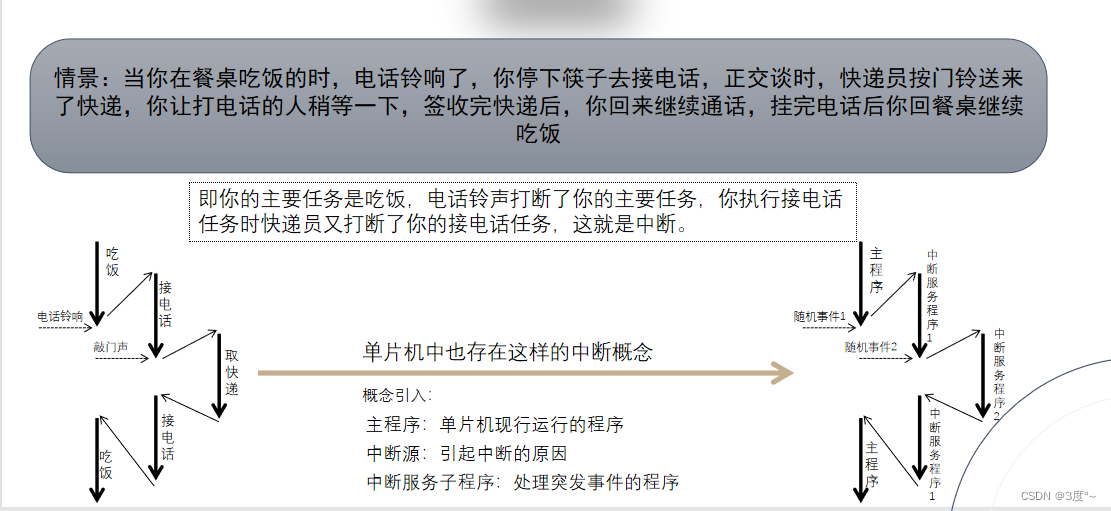
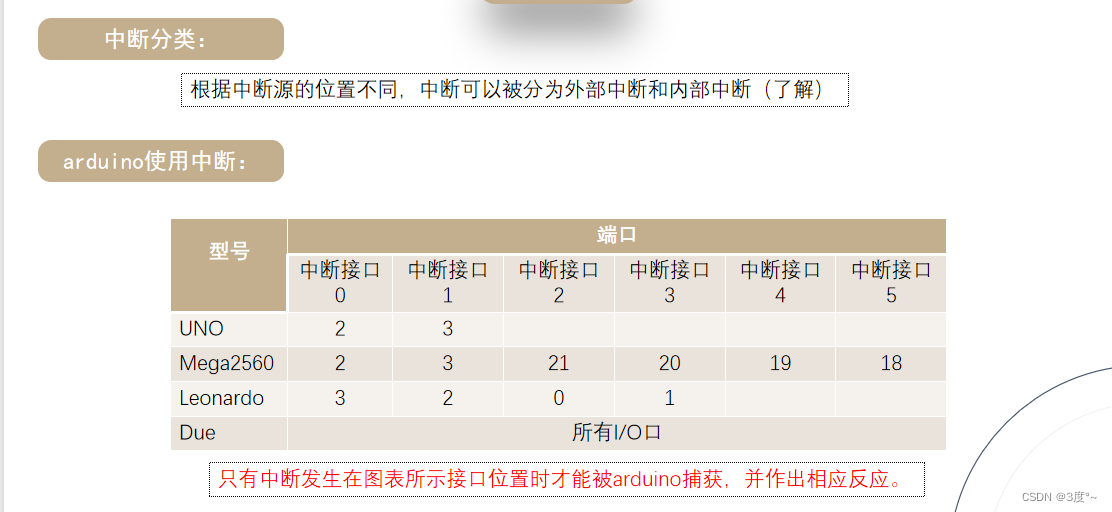
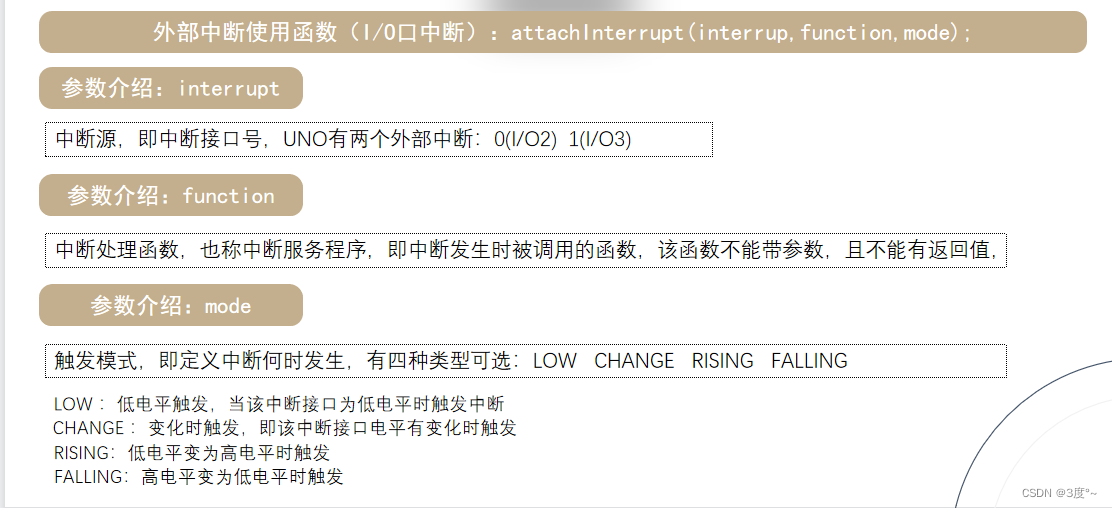
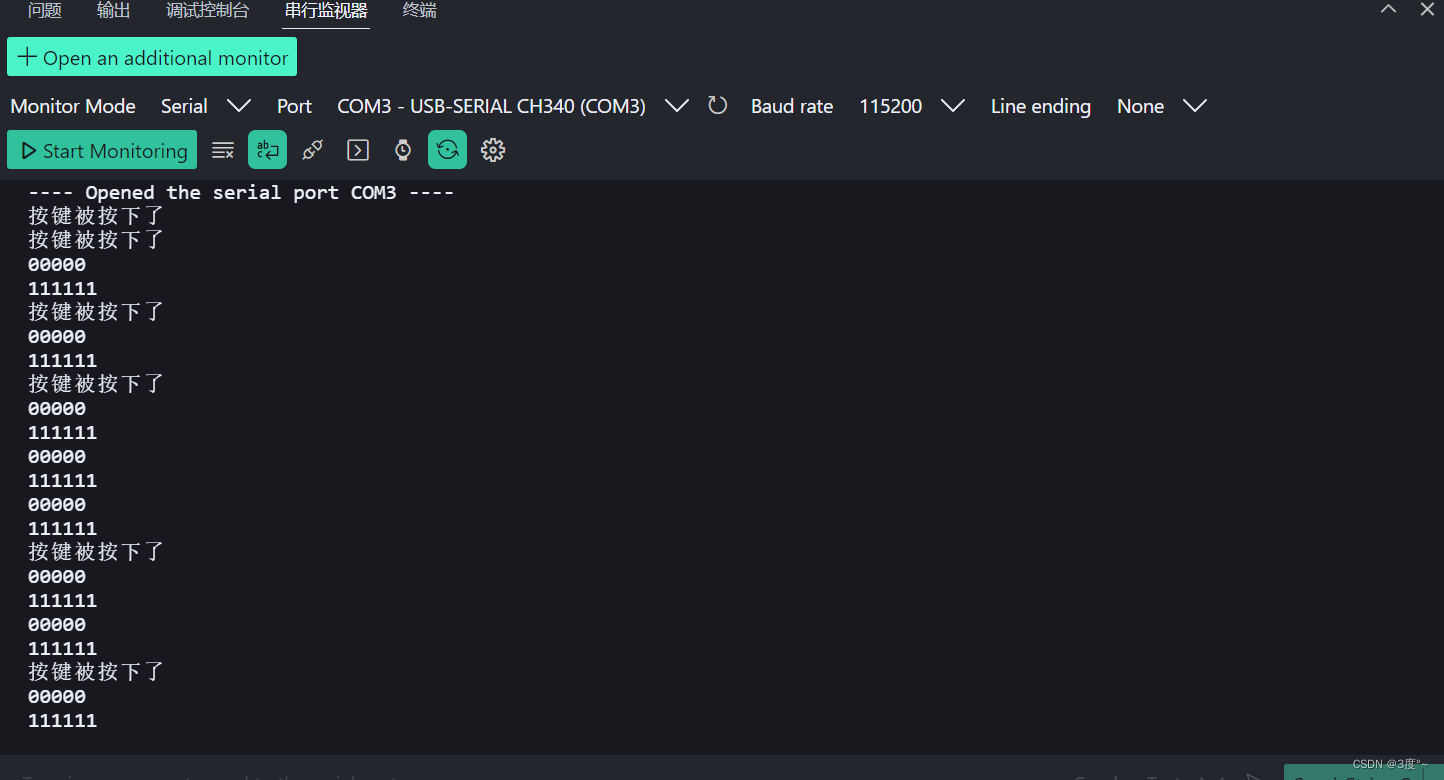
中断机制1
#include <Arduino.h>

// put function declarations here:
int led = 2;
int button = 0;

void set()
{
  Serial.println("按键被按下了");
}

void setup()
{
  // put your setup code here, to run once:
  Serial.begin(115200);
  pinMode(led, OUTPUT);
  digitalWrite(button, HIGH);
  attachInterrupt(0, set, FALLING);
}

void loop()
{
  // put your main code here, to run repeatedly:
  digitalWrite(led, HIGH);
  Serial.println("111111");
  delay(1000);
  digitalWrite(led, LOW);
  Serial.println("00000");
  delay(1000);
}

// put function definitions here:
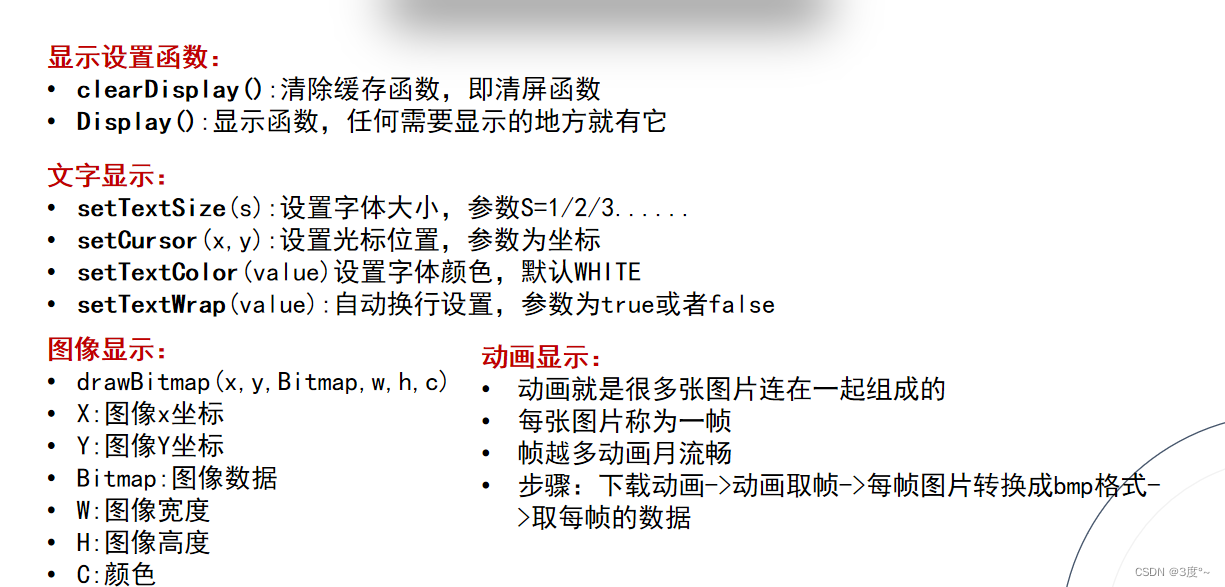
库的使用
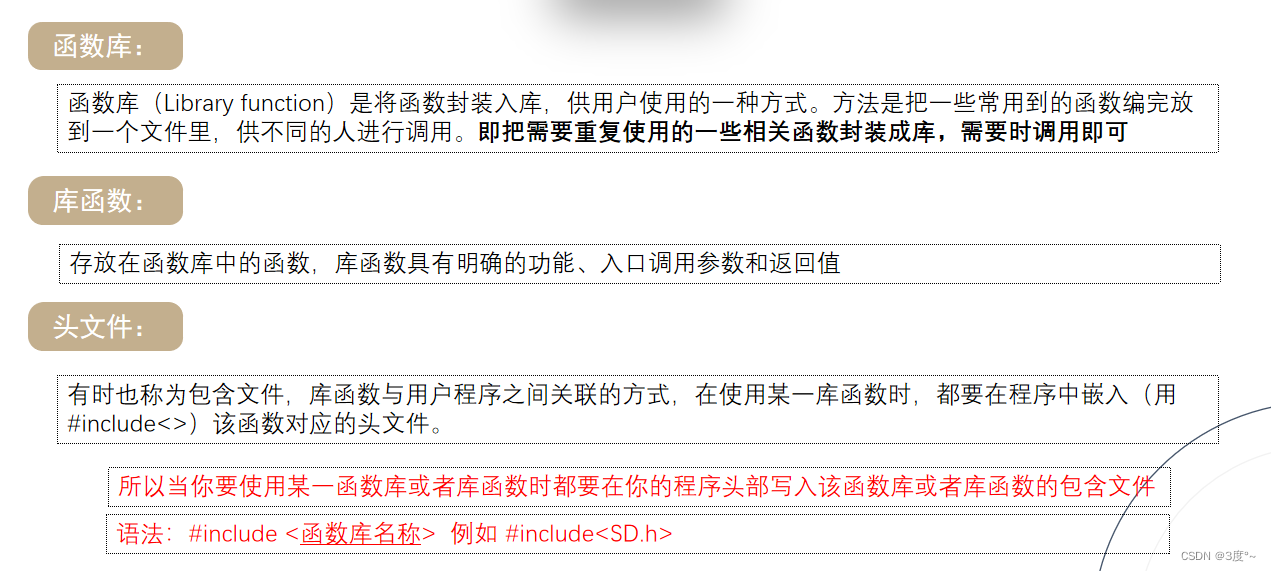
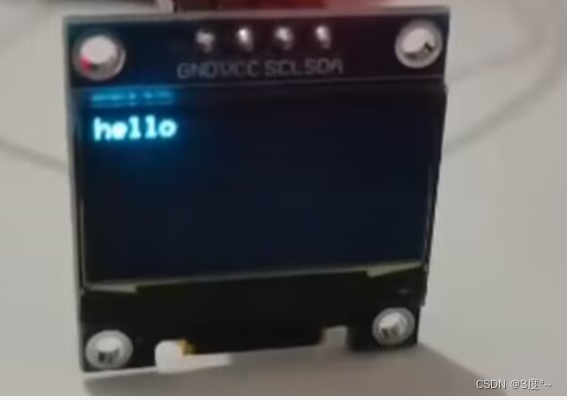
OLED1


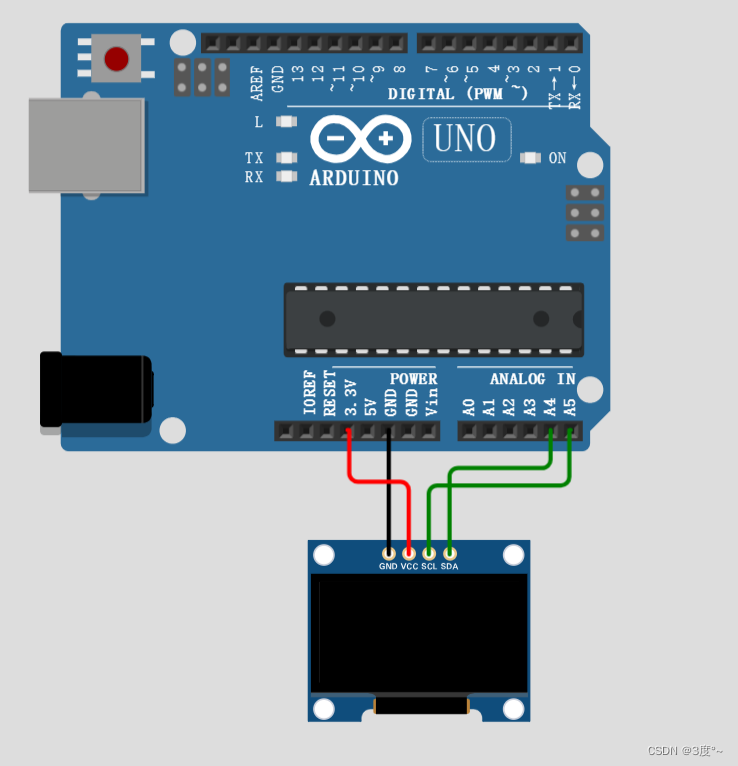
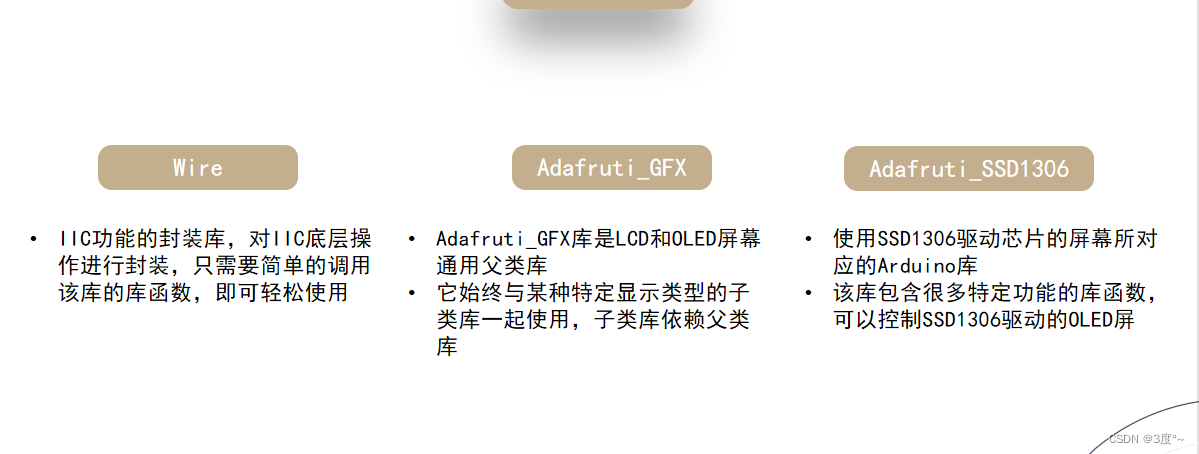
OLED2
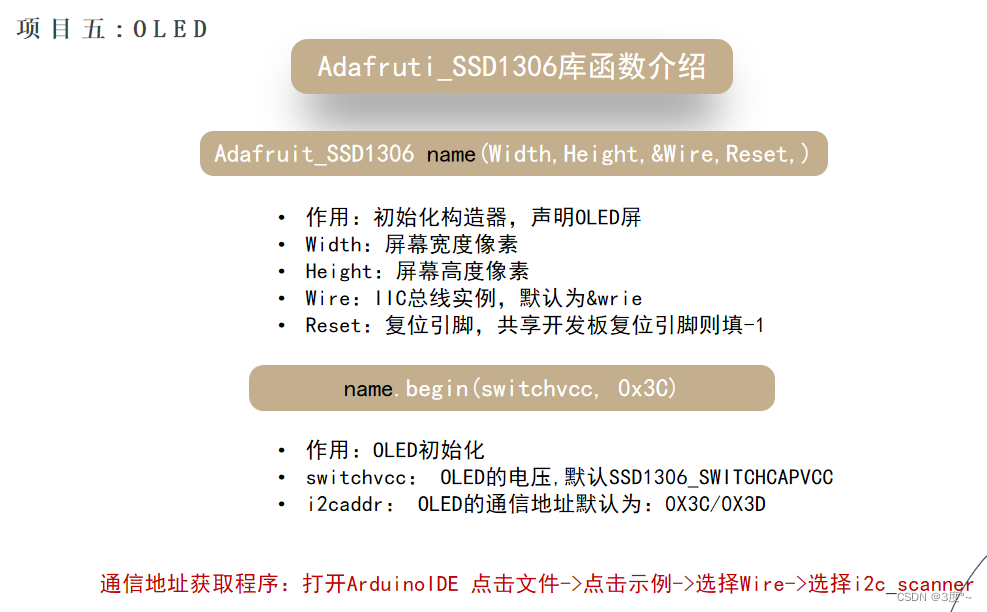

OLED3
OLED4
#include <Arduino.h>
#include <Adafruit_SSD1306.h>
#include <Wire.h>
// put function declarations here:
Adafruit_SSD1306 oled(128, 64, &Wire, -1);
void setup() {
// put your setup code here, to run once:
oled.begin(SSD1306_SWITCHCAPVCC, 0x3c);
}
void loop() {
// put your main code here, to run repeatedly:
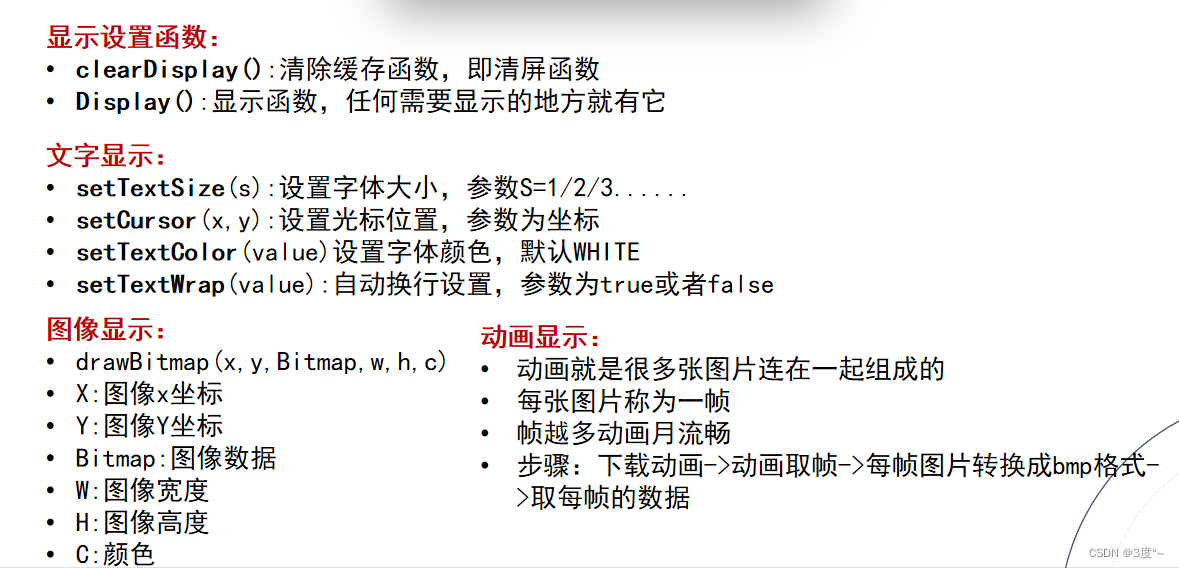
oled.clearDisplay(); // 清除缓存
oled.setTextSize(2); //字体大小
oled.setTextColor(1); //字体颜色
oled.setCursor(0, 0); //光标位置
oled.print("hello"); //输出,输出到缓存里边
oled.display(); //显示到屏幕
delay(2000);
}
// put function definitions here:
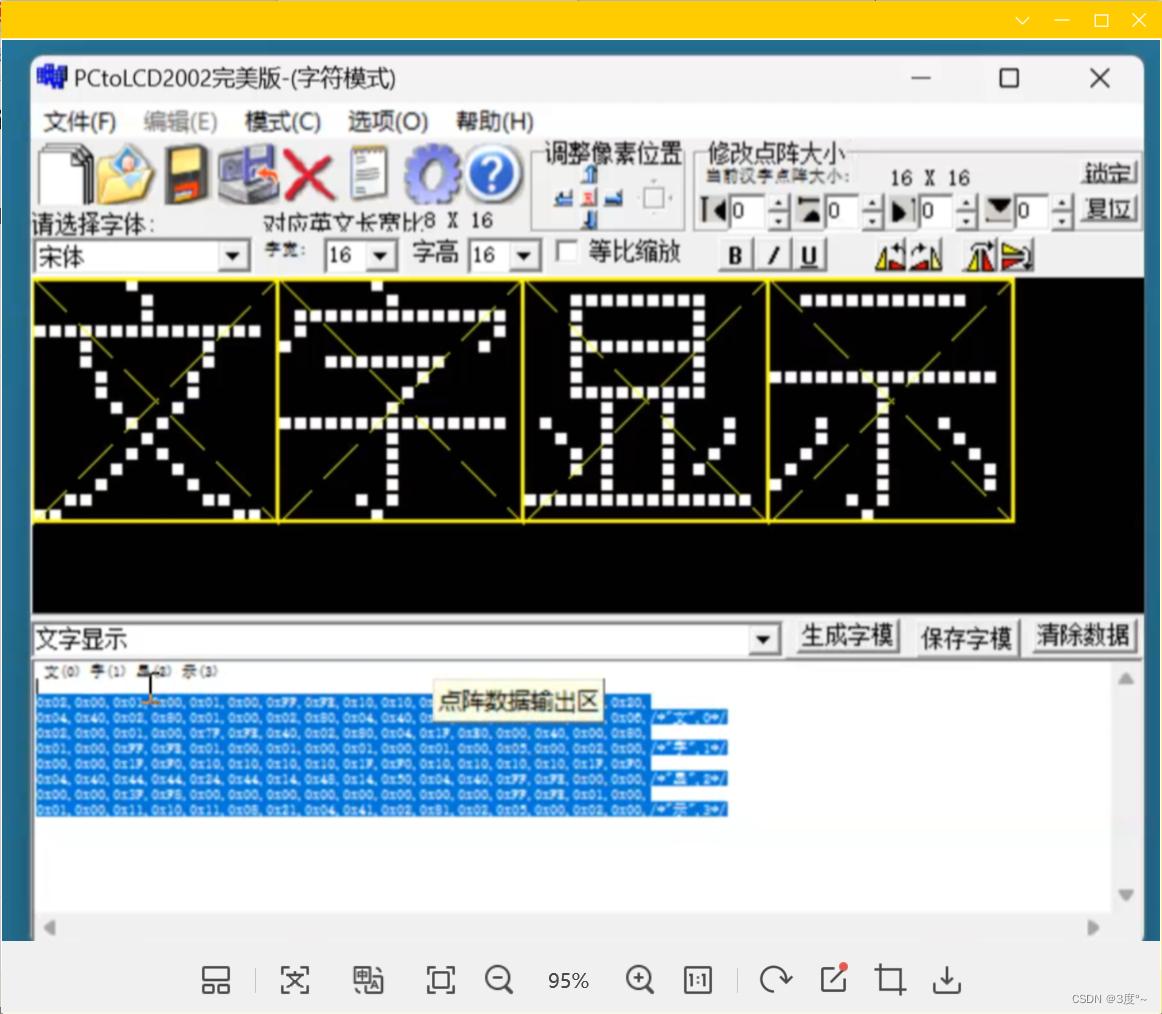
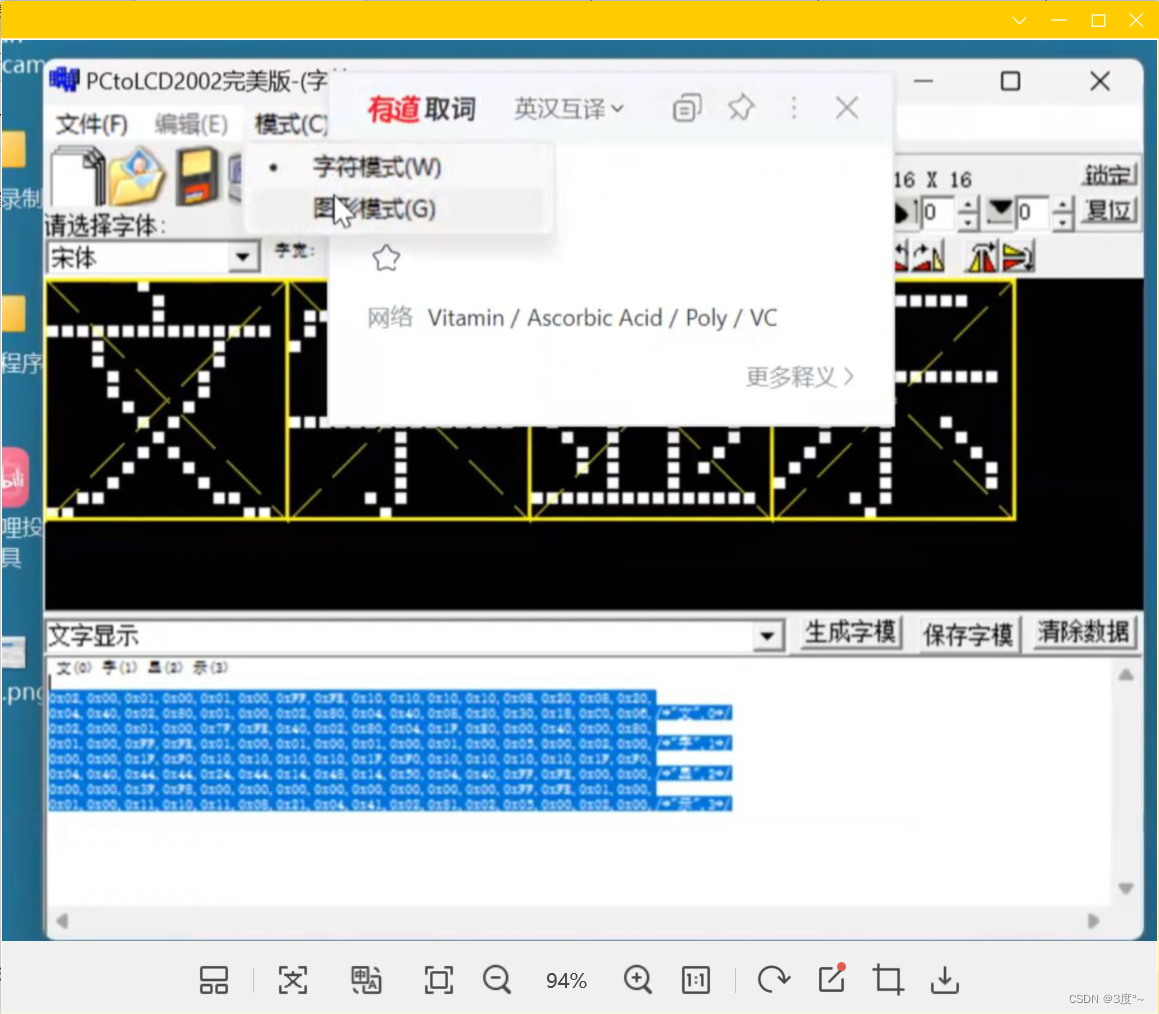
OLED5(生成汉字)

#include <Arduino.h>
#include <Adafruit_SSD1306.h>
#include <Wire.h>
// put function declarations here:
Adafruit_SSD1306 oled(128, 64, &Wire, -1);

static const unsigned char PROGMEM wen[]={
  0x02, 0x00, 0x01, 0x00, 0x01, 0x00, 0xFF, 0xFE, 0x10, 0x10, 0x10, 0x10, 0x08, 0x20, 0x08, 0x20,
  0x04, 0x40, 0x20, 0x80, 0x01, 0x00, 0x02, 0x80, 0x04, 0x40, 0x80, 0x20, 0x30, 0x18, 0xC0, 0x06,
}; // 文

void setup() {
  // put your setup code here, to run once:
  oled.begin(SSD1306_SWITCHCAPVCC, 0x3c);
}

void loop() {
  // put your main code here, to run repeatedly:
  oled.clearDisplay();
  oled.drawBitmap(0, 0, wen, 16, 16, 1);  //显示中文汉字,需要几个复制几个
  oled.display();
  delay(2000);
}
OLED6(图像显示)
OLED7

找简单的图片,注意调整尺寸,保存成bmp格式
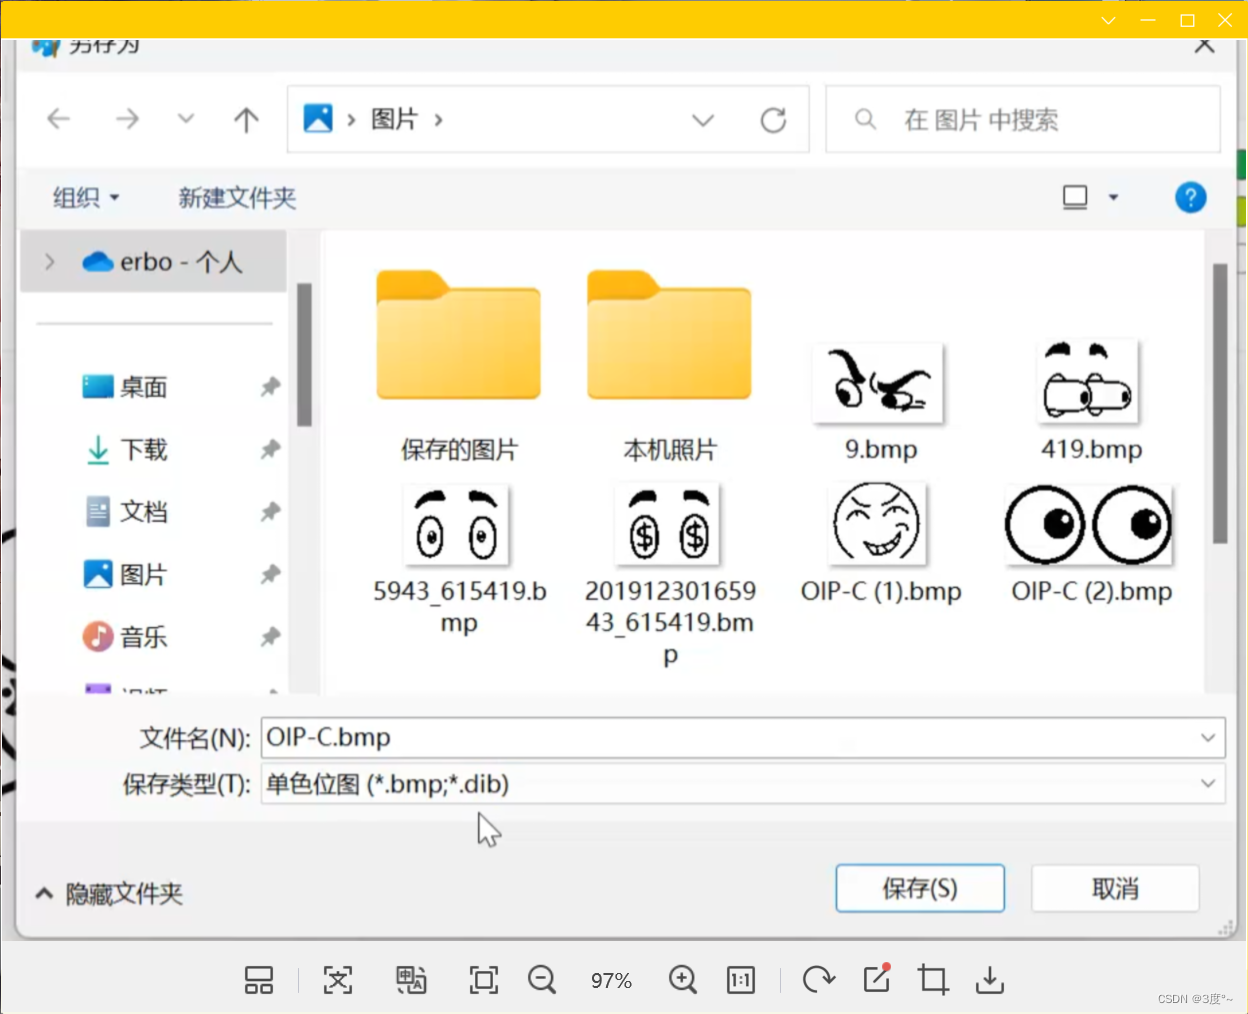
oled.drawBitmap(0, 0, wen, *, *, 1)
图片的话,**位置的尺寸必须和图片一样
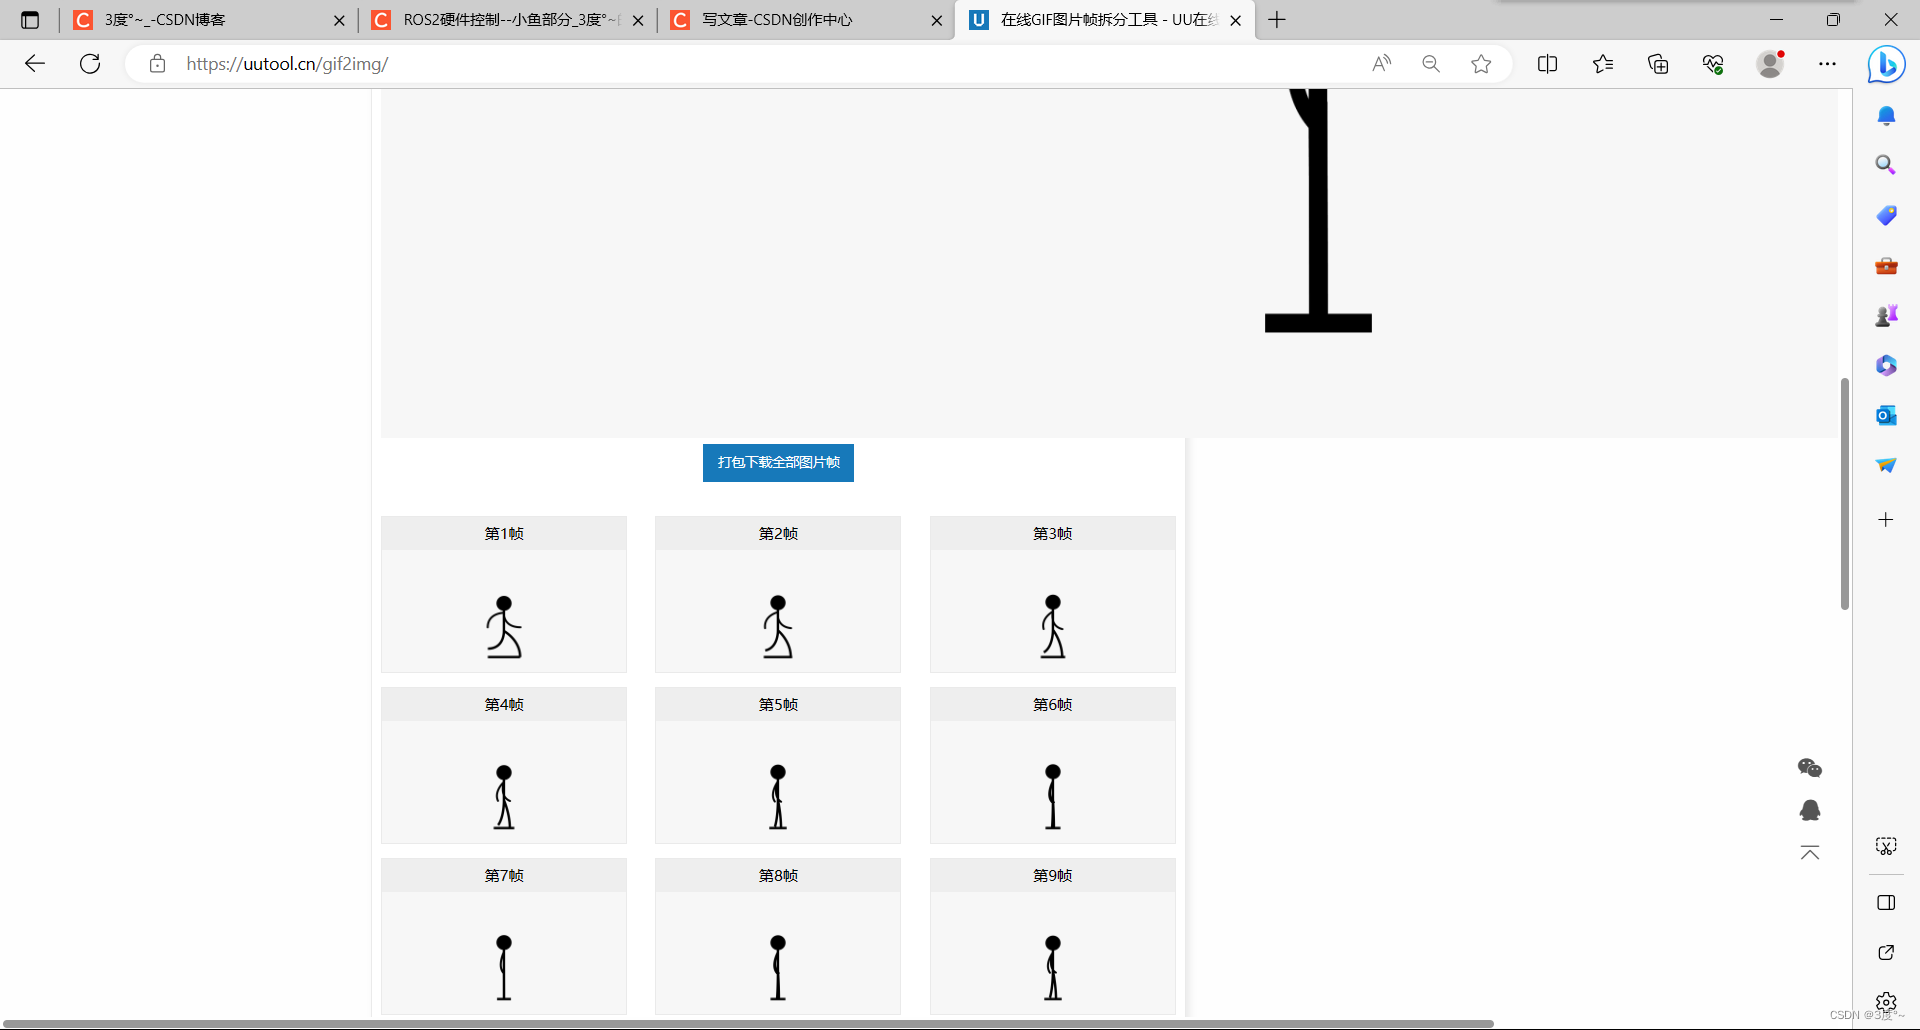
OLED8(制作动画)
UU在线工具 - 便捷实用的工具集合站 (uutool.cn)

OLED9
Adafruit_SSD1306.h
drawFastHLine:画一条水平的线
drawFastHLine:画一条竖直的线
startscrollright(0x00, 0x0f)--全屏滚动:向右滚动
startscrollleft(0x00, 0x0f):向左滚动
startscrolldiagright--全屏滚动:对角线向右滚动
startscrolldiagleft:对角线向左滚动
stopscroll():停止滚动
Adafruit_GFX.h(57行开始)
LCD1602(1)
(转载)Arduino学习笔记:基于LiquidCrystal库运行LCD1602_#include <liquidcrystal.h>_zx_ecust的博客-CSDN博客
(转载)My_arduino(4)-------LiquidCrystal_I2C库文件_fatal error: liquidcrystal_i2c.h:_瞲_大河弯弯的博客-CSDN博客
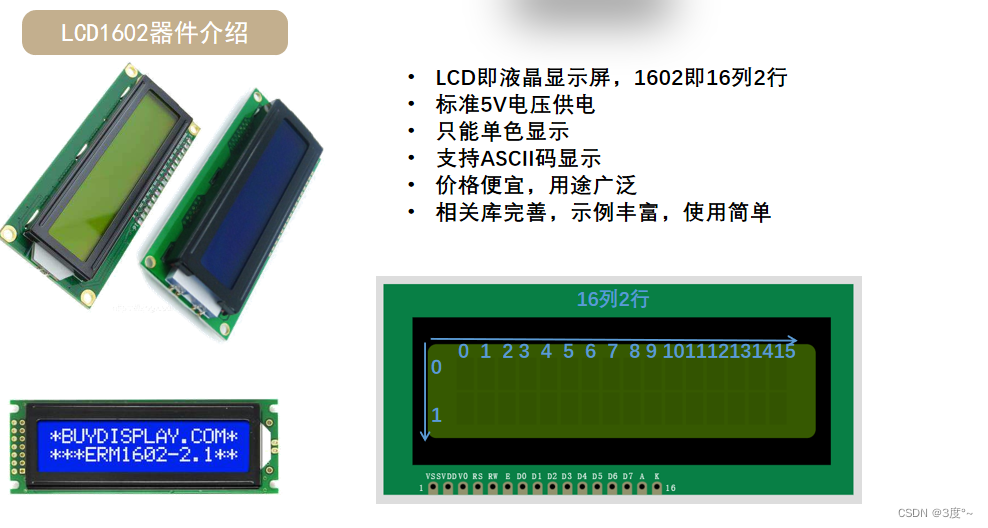
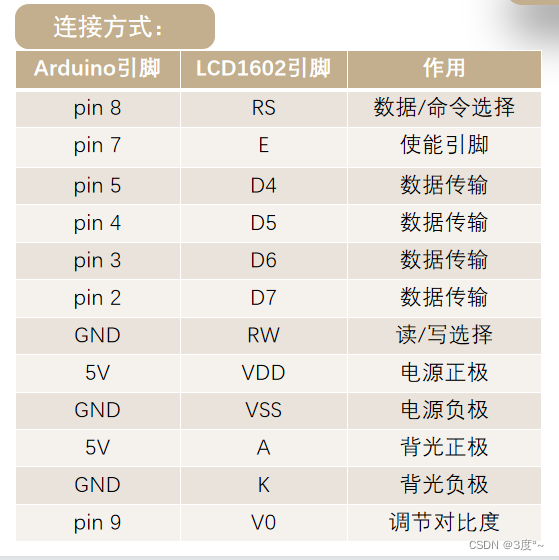
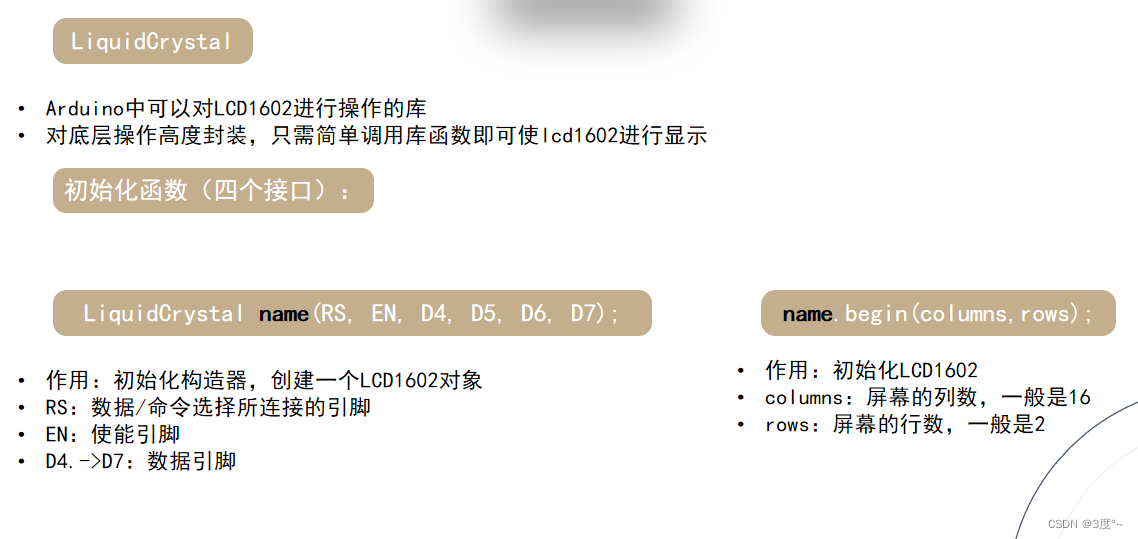
LCD1602(2)
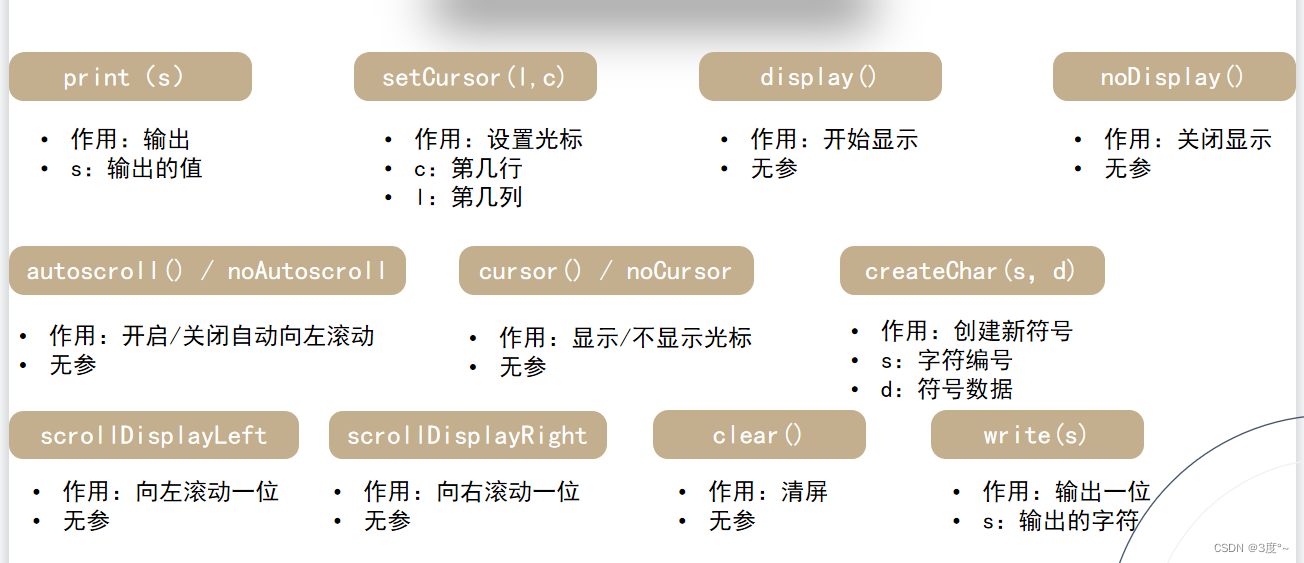
LCD1602(3)
LCD1602(4)
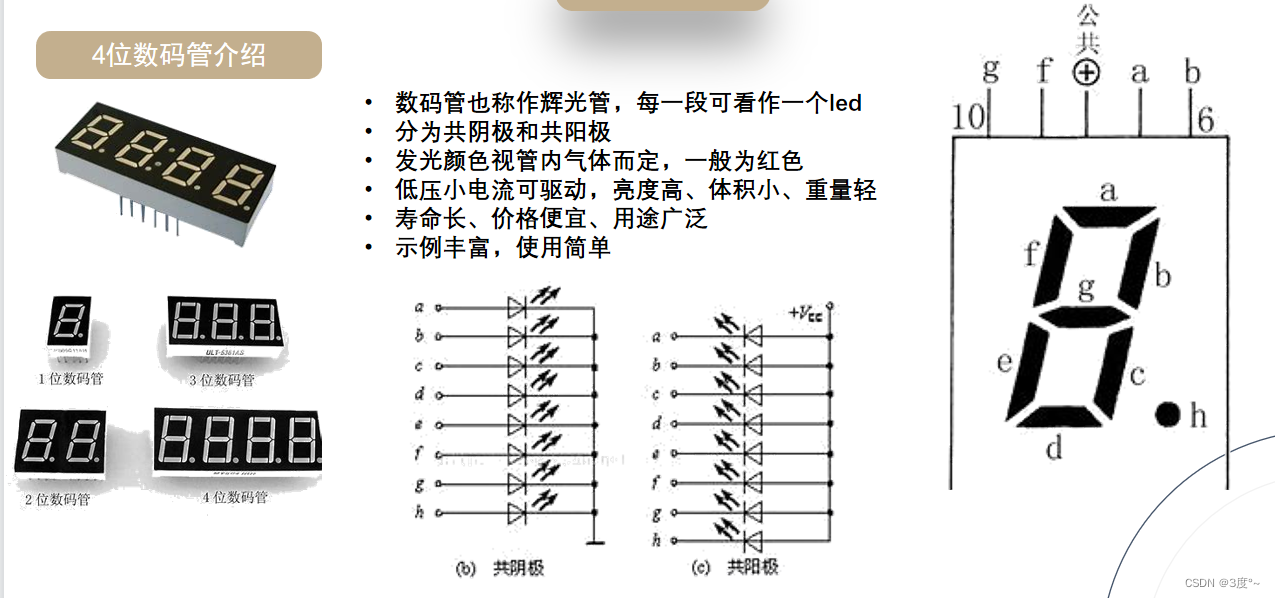
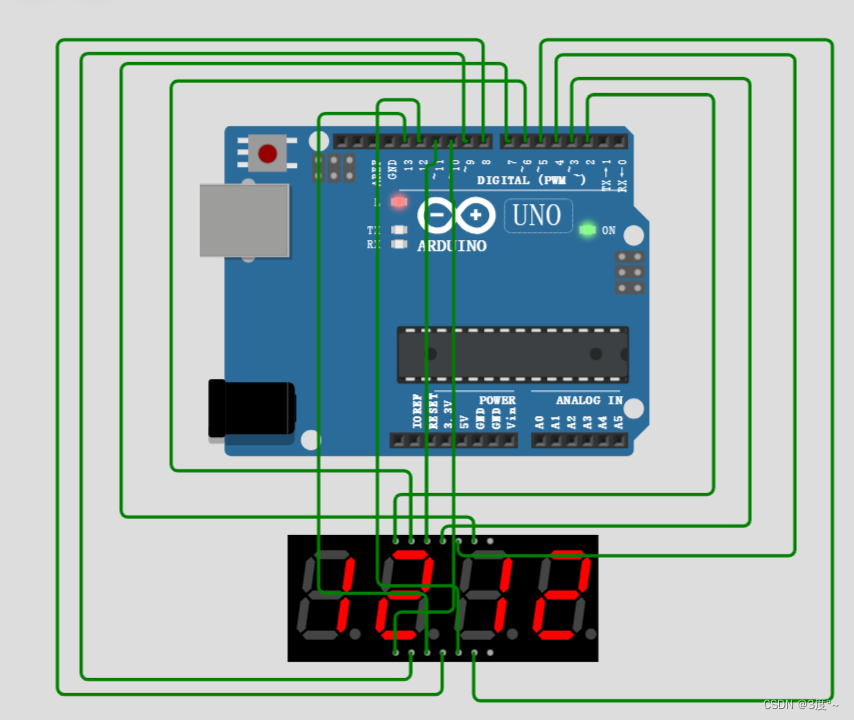
4位数码管(1)
转载:Arduino使用TM1637四位数码管_tm1637.set_蔚蓝慕的博客-CSDN博客
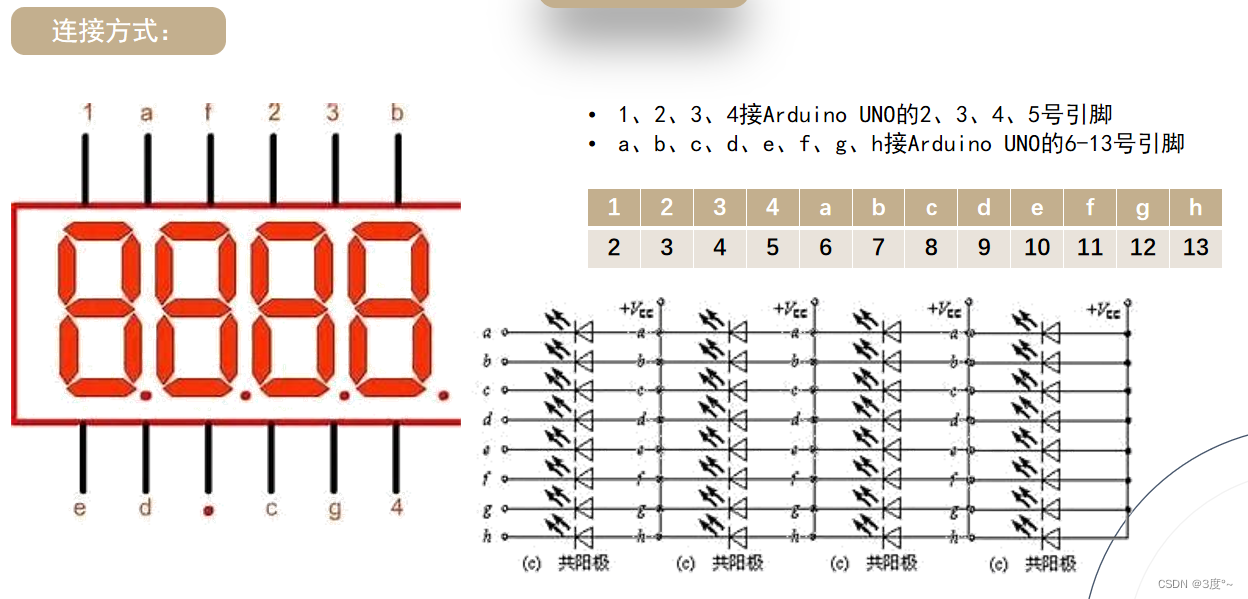
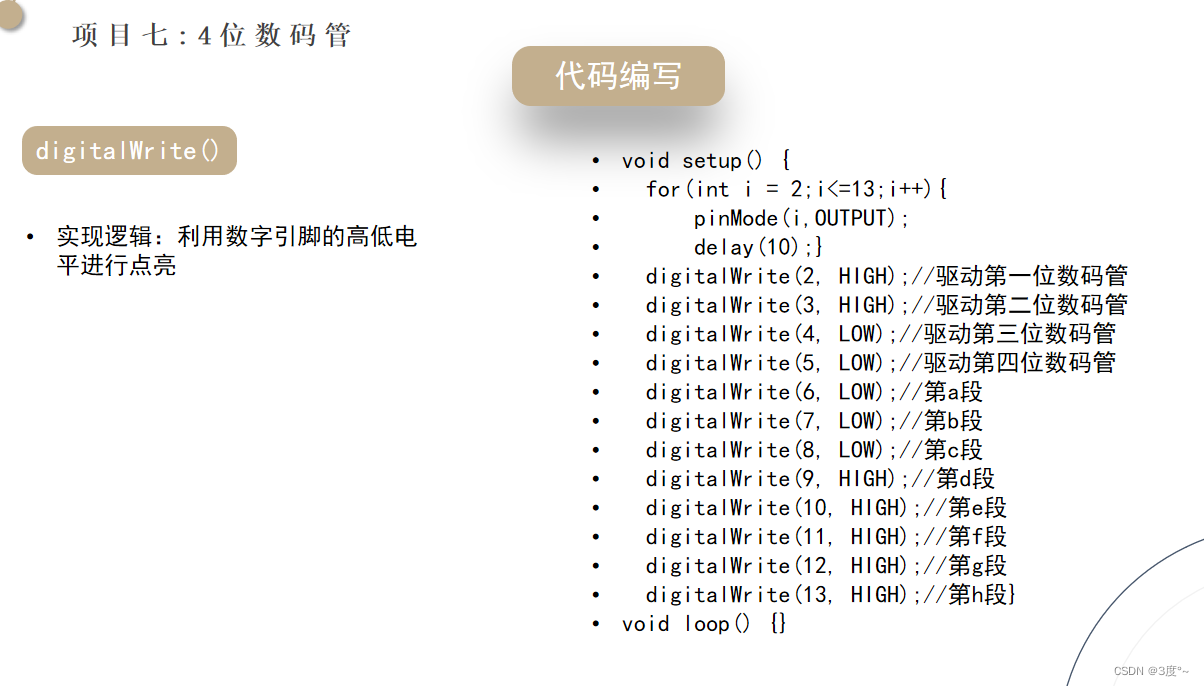
#include <Arduino.h>
void setup()
{
  for (int i = 2; i <= 13; i++)
  {
    pinMode(i, OUTPUT);
    delay(10);
  }
  digitalWrite(2, HIGH);  // 驱动第一位数码管
  digitalWrite(3, LOW);   // 驱动第二位数码管
  digitalWrite(4, LOW);   // 驱动第三位数码管
  digitalWrite(5, LOW);   // 驱动第四位数码管
  digitalWrite(6, LOW);   // 第a段
  digitalWrite(7, LOW);   // 第b段
  digitalWrite(8, LOW);   // 第c段
  digitalWrite(9, HIGH);  // 第d段
  digitalWrite(10, HIGH); // 第e段
  digitalWrite(11, HIGH); // 第f段
  digitalWrite(12, HIGH); // 第g段
  digitalWrite(13, HIGH); // 第h段
}
void loop()
{
  //
}

4位数码管(2)
#include <Arduino.h>

void setup()
{
  for (int i = 2; i <= 13; i++)
  {
    pinMode(i, OUTPUT);
    delay(10);
  }
}
void loop()
{
  // 第一个显示1
  com1();
  num_1();
  delay(3);
  clear();

  // 第二个显示2
  com2();
  num_2();
  delay(3);
  clear();

  // 第三个显示1
  com3();
  num_1();
  delay(3);
  clear();

  // 第四个显示2
  com4();
  num_2();
  clear();
}

void com1()
{
  digitalWrite(2, HIGH); // 驱动第一位数码管
  digitalWrite(3, LOW);  // 驱动第二位数码管
  digitalWrite(4, LOW);  // 驱动第三位数码管
  digitalWrite(5, LOW);  // 驱动第四位数码管
}
void com2()
{
  digitalWrite(2, LOW);  // 驱动第一位数码管
  digitalWrite(3, HIGH); // 驱动第二位数码管
  digitalWrite(4, LOW);  // 驱动第三位数码管
  digitalWrite(5, LOW);  // 驱动第四位数码管
}
void com3()
{
  digitalWrite(2, LOW);  // 驱动第一位数码管
  digitalWrite(3, LOW);  // 驱动第二位数码管
  digitalWrite(4, HIGH); // 驱动第三位数码管
  digitalWrite(5, LOW);  // 驱动第四位数码管
}
void com4()
{
  digitalWrite(2, LOW);  // 驱动第一位数码管
  digitalWrite(3, LOW);  // 驱动第二位数码管
  digitalWrite(4, LOW);  // 驱动第三位数码管
  digitalWrite(5, HIGH); // 驱动第四位数码管
}

void num_0()
{
  digitalWrite(6, LOW);   // 第a段
  digitalWrite(7, LOW);   // 第b段
  digitalWrite(8, LOW);   // 第c段
  digitalWrite(9, LOW);   // 第d段
  digitalWrite(10, LOW);  // 第e段
  digitalWrite(11, LOW);  // 第f段
  digitalWrite(12, HIGH); // 第g段
  digitalWrite(13, HIGH); // 第h段
}
void num_1()
{
  digitalWrite(6, HIGH);  // 第a段
  digitalWrite(7, LOW);   // 第b段
  digitalWrite(8, LOW);   // 第c段
  digitalWrite(9, HIGH);  // 第d段
  digitalWrite(10, HIGH); // 第e段
  digitalWrite(11, HIGH); // 第f段
  digitalWrite(12, HIGH); // 第g段
  digitalWrite(13, HIGH); // 第h段
}
void num_2()
{
  digitalWrite(6, LOW);   // 第a段
  digitalWrite(7, LOW);   // 第b段
  digitalWrite(8, HIGH);  // 第c段
  digitalWrite(9, LOW);   // 第d段
  digitalWrite(10, LOW);  // 第e段
  digitalWrite(11, HIGH); // 第f段
  digitalWrite(12, LOW);  // 第g段
  digitalWrite(13, HIGH); // 第h段
}
void clear()
{
  digitalWrite(6, HIGH);  // 第a段
  digitalWrite(7, HIGH);  // 第b段
  digitalWrite(8, HIGH);  // 第c段
  digitalWrite(9, HIGH);  // 第d段
  digitalWrite(10, HIGH); // 第e段
  digitalWrite(11, HIGH); // 第f段
  digitalWrite(12, HIGH); // 第g段
  digitalWrite(13, HIGH); // 第h段
}
4位数码管(3)
第一位数字动态显示
#include <Arduino.h>

int a = 0;
void setup()
{
  for (int i = 2; i <= 13; i++)
  {
    pinMode(i, OUTPUT);
    delay(10);
  }
}
void loop()
{
  // 第一个显示,动态显示1,2
  if (a > 2)
  {
    a = 0;
  }
  clear();
  com1(); // 位选
  if (a == 0)
  {
    num_0(); // 段选
  }
  else if (a == 1)
  {
    num_1(); // 段选
  }
  else if (a == 2)
  {
    num_2(); // 段选
  }
  a++;
  delay(1000);
}

void com1()
{
  digitalWrite(2, HIGH); // 驱动第一位数码管
  digitalWrite(3, LOW);  // 驱动第二位数码管
  digitalWrite(4, LOW);  // 驱动第三位数码管
  digitalWrite(5, LOW);  // 驱动第四位数码管
}
void com2()
{
  digitalWrite(2, LOW);  // 驱动第一位数码管
  digitalWrite(3, HIGH); // 驱动第二位数码管
  digitalWrite(4, LOW);  // 驱动第三位数码管
  digitalWrite(5, LOW);  // 驱动第四位数码管
}
void com3()
{
  digitalWrite(2, LOW);  // 驱动第一位数码管
  digitalWrite(3, LOW);  // 驱动第二位数码管
  digitalWrite(4, HIGH); // 驱动第三位数码管
  digitalWrite(5, LOW);  // 驱动第四位数码管
}
void com4()
{
  digitalWrite(2, LOW);  // 驱动第一位数码管
  digitalWrite(3, LOW);  // 驱动第二位数码管
  digitalWrite(4, LOW);  // 驱动第三位数码管
  digitalWrite(5, HIGH); // 驱动第四位数码管
}

void num_0()
{
  digitalWrite(6, LOW);   // 第a段
  digitalWrite(7, LOW);   // 第b段
  digitalWrite(8, LOW);   // 第c段
  digitalWrite(9, LOW);   // 第d段
  digitalWrite(10, LOW);  // 第e段
  digitalWrite(11, LOW);  // 第f段
  digitalWrite(12, HIGH); // 第g段
  digitalWrite(13, HIGH); // 第h段
}
void num_1()
{
  digitalWrite(6, HIGH);  // 第a段
  digitalWrite(7, LOW);   // 第b段
  digitalWrite(8, LOW);   // 第c段
  digitalWrite(9, HIGH);  // 第d段
  digitalWrite(10, HIGH); // 第e段
  digitalWrite(11, HIGH); // 第f段
  digitalWrite(12, HIGH); // 第g段
  digitalWrite(13, HIGH); // 第h段
}
void num_2()
{
  digitalWrite(6, LOW);   // 第a段
  digitalWrite(7, LOW);   // 第b段
  digitalWrite(8, HIGH);  // 第c段
  digitalWrite(9, LOW);   // 第d段
  digitalWrite(10, LOW);  // 第e段
  digitalWrite(11, HIGH); // 第f段
  digitalWrite(12, LOW);  // 第g段
  digitalWrite(13, HIGH); // 第h段
}
void clear()
{
  digitalWrite(6, HIGH);  // 第a段
  digitalWrite(7, HIGH);  // 第b段
  digitalWrite(8, HIGH);  // 第c段
  digitalWrite(9, HIGH);  // 第d段
  digitalWrite(10, HIGH); // 第e段
  digitalWrite(11, HIGH); // 第f段
  digitalWrite(12, HIGH); // 第g段
  digitalWrite(13, HIGH); // 第h段
}

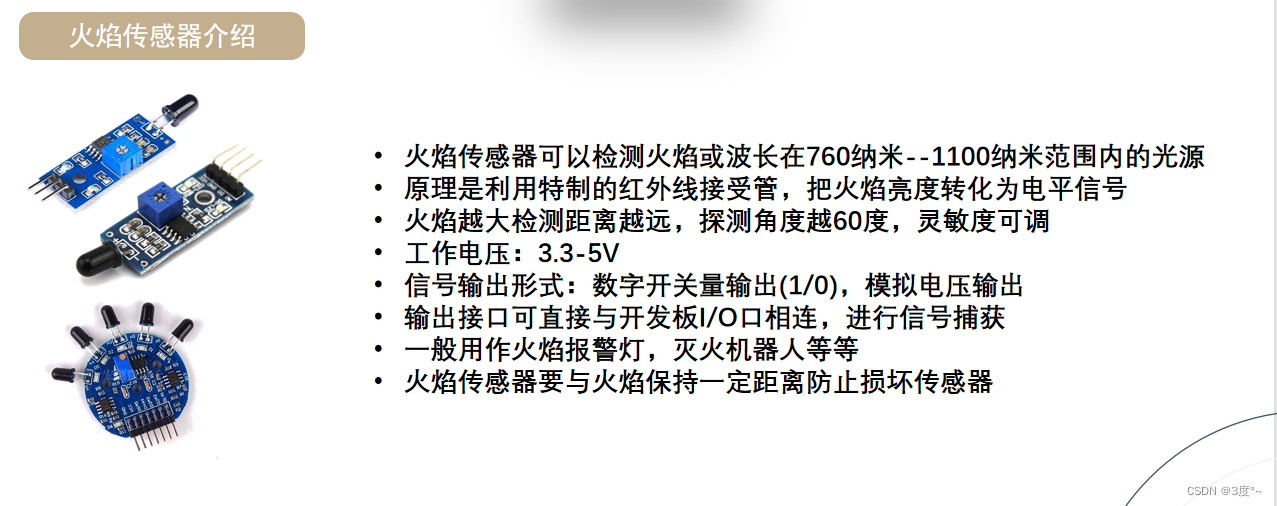
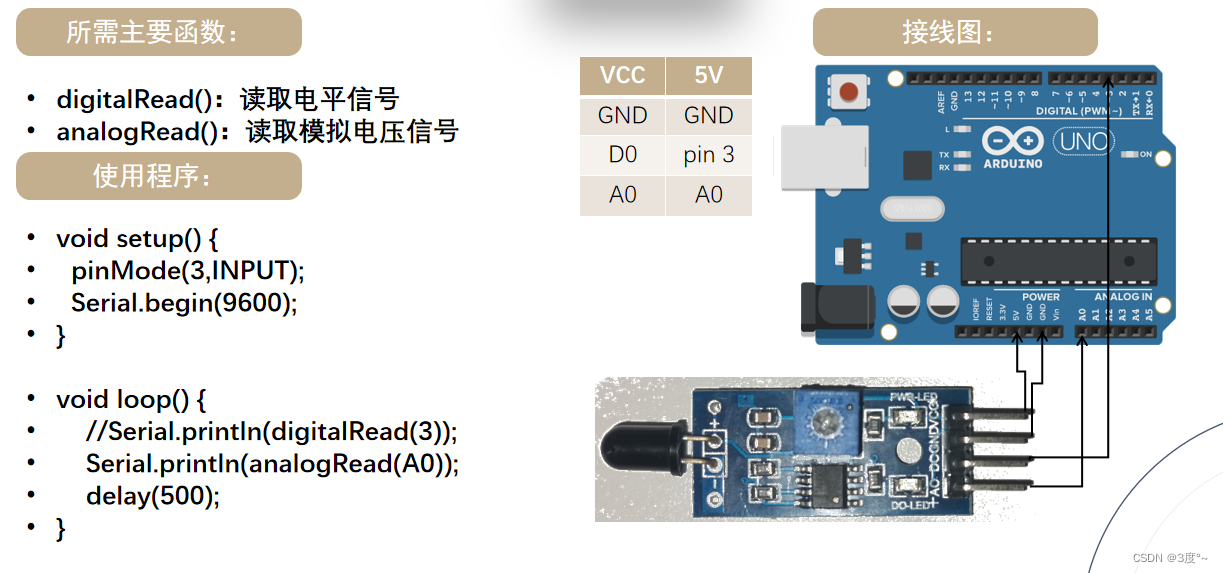
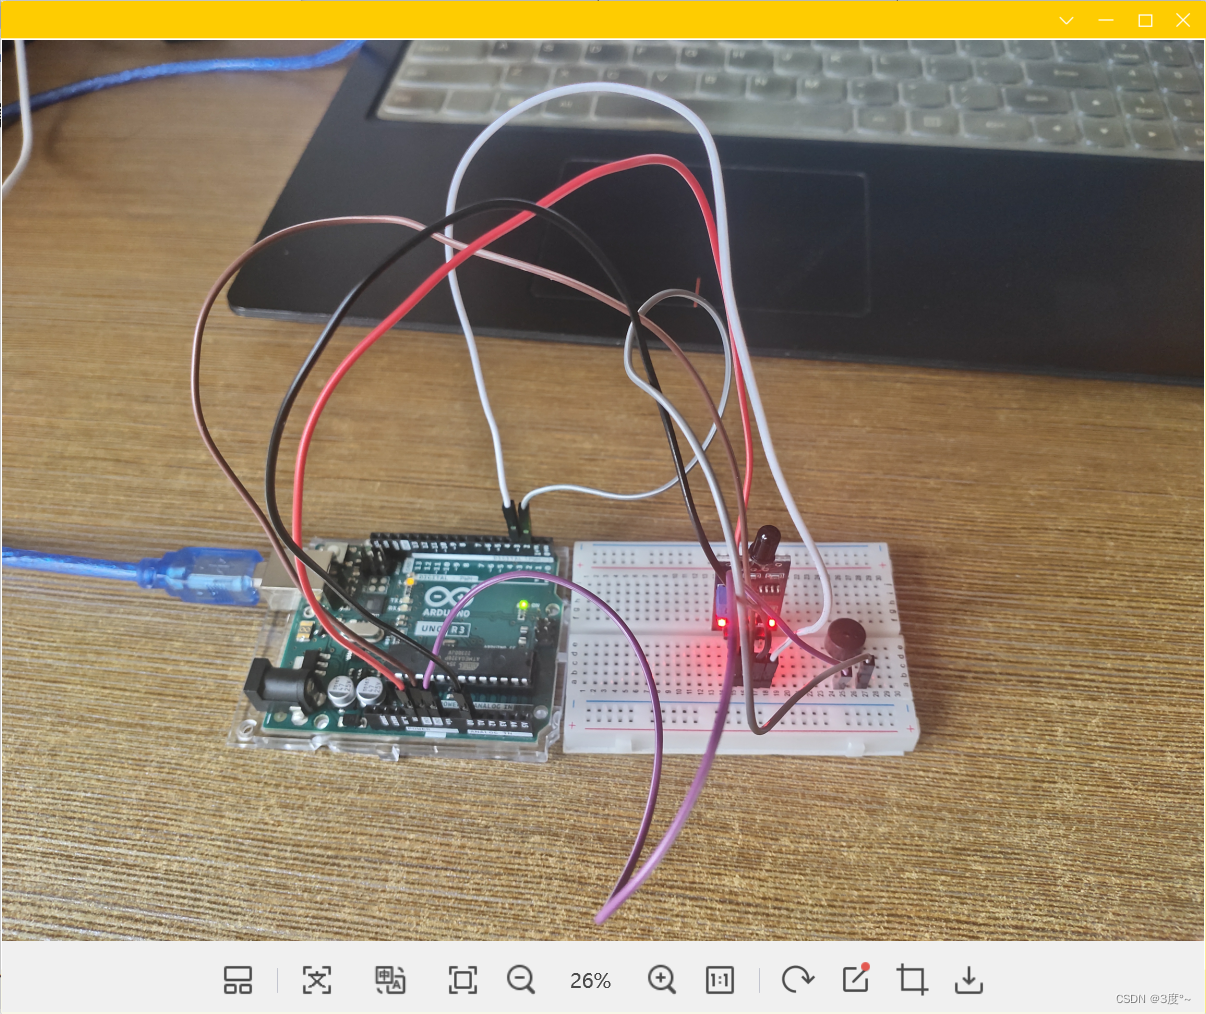
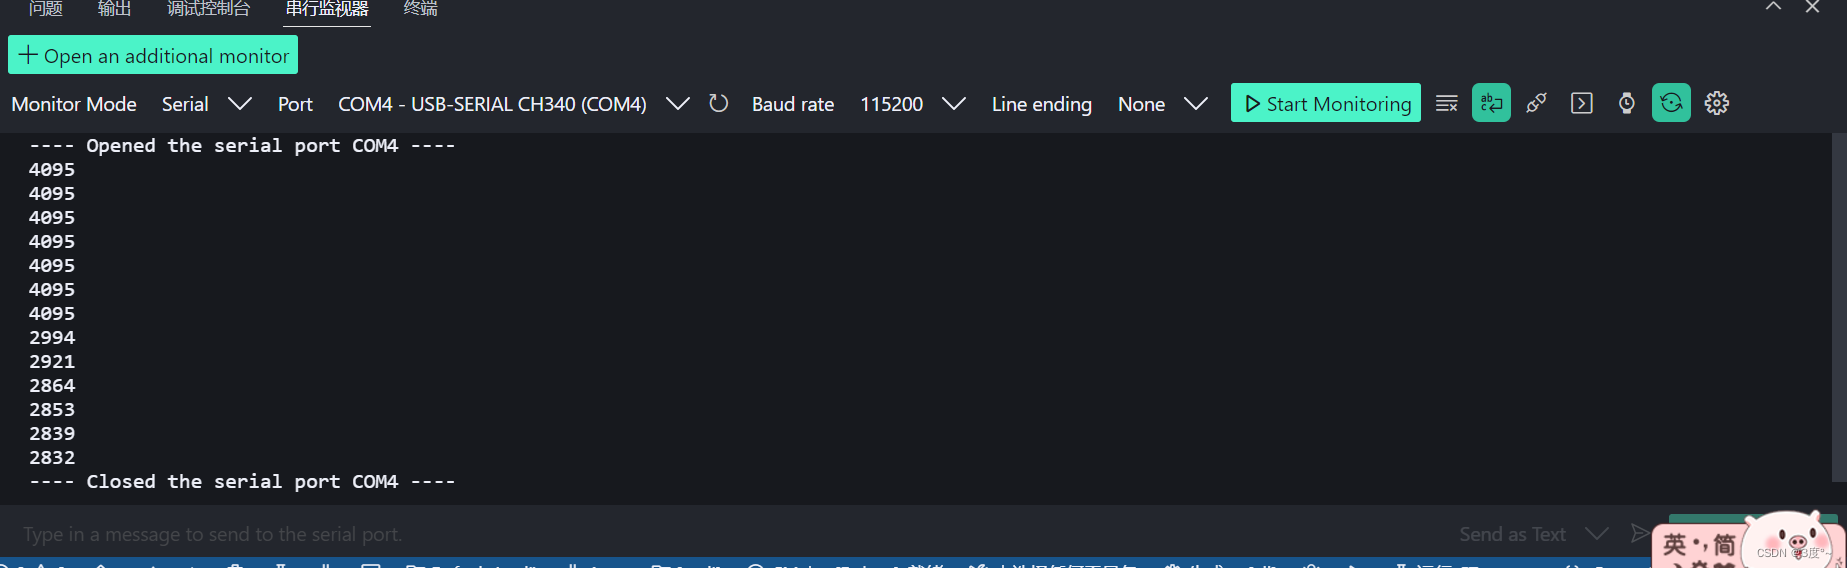
火焰检测
#include <Arduino.h>

// put function declarations here:
#define D3 3  // 火焰传感器数字信号口
// #define A0    // 模拟信号输入口
#define D2 2  // 蜂鸣器数字信号口

void setup() {
  // put your setup code here, to run once:
  Serial.begin(115200);
  pinMode(D3, INPUT);
  pinMode(D2, OUTPUT);
}

void loop() {
  Serial.print("数字信号:");
  Serial.println(digitalRead(D3));
  Serial.print("模拟信号:");
  Serial.println(analogRead(A0));
  Serial.println("-------------------------------");
  delay(1000);
  if (analogRead(A0) < 400) {
    digitalWrite(D2, HIGH);
    delay(100);
    digitalWrite(D2, LOW);
    delay(100);
  } else {
    digitalWrite(D2, LOW);
  }
}

// put function definitions here:
#include <Arduino.h>
// put function declarations here:
#define D3 3 // 火焰传感器数字信号口
// #define A0 // 模拟信号输入口
#define D2 2 // 蜂鸣器数字信号口
void setup() {
// put your setup code here, to run once:
Serial.begin(115200);
pinMode(D3, INPUT);
pinMode(D2, OUTPUT);
}
void loop() {
// Serial.print("数字信号:");
// Serial.println(digitalRead(D3));
// Serial.print("模拟信号:");
// Serial.println(analogRead(A0));
// Serial.println("-------------------------------");
// delay(1000);
// if (analogRead(D3) < 400)
// {
// digitalWrite(D2, HIGH);
// }
// else
// {
// digitalWrite(D2, LOW);
// }
Serial.println(analogRead(A0));
delay(2000);
}
// put function definitions here: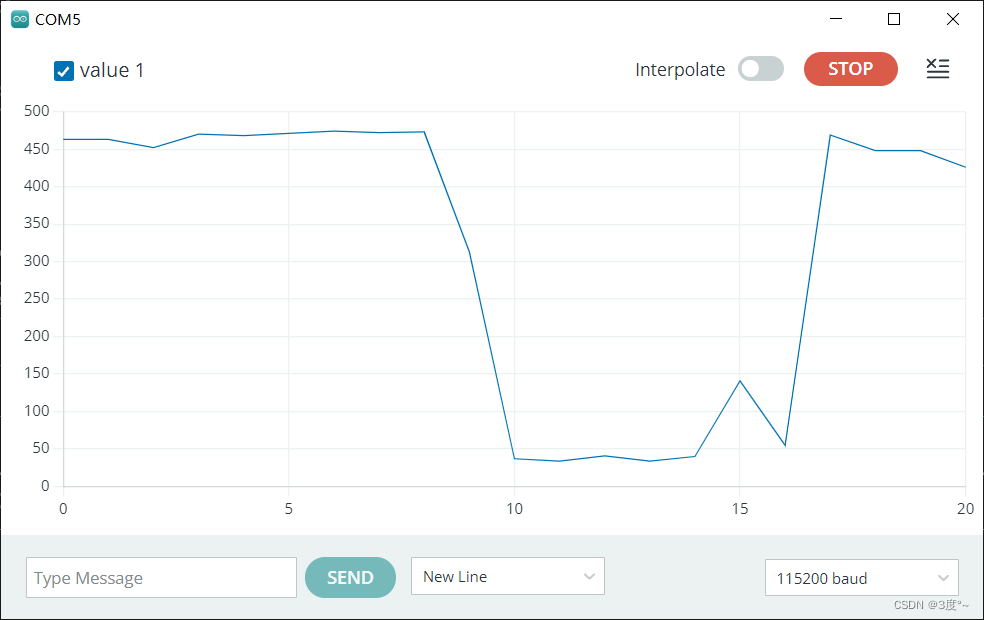
温度检测传感器
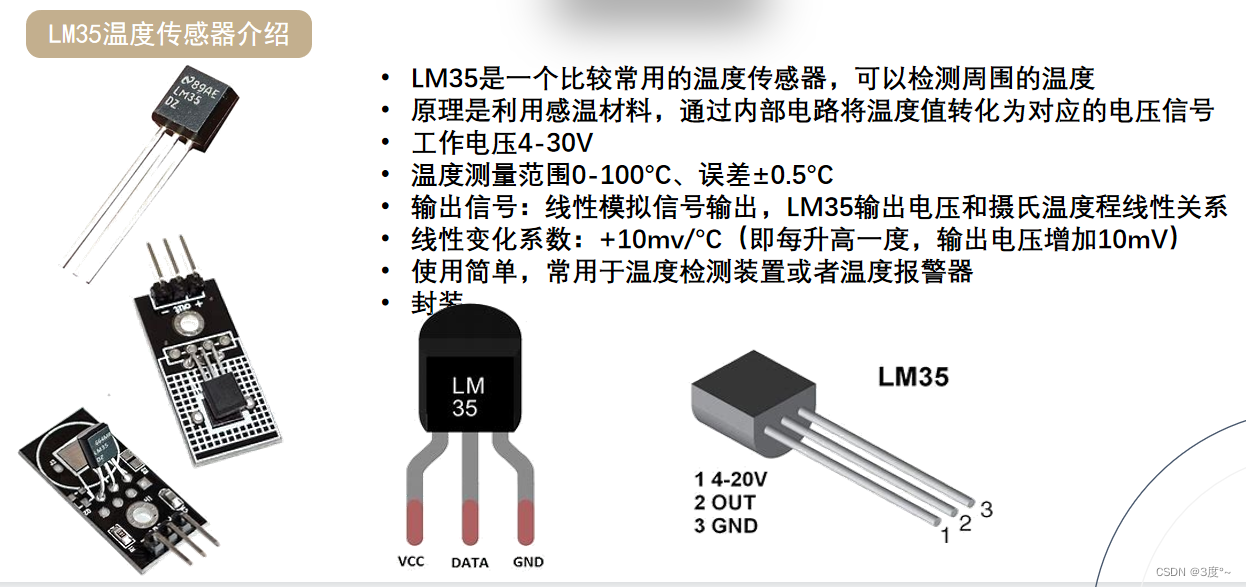
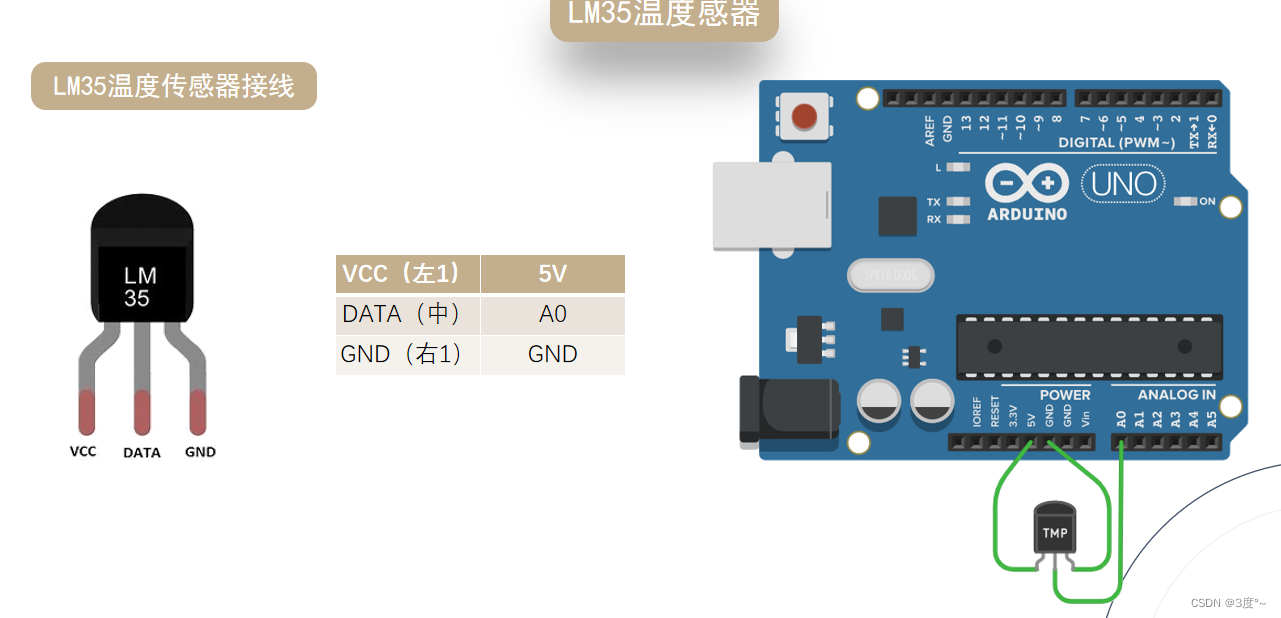
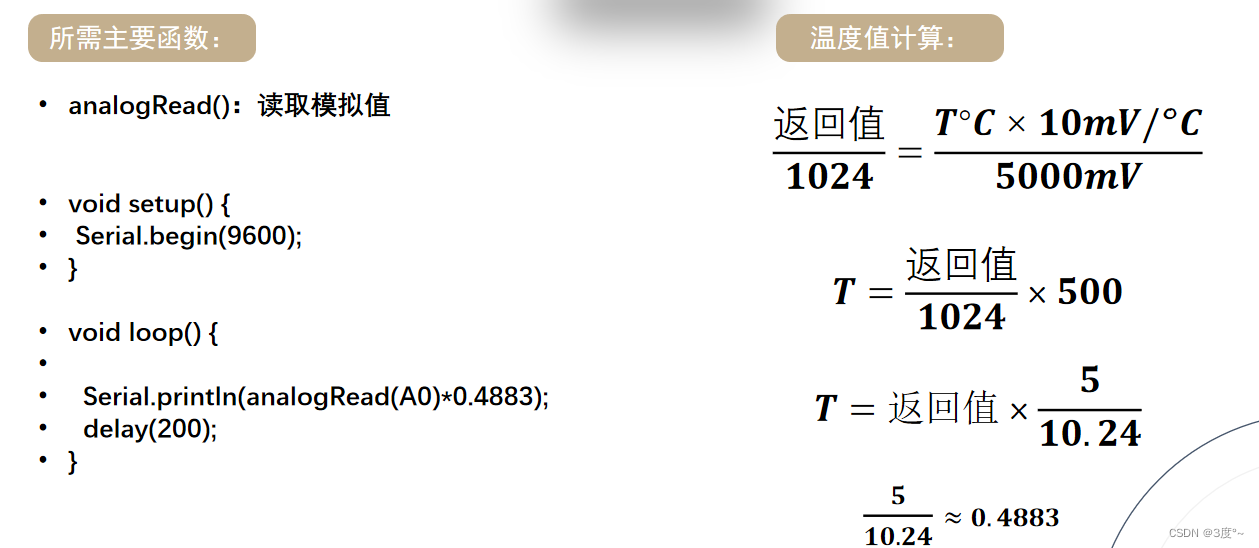

温湿度传感器


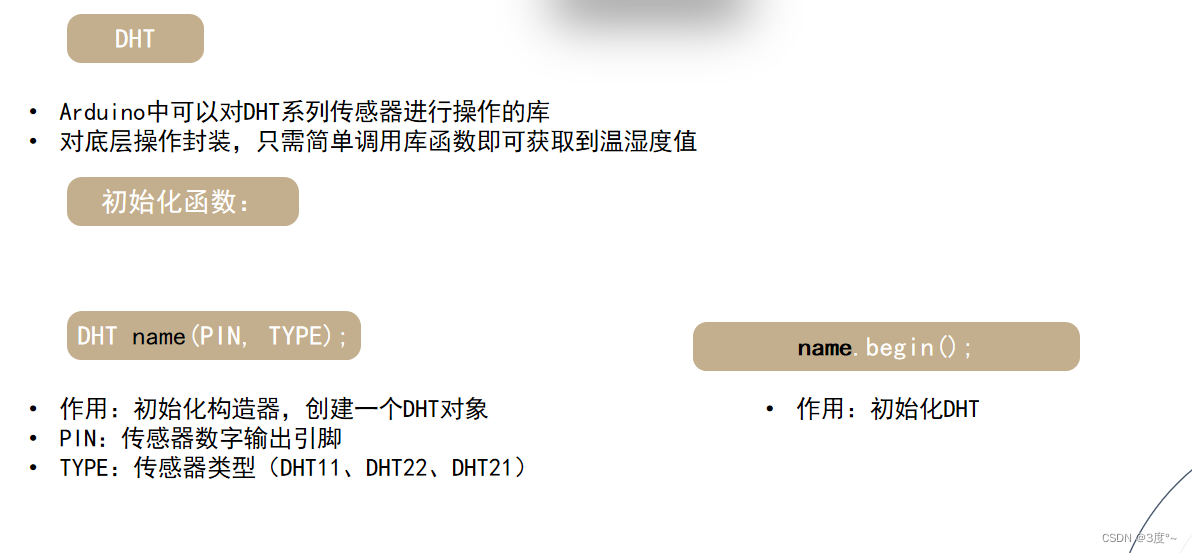
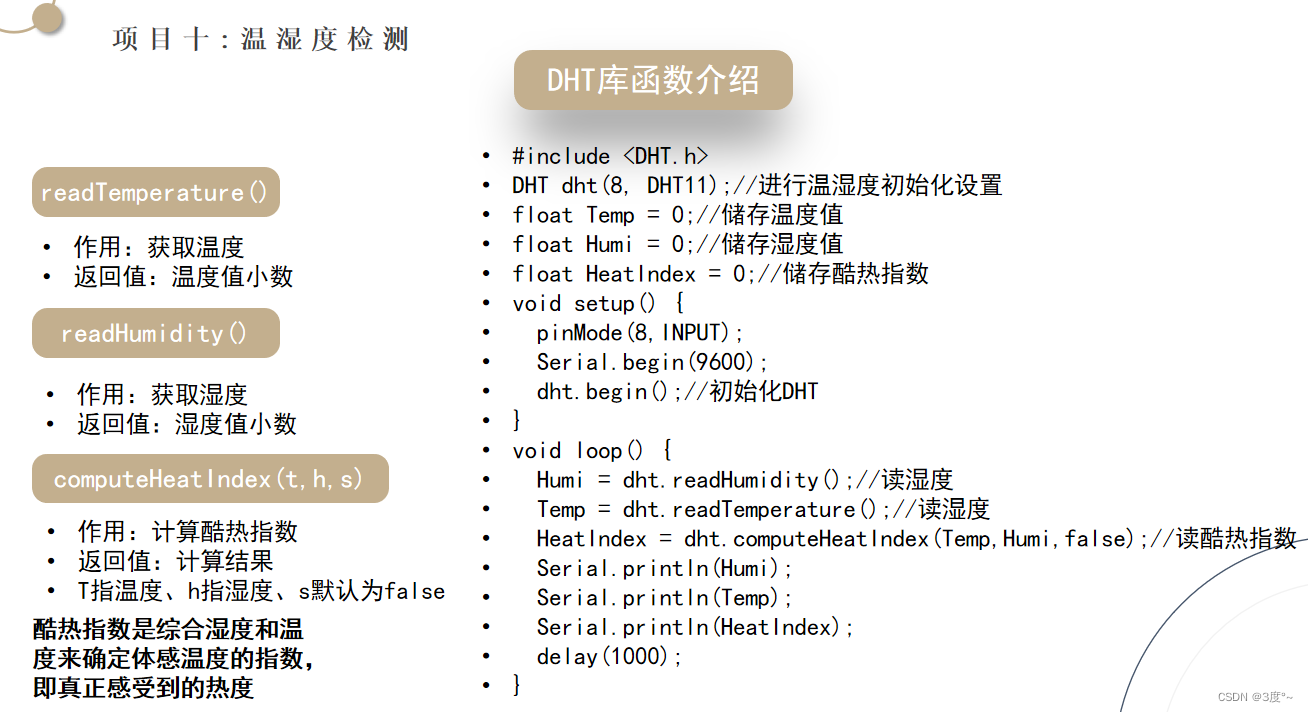
#include <Arduino.h>
#include <DHT.h>
#include <Adafruit_Sensor.h>
#define D3 3 // 温湿度信号输入
// put function declarations here:
DHT dht(D3, DHT11);
float temp = 0; // 存储温度值
float humi = 0; // 存储湿度值
float heatindex = 0; //存储酷热指数
void setup() {
// put your setup code here, to run once:
pinMode(D3, INPUT);
Serial.begin(115200);
dht.begin();
}
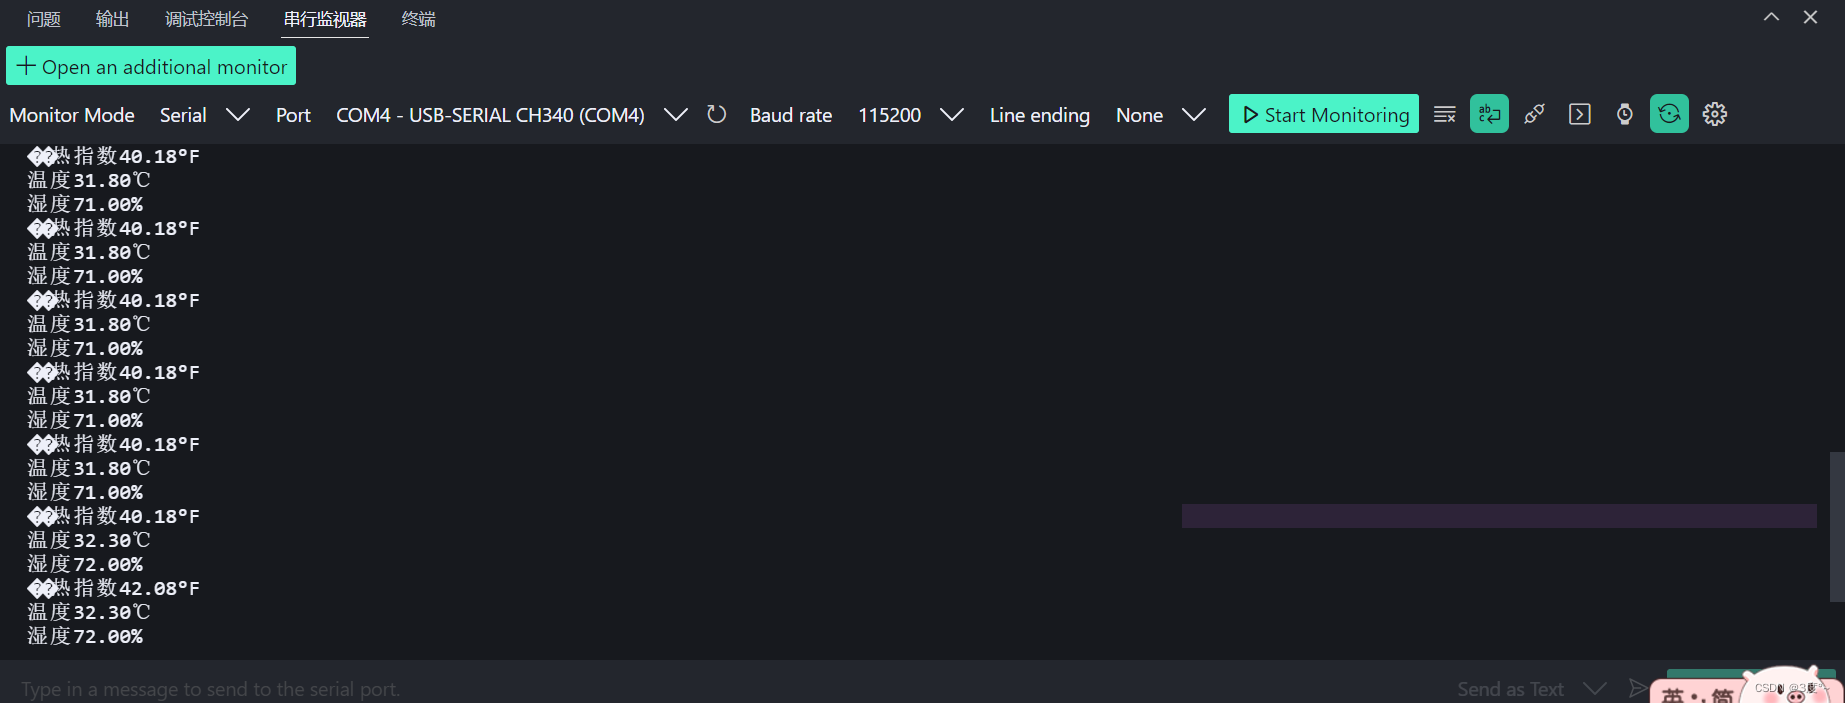
void loop() {
// put your main code here, to run repeatedly:
temp = dht.readTemperature();
humi = dht.readHumidity();
heatindex = dht.computeHeatIndex(temp, humi, false); // false--摄氏度, true--华氏度
Serial.print("温度");
Serial.print(temp);
Serial.println("℃");
Serial.print("湿度");
Serial.print(humi);
Serial.println("%");
Serial.print("酷热指数");
Serial.print(heatindex);
Serial.println("°F");
Serial.println("------------------------");
delay(2000);
}

可燃气体检测传感器
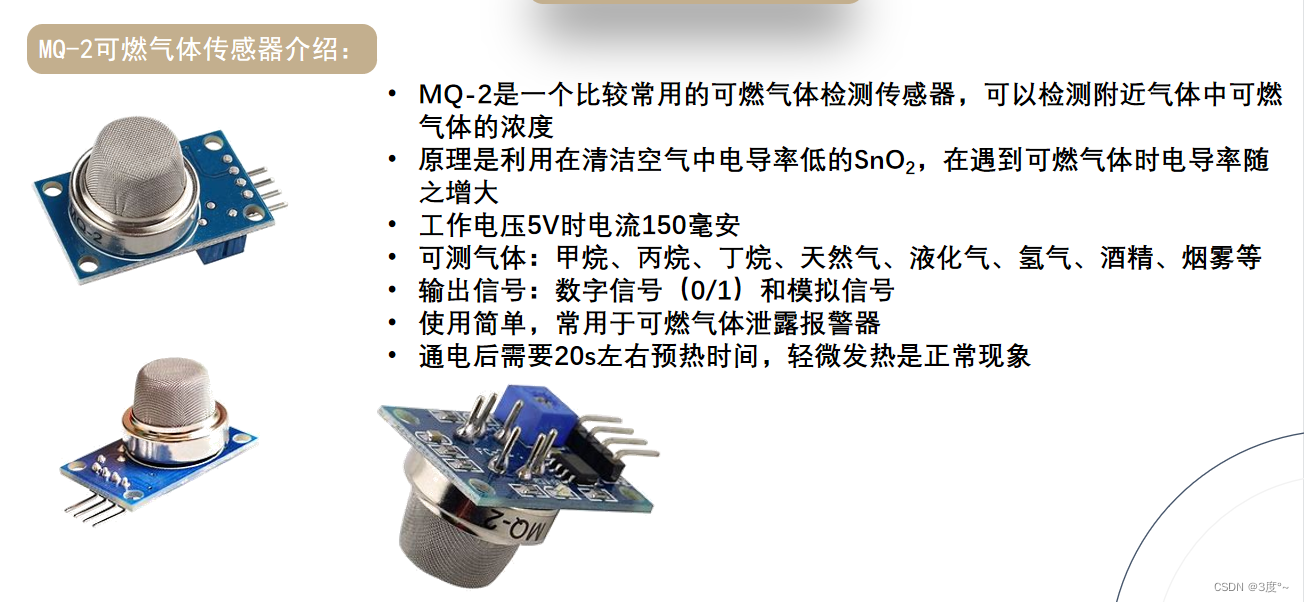
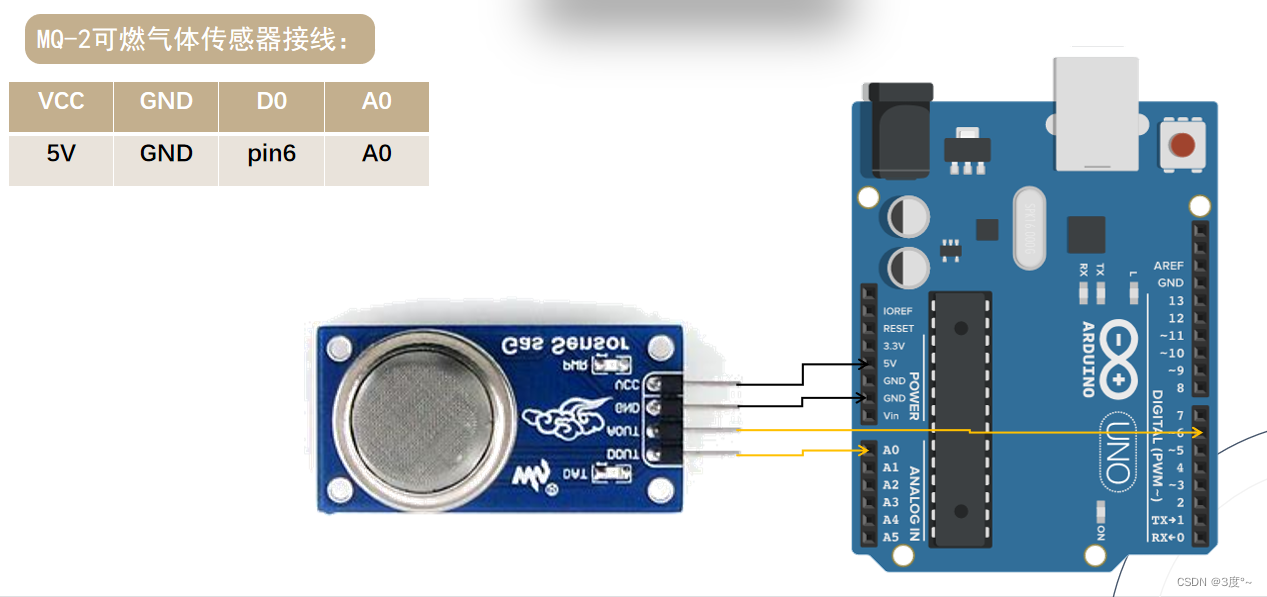
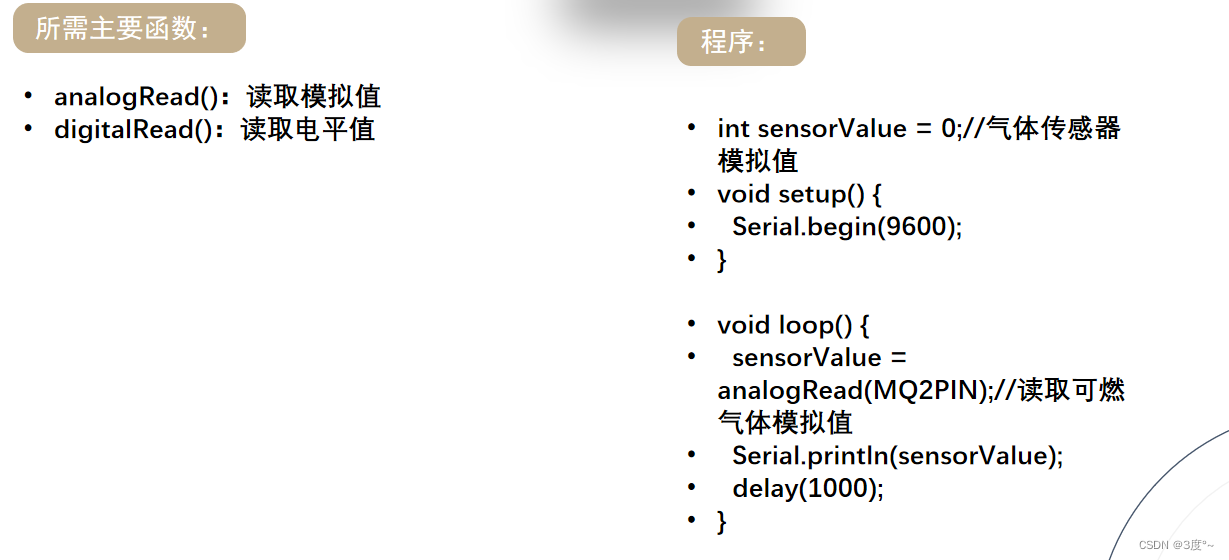
#include <Arduino.h>

// put function declarations here:
#define D3 3  //可燃气体传感器数字输入
#define D2 2  //蜂鸣器数字输入

int sensorValue = 0;  // 可燃气体传感器

void setup() {
  // put your setup code here, to run once:
  Serial.begin(115200);
  pinMode(D3, INPUT);
  pinMode(D2, OUTPUT);
}

void loop() {
  // put your main code here, to run repeatedly:
  Serial.println(digitalRead(D3));
  Serial.println("-------------------");
  Serial.println(analogRead(A0));
  Serial.println("-------------------");
  delay(1000);
  if (analogRead(A0) > 300) {
    digitalWrite(D2, HIGH);
    delay(100);
    digitalWrite(D2, LOW);
    delay(100);
  } else {
    digitalWrite(D2, LOW);
  }
}

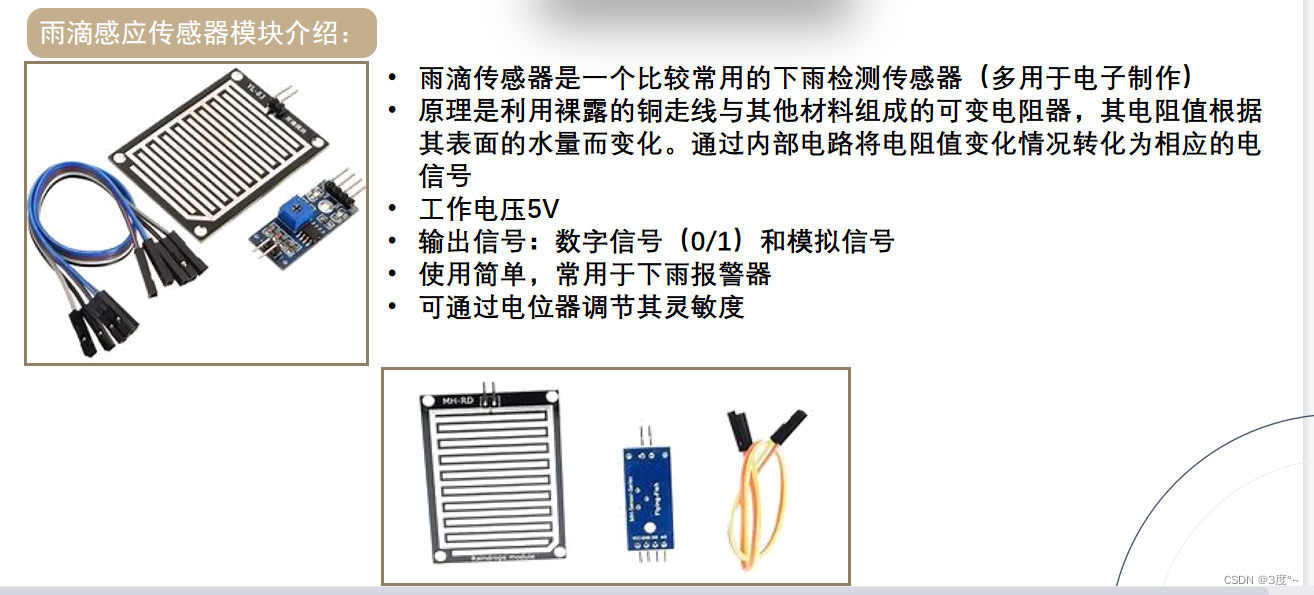
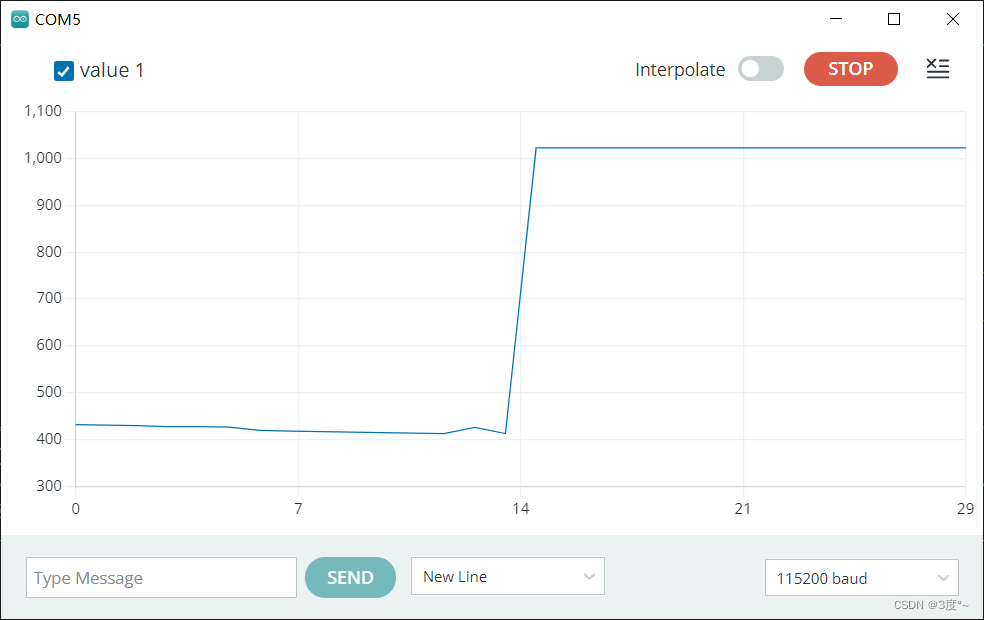
雨滴传感器
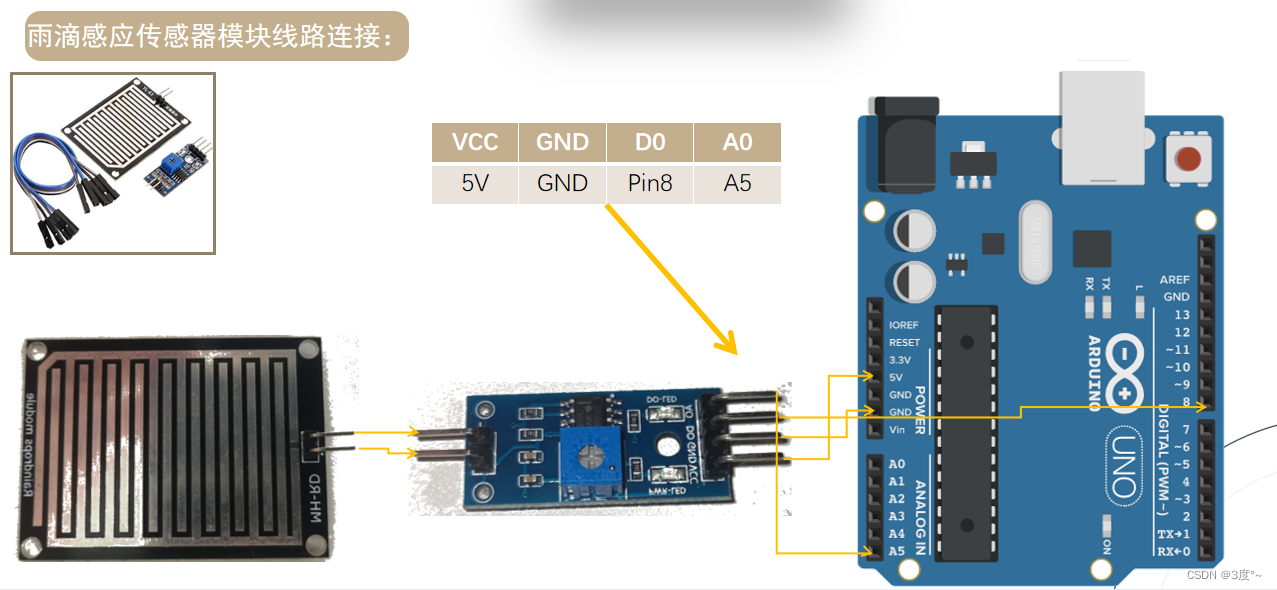
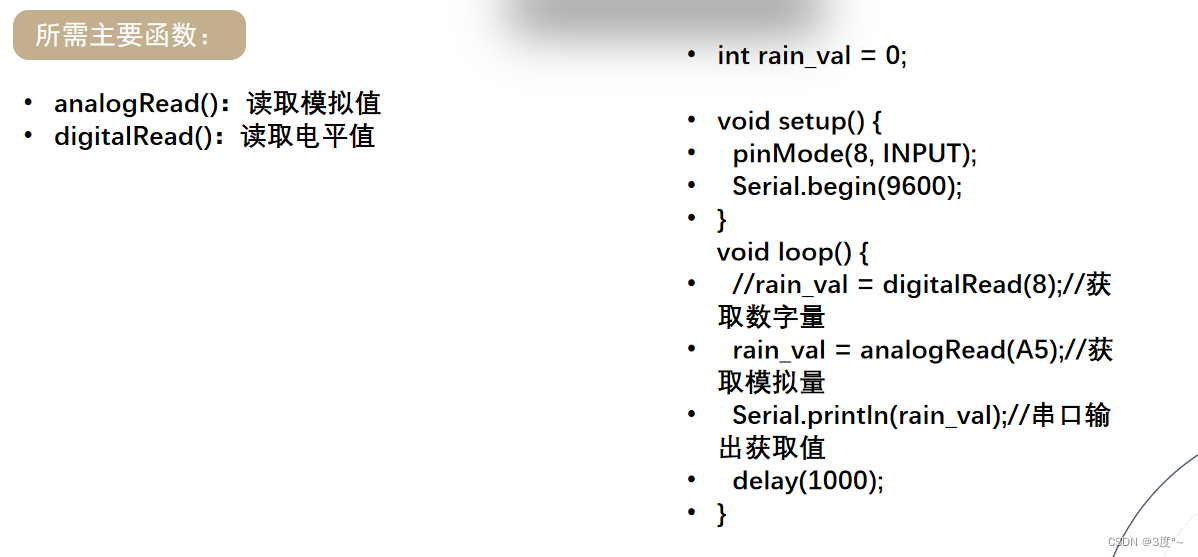
#include <Arduino.h>
#define D3 3  // 雨滴模拟器数字输入口
#define D2 2  //蜂鸣器数字输入

int rain_val_2 = 0;
void setup()
{
  pinMode(D3, INPUT);
  pinMode(D2, OUTPUT);
  Serial.begin(115200);
}

void loop()
{
  // rain_val_1 = digitalRead(4);  // 获取数字量
  rain_val_2 = analogRead(A0); // 获取模拟量
  Serial.println(rain_val_2);
  delay(1000);
  if (analogRead(A0) < 1000) {
    digitalWrite(D2, HIGH);
    delay(100);
    digitalWrite(D2, LOW);
    delay(100);
  } else {
    digitalWrite(D2, LOW);
  }
}
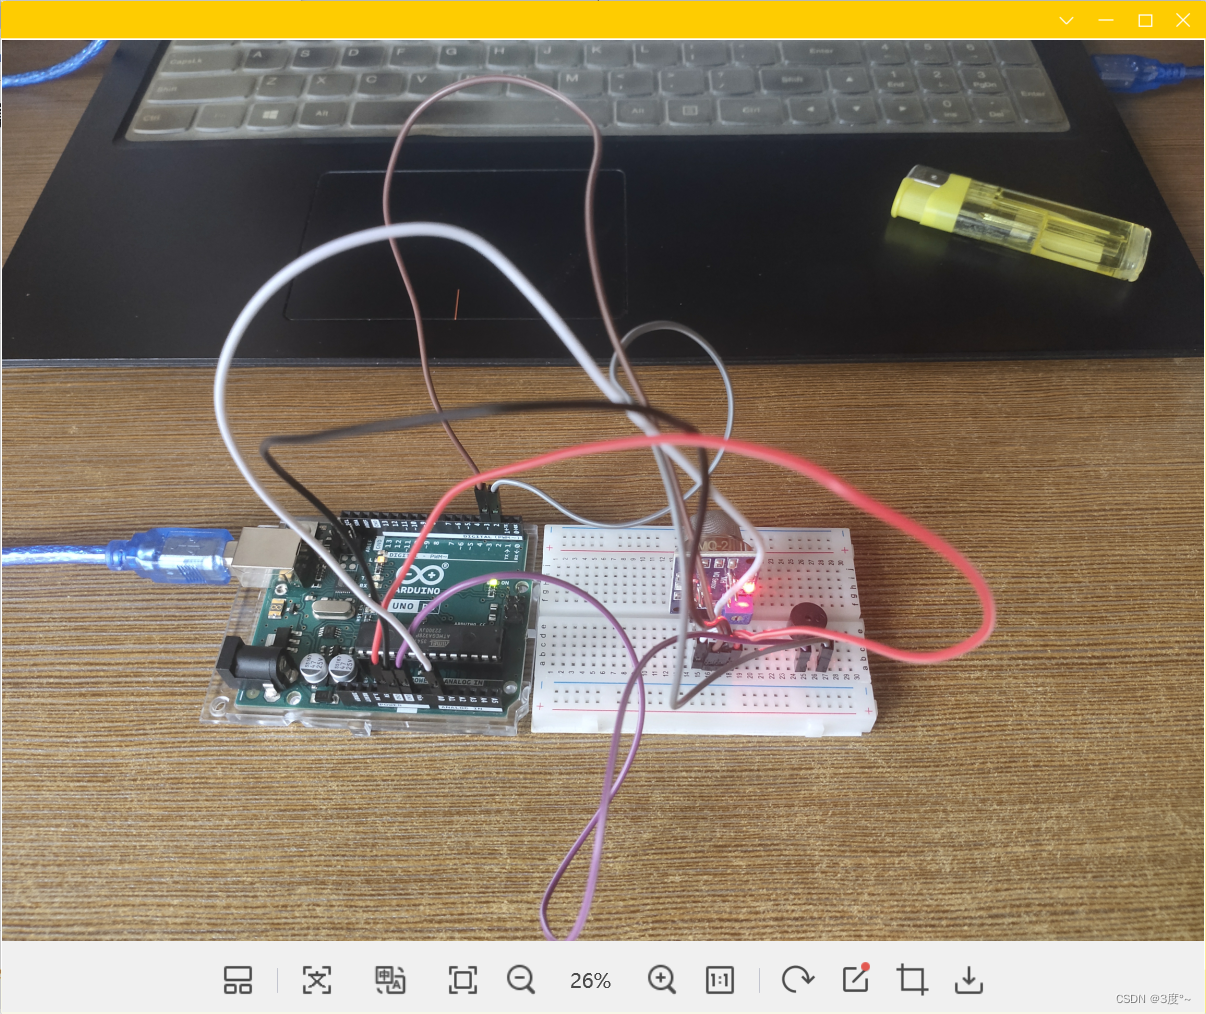
超声波传感器

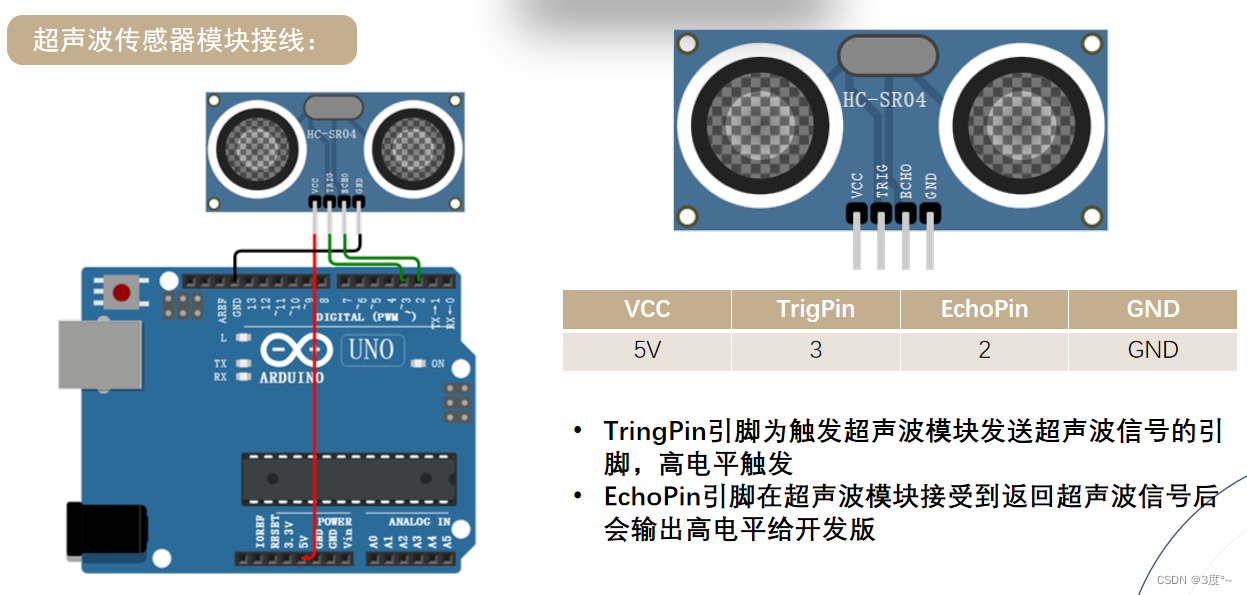

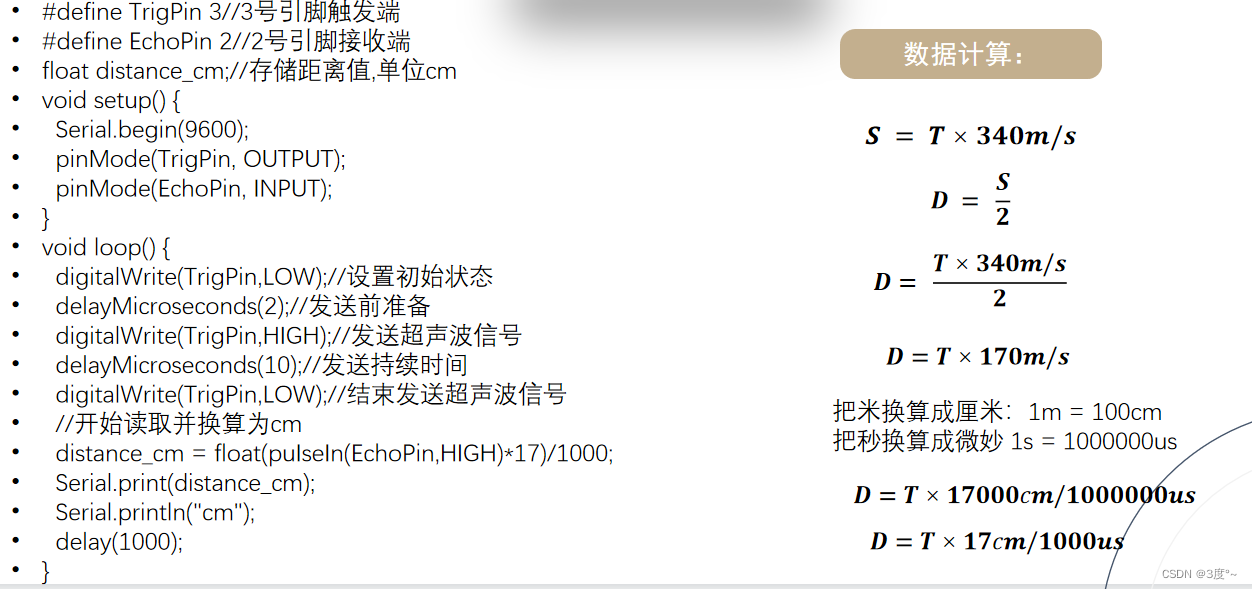
#include <Arduino.h>
#define trigpin 4
#define echopin 3
#define D2 2 // 蜂鸣器数字输入口
float distance_cm; // 存储距离值,单位cm
void setup()
{
Serial.begin(115200);
pinMode(trigpin, OUTPUT);
pinMode(echopin, INPUT);
pinMode(D2, OUTPUT);
}
void loop()
{
digitalWrite(trigpin, LOW); // 设置初始状态
delayMicroseconds(2); // 发送前准备
digitalWrite(trigpin, HIGH); // 发送超声波信号
delayMicroseconds(10); // 发送持续时间
digitalWrite(trigpin, LOW); // 结束发送超声波信号
// 开始读取并换算为cm
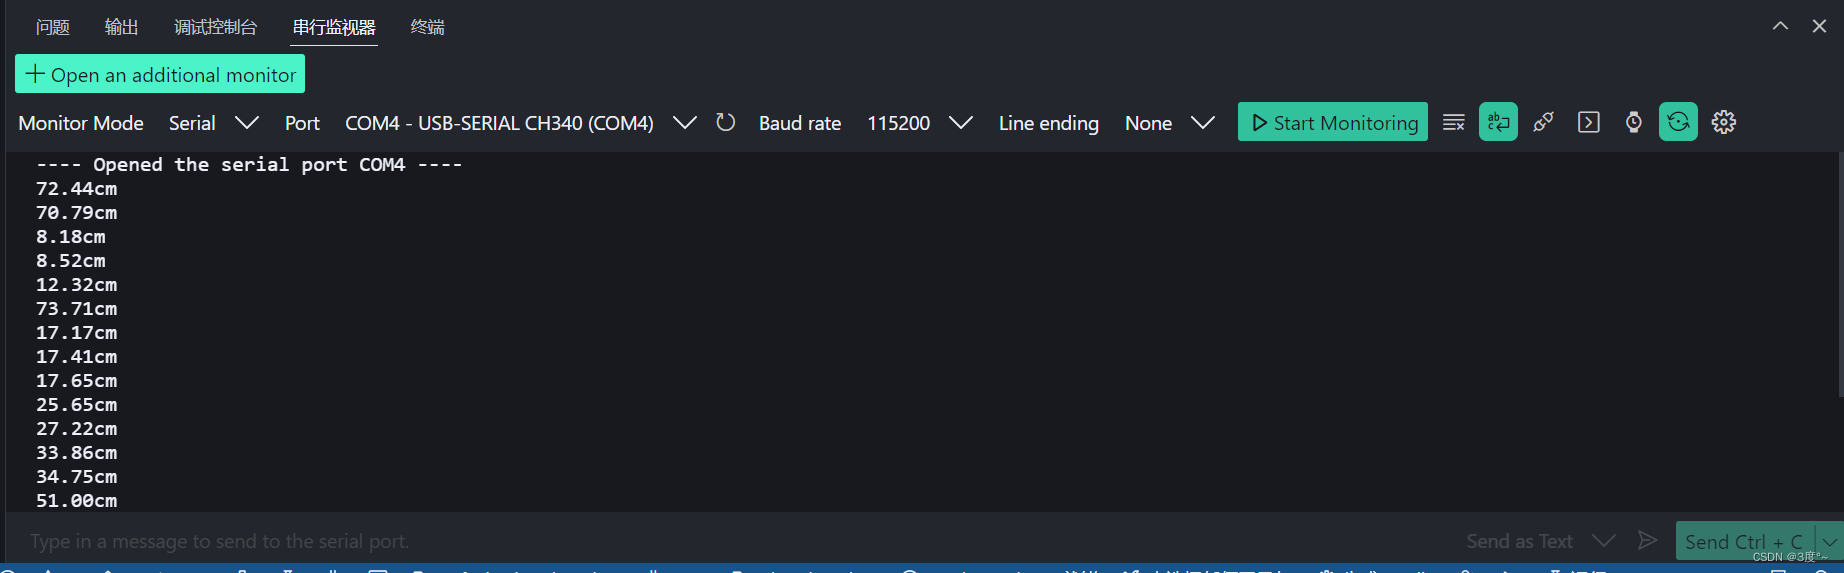
distance_cm = float(pulseIn(echopin, HIGH) * 17) / 1000;
Serial.print(distance_cm);
Serial.println("cm");
Serial.println("---------------------");
// Serial.println(100 + distance_cm * 10);
delay(1000);
if (distance_cm < 45) {
digitalWrite(D2, HIGH);
delay(100 + distance_cm * 10);
digitalWrite(D2, LOW);
delay(100 + distance_cm * 10);
} else {
digitalWrite(D2, LOW);
}
}
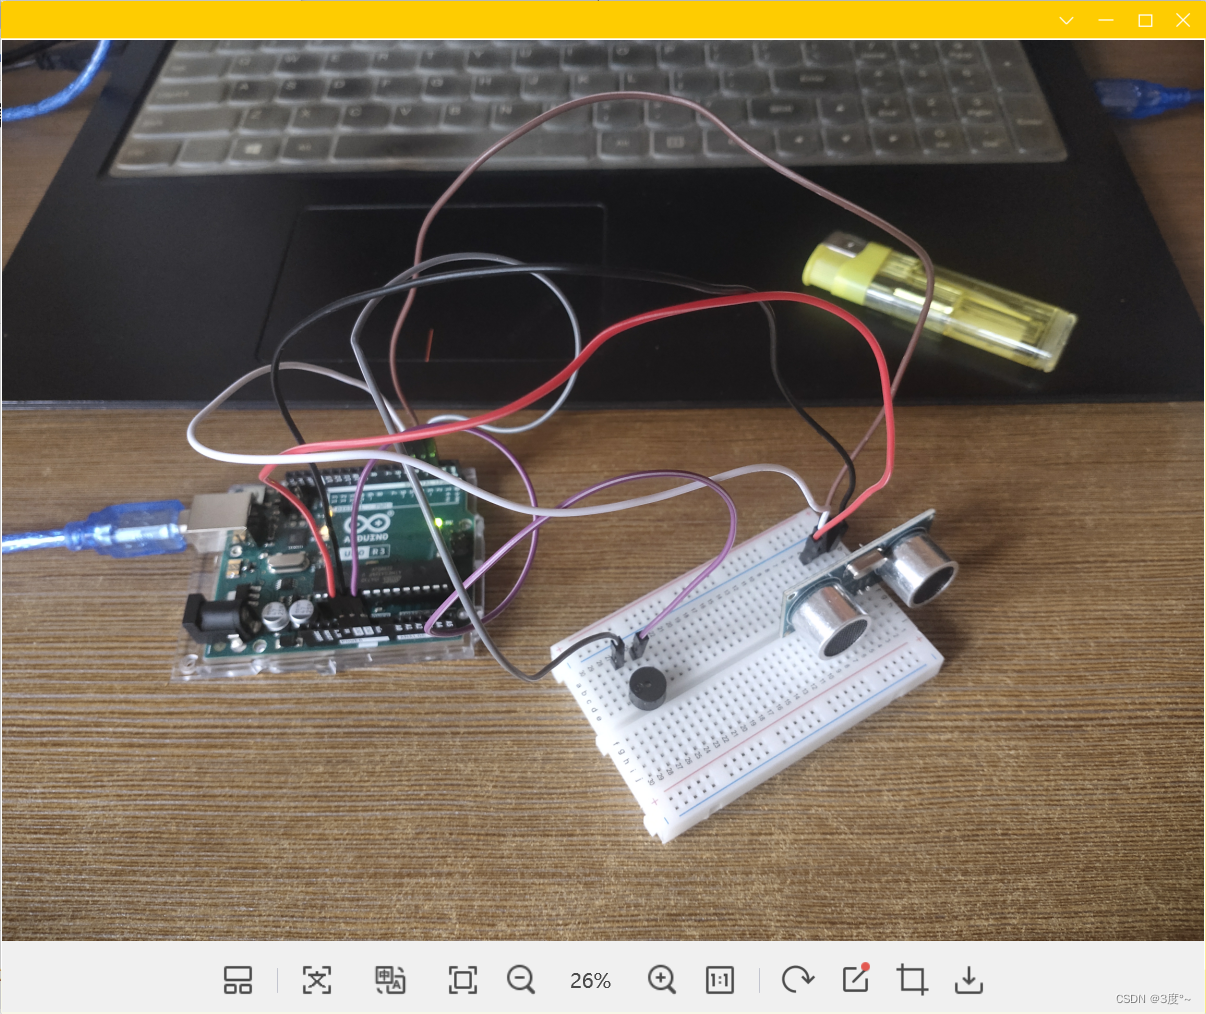
蜂鸣器
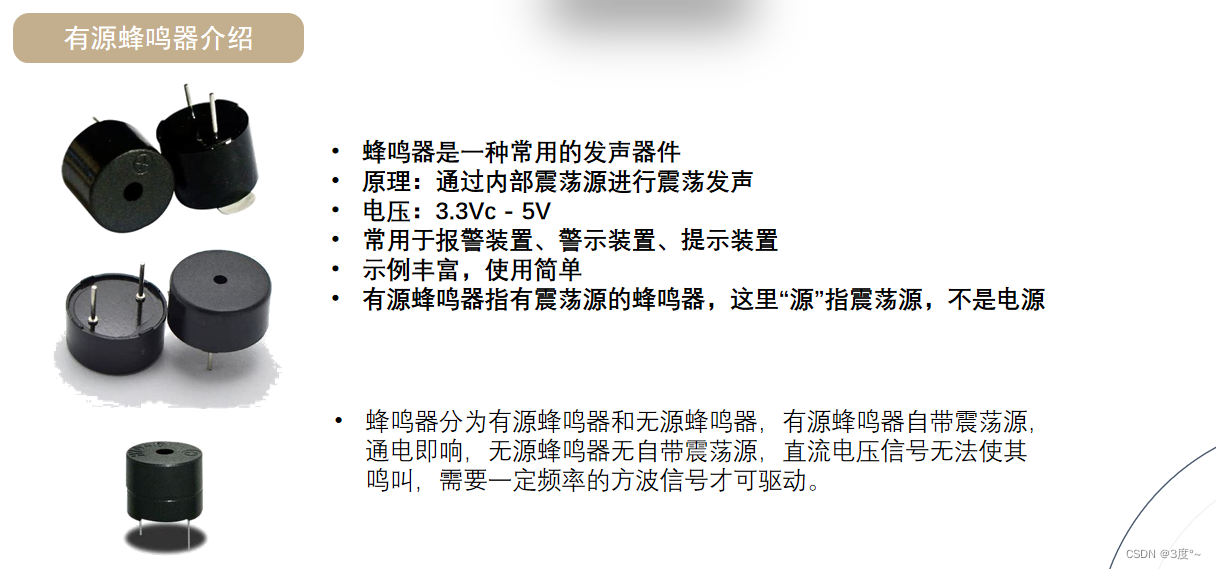
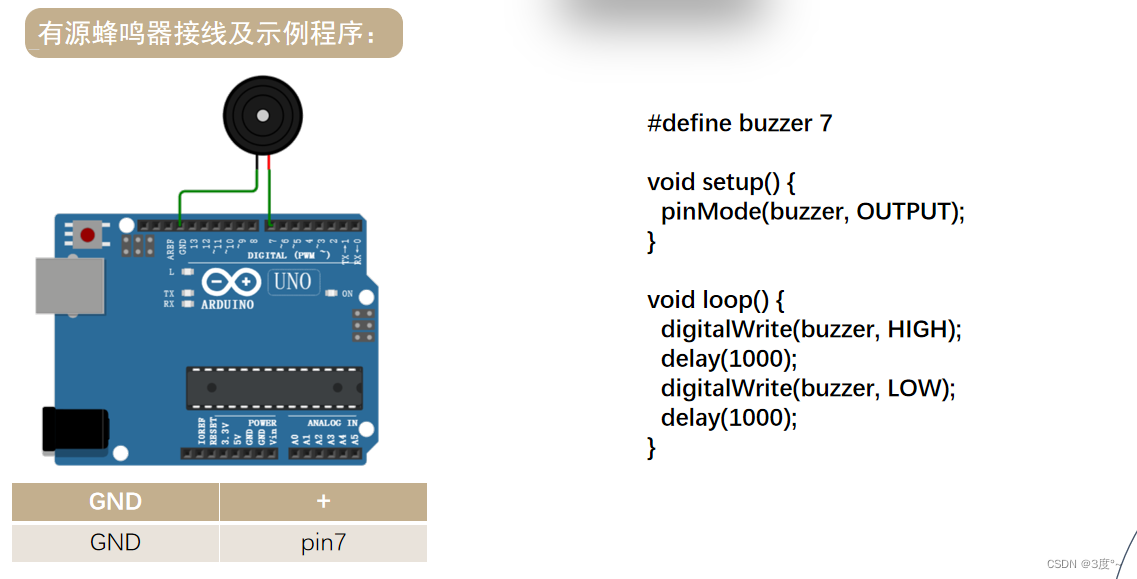
#include <Arduino.h>

// put function declarations here:
#define buzzer 4
void setup() {
  // put your setup code here, to run once:
  pinMode(buzzer, OUTPUT);
}

void loop() {
  // put your main code here, to run repeatedly:
  digitalWrite(buzzer, HIGH);  //发声
  delay(1000);
  digitalWrite(buzzer, LOW);   //不发声
  delay(1000);
}
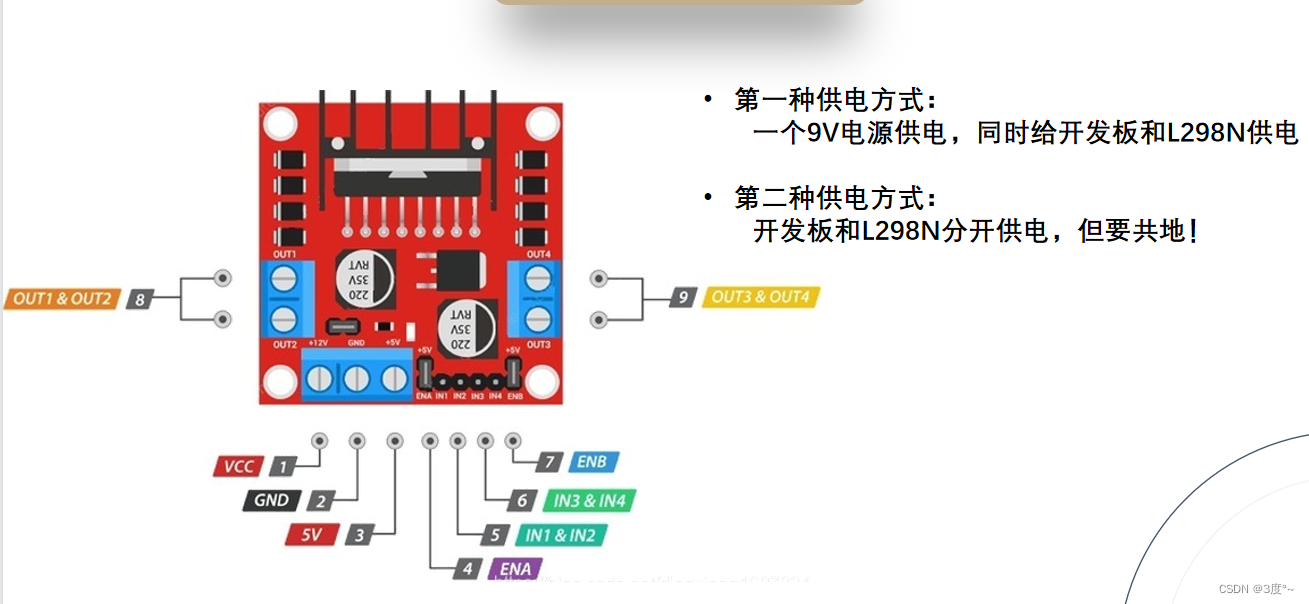
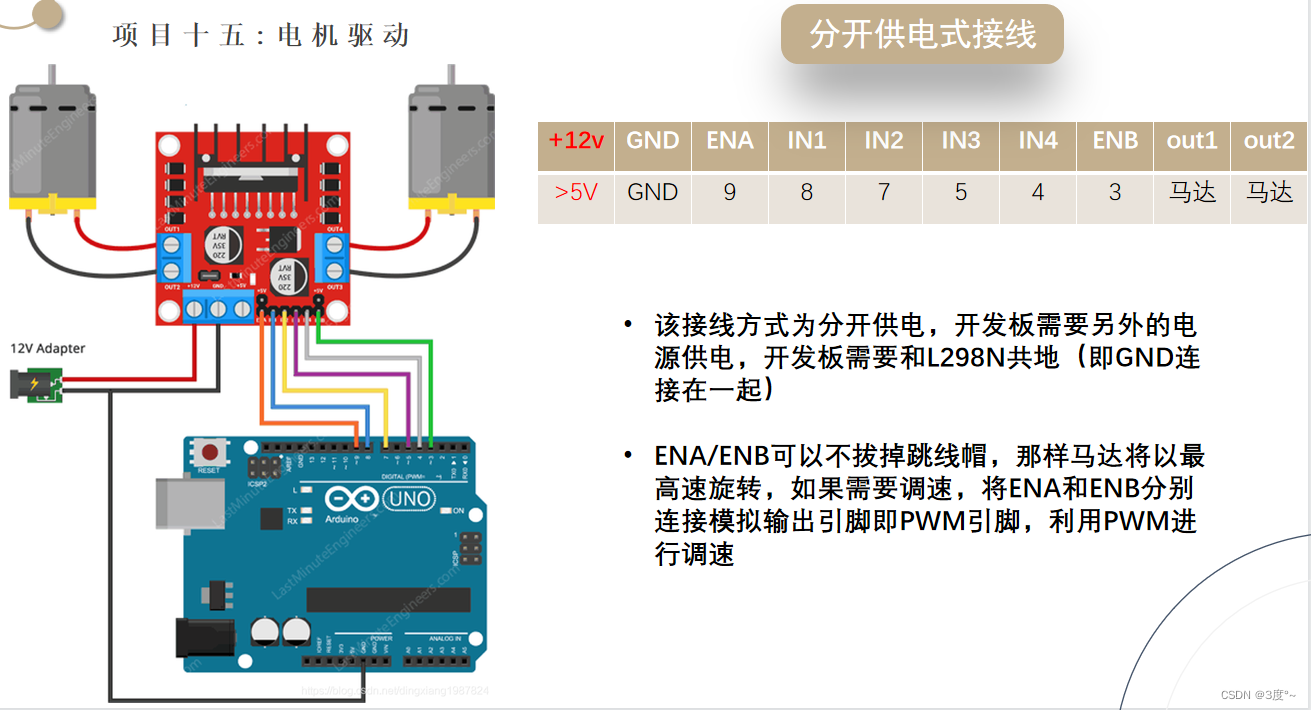
L298N电机驱动
转载:
L298N电机驱动模块的接线使用与代码实现_l298npwm调速接线_Clichong的博客-CSDN博客

当电源<12v的时候,板载5v输出使能跳线帽不用拔掉,>12v可以拔掉,再找一个5v电源给板子供电
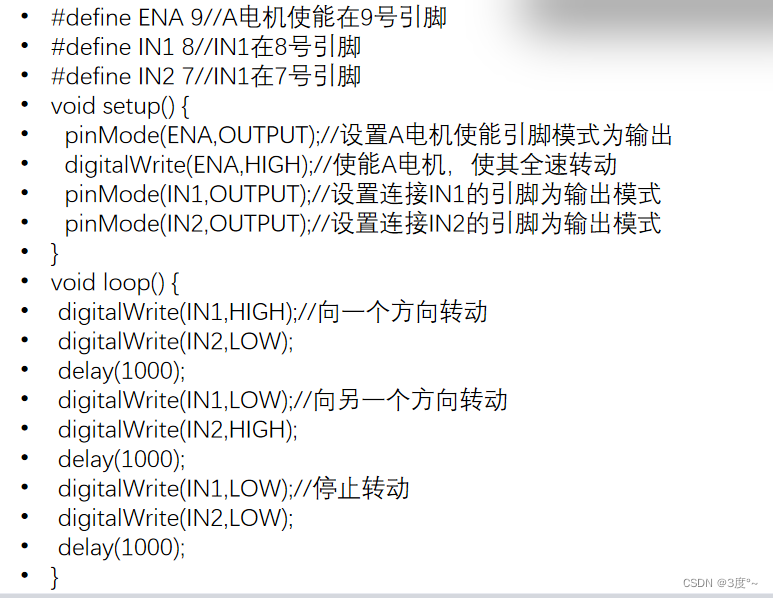
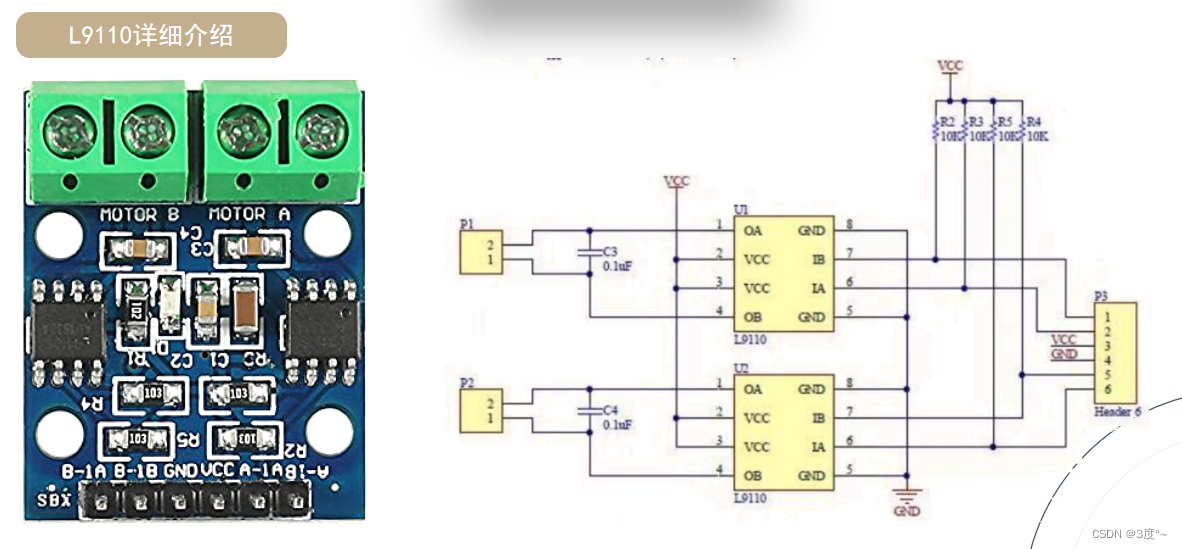
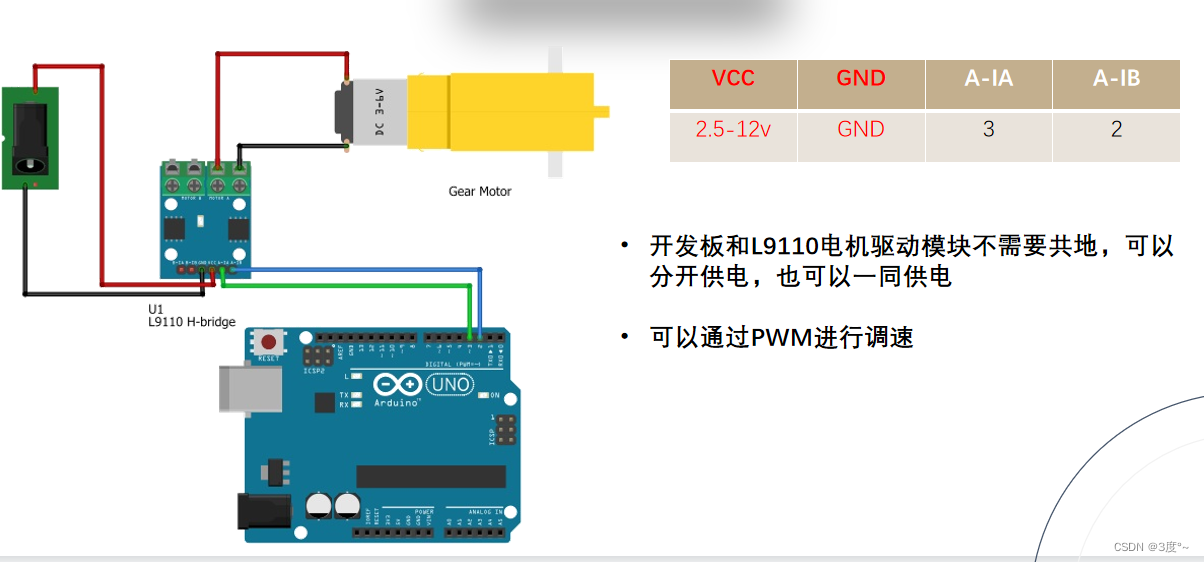
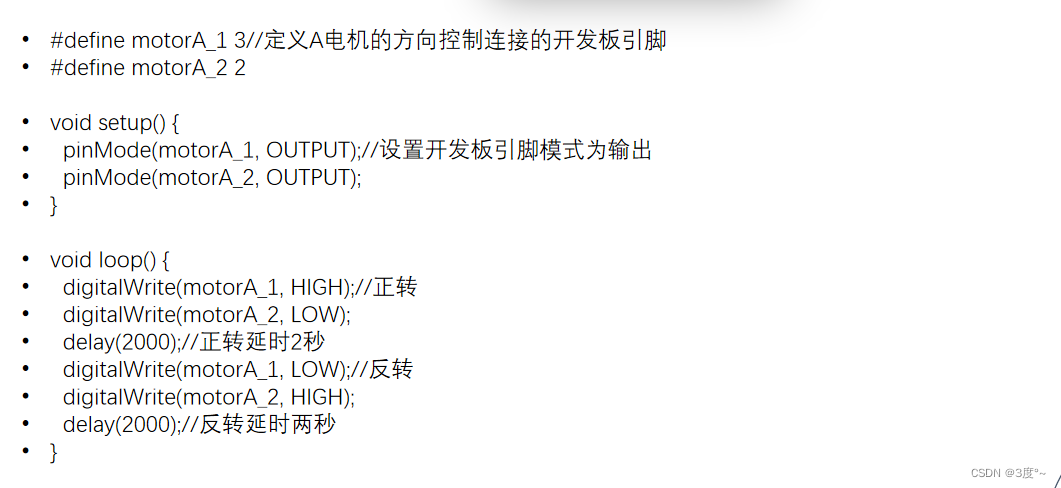
L9110电机驱动

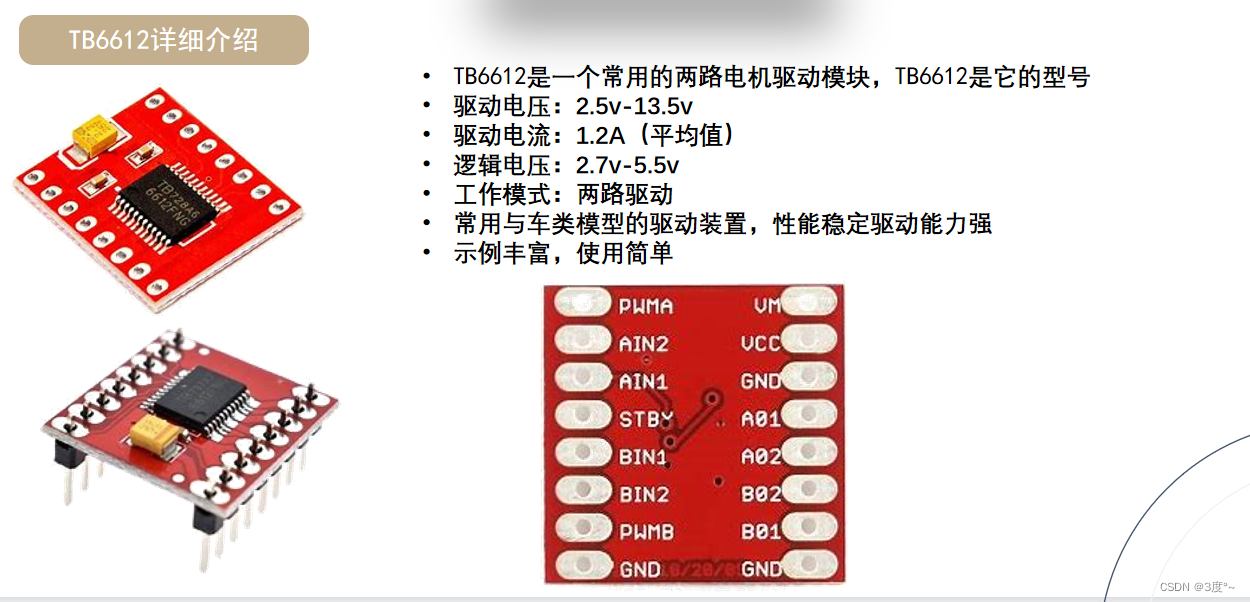
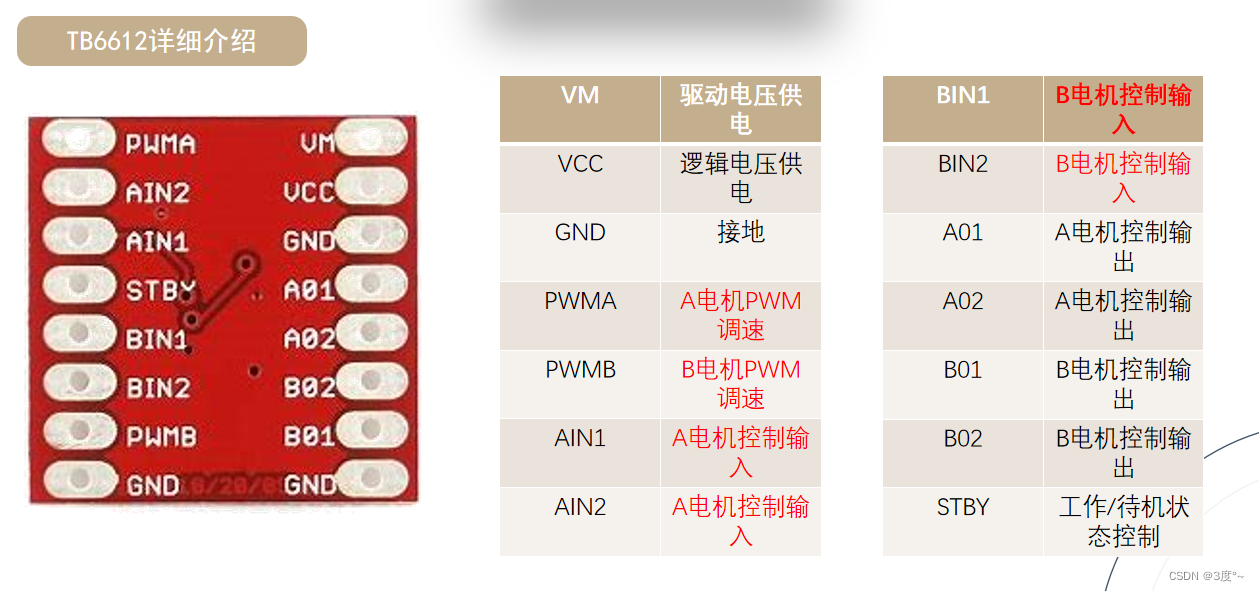
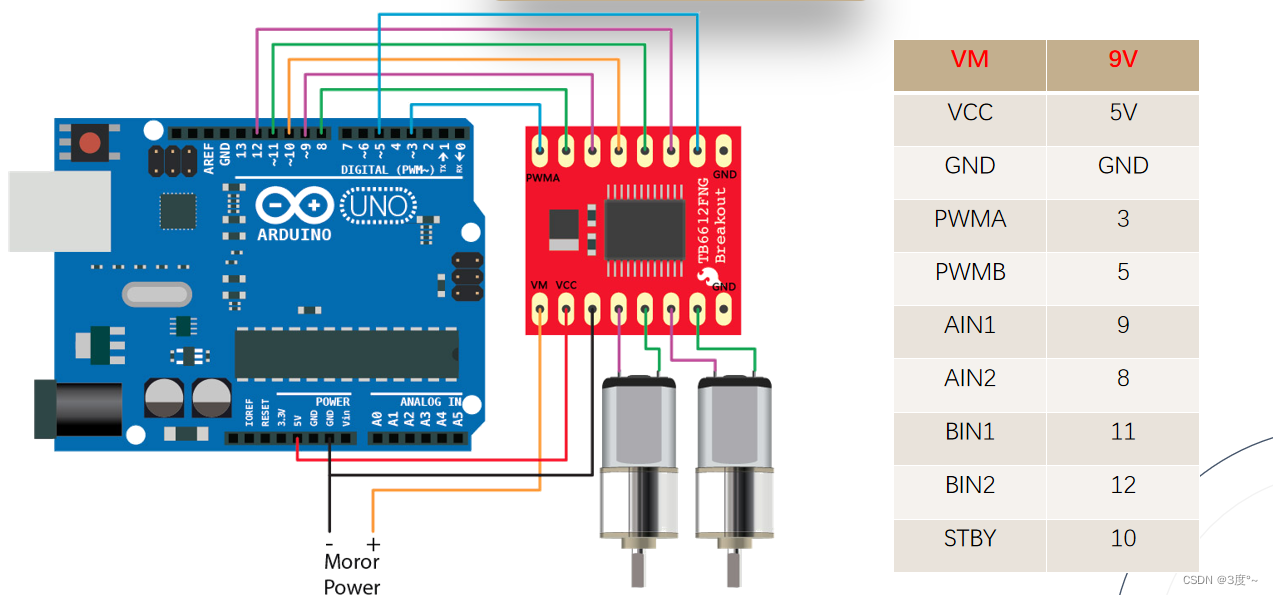
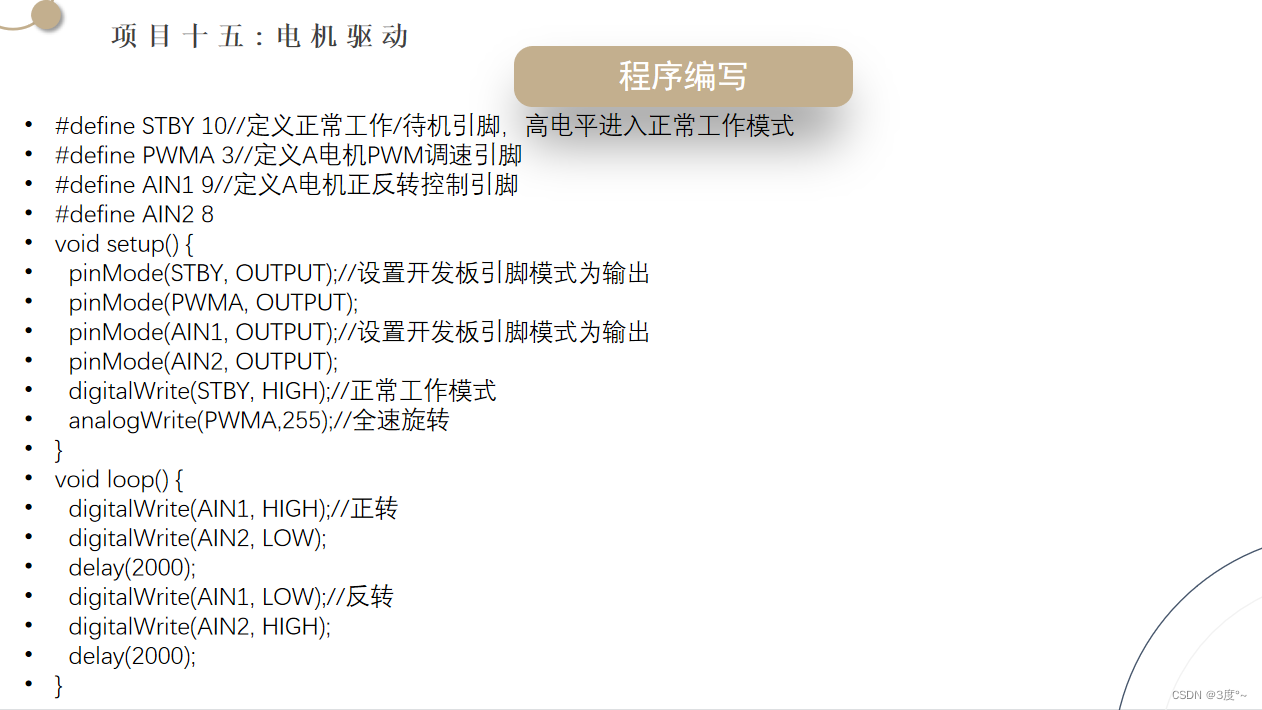
TB6612电机驱动
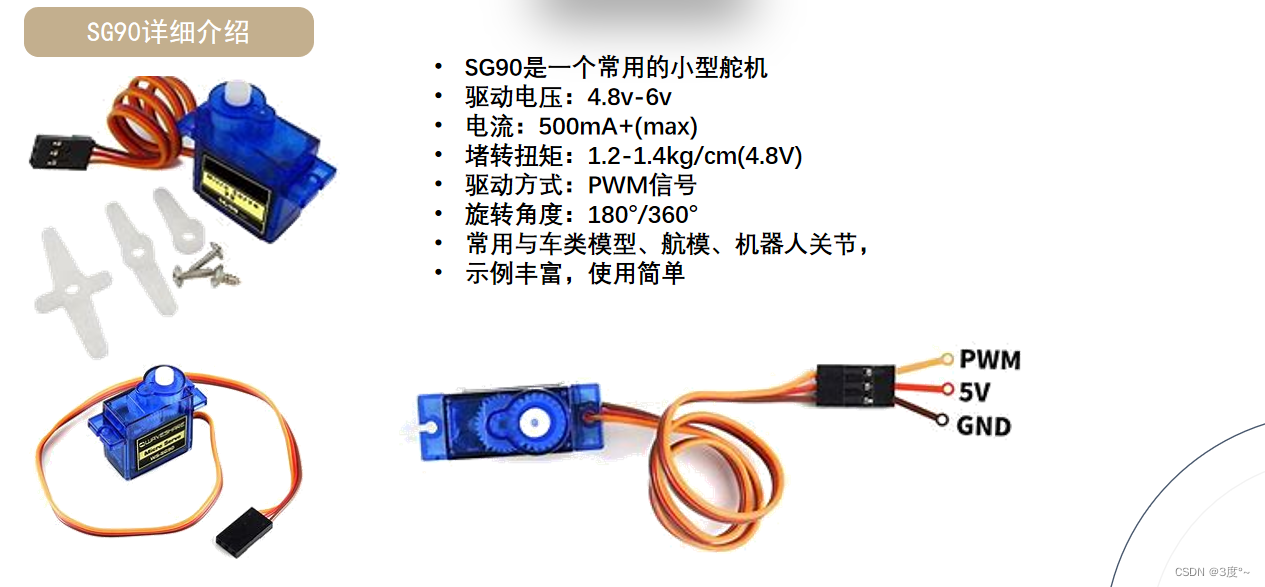
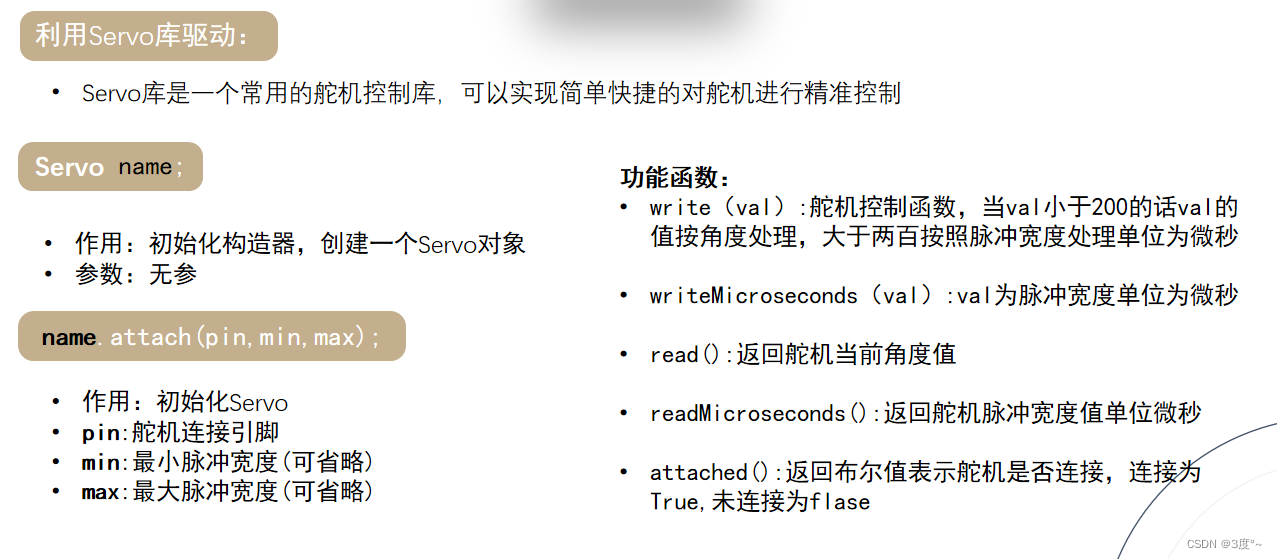
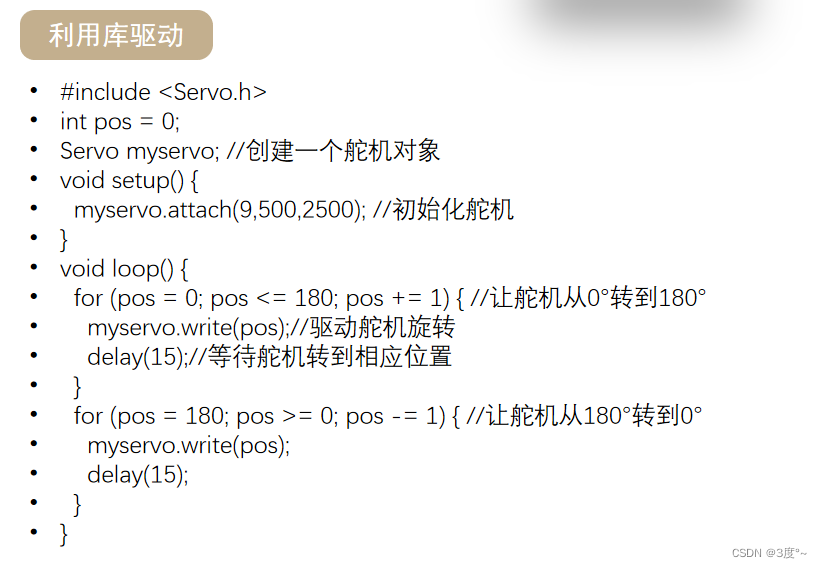
舵机使用


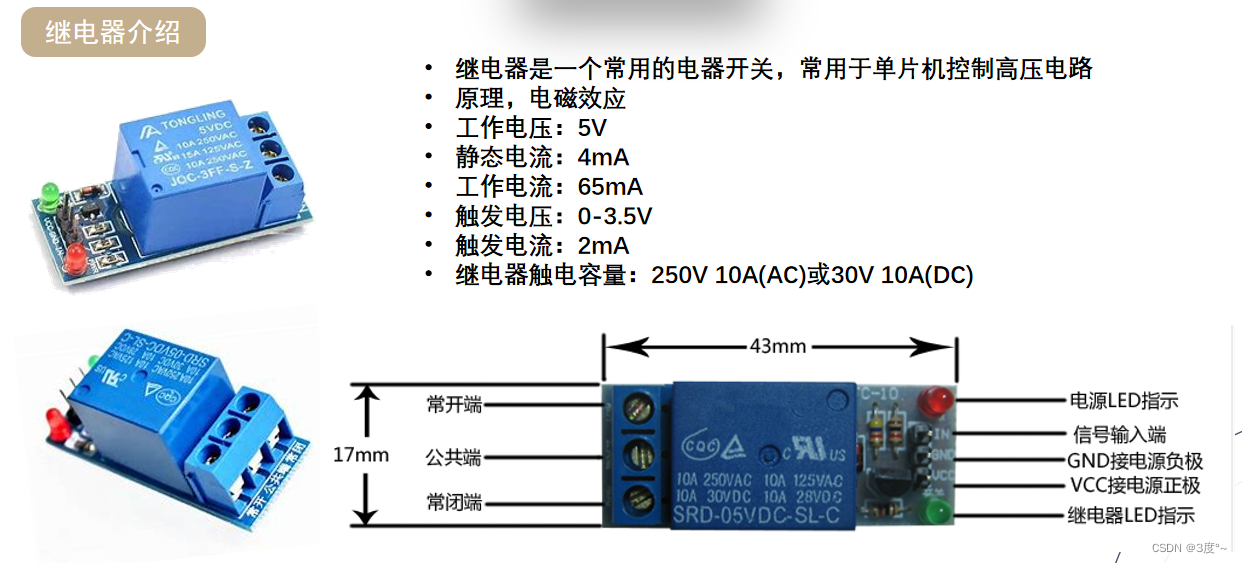
继电器使用
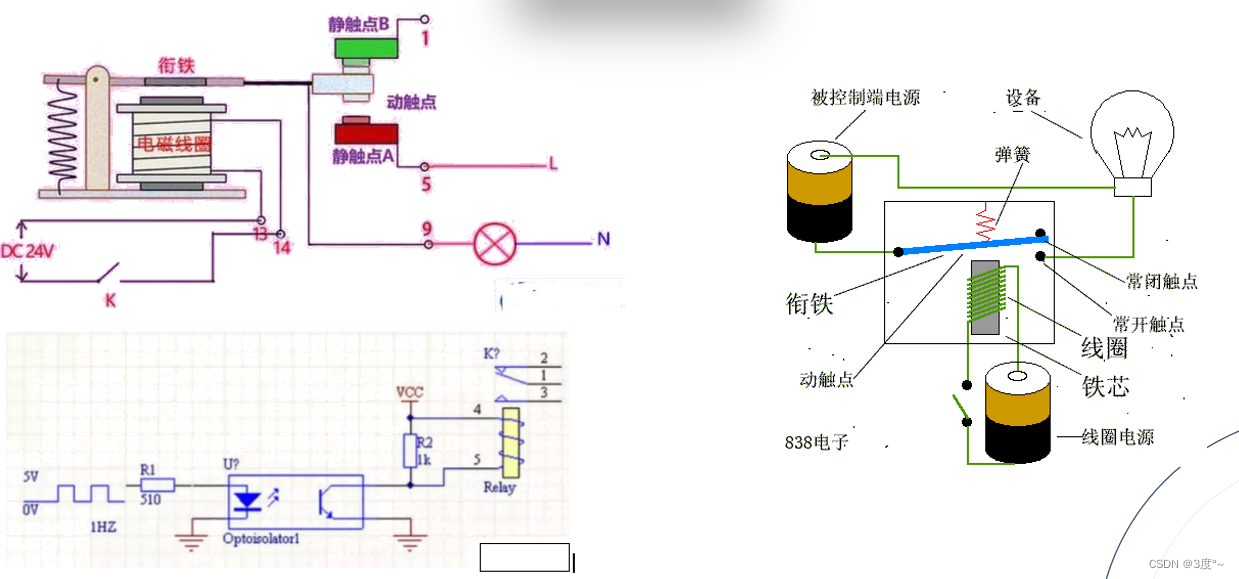
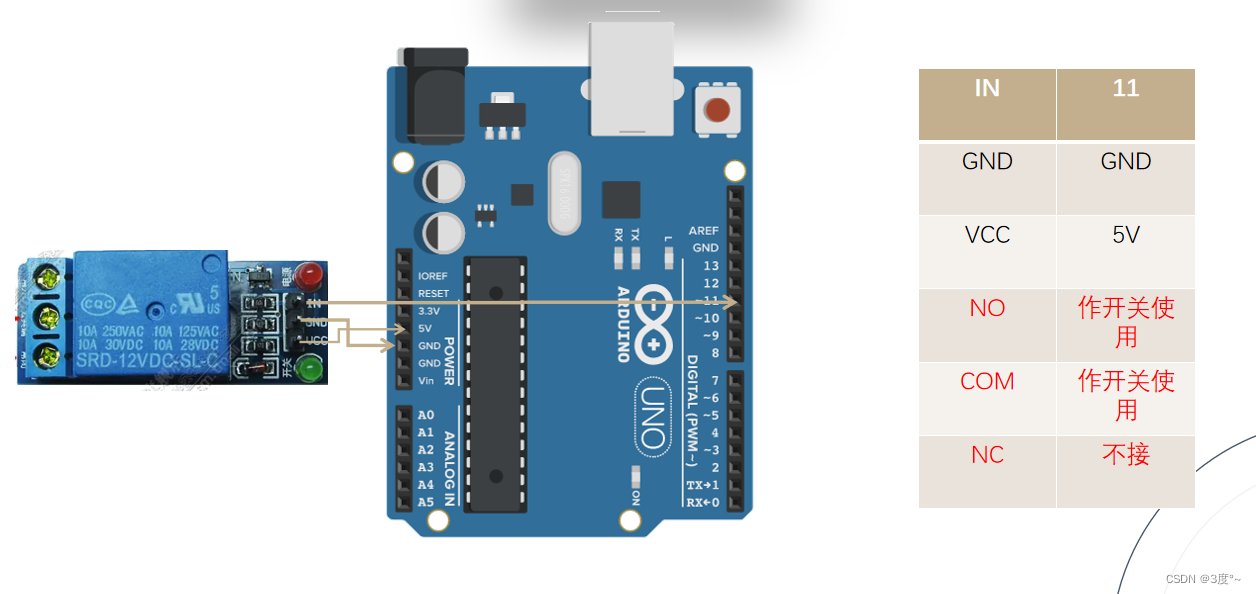
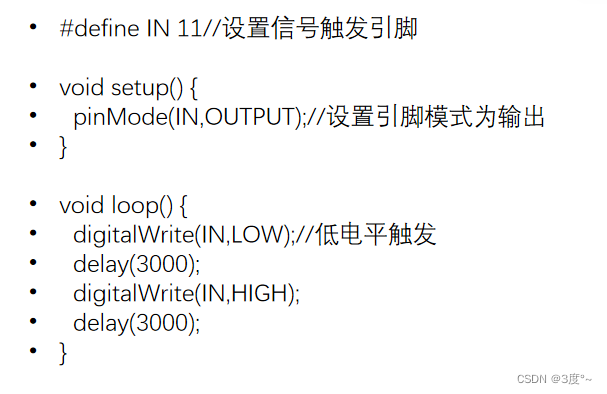
#define IN 11//设置信号触发引脚

void setup() {
pinMode(IN,OUTPUT);//设置引脚模式为输出
}
void loop() {
digitalWrite(IN,LOW);//低电平触发
delay(3000);
digitalWrite(IN,HIGH);
delay(3000);
}


 1万+
1万+


 被折叠的 条评论
为什么被折叠?
被折叠的 条评论
为什么被折叠?
 到【灌水乐园】发言


