


之前我的HoloLens目标检测功能是用的SAM+视觉大语言模型。它的好处是可以识别几乎所有对象,如墙壁或者地板或者其他的东西。但是它的缺点就是一次性只能识别一个物体,并且速度很慢。要一次性识别多个物体很麻烦,之前也是考虑过用yolo进行目标检测的,但是关于怎么去呈现检测结果是个问题。
本篇博文主要是做个笔记,同时给大家提供一种目标检测结果呈现的捷径的、轻巧的思路。
1.现有项目介绍
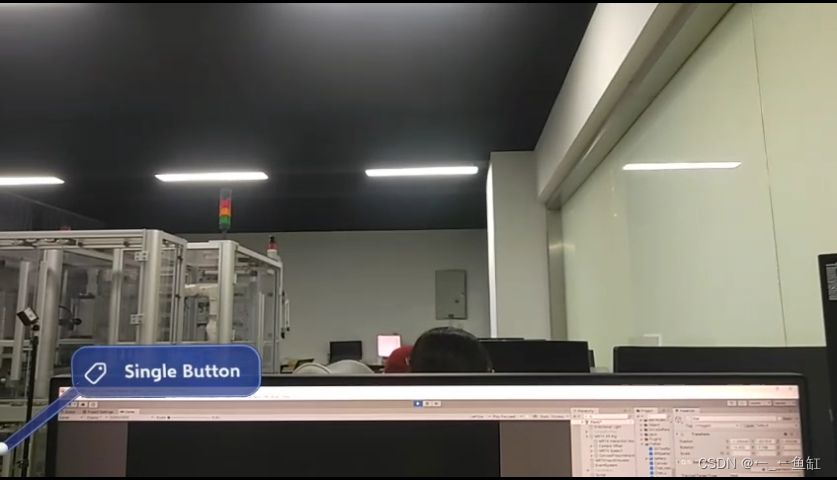
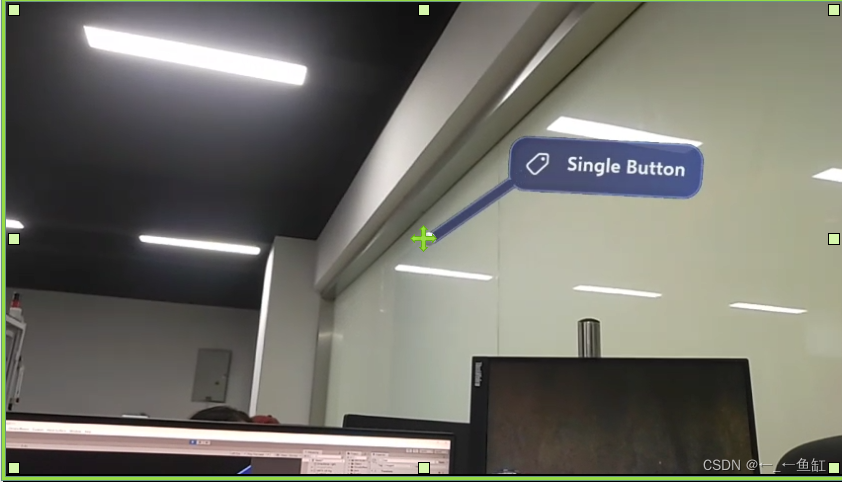
以下是我的单个物体的目标检测功能。
使用的模型
我利用的是一个视觉大语言模型的开源项目:
GitHub - CircleRadon/Osprey: [CVPR2024] The code for "Osprey: Pixel Understanding with Visual Instruction Tuning"

该功能是输入一张图片,以及一个平面坐标,就可以得到这个坐标对应的对象类别以及他的状态属性等详细描述。他有简短描述和长描述。而我在项目中直接默认识别了中央的位置物体。
该模型优点:可以识别图中所有的对象
缺点:速度慢,一个对象需要识别0.8s以上,且一次只能识别一个对象。
呈现效果设计
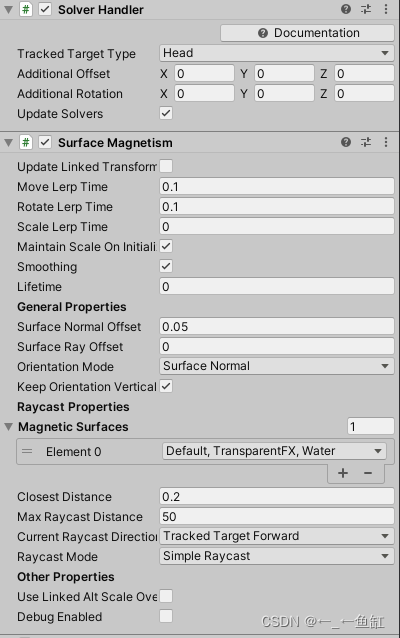
至于这个圆圈的识别icon是怎么来的,这里大家可以看看我之前的博文,http://t.csdnimg.cn/idQ7o。主要是用到MRTK3的solverhandle以及surface magnetism组件。具体用法可以看我给的官方案例SolverExamples里面的效果。
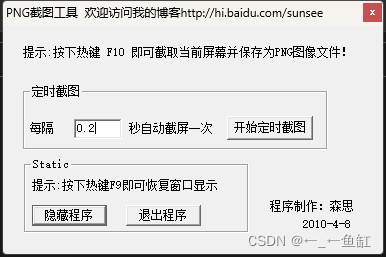
然后因为检测时间比较长,我就设置了icon的旋转特效,这里主要是用了两张png图片做UI,一个静止,一个旋转。
右下角的几分之几是为了判断现在请求的图片是否有丢失,因为0.8s才能检测完一张,有时候检测频率过快就会丢失。11/12表示发送了12张图片到后台,但是只获得了11次分类结果。
捕获图片
这一步我投机取巧了,这里我直接通过微软hololens的官方投屏软件投屏到桌面,然后通过自动截图软件设置0.2s截屏一次,
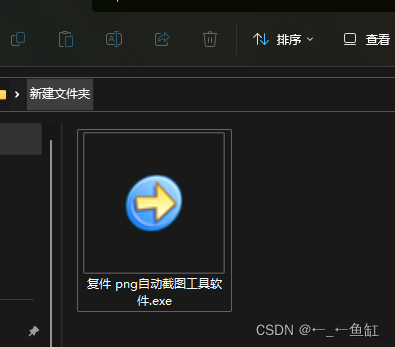
我主页提供了自动截图软件的下载:
https://download.csdn.net/download/qq_72486113/89156507?spm=1001.2014.3001.5503
2.Yolo接口部署
yolo官方案例测试
之前提到的方案首先是大语言模型需要17G显存,很麻烦,而且识别速度堪忧。
现在退求其次旋转Yolo来进行检测,这里我是用Yolov8的分割模型,主要是为了更好的确定掩码中点位置。
Yolov8官网:results - Ultralytics YOLOv8 Docs
主页tasks里的分割讲了怎么安装依赖还有给了代码示例:
from ultralytics import YOLO

# Load a model
model = YOLO('yolov8n-seg.pt')  # load an official model
model = YOLO('path/to/best.pt')  # load a custom model

# Predict with the model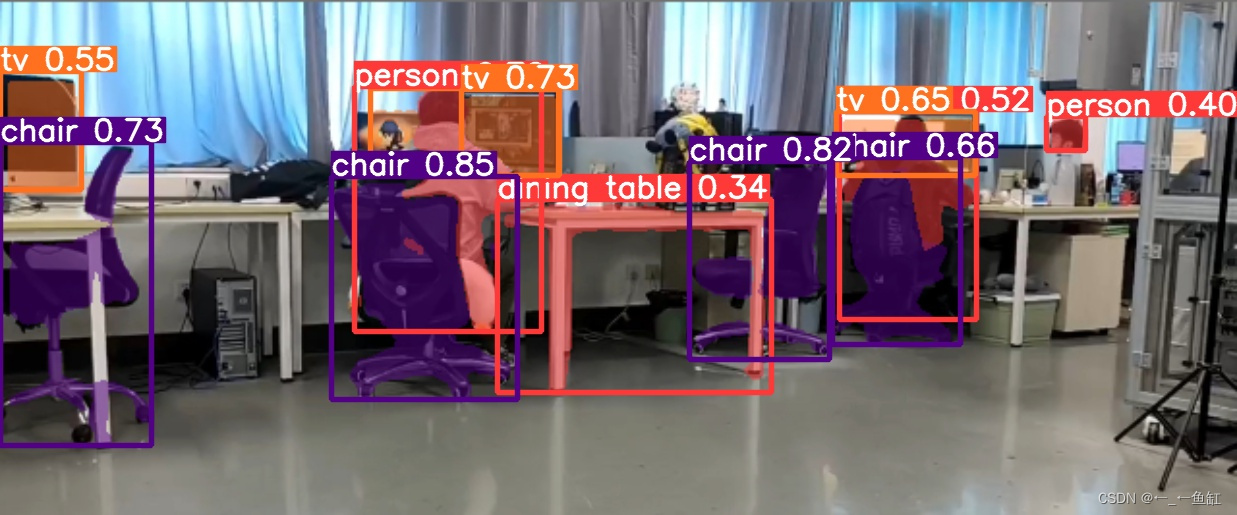
results = model('https://ultralytics.com/images/bus.jpg') # predict on an image这里我用的是参数最大的模型:YOLOv8x-seg,目前我8G显存测一张图大概1-10ms之间。这个模型参数多的好处就是能检测出一些不容易识别出但是有分类标签的对象。比如我贴了贴纸的电脑,他能够通过参数高的模型识别出来。yolov目前有80个分类类别。
介绍几个目前我们项目需要用到的yolo代码:
for result in results:
    json_result = result.tojson()           #将结果保存为json格式
    result.save(filename='result.jpg')      #保存结果图片保存为result.jpg
    json_data = json.loads(json_result)     #将结果保存为json格式
数据后处理
目前我给大家一个测试的代码:
import json
import numpy as np
import os
from PIL import Image
from ultralytics import YOLO
model = YOLO('yolov8x-seg.pt') # 加载官方模型
images_folder_path = "C:/Users/YWG/Desktop/电脑自动截图工具软件 定时截图软件"
def get_latest_image_path(folder_path):
files = [f for f in os.listdir(folder_path) if os.path.isfile(os.path.join(folder_path, f))]
images = [f for f in files if f.lower().endswith(('.png', '.jpg', '.jpeg', '.gif', '.bmp'))]
images.sort(key=lambda x: os.path.getmtime(os.path.join(folder_path, x)), reverse=True)
if images:
latest_image_path = os.path.join(folder_path, images[0])
print("最新图像路径:", latest_image_path)
return latest_image_path
else:
print("文件夹中没有照片.")
return None
results = model(get_latest_image_path(images_folder_path)) # 对图像进行预测
object_details = []
for result in results:
json_result = result.tojson()
result.save(filename='result.jpg')
json_data = json.loads(json_result)
for item in json_data:
name = item["name"]
segments = item["segments"]
x = np.array(segments['x'])
y = np.array(segments['y'])
x_center = round(np.mean(x), 2)
y_center = round(np.mean(y), 2)
object_details.append({
"name": name,
"x": x_center,
"y": y_center
})
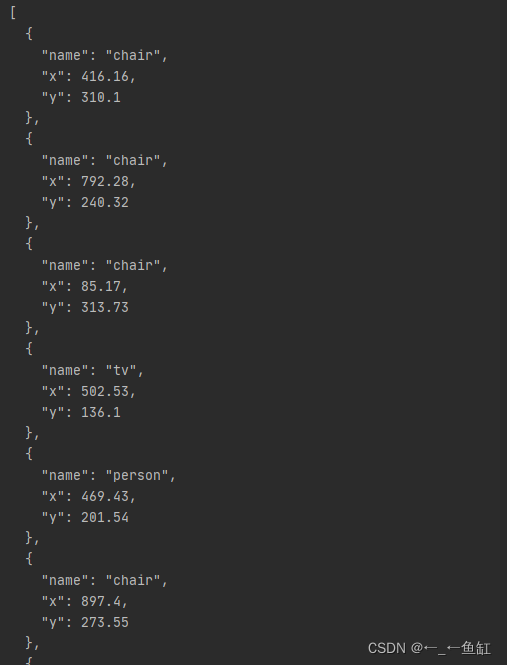
print(json.dumps(object_details, indent=2)) # 打印所有对象的名字和中心点
这个代码主要是识别一个文件夹中最新导入的图片(因为我是hololens的定时截图嘛,所以识别最新的图片)。然后将识别的json结果通过一系列处理得到一个列表,这个列表包含了每个识别到的对象的名字以及掩码中心(这里中心的话我没想到好的方式去获取,只能将就地取个平均值了)。
想具体了解处理过程的伙伴可以先自己打印json_result = result.tojson();中的json_result看看,就知道最初的结果是什么了。
这样我们就实现了一个功能: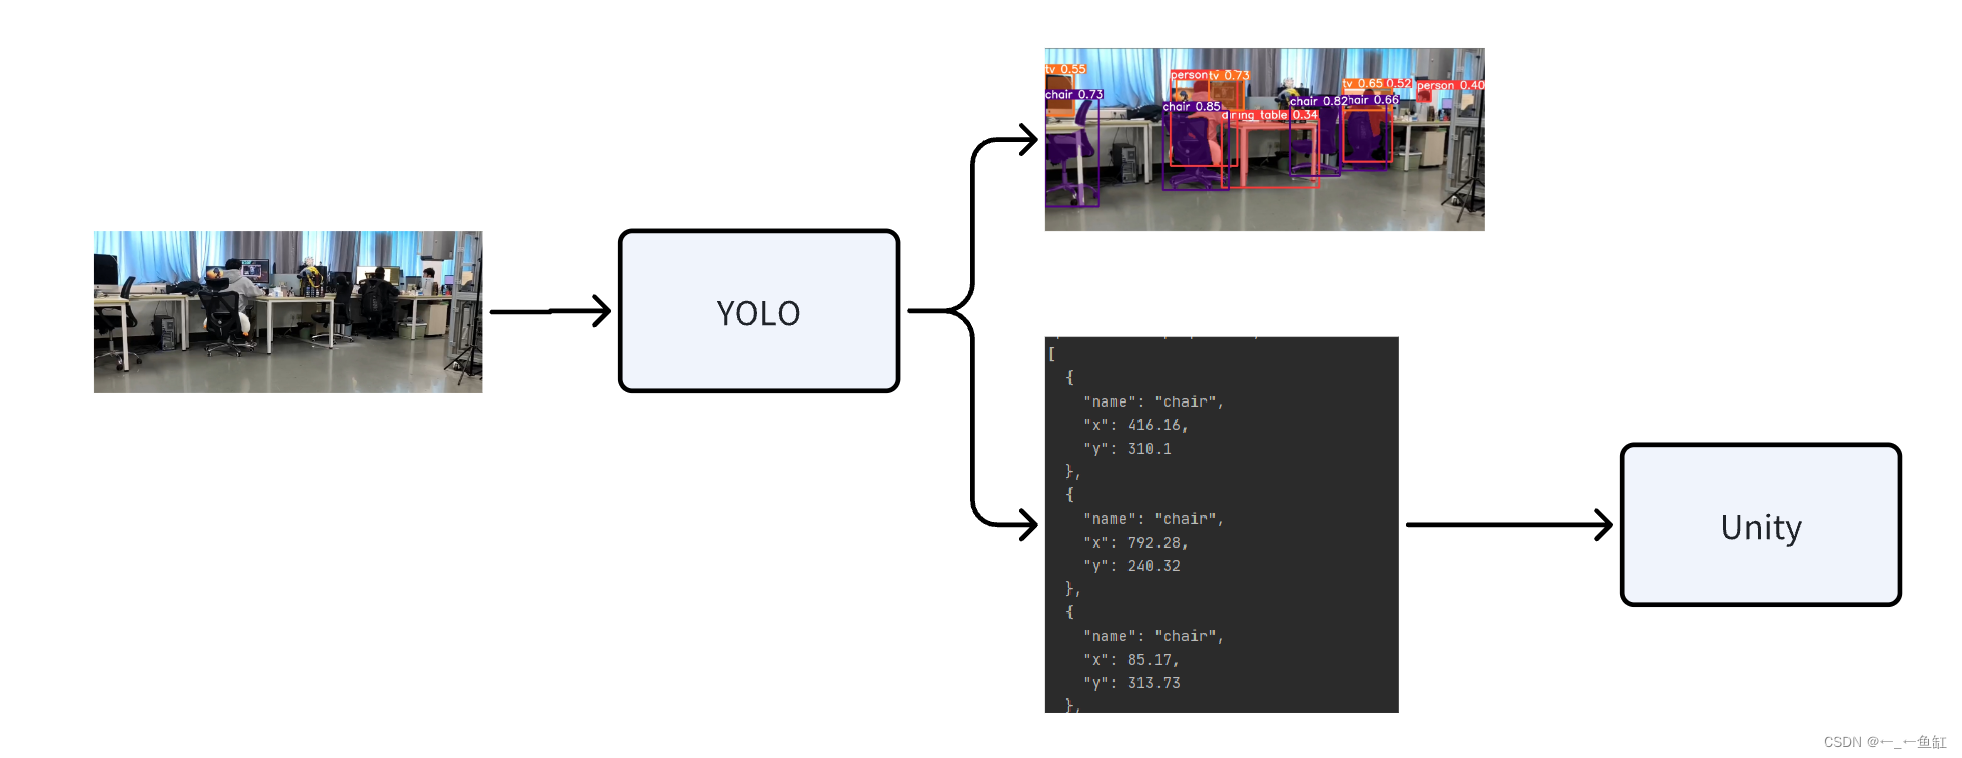
部署API
这一步其实很简单,我之前的博文有讲过怎么让GPT帮我们部署API,这里给出我的prompt给大家参考:
import json
import numpy as np
import os
from PIL import Image
from ultralytics import YOLO

model = YOLO('yolov8x-seg.pt')  # 加载官方模型
images_folder_path = "C:/Users/YWG/Desktop/电脑自动截图工具软件 定时截图软件"


def get_latest_image_path(folder_path):
    files = [f for f in os.listdir(folder_path) if os.path.isfile(os.path.join(folder_path, f))]
    images = [f for f in files if f.lower().endswith(('.png', '.jpg', '.jpeg', '.gif', '.bmp'))]
    images.sort(key=lambda x: os.path.getmtime(os.path.join(folder_path, x)), reverse=True)
    if images:
        latest_image_path = os.path.join(folder_path, images[0])
        print("最新图像路径:", latest_image_path)
        return latest_image_path
    else:
        print("文件夹中没有照片.")
        return None


results = model(get_latest_image_path(images_folder_path))  # 对图像进行预测
object_details = []

for result in results:
    json_result = result.tojson()
    result.save(filename='result.jpg')
    json_data = json.loads(json_result)

    for item in json_data:
        name = item["name"]
        segments = item["segments"]
        x = np.array(segments['x'])
        y = np.array(segments['y'])
        x_center = round(np.mean(x), 2)
        y_center = round(np.mean(y), 2)
        object_details.append({
            "name": name,
            "x": x_center,
            "y": y_center
        })
print(json.dumps(object_details, indent=2))  # 打印所有对象的名字和中心点

这是我现在的源码,我希望你帮我写一个脚本,将这个功能用FASTAPI部署成一个GET类型的api接口,
端口设置为8002,只要请求这个api,就可以获得object_details的json格式的响应
最后他会给你一个能够运行的脚本,接着我又提了一个需求:
我希望返回的结果中“x”和“y”的值可以归一化处理,也就是希望能够除以对应的图像的长宽。
最后我将答案贴在下面,大家可以直接复制粘贴用:
from fastapi import FastAPI
import json
import numpy as np
import os
from PIL import Image
from ultralytics import YOLO
import uvicorn

app = FastAPI()

model = YOLO('yolov8x-seg.pt')  # 加载官方模型
images_folder_path = "C:/Users/YWG/Desktop/电脑自动截图工具软件 定时截图软件"

def get_latest_image_path(folder_path):
    files = [f for f in os.listdir(folder_path) if os.path.isfile(os.path.join(folder_path, f))]
    images = [f for f in files if f.lower().endswith(('.png', '.jpg', '.jpeg', '.gif', '.bmp'))]
    images.sort(key=lambda x: os.path.getmtime(os.path.join(folder_path, x)), reverse=True)
    if images:
        return os.path.join(folder_path, images[0])
    return None

@app.get("/object_details")
def read_object_details():
    latest_image_path = get_latest_image_path(images_folder_path)
    if not latest_image_path:
        return {"error": "No images found in the specified folder."}

    image = Image.open(latest_image_path)
    width, height = image.size

    results = model(latest_image_path)  # 对图像进行预测
    object_details = []

    for result in results:
        json_result = result.tojson()
        result.save(filename='result.jpg')
        json_data = json.loads(json_result)

        for item in json_data:
            name = item["name"]
            segments = item["segments"]
            x = np.array(segments['x'])
            y = np.array(segments['y'])
            x_center = round(np.mean(x) / width, 4)  # 归一化 x 坐标
            y_center = round(np.mean(y) / height, 4)  # 归一化 y 坐标
            object_details.append({
                "name": name,
                "x": x_center,
                "y": y_center
            })
    return object_details

if __name__ == "__main__":
    uvicorn.run(app, host="0.0.0.0", port=8002)
至于这个API是否有效果,大家用Postman试试:(用法我在之前的LLM集成unity里面讲过)
如果响应体出现了如下图所示,则代表get成功。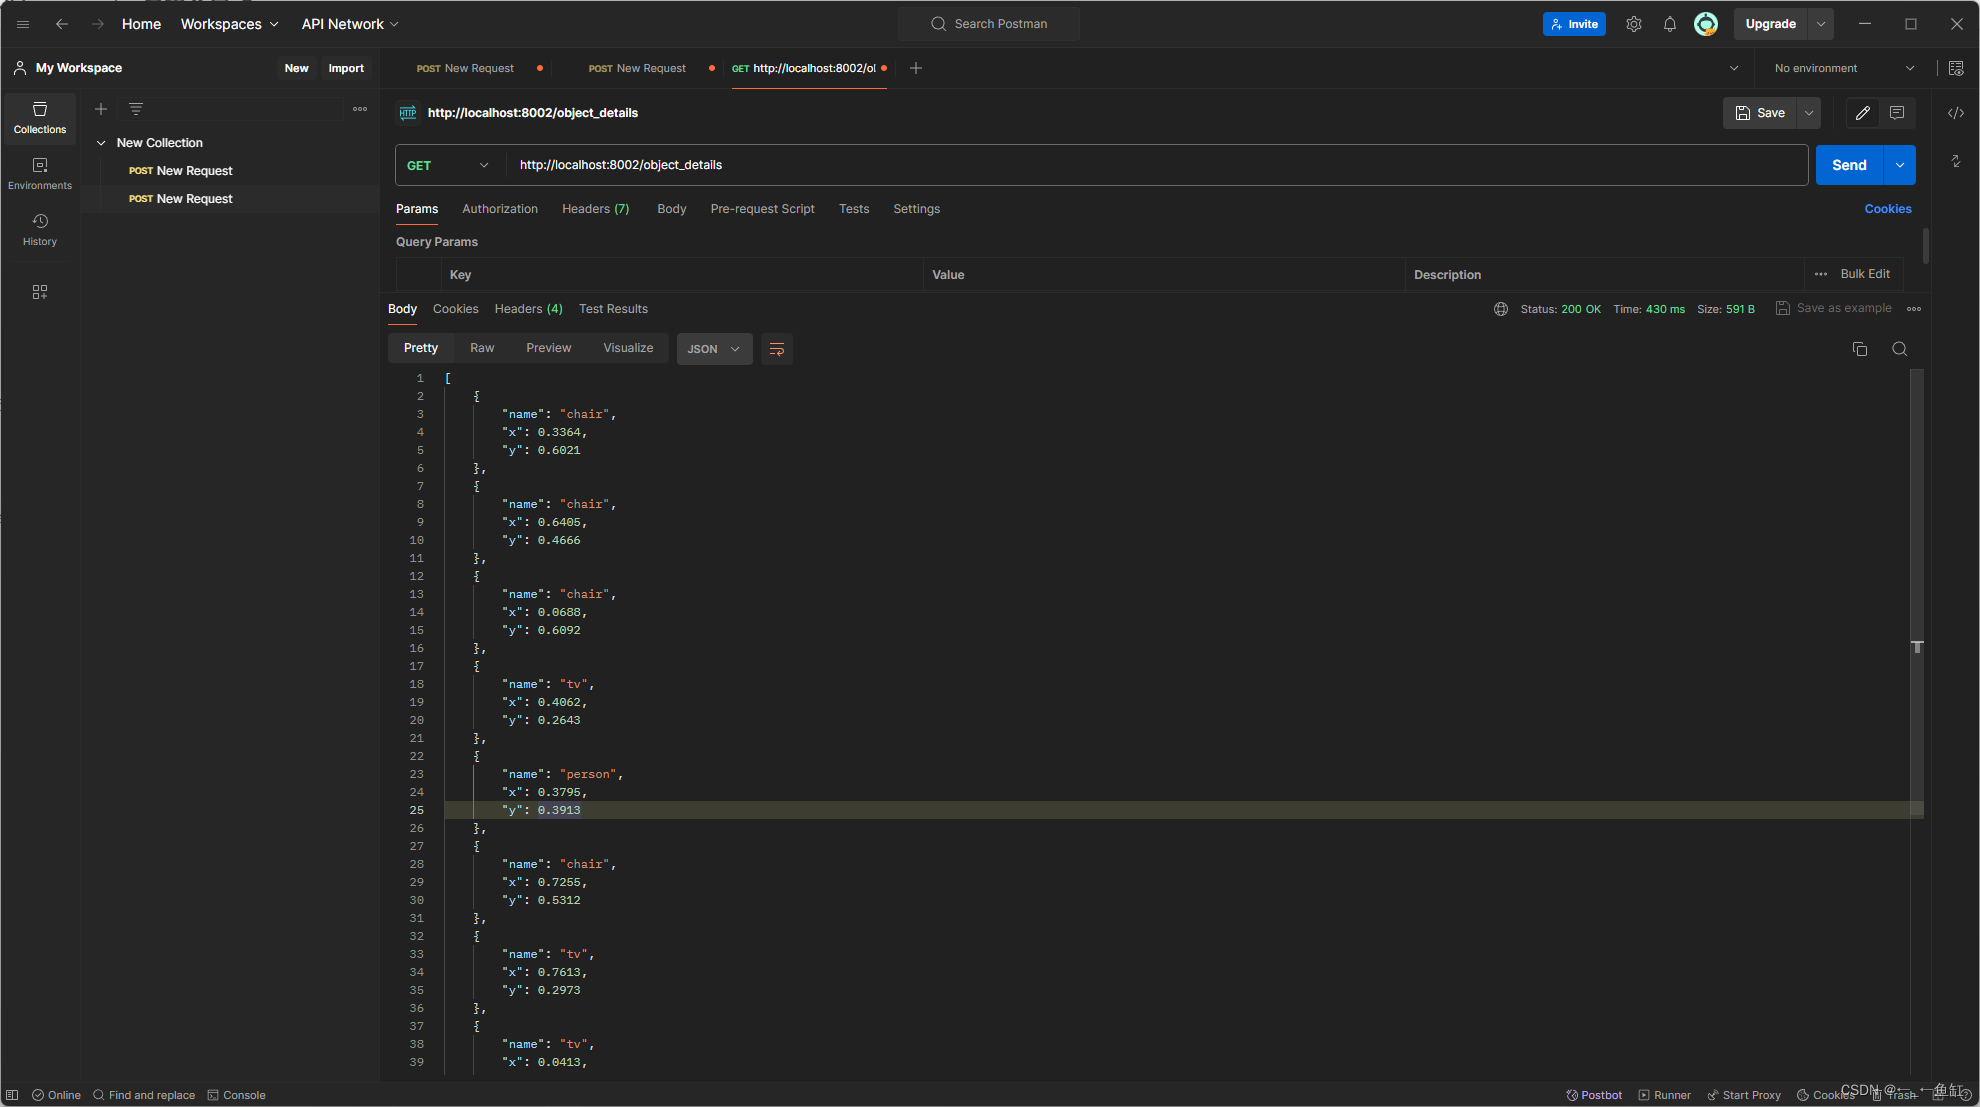
3.hololens中平面坐标转世界坐标
这一步我之前想了很多方案,最后感觉还是老方法最有效。
首先是确定Hololens的平面坐标系范围
平面坐标系
这里单独拎出来是怕大家每一个人的hololens不太一样,我这个不知道是不是年久失修了,出了些坐标偏差。但是思路都大同小异:
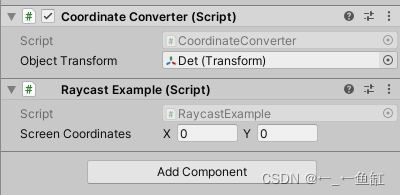
首先是脚本——世界坐标系转平面坐标系:
using System.Collections;
using UnityEngine;

public class CoordinateConverter : MonoBehaviour
{
    // 公开的Transform变量,用于拖拽对象
    public Transform objectTransform;
    public static float Z;

    private Vector3 lastScreenPoint;
    private const float checkInterval = 0.2f; // 检查间隔设为0.2秒
    private const float threshold = 10f; // 坐标变化阈值设为10

    // 使用Start方法启动协程
    void Start()
    {
        StartCoroutine(CheckScreenPointChange());
    }

    // 协程方法
    IEnumerator CheckScreenPointChange()
    {
        while (true)
        {
            yield return new WaitForSeconds(checkInterval); // 等待0.2秒

            // 确保objectTransform已被赋值
            if (objectTransform != null)
            {
                Vector3 screenPoint = Camera.main.WorldToScreenPoint(objectTransform.position);

                // 检查屏幕坐标的变化是否超过阈值
                if (Vector3.Distance(lastScreenPoint, screenPoint) > threshold)
                {
                    Debug.Log("屏幕坐标: " + screenPoint);
                }

                // 更新上一次的屏幕坐标
                lastScreenPoint = screenPoint;
                Z = screenPoint.z;
            }
        }
    }
}
这个脚本就是将对象目标的空间坐标实时转化为屏幕上的平面坐标。将他拖到场景中任意对象上,然后选择自己需要转化坐标的对象。此外只有对象位置有变动时才会打印坐标。之前一直喜欢用update来检查,但是感觉太占内存了,所以现在喜欢用协程0.2s来检测。

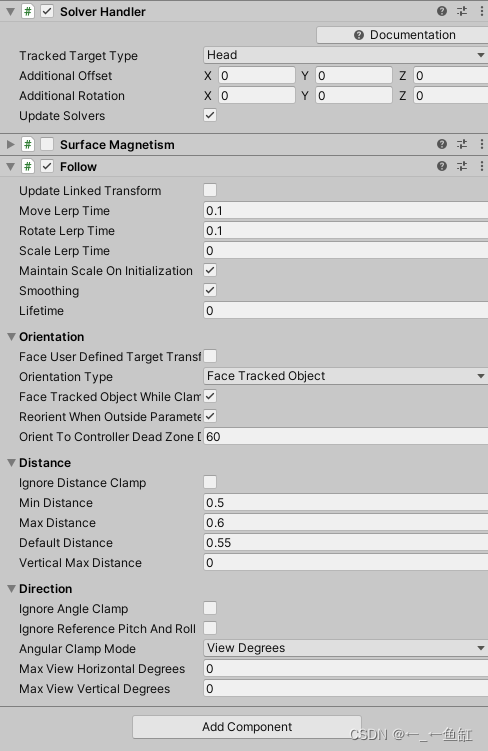
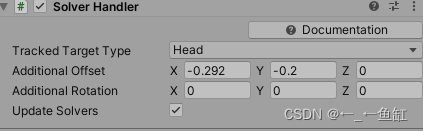
这个对象我建议加上solverhandle组件以及follow组件,这样我们就可以控制这个对象在平面中的位置了,follow组件设置distance为0.5-0.6之间,也就是眼前50cm。而水平、竖直的degrees设置为0,也就是没有任何的晃动。
首先我们在Unity上运行项目,看视野正中心位置的平面坐标,我game界面设置为3200*1400,所以在Unity运行时,打印的坐标为(1600.00, 700.00, 0.55),原点时左下角。
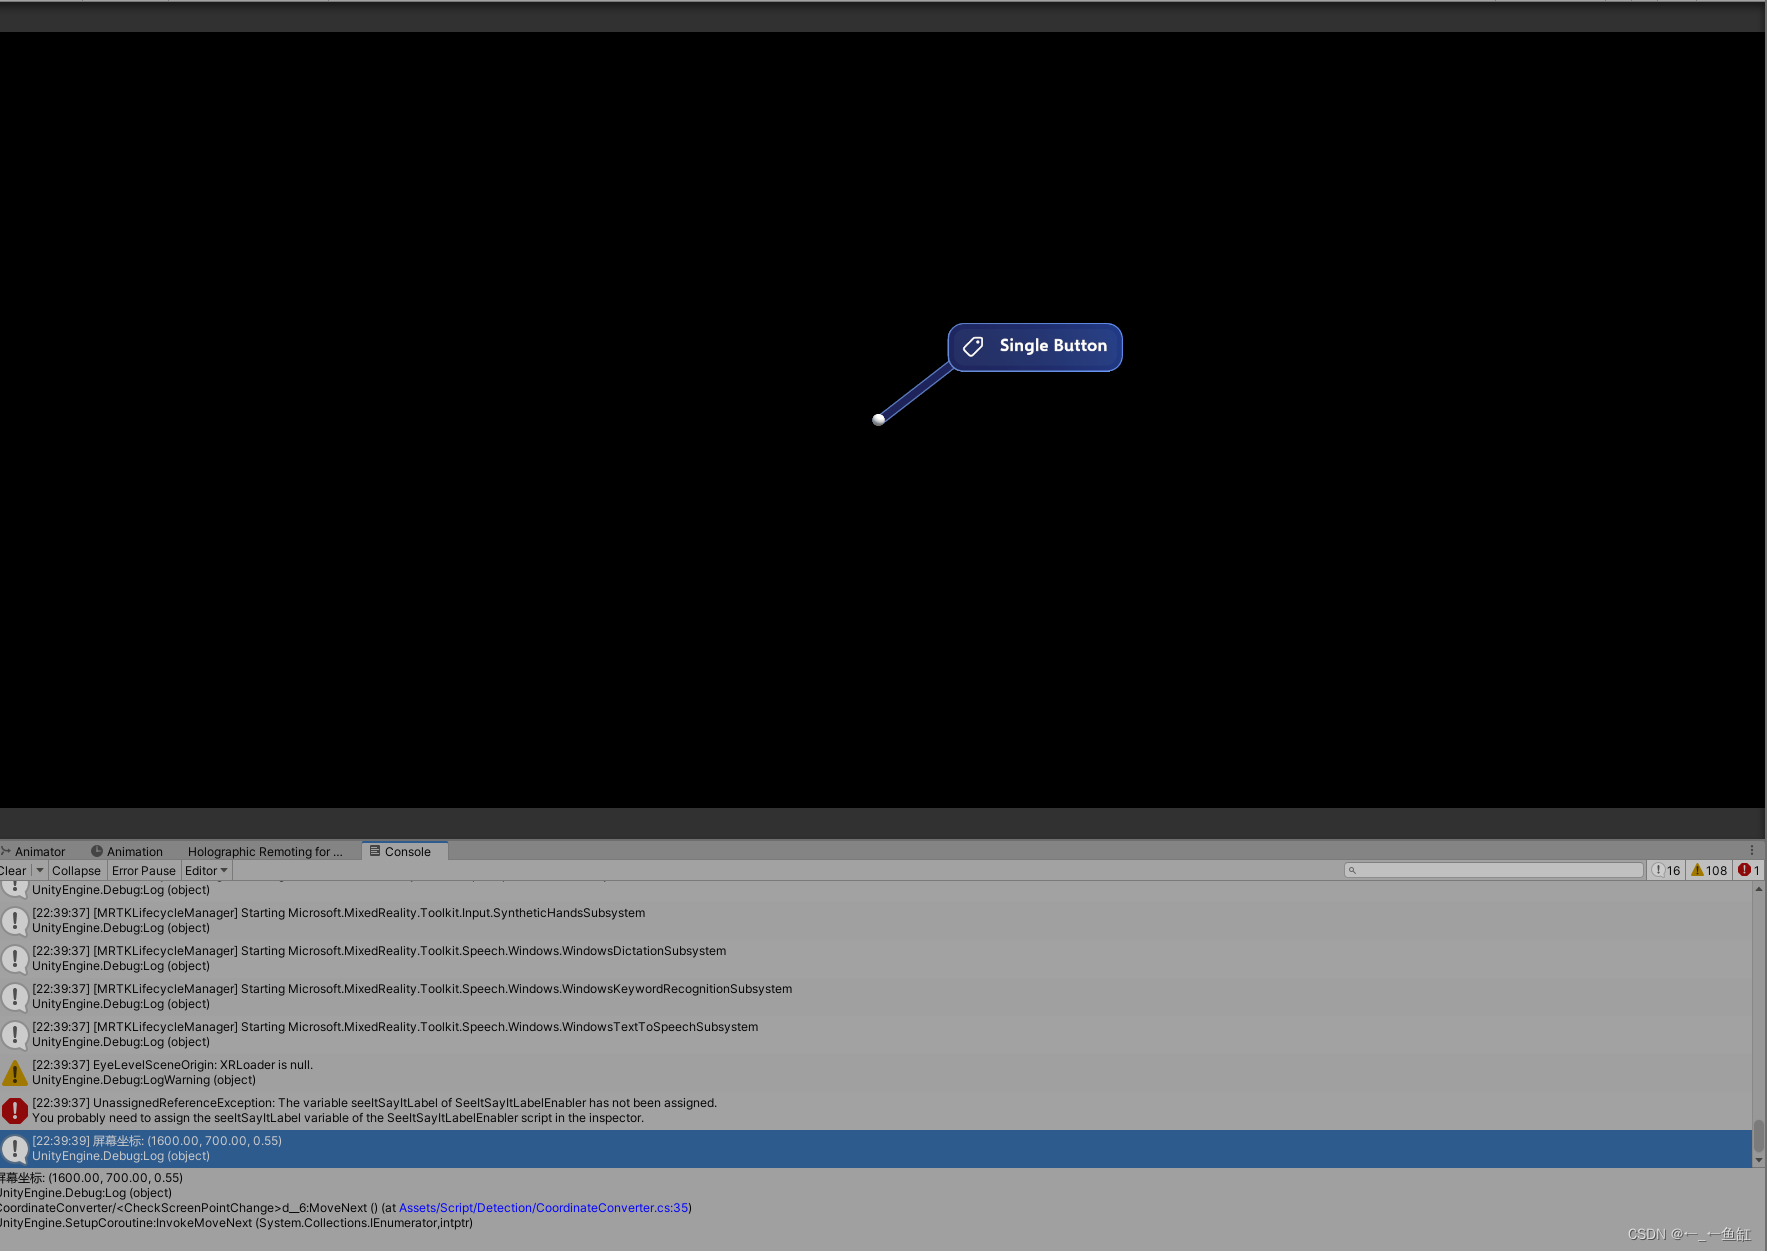
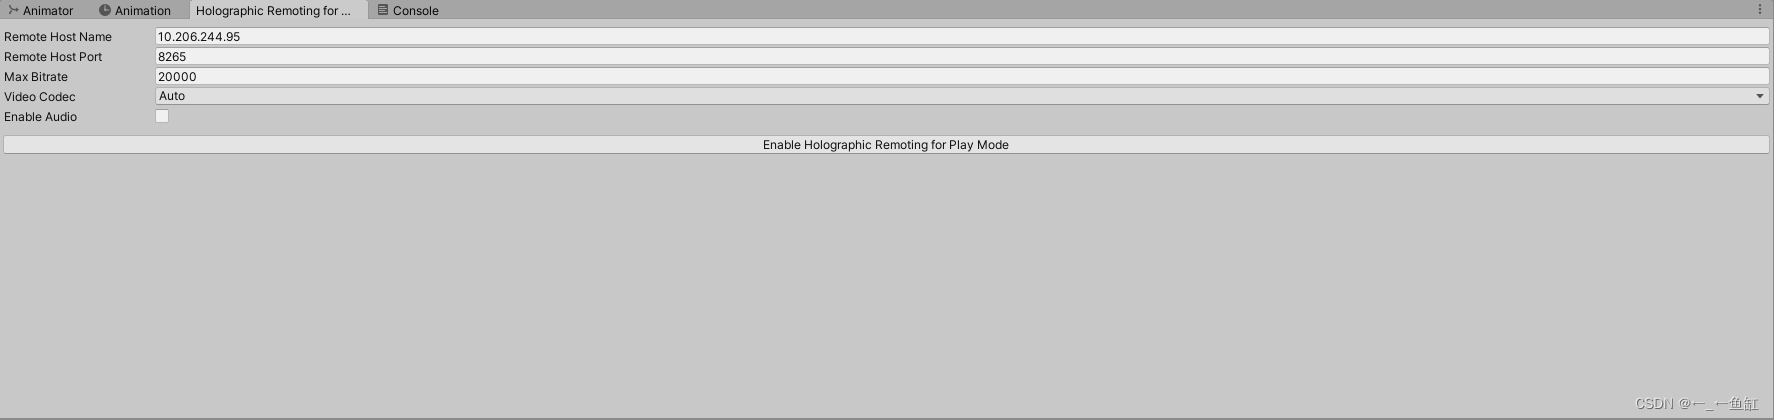
但是这里我们用holographic来远程映射,【这里我用MRTK3时,都习惯用远程映射的功能了,很实用,而且可以一边看效果一边在后台调整】具体官方教程:全息远程播放器 - Mixed Reality | Microsoft Learn
屏幕坐标: (720.33, 469.28, 0.50),
总体来看它不是那种很靠中的,而且坐标也变了。我们通过在Unity界面中的偏置来使对象移到屏幕的左下角和右上角。
屏幕坐标: (27.96, -12.82, 0.50),差不多归零了。代表没问题
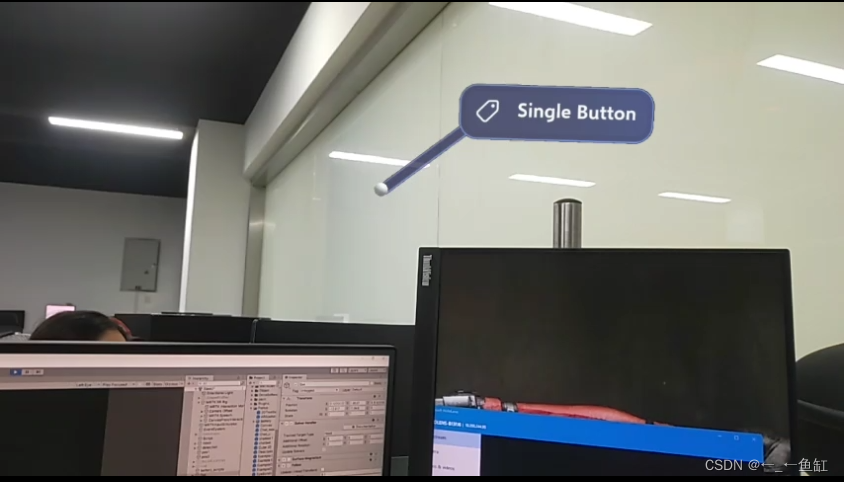
所以理论上来说中点位置如图所示:
屏幕坐标: (811.72, 372.45, 0.50)
下图是对象位于右上角的视图。
屏幕坐标: (1524.02, 801.70, 0.50)
以上的屏幕坐标不是很稳定,所以需要自己取个大概值,所以我取个中心位置的坐标来做参考,判断我们的HoloLens主要是多大的尺寸。具体我选定屏幕坐标尺寸为(1510~1550,750~850),结合录屏的截图尺寸为768*432。所以最终敲定为(1530, 770)
所以我们接下来获取到了归一化的目标对象坐标后,我们只需要做两件事就可以知道它的平面坐标,首先是转化原点,因为yolo得到的对象坐标是左上角为原点,而hololens是左下角原点。此外就是通过Yolo得到的归一化坐标,换算成平面坐标。
平面坐标系转世界坐标
下面这个函数可以输入一个平面坐标,然后相机会自动地朝这个平面坐标发射一条射线,射线落在空间网格上,就可以获得世界坐标。【这个灵感来自于一个CSDN上的机械臂开源代码,它实现的功能就是鼠标右击屏幕上任意一点,会从相机向该屏幕点方向发射一条射线,碰撞到带有mesh collider组件的对象,就会有碰撞点。机械臂获取到这个位置后就可以到这个位置抓取东西。】
using System.Collections;
using System.Collections.Generic;
using UnityEngine;
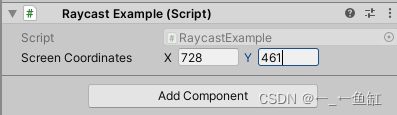
public class RaycastExample : MonoBehaviour
{
// 在Inspector中公开一个Vector2变量,用于输入屏幕坐标
public Vector2 screenCoordinates;
public void CastRay()
{
Ray ray = Camera.main.ScreenPointToRay(screenCoordinates);
RaycastHit hit;
if (Physics.Raycast(ray, out hit))
{
// hit.point 就是射线与网格的交点
Debug.Log("射线击中位置: " + hit.point);
// 可以在此位置放置对象或进行其他操作
// 例如:Instantiate(someObject, hit.point, Quaternion.identity);
}
}
}
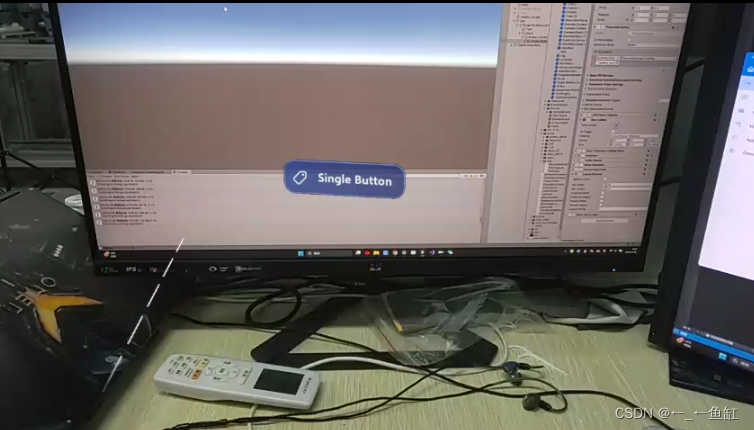
大家可以测试一下这个代码的功能和使用方法。首先拖拽到一个对象上,然后继续使用我们在平面坐标系步骤里面使用到的follow对象。不过这个时候需要用到surface magnetism组件了,并且我们要开启MRTK的空间扫描功能,这样才能建空间网格。

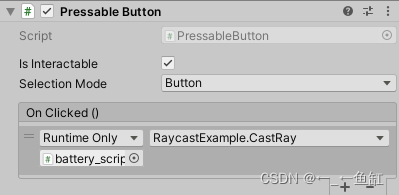
此外场景中挂载上对象选择到有surface magnetism组件的对象。接着在用一个按钮绑定public void CastRay()方法。这样按下按钮我们就可以看到控制台打印的射线落点了。这里还是用的全息投影技术,如果大家没有的话也可以在Unity里面仿真模拟一下,效果一样,不过得在场景中放几个有碰撞网格的对象。
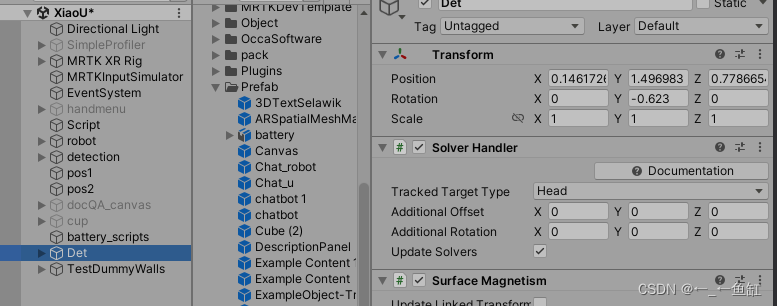
以下是我测试的截图和数据打印结果:
首先是在MR场景中我们的有surface magnetism组件的对象落在了眼前显示屏上。这里我设置的时空间网格隐藏状态。这时候我们查看对象的空间坐标和平面坐标:屏幕坐标: (728.56, 461.01, 0.72)。空间坐标:(0.14,1.49,0.77)。因为头部一直在晃动,所以保持个大概就行。接着我们在组件Raycast里输入这平面坐标(728,461),按下按钮(我这里的有surface magnetism组件的对象其实就是一个按钮),就看到控制台打印了射线击中位置: (0.17, 1.49, 0.81),这个值和我们看到对象的空间位置差不了太多,所以基本吻合,其实大家可以在Unity模式下运行,可以看到是分毫不差的。
检测结果YoloData 列表构建
这里的list主要用于存储检测的结果,包括对象名字,和对象的空间坐标:所以如下(这里我也是GPT帮我设计的,大家可以按自己的需求试试修改):
using System.Collections.Generic;
using UnityEngine;

// 定义一个类来存储每个元素的数据结构
public class ItemData
{
    public string name;
    public float x;
    public float y;
    public float z;

    public ItemData(string name, float x, float y, float z)
    {
        this.name = name;
        this.x = x;
        this.y = y;
        this.z = z;
    }
}


public static class YoloData
{
    public static List<ItemData> itemList = new List<ItemData>();

    // 初始化数据的方法,现在用来清空列表
    public static void InitializeData()
    {
        itemList.Clear(); // 清空列表
    }

    // 添加数据的方法
    public static void AddData(string name, float x, float y, float z)
    {
        itemList.Add(new ItemData(name, x, y, z));
    }
}
这个列表的构建主要目的是方便后期直接从这个列表里面获取数据然后在场景中生成label进行呈现了。
GET的Yolo数据后处理
接着就是从我们之前部署的api,从中获取我们的检测的json格式数据。
这里让GPT帮我们写一个脚本实现该功能,设计prompt:
首先设定角色:
你是Unity3D和Hololens2专家。用中文回答问题,并且注意我没有手,请回答完整。
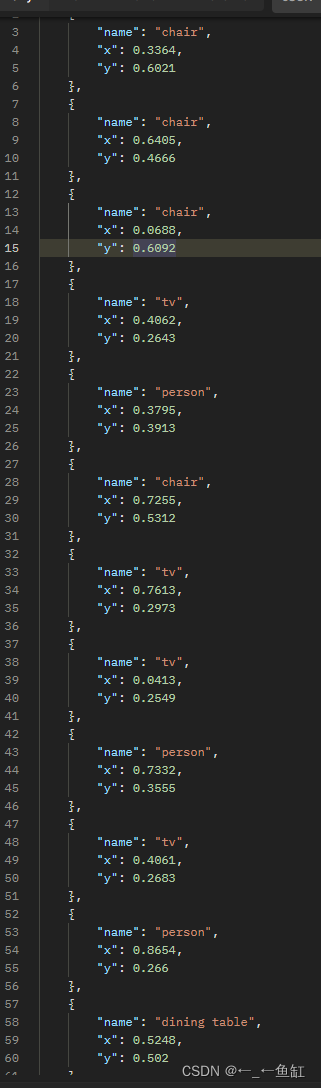
现在我需要你帮我写一个脚本,实现以下功能:通过GET方式请求http://localhost:8002/object_details接口,接口返回的是[
{
"name": "chair",
"x": 0.3364,
"y": 0.6021
},
{
"name": "chair",
"x": 0.6405,
"y": 0.4666
},
{
"name": "chair",
"x": 0.0688,
"y": 0.6092
},
{
"name": "tv",
"x": 0.4062,
"y": 0.2643
},
{
"name": "person",
"x": 0.3795,
"y": 0.3913
}
]
类型的json格式数据。现在对获取到的数据进行如下处理:其中一个花括号代表一个对象,需要将x和y的值进行转化,新的x=原来的x*1530,新的y=(1-原来的y)*770。然后将对象名称和对应的平面坐标保存为新的列表。我希望用函数StartYolo,StopYolo来开启和关闭协程,此外在Unity停止运行时也关闭协程。我每调用StartYolo一次就请求一次。
最后得到下面这个脚本:
using UnityEngine;
using System.Collections;
using System.Collections.Generic;
using UnityEngine.Networking;

public class ObjectDataFetcher : MonoBehaviour
{
    private Coroutine fetchCoroutine;


    // 开启数据获取
    public void StartYolo()
    {
        StopYolo();
        fetchCoroutine = StartCoroutine(GetObjectData());

    }

    // 停止数据获取
    public void StopYolo()
    {
        if (fetchCoroutine != null)
        {
            StopCoroutine(fetchCoroutine);
            fetchCoroutine = null;
        }
    }

    IEnumerator GetObjectData()
    {
        string url = "http://localhost:8002/object_details";
        UnityWebRequest request = UnityWebRequest.Get(url);
        yield return request.SendWebRequest();

        if (request.isNetworkError || request.isHttpError)
        {
            Debug.LogError(request.error);
        }
        else
        {
            ProcessData(request.downloadHandler.text);
        }
    }

    void ProcessData(string jsonData)
    {
        List<ObjectInfo> objects = new List<ObjectInfo>();

        // 解析JSON数据
        SimpleJSON.JSONNode data = SimpleJSON.JSON.Parse(jsonData);
        foreach (SimpleJSON.JSONNode node in data)
        {
            string name = node["name"];
            float x = node["x"].AsFloat;
            float y = node["y"].AsFloat;

            // 转换坐标
            float newX = x * 1530;
            float newY = (1 - y) * 770;

            // 创建新的对象信息并添加到列表中
            objects.Add(new ObjectInfo(name, newX, newY));
        }

        // 打印结果以验证
        foreach (ObjectInfo obj in objects)
        {
            Debug.Log($"Object: {obj.name}, X: {obj.x}, Y: {obj.y}");
        }
    }

    void OnDisable()
    {
        StopYolo();
    }
}

public class ObjectInfo
{
    public string name;
    public float x, y;

    public ObjectInfo(string name, float x, float y)
    {
        this.name = name;
        this.x = x;
        this.y = y;
    }
}
挂载到场景中,在start()里面调用StartYolo();开始运行。打印出结果,和Postman里的内容对应上了,代表脚本可行。
Yolo数据转空间坐标
以下是我利用GPT写代码的prompt:
using UnityEngine;
using System.Collections;
using System.Collections.Generic;
using UnityEngine.Networking;

public class ObjectDataFetcher : MonoBehaviour
{
    private Coroutine fetchCoroutine;

    private void Start()
    {
        StartYolo();
    }

    // 开启数据获取
    public void StartYolo()
    {
        StopYolo();
        fetchCoroutine = StartCoroutine(GetObjectData());

    }

    // 停止数据获取
    public void StopYolo()
    {
        if (fetchCoroutine != null)
        {
            StopCoroutine(fetchCoroutine);
            fetchCoroutine = null;
        }
    }

    IEnumerator GetObjectData()
    {
        string url = "http://localhost:8002/object_details";
        UnityWebRequest request = UnityWebRequest.Get(url);
        yield return request.SendWebRequest();

        if (request.isNetworkError || request.isHttpError)
        {
            Debug.LogError(request.error);
        }
        else
        {
            ProcessData(request.downloadHandler.text);
        }
    }

    void ProcessData(string jsonData)
    {
        List<ObjectInfo> objects = new List<ObjectInfo>();

        // 解析JSON数据
        SimpleJSON.JSONNode data = SimpleJSON.JSON.Parse(jsonData);
        foreach (SimpleJSON.JSONNode node in data)
        {
            string name = node["name"];
            float x = node["x"].AsFloat;
            float y = node["y"].AsFloat;

            // 转换坐标
            float newX = x * 1530;
            float newY = (1 - y) * 770;

            // 创建新的对象信息并添加到列表中
            objects.Add(new ObjectInfo(name, newX, newY));
        }

        // 打印结果以验证
        foreach (ObjectInfo obj in objects)
        {
            Debug.Log($"Object: {obj.name}, X: {obj.x}, Y: {obj.y}");
        }
    }

    void OnDisable()
    {
        StopYolo();
    }
}

public class ObjectInfo
{
    public string name;
    public float x, y;

    public ObjectInfo(string name, float x, float y)
    {
        this.name = name;
        this.x = x;
        this.y = y;
    }
}

现在获取到了List<ObjectInfo> objects的数据,现在我希望利用以下函数

public void CastRay()
    {
        Ray ray = Camera.main.ScreenPointToRay(screenCoordinates);

        RaycastHit hit;
        if (Physics.Raycast(ray, out hit))
        {
            // hit.point 就是射线与网格的交点
            Debug.Log("射线击中位置: " + hit.point);

            // 可以在此位置放置对象或进行其他操作
            // 例如:Instantiate(someObject, hit.point, Quaternion.identity);
        }
    }


来通过平面坐标获取世界坐标系,然后将新的对象名和对应的世界坐标存入


public class ItemData
{
    public string name;
    public float x;
    public float y;
    public float z;

    public ItemData(string name, float x, float y, float z)
    {
        this.name = name;
        this.x = x;
        this.y = y;
        this.z = z;
    }
}


public static class YoloData
{
    public static List<ItemData> itemList = new List<ItemData>();

    // 初始化数据的方法,现在用来清空列表
    public static void InitializeData()
    {
        itemList.Clear(); // 清空列表
    }

    // 添加数据的方法
    public static void AddData(string name, float x, float y, float z)
    {
        itemList.Add(new ItemData(name, x, y, z));
    }
}
下面我粘贴我的最终脚本ObjectDataFetcher :
using UnityEngine;
using System.Collections;
using System.Collections.Generic;
using UnityEngine.Networking;

public class ObjectDataFetcher : MonoBehaviour
{
    private Coroutine fetchCoroutine;
    public ObjectCreator objectCreator;
    private void Start()
    {
        StartYolo();
    }

    // 开启数据获取
    public void StartYolo()
    {
        StopYolo();
        fetchCoroutine = StartCoroutine(GetObjectData());

    }

    // 停止数据获取
    public void StopYolo()
    {
        if (fetchCoroutine != null)
        {
            StopCoroutine(fetchCoroutine);
            fetchCoroutine = null;
        }
    }

    IEnumerator GetObjectData()
    {
        string url = "http://localhost:8002/object_details";
        UnityWebRequest request = UnityWebRequest.Get(url);
        yield return request.SendWebRequest();

        if (request.isNetworkError || request.isHttpError)
        {
            Debug.LogError(request.error);
        }
        else
        {
            ProcessData(request.downloadHandler.text);
        }
    }

    void ProcessData(string jsonData)
    {
        List<ObjectInfo> objects = new List<ObjectInfo>();

        // 解析JSON数据
        SimpleJSON.JSONNode data = SimpleJSON.JSON.Parse(jsonData);
        foreach (SimpleJSON.JSONNode node in data)
        {
            string name = node["name"];
            float x = node["x"].AsFloat;
            float y = node["y"].AsFloat;

            float newX = x * 1530;
            float newY = (1 - y) * 770;

            objects.Add(new ObjectInfo(name, newX, newY));

            // 射线投射并转换为世界坐标
            CastRayAndAddToGlobalList(name, new Vector2(newX, newY));
        }

        // 打印结果以验证
        //foreach (ObjectInfo obj in objects)
        //{
        //    Debug.Log($"Object: {obj.name}, X: {obj.x}, Y: {obj.y}");
        //}
        objectCreator.CreateObjectsFromData();
        //YoloData.PrintAllData();
    }

    // 射线投射并添加数据到全局列表
    private void CastRayAndAddToGlobalList(string name, Vector2 screenCoordinates)
    {
        Ray ray = Camera.main.ScreenPointToRay(screenCoordinates);
        RaycastHit hit;

        if (Physics.Raycast(ray, out hit))
        {
            // 将击中点的坐标添加到全局数据列表中
            YoloData.AddData(name, hit.point.x, hit.point.y, hit.point.z);
            Debug.Log($"Item added: {name}, X: {hit.point.x}, Y: {hit.point.y}, Z: {hit.point.z}");
        }
    }
    void OnDisable()
    {
        StopYolo();
    }
}

public class ObjectInfo
{
    public string name;
    public float x, y;

    public ObjectInfo(string name, float x, float y)
    {
        this.name = name;
        this.x = x;
        this.y = y;
    }
}
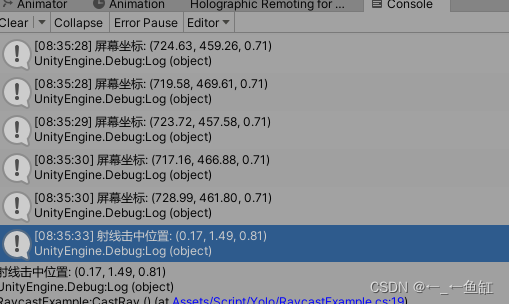
这个代码通过StartYolo()开始GET请求,然后将数据后处理后存入全局list。所以YoloData就存有对象名和对应的空间坐标。
4.创建标签名
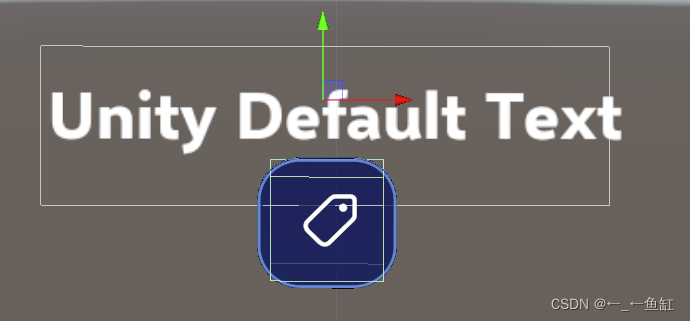
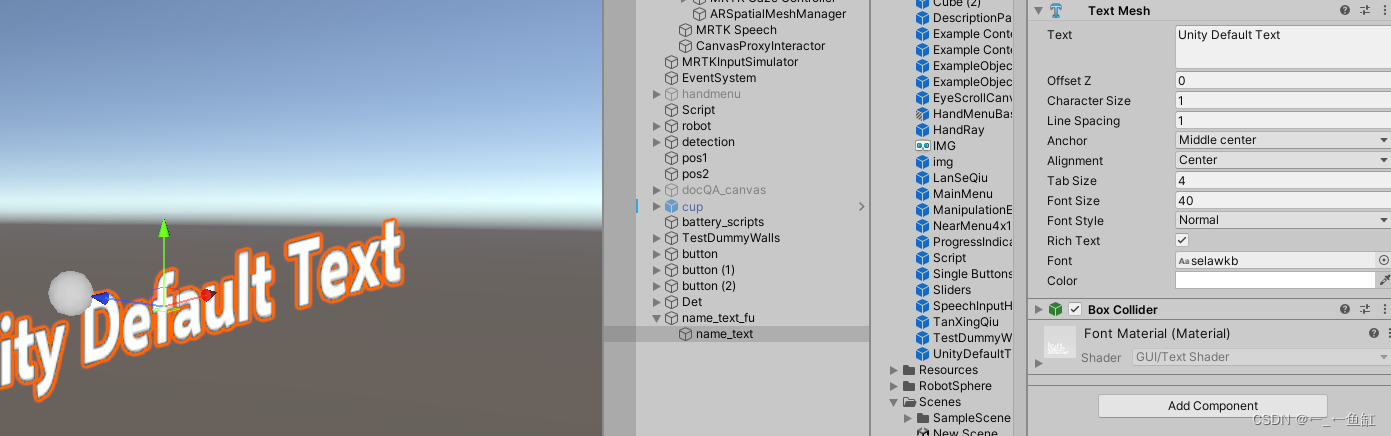
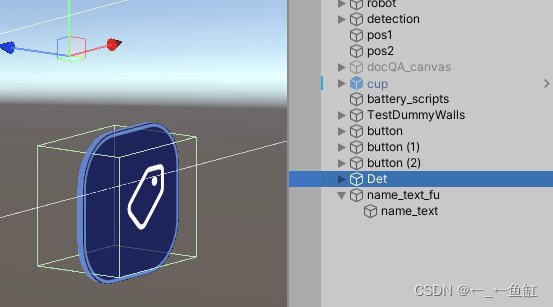
以下是我的标签,包括对象预设和文字预设,文字的话用的是TextMesh组件实现的。
以下是我设计的GPT问题:
using System.Collections.Generic;
using UnityEngine;

// 定义一个类来存储每个元素的数据结构
public class ItemData
{
    public string name;
    public float x;
    public float y;
    public float z;

    public ItemData(string name, float x, float y, float z)
    {
        this.name = name;
        this.x = x;
        this.y = y;
        this.z = z;
    }
}


public static class YoloData
{
    public static List<ItemData> itemList = new List<ItemData>();

    // 初始化数据的方法,现在用来清空列表
    public static void InitializeData()
    {
        itemList.Clear(); // 清空列表
    }

    // 添加数据的方法
    public static void AddData(string name, float x, float y, float z)
    {
        itemList.Add(new ItemData(name, x, y, z));
    }
    // 打印所有数据的方法
    public static void PrintAllData()
    {
        Debug.Log("打印 YoloData 列表内容:");
        foreach (ItemData item in itemList)
        {
            Debug.Log($"Name: {item.name}, X: {item.x}, Y: {item.y}, Z: {item.z}");
        }
    }
}
如上所示,现在我的YoloData里面已经存了一些对象的数据:他们的名字以及对应的空间坐标,
现在我在场景中已经有了一个对象预设以及一个文字预设是一个有textmesh组件的对象,
我需要对其中textmesh组件的text内容进行修改,现在我需要用一个函数
CreateObjectsFromData()来在对应的世界坐标处创建预设好的对象以及文本。
还需要注意的是创建的对象需要朝向相机,此外构建函数来摧毁所有过程中创建的对象,
在Unity关闭时也摧毁对象。
下面给出我的代码:
using System.Collections.Generic;
using UnityEngine;
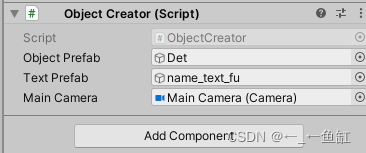
public class ObjectCreator : MonoBehaviour
{
public GameObject objectPrefab; // 对象预设
public GameObject textPrefab; // 文本预设
public Camera mainCamera; // 主相机
private List<GameObject> createdObjects = new List<GameObject>(); // 存储所有创建的对象
// 创建对象和文本的函数
public void CreateObjectsFromData()
{
foreach (ItemData item in YoloData.itemList)
{
// 创建对象
Vector3 position = new Vector3(item.x, item.y, item.z);
GameObject newObj = Instantiate(objectPrefab, position, Quaternion.identity);
newObj.name = item.name; // 设置对象的名字
// 计算面向相机的旋转
Vector3 directionToCamera = (position - mainCamera.transform.position).normalized;
Quaternion rotationTowardsCamera = Quaternion.LookRotation(directionToCamera);
// 设置对象和文本的旋转
newObj.transform.rotation = rotationTowardsCamera;
// 创建文本
GameObject newText = Instantiate(textPrefab, position, rotationTowardsCamera);
TextMesh textMesh = newText.transform.GetChild(0).GetComponent<TextMesh>();
if (textMesh != null)
{
textMesh.text = item.name; // 设置文本内容为对象的名字
}
// 可以选择性地将文本对象作为新创建的对象的子对象
newText.transform.SetParent(newObj.transform);
// 将创建的对象添加到列表中
createdObjects.Add(newObj);
createdObjects.Add(newText);
}
}
// 摧毁所有创建的对象
public void DestroyAllObjects()
{
foreach (GameObject obj in createdObjects)
{
Destroy(obj);
}
createdObjects.Clear(); // 清空列表
}
// 当Unity关闭运行时自动摧毁所有创建的对象
void OnApplicationQuit()
{
DestroyAllObjects();
}
}
5.最终效果展示
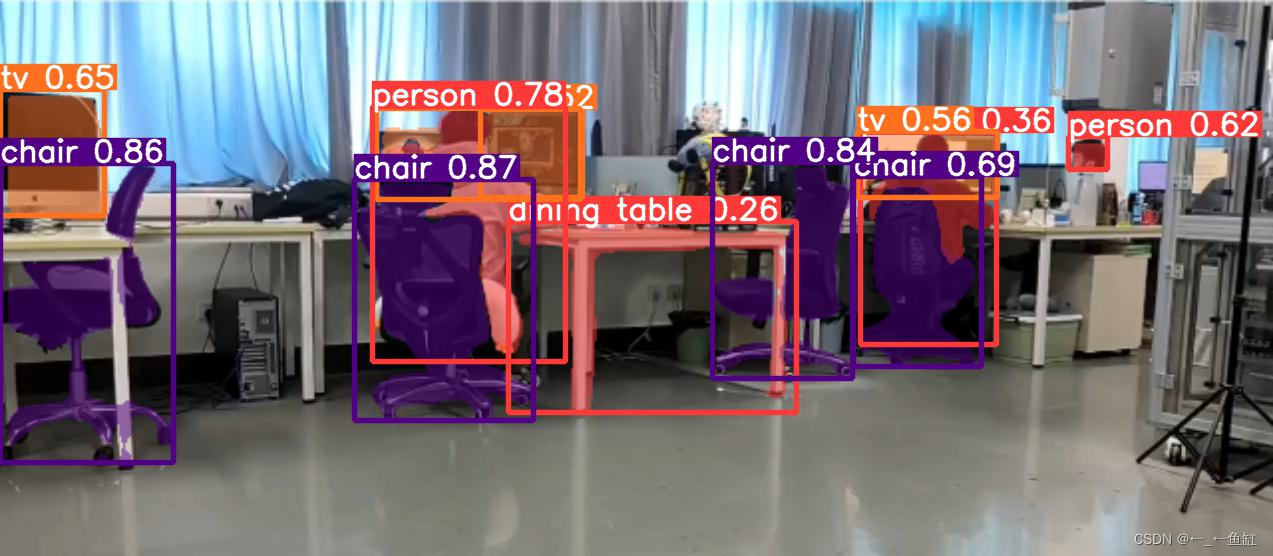
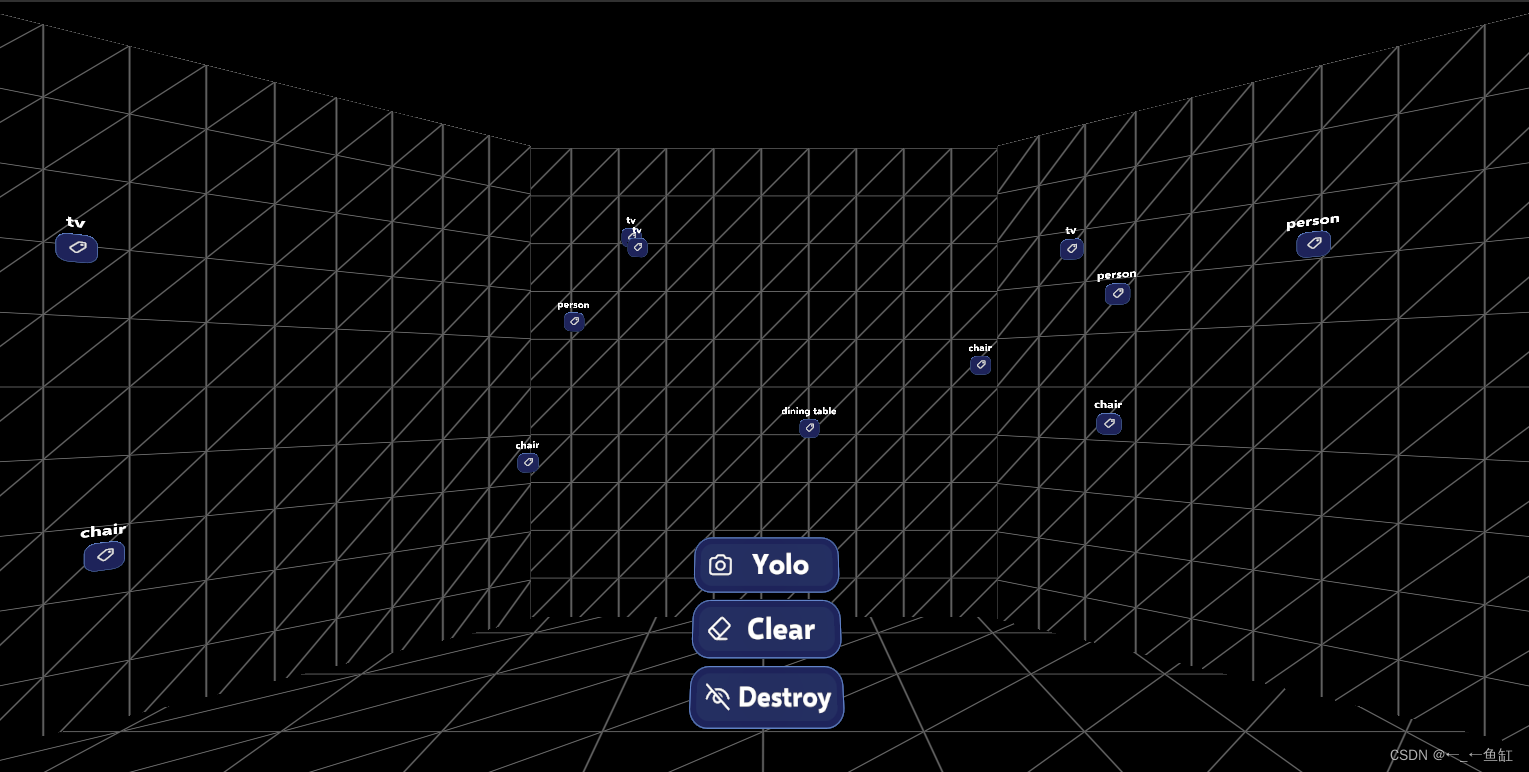
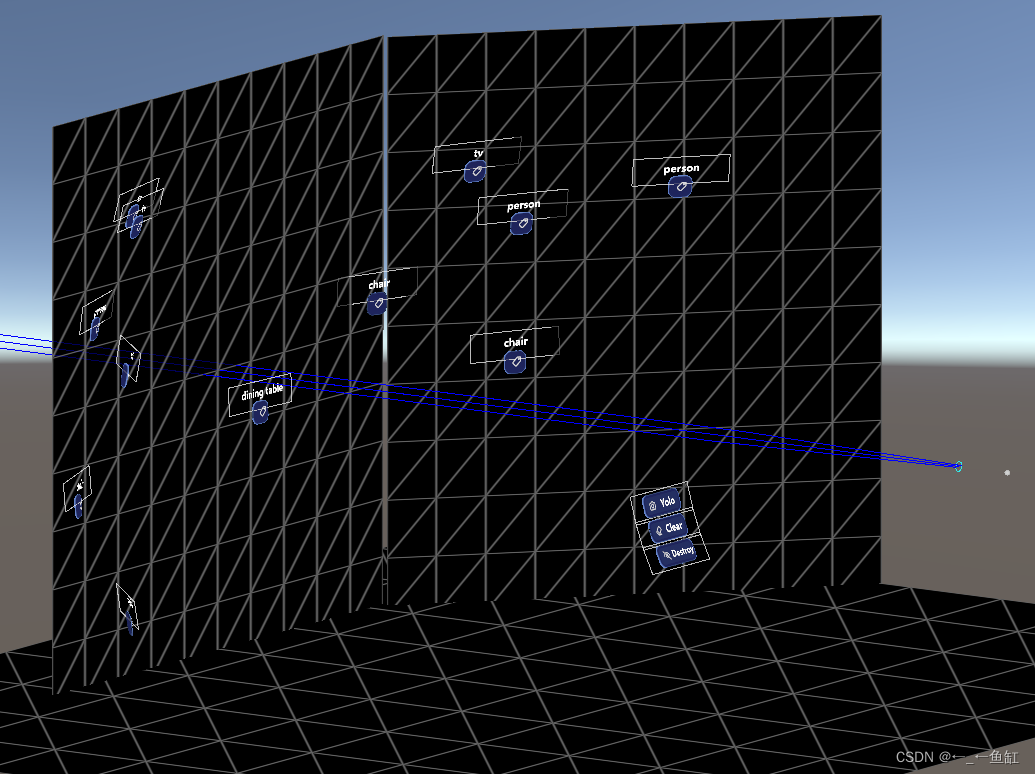
从屏幕上看,位置一一对应上了,从三位视角看也是定位到了网格上。
然后用真机测试:
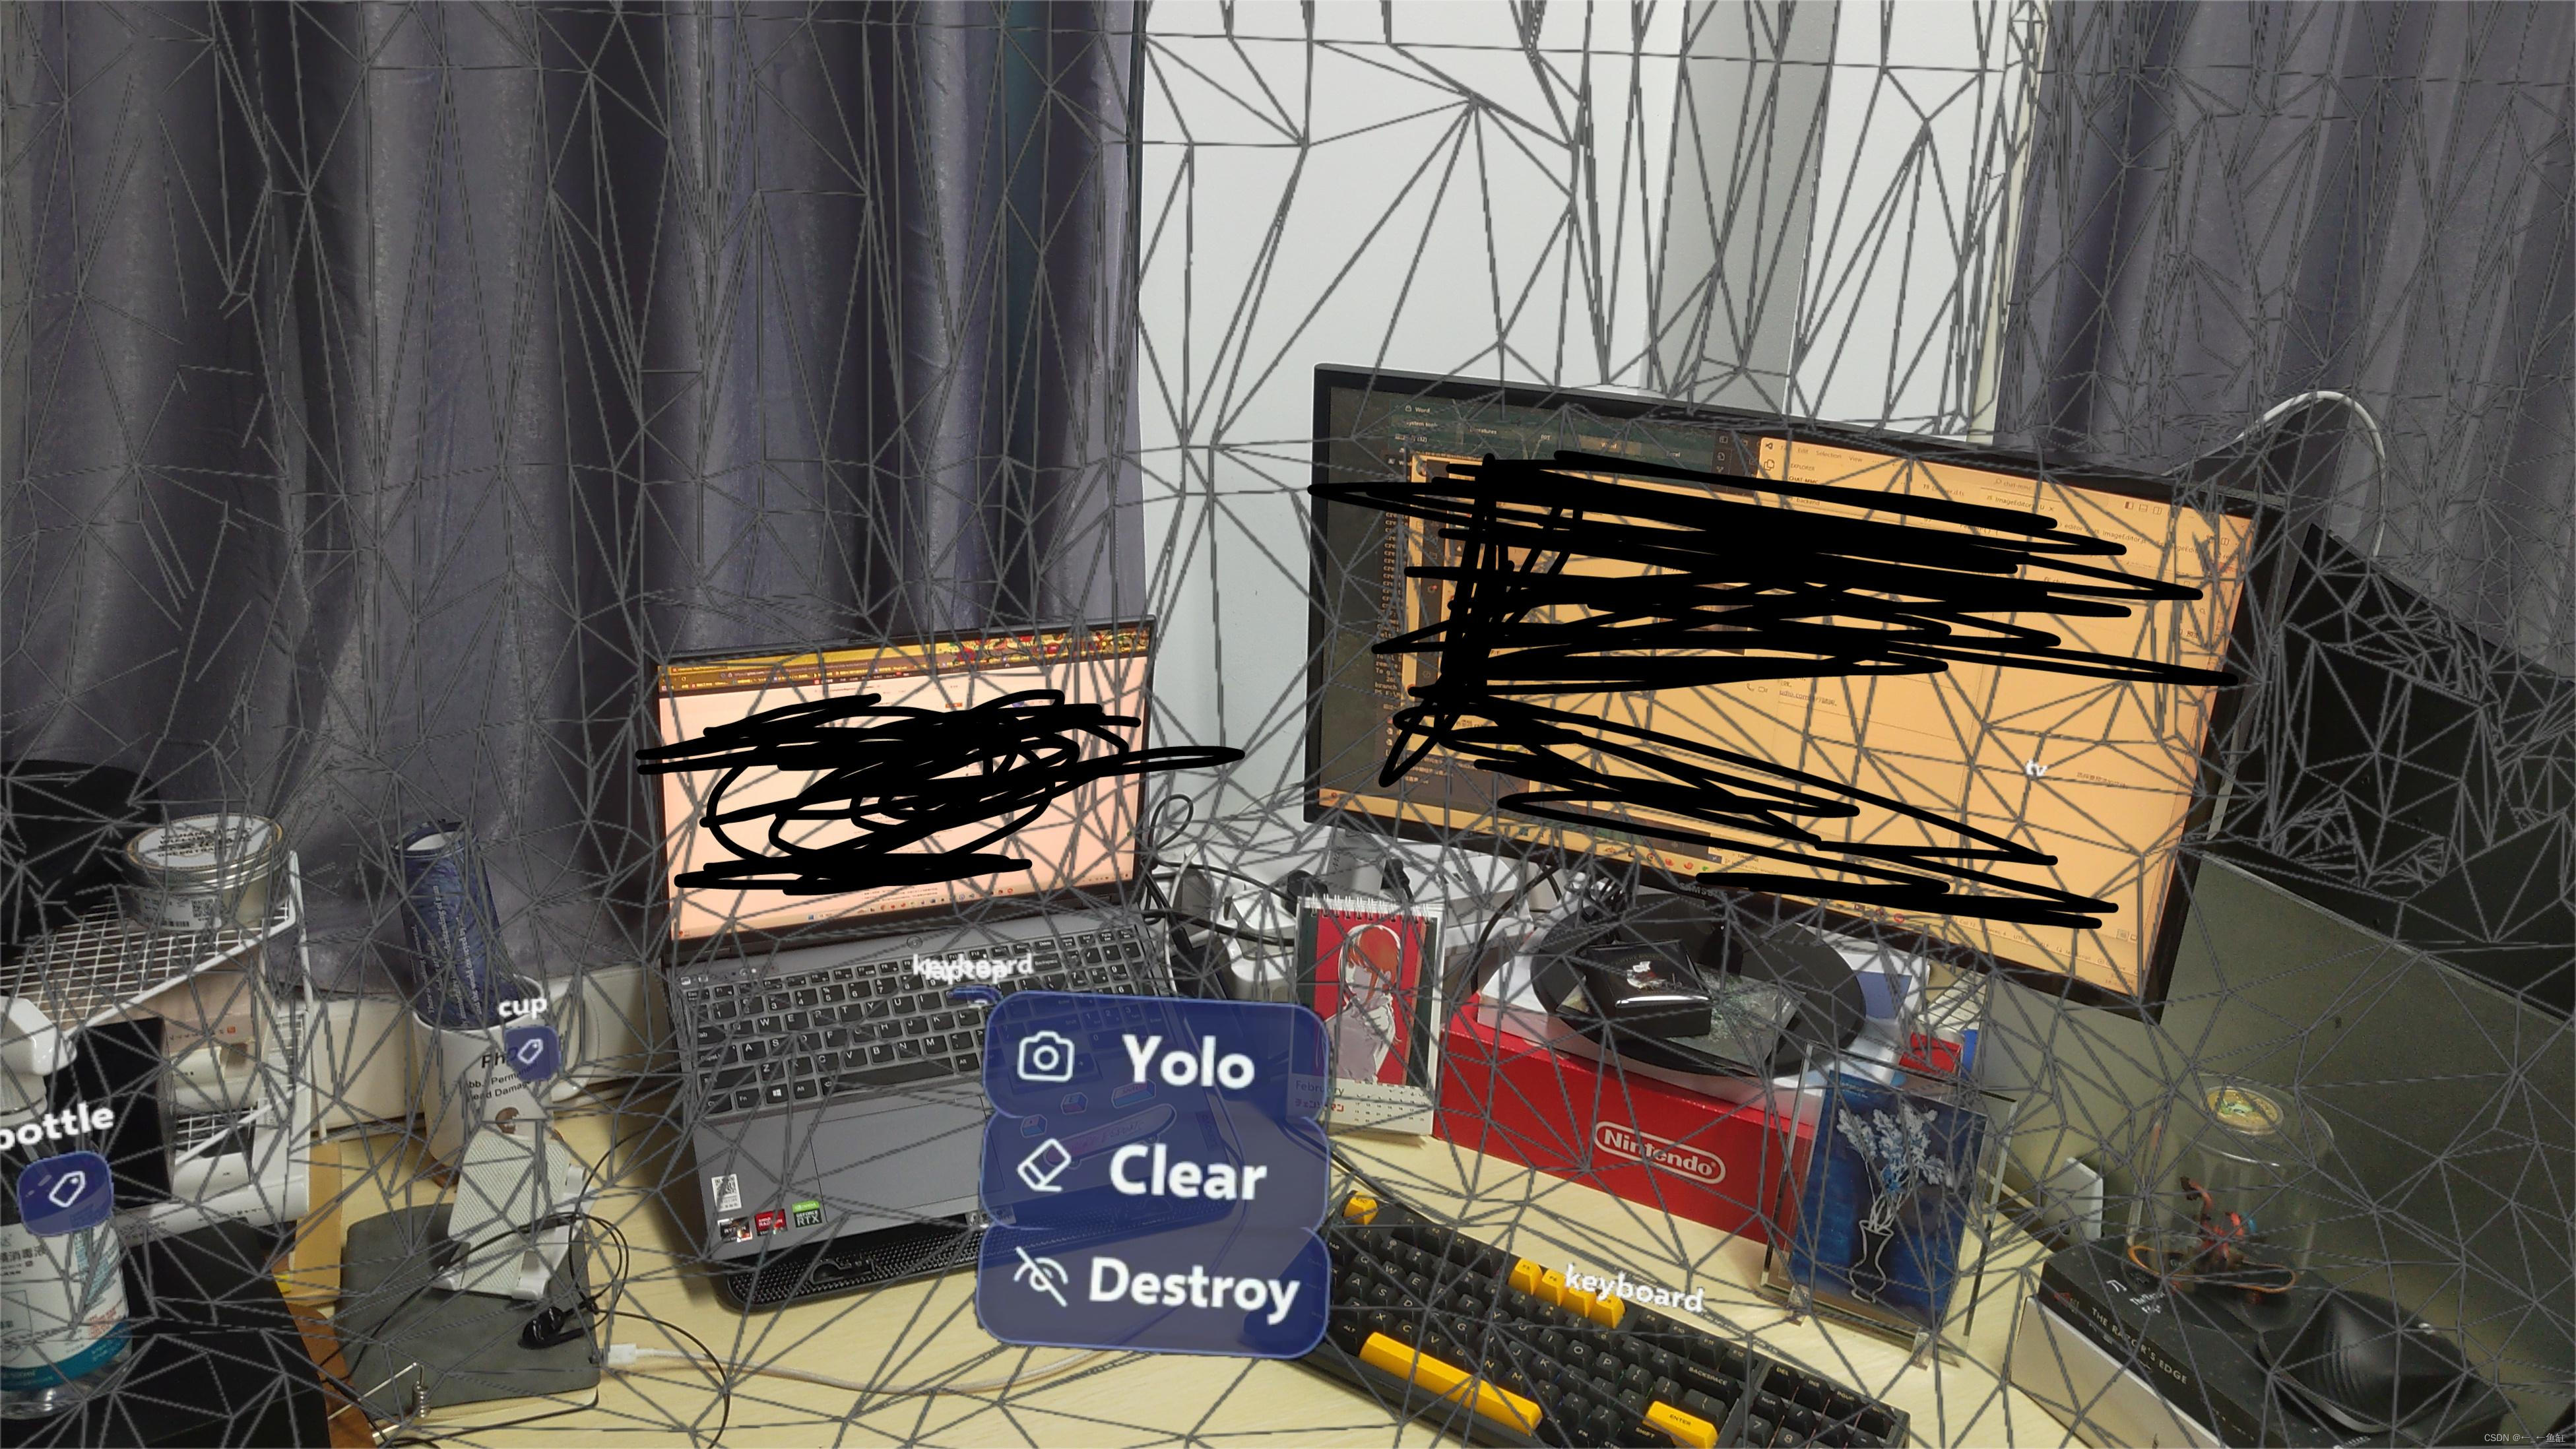
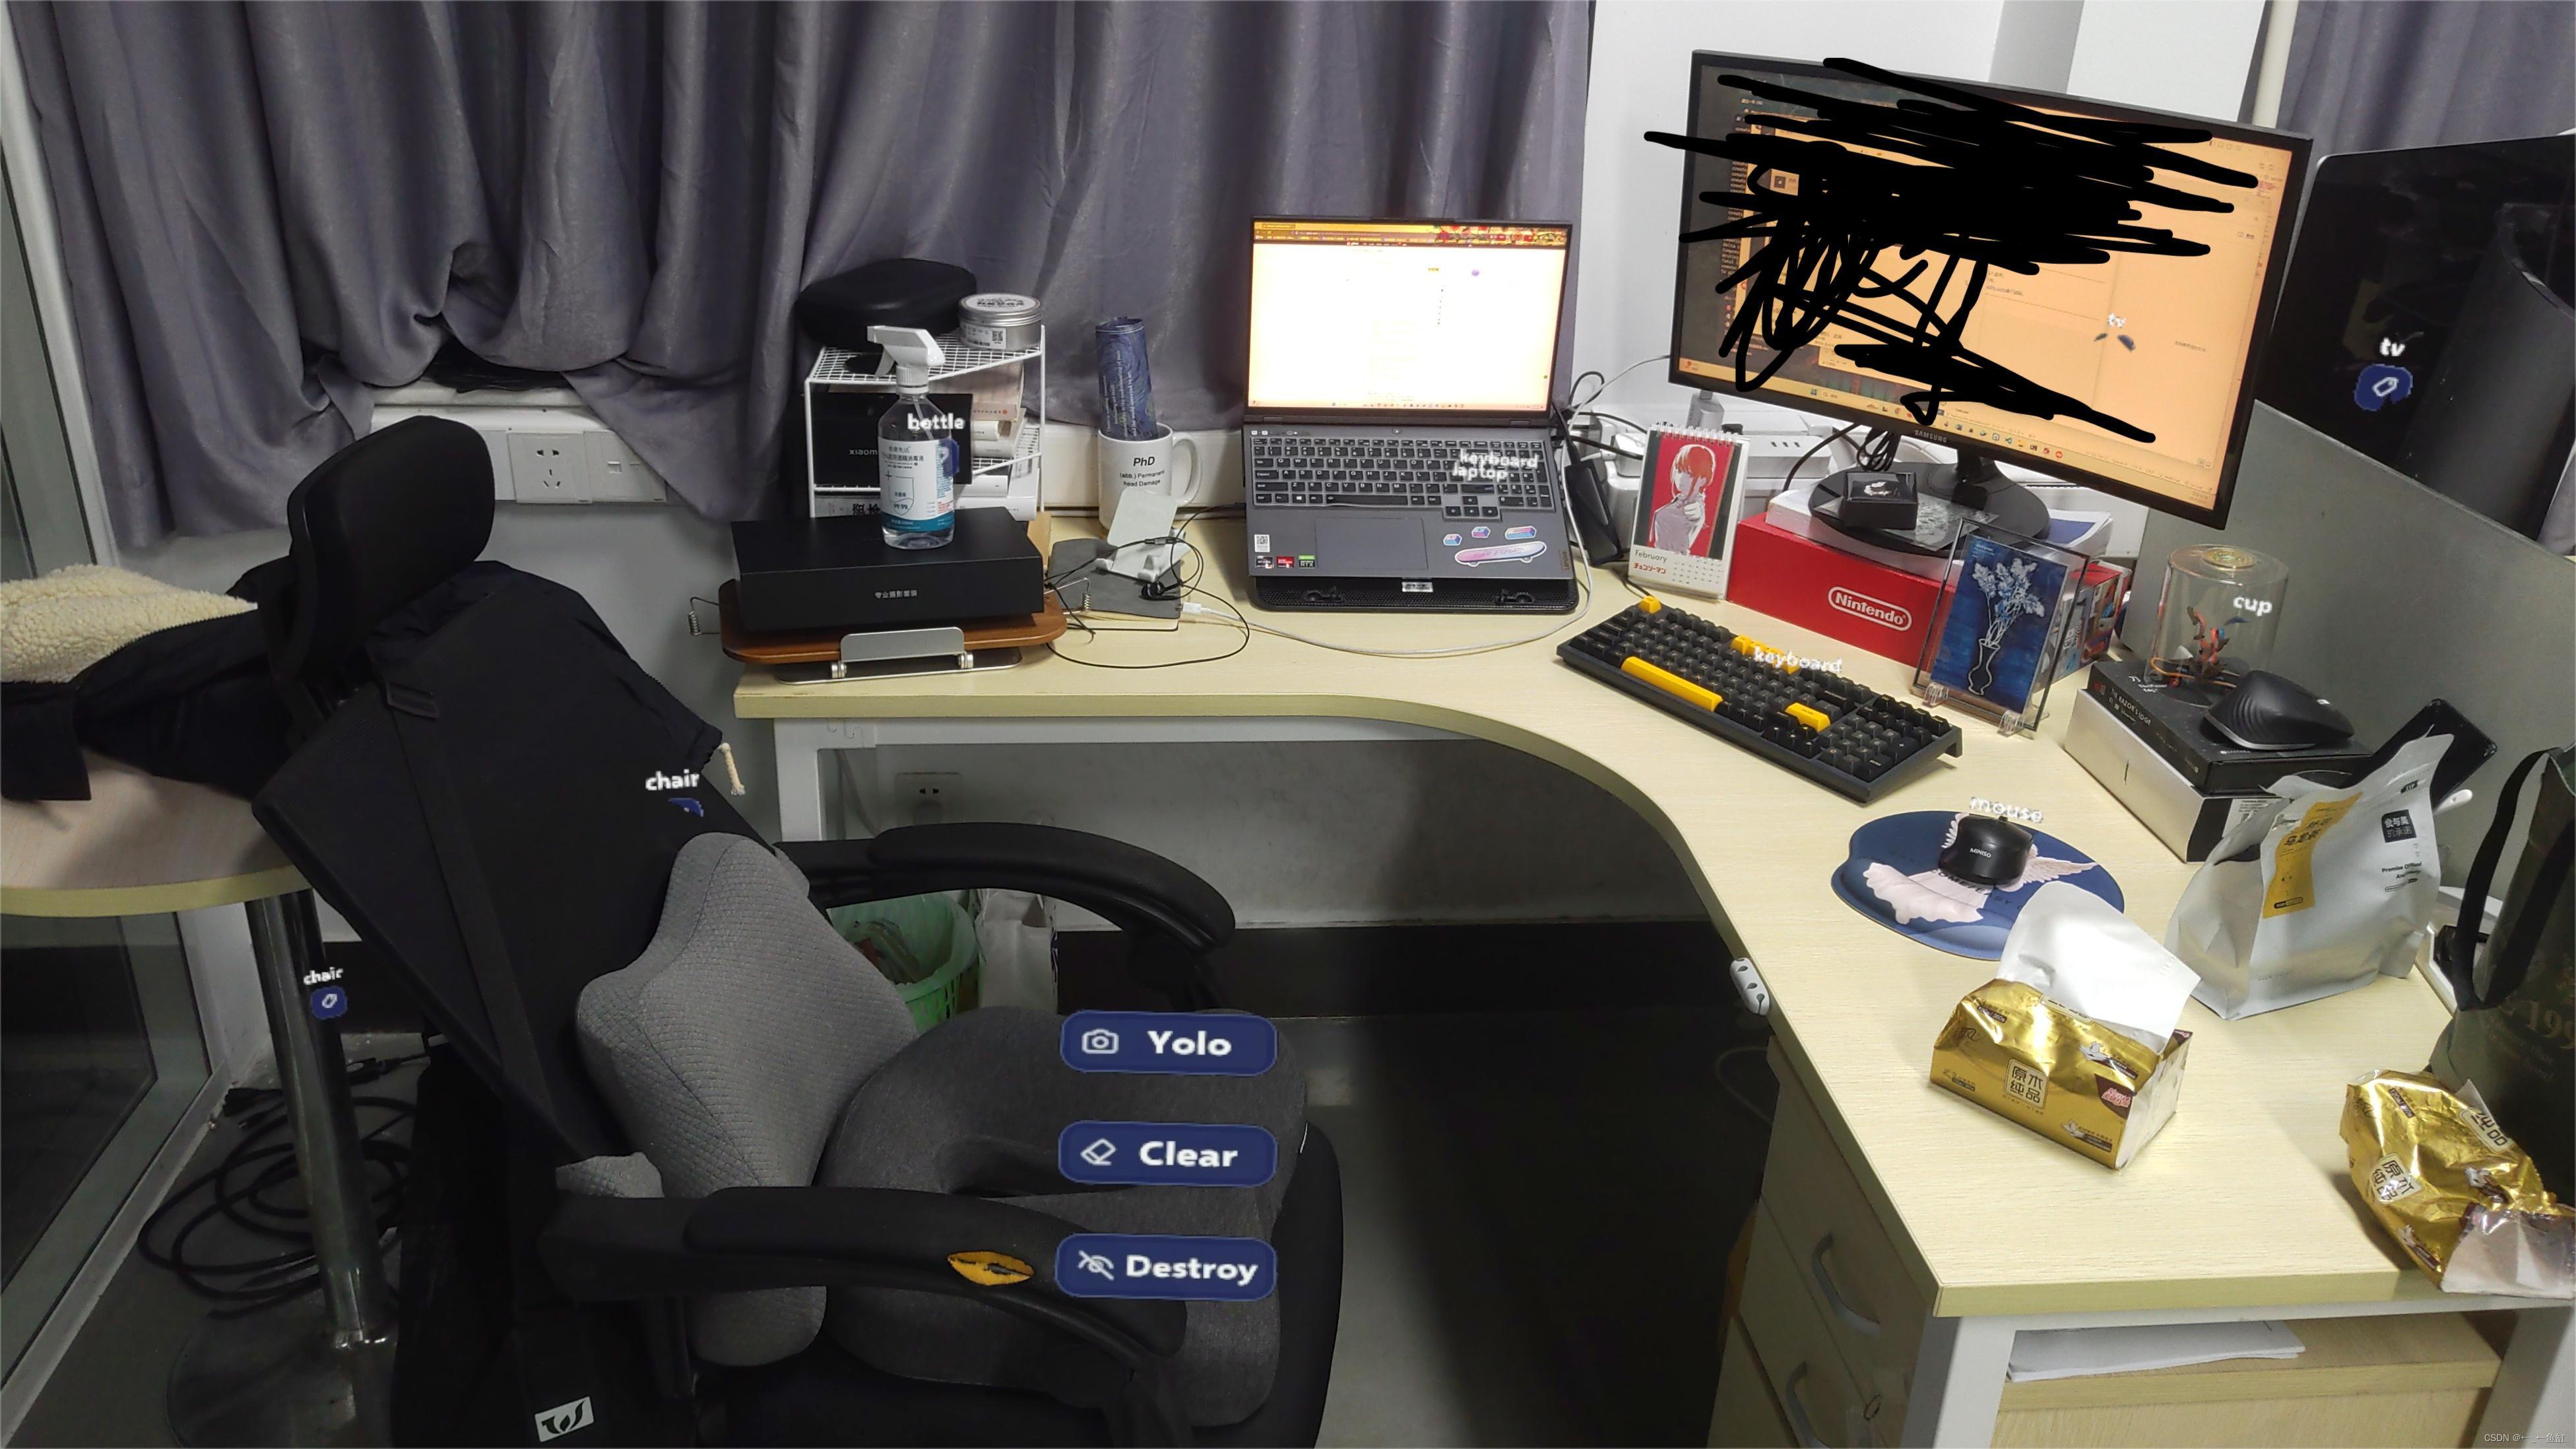
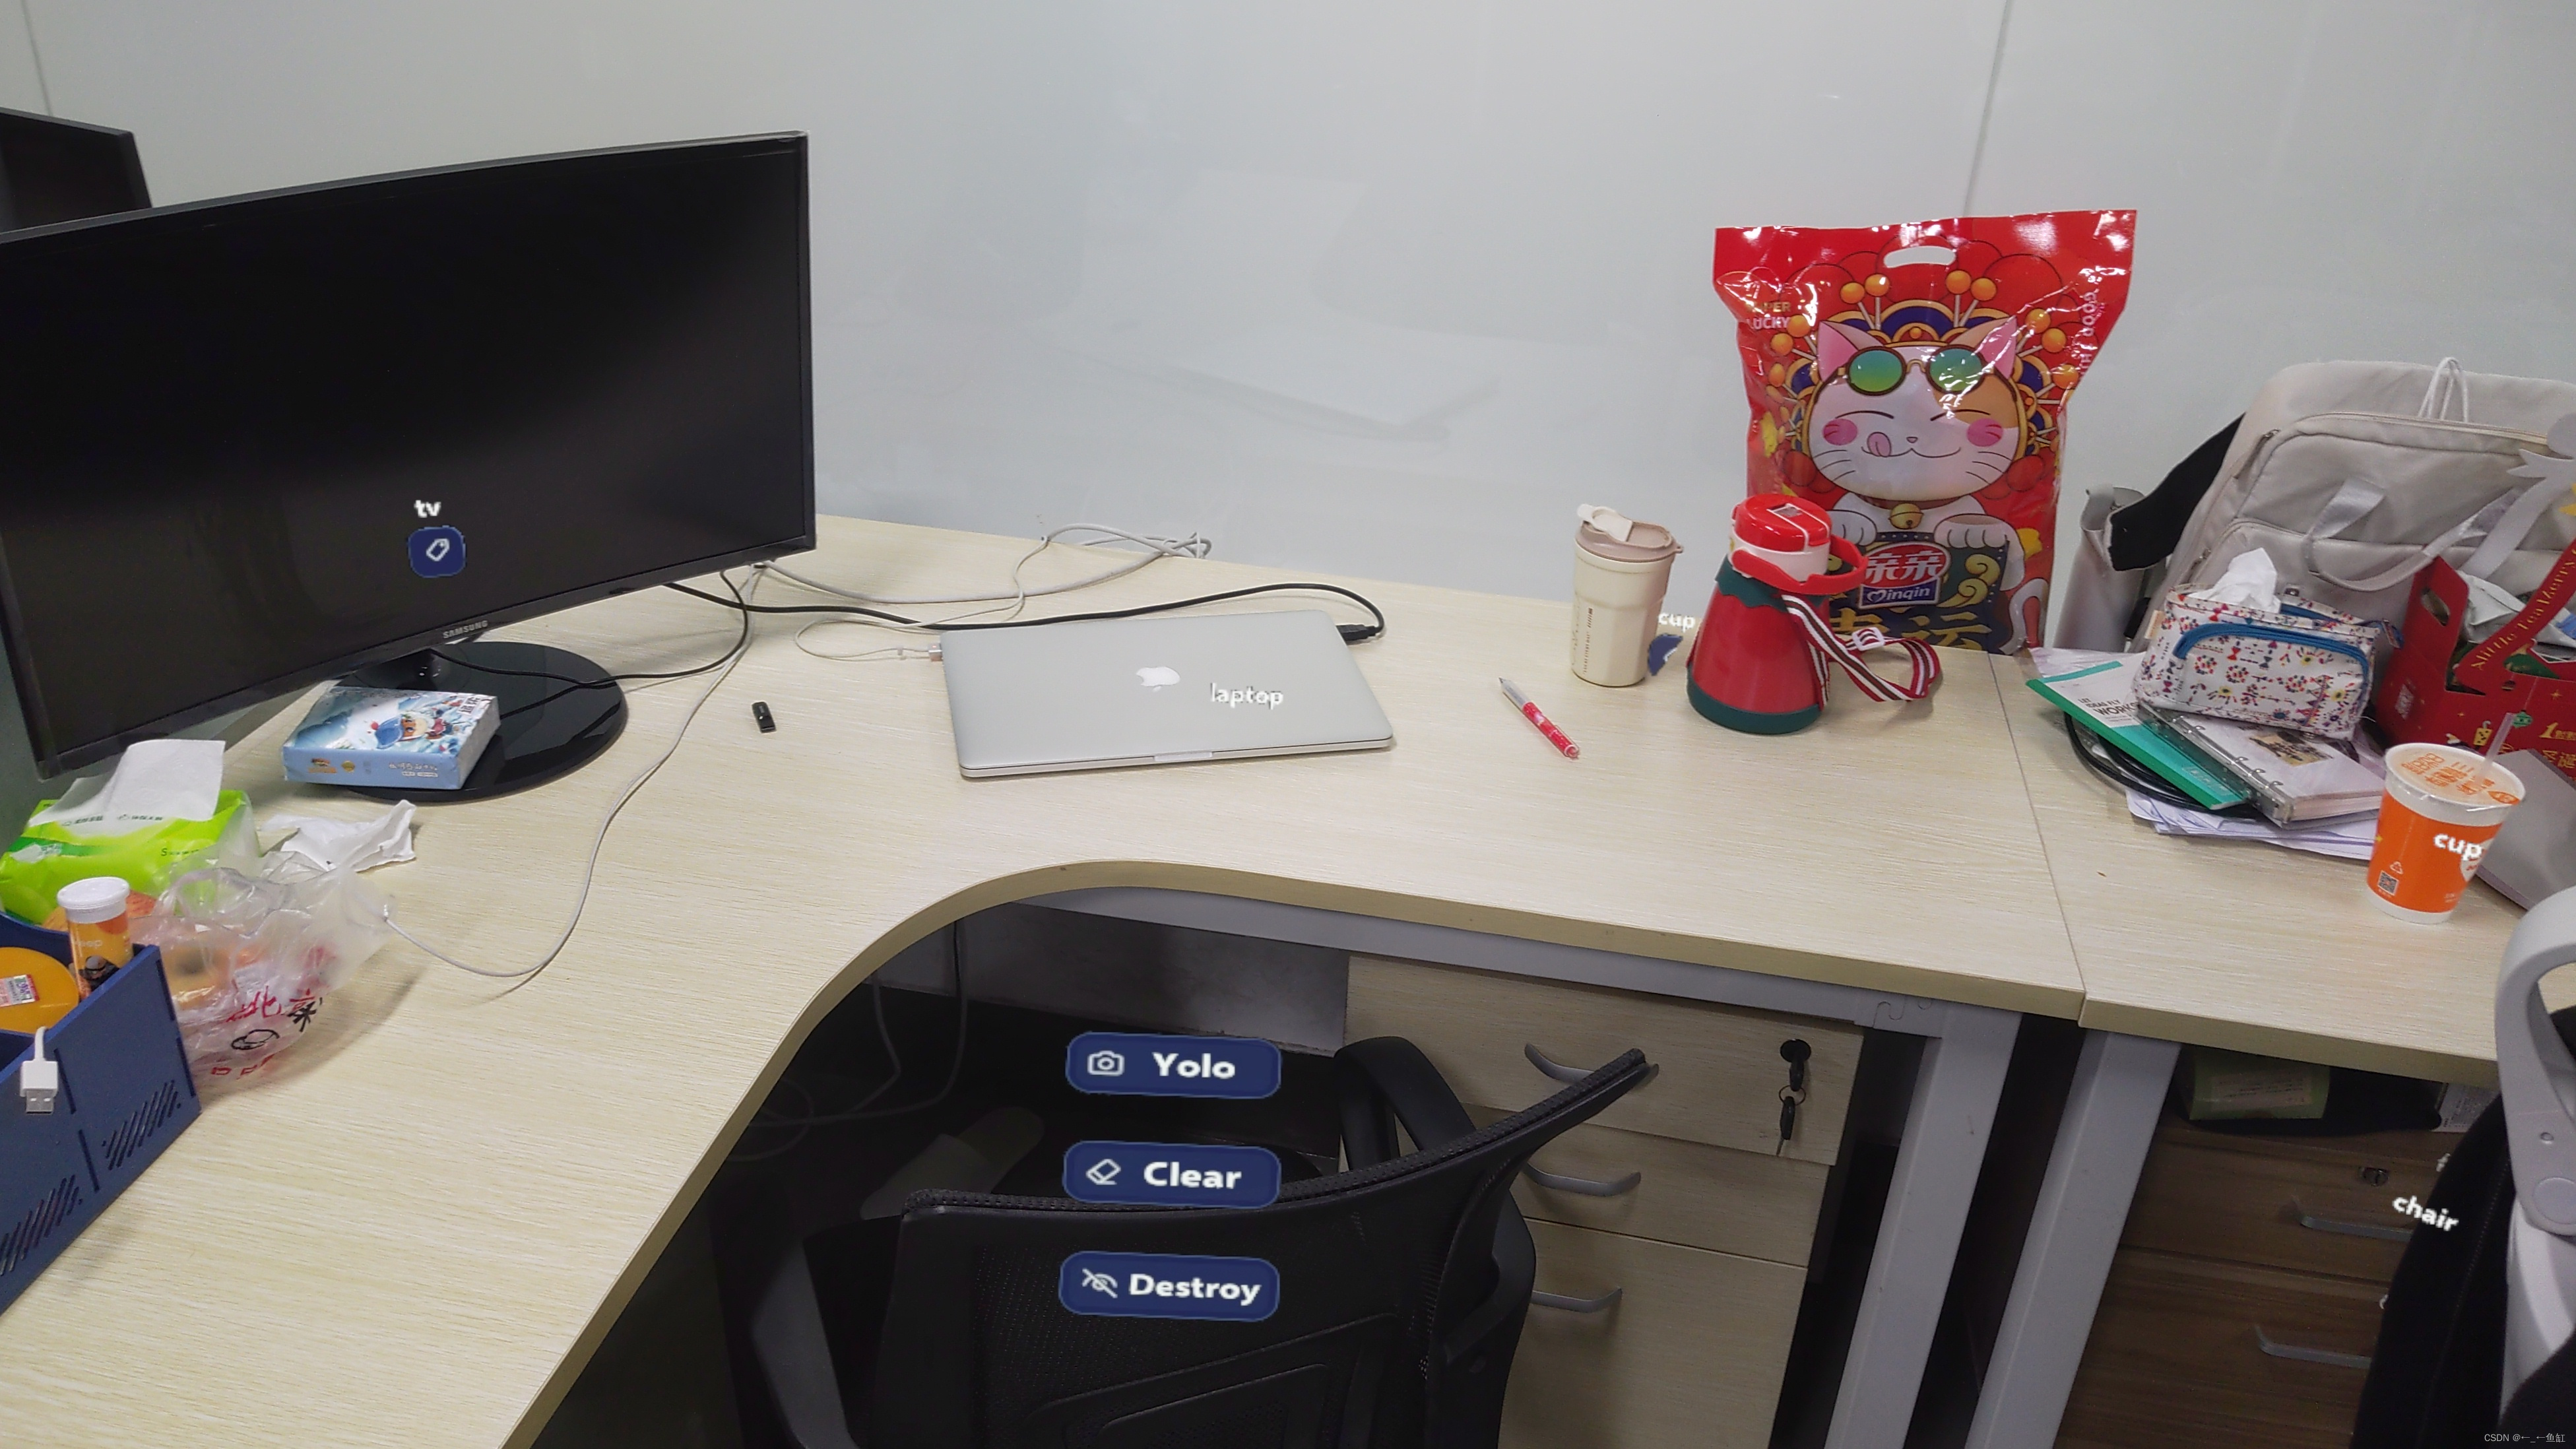
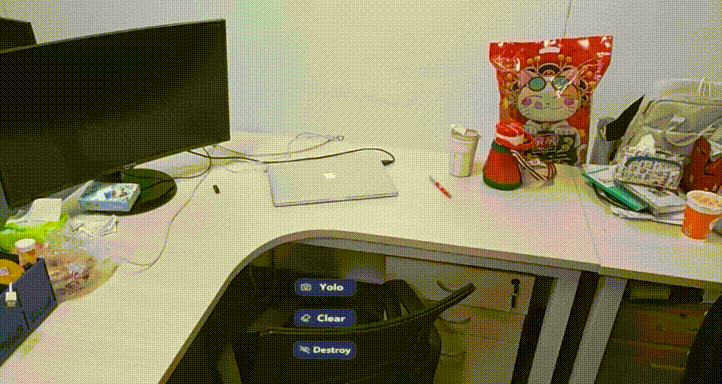
其中YOLO按钮包括检测+创建对象标签,Clear是清除YoloData数据,Destroy是清楚对象标签。


 861
861

 被折叠的 条评论
为什么被折叠?
被折叠的 条评论
为什么被折叠?
 到【灌水乐园】发言


