


因为是要模拟物理效果,所以创建工程的时候使用cocos2d ios with Box2D模板。接着,准备一个用来作为绳子片段的图片,例如:
rope.png:(4px×2px的一个橙色小方块,如果你想要带有样式的绳子,可以用PS简单制作),注意,纹理的长宽一定要是2的幂指数(因为我们要用到平铺纹理)。
将rope.png导入工程的resources中。
在模拟的时候,实际上是将绳子切分为很多个小线段来处理的,当分段足够细足够多时,绳子的模拟效果就会足够平滑。
为了模拟绳子受力效果,我们为每一个小线段定义节点,然后对这些点施加力(或者说模拟这些点的位移)来模拟绳子的运动效果,同时,我们用这些点来计算和限制每个小线段的移动,防止整个绳子松散掉。
在下面的说明中,我们对于每一部分先给出一些代码,然后做一下解释。
首先按照设计,我们需要定义三个类(都继承NSObject类),一个是Rope类,不必多说,就是我们的“绳子”类,还有一个是Segment类,定义了用来细分绳子的小线段,最后一个是Vertex类,即前面所说的节点。
首先来看一下Rope类的声明:
#import"cocos2d.h"
#import"Vertex.h"
#import"Segment.h"
#import"Box2D.h"
@interfaceRope : NSObject {
NSMutableArray* vertexes;
NSMutableArray* segments;
NSMutableArray* segSprites;
CCSpriteBatchNode* ropeSegBatchNode;
b2Body* startVertex;
b2Body* endVertex;
int segmentCount;
float segmentConnectionRatio;
}
-(id)initWithStart:(b2Body*) startVertex end:(b2Body*) endVertexsegBatchNode:(CCSpriteBatchNode*) ropeSegBatchNode;
-(void)updateSegments:(float)delta;
-(void)updateSegmentSprites;
-(void)createRope;
@end
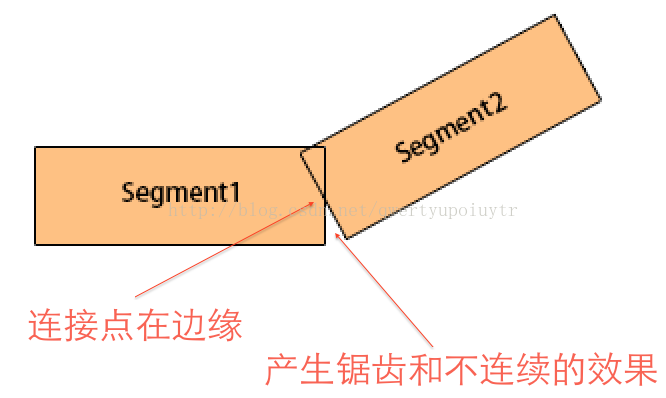
头文件中包括了cocos2d和box2d的头文件,还有Vertex类和Segment类的头文件。在Rope类中定义了节点Vertex和小线段Segment类的数组,用来存储整个绳子中包含的节点和线段,此外,还定义了一个CCSprite对象的数组,因为每一个小线段最终还是要通过精灵来显示的。除了这些绳子的组成部分,CCSpriteBatchNode成员用于共享纹理贴图(因为每一个Segment的CCSprite对象的纹理都是一样的,如果单个渲染效率代价太大)。startVertex和endVertex是两个box2d的刚体对象,用来模拟绳子的两个端点的物理效果。segmentCount用来存储绳子上的Segment个数(用于update循环),segmentConnectionRatio这个系数取值范围在0-0.1之间,我们知道Segment之间通过节点进行连接,如果节点定义在片段的边缘,那么两个片段在成一定角度的时候容易产生锯齿或者不连续的效果,因此将连接的节点向Segment内部移动一定的比例,保证其连续和平滑效果,segmentConnectionRatio就定义了这个比例,参考下面的图片:

在Rope类中定义了4个方法,initWithStart:end:segBatchNode:方法为初始化方法,通过传入起点和终点的刚体对象来做初始化工作。createRope创建绳子(包括Segments,Vertexes和CCSprite对象),updateSegments用来计算和更新线段的位置和节点的位置,updateSegmentSprites用来重新刷新每个线段对应的精灵的位置和旋转,实现绳子的动画效果。
这里我们先不给出实现,我们先给出Vertex和Segment类的声明和定义。
Vertex.h:
@interfaceVertex : NSObject {
float oldX;
float oldY;
}
@propertyfloat x;
@propertyfloat y;
-(void)setX:(float)xPos andY:(float)yPos;
-(void)updatePos;
-(void)applyGravity:(float) delta;
-(CGPoint)toCGPoint;
@end
类中声明了节点的位置x和y,另外还定义了前一次计算的位置oldX和oldY(oldX和oldY的用途在类定义的注释中会解释)。setX:andY方法用来更新x和y的值,updatePos方法用于根据oldX和oldY来修正x和y的位置(方法实现中有注释)。applyGravity方法对节点施加一个位移来模拟重力对绳子的影响。toCGPoint方法将Vertex类转换为CGPoint结构。
下面是Vertex的定义(Vertex.mm):
#import"Vertex.h"
@implementationVertex
@synthesize x;
@synthesize y;
-(void)setX:(float)xPos andY:(float)yPos {
oldX = x = xPos;
oldY = y = yPos;
}
-(void)updatePos {
//之所以要记录旧的位置,是因为每次调用updatePos方法
//更新位置之后,还会通过多次迭代计算来再次修正每个节点
//的位置(因为每个线段不能够被拉伸,而节点在重力和其他
//线段的影响下会致使线段拉伸,因此要做修正),这些修正
//并没有立即生效,而在下一次调用Rope的updateSegments
//方法更新时又会覆盖掉节点的位置调整,因此,需要记录旧
//的位置,并将之前的调整得到的差值反馈到节点位置上。
float tmpX = x;
float tmpY = y;
x += x - oldX;
y += y - oldY;
oldX = tmpX;
oldY = tmpY;
}
-(void)applyGravity:(float)delta {
y -= delta * 10.0; //10.0是重力的系数,如果要模拟轻绳子,可以适当减小这个系数,建议在5.0-10.0之间
}
-(CGPoint)toCGPoint {
return CGPointMake(x, y);
}
@end
下面是Segment的声明(Segment.h):
#import"Vertex.h"
@interfaceSegment : NSObject {
float length;
}
@propertyVertex* startVertex;
@propertyVertex* endVertex;
-(id)initWithStartVertex:(Vertex*) start andEndVertex:(Vertex*) end;
-(void)adjustVertexPosition;
@end
length为线段的初始长度,也是线段的不可变长度,根据这个长度来对线段的两端节点进行修正。startVertex和endVertex为两端节点。adjustVertexPosition用来修正节点。
Segment类定义(Segment.mm):
#import"Segment.h"
#import"cocos2d.h"
@implementationSegment
@synthesizestartVertex;
@synthesizeendVertex;
-(id)initWithStartVertex:(Vertex *)start andEndVertex:(Vertex *)end {
if (self = [super init]) {
startVertex = start;
endVertex = end;
//记录线段的初始长度
length = ccpDistance([start toCGPoint],[end toCGPoint]);
}
return self;
}
-(void)adjustVertexPosition {
//x和y方向的距离,用于后面求微调值时计算比例关系
float xLength = endVertex.x -startVertex.x;
float yLength = endVertex.y -startVertex.y;
//实际现在线段的长度(这个长度和初始值会有差异,所以需要修正)
float actualLength =ccpDistance([startVertex toCGPoint], [endVertex toCGPoint]);
//需要修正的长度
float adjustment = length - actualLength;
//通过三角形相似性来计算x和y方向上的修正长度,乘以0.5是因为起点和终点分别修正一半
float xAdjustment = adjustment * xLength *0.5 / actualLength;
float yAdjustment = adjustment * yLength *0.5 / actualLength;
//修正起点和终点位置
startVertex.x -= xAdjustment;
startVertex.y -= yAdjustment;
endVertex.x += xAdjustment;
endVertex.y += yAdjustment;
}
@end
初始化方法中通过两个节点计算出线段的长度。adjustVertexPosition中对各部分代码都做了详细的注释,这里不多解释了。
接着我们来看Rope类的定义。
Rope类的初始化方法定义如下:
-(id)initWithStart:(b2Body *)startVertex end:(b2Body *)endVertexsegBatchNode:(CCSpriteBatchNode *)ropeSegBatchNode {
if (self = [super init]) {
self->vertexes = [[NSMutableArrayalloc] init];
self->segments = [[NSMutableArrayalloc] init];
self->segSprites = [[NSMutableArrayalloc] init];
self->startVertex = startVertex;
self->endVertex = endVertex;
self->ropeSegBatchNode =ropeSegBatchNode;
[self createRope];
}
return self;
}
方法初始化了数组元素,将传入的两个端点的刚体对象赋给类的属性,传入纹理参数,调用createRope方法来初始化绳子中的元素(节点,线段,精灵等等)。
createRope方法:
-(void)createRope {
//获取两个端点的位置
b2Vec2 startVec =startVertex->GetPosition();
b2Vec2 endVec =endVertex->GetPosition();
CGPoint startPos = ccp(startVec.x *PTM_RATIO, startVec.y * PTM_RATIO);
CGPoint endPos = ccp(endVec.x * PTM_RATIO,endVec.y * PTM_RATIO);
//计算绳子长度
float totalLength = ccpDistance(startPos,endPos);
//定义每个线段的长度,减小这个值可以更平滑,但是太小容易导致不连续的效果
float segmentLength = 8;
//计算线段总个数
segmentCount = totalLength / segmentLength;
//计算表示绳子方向的基向量
CGPoint directionVector =ccpNormalize(ccpSub(endPos, startPos));
//定义线段连接处的缩进值(0-0.1之间)
segmentConnectionRatio = 0.1f;
//计算所有的节点的位置并加入数组
for (int i = 0; i < segmentCount + 1;i++) {
//通过起点和计数器来计算第i个节点的位置
CGPoint vPos = ccpAdd(startPos,ccpMult(directionVector, segmentLength * i * (1 - segmentConnectionRatio)));
Vertex* vertex = [[Vertex alloc] init];
[vertex setX:vPos.x andY:vPos.y];
[vertexes addObject:vertex];
}
//初始化所有的线段并加入数组
for (int i = 0; i < segmentCount; i++) {
Segment* seg = [[Segment alloc]initWithStartVertex:[vertexes objectAtIndex:i] andEndVertex:[vertexesobjectAtIndex:i+1]];
[segments addObject:seg];
}
//初始化精灵数组
if (ropeSegBatchNode != nil) {
for (int i = 0; i < segmentCount;i++) {
Segment* seg = [segmentsobjectAtIndex:i];
CGPoint startPoint =[seg.startVertex toCGPoint];
CGPoint endPoint = [seg.endVertextoCGPoint];
//初始化精灵
CCSprite* segSprite = [CCSpritespriteWithTexture:ropeSegBatchNode.texture rect:CGRectMake(0, 0, segmentLength,[[[ropeSegBatchNode textureAtlas] texture] pixelsHigh])];
//线段方向向量
CGPoint directionVector =ccpSub(startPoint, endPoint);
//线段的角度
float segmentAngle =ccpToAngle(directionVector);
//设置重复纹理
ccTexParams param = { GL_LINEAR,GL_LINEAR, GL_REPEAT, GL_REPEAT };
[segSprite.texturesetTexParameters:¶m];
//设置线段的位置和角度
[segSpritesetPosition:ccpMidpoint(startPoint, endPoint)];
[segSpritesetRotation:-CC_RADIANS_TO_DEGREES(segmentAngle)];
[ropeSegBatchNodeaddChild:segSprite];
[segSprites addObject:segSprite];
}
}
}
方法计算了线段的个数,初始化了节点、线段和精灵数组。方法中做了详细的注释,这里不过多的做解释了。
创建完成Rope之后,接下来我们来看更新绳子运动模拟的方法:
-(void)updateSegments:(float)delta {
//获取两个端点的位置
b2Vec2 startVec =startVertex->GetPosition();
b2Vec2 endVec =endVertex->GetPosition();
CGPoint startPos = ccp(startVec.x *PTM_RATIO, startVec.y * PTM_RATIO);
CGPoint endPos = ccp(endVec.x * PTM_RATIO,endVec.y * PTM_RATIO);
//更新绳子两个端点的位置
[[vertexes objectAtIndex:0] setX:startPos.xandY:startPos.y];
[[vertexes objectAtIndex:segmentCount]setX:endPos.x andY:endPos.y];
//对绳子施加重力效果,更新绳子每个节点的位置
for (int i = 1; i < segmentCount; i++) {
Vertex* vertex = [vertexesobjectAtIndex:i];
[vertex applyGravity:delta];
[vertex updatePos];
}
//8次迭代(迭代次数越多,效率越低,动画越细腻)来修正线段节点的位置
int iterationCount = 8;
for (int i = 0; i < iterationCount; i++){
for (int j = 0; j < segmentCount;j++) {
[[segments objectAtIndex:j]adjustVertexPosition];
}
}
}
方法updateSegments首先更新两个端点的位置,然后对绳子施加重力,最后再对节点进行修正。这里注意,我们调用updateSegments方法实际上只是对虚拟的节点和线段做了调整,并没有更新精灵,所以此时绳子并没有表现出任何变化。updateSegmentSprites方法根据updateSegments中修正的节点的位置来更新精灵:
-(void)updateSegmentSprites {
if (ropeSegBatchNode != nil) {
for (int i = 0; i < segmentCount;i++) {
Segment* seg = [segmentsobjectAtIndex:i];
CGPoint startPoint =[seg.startVertex toCGPoint];
CGPoint endPoint = [seg.endVertextoCGPoint];
float angle =ccpToAngle(ccpSub(startPoint, endPoint));
CCSprite* sprite = [segSpritesobjectAtIndex:i];
[spritesetPosition:ccpMidpoint(startPoint, endPoint)];
[spritesetRotation:-CC_RADIANS_TO_DEGREES(angle)];
}
}
}
方法中对于每一个线段,根据两端节点的位置来更新精灵的位置和旋转,产生动画效果。
接着我们来修改主场景的层HelloWorldLayer,在HelloWorldLayer声明中添加三个成员:
CCSpriteBatchNode*segmentBatchNode;
b2Body*anchorPoint;
NSMutableArray*ropes;
其中,segmentBatchNode用于在Segment之间共享纹理贴图。anchorPoint为绳子固定的旋转轴(一个虚拟的节点),ropes为绳子数组。
在HelloWorldLayer的init方法中添加初始化的语句:
ropes =[[NSMutableArray alloc] init];
segmentBatchNode= [CCSpriteBatchNode batchNodeWithFile:@"rope.png" capacity:100];
[selfaddChild:segmentBatchNode];
初始化绳子数组和纹理对象。
在initPhysics(初始化物理模拟)方法中添加绳子的虚拟旋转轴anchorPoint的初始化语句:
b2BodyDefanchorPointDef;
anchorPointDef.position.Set(s.width* 0.5 / PTM_RATIO, s.height * 0.8 / PTM_RATIO);
anchorPoint =world->CreateBody(&anchorPointDef);
接着我们在addNewSpriteAtPosition(不同的Box2D框架的版本不同,该方法的名称可能不同,这里我们Box2D的版本为2.3.0,该方法用于向场景中添加刚体盒子)方法最后添加下面的代码:
b2RopeJointDefjointDef;
jointDef.bodyA= anchorPoint;
jointDef.bodyB= body;
jointDef.localAnchorA= b2Vec2(0, 0);
jointDef.localAnchorB= b2Vec2(0, 0);
jointDef.maxLength=(body->GetPosition() - anchorPoint->GetPosition()).Length();
world->CreateJoint(&jointDef);
Rope* rope =[[Rope alloc] initWithStart:anchorPoint end:bodysegBatchNode:segmentBatchNode];
[ropesaddObject:rope];
该方法定义了一个绳索关节,将盒子对象和绳子的旋转轴软连接在一起,然后在他们之间创建绳子对象。
最后,我们在update方法的最后添加下面的语句,更新所有添加进场景中的绳子:
for (Rope*rope in ropes) {
[rope updateSegments:dt];
}
for (Rope*rope in ropes) {
[rope updateSegmentSprites];
}
接着我们可以做一下测试,下面是运行效果:
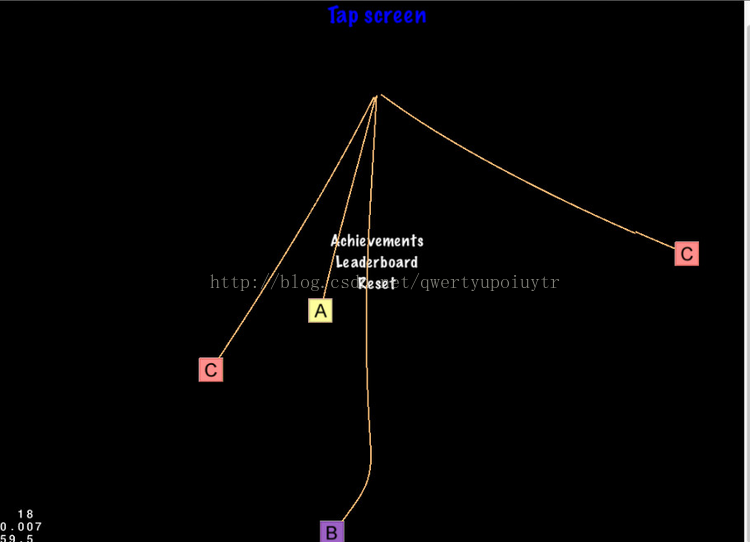
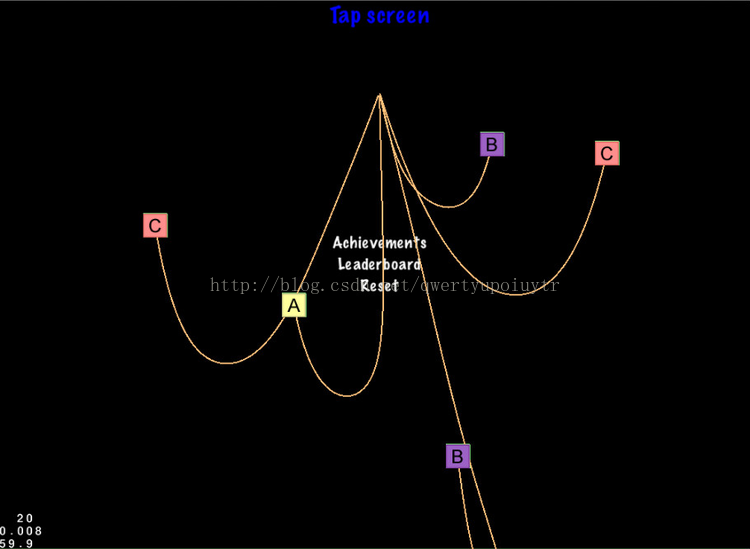
我们可以增大绳子的长度,并且将盒子变为静态对象来看下效果:
大功告成,有问题欢迎留言讨论。
官网示例代码下载地址:http://www.cocoachina.com/bbs/job.php?action=download&aid=17114


 1296
1296

 被折叠的 条评论
为什么被折叠?
被折叠的 条评论
为什么被折叠?
 到【灌水乐园】发言


