


1、内核编译
2、固件升级
Firstly, update the required boot files in the Raspberry Pi boot directory with those you've downloaded. These are:
- bootcode.bin
- fixup.dat
- start.elf
Next, you need to copy the VC libraries over. There are two copies of this: one for hard float and one for soft float. To find the correct one, run the following command:
${CCPREFIX}gcc -v 2>&1 | grep hard
If something prints out, and you can see --with-float=hard, you need the hard float ones. NOTE: The current version of Raspbian uses hard float.
Remove the /opt/vc directory from the Raspberry Pi root, then:
- For hard float, copy vc from the hardfp/opt directory into /opt in the Raspberry Pi root directory(硬件浮点)
- Otherwise copy vc from the top-level opt directory into /opt in the Raspberry Pi root directory.(软件模拟)
3、内核的基础库
4、SD卡扩容:
From this Raspberry Pi forum post:
- When the Raspberry Pi is first turned on, the ARM core is off, and the GPU core is on. At this point the SDRAM is disabled.
- The GPU starts executing the first stage bootloader, which is stored in ROM on the SoC. The first stage bootloader reads the SD card, and loads the second stage bootloader (
bootcode.bin) into the L2 cache, and runs it.bootcode.binenables SDRAM, and reads the third stage bootloader (loader.bin) from the SD card into RAM, and runs it.loader.binreads the GPU firmware (start.elf).start.elfreadsconfig.txt,cmdline.txtandkernel.img
loader.bindoesn't do much. It can handle.elffiles, and so is needed to loadstart.elfat the top of memory (ARM uses SDRAM from address zero). There is a plan to add elf loading support tobootcode.bin, which would makeloader.binunnecessary, but it's a low priority (I guess it might save you 100ms on boot).
Here are some resources that could be helpful:
- Bare-metal programming examples
- Baking Pi Operating Systems Development Tutorials
- Raspberry Pi firmware source code
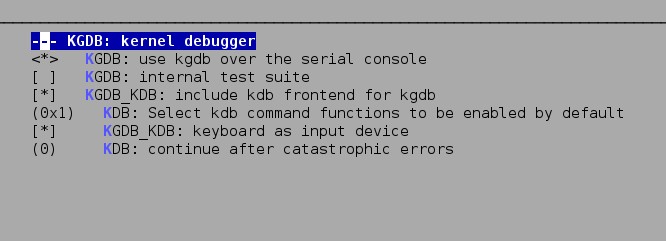
5、内核调试

# cat /boot/cmdline.txt
dwc_otg.lpm_enable=0 dwc_otg.speed=1 debug console=ttyAMA0,115200 kgdboc=ttyAMA0,115200 kgdbwait
console=tty1 root=/dev/mmcblk0p2 rootfstype=ext4 elevator=deadline rootwait 


 7212
7212

 被折叠的 条评论
为什么被折叠?
被折叠的 条评论
为什么被折叠?
 到【灌水乐园】发言


