


文章目录
一、寻找轮廓findContours()
1.要层次hierarchy
原型
void findContours(
	InputArray image,
	OutputArrayOfArrays contours,
	OutputArray hierarchy,
	int mode,
	int method,
	Point offset=Point()
);
参数
- image:输入图像。必须为8位单通道图像
- contours:轮廓。一般为
vector<vector<Point> > contours;,意思是多个点集,每个点集是一个轮廓,多个点集构成轮廓集。 - hierarchy:层次。一般为
vecotr<Vec4i> hierarchy; - mode:轮廓检索模式
- RETR_EXTERNAL:
- RETR_LIST:
- RETR_CCOMP:
- RETR_TREE :
- method:轮廓的近似方法
- CHAIN_AOOROX_NONE:
- CHAIN_AOOROX_SIMPLE:
- CHAIN_AOOROX_TC89_LI:
- CHAIN_AOOROX_TC89_KCOS:
- offset:每个轮廓点的可选偏移量
例
#include<opencv2/opencv.hpp>
using namespace std;
using namespace cv;
int main()
{
	//灰度图
	Mat srcImage=imread("M.jpg",0);

	//取阈值成二值图
	srcImage=srcImage>100;
	namedWindow("Threshold119",WINDOW_NORMAL);
	imshow("Threshold119",srcImage);

	Mat dstImage=Mat::zeros(srcImage.size(),srcImage.type());
	vector<vector<Point> > contours;
	vector<Vec4i> hierarchy;
	findContours(srcImage,contours,hierarchy,RETR_EXTERNAL,CHAIN_APPROX_SIMPLE);

	waitKey();
	return 0;
}
2.不要层次hierarchy
void findContours(
	InputArray image,
	OutputArrayOfArrays contours,
	int mode,
	int method,
	Point offset=Point()
);
3.轮廓就是点集
#include<iostream>
#include<opencv2/opencv.hpp>
using namespace cv;
using namespace std;

int main()
{
	Mat src=imread("/home/volume/VSCode/imageSrc/cube.png",0);

	Mat point_dst;
	point_dst.create(src.rows,src.cols,CV_8UC1);
	point_dst=Scalar::all(0);

	Mat bounding_dst;
	bounding_dst.create(src.rows,src.cols,CV_8UC1);
	bounding_dst=Scalar::all(0);

	//只绘制一个点集
	vector<vector<Point> > contours;
	findContours(src,contours,RETR_EXTERNAL,CHAIN_APPROX_SIMPLE);
	for(int i=0;i<contours[0].size();i++)
	{
		//绘制每个点
		circle(point_dst,contours[0][i],1,Scalar::all(255));
	}

	//圈出那个轮廓
	RotatedRect rotatedRect=minAreaRect(contours[0]);
	Point2f hull[4];
	rotatedRect.points(hull);
	for(int i=0;i<4;i++)
	{
		line(bounding_dst,hull[i],hull[(i+1)%4],Scalar::all(255));
	}

	imshow("src",src);
	imshow("point_dst",point_dst);
	imshow("bounding_dst",bounding_dst);
	waitKey();

	return 0;
}

二、绘制轮廓drawContours()
原型
void drawContours(
	InputArray image,
	OutputArrayOfArrays contours,
	int contourIdx,
	const Scalar &color,
	int thickness=1,
	int lineType=8,
	InputArray hierarchy=noArray(),
	int maxLevel=INT_MAX,
	Point offset=Point()
);
参数
- image:输入图像。必须为8位单通道图像。图像必须已经创建。
- contours:轮廓。为findContours()的
vector<vector<Point> > contours; - contourIdx:轮廓绘制的指示变量。如果为负值,则绘制所有轮廓
- color:轮廓的颜色
- thickness:轮廓线条的粗细度
- lineType:轮廓线条的类型
- hierarchy:层次结构信息
- maxLevel:表示用于绘制轮廓的最大等级
- offset:每个轮廓点的可选偏移量
#include<opencv2/opencv.hpp>
using namespace std;
using namespace cv;

# define WINDOW_NAME "Effect"

Mat g_srcImage;
vector<vector<Point> > g_contours;
vector<Vec4i> g_hierarchy;
int g_threshValue=80;
int g_threshValueMax=255;


void onChange(int,void*)
{
	//取阈值成二值图
	g_srcImage=g_srcImage>g_threshValue;
	namedWindow(WINDOW_NAME,WINDOW_NORMAL);
	imshow(WINDOW_NAME,g_srcImage);

	Mat dstImage=Mat::zeros(g_srcImage.size(),g_srcImage.type());

	namedWindow("dstImage",WINDOW_NORMAL);

	findContours(g_srcImage,g_contours,g_hierarchy,RETR_TREE,CHAIN_APPROX_SIMPLE);
	for(int index=0;index<g_contours.size();index++)
	{
		Scalar color(rand()&255,rand()&255,rand()&255);
		drawContours(dstImage,g_contours,index,color,FILLED,8,g_hierarchy);
		imshow("dstImage",dstImage);
		waitKey(1);
	}

}

int main()
{
	//灰度图
	g_srcImage=imread("t.jpg",0);
	namedWindow(WINDOW_NAME,WINDOW_NORMAL);
	imshow(WINDOW_NAME,g_srcImage);

	createTrackbar("Threshold",WINDOW_NAME,&g_threshValue,g_threshValueMax,onChange);
	onChange(0,0);

	waitKey();
	return 0;
}
三、寻找凸包
原型
void convexHull(
	InputArray points,
	OutputArray hull,
	bool clockkwise=false,
	bool returnPoints=true
)
参数
- points:输入的二维点集。可以是Mat类,也可以是vector容器
- hull:找到的凸包。凸包的数据其实是下标。
- clockkwise:操作方向标识符。真为顺时针,假为逆时针(默认)。并且坐标系是x指右,y指上
- returnPoints:操作标识符。真为返回各凸包的各个点(默认),假为返回凸包各点的指数。当hull是vector时,此标志被忽略。
绘制点的凸包
#include<opencv2/opencv.hpp>
using namespace std;
using namespace cv;

#define W_CONVEX "convexHull"

int main()
{
	Mat image=Mat::zeros(600,600,CV_8UC3);

	//初始化rng
	RNG& rng=theRNG();

	while(1)
	{
		char key;

		//获得一个3到103的数量
		int count=(unsigned)rng%100+3;
		vector<Point> points;

		for(int i=0;i<count;i++)
		{
			Point point;
			//在1/4到3/4区域内的正态分布点
			point.x=rng.uniform(image.cols/4,image.cols*3/4);
			point.y=rng.uniform(image.rows/4,image.rows*3/4);
			points.push_back(point);
		}

		//圈出要绘制的点
		for(int i=0;i<count;i++)
		{
			circle(image,points[i],3,Scalar::all(150),5);
		}

		//寻找凸包
		vector<int> hull;
		//凸包内数据其实是凸包的点points的下标
		convexHull(Mat(points),hull);


		//用连线表示凸包
		for(int i=0;i<hull.size();i++)
		{
			//从上一个点到下一个点
			line(image,points[hull[i]],points[hull[(i+1)%hull.size()]],Scalar::all(255),2);
		}

		namedWindow(W_CONVEX,WINDOW_NORMAL);
		imshow(W_CONVEX,image);

		//图像重新变成全黑的
		image=Scalar::all(0);

		if(waitKey()=='q') return 0;

	}

	return 0;
}

四、使用多边形
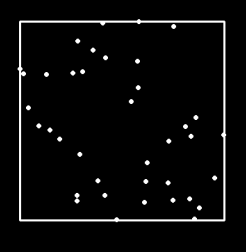
1.外部矩形边界boundingRect()
原型
Rect boundingRect(InputArray points)
参数
points:Mat类或者是std::vector二维点集
例子
#include<opencv2/opencv.hpp>
using namespace std;
using namespace cv;

#define W_CONVEX "RESULT"

int main()
{
	Mat image=Mat::zeros(600,600,CV_8UC3);

	//初始化rng
	RNG& rng=theRNG();

	while(1)
	{
		char key;

		//获得一个3到103的数量
		int count=(unsigned)rng%100+3;
		vector<Point> points;

		for(int i=0;i<count;i++)
		{
			Point point;
			//在1/4到3/4区域内的正态分布点
			point.x=rng.uniform(image.cols/4,image.cols*3/4);
			point.y=rng.uniform(image.rows/4,image.rows*3/4);
			circle(image,point,2,Scalar::all(255),2);
			points.push_back(point);
		}

		Rect rect=boundingRect(points);
		vector<Point> hull{rect.tl(),Point(rect.x+rect.width,rect.y),rect.br(),Point(rect.x,rect.y+rect.height)};
		for(int i=0;i<4;i++)
		{
			line(image,hull[i],hull[(i+1)%4],Scalar::all(255),2);
		}

		namedWindow(W_CONVEX,WINDOW_NORMAL);
		imshow(W_CONVEX,image);

		//图像重新变成全黑的
		image=Scalar::all(0);

		if(waitKey()=='q') return 0;

	}

	return 0;
}
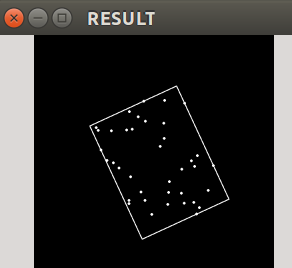
2.寻找最小包围矩形minAreaRect()
原型
RotateRect minAreaRect(InputArray points)
参数
points:Mat类或者是std::vector二维点集
返回一个包围点的RotatedRect
例子:
#include<opencv2/opencv.hpp>
using namespace std;
using namespace cv;

#define W_CONVEX "RESULT"

int main()
{
	Mat image=Mat::zeros(600,600,CV_8UC3);

	//初始化rng
	RNG& rng=theRNG();

	while(1)
	{
		char key;

		//获得一个3到103的数量
		int count=(unsigned)rng%100+3;
		vector<Point> points;

		for(int i=0;i<count;i++)
		{
			Point point;
			//在1/4到3/4区域内的正态分布点
			point.x=rng.uniform(image.cols/4,image.cols*3/4);
			point.y=rng.uniform(image.rows/4,image.rows*3/4);
			circle(image,point,2,Scalar::all(255),2);
			points.push_back(point);
		}

		RotatedRect rect=minAreaRect(points);
		Point2f hull[4];
		rect.points(hull);
		for(int i=0;i<4;i++)
		{
			line(image,hull[i],hull[(i+1)%4],Scalar::all(255),2);
		}

		namedWindow(W_CONVEX,WINDOW_NORMAL);
		imshow(W_CONVEX,image);

		//图像重新变成全黑的
		image=Scalar::all(0);

		if(waitKey()=='q') return 0;

	}

	return 0;
}
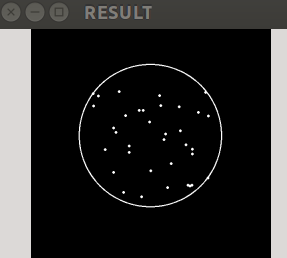
3.寻找最小包围圆形minEnclosingCircle()
原型
void minEnclosingCircle(
	InputArray points,
	Point2f& center,
	float& radius
);
参数
- points:Mat类或者是std::vector二维点集
- center:圆心位置
- radius:圆的半径
例子:
#include<opencv2/opencv.hpp>
using namespace std;
using namespace cv;

#define W_CONVEX "RESULT"

int main()
{
	Mat image=Mat::zeros(600,600,CV_8UC3);

	//初始化rng
	RNG& rng=theRNG();

	while(1)
	{
		char key;

		//获得一个3到103的数量
		int count=(unsigned)rng%100+3;
		vector<Point> points;

		for(int i=0;i<count;i++)
		{
			Point point;
			//在1/4到3/4区域内的正态分布点
			point.x=rng.uniform(image.cols/4,image.cols*3/4);
			point.y=rng.uniform(image.rows/4,image.rows*3/4);
			circle(image,point,2,Scalar::all(255),2);
			points.push_back(point);
		}

		Point2f center;
		float radius;
		minEnclosingCircle(points,center,radius);
		circle(image,center,radius,Scalar::all(255),2);

		namedWindow(W_CONVEX,WINDOW_NORMAL);
		imshow(W_CONVEX,image);

		//图像重新变成全黑的
		image=Scalar::all(0);

		if(waitKey()=='q') return 0;

	}

	return 0;
}
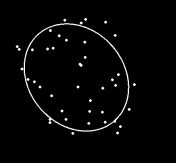
4.用椭圆拟合二维点集fitEllipse()
原型
RotateRect fitEllipse(InputArray points)
注意:点集points内点的个数必须大于等于5个。
参数
points:Mat类或者是std::vector二维点集
例子
#include<opencv2/opencv.hpp>
using namespace std;
using namespace cv;

#define W_CONVEX "RESULT"

int main()
{
	Mat image=Mat::zeros(600,600,CV_8UC3);

	//初始化rng
	RNG& rng=theRNG();

	while(1)
	{
		char key;

		//获得一个3到103的数量
		int count=(unsigned)rng%100+3;
		vector<Point> points;

		for(int i=0;i<count;i++)
		{
			Point point;
			//在1/4到3/4区域内的正态分布点
			point.x=rng.uniform(image.cols/4,image.cols*3/4);
			point.y=rng.uniform(image.rows/4,image.rows*3/4);
			circle(image,point,2,Scalar::all(255),2);
			points.push_back(point);
		}

		if(count<5) continue;

		RotatedRect fitRect=fitEllipse(points);

		ellipse(image,fitRect,Scalar::all(255),2);

		namedWindow(W_CONVEX,WINDOW_NORMAL);
		imshow(W_CONVEX,image);

		//图像重新变成全黑的
		image=Scalar::all(0);

		if(waitKey()=='q') return 0;

	}

	return 0;
}
5.逼近多边形曲线approxPolyDP()
原型
void approxPolyDP(
	InputArray curve,
	OutputArray approxCurve,
	double epsilon,
	bool closed
)
参数
- points:Mat类或者是std::vector二维点集
- approxCurve:多边形逼近的结果,类型和points一致
- epsilon:逼近的精度
- closed:真为封闭曲线(第一个和最后一个顶点相连),假为不封闭。
例子
五、其他
1.测量点是否在其中pointPolygonTest()
原型
double pointPolygonTest(
	InputArray contour,
	Point2f pt,
	bool measureDist
);
参数
- contour:
findContours()获得的轮廓 - pt:点
- measureDist:决定返回值的类型。
- 当为
true时,返回pt点距离轮廓中与其最近的点的距离。 - 当为
false时,返回+1、0或-1
- 当为
- 返回值:返回判断结果
- 在其中inside:正值
- 在边上edge:0值
- 在外边:负值
例
#include<iostream>
#include<opencv2/opencv.hpp>
using namespace cv;
using namespace std;

int main()
{
	Mat src=imread("/home/volume/VSCode/imageSrc/cube.png",0);

	vector<vector<Point> > contours;
	findContours(src,contours,RETR_EXTERNAL,CHAIN_APPROX_SIMPLE);

	cout<<pointPolygonTest(contours[0],Point2f(1,1),true)<<endl;
	//-196.471
	cout<<pointPolygonTest(contours[0],Point2f(1,1),false)<<endl;
	//-1

	cout<<pointPolygonTest(contours[0],contours[0][0],true)<<endl;
	//-0
	cout<<(pointPolygonTest(contours[0],contours[0][0],true)==0)<<endl;
	//1,看来-0也是等于0的。
	cout<<pointPolygonTest(contours[0],contours[0][0],false)<<endl;
	//0

	return 0;
}


 8096
8096


 被折叠的 条评论
为什么被折叠?
被折叠的 条评论
为什么被折叠?
 到【灌水乐园】发言


