


1.简介
正如计算机视觉和自然语言处理从两个独立的学科走向统一的学科一样,现在,大语言模型和扩散模型(或者说理解与生成)正在走向统一。
在过去的几年里,多模态智能的两个关键支柱--理解和生成--取得了显著的进步。对于多模态理解,可以使用像LLaVA已经在视觉语言任务(例如视觉问答(VQA))中表现出了卓越的能力。对于视觉生成的另一支柱,降噪扩散概率模型(DDPM)彻底改变了传统的生成范式,在文本到图像/视频生成方面实现了前所未有的性能。
最近的论文试图从这两个不同的领域组装模型,以形成一个统一的系统,可以处理多模态理解和生成。然而,现有的尝试主要是独立地处理每个域,并且通常涉及单独负责理解和生成的各个模型。这激发了一个研究问题:一个单一的Transformer可以处理多模态理解和生成?
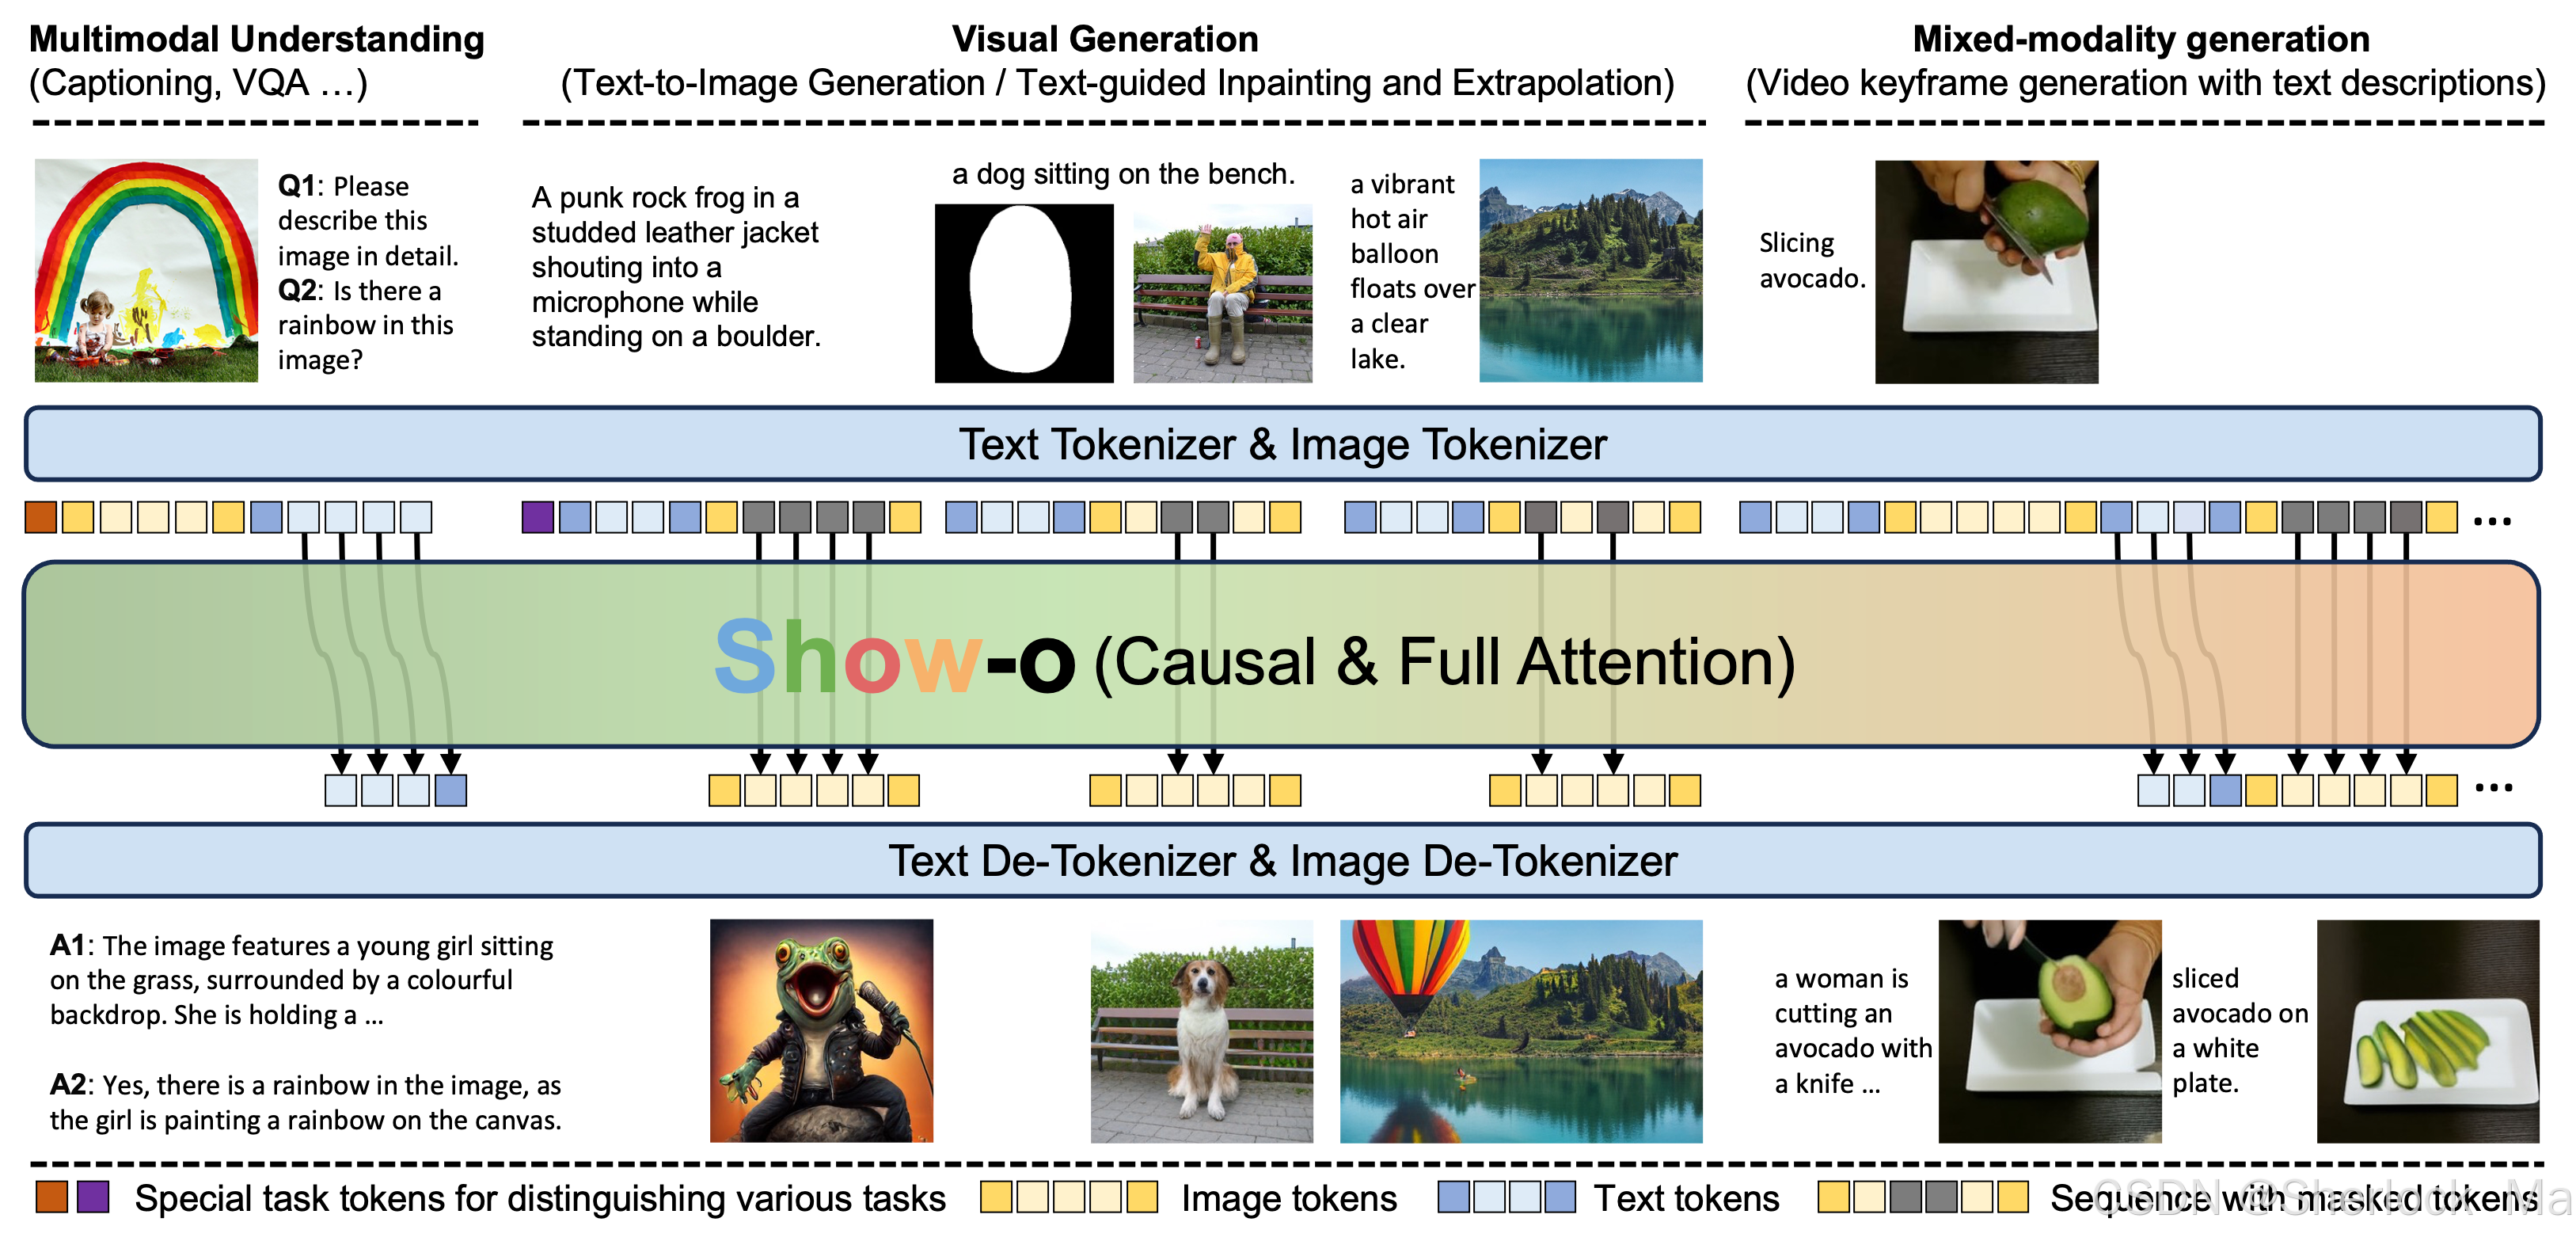
Show-o,统一了多模态理解和生成,既能完成多模态大模型的理解,又能完成生成模型的生成。与完全自回归模型不同,Show-o统一了自回归和(离散)扩散建模,以自适应地处理各种和混合模态的输入和输出。统一模型灵活地支持各种视觉语言任务,包括视觉问答,文本到图像生成,文本引导的修复/外推和混合模态生成。
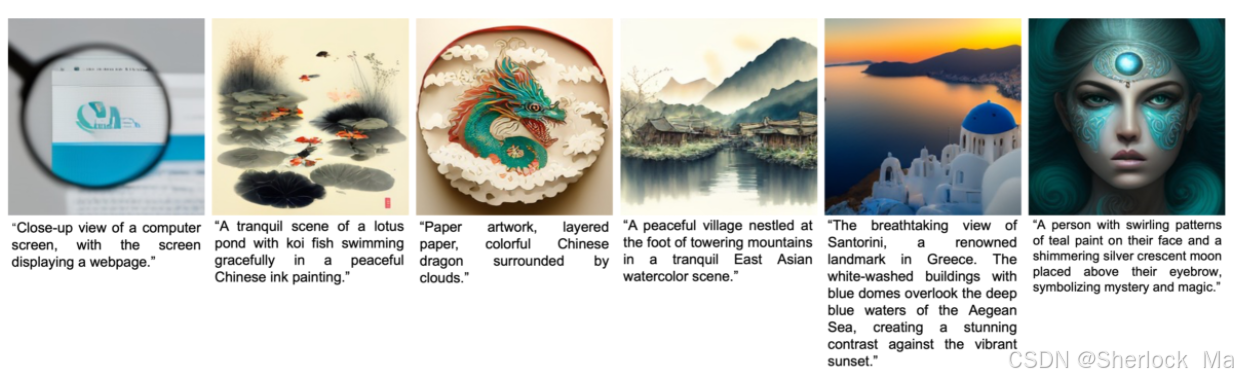
show-o示例:
相关资源
代码:https://github.com/showlab/Show-o
论文:https://arxiv.org/pdf/2408.12528
demo:https://huggingface.co/spaces/showlab/Show-o
权重:https://huggingface.co/showlab
2.论文
整体架构
show-o的整体架构和其他多模态大模型区别不大,多模态理解时的操作和其他大模型一样,即自回归生成token。
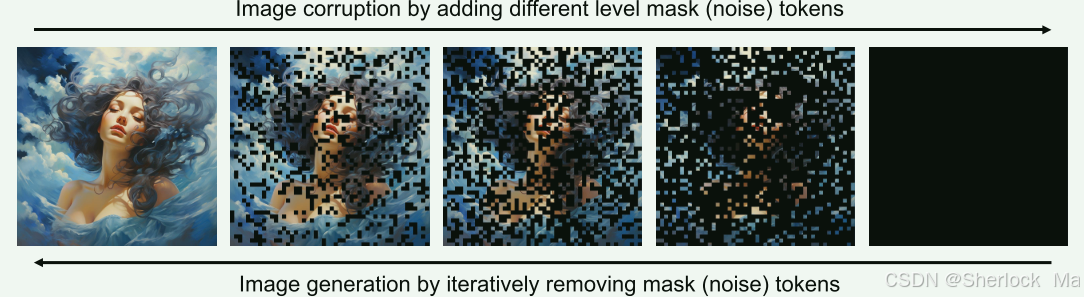
最大的区别在于show-o生成时是先以自回归的形式预测所有token,然后按照diffusion的模式,每次只采纳几个token的预测结果,其他的依旧保持掩码状态,然后再输入到模型迭代多次,生成图片。(类似于diffusion的逐步去噪)
注意:生成过程中,Diffusion是加噪去噪的过程,而show-o是加掩码和去掩码的过程,这个过程使用的是Transformer模型(用transformer模型,使用diffusion的方法实现大一统)。见下图。
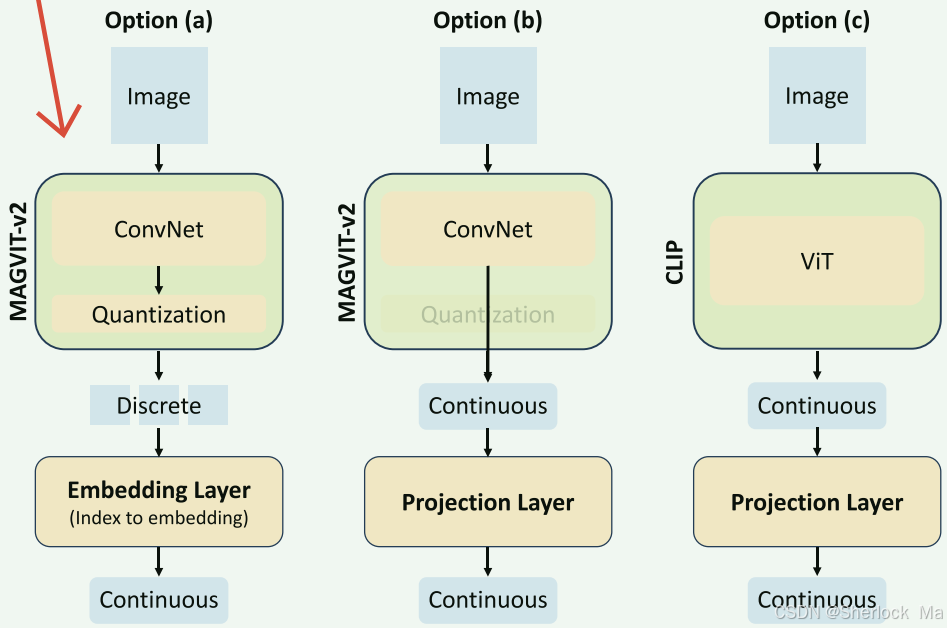
tokenization
论文实验了三种方法,我们主要讲两种
第一种(option(a))是用离散的视觉Encoder处理图像,如magvit-v2,这个模型会把图像变成16*16的离散令牌,codebook大小在8192,其token id在文本token id的后面,即50000-58000左右
第三种(option(c))是用离散的视觉Encoder处理图像,如CLIP,和其他多模态大模型没什么区别。
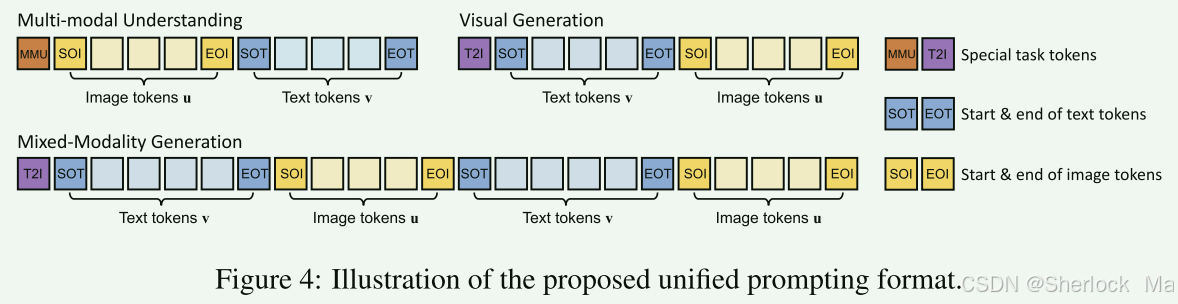
prompt
show-o的prompt以任务令牌为开头,包括<MMU>、<T2I>,接着跟上图像或文本token,图像的token以<SOI>和<EOI>为开头和结束,而文本的token以<SOT>和<EOT>为开头和结束。
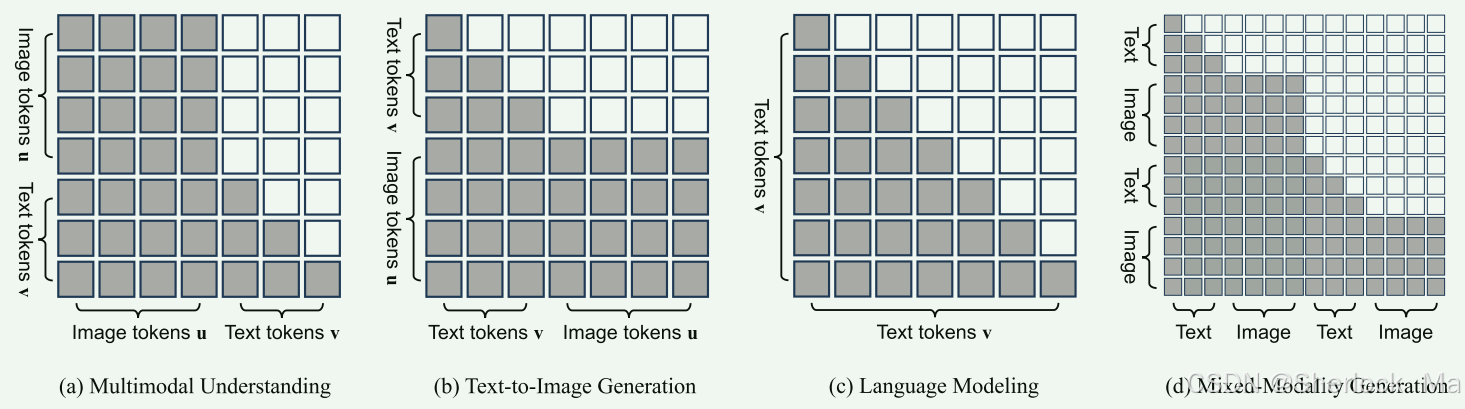
注意力机制
作者提出了一种全注意机制,使得Show-o能够以不同的方式对各种类型的信号进行建模。它是一种综合的注意机制,具有因果和完全注意,根据输入序列的格式自适应地混合和变化。
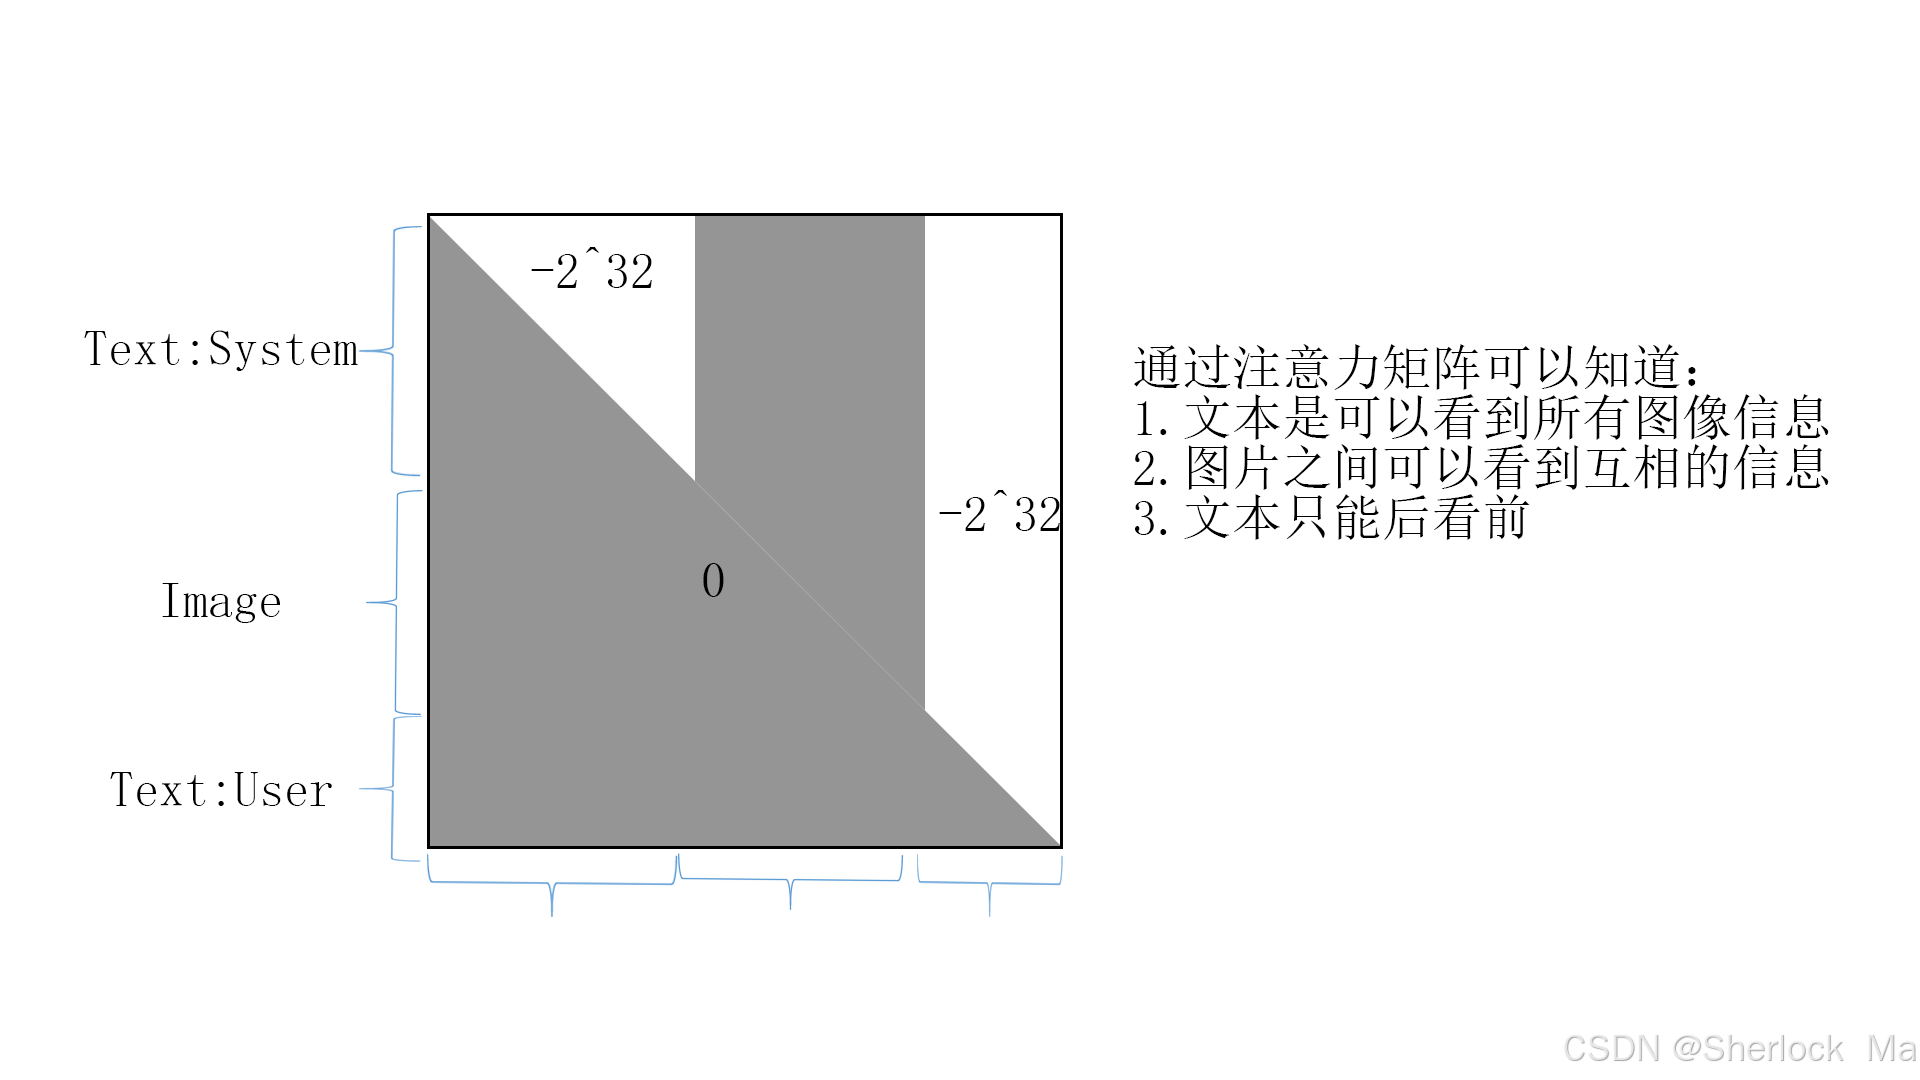
具体地说,Show-o通过因果注意对序列中的文本标记v进行建模。对于图像标记u,Show-o通过全注意力处理它们,允许每个标记与所有其他相关标记全面交互。给定一个格式化的输入序列,很明显,在多模态理解中(下图(a)),序列中的文本标记可以涉及所有先前的图像标记,而在文本到图像生成中(下图(B)),图像标记能够与所有先前的文本标记交互。全注意保持了预训练LLM的文本推理知识,减少了采样次数,提高了图像生成效率。此外,它自然支持各种下游应用,如图像修复和外推,而无需任何微调。当只给予文本标记时,它退化为因果注意(下图(c))。
损失函数
作者采用两个学习目标:i) Next Token Prediction (NTP,也就是自回归模型的损失) and ii) Mask Token Prediction (MTP,类似于扩散模型的损失).
NTP:给定用于多模态理解的具有M个图像标记u和N个文本标记v的序列,通过采用标准语言建模目标来最大化文本标记的可能性。

为了对输入序列内的图像标记u进行建模,我们首先以随机比率(由时间步长控制)用[MASK]标记随机替换图像标记,以创建掩码序列。接下来,我们的目标是通过未掩蔽区域为条件的掩蔽标记和之前的文本标记重建原始图像标记:

训练
- 第一阶段:采用RefinedWeb数据集来训练Show-o以保持语言建模能力。同时,ImageNet-1K数据集和图像-文本对分别用于训练Show-o进行类条件图像生成和图像字幕。这个阶段主要涉及学习离散图像标记的新的可学习嵌入,图像生成的像素依赖性,以及图像和文本之间的对齐。
- 第二阶段:基于预训练的权重,继续在图像-文本数据上进行文本到图像生成的训练。这个阶段主要集中在图像和文本对齐的图像字幕和文本到图像的生成。
- 第三阶段:最后,通过将过滤后的高质量图像-文本对用于文本到图像生成,以及用于多模态理解和混合模态生成的指导数据,进一步完善预训练的Show-o模型。
和transfusion的区别
处理图像的vision tower不同,transfusion是vae(连续),show-o是vq-vae(magvit,离散的),也就是说transfusion是编码成连续的向量,而show-o是编码成离散token,和文本的token合并后再转换为密集向量。
当然,show-o在图片理解的时候也有clip版本,不过生成时只有magvit(vq-vae,或者说离散)
3.代码
环境配置
pip3 install -r requirements.txt个人使用CogVideoX同款镜像源,安装几个库后就可以直接使用了。
另外,你还需要登录wandb,详细教程请参考其他博客,需要注意的是,这个库要梯子才能登录。
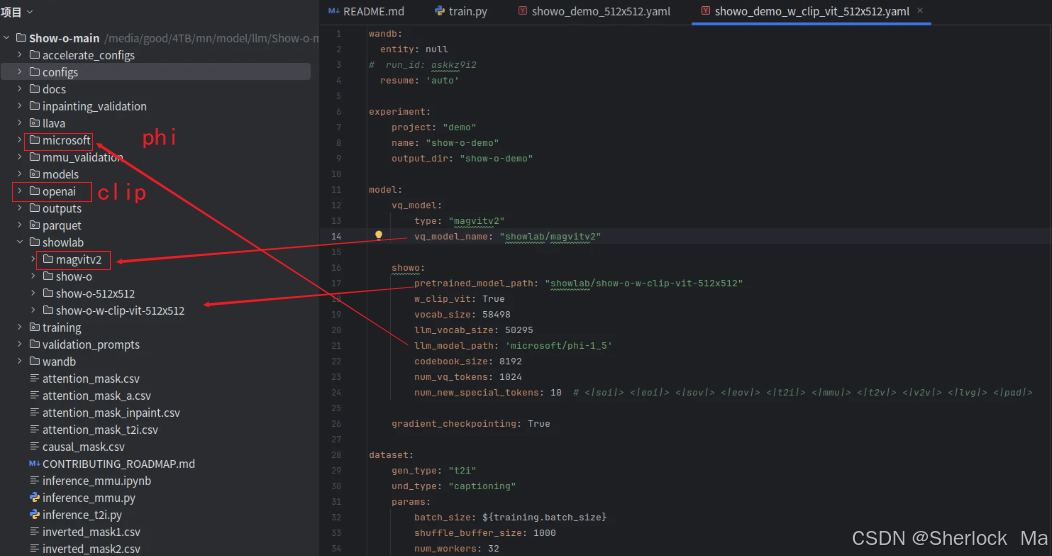
wandb login <your wandb keys>除了下载show-o自己的权重,你还需要下载phi-1_5和CLIP的权重,
phi-1_5:microsoft/phi-1_5 · HF Mirror
clip:openai/clip-vit-large-patch14-336 · HF Mirror
show-o仓库:showlab (Show Lab) (仓库地址,请根据所需,自选权重)
放置位置如下:
inference_mmu.py(图像QA)
基本使用
你可以选择clip模型作为视觉编码器,也就是论文4.1所说的option(c)
python3 inference_mmu.py config=configs/showo_demo_w_clip_vit_512x512.yaml \
max_new_tokens=100 \
mmu_image_root=./mmu_validation question='Please describe this image in detail. *** Do you think the image is unusual or not?'
或者选择magvitv2模型,也就是论文4.1所说的option(a)
python3 inference_mmu.py config=configs/showo_demo_512x512.yaml \
max_new_tokens=100 \
mmu_image_root=./mmu_validation question='Please describe this image in detail. *** Do you think the image is unusual or not?'
初始化
运行起代码后,代码会首先进入初始化环节,这里大家只需要知道以下模型即可:
- tokenizer:phi-1_5
- vq_model:magvitv2
- model:showo
- vision_tower:clip-vit
以上四个模型都会调用,但如果选择的是option(c),代码只会使用vision_tower,相反,如果选择option(a),代码会只使用vq_model,相当于另一个调了不用。
整体逻辑
file_list = os.listdir(config.mmu_image_root)       # 文件夹下的所有图片
responses = ['' for i in range(len(file_list))]     # 返回值
images = []
config.question = config.question.split(' *** ')    # 把n个问题拆分
for i, file_name in enumerate(tqdm(file_list)):    # 每张图片遍历
    图像预处理
    for question in config.question:    # 每个问题挨个处理
        if clip:
            1.
            2.
            3.
            4.
        else:
            # 这里是使用magvitv2的部分
图像预处理
这里其实是分了两步:
- 如果选择showo_demo_w_512x512_clip_vit.yaml,也就是option(c),其需要pixel_values作为输入,pixel_values是通过Image库读取,然后经过clip转化得到的
- 如果选择showo_demo_512x512.yaml,也就是option(a),首先通过Image库读取图片,然后用image_transform函数处理图片,具体来说,这个函数包括了尺寸缩放、转换为tensor、归一化等操作;最后通过magvitv2转换为离散令牌,需要注意的是,这里的图片令牌的序号是排在文本令牌的后面,这也就是下面代码倒数第二行在做的事情。
image_path = os.path.join(config.mmu_image_root, file_name)
image_ori = Image.open(image_path).convert("RGB")
image = image_transform(image_ori, resolution=config.dataset.params.resolution).to(device)  # 变成正方形,变tensor,然后归一化
image = image.unsqueeze(0)  # [1,3,512,512]
images.append(image)

# 如果config是showo_demo_w_512x512_clip_vit.yaml,下面代码用pixel_values
pixel_values = clip_image_processor.preprocess(image_ori, return_tensors="pt")["pixel_values"][0]   # [3,336,336]
# 如果config是showo_demo_512x512.yaml,下面代码用image_tokens
image_tokens = vq_model.get_code(image) + len(uni_prompting.text_tokenizer)     # 这里是计算图片的token编码,即图像原来的编码加上文本编码的总数 [1,1024]
batch_size = 1
处理与模型生成
1.处理文本
我们以clip为例,首先会进入处理文本的步骤。具体来说,代码会使用text_tokenizer将system的信息、user的信息转换为token,接着把两部分并,结果为input_ids_llava。下面是input_ids_llava的详细介绍:
首先是一个说明问题类型的token<|mmu|>,然后是system的token,然后是表示图片开始的令牌<|soi|>,以及图片结束的令牌<|eoi|>,图片留到第二步再加上(这里只是注释),最后是user的token。这里会把以上提到的所有信息concat起来,最后的尺寸是[b,28+len+3],其中28是system令牌的长度,一般不会改;len是user令牌的长度,3是三个特殊令牌的长度。
if config.model.showo.w_clip_vit:
    # 1.处理文本
    conv = conversation_lib.default_conversation.copy()
    conv.append_message(conv.roles[0], question)    # 添加user
    conv.append_message(conv.roles[1], None)    # 添加assistant
    prompt_question = conv.get_prompt()     # prompt
    question_input = []
    question_input.append(prompt_question.strip())

    input_ids_system = [uni_prompting.text_tokenizer(SYSTEM_PROMPT, return_tensors="pt", padding="longest").input_ids
                            for _ in range(batch_size)]     # system_prompt的tokenization    [1,28]
    input_ids_system = torch.stack(input_ids_system, dim=0)
    assert input_ids_system.shape[-1] == 28
    input_ids_system = input_ids_system.to(device)
    input_ids_system = input_ids_system[0]

    input_ids = [uni_prompting.text_tokenizer(prompt, return_tensors="pt", padding="longest").input_ids
                    for prompt in question_input]   # prompt的tokenization   [1,len]

    input_ids = torch.stack(input_ids)
    input_ids = torch.nn.utils.rnn.pad_sequence(    # 填充
            input_ids, batch_first=True, padding_value=uni_prompting.text_tokenizer.pad_token_id
    )
    input_ids = torch.tensor(input_ids).to(device).squeeze(0)
    # import pdb; pdb.set_trace()
    input_ids_llava = torch.cat([
            (torch.ones(input_ids.shape[0], 1) *uni_prompting.sptids_dict['<|mmu|>']).to(device),
            input_ids_system,
            (torch.ones(input_ids.shape[0], 1) * uni_prompting.sptids_dict['<|soi|>']).to(device),
            # place your img embedding here
            (torch.ones(input_ids.shape[0], 1) * uni_prompting.sptids_dict['<|eoi|>']).to(device),
            input_ids,
    ], dim=1).long()    # prompt的token进行拼接[1,28+len+3]
2.图像处理
这里其实是通过CLIP对图片进行处理,然后通过线性层转换至大模型的理解空间,即转换为2048维的向量;text_embedding则是用show-o的embedding层将之前离散文本token转换为大模型的理解空间,即2048维的密集向量。
images_embeddings = vision_tower(pixel_values[None])    # CLIP  [b,576,1024]
images_embeddings = model.mm_projector(images_embeddings)   # show-o线性层 [b,576,2048]

text_embeddings = model.showo.model.embed_tokens(input_ids_llava)   # embed [1,28+len+3,2048]
3.拼接
具体来说,这个部分就是将图片填入之前prompt预留的位置。
attention_mask_llava则是论文中提到的Omni-Attention Mechanism(a)
# 3.Full input seq    拼接图片和文本
part1 = text_embeddings[:, :2 + SYSTEM_PROMPT_LEN, :]
part2 = text_embeddings[:, 2 + SYSTEM_PROMPT_LEN:, :]
input_embeddings = torch.cat((part1, images_embeddings, part2), dim=1)  # [b,len,2048]

attention_mask_llava = create_attention_mask_for_mmu_vit(input_embeddings,      # 注意力 [1,1,len,len]
                                                        system_prompt_len=SYSTEM_PROMPT_LEN)
在create_attention_mask_for_mmu_vit中,先通过tril函数生成一个下半三角为1的注意力矩阵,然后通过切片转换为(a)图所示的注意力矩阵。如果return_inverse_mask=True,代码会吧原本为1的部分变成0,原本为0的变成-2^32,供下一步计算。
def create_attention_mask_for_mmu_vit(
        sequence,
        return_inverse_mask=True,
        system_prompt_len=0
):
    N, L, H = sequence.shape
    causal_mask = torch.tril(torch.ones((N, 1, L, L), dtype=torch.bool)).to(sequence.device)    # 生成一个下三角的布尔张量,其中主对角线及以下的元素为True,以上的元素为False。
    index = 1 + system_prompt_len + 1 + 576
    # PART OF SYSTEM PROMPT SHOULD BE CAUSAL ALSO
    # causal_mask[:, :, :, :index] = 1
    causal_mask[:, :, :, 1+system_prompt_len+1:index] = 1

    if return_inverse_mask:
        inverted_mask = 1.0 - causal_mask.type(torch.int64)

        inverted_mask = inverted_mask.masked_fill(
            inverted_mask.to(torch.bool), torch.iinfo(torch.int64).min      # 转换为布尔张量,这样 masked_fill 函数就可以根据这个布尔张量中的True值进行替换。
        )       # 原本的上三角部分(在 causal_mask 中为0)被替换为一个非常小的负数,而下三角部分(在 causal_mask 中为1)保持为0。

        return inverted_mask
    else:
        return causal_mask
这里的注意力矩阵如下:0代表能看见,-2^32表示看不见
4.show-o生成
这部分是模型的自回归生成过程,是核心代码
# 4.生成
cont_toks_list = model.mmu_generate(input_embeddings=input_embeddings,
                                    attention_mask=attention_mask_llava[0].unsqueeze(0),
                                    max_new_tokens=config.max_new_tokens,
                                    top_k=top_k,
                                    eot_token=tokenizer.eos_token_id
                                    )   # 返回的是列表,每个元素都是tensor
mmu_generate实际上就是模型进行自回归循环生成的过程,具体如下:
- 首先通过idx(如果是magvit)或input_embedding(如果是clip)以及掩码,生成下一个token的概率logits
- 更新掩码,掩码是每次行列尺寸各加1,添加方式是下半三角掩码的形式。
- 使用temperature控制随机性,然后通过top-k提取概率最大的k个,然后把其他的置为-inf
- 通过softmax和multinormal提取下一个token id
- 更新idx或input_embedding
for _ in range(max_new_tokens):     # 自回归生成
    #1.模型生成下一个token的概率
    logits = self(idx, input_embeddings=input_embeddings, attention_mask=attention_mask)    # [b,len,c]

    # 2.更新注意力矩阵
    L = attention_mask.shape[-1]
    attention_mask = attention_mask.squeeze()
    attention_mask_a = torch.hstack(
        [
            attention_mask,  # L, L
            torch.zeros((L, 1)).to(device) + torch.finfo(logits.dtype).min,
        ]
    )   # [len+i-1,len+i] i是循环次数
    attention_mask_b = torch.vstack(
        [
            attention_mask_a,  # L, L+1
            torch.hstack([attention_mask[-1, :], torch.tensor([0]).to(device)]).unsqueeze(0),
        ]
    )       # [len+i,len+i]
    attention_mask = attention_mask_b

    # pluck the logits at the final step and scale by desired temperature
    logits = logits[:, -1, :] / temperature     # 取logits最后一个,用temperature控制模型的随机性

    # 3.取概率最大的k个
    if top_k is not None:   # 将top_k以外的置为-inf
        v, _ = torch.topk(logits, min(top_k, logits.size(-1)))
        logits[logits < v[:, [-1]]] = -float('Inf')

    # 4.取概率最大的token
    probs = F.softmax(logits, dim=-1)
    # sample from the distribution
    idx_next = torch.multinomial(probs, num_samples=1)  # 从概率分布中随机抽取样本,获得下一个token
    result.append(idx_next[0][0])


    # 5.更新idx或input_embedding
    if self.config.w_clip_vit:  # 如果是clip,输入的是input_embedding,需要更新input_embedding
        idx_next_embeddings = self.showo.model.embed_tokens(idx_next)   # [b,1,2048]
        input_embeddings = torch.cat([input_embeddings, idx_next_embeddings], dim=1)    # [b,len+i,2048]
    else:   # 如果是magvit,输入的是idx,需要更新idx
        idx = torch.cat((idx, idx_next), dim=1)

    if eot_token is not None and idx_next.cpu() == eot_token:   # 结束符号终结
        break
在第一步生成logits的self里,核心代码如下:
if input_embeddings is None:
    logits = self.showo(input_ids=input_ids, attention_mask=attention_mask)['logits']
else:
    logits = self.showo(inputs_embeds=input_embeddings, attention_mask=attention_mask)['logits']
内部的核心代码如下,这里就是使用phi模型进行输出
# decoder outputs consists of (dec_features, layer_state, dec_hidden, dec_attn)
outputs = self.model(
    input_ids=input_ids,
    attention_mask=attention_mask,
    position_ids=position_ids,
    past_key_values=past_key_values,
    inputs_embeds=inputs_embeds,
    use_cache=use_cache,
    output_attentions=output_attentions,
    output_hidden_states=output_hidden_states,
    return_dict=return_dict,
)       # [b,len+i,2048]

hidden_states = outputs[0]
logits = self.lm_head(hidden_states)    # [b,len+i,58489]
logits = logits.float()
phi模型的架构如下:
(model): PhiModel(
      (embed_tokens): Embedding(58498, 2048)
      (embed_dropout): Dropout(p=0.0, inplace=False)
      (layers): ModuleList(
        (0-23): 24 x PhiDecoderLayer(
          (self_attn): PhiSdpaAttention(
            (q_proj): Linear(in_features=2048, out_features=2048, bias=True)
            (k_proj): Linear(in_features=2048, out_features=2048, bias=True)
            (v_proj): Linear(in_features=2048, out_features=2048, bias=True)
            (dense): Linear(in_features=2048, out_features=2048, bias=True)
            (q_layernorm): LayerNorm((64,), eps=1e-05, elementwise_affine=True)
            (k_layernorm): LayerNorm((64,), eps=1e-05, elementwise_affine=True)
            (rotary_emb): PhiRotaryEmbedding()
          )
          (mlp): PhiMLP(
            (activation_fn): NewGELUActivation()
            (fc1): Linear(in_features=2048, out_features=8192, bias=True)
            (fc2): Linear(in_features=8192, out_features=2048, bias=True)
          )
          (input_layernorm): LayerNorm((2048,), eps=1e-05, elementwise_affine=True)
          (resid_dropout): Dropout(p=0.0, inplace=False)
        )
      )
      (final_layernorm): LayerNorm((2048,), eps=1e-05, elementwise_affine=True)
    )
拼接回答
将模型的生成结果通过tokenizer转换为文字,然后拼接后放入response里。
text = uni_prompting.text_tokenizer.batch_decode(cont_toks_list, skip_special_tokens=True)
print(text)
responses[i] += f'User: ' + question + f'\n Answer : ' + text[0] + '\n'
模型结果
这个部分就是把图片逆归一化。需要重要的是,代码默认会把图片上传到wandb。
images = torch.cat(images, dim=0)   # [b,3,512,512]
images = torch.clamp((images + 1.0) / 2.0, min=0.0, max=1.0)
images *= 255.0
images = images.permute(0, 2, 3, 1).cpu().numpy().astype(np.uint8)
pil_images = [Image.fromarray(image) for image in images]
magvitv2部分
如果在config选择showo_demo_512x512.yaml,也就是option(a),代码会走else部分,详情请看整体逻辑。
唯一不同的点在于这里其实是将magvit处理好的离散令牌和文本令牌拼接到一起,也就是说这里输入到mmu_generate里的inputs_ids是离散的token id,而非密集向量。mmu_generate里面没有将其转换为密集向量,而是直接输入到phi-1_5里,由phi-1_5内部转换为密集向量再输入给大模型,phi-1_5输出的是密集向量,然后通过线性层转换为token,再通过detokenizer转换为字符。
需要重要的是,这里的线性层维度其实是预留了图片token的id,只不过现在我们进行的是图片理解,没有用到这部分id。
input_ids = uni_prompting.text_tokenizer(['USER: \n' + question + ' ASSISTANT:'])[
    'input_ids']
input_ids = torch.tensor(input_ids).to(device)

input_ids = torch.cat([
    (torch.ones(input_ids.shape[0], 1) * uni_prompting.sptids_dict['<|mmu|>']).to(device),
    (torch.ones(input_ids.shape[0], 1) * uni_prompting.sptids_dict['<|soi|>']).to(device),
    image_tokens,
    (torch.ones(input_ids.shape[0], 1) * uni_prompting.sptids_dict['<|eoi|>']).to(device),
    (torch.ones(input_ids.shape[0], 1) * uni_prompting.sptids_dict['<|sot|>']).to(device),
    input_ids
], dim=1).long()

attention_mask = create_attention_mask_for_mmu(input_ids.to(device),
                                               eoi_id=int(uni_prompting.sptids_dict['<|eoi|>']))

cont_toks_list = model.mmu_generate(input_ids, attention_mask=attention_mask,
                            max_new_tokens=config.max_new_tokens, top_k=top_k,
                            eot_token=uni_prompting.sptids_dict['<|eot|>'])
需要注意的是,模型会在generate函数里面将离散token id转换为密集向量,而clip是在外部转换的。下面是转换的代码
if inputs_embeds is None:
    inputs_embeds = self.embed_tokens(input_ids)
inference_t2i.py(文生图)
需要说明一点的是,生成部分只能使用magvit,没有clip版本。
基本使用
生成512*512的图片
python3 inference_t2i.py config=configs/showo_demo_512x512.yaml \
batch_size=1 validation_prompts_file=validation_prompts/showoprompts.txt \
guidance_scale=5 generation_timesteps=50 \
mode='t2i'
其中的showoprompts.txt
A 3D render of a futuristic car made of glass, driving through a city of mirrors.
A photo-realistic image of a garden with pink and blue flowers. There are pink poppies in the foreground, with their petals gently curved. The background features purple cosmos flowers. The flowers have water droplets on their petals, which glisten in the natural light. The green leaves are lush and healthy. The background is blurred, with a few trees and buildings visible. The overall image has a high resolution and is hyper-realistic, as if taken by a skilled photographer.
an egg and a bird made of wheat bread.
An armchair in the shape of an avocado
The image features a stylized stained glass illustration of a hummingbird with vibrant colors, set against a backdrop of swirling patterns and a large sun. The composition includes floral elements and intricate details, creating a vivid and dynamic scene that emphasizes the beauty of the bird. The colors range from greens to reds, enhancing the lively and artistic aesthetic of the piece.
A 3D render of a surreal explosion scene on the shore of a beautiful white sand beach with crystal clear water. The explosion has a spatter of oil paint with pastel colors and a thick consistency. The explosion is in a quiet and serene environment. A beautiful Japanese woman with a dress compacted to the sea is seen. There are butterfly petals and flowers with an ethereal glow and bioluminescence. There are pink and blue roses, and the overall image has a surreal and dreamlike quality.
A 3D render of a cute, round rice ball character with big, sparkling eyes that convey curiosity and joy. Its body is a soft, fluffy white with a slight sheen, resembling freshly cooked rice. Mochi has small, rosy cheeks that give it a warm, friendly expression. A tiny smile brightens its face, and it often sports a colorful ribbon tied around its "waist," adding a playful touch. Mochi's arms and feet are cartoonishly short, allowing it to bounce adorably around its surroundings.
A hyper-realistic close-up photograph of a woman's face, focusing on the left side. The image is highly detailed and realistic, showing voluminous glossy lips slightly parted, a well-defined nose, and open eyes with long eyelashes that cast shadows on the skin. The eye color is crystal clear almond green. The skin texture is crisp, with incredible detail of natural, lush skin and pores and freckles, with subtle highlights and shadows that give a realistic, close-up appearance.
A vibrant cartoon of a chameleon blending into a tie-dye pattern.
A colorful cartoon of a tiger camouflaged in an abstract art painting, its stripes merging with the wild brushstrokes.
A 3D render of a cute, round rice ball character named Mochi, with big, sparkling eyes that convey curiosity and joy. Its body is a soft, fluffy white with a slight sheen, resembling freshly cooked rice. Mochi has small, rosy cheeks that give it a warm, friendly expression. A tiny smile brightens its face, and it often sports a colorful ribbon tied around its "waist," adding a playful touch. Mochi's arms and feet are cartoonishly short, allowing it to bounce adorably around its surroundings. This time, Mochi is placed against a background that is a vibrant explosion of colors, with bright hues of fuchsia, turquoise, lemon yellow, and emerald green creating a canvas of vibrant contrasts and playful energy. The clashing colors make Mochi's soft white body and rosy cheeks stand out even more, inviting viewers into a world of cheerful exuberance and visual delight.
The word 'mardefly' on a coffee mug.
A group of seven people standing on a snow-covered slope, allwearing skis and posing for a picture.
处理文本和图片
具体来说
- 这里就是把showoprompts导入进来,命名为validation_prompts
- 循环遍历提示词
- 生成图像的掩码,大小为[1,1024],其中每个元素都是mask_token,即token id=58497
- 生成有条件的input_ids
- 生成无条件的input_ids和注意力掩码
elif config.mode == 't2i':
    # 1.读取所有的提示词
    with open(config.dataset.params.validation_prompts_file, "r") as f:     # 读取提示词
        validation_prompts = f.read().splitlines()
    # 循环遍历 所有的提示词
    for step in tqdm(range(0, len(validation_prompts), config.training.batch_size)):
        prompts = validation_prompts[step:step + config.training.batch_size]
        # 3.生成图像掩码
        image_tokens = torch.ones((len(prompts), config.model.showo.num_vq_tokens),     # [1,1024],里面全是58497
                                  dtype=torch.long, device=device) * mask_token_id
        # 4.有条件的
        input_ids, _ = uni_prompting((prompts, image_tokens), 't2i_gen')    # 文本+图片的token id,有条件的输入

        if config.training.guidance_scale > 0:
            # 5.无条件的
            uncond_input_ids, _ = uni_prompting(([''] * len(prompts), image_tokens), 't2i_gen')     # 无条件的输入
            attention_mask = create_attention_mask_predict_next(torch.cat([input_ids, uncond_input_ids], dim=0),    # [2b,1,len,len]
                                                                pad_id=int(uni_prompting.sptids_dict['<|pad|>']),
                                                                soi_id=int(uni_prompting.sptids_dict['<|soi|>']),
                                                                eoi_id=int(uni_prompting.sptids_dict['<|eoi|>']),
                                                                rm_pad_in_image=True)
        else:
            attention_mask = create_attention_mask_predict_next(input_ids,
                                                                pad_id=int(uni_prompting.sptids_dict['<|pad|>']),
                                                                soi_id=int(uni_prompting.sptids_dict['<|soi|>']),
                                                                eoi_id=int(uni_prompting.sptids_dict['<|eoi|>']),
                                                                rm_pad_in_image=True)
            uncond_input_ids = None
我们主要来看uni_prompting,这里主要是将文本转为token。然后把文本和图像的token输入到t2i_gen_prompt处理。
elif task == "t2i_gen":
    text_ids = self.text_tokenizer(input[0])['input_ids']  # 文本转token(B, max_len)
    image_ids = input[1]  # 图像token(B, #tokens)
    sequence_ids_with_masks = self.t2i_gen_prompt(text_ids, image_ids)
接下来我们来看t2i_gen_prompt函数
- 首先遍历所有的文本,注意text_ids是二维列表,第一维代表batch_size,第二维则是所有文本的token id,长度为seq_len
- 添加特殊token,变成<t2i>+<sot>+text_id+<eot>
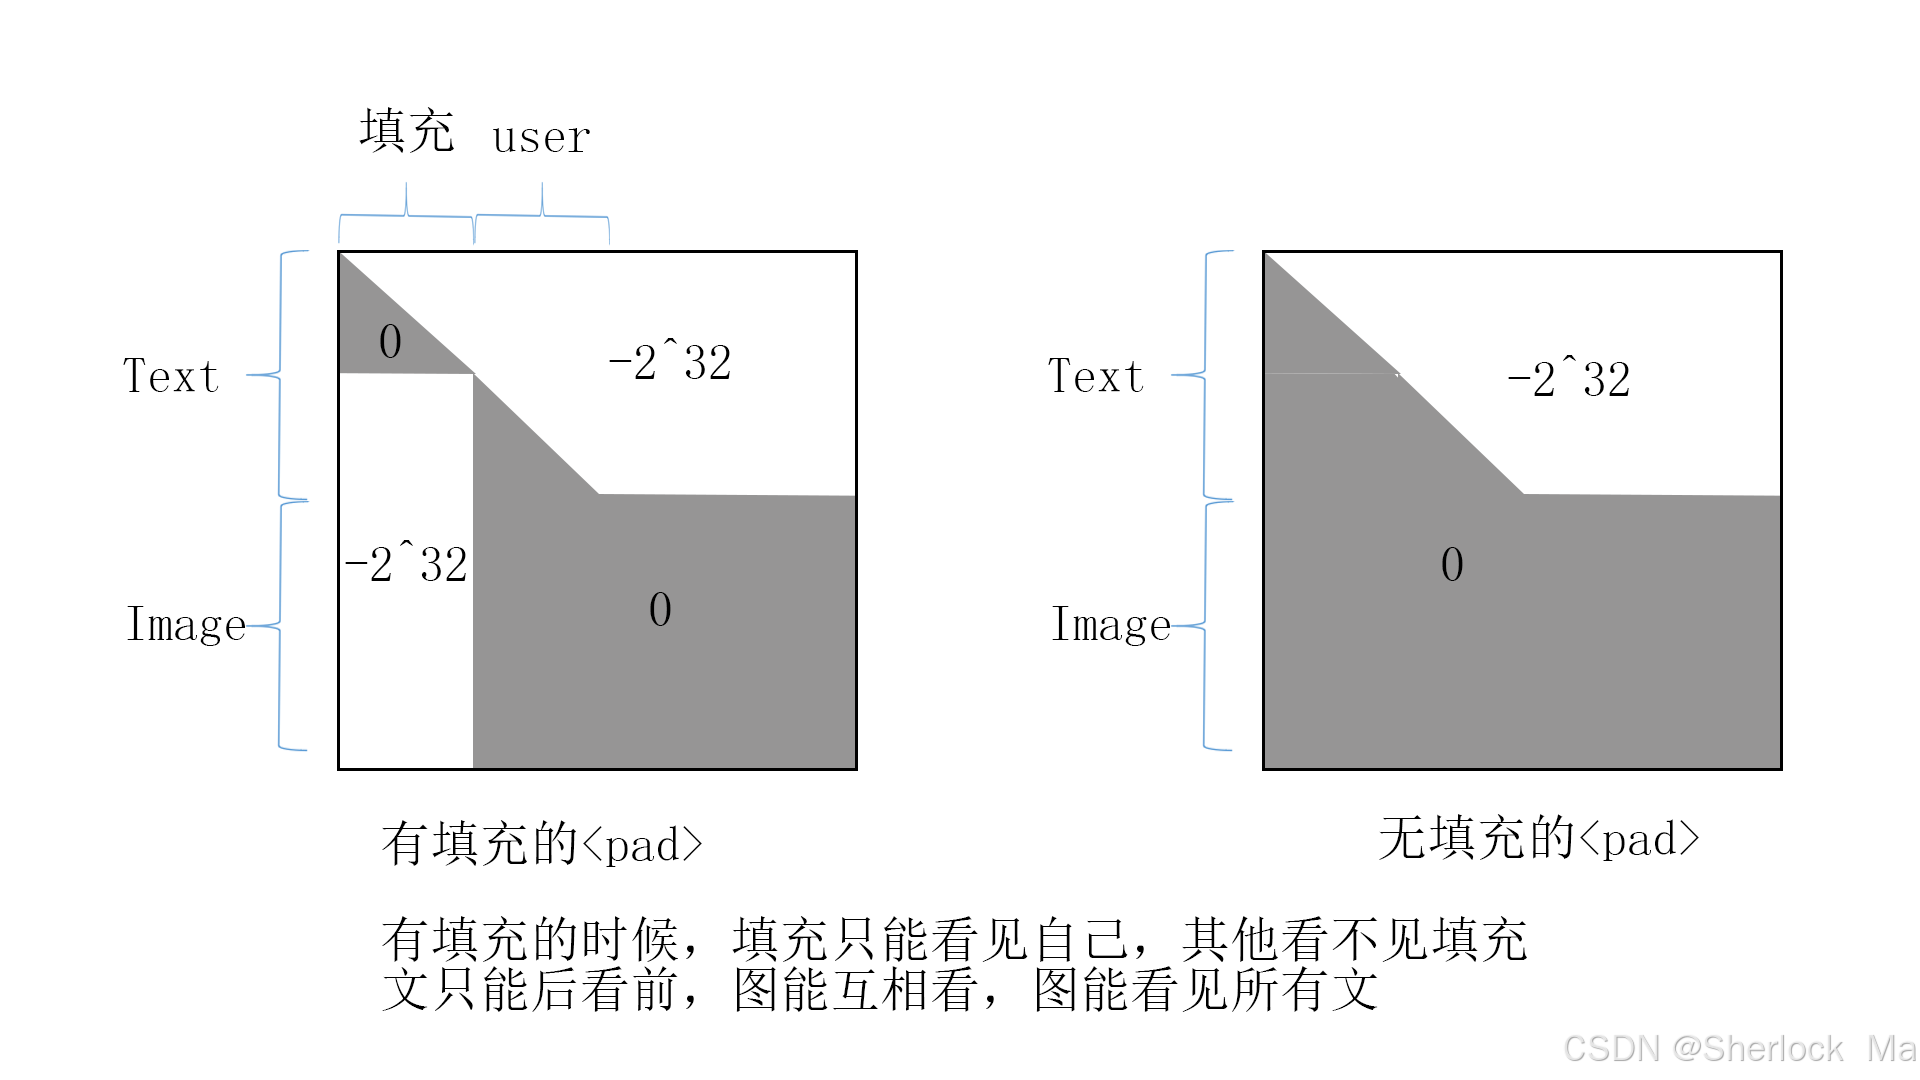
- 长度不够则用<pad>补齐,长度超了截断。奇怪的是,这里<pad>是加在文本前面的(其实没什么影响)
- 生成注意力掩码
- 将图片添加进来,也就是说最后的temp_ids是<t2i>+<sot>+text_id+<eot>+<soi>+image_id+<eoi>
for i in range(len(text_ids)):  # text_ids是两层列表,第一层的长度是batchsize,第二层长度是seq_len
    if len(text_ids[i]) == 0:   # 文本开始
        text_ids[i] = [self.text_tokenizer.bos_token_id]
    elif text_ids[i][0] != self.text_tokenizer.bos_token_id:
        text_ids[i] = [self.text_tokenizer.bos_token_id] + text_ids[i]
    # note that, llama3 tokenizer automatically add the bot token at first but without eot
    temp_ids = [int(self.sptids_dict['<|t2i|>'])] + text_ids[i] + [self.text_tokenizer.eos_token_id]    # t2i+sot+text_id+eot
    if self.max_text_len >= len(temp_ids):  # 不够则填充,在前面填充
        temp_ids = [self.pad_id] * (self.max_text_len - len(temp_ids)) + temp_ids
        temp_masks = [0] * (self.max_text_len - len(temp_ids)) + [1] * len(temp_ids)
    else:   # 长则截断
        temp_ids = temp_ids[:self.max_text_len - 1] + [self.text_tokenizer.eos_token_id]
        temp_masks = [1] * len(temp_ids)  # +2 for two special tokens

    # prompting -- [task token] [sot] [text tokens] [eot] [soi] [image tokens] [eoi]
    temp_ids = torch.cat([
        torch.tensor(temp_ids).to(device),
        self.sptids_dict['<|soi|>'].to(device),
        image_ids[i],
        self.sptids_dict['<|eoi|>'].to(device)
    ], dim=0)
这里的注意力掩码图如下:
生成
with torch.no_grad():
    gen_token_ids = model.t2i_generate(
        input_ids=input_ids,
        uncond_input_ids=uncond_input_ids,
        attention_mask=attention_mask,
        guidance_scale=config.training.guidance_scale,
        temperature=config.training.get("generation_temperature", 1.0),
        timesteps=config.training.generation_timesteps,
        noise_schedule=mask_schedule,
        noise_type=config.training.get("noise_type", "mask"),
        seq_len=config.model.showo.num_vq_tokens,   # 图片token数量,1024
        uni_prompting=uni_prompting,
        config=config,
    )   # [b,图片token]=[1,1024]
我们来看里面的核心代码,这里的整体逻辑其实很简单,就是类似于diffusion的迭代去噪过程,唯一不同的是,show-o这里是预测掩码的信息,而不是去除噪声。
- 首先将无条件和有条件控制的信息整合,输入到模型进行预测,然后把无条件和有条件控制的结果根据公式整合在一起,变成logits
- 计算每个token的概率和预测的token id,根据时间timestep计算当前步该掩码多少token
- 进行掩码,把结果拼回input_ids_minus_lm_vocab_size和sampled_ids
- 迭代timesteps次后,输出sampled_ids
for step in range(timesteps):
    if uncond_input_ids is not None and guidance_scale > 0:
        uncond_input_ids = torch.cat(
            [uncond_prefix, input_ids[:, config.dataset.preprocessing.max_seq_length + 1:]], dim=1)
        model_input = torch.cat([input_ids, uncond_input_ids])  # [2b,len]
        cond_logits, uncond_logits = self(model_input, attention_mask=attention_mask).chunk(2)      # 模型预测
        # logits = uncond_logits + guidance_scale * (cond_logits - uncond_logits)
        # it seems that muse has a different cfg setting
        logits = (1 + guidance_scale) * cond_logits - guidance_scale * uncond_logits    # 同时考虑有条件和无条件的 [1,len,58498]
        logits = logits[:, -(num_vq_tokens + 1):-1, config.model.showo.llm_vocab_size + num_new_special_tokens:-1]  # [1,图片len,8192]=[1,1024,8192]
    else:
        logits = self(input_ids, attention_mask=attention_mask)
        logits = logits[:, -(num_vq_tokens + 1):-1, config.model.showo.llm_vocab_size + num_new_special_tokens:-1]

    probs = logits.softmax(dim=-1)
    sampled = probs.reshape(-1, logits.size(-1))    # [1024,8192]
    sampled_ids = torch.multinomial(sampled, 1, generator=generator)[:, 0].view(*logits.shape[:-1]) # [1,1024]

    unknown_map = input_ids_minus_lm_vocab_size == mask_token_id    # 哪些地方是mask
    sampled_ids = torch.where(unknown_map, sampled_ids, input_ids_minus_lm_vocab_size)  # 检查 unknown_map 中的每个元素,如果为真(即对应的 sampled_ids 元素是未知的),则从 sampled_ids 中选择元素;如果为假(即对应的 sampled_ids 元素是已知的),则从 input_ids_minus_lm_vocab_size 中选择元素。
    # Defines the mask ratio for the next round. The number to mask out is
    # determined by mask_ratio * unknown_number_in_the_beginning.
    ratio = 1.0 * (step + 1) / timesteps
    mask_ratio = noise_schedule(torch.tensor(ratio))
    # Computes the probabilities of each selected tokens.
    selected_probs = torch.gather(probs, -1, sampled_ids.long()[..., None])     # 计算token id的概率
    selected_probs = selected_probs.squeeze(-1) # [1,1024]

    # Ignores the tokens given in the input by overwriting their confidence.
    selected_probs = torch.where(unknown_map, selected_probs, torch.finfo(selected_probs.dtype).max)
    # Gets mask lens for each sample in the batch according to the mask ratio.
    mask_len = (num_vq_tokens * mask_ratio).floor().unsqueeze(0).to(logits.device)  # 当前应当被遮掩的token数量
    # Keeps at least one of prediction in this round and also masks out at least
    # one and for the next iteration
    mask_len = torch.max(
        torch.tensor([1], device=logits.device), torch.min(unknown_map.sum(dim=-1, keepdim=True) - 1, mask_len)
    )
    # Adds noise for randomness
    temperature = temperature * (1.0 - ratio)
    masking = mask_by_random_topk(mask_len, selected_probs, temperature, generator=generator)
    # Masks tokens with lower confidence.
    input_ids[:, -(num_vq_tokens + 1):-1] = torch.where(masking, mask_token_id,     # 拼回原图和文本的token_id中
                                                  sampled_ids + config.model.showo.llm_vocab_size
                                                  + num_new_special_tokens)
    input_ids_minus_lm_vocab_size = torch.where(masking, mask_token_id, sampled_ids)
输出
使用decoder将图片转为512*512的大小,然后逆归一化,将图片的色彩空间转回0-255。需要注意的是,模型的输出会上传到wandb,需要登录才能查看。
gen_token_ids = torch.clamp(gen_token_ids, max=config.model.showo.codebook_size - 1, min=0) # 将输入张量中的每个元素限制在 min 和 max 之间,如果元素小于 min,则将其设置为 min;如果元素大于 max,则将其设置为 max。
images = vq_model.decode_code(gen_token_ids)    # ->[b,c,512,512]

images = torch.clamp((images + 1.0) / 2.0, min=0.0, max=1.0)
images *= 255.0
images = images.permute(0, 2, 3, 1).cpu().numpy().astype(np.uint8)
pil_images = [Image.fromarray(image) for image in images]
inference_t2i.py(inpainting)
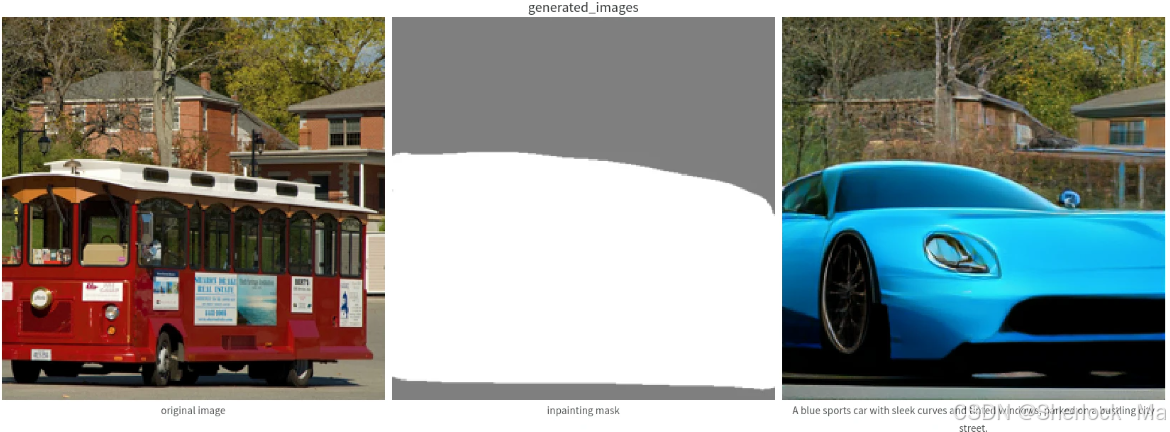
其实这里的步骤和上面的文生图是一样的,唯一的区别在于文生图是图片的所有patch都进行了掩码,而这里只把bus_mask中的掩码区域进行掩码,然后用show-o进行生成,整体流程都是一样的,故不多介绍,我们只看看掩码是怎么转化为attention_mask的。
基本使用
生成256*256的图片
python3 inference_t2i.py config=configs/showo_demo.yaml \
batch_size=1 \
guidance_scale=1.75 generation_timesteps=16 \
mode='inpainting' prompt='A blue sports car with sleek curves and tinted windows, parked on a bustling city street.' \
image_path=./inpainting_validation/bus.jpg inpainting_mask_path=./inpainting_validation/bus_mask.webp
图片处理与掩码生成
具体来说:
- 首先导入prompt和原始图片还有掩码图片
- 使用F.interpolate将掩码插值至[1,1,16,16],然后转换为[1,256]
- 用decoder将原始图片转换为token,[1,256]
- 用掩码信息覆盖掉部分原始图片信息
- 使用uni_prompting将文本和图片的token拼在一起
if config.mode == 'inpainting':
    # 导入prompt和图片以及蒙版
    prompt = [config.prompt] * config.batch_size
    inpainting_image = Image.open(config.image_path).convert("RGB")
    inpainting_mask = Image.open(config.inpainting_mask_path).convert("L")

    inpainting_image = image_transform(inpainting_image, resolution=config.dataset.params.resolution).to(device)
    inpainting_mask = image_transform(inpainting_mask, resolution=config.dataset.params.resolution, normalize=False)

    # record original image and inpainting mask
    images = torch.clamp(
        (torch.stack([inpainting_image, inpainting_mask.repeat(3, 1, 1).to(device)], dim=0) + 1.0) / 2.0,
        min=0.0, max=1.0)   # [b,c,h,w]=[2,3,256,256]
    images *= 255.0
    images = images.permute(0, 2, 3, 1).cpu().numpy().astype(np.uint8)
    pil_images = [Image.fromarray(image) for image in images]

    labels = ['original image', 'inpainting mask']
    wandb_images = [wandb.Image(image, caption=labels[i]) for i, image in enumerate(pil_images)]

    inpainting_image = inpainting_image.unsqueeze(0).repeat(config.training.batch_size, 1, 1, 1)    # [b,c,h,w]=[1,3,256,256]

    inpainting_mask = inpainting_mask.unsqueeze(0).to(device)
    inpainting_mask = F.interpolate(inpainting_mask, size=config.dataset.params.resolution // 16, mode='bicubic')
    inpainting_mask = inpainting_mask.repeat(config.training.batch_size, 1, 1, 1)

    inpainting_mask[inpainting_mask < 0.5] = 0
    inpainting_mask[inpainting_mask >= 0.5] = 1

    inpainting_mask = inpainting_mask.reshape(config.training.batch_size, -1)
    inpainting_mask = inpainting_mask.to(torch.bool)    # [1,256]

    inpainting_image_tokens = vq_model.get_code(inpainting_image) + len(uni_prompting.text_tokenizer)   # [1,256]
    inpainting_image_tokens[inpainting_mask] = mask_token_id    # 掩码覆盖部分信息

input_ids, _ = uni_prompting((prompt, inpainting_image_tokens), 't2i_gen') # [1,387]inference_t2i.py(extrapolation)
基本使用
python3 inference_t2i.py config=configs/showo_demo.yaml \
batch_size=1 \
guidance_scale=1.75 generation_timesteps=16 \
mode='extrapolation' extra_direction='left *** left *** left *** right *** right *** right' offset=0 prompt='a serene natural landscape featuring a clear, blue lake surrounded by lush green trees. *** a serene natural landscape featuring a clear, blue lake surrounded by lush green trees. *** a serene natural landscape featuring a clear, blue lake surrounded by lush green trees. *** a serene natural landscape featuring a clear, blue lake surrounded by lush green trees. *** a serene natural landscape featuring a clear, blue lake surrounded by lush green trees. *** a serene natural landscape featuring a clear, blue lake surrounded by lush green trees.' \
image_path=./inpainting_validation/alpine_lake.jpg
预处理
将输入的prompt和extra_direction按***拆分
# 将prompt和extra_direction按***拆分
prompt = [p for p in config.prompt.split(" *** ") if len(p) != 0]
extra_direction = [d for d in config.extra_direction.split(" *** ") if len(d) != 0]
接着进入for循环,循环第一次迭代,会导入图片,并转为离散令牌(token),其大小为[1,16,16]
if id == 0:     # 如果第一次,需要读图+转token
    extrapolation_image = Image.open(config.image_path).convert("RGB")
    extrapolation_image = image_transform(extrapolation_image,
                                          resolution=config.dataset.params.resolution).to(device)

    B, _, _ = extrapolation_image.shape
    extrapolation_image = extrapolation_image.unsqueeze(0)  # [1,3,256,256]
    extrapolation_image_tokens = vq_model.get_code(extrapolation_image) + len(uni_prompting.text_tokenizer) # 将图像的token id转化到文本token id之后[1,256]
    extrapolation_image_tokens = extrapolation_image_tokens.reshape(1,  # [1,16,16]
                                                                    config.dataset.params.resolution // 16,
                                                                    config.dataset.params.resolution // 16)
    extrapolation_image_tokens = extrapolation_image_tokens.repeat(config.training.batch_size, 1, 1)
生成图片的另一半,这一半是用于最后和模型生成结果拼一起的
image_left_part = extrapolation_image_tokens[:, :, :-(W//2-config.offset)] - len(uni_prompting.text_tokenizer)  # 左半图[1,h,w],最开始[1,16,8]
image_right_part = extrapolation_image_tokens[:, :, W//2-config.offset:] - len(uni_prompting.text_tokenizer)    # 右半图
image_up_part = extrapolation_image_tokens[:, :-(W//2-config.offset), :] - len(uni_prompting.text_tokenizer)    # 上半图[1,h,w],最开始[1,8,16]
image_down_part = extrapolation_image_tokens[:, W//2-config.offset:, :] - len(uni_prompting.text_tokenizer)     # 下半图
生成掩码,注意掩码的尺寸只有一半,即[1,16,8]或[1,8,16]
# 生成掩码
if direction in ['left', 'right']:
    extrapolation_mask = torch.zeros((config.training.batch_size,   # [1,16,8]
                                      config.dataset.params.resolution // 16,
                                      config.dataset.params.resolution // 16 // 2 + config.offset),
                                     dtype=torch.int64, device=device) + mask_token_id
else:
    extrapolation_mask = torch.zeros((config.training.batch_size,
                                      config.dataset.params.resolution // 16 // 2 + config.offset,
                                      config.dataset.params.resolution // 16),
                                     dtype=torch.int64, device=device) + mask_token_id
生成用于输入模型预测的输入数据。这里是掩码图和原图的另一半拼接,以左右为例,是[1,16,8]+[1,16,8]=[1,16,16]。需要注意的是
- 不管迭代几次,这里的原图另一半都是[1,16,8],8这个尺寸是始终不变的,也就是说,输入给模型的尺寸始终是16*16
- 随着原图尺寸变大,到后面会使用先前步骤生成的图当做这一步输入的数据,用于预测掩码部分。

# 这里就是把掩码和原图的一半拼起来。
if direction == 'left':
    extrapolation_image_tokens = torch.cat(     # 如左就是把[1,16,8]的掩码和原图左边[1,16,8]拼起来,变成[1,16,16]
        [extrapolation_mask, extrapolation_image_tokens[:, :, :W//2-config.offset]], dim=-1)
elif direction == 'right':
    extrapolation_image_tokens = torch.cat(
        [extrapolation_image_tokens[:, :, -(W//2-config.offset):], extrapolation_mask], dim=-1)
elif direction == 'up':
    extrapolation_image_tokens = torch.cat(
        [extrapolation_mask, extrapolation_image_tokens[:, :W // 2 - config.offset, :]], dim=-2)
else:
    extrapolation_image_tokens = torch.cat(
        [extrapolation_image_tokens[:, -(W // 2 - config.offset):, :], extrapolation_mask], dim=-2)
拼接文本和图片token,以及生成注意力掩码
extrapolation_image_tokens = extrapolation_image_tokens.reshape(config.training.batch_size, -1) # [1,256]

input_ids, _ = uni_prompting((prt, extrapolation_image_tokens), 't2i_gen')  #将文本和图像token拼接起来 [1,387]

if config.training.guidance_scale > 0:
    uncond_input_ids, _ = uni_prompting(([''] * len(prt), extrapolation_image_tokens), 't2i_gen')
    attention_mask = create_attention_mask_predict_next(torch.cat([input_ids, uncond_input_ids], dim=0),
                                                        pad_id=int(uni_prompting.sptids_dict['<|pad|>']),
                                                        soi_id=int(uni_prompting.sptids_dict['<|soi|>']),
                                                        eoi_id=int(uni_prompting.sptids_dict['<|eoi|>']),
                                                        rm_pad_in_image=True)   # [2b,1,387,387]
else:
    attention_mask = create_attention_mask_predict_next(input_ids,
                                                        pad_id=int(uni_prompting.sptids_dict['<|pad|>']),
                                                        soi_id=int(uni_prompting.sptids_dict['<|soi|>']),
                                                        eoi_id=int(uni_prompting.sptids_dict['<|eoi|>']),
                                                        rm_pad_in_image=True)
生成与输出
生成部分的代码和之前一模一样,里面的核心也没变,故不多介绍
with torch.no_grad():
    gen_token_ids = model.t2i_generate(
        input_ids=input_ids,
        uncond_input_ids=uncond_input_ids,
        attention_mask=attention_mask,
        guidance_scale=config.training.guidance_scale,
        temperature=config.training.get("generation_temperature", 1.0),
        timesteps=config.training.generation_timesteps,
        noise_schedule=mask_schedule,
        noise_type=config.training.get("noise_type", "mask"),
        seq_len=config.model.showo.num_vq_tokens,
        uni_prompting=uni_prompting,
        config=config,
    )

gen_token_ids = torch.clamp(gen_token_ids, max=config.model.showo.codebook_size - 1, min=0)
gen_token_ids = gen_token_ids.reshape(config.training.batch_size,
                                      config.dataset.params.resolution // 16,
                                      config.dataset.params.resolution // 16)
输出部分就是把原图保留下来的部分和模型预测的部分拼接起来。
if direction == 'left':     # 把合成的图和原图的另一边拼起来
    gen_token_ids = torch.cat([gen_token_ids, image_right_part], dim=-1)
elif direction == 'right':
    gen_token_ids = torch.cat([image_left_part, gen_token_ids], dim=-1)
elif direction == 'up':
    gen_token_ids = torch.cat([gen_token_ids, image_down_part], dim=-2)
else:
    gen_token_ids = torch.cat([image_left_part, gen_token_ids], dim=-2)
模型生成结果默认上传到wandb
训练
看懂推理部分的代码后,其实训练部分的代码就很容易了,因为作者没有足够的资源,这里就不详细介绍了,这里仅对其中的代码做简要的介绍。
stage 1
在 ImageNet-1K 数据集上进行预训练。在 configs/showo_pretraining_stage1.yaml 中将数据路径更改为 ImageNet-1K。请注意,我们使用内部软件包处理 RefinedWeb 数据集,您必须手动注释 training/train.py 中与语言建模相关的代码部分或编写新的数据dataloader。
accelerate launch --config_file path/to/your/accelerate_config --main_process_port=8888 training/train.py config=configs/showo_pretraining_stage1.yaml训练之后的文件夹内容如下:
├── show-o-training-stage1/
|   ├── ...
|   ├── checkpoint-500000
|   └── config.yaml
stage 2
只需为第 2 阶段创建一个新的输出文件夹(在 yaml 配置中编辑),将第 1 阶段的checkpoint复制到该文件夹,并将其重命名为checkpoint-0。 它将自动恢复下一阶段的训练。在接下来的阶段中,应用相同的程序恢复训练。
├── show-o-training-stage2/
|   └── checkpoint-0
stage2在图像-文本数据集上进行预训练。默认的dataloader基于 WebDataset。请在 configs/showo_pretraining_stage2.yaml 中更改数据路径。
accelerate launch --config_file path/to/your/accelerate_config --main_process_port=8888 training/train.py config=configs/showo_pretraining_stage2.yamlstage 3
在高质量图像-文本数据集上进行预训练。更改 configs/showo_pretraining_stage3.yaml 中的数据路径。
accelerate launch --config_file path/to/your/accelerate_config --main_process_port=8888 training/train.py config=configs/showo_pretraining_stage3.yaml【option a】
对LLaVA数据集的指令调整 (llava-pretrain)。更改 llava/llava_data_vq_unified.py 中的数据路径。
accelerate launch --config_file path/to/your/accelerate_config --main_process_port=8888 training/train.py config=configs/showo_instruction_tuning_1.yaml对LLaVA数据集进行指令调整 (llava-tuning)。更改 llava/llava_data_vq_unified.py 中的数据路径。
accelerate launch --config_file path/to/your/accelerate_config --main_process_port=8888 training/train.py config=configs/showo_instruction_tuning_2.yaml【option c】
使用 CLIP-ViT 对 LLaVA 数据集 (llava-pretrain) 进行指令调整。更改 llava/llava_pretrain_data.py 中的数据路径。
accelerate launch --config_file path/to/your/accelerate_config --main_process_port=8888 training/train_w_clip_vit.py config=configs/showo_instruction_tuning_1_w_clip_vit.yaml使用 CLIP-ViT 对 LLaVA 数据集 (llava-tuning) 进行指令调整。更改 llava/llava_instuct_data.py 中的数据路径。
accelerate launch --config_file path/to/your/accelerate_config --main_process_port=8888 training/train_w_clip_vit.py config=configs/showo_instruction_tuning_2_w_clip_vit.yaml代码解析
首先是数据集导入部分,具体来说,这部分会根据config文件,导入不同的数据集,然后合并为combined_dataloader,里面包含三部分:
- "t2i_flow": train_dataloader_t2i,文生图的数据
- "lm_flow": train_dataloader_lm,大语言模型对话数据
- "mmu_flow": train_dataloader_mmu,多模态理解
这里是三个不同类型的数据集混合训练!不管哪个阶段都是混合!
preproc_config = config.dataset.preprocessing
dataset_config = config.dataset.params

# Data for generation
if config.dataset.gen_type == "t2i":    # stage2-3
    dataset = Text2ImageDataset(
        train_shards_path_or_url=dataset_config.train_t2i_shards_path_or_url,
        tokenizer=None,  # we want to get raw texts
        max_seq_length=preproc_config.max_seq_length,
        num_train_examples=config.experiment.max_train_examples_t2i,
        per_gpu_batch_size=config.training.batch_size_t2i,
        global_batch_size=total_batch_size_t2i_without_accum,
        num_workers=dataset_config.num_workers,
        resolution=preproc_config.resolution,
        shuffle_buffer_size=dataset_config.shuffle_buffer_size,
        pin_memory=dataset_config.pin_memory,
        persistent_workers=dataset_config.persistent_workers,
        external_caption_path=dataset_config.external_caption_path,
        external_journeydb_caption_path=dataset_config.external_journeydb_caption_path,
        external_laion12m_caption_path=dataset_config.external_laion12m_caption_path,
        external_cc12m_caption_path=dataset_config.external_cc12m_caption_path,
    )
    train_dataloader_t2i = dataset.train_dataloader
    num_update_steps_per_epoch = math.ceil(
        train_dataloader_t2i.num_batches / config.training.gradient_accumulation_steps)
    num_train_epochs = math.ceil(config.training.max_train_steps / num_update_steps_per_epoch)

elif config.dataset.gen_type == "t2i_parquet":
    # this part relies on the internal packages, which will not be released
    num_update_steps_per_epoch = math.ceil(config.experiment.max_train_examples_t2i / total_batch_size_t2i)
    num_train_epochs = math.ceil(config.training.max_train_steps / num_update_steps_per_epoch)

    train_dataloader_t2i = create_imagetext_dataloader(
        train_shards_path_or_url=dataset_config.train_t2i_shards_path_or_url,
        batch_size=config.training.batch_size_t2i,
        image_size=preproc_config.resolution,
        num_workers=dataset_config.num_workers,
        num_readers=32,
        predefined_steps=num_update_steps_per_epoch,
        drop_last=True,
        shuffle=True,
        shuffle_buffer_size=dataset_config.shuffle_buffer_size
    )

elif config.dataset.gen_type == "imagenet1k":   # stage 1
    dataset_imagenet = ImageNetDataset(
        dataset_config.train_t2i_shards_path_or_url,
        image_size=preproc_config.resolution,
    )

    print('process index : ',
          accelerator.process_index, ', ', accelerator.num_processes,
          "Length: ", len(dataset_imagenet))

    if accelerator.num_processes > 1:
        sampler = DistributedSampler(dataset_imagenet,
                                     num_replicas=accelerator.num_processes,
                                     rank=accelerator.process_index,
                                     shuffle=True,
                                     )
        shuffle = False
    else:
        sampler = None
        shuffle = True

    train_dataloader_t2i = DataLoader(dataset_imagenet, batch_size=config.training.batch_size_t2i,
                                      sampler=sampler, collate_fn=dataset_imagenet.collate_fn,
                                      shuffle=shuffle, num_workers=dataset_config.num_workers)
    num_update_steps_per_epoch = math.ceil(len(dataset_imagenet) / total_batch_size_t2i)
    num_train_epochs = math.ceil(config.training.max_train_steps / num_update_steps_per_epoch)

else:
    raise ValueError(f"Unsupported dataset type {config.dataset.type}")

total_batch_size_mmu_without_accum = config.training.batch_size_mmu * accelerator.num_processes
# Data for image captioning
if config.dataset.und_type == "captioning":     # stage 1-3
    dataset_mmu = Text2ImageDataset(
        train_shards_path_or_url=dataset_config.train_mmu_shards_path_or_url,
        tokenizer=None,  # we want to get raw texts
        max_seq_length=preproc_config.max_seq_length,
        num_train_examples=config.experiment.max_train_examples_mmu,
        per_gpu_batch_size=config.training.batch_size_mmu,
        global_batch_size=total_batch_size_mmu_without_accum,
        num_workers=dataset_config.num_workers,
        resolution=preproc_config.resolution,
        shuffle_buffer_size=dataset_config.shuffle_buffer_size,
        pin_memory=dataset_config.pin_memory,
        persistent_workers=dataset_config.persistent_workers,
        external_caption_path=dataset_config.external_caption_path,
        external_journeydb_caption_path=dataset_config.external_journeydb_caption_path,
        external_laion12m_caption_path=dataset_config.external_laion12m_caption_path,
        external_cc12m_caption_path=dataset_config.external_cc12m_caption_path,
        is_captioning=True,
        add_caption_prompt=dataset_config.add_caption_prompt,
    )
    train_dataloader_mmu = dataset_mmu.train_dataloader

elif config.dataset.und_type == "captioning_parquet":
    train_dataloader_mmu = create_imagetext_dataloader(
        train_shards_path_or_url=dataset_config.train_mmu_shards_path_or_url,
        batch_size=config.training.batch_size_mmu,
        image_size=preproc_config.resolution,
        num_workers=dataset_config.num_workers,
        num_readers=32,
        predefined_steps=num_update_steps_per_epoch,
        drop_last=True,
        shuffle=True,
        shuffle_buffer_size=dataset_config.shuffle_buffer_size,
        is_captioning=True
    )

elif config.dataset.und_type == "llava_pretrain":   # 对LLaVA数据集的指令调整 (llava-pretrain)
    train_dataloader_mmu = get_instruct_data_loader(
        tokenizer,
        batch_size=config.training.batch_size_mmu,
        num_workers=dataset_config.num_workers,
        world_size=accelerator.num_processes,
        local_rank=accelerator.process_index,
        max_length=preproc_config.max_seq_length if config.dataset.add_system_prompt else preproc_config.max_seq_length + SYSTEM_PROMPT_LEN,
        phase="pretrain"
    )

elif config.dataset.und_type == "llava_tuning":     # 对LLaVA数据集进行指令调整 (llava-tuning)
    train_dataloader_mmu = get_instruct_data_loader(
        tokenizer,
        batch_size=config.training.batch_size_mmu,
        num_workers=dataset_config.num_workers,
        world_size=accelerator.num_processes,
        local_rank=accelerator.process_index,
        max_length=preproc_config.max_seq_length if config.dataset.add_system_prompt else preproc_config.max_seq_length + SYSTEM_PROMPT_LEN,
        phase="tuning"
    )

else:
    raise NotImplementedError(f"Unsupported dataset type {config.dataset.und_type}")

# LLM pure text dataset: RefinedWeb
dataset_lm = RefinedWebDataset(data_path=dataset_config.train_lm_shards_path_or_url,
                               rank=accelerator.process_index,
                               world_size=accelerator.num_processes,
                               num_workers=dataset_config.num_workers)

train_dataloader_lm = torch.utils.data.DataLoader(dataset_lm, batch_size=config.training.batch_size_lm,
                                                  sampler=None, collate_fn=dataset_lm.collate_fn,
                                                  num_workers=dataset_config.num_workers)

# Combine these dataloaders into a single iterable model
iterables = {
    "t2i_flow": train_dataloader_t2i,
    "lm_flow": train_dataloader_lm,
    "mmu_flow": train_dataloader_mmu,
}

combined_dataloader = CombinedLoader(iterables, mode=config.dataset.combined_loader_mode)
接着是数据的拼接过程,这里实际上是一个多任务学习的场景,其中模型同时在不同的数据集上进行训练。具体来说,代码中涉及了三个不同的数据流("t2i_flow"、"lm_flow" 和 "mmu_flow"),它们分别对应于文本到图像生成、语言模型的文本生成和多模态理解任务。代码在这里会把t2i、llm、mmu三部分的数据集混合起来训练。模型在每个训练批次中都会处理来自这三个数据集的数据,从而同时进行多任务学习,提高泛化能力。
for epoch in range(first_epoch, num_train_epochs):
    model.train()
    for batch, batch_idx, dataloader_idx in combined_dataloader:
        # for loss calculation
        batch_size_t2i = batch["t2i_flow"]["images"].shape[0]
        batch_size_lm = len(batch["lm_flow"]["input_ids"])
        batch_size_mmu = batch["mmu_flow"]["images"].shape[0]

        # *-------*-------*-------*-------*-------*-------*-------*-------*-------*-------*-------*
        # t2i   Build formatted sequences for class-conditional/text-to-image generation
        # *-------*-------*-------*-------*-------*-------*-------*-------*-------*-------*-------*
        pixel_values, texts = batch["t2i_flow"]["images"], batch["t2i_flow"]["input_ids"]
        pixel_values = pixel_values.to(accelerator.device, non_blocking=True)
        data_time_m.update(time.time() - end)

        # 图像的输入和掩码 Encode images to image tokens, mask them and create input and labels
        (
            input_ids,
            labels,
            mask_prob,
            image_tokens_ori
        ) = prepare_inputs_and_labels(pixel_values, texts, config.training.min_masking_rate)
        attention_mask = create_attention_mask_predict_next(input_ids,
                                                            pad_id=int(uni_prompting.sptids_dict['<|pad|>']),
                                                            soi_id=int(uni_prompting.sptids_dict['<|soi|>']),
                                                            eoi_id=int(uni_prompting.sptids_dict['<|eoi|>']),
                                                            rm_pad_in_image=True,
                                                            return_inverse_mask=True)
        attention_mask = attention_mask.to(mask_dtype)

        # *-------*-------*-------*-------*-------*-------*-------*-------*-------*-------*-------*
        # llm   文本的输入和掩码,然后和图像的拼接起来  Build formatted sequences for language modeling
        # *-------*-------*-------*-------*-------*-------*-------*-------*-------*-------*-------*
        texts_lm = batch["lm_flow"]["input_ids"]
        input_ids_lm, _, labels_lm = uni_prompting((texts_lm, input_ids.shape[-1]), 'lm')
        attention_mask_lm = create_attention_mask_predict_next(input_ids_lm.to(input_ids.device),
                                                               pad_id=int(uni_prompting.sptids_dict['<|pad|>']),
                                                               soi_id=int(uni_prompting.sptids_dict['<|soi|>']),
                                                               eoi_id=int(uni_prompting.sptids_dict['<|eoi|>']))
        attention_mask_lm = attention_mask_lm.to(mask_dtype)
        attention_mask = torch.cat([attention_mask, attention_mask_lm], dim=0)  # 文本和图像的拼接起来
        input_ids = torch.cat((input_ids, input_ids_lm.to(input_ids.device)), dim=0)
        labels = torch.cat((labels, labels_lm.to(input_ids.device)), dim=0)

        # *-------*-------*-------*-------*-------*-------*-------*-------*-------*-------*-------*
        # mmu   Build formatted sequences for captioning/multimodal understanding
        # *-------*-------*-------*-------*-------*-------*-------*-------*-------*-------*-------*
        if "llava" in config.dataset.und_type:
            pixel_values_mmu, input_ids_mmu, labels_mmu = (batch["mmu_flow"]["images"],
                                                           batch["mmu_flow"]["input_ids"],
                                                           batch["mmu_flow"]["labels"])
            pixel_values_mmu = pixel_values_mmu.to(accelerator.device, non_blocking=True)
            input_ids_mmu = input_ids_mmu.to(accelerator.device, non_blocking=True)
            image_tokens_mmu = vq_model.get_code(pixel_values_mmu)
            image_tokens_mmu = image_tokens_mmu + len(uni_prompting.text_tokenizer)

            input_ids_mmu = torch.cat([
                (torch.ones(input_ids_mmu.shape[0], 1) * uni_prompting.sptids_dict['<|mmu|>']).to(
                    accelerator.device),
                (torch.ones(input_ids_mmu.shape[0], 1) * uni_prompting.sptids_dict['<|soi|>']).to(
                    accelerator.device),
                image_tokens_mmu,
                (torch.ones(input_ids_mmu.shape[0], 1) * uni_prompting.sptids_dict['<|eoi|>']).to(
                    accelerator.device),
                input_ids_mmu,
            ], dim=1).long()

            labels_mmu = torch.cat([
                (torch.ones(input_ids_mmu.shape[0], 1) * uni_prompting.ignore_id).to(accelerator.device),
                (torch.ones(input_ids_mmu.shape[0], 1) * uni_prompting.ignore_id).to(accelerator.device),
                torch.ones_like(image_tokens_mmu) * uni_prompting.ignore_id,
                (torch.ones(input_ids_mmu.shape[0], 1) * uni_prompting.ignore_id).to(accelerator.device),
                labels_mmu.to(accelerator.device)
            ], dim=1).long()

        else:

            pixel_values_mmu, texts_mmu = batch["mmu_flow"]["images"], batch["mmu_flow"]["input_ids"]
            pixel_values_mmu = pixel_values_mmu.to(accelerator.device, non_blocking=True)
            image_tokens_mmu = vq_model.get_code(pixel_values_mmu)
            image_tokens_mmu = image_tokens_mmu + len(uni_prompting.text_tokenizer)
            input_ids_mmu, _, labels_mmu = uni_prompting((image_tokens_mmu, texts_mmu), 'mmu')
            input_ids_mmu = input_ids_mmu.to(accelerator.device, non_blocking=True)

        attention_mask_mmu = create_attention_mask_for_mmu(input_ids_mmu.to(input_ids.device),
                                                           eoi_id=int(uni_prompting.sptids_dict['<|eoi|>']))
        attention_mask_mmu = attention_mask_mmu.to(mask_dtype)

        # 把mmu部分输入和之前的拼起来
        attention_mask = torch.cat([attention_mask, attention_mask_mmu], dim=0)
        input_ids = torch.cat((input_ids, input_ids_mmu.to(input_ids.device)), dim=0)
        labels = torch.cat((labels, labels_mmu.to(input_ids.device)), dim=0)

        if global_step == 0 and epoch == 0:
            logger.info("Input ids: {}".format(input_ids))
            logger.info("Labels: {}".format(labels))
其中的准备输入和标签部分,可以看到这里实际上和推理时的处理差不多。
def prepare_inputs_and_labels(
        pixel_values_or_image_ids: Union[torch.FloatTensor, torch.LongTensor],
        texts: Union[str, str],
        min_masking_rate: float = 0.0,
        is_train: bool = True,
):

    image_tokens = vq_model.get_code(pixel_values_or_image_ids)     # 图像的token id
    image_tokens = image_tokens + len(uni_prompting.text_tokenizer)     # 加到文本token后面

    # create MLM mask and labels
    input_ids, labels, loss_weight, mask_prob = mask_or_random_replace_tokens(  # 掩码,详见论文
        image_tokens,
        mask_id,
        config,
        mask_schedule=mask_schedule,
        is_train=is_train,
    )
    input_ids, masks, labels = uni_prompting((texts, input_ids, labels), 't2i')     # 提示词

    return input_ids, labels, mask_prob, image_tokens
训练:使用模型预测,然后计算损失,然后反向传播。
with accelerator.accumulate(model):
    logits, loss_t2i, loss_lm, loss_mmu = model(
        input_ids=input_ids,
        input_embeddings=None,
        attention_mask=attention_mask,
        labels=labels,
        label_smoothing=config.training.label_smoothing,
        batch_size_t2i=batch_size_t2i,
        batch_size_lm=batch_size_lm,
        batch_size_mmu=batch_size_mmu,
        max_seq_length=config.dataset.preprocessing.max_seq_length,
    )

    # Gather the losses across all processes for logging (if we use distributed training).
    avg_loss_t2i = accelerator.gather(loss_t2i.repeat(config.training.batch_size_t2i)).mean()
    avg_loss_lm = accelerator.gather(loss_lm.repeat(config.training.batch_size_lm)).mean()
    avg_loss_mmu = accelerator.gather(loss_mmu.repeat(config.training.batch_size_mmu)).mean()
    loss = config.training.t2i_coeff * loss_t2i + \
           config.training.lm_coeff * loss_lm + \
           config.training.mmu_coeff * loss_mmu

    avg_masking_rate = accelerator.gather(mask_prob.repeat(config.training.batch_size_t2i)).mean()

    accelerator.backward(loss)

    if config.training.max_grad_norm is not None and accelerator.sync_gradients:
        accelerator.clip_grad_norm_(model.parameters(), config.training.max_grad_norm)

    optimizer.step()
    lr_scheduler.step()

    # log gradient norm before zeroing it
    if (
            accelerator.sync_gradients
            and (global_step + 1) % config.experiment.log_grad_norm_every == 0
            and accelerator.is_main_process
    ):
        log_grad_norm(model, accelerator, global_step + 1)

    optimizer.zero_grad(set_to_none=True)
最后的评估与保存就不多赘述了。
4.测试
t2i(文生图)
以下是官方提供的13条提示词中,我挑了3个个人认为效果最好的进行展示。
A 3D render of a futuristic car made of glass, driving through a city of mirrors.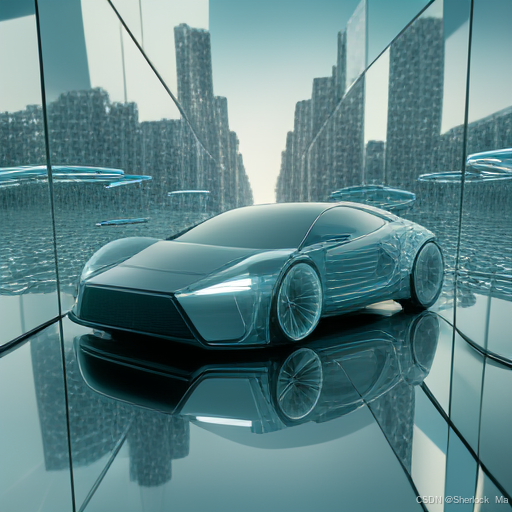
An armchair in the shape of an avocado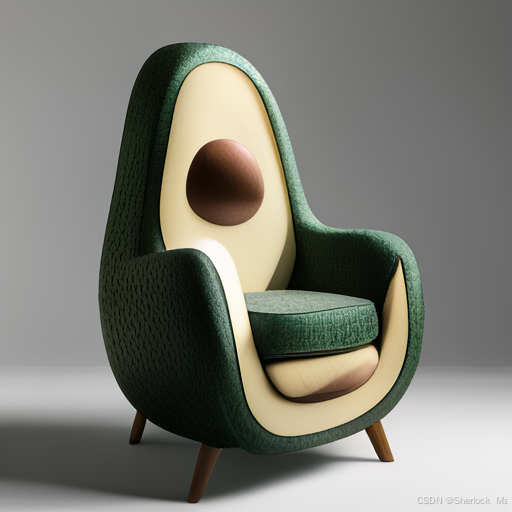
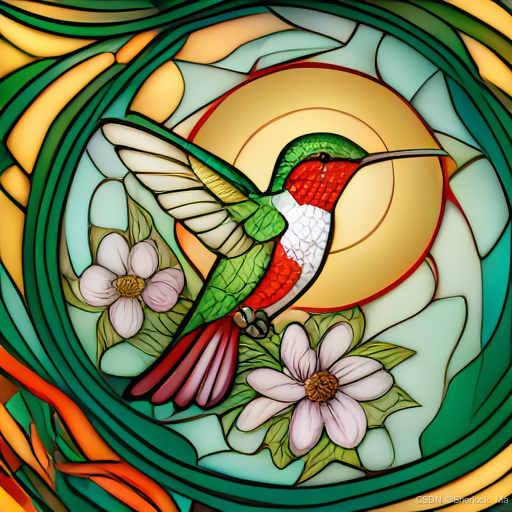
The image features a stylized stained glass illustration of a hummingbird with vibrant colors, set against a backdrop of swirling patterns and a large sun. The composition includes floral elements and intricate details, creating a vivid and dynamic scene that emphasizes the beauty of the bird. The colors range from greens to reds, enhancing the lively and artistic aesthetic of the piece.
t2i(inpainting)
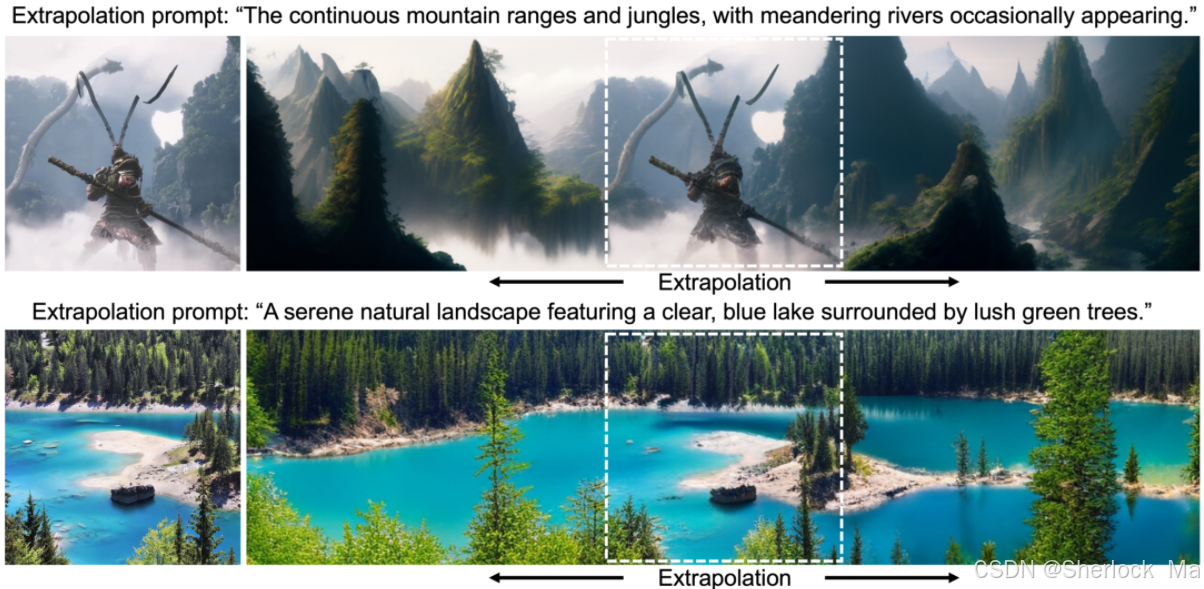
t2i(extrapolation)
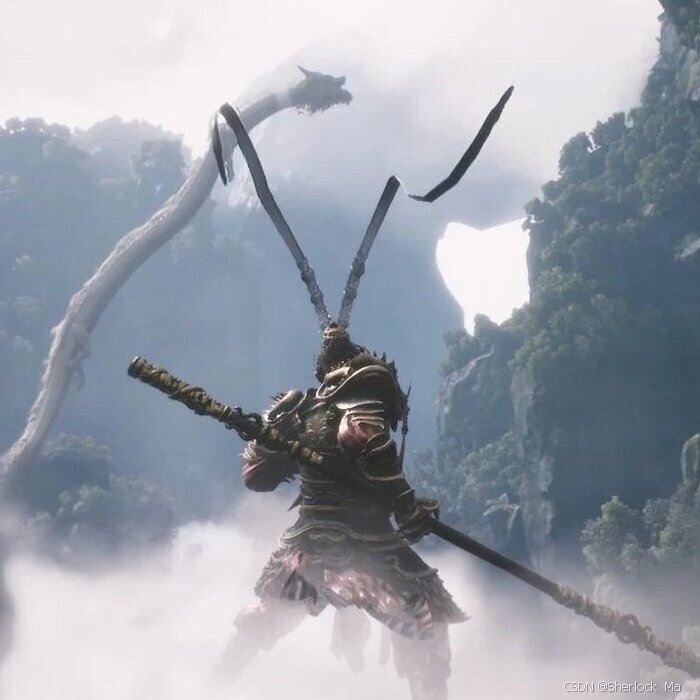
extra_direction="left *** left *** left *** right *** right *** right"
offset=0
prompt="The continuous mountain ranges and jungles, with meandering rivers occasionally appearing. *** The continuous mountain ranges and jungles, with meandering rivers occasionally appearing. *** The continuous mountain ranges and jungles, with meandering rivers occasionally appearing. *** The continuous mountain ranges and jungles, with meandering rivers occasionally appearing. *** The continuous mountain ranges and jungles, with meandering rivers occasionally appearing. *** The continuous mountain ranges and jungles, with meandering rivers occasionally appearing."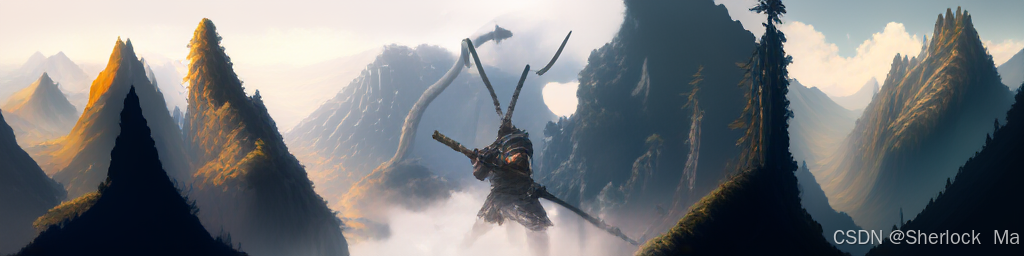
5.总结
“Show-o”是一种创新的统一Transformer模型,它在多模态理解和生成领域展现出了革命性的潜力。与传统的多模态模型不同,Show-o通过融合自回归和离散扩散建模,能够灵活地处理各种模态的输入和输出。这种融合策略不仅提高了模型的适应性,还增强了其在不同视觉-语言任务中的表现力,包括视觉问题回答、文本到图像生成、文本引导的修复和扩展,以及混合模态生成等。
在实际应用中,Show-O模型展示了其在加速图像生成方面的显著优势。相比于传统的自回归生成图像的方法,Show-O需要的采样步骤大幅减少,这不仅提高了生成效率,还降低了计算成本。此外,Show-O模型还能够自然地支持各种下游应用,如文本引导的图像修复和扩展,无需额外的微调。
总的来说,Show-O模型通过其创新的架构和先进的技术,为多模态人工智能领域提供了一个强大的工具。它不仅推动了多模态理解和生成技术的发展,还为未来的研究和应用开辟了新的可能性。随着进一步的研究和发展,Show-O模型有望在多模态人工智能领域发挥更大的作用,解决更多的实际问题,并为用户带来更加丰富和直观的体验。
探索AI生成的无限可能,与Show-o一起开启创意之旅!如果你对这篇分享充满热情,别忘了点赞和关注,让我们的创新故事持续发光发热。每一次互动都是我们前进的动力,感谢你的支持,让我们共同见证科技与艺术的完美融合!


 392
392

 被折叠的 条评论
为什么被折叠?
被折叠的 条评论
为什么被折叠?
 到【灌水乐园】发言


