


1.简介
目前,多模态任务由扩散模型主导(例如,stable diffusion)和组合方法(例如,CLIP与LLM组合)。这些先进的模型因其卓越的能力而受到重视,它们能够高效地处理和理解包括图像、文本和视频在内的多种数据类型,并据此生成精确而相关的输出。但是这些模型往往需要多个专门模型来分别负责理解与生成任务。这激发了一个研究问题:一个单一的Transformer可以处理多模态理解和生成?
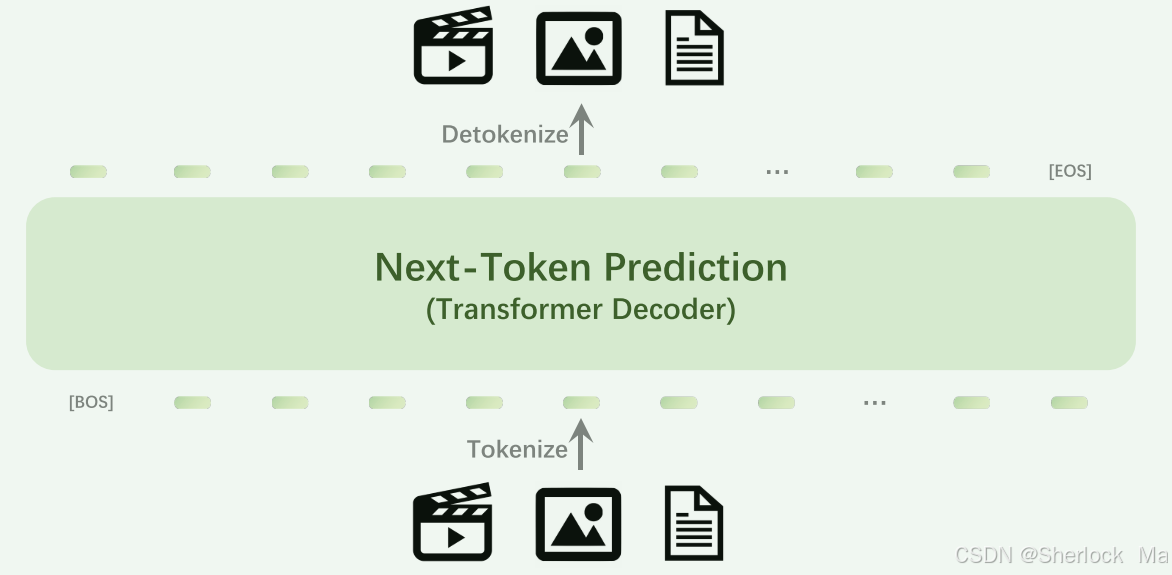
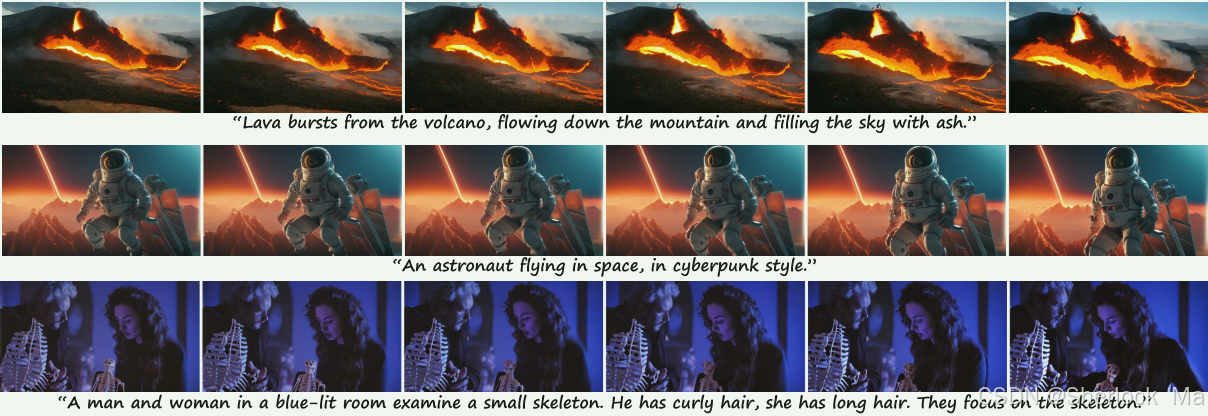
近日,北京智源人工智能研究院正式发布原生多模态世界模型Emu3。Emu3只基于下一个token预测,无需扩散模型或组合式方法,把图像、文本和视频编码为一个离散空间,在多模态混合序列上从头开始联合训练一个Transformer。Emu 3在生成和感知任务方面都优于几个成熟的特定于任务的模型,超越了SDXL和LLaVA-1.6等旗舰模型。除此之外,Emu 3还能够通过预测视频序列中的下一个令牌来生成高保真度视频。
该模型实现了视频、图像、文本三种模态的统一理解与生成,成功验证了基于下一个token预测的多模态技术范式,释放其在大规模训练和推理上的潜力。
接下来,本篇博客将为您详细解读这一未来的发展趋势,因为设备限制,本文只对代码做大概的介绍,也欢迎大家在评论区交流。
论文:https://arxiv.org/pdf/2409.18869
项目页面:Emu3
github代码:https://github.com/baaivision/Emu3
hf权重仓库:BAAI (Beijing Academy of Artificial Intelligence)
2.论文
Data
Emu3是在语言、图像和视频数据的混合上从头开始训练的。
语言数据:Aquila是一个由中文和英文数据组成的高质量语料库。
图像数据:作者策划了一个大规模的图像-文本数据集,其中包括开源的Web数据、人工智能生成的数据和高质量的内部数据。然后进行了过滤,过滤过程如下:
- 应用分辨率滤波器,丢弃分辨率低于512 × 512像素的样本。
- 我们使用LAION-AI aesthetic predictor评估每张图像的美学质量,排除评分低于5.5的图像,以确保整体美学质量。
- 对于没有通过美学过滤器的图像,我们采用文本检测和颜色过滤来保留非单色图像和拥有少量文本的图像,从而提高开放世界图像的过滤召回率。
- 此外,我们还准备了用于图像理解的补充数据。通过DenseFusion中的数据处理管道作者从各种开源Web数据中提取了数百万张代表性图像,这些图像涵盖了广泛的类别,包括图表、表格、文本丰富的内容等。
视频数据:作者收集的视频涵盖了广泛的类别,如风景,动物,植物,游戏和动作。
预处理,包括以下四个阶段:
- 作者使用PySceneDect 4将视频分割成场景,使用ContentDetector和ThresholdDetector分别识别内容变化和淡入/淡出事件。
- 使用PaddleOCR 3执行文本检测,并删除文本覆盖范围过大的片段。为了降低计算成本,作者以2 FPS的速度对视频帧进行采样,并将短边调整为256。
- 使用PaddleOCR 3执行文本检测,并删除文本覆盖范围过大的片段。为了降低计算成本,作者以2 FPS的速度对视频帧进行采样,并将短边调整为256。
- 最后,作者使用LAION-AI aesthetic predictor评估了每个片段的美学质量。我们对三个帧进行采样,并为每个剪辑获得三个得分,并且丢弃最低得分小于5的剪辑。
视频添加字幕:作者使用基于图像字幕器训练的视频字幕器来为过滤后的视频剪辑添加字幕。
- 训练数据最初用GPT-4V标记。对于每个视频剪辑,作者采样八帧,并为GPT-4V创建详细的提示,以描述这些帧中的内容和运动。有些标注的数据需要手工修改。
- 然后,作者在这个标记的数据上微调图像captioner,以开发视频captioner。
- 对于大规模部署,作者使用vLLM加速字幕。短于20秒的片段使用12个均匀采样的帧来加标题,而较长的片段被分成10-20秒的子片段,每个子片段独立地加标题。
Vision Tokenizer
作者基于SBER-MoVQGAN 5训练视觉标记器,其codebook的尺寸为32768的,它可以将4 × 512 × 512的视频片段或512 × 512的图像编码为4096个离散token。也就是说,这个tokenizer在时间维度上实现了4×压缩,在空间维度上实现了8×8压缩,适用于任何时间和空间分辨率。
结构
Emu3的结构和show-o很像,建议可以先去看一下show-o的那篇博客:
Show-o:统一多模态理解和生成的强大模型(包含代码论文详解)-CSDN博客
本质上,二者都是讲图片或者文本转化为离散token,然后合并后输入到大模型里 ,大模型输出结果再通过tokenizer转化为图片或者文本,二者使用的tokenizer都是vq-vae的架构,区别仅仅在于具体的模型不一样,如show-o使用的是magvit,而emu3使用的是SBER-MoVQGAN 5。
训练
prompt
生成的训练数据的prompt结构如下:
[BOS] {caption text} [SOV] {meta text} [SOT] {vision tokens} [EOV] [EOS]- [BOS]和[EOS]是文本标记器中的原始特殊标记,
- [SOV]标记视觉输入的开始,而[EOV]指示视觉输入的结束。
- [SOT]标记视觉标记的开始,
- 另外,[EOL]和[EOF]被插入到视觉表征中以分别表示行中断和帧中断。就是图像会转换为[64,64]的离散token表,然后每一行会加入eol表示中断
- “Meta文本”包含有关图像分辨率的信息,对于视频,它包括分辨率、帧速率和持续时间,所有这些都以纯文本格式显示。作者还将数据集中的“标题文本”字段移动到[EOV]标记之后,
损失函数
仅需要使用标准的交叉熵损失来训练下一令牌预测任务。为了防止视觉表征支配学习过程,我们对与视觉表征相关联的损失应用0.5的权重。
并行
Emu 3模型在预训练期间利用广泛的上下文长度来处理视频数据。为了便于训练,作者采用了张量并行(TP)、上下文并行(CP)和数据并行(DP)的组合。同时,将文本-图像数据打包成最大上下文长度,充分利用计算资源,同时保证打包过程中完整图像不被分割。
预训练
预培训过程分两个阶段进行。
- 在第一阶段中,不使用视频数据训练,仅使用文本和图像数据,上下文长度5120
- 在第二阶段中,引入视频数据,并且采用131072的上下文长度。
Post-training
Vision Generation
Quality Fine-Tuning:为提高生成结果的质量。我们使用高质量的数据进行质量微调
- 对于QFT中的图像数据,我们选择了不同的高质量来源,并根据三种常见偏好评分的平均值进行了筛选:HPSv2.1、MPS和LAION美学评分。
- 在QFT过程中,我们将训练数据的分辨率从512像素提高到720像素,以提高生成质量。
- 对于视频数据,我们从高质量的源中采样,并应用严格的分辨率和光流滤波器以确保质量。
- 此外,在训练结束时,我们使用退火策略以线性衰减学习率至零
Direct Preference Optimization(DPO):可以理解为强化学习
数据集构建:
- 使用质量微调模型对每个用户收集的提示(p)执行8-10次推断,创建初始数据池(x)
- 每个提示都由三个投票人进行评估,重点是视觉吸引力和提示对齐。
- 基于得分,选择得分最高的样本,并且拒绝得分最低的样本,以形成三个一组(pi,xchosen i,xrejected i),并提示进一步训练。
emu 3-DPO通过最小化DPO损失和next-token预测交叉熵损失,以微调QFT模型。
Vision-Language Understanding
用于视觉语言理解的模型经历了两个阶段的后训练过程
- 图像到文本的训练
- 将图像理解数据与纯语言数据相结合
- 与视觉标记相关的损失被忽略,仅使用纯文本预测的损失。
- 每张图像的大小调整为约512 × 512的分辨率,同时保留原始纵横比。
- 指令调整
- 从数据集中抽取一个问答对子集,以增强视觉指令跟随能力。
- 低于512 × 512或高于1024 × 1024的图像将被调整为分辨率下限或上限,同时保持相应的纵横比,而其他图像则保持其原始分辨率。
3.代码
前言:emu3模型实在是太大了,生成部分还能勉强debug完前半段,理解部分连主体代码都debug不了,不建议资源不足的小伙伴尝试。
环境配置
pip install -r requirements.txt我这里直接使用之前配置大模型的环境,可以直接运行!
权重下载(gen和chat权重分别为40g左右,慎重考虑):
emu3-gen:BAAI/Emu3-Gen at main
emu3-chat:BAAI/Emu3-Chat · HF Mirror
tokenizer:BAAI/Emu3-VisionTokenizer · HF Mirror
emu-stage1:BAAI/Emu3-Stage1 · HF Mirror
生成
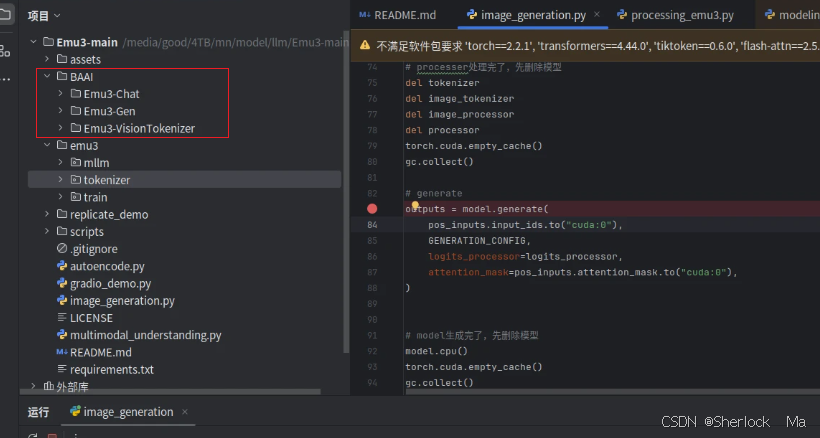
如何在3090上debug
需要注意的是,模型实在是太大了,这导致我的3090也无法完整跑完,我对代码稍作修改,使其能够debug完前半部分流程,到最后的decoder还是会报错,我建议显卡资源吃紧的朋友果断放弃。
这里的代码应该还是有问题的,如果读者有解决办法,欢迎评论区或私信交流。
# -*- coding: utf-8 -*-
from PIL import Image
from transformers import AutoTokenizer, AutoModel, AutoImageProcessor, AutoModelForCausalLM
from transformers.generation.configuration_utils import GenerationConfig
from transformers.generation import LogitsProcessorList, PrefixConstrainedLogitsProcessor, UnbatchedClassifierFreeGuidanceLogitsProcessor
import torch
import gc   # 加入这个库

from emu3.mllm.processing_emu3 import Emu3Processor


# model path
EMU_HUB = "BAAI/Emu3-Gen"
VQ_HUB = "BAAI/Emu3-VisionTokenizer"

# prepare model and processor
model = AutoModelForCausalLM.from_pretrained(
    EMU_HUB,
    device_map="cuda:0",
    torch_dtype=torch.bfloat16,
    attn_implementation="flash_attention_2",
    trust_remote_code=True,
)
model.eval()

tokenizer = AutoTokenizer.from_pretrained(EMU_HUB, trust_remote_code=True, padding_side="left")
image_processor = AutoImageProcessor.from_pretrained(VQ_HUB, trust_remote_code=True)
image_tokenizer = AutoModel.from_pretrained(VQ_HUB, device_map="cuda:0", trust_remote_code=True).eval()
processor = Emu3Processor(image_processor, image_tokenizer, tokenizer)

# prepare input
POSITIVE_PROMPT = " masterpiece, film grained, best quality."
NEGATIVE_PROMPT = "lowres, bad anatomy, bad hands, text, error, missing fingers, extra digit, fewer digits, cropped, worst quality, low quality, normal quality, jpeg artifacts, signature, watermark, username, blurry."

classifier_free_guidance = 3.0
prompt = ["a portrait of young girl."] # , "a shiba inu"]
prompt = [p + POSITIVE_PROMPT for p in prompt]

kwargs = dict(
    mode='G',
    ratio=["1:1", ], # "16:9"],
    image_area=model.config.image_area,
    return_tensors="pt",
    padding="longest",
)
pos_inputs = processor(text=prompt, **kwargs)
neg_inputs = processor(text=[NEGATIVE_PROMPT] * len(prompt), **kwargs)

# prepare hyper parameters
GENERATION_CONFIG = GenerationConfig(
    use_cache=True,
    eos_token_id=model.config.eos_token_id,
    pad_token_id=model.config.pad_token_id,
    max_new_tokens=40960,
    do_sample=True,
    top_k=2048,
)

h = pos_inputs.image_size[:, 0]
w = pos_inputs.image_size[:, 1]
constrained_fn = processor.build_prefix_constrained_fn(h, w)
logits_processor = LogitsProcessorList([
    UnbatchedClassifierFreeGuidanceLogitsProcessor(
        classifier_free_guidance,
        model,
        unconditional_ids=neg_inputs.input_ids.to("cuda:0"),
    ),
    PrefixConstrainedLogitsProcessor(
        constrained_fn ,
        num_beams=1,
    ),
])

# processer处理完了,先删除模型
del tokenizer
del image_tokenizer
del image_processor
del processor
torch.cuda.empty_cache()
gc.collect()

# generate
outputs = model.generate(
    pos_inputs.input_ids.to("cuda:0"),
    GENERATION_CONFIG,
    logits_processor=logits_processor,
    attention_mask=pos_inputs.attention_mask.to("cuda:0"),
)


# model生成完了,先删除模型
del model
torch.cuda.empty_cache()
gc.collect()

# 重新导入processor
tokenizer = AutoTokenizer.from_pretrained(EMU_HUB, trust_remote_code=True, padding_side="left")
image_processor = AutoImageProcessor.from_pretrained(VQ_HUB, trust_remote_code=True)
image_tokenizer = AutoModel.from_pretrained(VQ_HUB, device_map="cuda:0", trust_remote_code=True).eval()
processor = Emu3Processor(image_processor, image_tokenizer, tokenizer)

for idx_i, out in enumerate(outputs):
    mm_list = processor.decode(out)
    for idx_j, im in enumerate(mm_list):
        if not isinstance(im, Image.Image):
            continue
        im.save(f"result_{idx_i}_{idx_j}.png")
显存溢出的解决方法:Torch 中显存回收节省显存的方法-腾讯云开发者社区-腾讯云
image_generation.py
这里主要是模型进行配置的部分,包括模型的导入、将prompt转换为token,计算h,w,代码会通过下一行进入模型进行预测:
# generate
outputs = model.generate(
    pos_inputs.input_ids.to("cuda:0"),
    GENERATION_CONFIG,
    logits_processor=logits_processor,
    attention_mask=pos_inputs.attention_mask.to("cuda:0"),
)
pos_inputs里面的参数如下:
- 'attention_mask':掩码,[b,len]
- 'image_size':图片尺寸,[b],每个位置上包括h,w
- 'input_ids':输入的token id,[b,len]
- 'token_type_ids':
logits_processor里面包括了图像的尺寸、模型model、neg_inputs(负面提示词)
generate
接着代码会跳入transformers库的utils.py的generate(),这里的代码看着很长,其实前面10步全是配置信息的代码,这里值得注意的地方如下:
- max_length:40960+len(输入文本的最大长度),这个40960就是在image_generatation.py里面设置的max_new_tokens=40960,
- generation_mode:GenerationMode.SAMPLE
因此,代码会跳入这层循环:
elif generation_mode in (GenerationMode.SAMPLE, GenerationMode.GREEDY_SEARCH):
    # 11. expand input_ids with `num_return_sequences` additional sequences per batch
    input_ids, model_kwargs = self._expand_inputs_for_generation(
        input_ids=input_ids,
        expand_size=generation_config.num_return_sequences,     # 如果是1,直接return
        is_encoder_decoder=self.config.is_encoder_decoder,
        **model_kwargs,
    )

    # 12. run sample (it degenerates to greedy search when `generation_config.do_sample=False`)
    result = self._sample(
        input_ids,
        logits_processor=prepared_logits_processor,
        stopping_criteria=prepared_stopping_criteria,
        generation_config=generation_config,
        synced_gpus=synced_gpus,
        streamer=streamer,
        **model_kwargs,     # 包含mask
    )
首先是 _expand_inputs_for_generation 的函数,其目的是将输入张量从 [batch_size, ...] 扩展到 [batch_size * expand_size, ...],以适应生成任务中的批量扩展。其步骤如下:
-
检查
expand_size:如果expand_size为1,则不需要扩展,直接返回原始的input_ids和model_kwargs。(按照官方示例,expand_size=1,这里就直接return了) -
定义
_expand_dict_for_generation函数:这是一个内部函数,用于扩展模型参数字典中的张量。它遍历字典中的每个键值对,如果值不是None且是PyTorch张量,则使用repeat_interleave方法在第0维(即批次维)上重复扩展。 -
扩展
input_ids:如果input_ids不为None,则使用repeat_interleave方法在第0维上重复扩展。 -
扩展
model_kwargs:使用_expand_dict_for_generation函数扩展model_kwargs中的张量。 -
处理编码器-解码器模型:如果
is_encoder_decoder为True,检查model_kwargs中是否有encoder_outputs。如果有,则对encoder_outputs进行扩展。 -
返回扩展后的张量和参数:返回扩展后的
input_ids和model_kwargs。
def _expand_inputs_for_generation(
    expand_size: int = 1,
    is_encoder_decoder: bool = False,
    input_ids: Optional[torch.LongTensor] = None,
    **model_kwargs,
) -> Tuple[torch.LongTensor, Dict[str, Any]]:
    """Expands tensors from [batch_size, ...] to [batch_size * expand_size, ...]"""
    # Do not call torch.repeat_interleave if expand_size is 1 because it clones
    # the input tensor and thus requires more memory although no change is applied
    if expand_size == 1:
        return input_ids, model_kwargs

    def _expand_dict_for_generation(dict_to_expand):
        for key in dict_to_expand:
            if (
                key != "cache_position"
                and dict_to_expand[key] is not None
                and isinstance(dict_to_expand[key], torch.Tensor)
            ):
                dict_to_expand[key] = dict_to_expand[key].repeat_interleave(expand_size, dim=0)
        return dict_to_expand

    if input_ids is not None:
        input_ids = input_ids.repeat_interleave(expand_size, dim=0)

    model_kwargs = _expand_dict_for_generation(model_kwargs)

    if is_encoder_decoder:
        if model_kwargs.get("encoder_outputs") is None:
            raise ValueError("If `is_encoder_decoder` is True, make sure that `encoder_outputs` is defined.")
        model_kwargs["encoder_outputs"] = _expand_dict_for_generation(model_kwargs["encoder_outputs"])

    return input_ids, model_kwargs
_sample
接着是self._sample部分,代码前半部分是配置信息,故不多赘述,这里需要注意的是,max_length=40960+最大文本长度。这里的40960是image_generation.py设置的max_new_tokens=40960,
max_length = generation_config.max_length # emu3:40960+len核心部分代码及解释如下:
因为llava实际上也使用了这部分代码,所以你可以参考llava的那篇博客:LLaVA-1.5:强大的多模态大模型(包含论文代码详解)-CSDN博客,这里唯一需要注意的是,llava的维度仅有32000,而emu3的维度为184622
具体步骤如下:
- 自回归:
while self._has_unfinished_sequences(...):这个循环会一直执行,直到所有序列都完成。_has_unfinished_sequences函数检查哪些序列还未达到最大长度或其他结束条件。 - 准备模型输入
- 预测:
outputs = self(**model_inputs, return_dict=True):执行模型的前向传播,获取下一个token的预测结果。第一次是[b,len,184622],后面就变成[b,1,184622]了- 在生成任务的初始阶段,模型接收一个完整的输入序列(
input_ids),这个序列的长度为len。模型对整个序列进行处理。因此第一次是[b,len,184622] - 在后续生成过程中,每次迭代只生成一个token,因此模型的输出只需要预测当前步骤下一个token的概率分布。这时,模型的输出形状变为
[b,1,184622] - 每次只处理一个token的预测可以减少计算量和内存使用,特别是在处理长序列时。
- 在生成任务的初始阶段,模型接收一个完整的输入序列(
- 计算token id:
- 首先通过logits_processor将概率低的全变成-inf,
- 然后通过softmax转换到0-1的区间,并且所有输出值的总和为1。
- 然后通过torch.multinomial计算下一个token,即next_token
- 更新
- 需要注意的是,input_ids是将输入的token和模型输出的token concat起来的
while self._has_unfinished_sequences(       # 自回归循环输出
    this_peer_finished, synced_gpus, device=input_ids.device, cur_len=cur_len, max_length=max_length
):
    # prepare model inputs
    model_inputs = self.prepare_inputs_for_generation(input_ids, **model_kwargs)    # llava:包含掩码、inputs_embed

    # prepare variable output controls (note: some models won't accept all output controls)
    model_inputs.update({"output_attentions": output_attentions} if output_attentions else {})
    model_inputs.update({"output_hidden_states": output_hidden_states} if output_hidden_states else {})

    # forward pass to get next token
    outputs = self(**model_inputs, return_dict=True)    # llava:模型预测  第一次[1,634,32000],后面都是[1,1,32000] emu3:第一次[b,len,184622],后面都是[b,1,184600]

    if synced_gpus and this_peer_finished:
        continue  # don't waste resources running the code we don't need

    # Clone is needed to avoid keeping a hanging ref to outputs.logits which may be very large for first iteration
    # (the clone itself is always small)
    next_token_logits = outputs.logits.clone()[:, -1, :].float()    # 下一个token的概率

    # pre-process distribution
    next_token_scores = logits_processor(input_ids, next_token_logits)  # emu3:把其他的全变成-inf

    # Store scores, attentions and hidden_states when required
    if return_dict_in_generate:
        if output_scores:
            scores += (next_token_scores,)
        if output_logits:
            raw_logits += (next_token_logits,)
        if output_attentions:
            decoder_attentions += (
                (outputs.decoder_attentions,) if self.config.is_encoder_decoder else (outputs.attentions,)
            )
            if self.config.is_encoder_decoder:
                cross_attentions += (outputs.cross_attentions,)

        if output_hidden_states:
            decoder_hidden_states += (
                (outputs.decoder_hidden_states,)
                if self.config.is_encoder_decoder
                else (outputs.hidden_states,)
            )

    # token selection
    if do_sample:    # emu3走这里
        probs = nn.functional.softmax(next_token_scores, dim=-1)
        # TODO (joao): this OP throws "skipping cudagraphs due to ['incompatible ops']", find solution
        next_tokens = torch.multinomial(probs, num_samples=1).squeeze(1)    # emu3:取最大概率的token
    else:
        next_tokens = torch.argmax(next_token_scores, dim=-1)   # llava:取最大概率的token

    # finished sentences should have their next token be a padding token
    if has_eos_stopping_criteria:
        next_tokens = next_tokens * unfinished_sequences + pad_token_id * (1 - unfinished_sequences)

    # update generated ids, model inputs, and length for next step
    input_ids = torch.cat([input_ids, next_tokens[:, None]], dim=-1)    # 输出结果和输入拼接
    if streamer is not None:
        streamer.put(next_tokens.cpu())
    model_kwargs = self._update_model_kwargs_for_generation(    # 更新序列
        outputs,
        model_kwargs,
        is_encoder_decoder=self.config.is_encoder_decoder,
    )

    unfinished_sequences = unfinished_sequences & ~stopping_criteria(input_ids, scores)
    this_peer_finished = unfinished_sequences.max() == 0
    cur_len += 1

    # This is needed to properly delete outputs.logits which may be very large for first iteration
    # Otherwise a reference to outputs is kept which keeps the logits alive in the next iteration
    del outputs     # 删除
最后模型输出input_ids
decoder
for idx_i, out in enumerate(outputs):
    mm_list = processor.decode(out)
    for idx_j, im in enumerate(mm_list):
        if not isinstance(im, Image.Image):
            continue
        im.save(f"result_{idx_i}_{idx_j}.png")
我们直接来看processor.decode
def decode(self, *args, **kwargs):
    doc = self.tokenizer.decode(*args, **kwargs)
    return self.multimodal_decode(doc)
这里doc数据如下:
<|extra_203|>a portrait of young girl. masterpiece, film grained, best quality.<|image start|>90*90<|image token|><|visual token 002288|><|visual token 005963|><|visual token 014529|><|visual token 000144|><|visual token 002299|><|visual token 014179|> ......我们接着来看multimodal_decode:
- 使用re把doc拆分成3部分:输入的文本、图片输出的token、eostoken
- 把文本直接加到multimodal_output,
- 把图片先用re提取所有的token id,然后并转为int
- 将图片的token id转为图片,并加到multimodal_output
def multimodal_decode(self, doc):
    multimodal_output = []
    pattern = rf'({re.escape(self.tokenizer.boi_token)}.*?{re.escape(self.tokenizer.eoi_token)})'
    chunks = re.split(pattern, doc)      # 拆成输入、输出、eos三个部分
    for c in chunks:
        if len(c) == 0:
            continue

        if self.tokenizer.boi_token in c:   # 有boi,即图片的部分走这里。
            image = []
            image_rows = re.split(re.escape(self.tokenizer.eol_token), c)   # h+1(h是行,每行包括w个token,1是eoi)
            # 提取所有的token id,并转为int
            for r in image_rows:    # r: <|image start|>90*90<|image token|><|visual token 008251|><|visual token 006384|><|visual token 001996|><|visual token 001013|>
                token_ids = re.findall(self.visual_template[1], r)      # 提取出id token_ids: ['008251', '006384',....]
                if len(token_ids) > 0:
                    row_token = [int(m) for m in token_ids]     # 转为int
                    image.append(row_token)
            image = torch.tensor(image, dtype=torch.long, device=self.vision_tokenizer.device)      # [h,w]
            #转为图像
            image = self.vision_tokenizer.decode(image[None]).float()
            image = self.image_processor.postprocess(image)["pixel_values"][0]
            multimodal_output.append(image)
        else:
            multimodal_output.append(c)
最后保存图片
理解
这里建议修改源码,把tokenizer部分放到前面,然后del删掉,这样勉强能进入generate进行debug,但还是走不完完整的流程,显卡资源不够的不建议尝试。
# -*- coding: utf-8 -*-
from PIL import Image
from transformers import AutoTokenizer, AutoModel, AutoImageProcessor, AutoModelForCausalLM
from transformers.generation.configuration_utils import GenerationConfig
import torch
import gc

from emu3.mllm.processing_emu3 import Emu3Processor


# model path
EMU_HUB = "BAAI/Emu3-Chat"
VQ_HUB = "BAAI/Emu3-VisionTokenizer"


tokenizer = AutoTokenizer.from_pretrained(EMU_HUB, trust_remote_code=True, padding_side="left")
image_processor = AutoImageProcessor.from_pretrained(VQ_HUB, trust_remote_code=True)
image_tokenizer = AutoModel.from_pretrained(VQ_HUB, device_map="cuda:0", trust_remote_code=True).eval()
processor = Emu3Processor(image_processor, image_tokenizer, tokenizer)


# prepare input
text = ["Please describe the image"] #, "Please describe the image"]
image = Image.open("assets/demo.png")
image = [image]#, image]

inputs = processor(
    text=text,
    image=image,
    mode='U',
    padding_image=True,
    padding="longest",
    return_tensors="pt",
)

# prepare hyper parameters
GENERATION_CONFIG = GenerationConfig(pad_token_id=tokenizer.pad_token_id, bos_token_id=tokenizer.bos_token_id, eos_token_id=tokenizer.eos_token_id)


del tokenizer
del image_tokenizer
del image_processor
del processor
torch.cuda.empty_cache()
gc.collect()


# prepare model and processor
model = AutoModelForCausalLM.from_pretrained(
    EMU_HUB,
    device_map="cuda:0",
    torch_dtype=torch.bfloat16,
    attn_implementation="flash_attention_2",
    trust_remote_code=True,
)
model.eval()


# generate
outputs = model.generate(
    inputs.input_ids.to("cuda:0"),
    GENERATION_CONFIG,
    max_new_tokens=1024,
    attention_mask=inputs.attention_mask.to("cuda:0"),
)

outputs = outputs[:, inputs.input_ids.shape[-1]:]
answers = processor.batch_decode(outputs, skip_special_tokens=True)
for ans in answers:
    print(ans)
multimodal_understanding.py部分就不多说了,主要的不同在于将图像转换为离散token,代码在input=processor里处理。
processor
跳入processor后,其他代码就不展示了,首先是这里,这里的代码会将图片转换为token id,尺寸为[b,64,64]:
image_tokens = self.tokenize_image(image, padding_image=padding_image) # [b,16,16]tokenize_image的核心操作如下,主要就是转rgb、归一化、resize,然后通过视觉tokenizer转为离散token。
if is_all_same_size:
    image_inputs = self.image_processor(image, return_tensors="pt")["pixel_values"]     # numpy归一化、resize等操作 转换为[b,3,512,512]
    image_inputs = image_inputs.to(self.vision_tokenizer.device, self.vision_tokenizer.dtype)
    image_tokens = self.vision_tokenizer.encode(image_inputs)   # image encoder:[b,64,64]
接下来,我们来看看self.vision_tokenizer.encode()怎么做的:
- 首先将其扩展到[b,t,c,h,w]的向量,其中t是时间步,如果是图片,就复制4次
- 使用self.encoder压缩,其中时间压缩4倍,空间压缩8*8倍
- self.quantize(h)转换为离散token id
def encode(self, x: torch.Tensor):
    ndim = x.ndim
    if ndim == 4:
        t = self.config.temporal_downsample_factor
        b, c, h, w = x.shape
        x = x.unsqueeze(1).repeat(1, t, 1, 1, 1)
    elif ndim == 5:
        b, t, c, h, w = x.shape

    h = self.encoder(x)     # [b,复制的时间步=4,3,512,512]->[b,时间压缩4倍=1,4,64,64]

    # b t c h w -> b c t h w
    h = h.permute(0, 2, 1, 3, 4)
    h = self.quant_conv(h)
    # b c t h w -> b t c h w
    h = h.permute(0, 2, 1, 3, 4)

    codes = self.quantize(h)    # Conv3d [b,1,64,64]

    if ndim == 4:
        codes = codes.squeeze(1)    # [b,64,64]

    return codes
其中的codes = self.quantize(h)计算过程如下:
class Emu3VisionVQVectorQuantizer(nn.Module):

    def __init__(self, config: Emu3VisionVQConfig):
        super().__init__()
        self.embedding = nn.Embedding(config.codebook_size, config.embed_dim)
        self.embedding.weight.data.uniform_(-1.0 / config.codebook_size, 1.0 / config.codebook_size)

    def forward(self, x: torch.Tensor):
        # b t c h w -> b t h w c
        b, t, c, h, w = x.shape
        x = x.permute(0, 1, 3, 4, 2).contiguous()
        x_flattened = x.view(-1, c)     # [b*4096,4]

        codebook = self.embedding.weight    # 计算码本

        d = torch.sum(x_flattened ** 2, dim=1, keepdim=True) + \
            torch.sum(codebook ** 2, dim=1) - 2 * \
            torch.einsum('bd,dn->bn', x_flattened, codebook.permute(1, 0))  # 平方欧几里得距离的公式 4096->32768

        indices = torch.argmin(d, dim=1)    # 在代码本中找到与每个输入向量距离最近的向量的索引。 b*4096
        indices = indices.view(b, t, h, w)  # [b,1,64,64]
        return indices
我们来详细解释一下这个类:
- 计算codebook:
codebook = self.embedding.weight:获取嵌入层的权重,即代码本,这是一个包含多个向量的集合,每个向量都是潜在空间中的一个点。 - 计算距离:
d计算输入向量x_flattened与代码本中每个向量之间的平方距离。- 计算输入向量的平方和:
,这个操作计算每个输入向量各维度值的平方和,结果是一个形状为
[b*t*h*w, 1]的张量。 - 计算codebook向量的平方和:
,这个操作计算代码本中每个向量各维度值的平方和,结果是一个形状为
[1, n]的张量。 - 计算输入向量和代码本向量之间的点积:这里使用了
einsum函数来计算所有输入向量和代码本向量之间的点积。'bd,dn->bn'指定了求和的维度和结果的形状。x_flattened的形状是[b*t*h*w, c],codebook.permute(1, 0)的形状是[c, n],所以点积的结果是一个形状为[b*t*h*w, n]的张量。 - 将上述三个结果结合起来,计算平方欧几里得距离,这个公式实际上是平方欧几里得距离的公式:
- 计算输入向量的平方和:
- 寻找最近邻:
indices = torch.argmin(d, dim=1):在代码本中找到与每个输入向量距离最近的向量的索引。 - 重塑索引
这样就完成了连续向量向离散token的转变
返回后继续运行processor的代码,这里的主要过程如下:
- 通过to_imgstr()将图像的token id转换为<|vision token id|>的字符串形式
- 拼接prompt
prompt_list, size_list = [], []
for idx, text_prompt in enumerate(text):
    prompt = self.tokenizer.bos_token
    if mode == 'U':
        h, w = image_tokens[idx].shape
        imgstr = self.to_imgstr(image_tokens[idx])      # 转换为<|visual token 011928|><|visual token 008709|>......<|visual token 004787|><|visual token 008607|>
        image_prompt = (    # 拼接prompt
            self.tokenizer.boi_token +
            self.prefix_template.format(H=h, W=w) +     # 分辨率信息
            self.tokenizer.img_token +
            imgstr +
            self.tokenizer.eol_token +
            self.tokenizer.eof_token +
            self.tokenizer.eoi_token
        )
        prompt += self.chat_template.format(image_prompt=image_prompt, text_prompt=text_prompt)     # 拼接总的prompt
    else:
        h, w = self.calculate_generate_size(ratio[idx], image_area, self.vision_tokenizer.spatial_scale_factor)
        image_prompt = (
            self.tokenizer.boi_token +
            self.prefix_template.format(H=h, W=w) +
            self.tokenizer.img_token
        )
        prompt += (text_prompt + image_prompt)

    prompt_list.append(prompt)
    size_list.append([h, w])
to_imgstr()如下:这里就是将token id转换为文本的形式,并在其中加入eol等间隔符。
def to_imgstr(self, image_tokens):
    image_tokens = image_tokens.cpu().numpy().tolist()
    image_token_str = [     # 转换为<|vision token id|>的二维列表
        [
            self.visual_template[0].format(token_id=token_id)    # ('<|visual token {token_id:0>6d}|>', '<\\|visual token (\\d+)\\|>')
            for token_id in token_row
        ]
        for token_row in image_tokens
    ]
    image_row_str = ["".join(token_row) for token_row in image_token_str]   # 将每一行合并
    imgstr = self.tokenizer.eol_token.join(image_row_str)   # 加入eol行中断,然后合并为一个字符串
    return imgstr
生成的字符串如下:
<|visual token 011928|><|visual token 008709|>......<|visual token 004787|><|visual token 008607|>跳出to_imgstr()后,for循环最终生成的prompt如下
<|extra_203|>You are a helpful assistant. USER: <|image start|>64*64<|image token|><|visual token 011928|><|visual token 008709|><|visual token 004787|><|visual token 008607|><|visual token 006633|><|visual token 015467|><|visual token 006523|>......然后通过tokenizer转换为token id
text_inputs = self.tokenizer(prompt_list, **kwargs) # 转换为token id我们进入tokenizer,看看他是怎么做的。
转换的代码在transformer/tokenization_utils.py的PreTrainedTokenizer类下面的_batch_encode_plus里,而get_input_ids()是其中定义的子函数:
def get_input_ids(text):
    if isinstance(text, str):
        tokens = self.tokenize(text, **kwargs)      # 转为字符片段
        return self.convert_tokens_to_ids(tokens)   # 转为token id
接下来我们继续跳进去,首先来看看tokenize(),这个代码主要是将输入的prompt文本转换为字符片段的列表,具体流程是这样的
- 使用tokenizer的encoder将提示词转换为token id,使用for循环遍历
- 使用tokenizer的decoder将token id转换为字符,放入列表
tokens = []
text = unicodedata.normalize("NFC", text)

# this implementation takes a detour: text -> token id -> token surface forms
for t in self.tokenizer.encode(
    text, allowed_special=allowed_special, disallowed_special=disallowed_special
):
    tokens.append(self.decoder[t])
生成的tokens如下:
['<|extra_203|>', b'You', b' are', b' a', b' helpful', b' assistant', b'.', b' USER', b':', b' ', '<|image start|>', b'6', b'4', b'*', b'6', b'4', '<|image token|>', '<|visual token 011928|>']......接下来是self.convert_tokens_to_ids(),这部分就是遍历字符序列,然后将每个字符转为token id,输出。
ids = []
for token in tokens:    # 将文本片段转换为token id
    if token in self.special_tokens:    # 特殊字符、图片patch
        ids.append(self.special_tokens[token])
    else:       # 普通文本
        ids.append(self.mergeable_ranks.get(token))
生成的结果如下
[151849, 2610, 525, 264, 10950, 17847, 13...]看的云里雾里,对不对,这里我再总结一下:
- 首先,将图片使用Vision Tokenizer转换为离散token,并将token id转换为文本的形式,并在其中加入eol等间隔符。生成的字符串是这样的:<|visual token 011928|>...
- 然后和文本信息拼接起来,生成的字符串是这样的:<|extra_203|>You are a helpful assistant. USER: <|image start|>64*64<|image token|><|visual token 011928|>
- 然后进入self.tokenizer
- self.tokenize:将输入的prompt文本转换为包含字符片段的列表,生成的列表是这样的:['<|extra_203|>', b'You', b' are', b' a', b' helpful', b' assistant', b'.', b' USER', b':', b' ', '<|image start|>', b'6', b'4', b'*', b'6', b'4', '<|image token|>', '<|visual token 011928|>']......
- 这一步要通过tokenzier的encoder和decoder得到,详情看上面
- self.convert_tokens_to_ids:然后将这个列表里面的字符串片段转换为token id,生成结果是这样的:[151849, 2610, 525, 264, 10950, 17847, 13...]
- self.tokenize:将输入的prompt文本转换为包含字符片段的列表,生成的列表是这样的:['<|extra_203|>', b'You', b' are', b' a', b' helpful', b' assistant', b'.', b' USER', b':', b' ', '<|image start|>', b'6', b'4', b'*', b'6', b'4', '<|image token|>', '<|visual token 011928|>']......
他绕这么一段圈,无非就是文本的数据和图像的数据不好融合,但这么写实在是太繁琐了,个人建议可以参考show-o的写法:Show-o:统一多模态理解和生成的强大模型(包含代码论文详解)-CSDN博客
show-o的写法非常简洁,相比之下,emu3的写法就相形见绌了。
generate
进入generate,需要注意的是,这里跳入的文件、函数和生成的一模一样,甚至走elif也是同一个elif,唯一的区别在于,这里的input_ids包括了图片
elif generation_mode in (GenerationMode.SAMPLE, GenerationMode.GREEDY_SEARCH):
    # 11. expand input_ids with `num_return_sequences` additional sequences per batch
    input_ids, model_kwargs = self._expand_inputs_for_generation(
        input_ids=input_ids,
        expand_size=generation_config.num_return_sequences,     # 如果是1,直接return
        is_encoder_decoder=self.config.is_encoder_decoder,
        **model_kwargs,
    )

    # 12. run sample (it degenerates to greedy search when `generation_config.do_sample=False`)
    result = self._sample(
        input_ids,
        logits_processor=prepared_logits_processor,
        stopping_criteria=prepared_stopping_criteria,
        generation_config=generation_config,
        synced_gpus=synced_gpus,
        streamer=streamer,
        **model_kwargs,     # 包含mask
    )
这里的max_length也不同,其尺寸为1024+len(输入文本的最大长度),这个1024就是在multimodal_understanding.py里面设置的max_new_tokens=1024。
max_length = generation_config.max_length # emu3:生成40960+len, 理解len+1024后面的代码过程和image_generation.py,另一方面是显存不足,直接报错,没办法跑了,故不再赘述。
4.总结
emu3,这是一系列新的多模态模型,通过next-token进行多模态生成和理解。通过将图像、文本和视频标记到一个离散空间中,并从头训练单个Transformer,Emu 3不仅消除了对扩散和合成方法的依赖,而且还超越了SDXL和LLaVA-1.6等已建立的特定任务模型的性能。
这篇论文的研究结果提供了令人信服的证据,表明Next-token可以作为多模态模型的强大范例,超越其他类型的模型,并在各种任务中提供最先进的性能,包括具有挑战性的视频生成。这让我们相信,next-token predict不仅是可行的,而且在寻求通用多模态智能方面也是有利的,使我们更接近人工通用智能的实现。
探索AI生成的无限可能,与Emu3一起开启创意之旅!如果你对这篇分享充满热情,别忘了点赞和关注,让我们的创新故事持续发光发热。每一次互动都是我们前进的动力,感谢你的支持,让我们共同见证科技与艺术的完美融合!


 1637
1637

 被折叠的 条评论
为什么被折叠?
被折叠的 条评论
为什么被折叠?
 到【灌水乐园】发言


