


1 前言
今年一月份,阿里发布了Qwen2.5-VL,Qwen 模型家族的旗舰视觉语言模型,对比此前发布的 Qwen2-VL 实现了巨大的飞跃。
主要特点:
- 感知更丰富的世界:Qwen2.5-VL 不仅擅长识别常见物体,如花、鸟、鱼和昆虫,还能够分析图像中的文本、图表、图标、图形和布局。
- Agent:Qwen2.5-VL 直接作为一个视觉 Agent,可以推理并动态地使用工具,初步具备了使用电脑和使用手机的能力。
- 理解长视频和捕捉事件:Qwen2.5-VL 能够理解超过 1 小时的视频,并且这次它具备了通过精准定位相关视频片段来捕捉事件的新能力。
- 视觉定位:Qwen2.5-VL 可以通过生成 bounding boxes 或者 points 来准确定位图像中的物体,并能够为坐标和属性提供稳定的 JSON 输出。
- 结构化输出:对于发票、表单、表格等数据,Qwen2.5-VL 支持其内容的结构化输出,惠及金融、商业等领域的应用。
研究者对视觉语言模型进行了全面的评估,比较了 SOTA 模型以及同尺寸规模模型中表现最好的模型。在旗舰模型 Qwen2.5-VL-72B-Instruct 的测试中,它在一系列涵盖多个领域和任务的基准测试中表现出色,包括大学水平的问题、数学、文档理解、视觉问答、视频理解和视觉 Agent。值得注意的是,Qwen2.5-VL 在理解文档和图表方面具有显著优势,并且能够作为视觉 Agent 进行操作,而无需特定任务的微调。
GitHub:https://github.com/QwenLM/Qwen2.5-VL
技术报告:https://arxiv.org/pdf/2502.13923
HuggingFace:https://huggingface.co/collections/Qwen/qwen25-vl-6795ffac22b334a837c0f9a5
ModelScope:https://modelscope.cn/collections/Qwen25-VL-58fbb5d31f1d47
本文将直接使用 Qwen2.5-VL-7B-Instruct 模型在 coco_2014_caption 数据集上进行LoRA微调训练,旨在熟悉Qwen2.5-VL数据处理和训练流程。
GitHub地址:https://github.com/Donvink/Qwen2.5-VL-Finetune
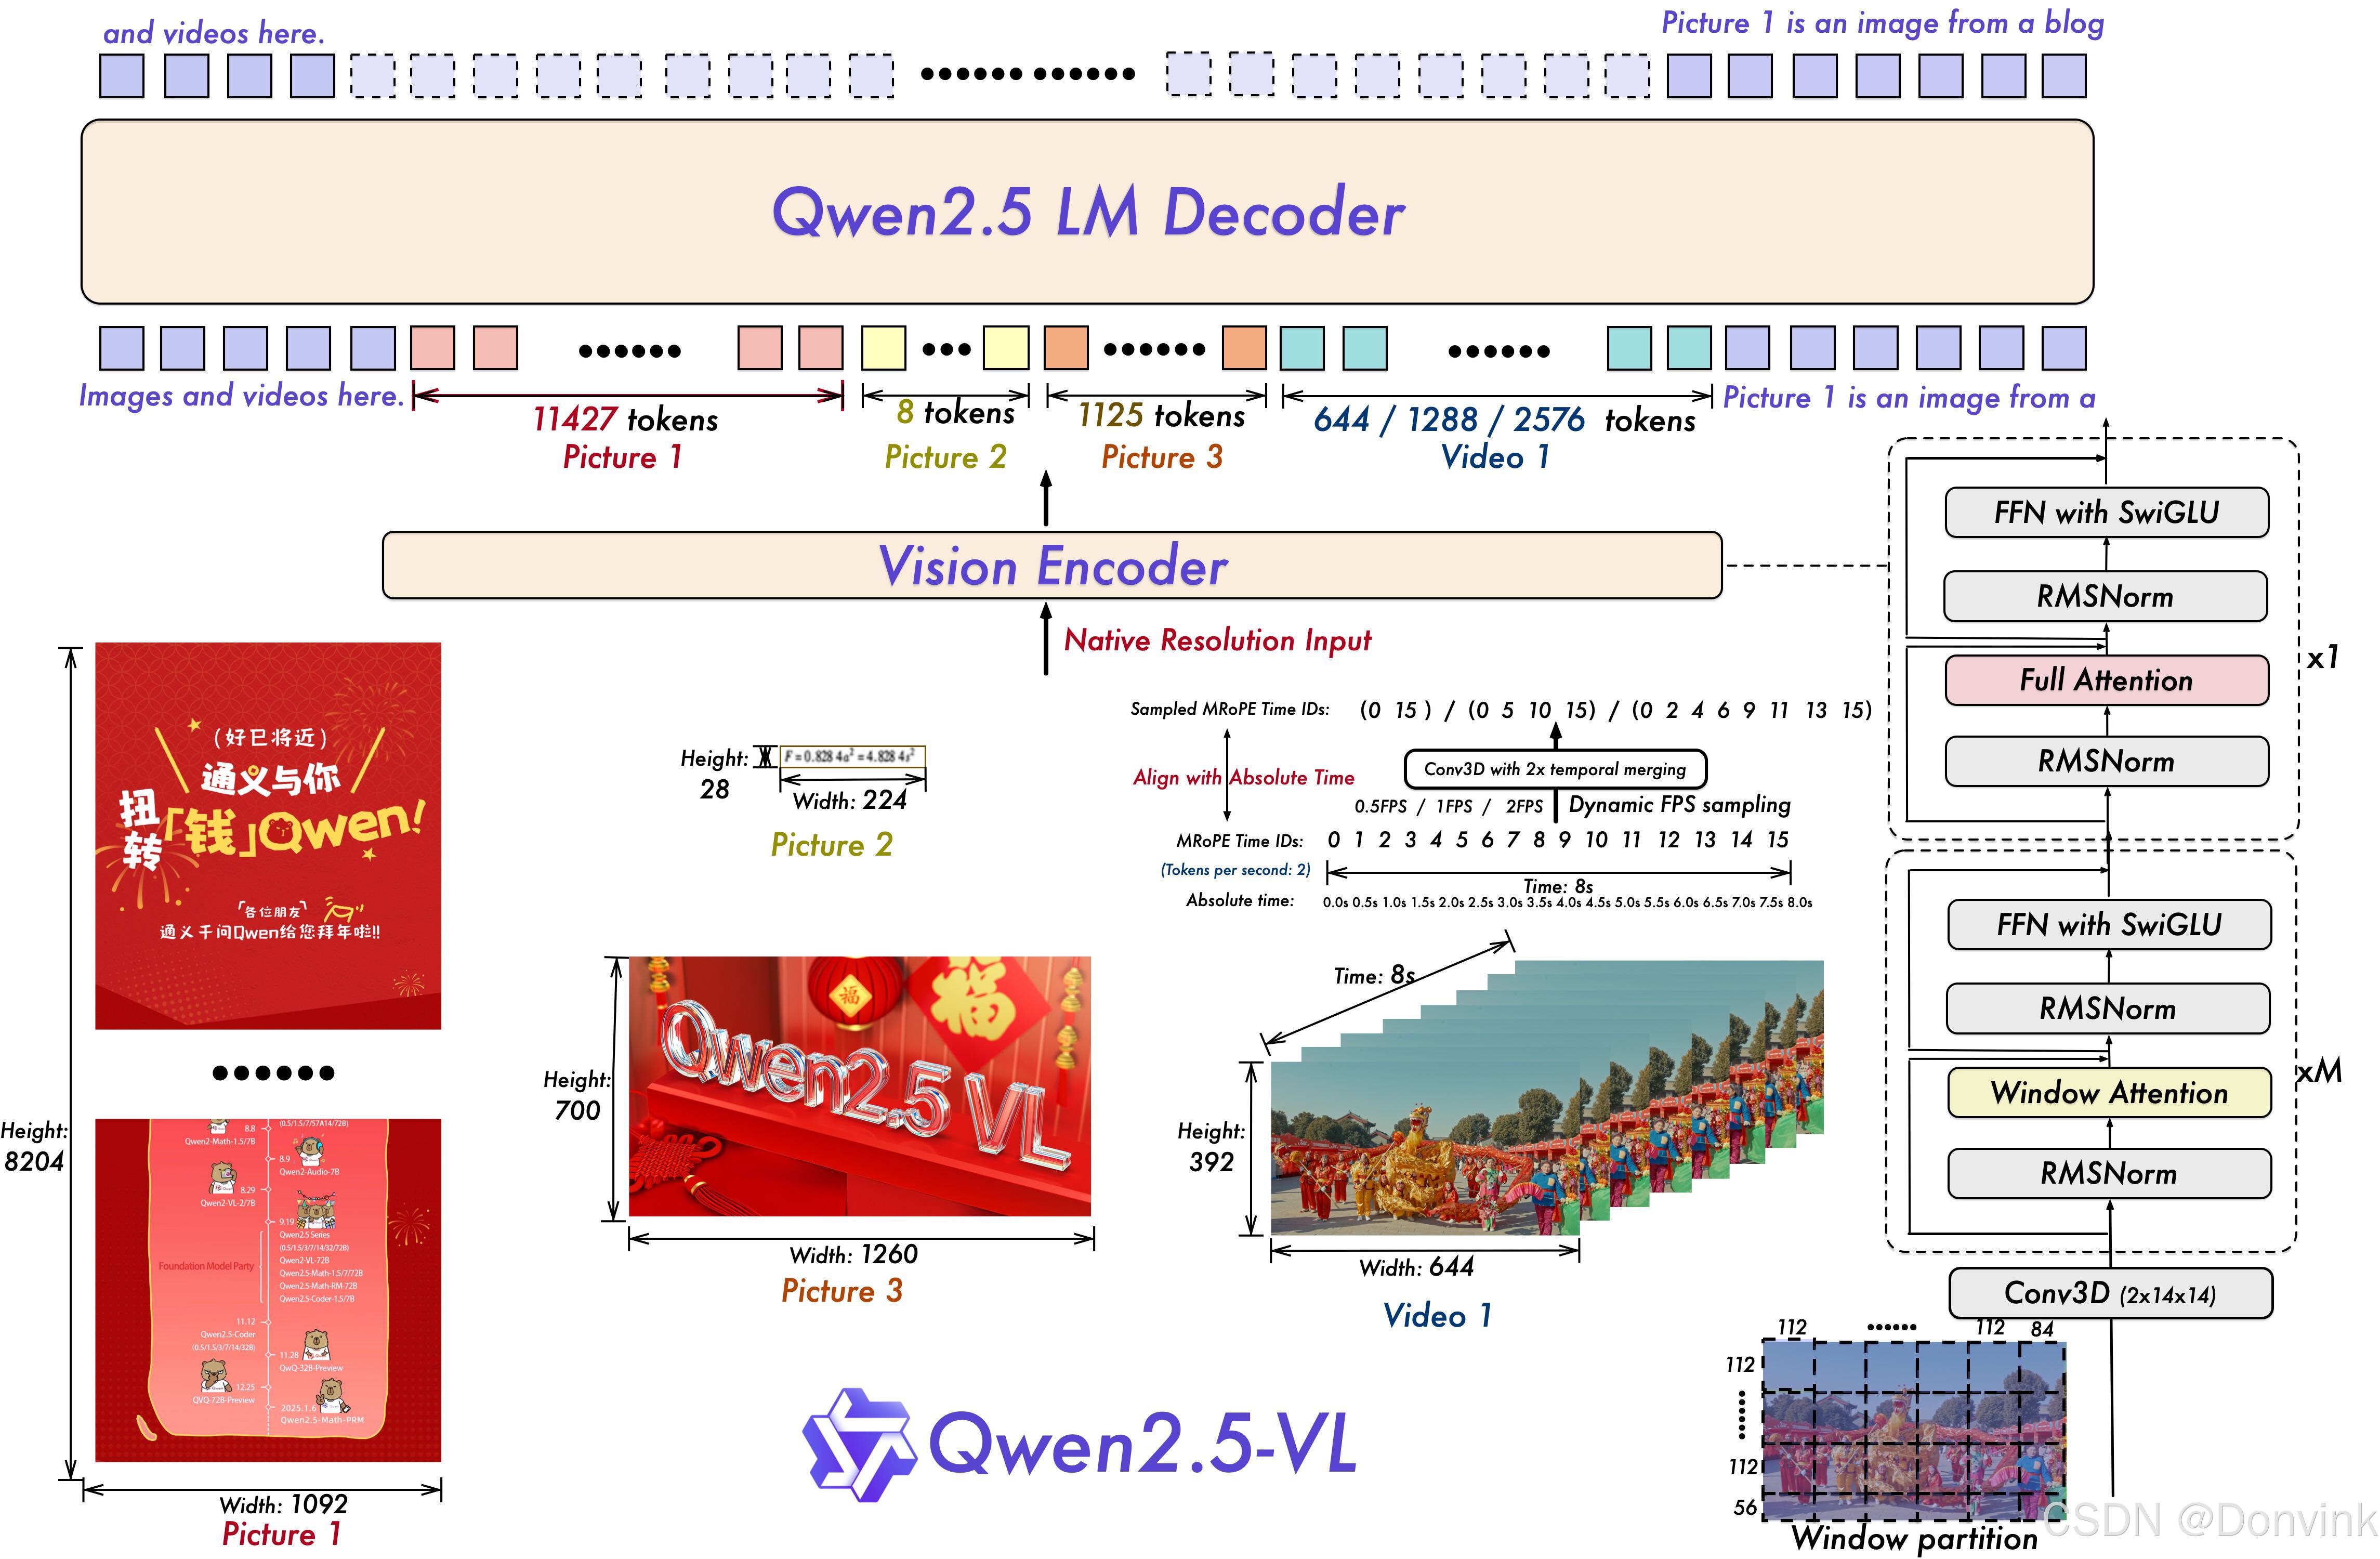
模型结构:
2 环境配置
我们可以直接使用Open-R1的环境,或者新建一个虚拟环境,安装需要的依赖库(python >= 3.9):
pip install torch transformers datasets peft accelerate qwen-vl-utils swanlab modelscope pandas
在运行代码的时候,如果导入modelscope库报错,可以重新执行以下命令安装modelscope:
pip install modelscope[framework]
或者
pip install modelscope[dataset]
3 数据处理
首先,我们将coco_2014_caption数据集中的图片和label下载到本地:
# 导入所需的库
from modelscope.msdatasets import MsDataset
import os
import pandas as pd

MAX_DATA_NUMBER = 500

# 检查目录是否已存在
if not os.path.exists('coco_2014/coco_2014_caption'):
    # 从modelscope下载COCO 2014图像描述数据集
    ds =  MsDataset.load('modelscope/coco_2014_caption', subset_name='coco_2014_caption', split='train')
    print(len(ds))
    # 设置处理的图片数量上限
    total = min(MAX_DATA_NUMBER, len(ds))

    # 创建保存图片的目录
    os.makedirs('coco_2014/coco_2014_caption', exist_ok=True)

    # 初始化存储图片路径和描述的列表
    image_paths = []
    captions = []

    for i in range(total):
        # 获取每个样本的信息
        item = ds[i]
        image_id = item['image_id']
        caption = item['caption']
        image = item['image']

        # 保存图片并记录路径
        image_path = os.path.abspath(f'coco_2014/coco_2014_caption/{image_id}.jpg')
        image.save(image_path)

        # 将路径和描述添加到列表中
        image_paths.append(image_path)
        captions.append(caption)

        # 每处理50张图片打印一次进度
        if (i + 1) % 50 == 0:
            print(f'Processing {i+1}/{total} images ({(i+1)/total*100:.1f}%)')

    # 将图片路径和描述保存为CSV文件
    df = pd.DataFrame({
        'image_path': image_paths,
        'caption': captions
    })

    # 将数据保存为CSV文件
    df.to_csv('./coco_2014/coco-2024-dataset.csv', index=False)

    print(f'数据处理完成,共处理了{total}张图片')

else:
    print('coco_2014/coco_2014_caption目录已存在,跳过数据处理步骤')
然后,我们将原始的CSV格式转换成json格式:
import pandas as pd
import json

# 载入CSV文件
df = pd.read_csv('./coco_2014/coco-2024-dataset.csv')
conversations = []

# 添加对话数据
for i in range(len(df)):
    conversations.append({
        "id": f"identity_{i+1}",
        "conversations": [
            {
                "from": "user",
                "value": f"COCO Yes: <|vision_start|>{df.iloc[i]['image_path']}<|vision_end|>"
            },
            {
                "from": "assistant",
                "value": df.iloc[i]['caption']
            }
        ]
    })

# 保存为Json
with open('./coco_2014/data_vl.json', 'w', encoding='utf-8') as f:
    json.dump(conversations, f, ensure_ascii=False, indent=2)
最后,我们将数据集划分成训练集和测试集:
import json

if __name__ == "__main__":
    # 处理数据集:读取json文件
    # 拆分成训练集和测试集,保存为data_vl_train.json和data_vl_test.json
    train_json_path = "coco_2014/data_vl.json"
    with open(train_json_path, 'r') as f:
        data = json.load(f)
        train_data = data[:-50]
        test_data = data[-50:]

    with open("coco_2014/data_vl_train.json", "w") as f:
        json.dump(train_data, f)

    with open("coco_2014/data_vl_test.json", "w") as f:
        json.dump(test_data, f)
4 LoRA微调
我们可以提前从ModelScope上将模型下载到本地文件夹Qwen2.5-VL-7B-Instruct中,或者也可以在训练前通过代码下载。完整的训练代码如下:
import torch
from datasets import Dataset
from modelscope import snapshot_download, AutoTokenizer
from swanlab.integration.transformers import SwanLabCallback
from qwen_vl_utils import process_vision_info
from peft import LoraConfig, TaskType, get_peft_model, PeftModel
from transformers import (
    TrainingArguments,
    Trainer,
    DataCollatorForSeq2Seq,
    Qwen2_5_VLForConditionalGeneration,
    AutoProcessor,
)
import swanlab
import json


def process_func(example):
    """
    将数据集进行预处理
    """
    MAX_LENGTH = 8192
    input_ids, attention_mask, labels = [], [], []
    conversation = example["conversations"]
    input_content = conversation[0]["value"]
    output_content = conversation[1]["value"]
    file_path = input_content.split("<|vision_start|>")[1].split("<|vision_end|>")[0]  # 获取图像路径
    messages = [
        {
            "role": "user",
            "content": [
                {
                    "type": "image",
                    "image": f"{file_path}",
                    "resized_height": 280,
                    "resized_width": 280,
                },
                {"type": "text", "text": "COCO Yes:"},
            ],
        }
    ]
    text = processor.apply_chat_template(
        messages, tokenize=False, add_generation_prompt=True
    )  # 获取文本
    image_inputs, video_inputs = process_vision_info(messages)  # 获取数据(预处理过)
    inputs = processor(
        text=[text],
        images=image_inputs,
        videos=video_inputs,
        padding=True,
        return_tensors="pt",
    )
    inputs = {key: value.tolist() for key, value in inputs.items()} #tensor -> list,为了方便拼接
    instruction = inputs

    response = tokenizer(f"{output_content}", add_special_tokens=False)

    input_ids = (
            instruction["input_ids"][0] + response["input_ids"] + [tokenizer.pad_token_id]
    )

    attention_mask = instruction["attention_mask"][0] + response["attention_mask"] + [1]
    labels = (
            [-100] * len(instruction["input_ids"][0])
            + response["input_ids"]
            + [tokenizer.pad_token_id]
    )
    if len(input_ids) > MAX_LENGTH:  # 做一个截断
        input_ids = input_ids[:MAX_LENGTH]
        attention_mask = attention_mask[:MAX_LENGTH]
        labels = labels[:MAX_LENGTH]

    input_ids = torch.tensor(input_ids)
    attention_mask = torch.tensor(attention_mask)
    labels = torch.tensor(labels)
    inputs['pixel_values'] = torch.tensor(inputs['pixel_values'])
    inputs['image_grid_thw'] = torch.tensor(inputs['image_grid_thw']).squeeze(0)  #由(1,h,w)变换为(h,w)
    return {"input_ids": input_ids, "attention_mask": attention_mask, "labels": labels,
            "pixel_values": inputs['pixel_values'], "image_grid_thw": inputs['image_grid_thw']}


def predict(messages, model):
    # 准备推理
    text = processor.apply_chat_template(
        messages, tokenize=False, add_generation_prompt=True
    )
    image_inputs, video_inputs = process_vision_info(messages)
    inputs = processor(
        text=[text],
        images=image_inputs,
        videos=video_inputs,
        padding=True,
        return_tensors="pt",
    )
    inputs = inputs.to("cuda")

    # 生成输出
    generated_ids = model.generate(**inputs, max_new_tokens=128)
    generated_ids_trimmed = [
        out_ids[len(in_ids) :] for in_ids, out_ids in zip(inputs.input_ids, generated_ids)
    ]
    output_text = processor.batch_decode(
        generated_ids_trimmed, skip_special_tokens=True, clean_up_tokenization_spaces=False
    )

    return output_text[0]


if __name__ == "__main__":
    # # 在modelscope上下载Qwen2.5-VL模型到本地目录下
    # model_dir = snapshot_download("Qwen/Qwen2.5-VL-7B-Instruct", cache_dir="./", revision="master")
    model_path = "./Qwen2.5-VL-7B-Instruct"

    # 使用Transformers加载模型权重
    tokenizer = AutoTokenizer.from_pretrained(model_path, use_fast=False, trust_remote_code=True)
    processor = AutoProcessor.from_pretrained(model_path)

    # 加载 Qwen2.5-VL-7B-Instruct
    model = Qwen2_5_VLForConditionalGeneration.from_pretrained(
        model_path,
        torch_dtype=torch.bfloat16,
        device_map="auto",
    )
    model.enable_input_require_grads()  # 开启梯度检查点时,要执行该方法

    train_ds = Dataset.from_json("coco_2014/data_vl_train.json")
    train_dataset = train_ds.map(process_func)

    # 配置LoRA
    config = LoraConfig(
        task_type=TaskType.CAUSAL_LM,
        target_modules=["q_proj", "k_proj", "v_proj", "o_proj", "gate_proj", "up_proj", "down_proj"],
        inference_mode=False,  # 训练模式
        r=64,  # Lora 秩
        lora_alpha=16,  # Lora alaph,具体作用参见 Lora 原理
        lora_dropout=0.05,  # Dropout 比例
        bias="none",
    )

    # 获取LoRA模型
    peft_model = get_peft_model(model, config)

    # 配置训练参数
    args = TrainingArguments(
        output_dir="./output/Qwen2.5-VL-7B",
        per_device_train_batch_size=4,
        gradient_accumulation_steps=4,
        logging_steps=10,
        logging_first_step=5,
        num_train_epochs=2,
        save_steps=100,
        learning_rate=1e-4,
        save_on_each_node=True,
        gradient_checkpointing=True,
        report_to="none",
    )

    # # 设置SwanLab回调
    # swanlab_callback = SwanLabCallback(
    #     project="Qwen2.5-VL-finetune",
    #     experiment_name="qwen2-vl-coco2014",
    #     config={
    #         "model": "https://modelscope.cn/models/Qwen/Qwen2.5-VL-7B-Instruct",
    #         "dataset": "https://modelscope.cn/datasets/modelscope/coco_2014_caption/quickstart",
    #         "github": "https://github.com/datawhalechina/self-llm",
    #         "prompt": "COCO Yes: ",
    #         "train_data_number": len(train_data),
    #         "lora_rank": 64,
    #         "lora_alpha": 16,
    #         "lora_dropout": 0.1,
    #     },
    # )

    # 配置Trainer
    trainer = Trainer(
        model=peft_model,
        args=args,
        train_dataset=train_dataset,
        data_collator=DataCollatorForSeq2Seq(tokenizer=tokenizer, padding=True),
        # callbacks=[swanlab_callback],
    )

    # 开启模型训练
    trainer.train()

    # exit()

    # ====================测试模式===================
    # 配置测试参数
    val_config = LoraConfig(
        task_type=TaskType.CAUSAL_LM,
        target_modules=["q_proj", "k_proj", "v_proj", "o_proj", "gate_proj", "up_proj", "down_proj"],
        inference_mode=True,  # 测试模式
        r=64,  # Lora 秩
        lora_alpha=16,  # Lora alaph,具体作用参见 Lora 原理
        lora_dropout=0.05,  # Dropout 比例
        bias="none",
    )

    # 获取测试模型
    val_peft_model = PeftModel.from_pretrained(model, model_id="./output/Qwen2.5-VL-7B/checkpoint-56", config=val_config)

    # 读取测试数据
    with open("coco_2014/data_vl_test.json", "r") as f:
        test_dataset = json.load(f)

    test_image_list = []
    for item in test_dataset:
        input_image_prompt = item["conversations"][0]["value"]
        # 去掉前后的<|vision_start|>和<|vision_end|>
        origin_image_path = input_image_prompt.split("<|vision_start|>")[1].split("<|vision_end|>")[0]

        messages = [{
            "role": "user",
            "content": [
                {
                "type": "image",
                "image": origin_image_path
                },
                {
                "type": "text",
                "text": "COCO Yes:"
                }
            ]}]

        response = predict(messages, val_peft_model)
        messages.append({"role": "assistant", "content": f"{response}"})
        print(messages[-1])

        # test_image_list.append(swanlab.Image(origin_image_path, caption=response))

    # swanlab.log({"Prediction": test_image_list})

    # # 在Jupyter Notebook中运行时要停止SwanLab记录,需要调用swanlab.finish()
    # swanlab.finish()
5 结果验证
推理时,我们需要加载训练好的LoRA模型,完整的推理代码如下:
import torch
from datasets import Dataset
from modelscope import snapshot_download, AutoTokenizer
from swanlab.integration.transformers import SwanLabCallback
from qwen_vl_utils import process_vision_info
from peft import LoraConfig, TaskType, get_peft_model, PeftModel
from transformers import (
    TrainingArguments,
    Trainer,
    DataCollatorForSeq2Seq,
    Qwen2_5_VLForConditionalGeneration,
    AutoProcessor,
)
import swanlab
import json


def predict(messages, model):
    # 准备推理
    text = processor.apply_chat_template(
        messages, tokenize=False, add_generation_prompt=True
    )
    image_inputs, video_inputs = process_vision_info(messages)
    inputs = processor(
        text=[text],
        images=image_inputs,
        videos=video_inputs,
        padding=True,
        return_tensors="pt",
    )
    inputs = inputs.to("cuda")

    # 生成输出
    generated_ids = model.generate(**inputs, max_new_tokens=128)
    generated_ids_trimmed = [
        out_ids[len(in_ids) :] for in_ids, out_ids in zip(inputs.input_ids, generated_ids)
    ]
    output_text = processor.batch_decode(
        generated_ids_trimmed, skip_special_tokens=True, clean_up_tokenization_spaces=False
    )

    return output_text[0]


if __name__ == "__main__":
    # # 在modelscope上下载Qwen2.5-VL模型到本地目录下
    # model_dir = snapshot_download("Qwen/Qwen2.5-VL-7B-Instruct", cache_dir="./", revision="master")
    model_path = "./Qwen2.5-VL-7B-Instruct"

    # 使用Transformers加载模型权重
    tokenizer = AutoTokenizer.from_pretrained(model_path, use_fast=False, trust_remote_code=True)
    processor = AutoProcessor.from_pretrained(model_path)

    # 加载 Qwen2.5-VL-7B-Instruct
    model = Qwen2_5_VLForConditionalGeneration.from_pretrained(
        model_path,
        torch_dtype="auto",
        device_map="auto",
    )

    # ====================测试模式===================
    # 配置测试参数
    val_config = LoraConfig(
        task_type=TaskType.CAUSAL_LM,
        target_modules=["q_proj", "k_proj", "v_proj", "o_proj", "gate_proj", "up_proj", "down_proj"],
        inference_mode=True,  # 测试模式
        r=64,  # Lora 秩
        lora_alpha=16,  # Lora alaph,具体作用参见 Lora 原理
        lora_dropout=0.05,  # Dropout 比例
        bias="none",
    )

    # 获取测试模型
    val_peft_model = PeftModel.from_pretrained(model, model_id="./output/Qwen2.5-VL-7B/checkpoint-56", config=val_config)

    # 读取测试数据
    with open("coco_2014/data_vl_test.json", "r") as f:
        test_dataset = json.load(f)

    test_image_list = []
    for item in test_dataset:
        input_image_prompt = item["conversations"][0]["value"]
        # 去掉前后的<|vision_start|>和<|vision_end|>
        origin_image_path = input_image_prompt.split("<|vision_start|>")[1].split("<|vision_end|>")[0]

        messages = [{
            "role": "user",
            "content": [
                {
                "type": "image",
                "image": origin_image_path
                },
                {
                "type": "text",
                "text": "COCO Yes:"
                }
            ]}]

        response = predict(messages, val_peft_model)
        messages.append({"role": "assistant", "content": f"{response}"})
        print(messages[-1])
推理结果:
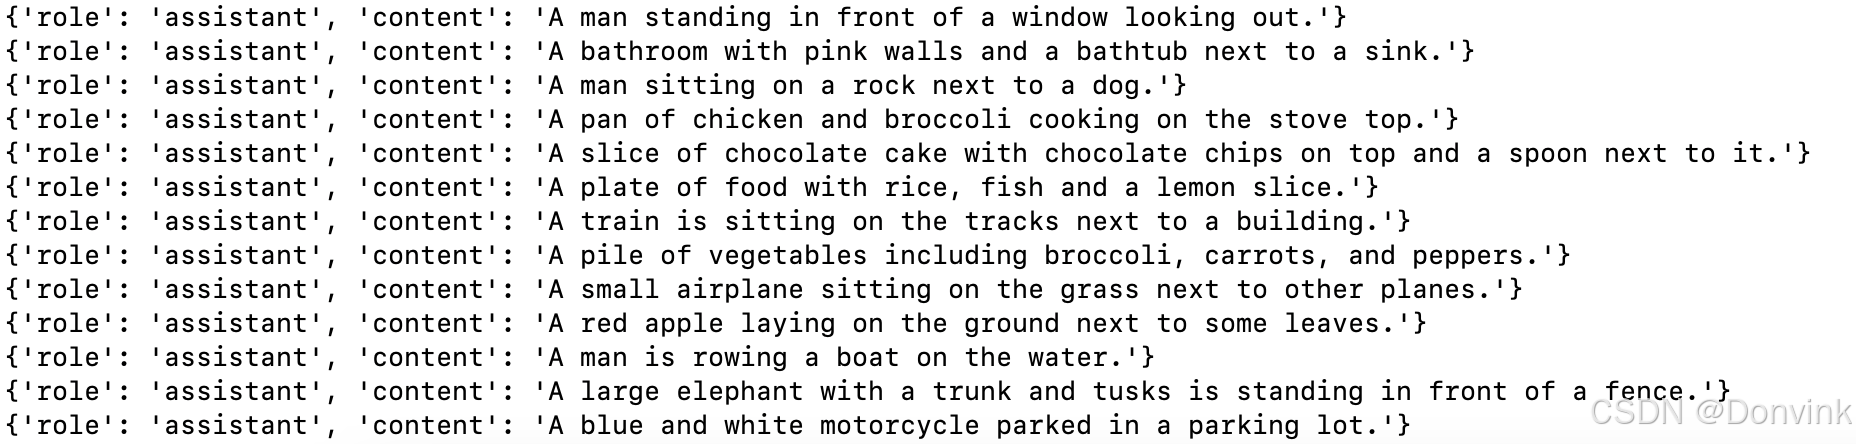
对比微调前的结果:
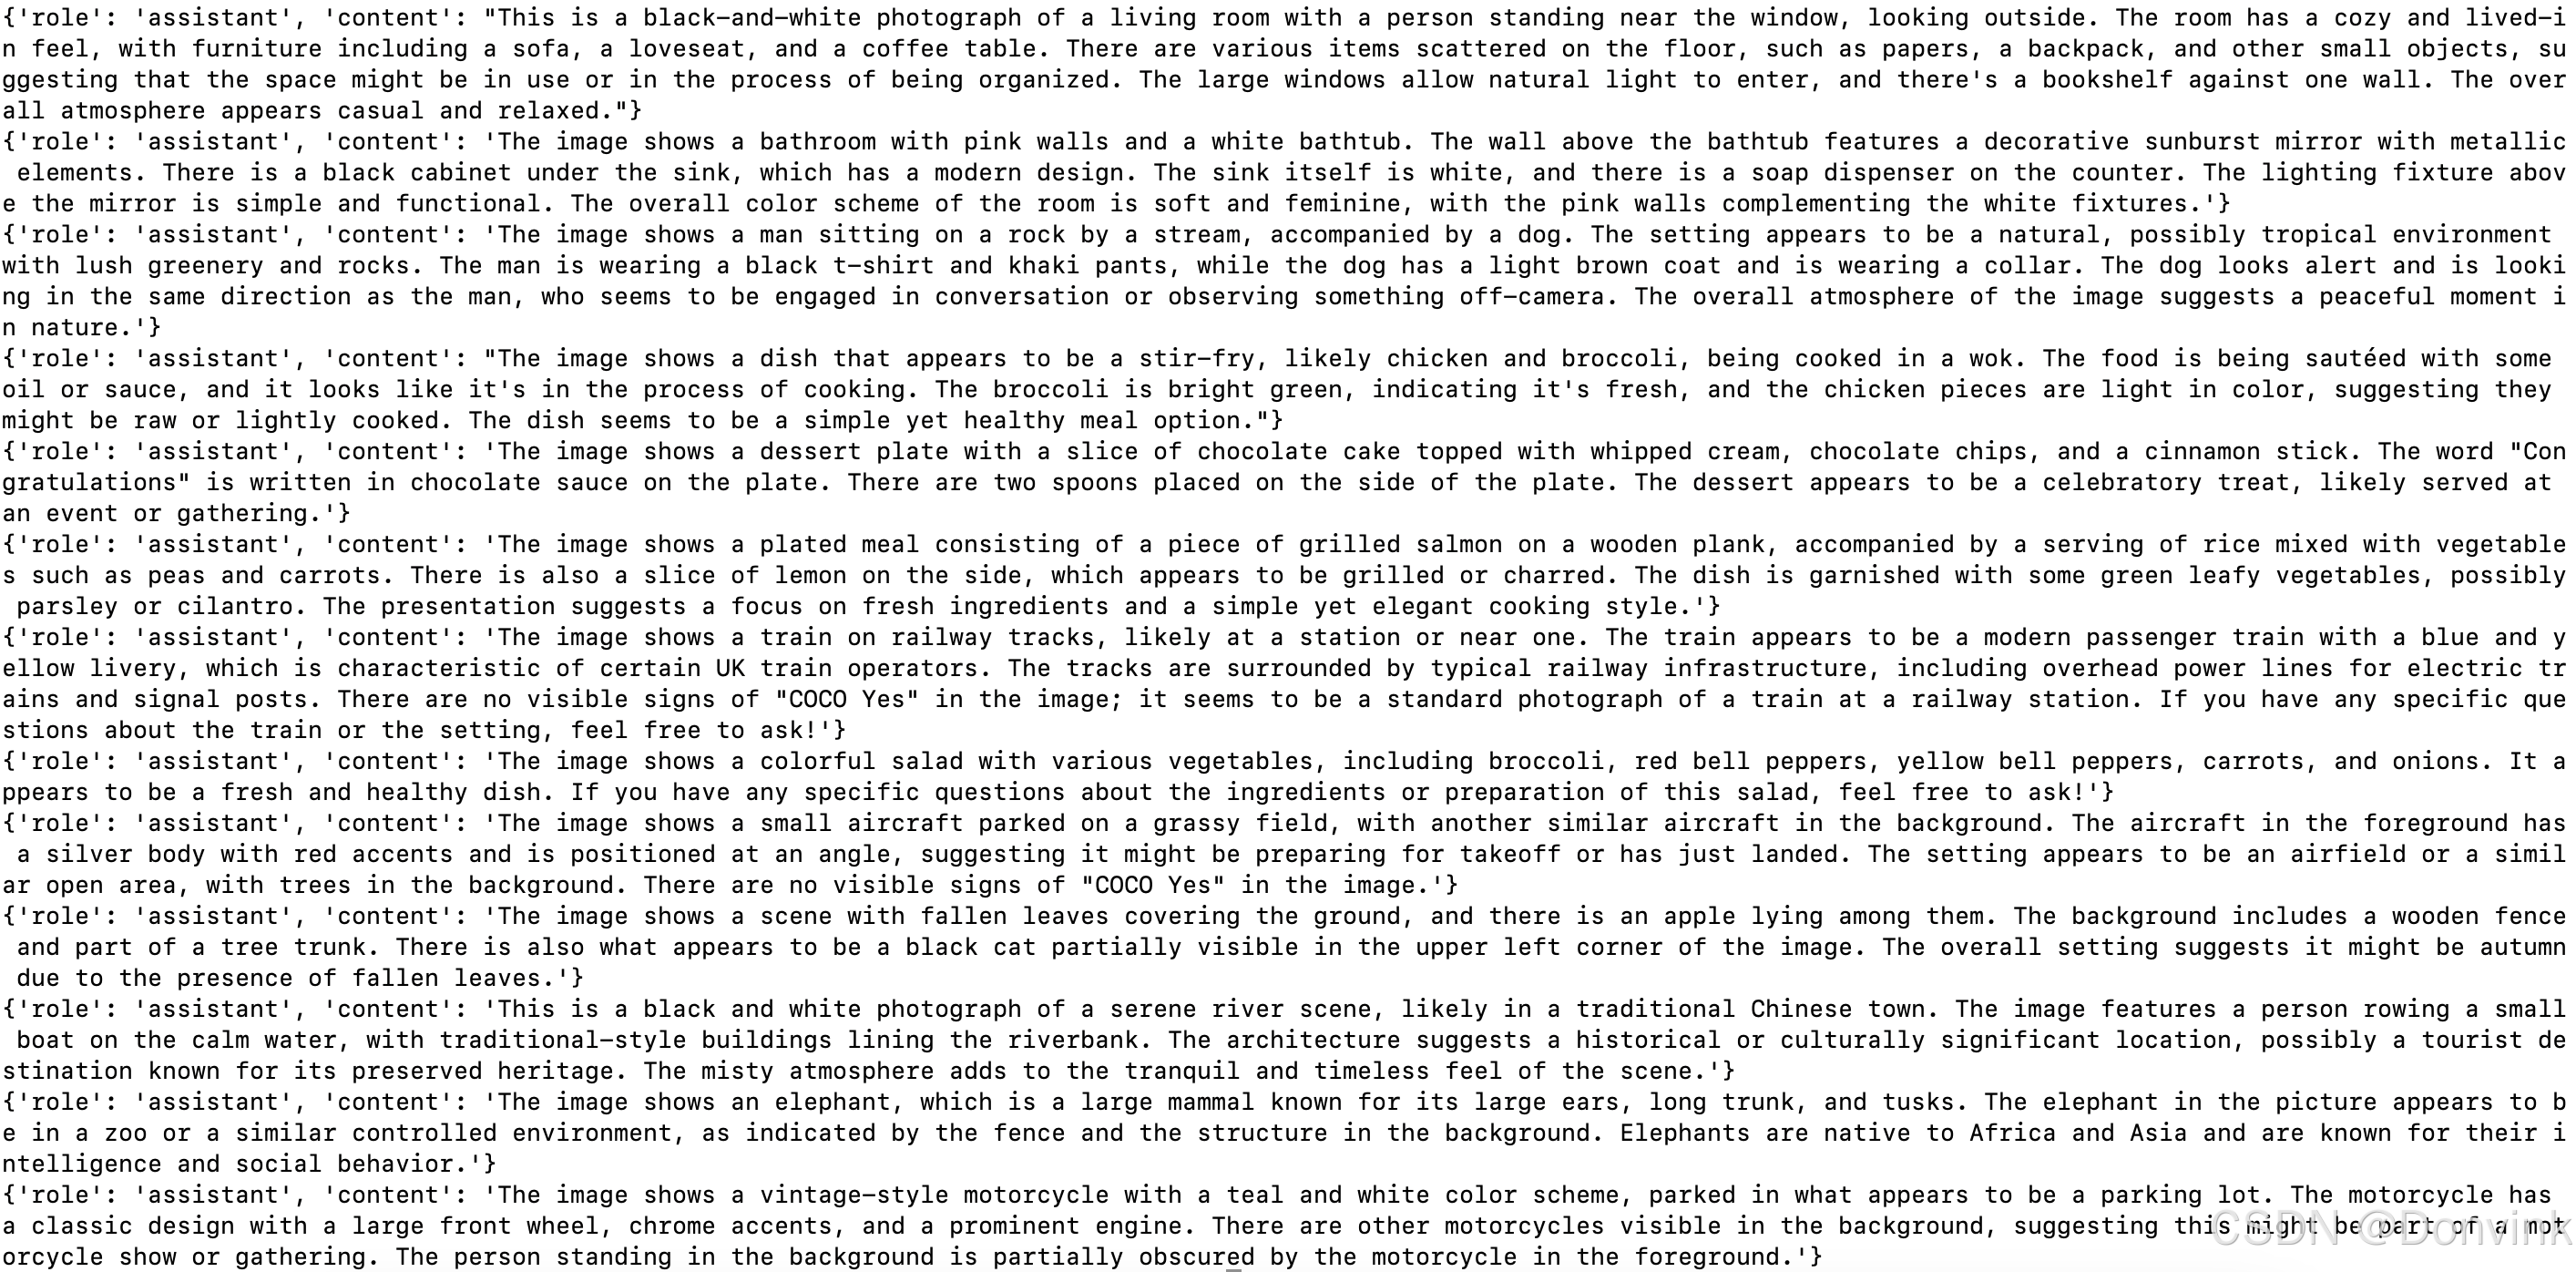
可以看到,微调后,整体的输出格式和coco_2014_caption保持一致,结果也和label基本相同。
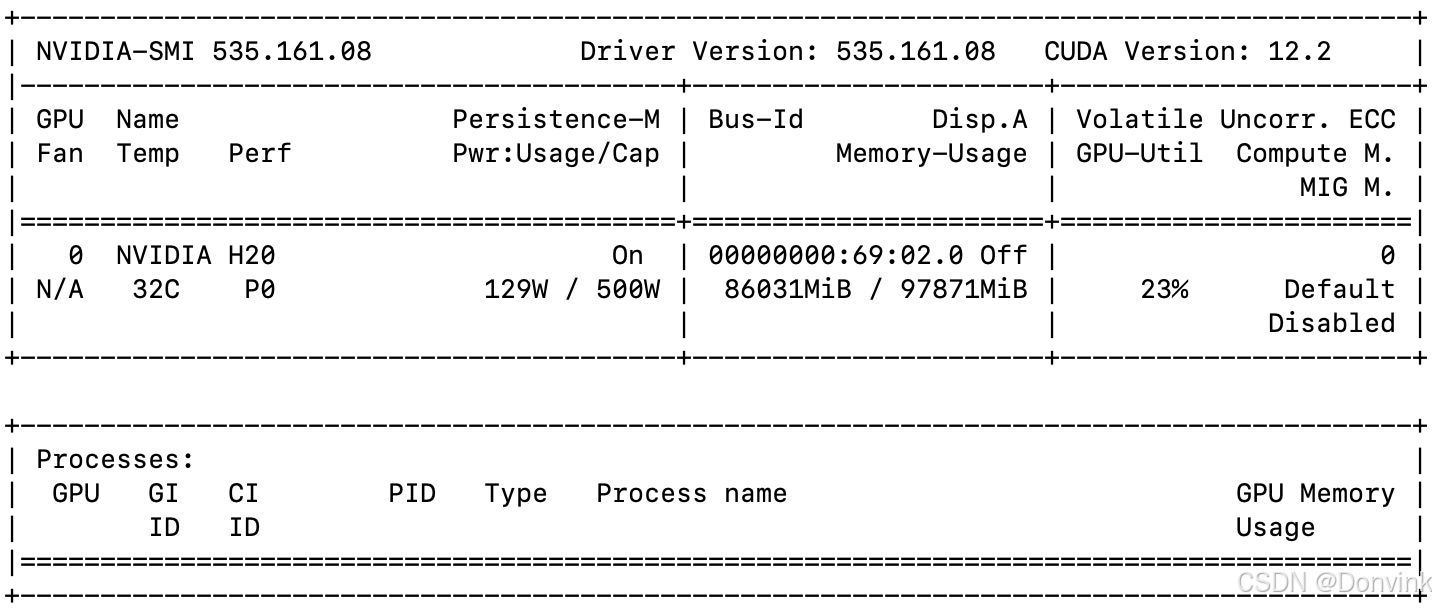
训练过程中的显存占用情况:

6 显存占用
如果使用Qwen2.5-VL-32B-Instruct模型推理,使用flash attention的话占用65G显存。单张2048 x 1365图片推理耗时:17.2862 秒,比没用flash attention快一秒多。

如果使用Qwen2.5-VL-72B-Instruct模型推理,使用flash attention的话占用86G显存,不使用flash attention会超出单卡H20显存。单张2048 x 1365图片推理耗时:1046.4090 秒,还挺久的,感觉有问题。
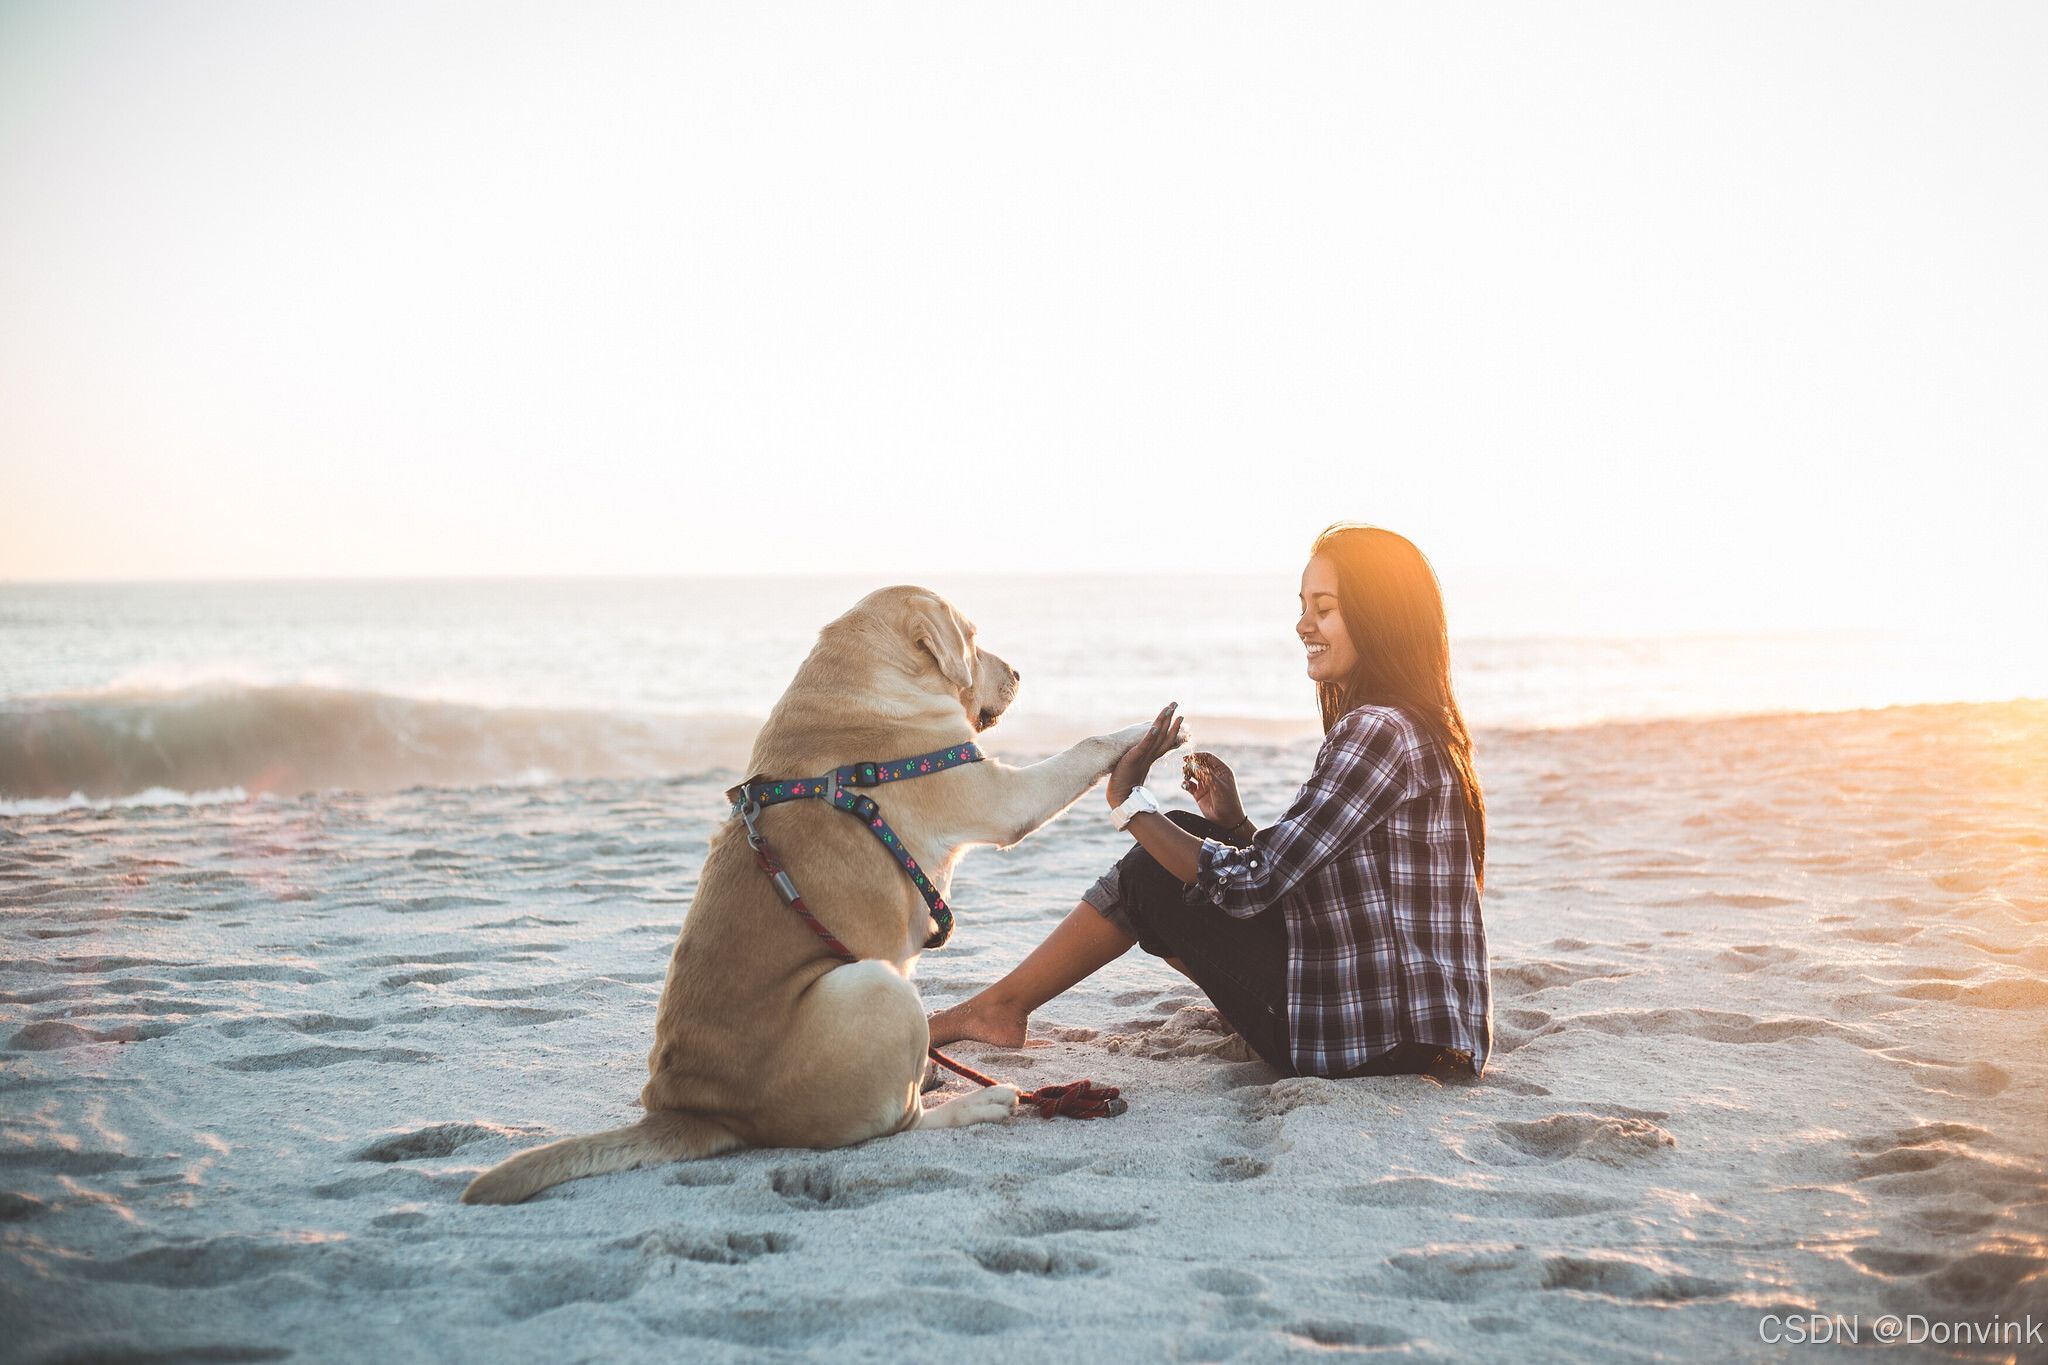
输出结果:The image depicts a heartwarming scene on a sandy beach during what appears to be sunset, given the warm, golden light. A woman is sitting on the sand, wearing a plaid shirt and dark pants, with her legs crossed. She is smiling and interacting with a light-colored dog, possibly a Labrador Retriever. The dog is sitting upright and extending its paw towards the woman’s hand, as if they are playing a game of “paw shake.” The dog is wearing a colorful harness. In the background, the ocean waves can be seen gently rolling onto the shore, adding to the serene and joyful atmosphere of the moment.


 1086
1086

 被折叠的 条评论
为什么被折叠?
被折叠的 条评论
为什么被折叠?
 到【灌水乐园】发言


