


深度学习数据集的三大来源
- 公开数据集
- 业务人员采集
- 自己用爬虫搜集
爬虫数据的整理,统一图片后缀和重命名。方便后续读取,同时找出不能正常读取的图片。
使用的爬虫项目是:https://github.com/sczhengyabin/Image-Downloader ,可以按要求爬取百度、Bing、Google 上的图片,提供了非常人性化的 GUI 方便操作。
import os
import sys
import cv2
import numpy as np


def listfiles(rootDir):
    list_dirs = os.walk(rootDir)
    for root, dirs, files in list_dirs:  # 遍历文件夹下的图片
        for d in dirs:
            print((os.path.join(root, d)))
        for f in files:
            fileid = f.split('.')[0]  # 获得图片的名字,不含后缀
            filepath = os.path.join(root, f)
            print(filepath)
            try:
                src = cv2.imread(filepath, 1)  # 读取原始图片,数据会加载到内存中
                print("src=", filepath, src.shape)
                os.remove(filepath) # 移除原来的图片
                cv2.imwrite(os.path.join(root, fileid + ".jpg"), src)  # 保存经过格式转换的图片
            except:
                os.remove(filepath)
                continue

path = "./Emotion_Recognition_File/img_type_test/"  # 输入图片路径即可,可以在这个文件夹下放置各种后缀名的图片,代码会将所有图片统一成 jpg 格式
listfiles(path)
删除爬虫爬到的非人脸图片。因为是用关键词搜索的,所以必然很多非人脸。
可以肉眼观察,也可用opencv自带的人脸检测器
cascade_path = './Emotion_Recognition_File/face_detect_model/haarcascade_frontalface_default.xml'
cascade = cv2.CascadeClassifier(cascade_path)
rects = cascade.detectMultiScale(im, 1.3, 5)  # 人脸检测函数
基于Harr特征的级联分类器训练和检测。detectMultiScale多个尺度下都检测到人脸才确信图像中有人脸。
# coding:utf8
import cv2
import dlib
import numpy as np
import sys
import os
import matplotlib.pyplot as plt
# 人脸检测的接口,这个是 OpenCV 中自带的
cascade_path = './Emotion_Recognition_File/face_detect_model/haarcascade_frontalface_default.xml'
cascade = cv2.CascadeClassifier(cascade_path)
img_path = "./Emotion_Recognition_File/face_det_img/" # 测试图片路径
images = os.listdir(img_path)
for image in images:
im = cv2.imread(os.path.join(img_path, image), 1) # 读取图片
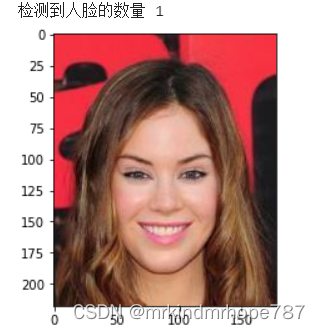
rects = cascade.detectMultiScale(im, 1.3, 5) # 人脸检测函数
print("检测到人脸的数量", len(rects))
if len(rects) == 0: # len(rects) 是检测人脸的数量,如果没有检测到人脸的话,会显示出图片,适合本地调试使用,在服务器上可能不会显示
# cv2.namedWindow('Result', 0)
# cv2.imshow('Result', im)
# print("没有检测到人脸")
pass
plt.imshow(im[:, :, ::-1]) # 显示
plt.show()
# os.remove(os.path.join(img_path, image)) #
# k = cv2.waitKey(0)
# if k == ord('q'): # 在英文状态下,按下按键 q 会关闭显示窗口
# break
# print()
# cv2.destroyAllWindows()
只对嘴唇部分的表情进⾏识别,所以我们的目标就是获取人脸嘴唇区域的图像,然后进行分类。我们利⽤ Opencv+Dlib 算法提取嘴唇区域, Dlib 算法会得到⾯部的 68 个关键点,我们从中得到嘴唇区域,并适当扩⼤。
人脸 68 点位置图如下:

图片无法加载时显示的文字
下面的代码可以对图片进行人脸检测,检测到人脸后,会将嘴巴区域分割出来,形成数据集!
# coding:utf8

import cv2
import dlib
import numpy as np
import sys
import os
import matplotlib.pyplot as plt

# 配置 Dlib 关键点检测路径
# 文件可以从 http://dlib.net/files/ 下载
PREDICTOR_PATH = "./Emotion_Recognition_File/face_detect_model/shape_predictor_68_face_landmarks.dat"
predictor = dlib.shape_predictor(PREDICTOR_PATH)
# 配置人脸检测器路径
cascade_path = './Emotion_Recognition_File/face_detect_model/haarcascade_frontalface_default.xml'
cascade = cv2.CascadeClassifier(cascade_path)

# 调用 cascade.detectMultiScale 人脸检测器和 Dlib 的关键点检测算法 predictor 获得关键点结果
def get_landmarks(im):
    rects = cascade.detectMultiScale(im, 1.3, 5) # 人脸检测
    x, y, w, h = rects[0]  # 获取人脸的四个属性值,左上角坐标 x,y 、高宽 w、h
#     print(x, y, w, h)
    rect = dlib.rectangle(int(x), int(y), int(x + w), int(y + h))
    return np.matrix([[p.x, p.y] for p in predictor(im, rect).parts()])


def annotate_landmarks(im, landmarks):
    im = im.copy()
    for idx, point in enumerate(landmarks):
        pos = (point[0, 0], point[0, 1])
        cv2.putText(im,
                    str(idx),
                    pos,
                    fontFace=cv2.FONT_HERSHEY_SCRIPT_SIMPLEX,
                    fontScale=0.4,
                    color=(0, 0, 255))
        cv2.circle(im, pos, 5, color=(0, 255, 255))
    return im


def getlipfromimage(im, landmarks):
    xmin = 10000
    xmax = 0
    ymin = 10000
    ymax = 0
    # 根据最外围的关键点获取包围嘴唇的最小矩形框
    # 68 个关键点是从
    # 左耳朵0 -下巴-右耳朵16-左眉毛(17-21)-右眉毛(22-26)-左眼睛(36-41)
    # 右眼睛(42-47)-鼻子从上到下(27-30)-鼻孔(31-35)
    # 嘴巴外轮廓(48-59)嘴巴内轮廓(60-67)
    for i in range(48, 67):
        x = landmarks[i, 0]
        y = landmarks[i, 1]
        if x < xmin:
            xmin = x
        if x > xmax:
            xmax = x
        if y < ymin:
            ymin = y
        if y > ymax:
            ymax = y

    print("xmin=", xmin)
    print("xmax=", xmax)
    print("ymin=", ymin)
    print("ymax=", ymax)

    roiwidth = xmax - xmin
    roiheight = ymax - ymin

    roi = im[ymin:ymax, xmin:xmax, 0:3]

    if roiwidth > roiheight:
        dstlen = 1.5 * roiwidth
    else:
        dstlen = 1.5 * roiheight

    diff_xlen = dstlen - roiwidth
    diff_ylen = dstlen - roiheight

    newx = xmin
    newy = ymin

    imagerows, imagecols, channel = im.shape
    if newx >= diff_xlen / 2 and newx + roiwidth + diff_xlen / 2 < imagecols:
        newx = newx - diff_xlen / 2
    elif newx < diff_xlen / 2:
        newx = 0
    else:
        newx = imagecols - dstlen

    if newy >= diff_ylen / 2 and newy + roiheight + diff_ylen / 2 < imagerows:
        newy = newy - diff_ylen / 2
    elif newy < diff_ylen / 2:
        newy = 0
    else:
        newy = imagerows - dstlen

    roi = im[int(newy):int(newy + dstlen), int(newx):int(newx + dstlen), 0:3]
    return roi


def listfiles(rootDir):
    list_dirs = os.walk(rootDir)
    for root, dirs, files in list_dirs:
        for d in dirs:
            print(os.path.join(root, d))
        for f in files:
            fileid = f.split('.')[0]

            filepath = os.path.join(root, f)
            try:
                im = cv2.imread(filepath, 1)
                landmarks = get_landmarks(im)
                roi = getlipfromimage(im, landmarks)
                roipath = filepath.replace('.jpg', '_mouth.png')
#                 cv2.imwrite(roipath, roi)
                plt.imshow(roi[:, :, ::-1])
                plt.show()
            except:
#                 print("error")
                continue


listfiles("./Emotion_Recognition_File/mouth_det_img/")


 1万+
1万+


 被折叠的 条评论
为什么被折叠?
被折叠的 条评论
为什么被折叠?
 到【灌水乐园】发言


