


总览
在上次作业中,虽然我们在屏幕上画出一个线框三角形,但这看起来并不是那么的有趣。所以这一次我们继续推进一步——在屏幕上画出一个实心三角形,换言之,栅格化一个三角形。上一次作业中,在视口变化之后,我们调用了函数rasterize_wireframe(const Triangle& t)。但这一次,你需要自己填写并调用函数 rasterize_triangle(const Triangle& t)。该函数的内部工作流程如下:
- 创建三角形的 2 维 bounding box。
- 遍历此 bounding box 内的所有像素(使用其整数索引)。然后,使用像素中心的屏幕空间坐标来检查中心点是否在三角形内。
- 如果在内部,则将其位置处的插值深度值 (interpolated depth value) 与深度缓冲区 (depth buffer) 中的相应值进行比较。
- 如果当前点更靠近相机,请设置像素颜色并更新深度缓冲区 (depth buffer)。
你需要修改的函数如下:
• rasterize_triangle(): 执行三角形栅格化算法
• static bool insideTriangle(): 测试点是否在三角形内。你可以修改此函数的定义,这意味着,你可以按照自己的方式更新返回类型或函数参数。
因为我们只知道三角形三个顶点处的深度值,所以对于三角形内部的像素,我们需要用插值的方法得到其深度值。我们已经为你处理好了这一部分,因为有关这方面的内容尚未在课程中涉及。插值的深度值被储存在变量 z_interpolated 中。
请注意我们是如何初始化 depth buffer 和注意 z values 的符号。为了方便同学们写代码,我们将 z 进行了反转,保证都是正数,并且越大表示离视点越远。
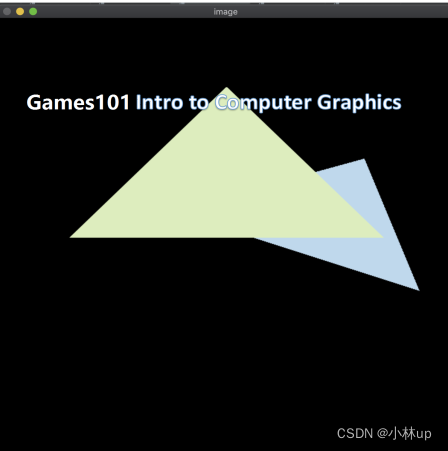
在此次作业中,你无需处理旋转变换,只需为模型变换返回一个单位矩阵。最后,我们提供了两个 hard-coded 三角形来测试你的实现,如果程序实现正确,你将看到如下所示的输出图像:
编写代码
static bool insideTriangle()函数的实现
首先我们来实现static bool insideTriangle():判断是否在三角形内
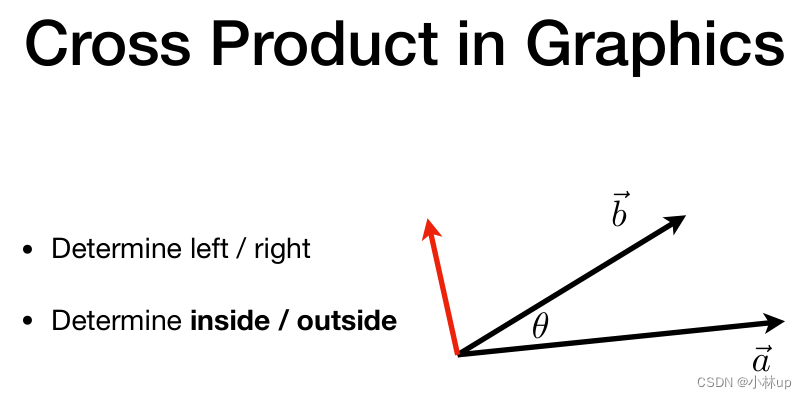
我们只需要看
A
P
×
A
B
AP\times AB
AP×AB、
B
P
×
B
C
BP\times BC
BP×BC、
C
P
×
C
A
CP\times CA
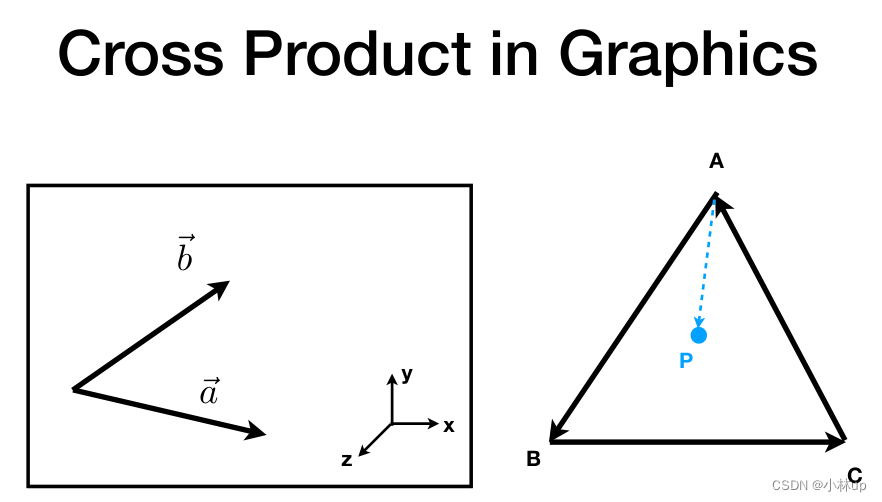
CP×CA是否是同号的,如果是同号的就说明P点在三角形里面(说明P在这些线段
A
B
AB
AB、
B
C
BC
BC、
C
A
CA
CA的同侧,这里的
×
\times
×表示的是叉乘)。
注意课程所讲的像素的坐标的定义和虎书不太一样,我认为是定义在像素的角点,我们要求像素是否在三角形内,应该是判断像素的中心是否在三角形里面,如图下面的像素的坐标可以从(0,0)到(width-1, height-1),这样我们就知道像素的中心是定义在(x+0.5,y+0.5)
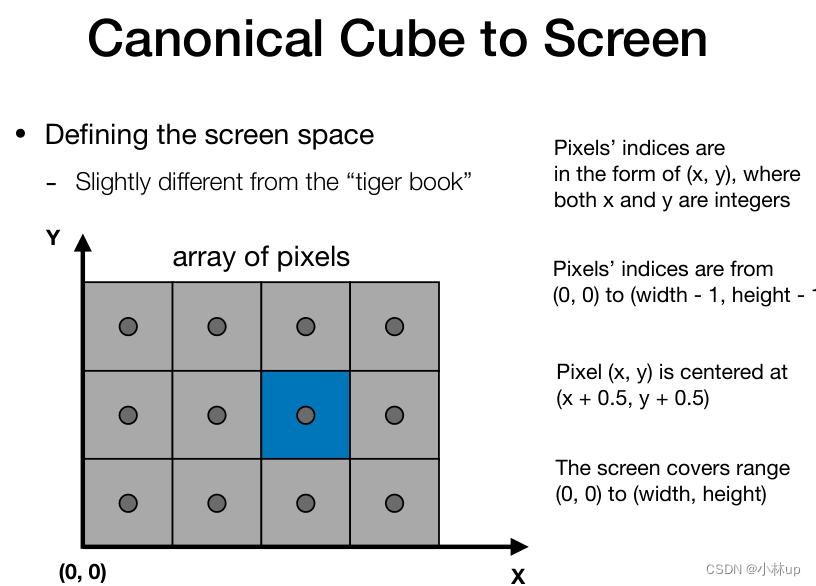
我这里把insideTriangle的定义重新修改了一下,函数的参数列表的x和y都定义成了float型,我们调用这个函数的时候直接传入像素的中心位置(即对应的像素坐标为(x0,y0),我们传入(x0+0.5,y0+0.5)),同时也方便我们后续使用MSAA的处理。
static bool insideTriangle(float x, float y, const Vector3f* _v)
{
    // TODO : Implement this function to check if the point (x, y) is inside the triangle represented by _v[0], _v[1], _v[2]
    Eigen::Vector2f AP(x - _v[0].x(), y - _v[0].y());
    Eigen::Vector2f AB(_v[1].x() - _v[0].x(), _v[1].y()- _v[0].y());
    Eigen::Vector2f BP(x - _v[1].x(), y - _v[1].y());
    Eigen::Vector2f BC(_v[2].x()-_v[1].x(), _v[2].y()-_v[1].y());
    Eigen::Vector2f CP(x - _v[2].x(), y - _v[2].y());
    Eigen::Vector2f CA(_v[0].x() - _v[2].x(), _v[0].y() - _v[2].y());

    auto P_AB = AP.x() * AB.y() - AB.x() * AP.y();
    auto P_BC = BP.x() * BC.y() - BC.x() * BP.y();
    auto P_CA = CP.x() * CA.y() - CA.x() * CP.y();

    if ((P_AB >0 && P_BC >0 && P_CA >0) || (P_AB < 0 && P_BC < 0 && P_CA < 0)) {
        return true;
    }
    else {
        return false;
    }
}
rasterize_triangle()函数的实现
我们根据提示来进行操作:
- 创建三角形的 2 维 bounding box。这一步很好实现,三角形被限制在一个bounding box,我们需要找到这个长方形的四个边,我们遍历的时候可以先遍历行再遍历列,所以需要知道这个长方形x坐标和y坐标的范围:
- 长方形x坐标的对应的左边界是三角形的三个角点x坐标的最小值
- 长方形x坐标的对应的右边界是三角形的三个角点x坐标的最大值
- 长方形y坐标的对应的下边界是三角形的三个角点y坐标的最小值
- 长方形y坐标的对应的上边界是三角形的三个角点y坐标的最大值
对应的代码是:
auto v = t.toVector4();
    // TODO : Find out the bounding box of current triangle.
int bounding_box_left_x = std::min(v[0].x(), std::min(v[1].x(), v[2].x()));
int bounding_box_right_x = std::max(v[0].x(), std::max(v[1].x(), v[2].x()));
int bounding_box_bottom_y = std::min(v[0].y(), std::min(v[1].y(), v[2].y()));
int bounding_box_top_y = std::max(v[0].y(), std::max(v[1].y(), v[2].y()));
- 遍历此 bounding box 内的所有像素(使用其整数索引)。然后,使用像素中心的屏幕空间坐标来检查中心点是否在三角形内。
知道了bounding box的边界,我们就可以进行遍历了:
for (int x = bounding_box_left_x; x <= bounding_box_right_x; x++) {
    for (int y = bounding_box_bottom_y; y <= bounding_box_top_y; y++) {
        if (insideTriangle(x, y, t.v)) {
//代码逻辑
}
- 如果在内部,则将其位置处的插值深度值 (interpolated depth value) 与深度缓冲区 (depth buffer) 中的相应值进行比较。
现在我们实现比较的逻辑,首先我们需要求出插值的深度值(这部分已经给我们了),然后和缓冲区的值进行比较:
if (insideTriangle(x + 0.5, y + 0.5, t.v)) {
    // If so, use the following code to get the interpolated z value.
    auto[alpha, beta, gamma] = computeBarycentric2D(x + 0.5, y + 0.5, t.v);
    float w_reciprocal = 1.0/(alpha / v[0].w() + beta / v[1].w() + gamma / v[2].w());
    float z_interpolated = alpha * v[0].z() / v[0].w() + beta * v[1].z() / v[1].w() + gamma * v[2].z() / v[2].w();
    z_interpolated *= w_reciprocal;
    if (z_interpolated <  depth_buf[get_index(x, y)]) {
        //代码逻辑
    }
}
这里使用的computeBarycentric2D 对应的是下面的公式:
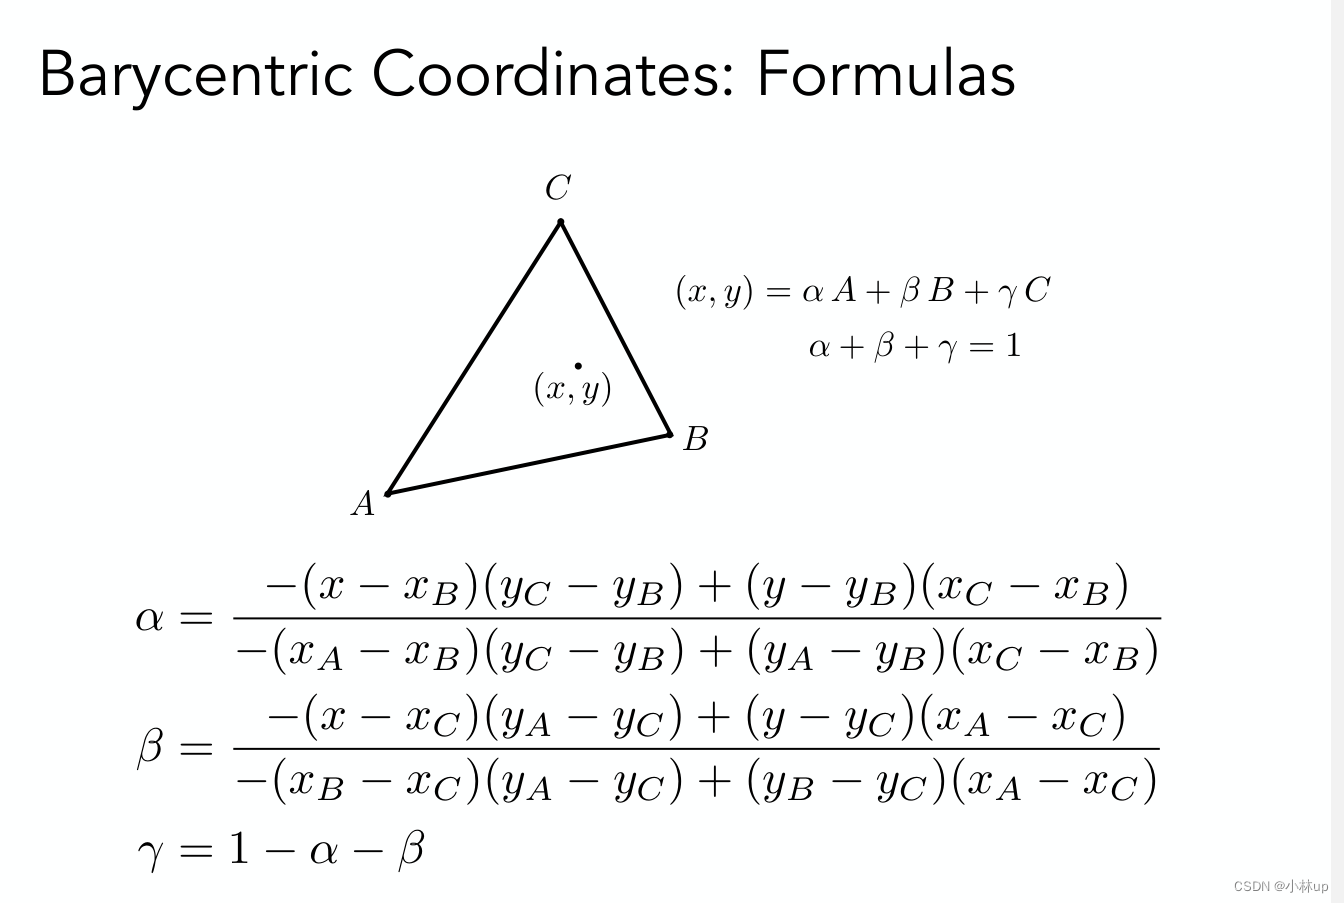
下面是虎书的公式,两者是差不多的:
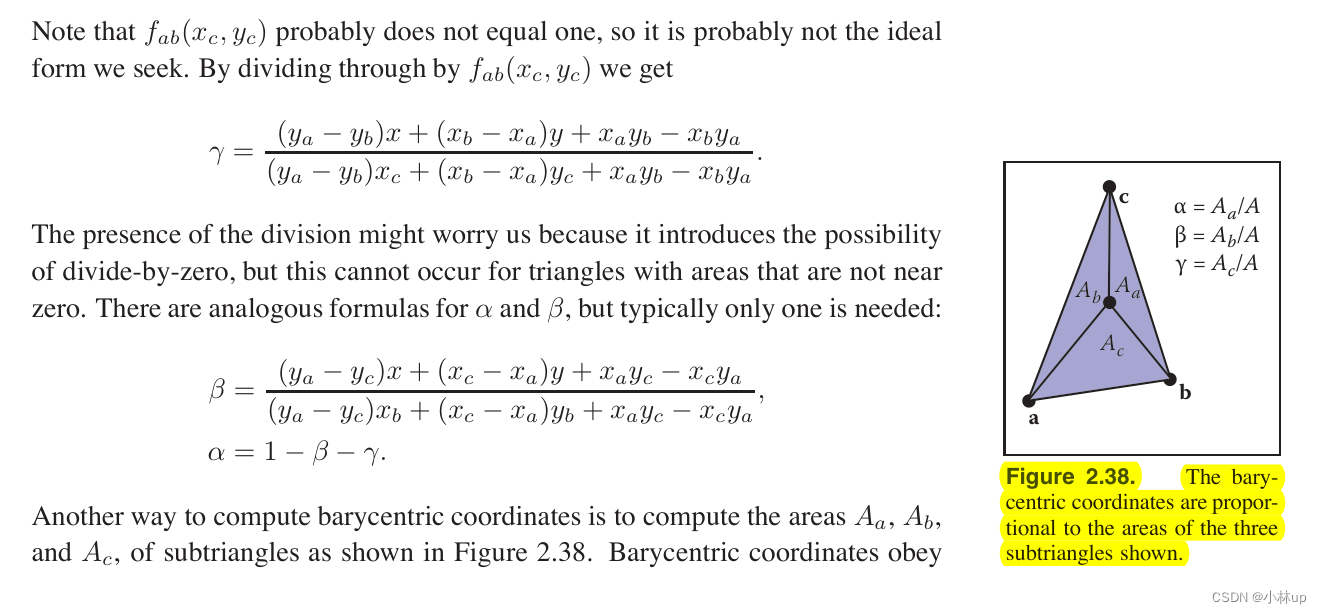
然后我们把这三个系数对应乘上三角形三个点的深度就是插值以后的深度了。
其对应的代码是
static std::tuple<float, float, float> computeBarycentric2D(float x, float y, const Vector3f* v)
{
    float c1 = (x*(v[1].y() - v[2].y()) + (v[2].x() - v[1].x())*y + v[1].x()*v[2].y() - v[2].x()*v[1].y()) / (v[0].x()*(v[1].y() - v[2].y()) + (v[2].x() - v[1].x())*v[0].y() + v[1].x()*v[2].y() - v[2].x()*v[1].y());
    float c2 = (x*(v[2].y() - v[0].y()) + (v[0].x() - v[2].x())*y + v[2].x()*v[0].y() - v[0].x()*v[2].y()) / (v[1].x()*(v[2].y() - v[0].y()) + (v[0].x() - v[2].x())*v[1].y() + v[2].x()*v[0].y() - v[0].x()*v[2].y());
    float c3 = (x*(v[0].y() - v[1].y()) + (v[1].x() - v[0].x())*y + v[0].x()*v[1].y() - v[1].x()*v[0].y()) / (v[2].x()*(v[0].y() - v[1].y()) + (v[1].x() - v[0].x())*v[2].y() + v[0].x()*v[1].y() - v[1].x()*v[0].y());
    return {c1,c2,c3};
}
- 如果当前点更靠近相机,请设置像素颜色并更新深度缓冲区 (depth buffer)。
更靠近相机,由于这里的深度的值都设置为了正值,所以我们定义更靠近相机就是z_interpolated小于depth_buf对应的值。我们把深度缓冲区的深度更新为z_interpolated,把对应像素的颜色定义为三角形的颜色。
if (z_interpolated <  depth_buf[get_index(x, y)) {
        depth_buf[get_index(x, y)] = z_interpolated;
        // TODO : set the current pixel (use the set_pixel function) to the color of the triangle (use getColor function) if it should be painted.
        set_pixel(Eigen::Vector3f(x, y, z_interpolated),  t.getColor());
    }
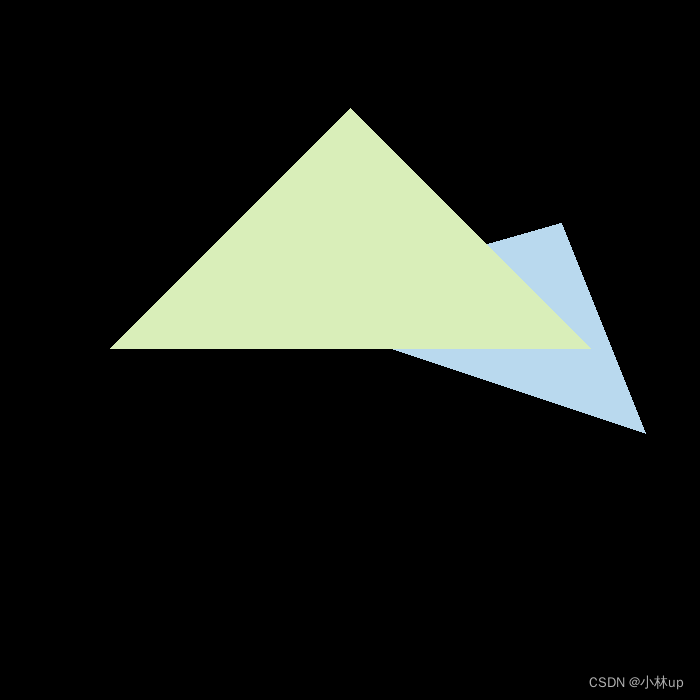
这里还需要注意一个小bug,如果单单用上面的代码运行会发现图形覆盖顺序不对:
这一点在讨论里有讲述
Home,Forums,GAMES在线课程(现代计算机图形学入门)i讨论区,Hw2的疑问
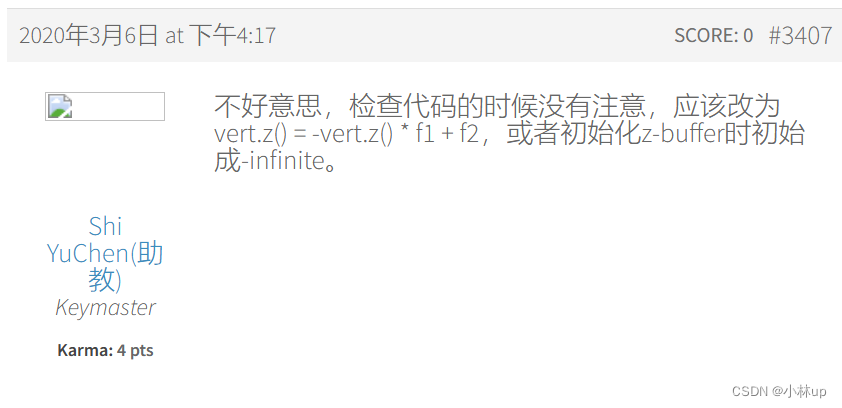
这样才是z越大表示越远。所以我们这里需要修改一下(原来没有添加vert.z()的负号):
vert.z() = -vert.z() * f1 + f2;
完整的代码是:
void rst::rasterizer::rasterize_triangle(const Triangle& t) {
    auto v = t.toVector4();
    // TODO : Find out the bounding box of current triangle.
    int bounding_box_left_x = std::min(v[0].x(), std::min(v[1].x(), v[2].x()));
    int bounding_box_right_x = std::max(v[0].x(), std::max(v[1].x(), v[2].x()));
    int bounding_box_bottom_y = std::min(v[0].y(), std::min(v[1].y(), v[2].y()));
    int bounding_box_top_y = std::max(v[0].y(), std::max(v[1].y(), v[2].y()));

    /*without MSAA*/

    // iterate through the pixel and find if the current pixel is inside the triangle

    for (int x = bounding_box_left_x; x <= bounding_box_right_x; x++) {
        for (int y = bounding_box_bottom_y; y <= bounding_box_top_y; y++) {
            if (insideTriangle(x + 0.5, y + 0.5, t.v)) {
                auto[alpha, beta, gamma] = computeBarycentric2D(x + 0.5, y + 0.5, t.v);
			    float w_reciprocal = 1.0/(alpha / v[0].w() + beta / v[1].w() + gamma / v[2].w());
			    float z_interpolated = alpha * v[0].z() / v[0].w() + beta * v[1].z() / v[1].w() + gamma * v[2].z() / v[2].w();
			    z_interpolated *= w_reciprocal;
                if (z_interpolated <  depth_buf[get_index(x, y)) {
                    depth_buf[get_index(x, y)] = z_interpolated;
                    // TODO : set the current pixel (use the set_pixel function) to the color of the triangle (use getColor function) if it should be painted.
                    set_pixel(Eigen::Vector3f(x, y, z_interpolated),  t.getColor());
                }
            }
        }
    }
}
可以看到三角形的效果渲染出来了,但是这里会出现锯齿:
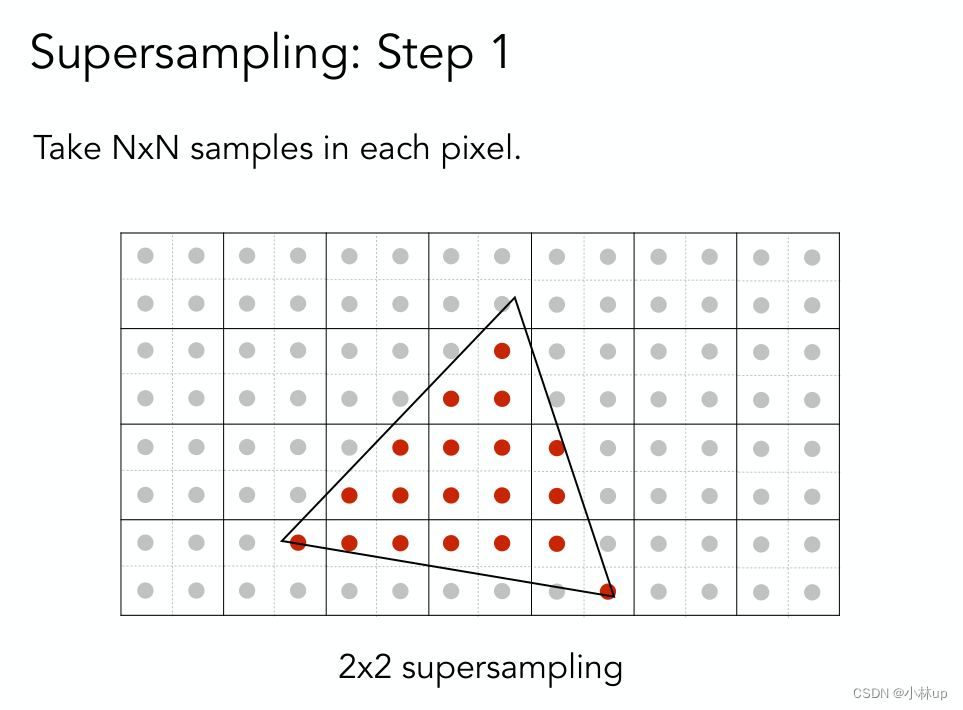
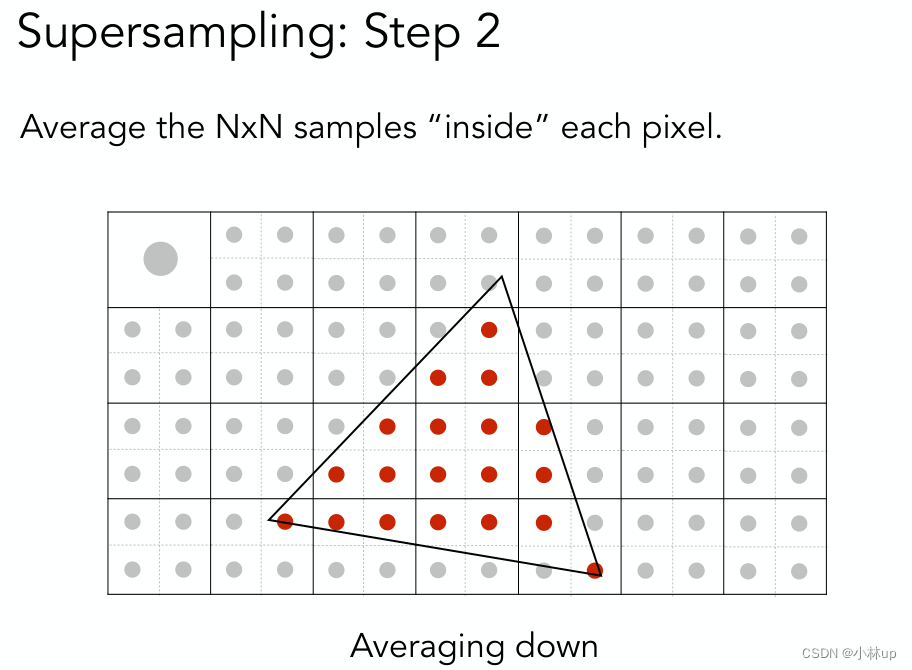
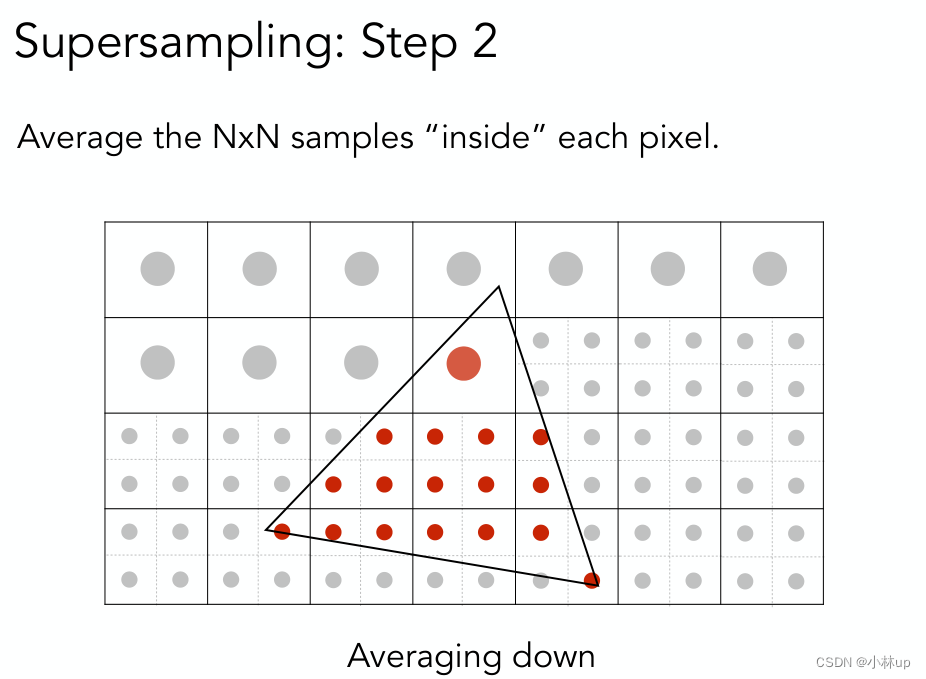
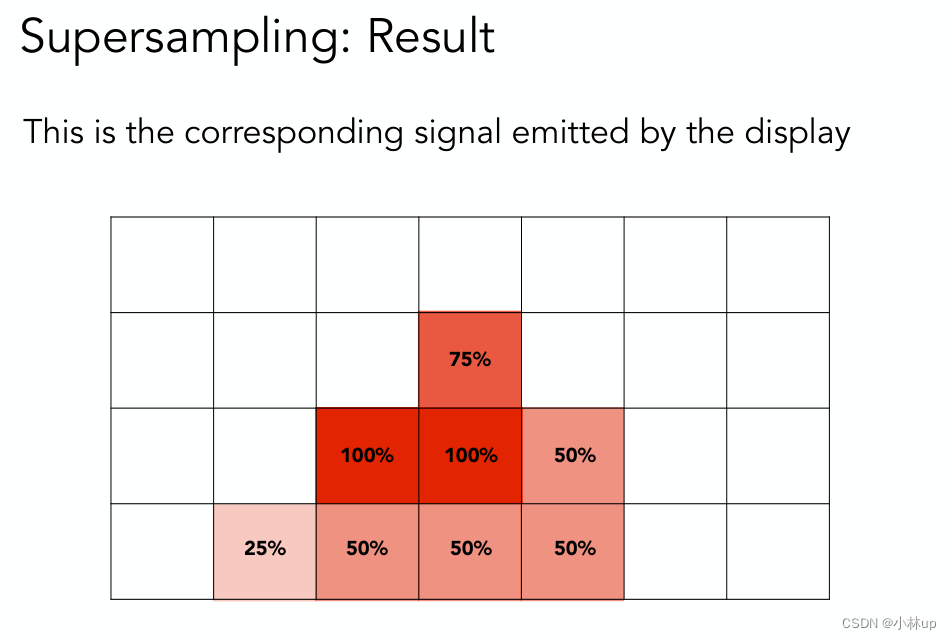
然后是进阶的部分,我们使用 2x2 MSAA 缓解走样问题,即对每个像素进行 2x2 超采样,看一个像素的四个部分,有几个部分在三角形内,就把该点像素颜色乘上对应占比。(其实就是进行一次模糊操作)

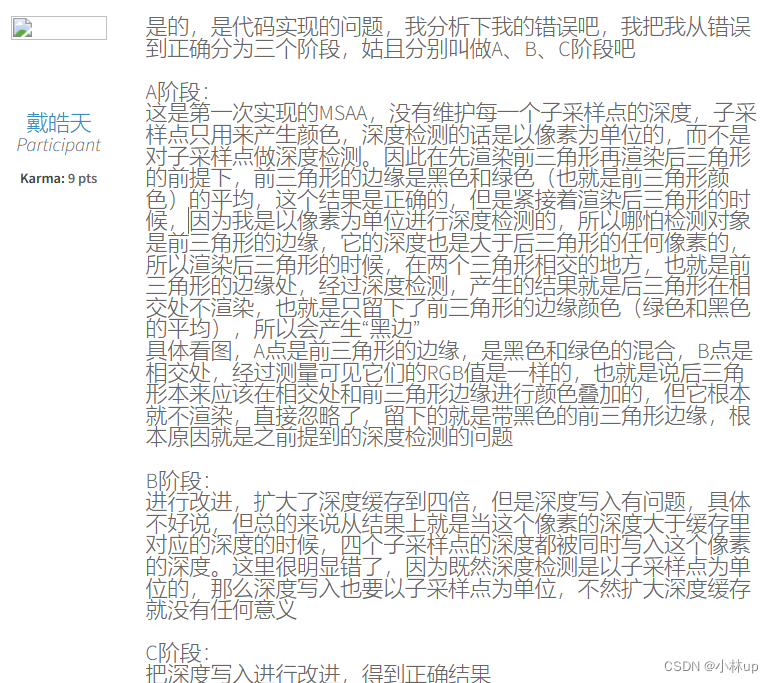
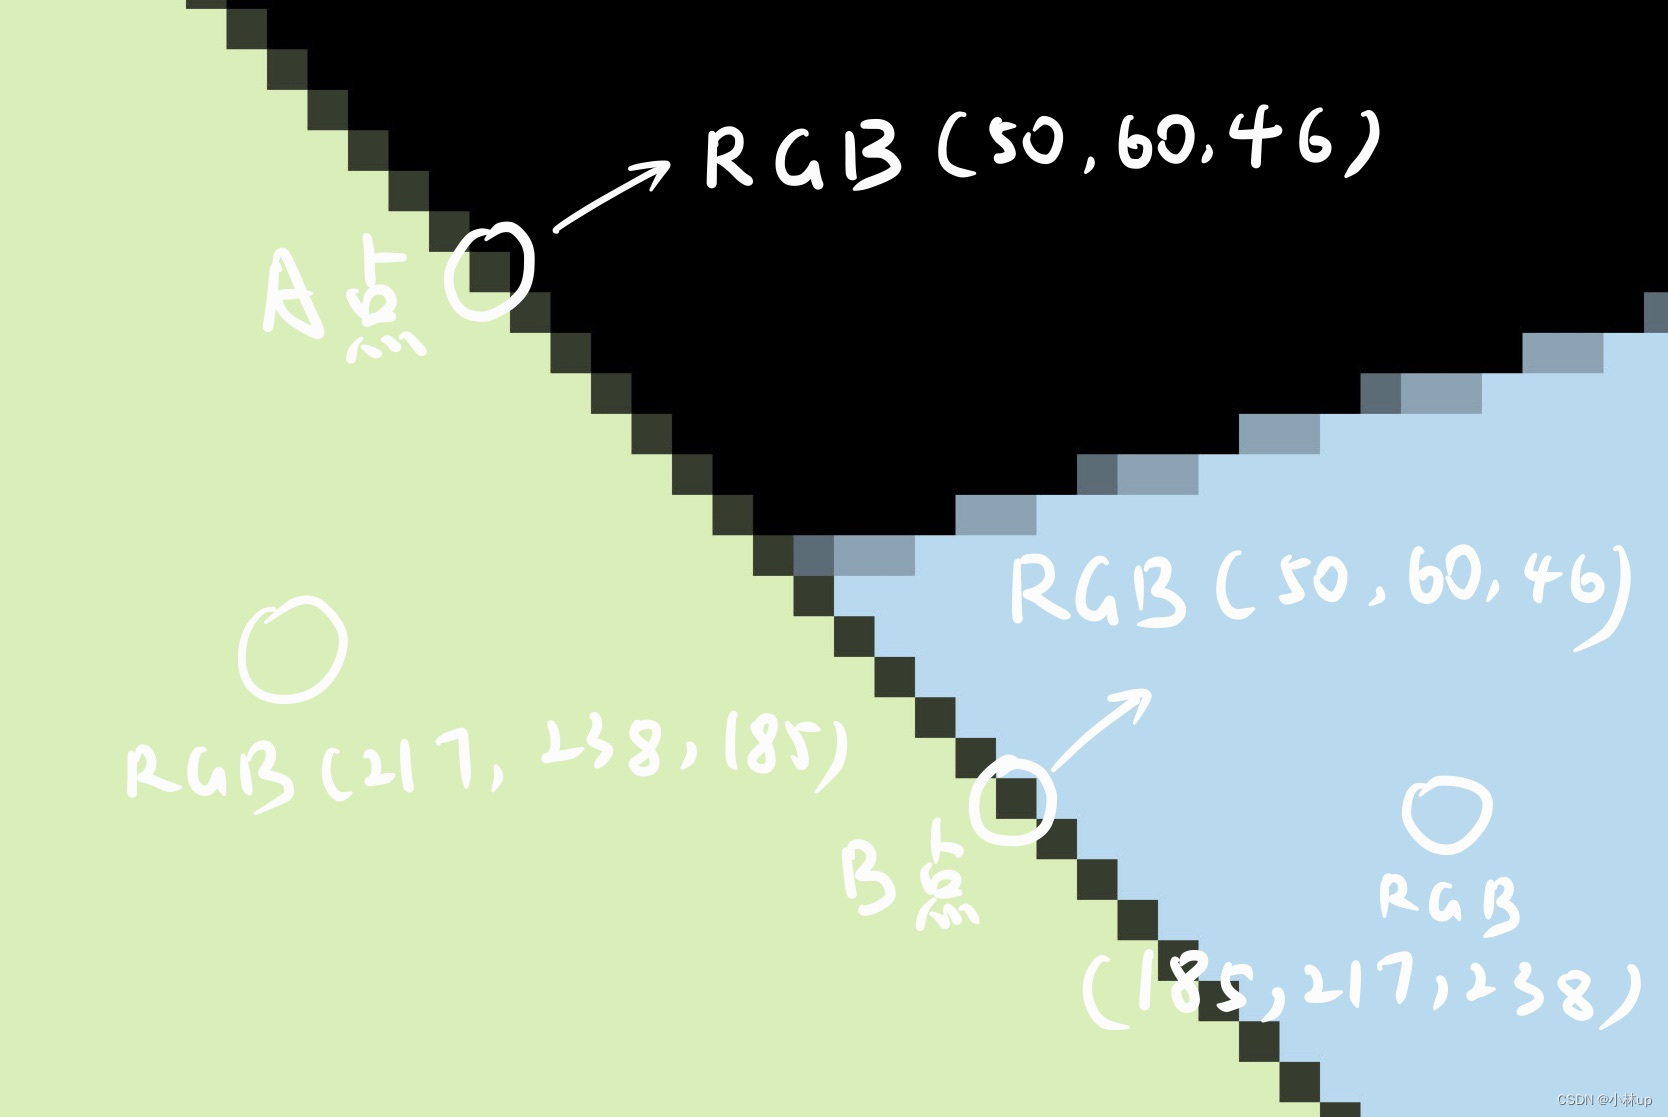
初代的代码没有维护每一个子采样点的深度,深度用的还是中心点的深度,而颜色对应是乘上了百分比:
void rst::rasterizer::rasterize_triangle(const Triangle& t) {
    auto v = t.toVector4();
    // TODO : Find out the bounding box of current triangle.
    int bounding_box_left_x = std::min(v[0].x(), std::min(v[1].x(), v[2].x()));
    int bounding_box_right_x = std::max(v[0].x(), std::max(v[1].x(), v[2].x()));
    int bounding_box_bottom_y = std::min(v[0].y(), std::min(v[1].y(), v[2].y()));
    int bounding_box_top_y = std::max(v[0].y(), std::max(v[1].y(), v[2].y()));

    /*with MSAA*/
    // iterate through the pixel and find if the current pixel is inside the triangle

    int inNumber;
    float rd[4][2] ={
                    {0.25, 0.25},
                    {0.25, 0.75},
                    {0.75, 0.25},
                    {0.75, 0.75}};
    for (int x = bounding_box_left_x; x <= bounding_box_right_x; x++) {
        for (int y = bounding_box_bottom_y; y <= bounding_box_top_y; y++) {
            inNumber = 0;
            for (int i = 0; i < 4; i++){
                    if (insideTriangle(x+rd[i][0], y+rd[i][1], t.v)) {
                    	inNumber++;
                    }
            }
            if (inNumber > 0){
                auto[alpha, beta, gamma] = computeBarycentric2D(x + 0.5, y + 0.5, t.v);
                float z_interpolated = alpha * v[0].z() / v[0].w() + beta * v[1].z() / v[1].w() + gamma * v[2].z() / v[2].w();
                z_interpolated *= w_reciprocal;
                if (z_interpolated < depth_buf[get_index(x, y)]) {
                    depth_buf[get_index(x, y)] = z_interpolated;
                // TODO : set the current pixel (use the set_pixel function) to the color of the triangle (use getColor function) if it should be painted.
	                Eigen::Vector3f pixelColor;
	                pixelColor << inNumber * t.getColor() / 4;
	                set_pixel(Eigen::Vector3f(x, y, z_interpolated), pixelColor);
                }
            }
        }
    }

}
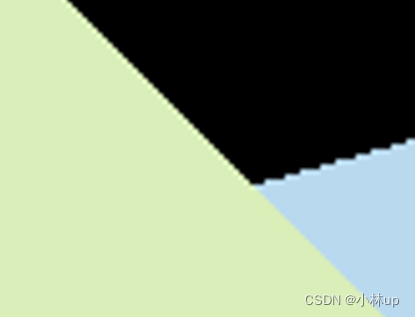
但是这样渲染出来的是有黑边的。

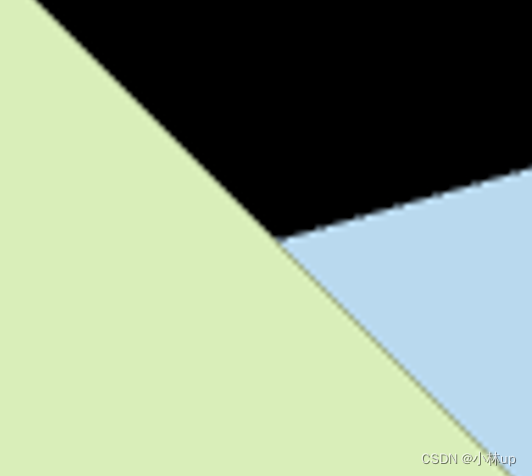
这个讨论把黑边介绍得很好。
Home › Forums › GAMES在线课程(现代计算机图形学入门)讨论区 › 提高部分的解决方案 – 答案就在作业文档中
改进的方法就是我们要记录采样点的深度,像素的颜色根据采样点的颜色取均值,而深度检测的对象也是采样点
在rasterizer.hpp定义采样点的颜色和采样点的深度的数组
std::vector<Eigen::Vector3f> sample_frame_buf;
std::vector<float> sample_depth_buf;
仿照原来类定义的frame_buf和depth_buf添加操作:
rst::rasterizer::rasterizer(int w, int h) : width(w), height(h)
{
    frame_buf.resize(w * h);
    depth_buf.resize(w * h);

    //MSAA
    sample_frame_buf.resize(4 * w * h);
    sample_depth_buf.resize(4 * w * h);
}
void rst::rasterizer::clear(rst::Buffers buff)
{
    if ((buff & rst::Buffers::Color) == rst::Buffers::Color)
    {
        std::fill(frame_buf.begin(), frame_buf.end(), Eigen::Vector3f{0, 0, 0});
        //MSAA sample_frame_buf
        std::fill(sample_frame_buf.begin(), sample_frame_buf.end(), Eigen::Vector3f{0, 0, 0});
    }
    if ((buff & rst::Buffers::Depth) == rst::Buffers::Depth)
    {
        std::fill(depth_buf.begin(), depth_buf.end(), std::numeric_limits<float>::infinity());
        //MSAA sample_depth_buf
        std::fill(sample_depth_buf.begin(), sample_depth_buf.end(), std::numeric_limits<float>::infinity());
    }
}
并且在rasterizer.cpp定义了一个新函数(注意在rasterizer.hpp加上声明)方便我们获取采样点的索引:
int rst::rasterizer::get_sample_index(int x, int y)
{
    return (2 * height -1 -y) * 2 * width + x;
}
接着我们就可以实现MSAA了:
void rst::rasterizer::rasterize_triangle(const Triangle& t) {
	int inNumber;
	float x_sample;
	float y_sample;
	int sample_index[4];

	std::vector<Eigen::Vector3f> pixelvec;

	float rd[4][2] ={
	                {0.25, 0.25},
	                {0.25, 0.75},
	                {0.75, 0.25},
	                {0.75, 0.75}};//定义四个采样点的中心距离
	for (int x = bounding_box_left_x; x <= bounding_box_right_x; x++) {
	    for (int y = bounding_box_bottom_y; y <= bounding_box_top_y; y++) {
	        inNumber = 0;
	        for (int i = 0; i < 4; i++){
	                x_sample = x + rd[i][0];
	                y_sample = y + rd[i][1];
	                sample_index[i] =  get_sample_index(int(2 * x_sample), int(2 * y_sample));
	                if (insideTriangle(x_sample, y_sample, t.v)) {
	                // If so, use the following code to get the interpolated z value.
	                    auto[sample_alpha, sample_beta, sample_gamma] = computeBarycentric2D(x_sample, y_sample, t.v);
	                    float sample_w_reciprocal = 1.0/(sample_alpha / v[0].w() + sample_beta / v[1].w() + sample_gamma / v[2].w());
	                    float sample_z_interpolated = sample_alpha * v[0].z() / v[0].w() + sample_beta * v[1].z() / v[1].w() + sample_gamma * v[2].z() / v[2].w();
	                    sample_z_interpolated *= sample_w_reciprocal;
	                    if (sample_z_interpolated <  sample_depth_buf[sample_index[i]]) {
	                        sample_depth_buf[sample_index[i]] = sample_z_interpolated;
	                    // TODO : set the current pixel (use the set_pixel function) to the color of the triangle (use getColor function) if it should be painted.
	                        sample_frame_buf[sample_index[i]] = t.getColor();
	                        inNumber = inNumber + 1;
	                    }
	                }
	        }
	        if (inNumber > 0){
	            // TODO : set the current pixel (use the set_pixel function) to the color of the triangle (use getColor function) if it should be painted.
	            Eigen::Vector3f pixelColor;
	            pixelColor <<  (sample_frame_buf[sample_index[0]] + sample_frame_buf[sample_index[1]] + sample_frame_buf[sample_index[2]] + sample_frame_buf[sample_index[3]])/ 4;
	            set_pixel(Eigen::Vector3f(x, y, 0), pixelColor);
	        }
	    }
	}
}
图形的边缘就比较柔和了

明显看到边缘比较柔和了,而且是没有黑边的。


 876
876


 被折叠的 条评论
为什么被折叠?
被折叠的 条评论
为什么被折叠?
 到【灌水乐园】发言


