


今天来讲一下堆,在网上看到一个很好的文章,不过它实现堆是用Golang写的,我这里打算用C++实现一下:
1. 基本概念
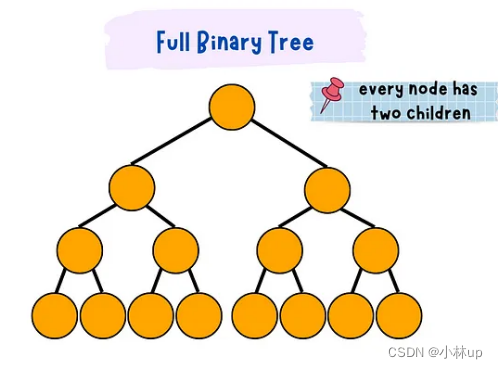
- 满二叉树(二叉树每层节点都是满的):
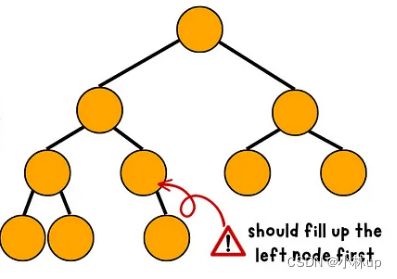
- 完全二叉树:叶子节点只出现在最后一层或倒数第二层,并且节点都是向左聚拢

- 非完全二叉树:下面的二叉树不满足完全二叉树的节点都向左聚拢,所以是非完全二叉树
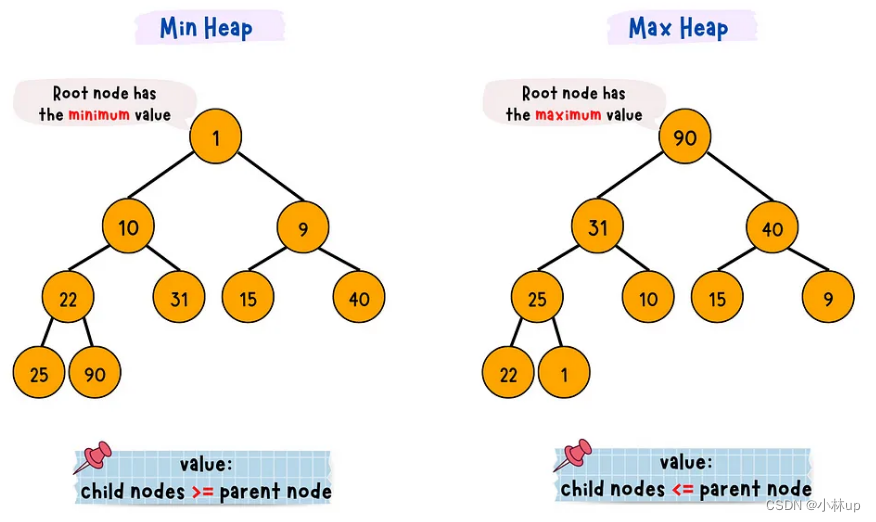
堆也是一颗完全二叉树。
- 小顶堆:根节点是最小值,并且子节点大于等于父节点
- 大顶堆:根节点是最大值,并且子节点小于等于父节点
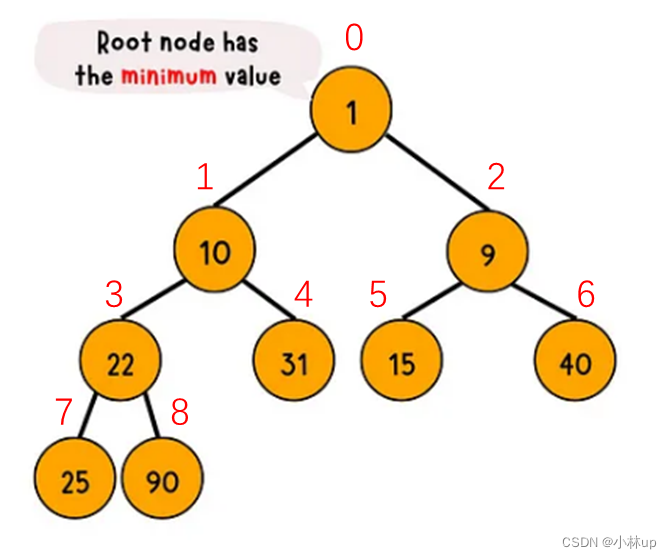
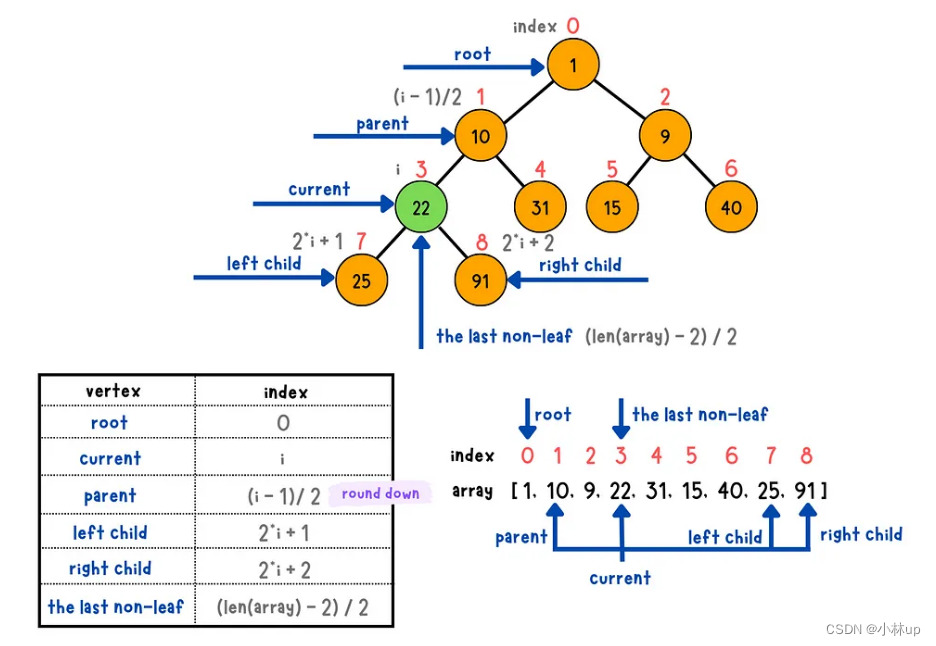
由于树的特性,堆可以用数组索引的形式表示,以小顶堆为例,在下面的小顶堆里,依次从上到下从左往右给节点编号,根节点的编号是0,:
对应的数组为:

对比数组和堆,堆的索引有以下的性质:
- 根节点索引是
0 - 若当前节点索引为
i,如果它有父节点,父节点的索引是(i-1)/2(C++向下取整) - 若当前节点索引为
i,如果它有左节点,左节点的索引是2*i+1,如果它有右节点,右节点的索引是2*i+2 - 设数组的长度为
len,最后一个非叶子节点的索引是(len-2)/2,比如上面的K是9,最后一个非叶子节点的索引是(9-2)/2=3
2. 堆的基本操作
C++有heapn内置函数来实现,具体看c++重拾 STL之heap(堆)。这里我们讲解原理,下面以小顶堆为例描述堆的相关操作
2.0 交换节点操作
我们先定义交换节点的操作,为后面调整为堆做准备:
void HeapSwap(vector<int> &minHeap, int curIndex, int swapIndex)
{
    int t = minHeap[curIndex];
    minHeap[curIndex] = minHeap[swapIndex];
    minHeap[swapIndex] = t;
}
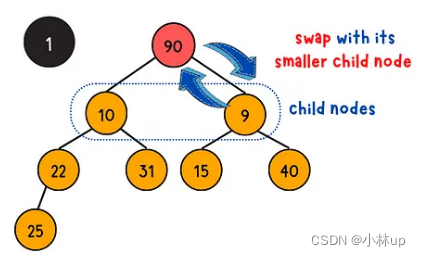
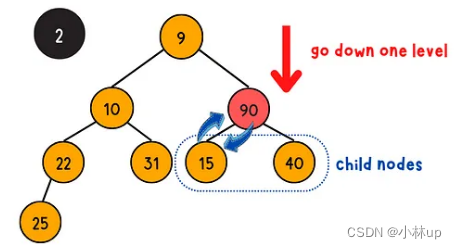
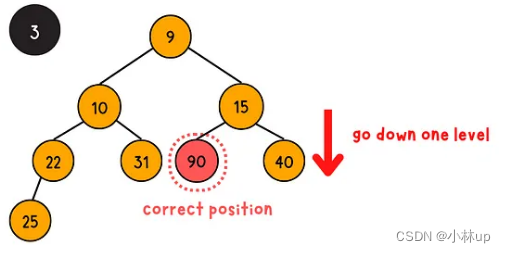
2.1 下浮操作
下浮操作是通过下浮的方式把一个完全二叉树调整为堆,具体的步骤是将它与它的左儿子,右儿子比较大小,如果不满足小顶堆的性质(当前节点的值大于等于左右孩子的节点的值),当前节点需要与左右孩子的最小值节点交换位置(否则不满足堆的性质),递归的完成这个过程。(时间复杂度是log(n))
我们定义一个swapIndex,记录需要交换调整的节点索引,如果需要调整,这个索引是当前节点和左右子节点索引的最小值,这个过程要注意判断边界条件:
void HeapSiftDown(vector<int> &minHeap, int curIndex)
{
    int leftChildIndex = 2 * curIndex + 1;  // 左孩子节点的索引
    int rightChildIndex = 2 * curIndex + 2; // 右孩子节点的索引
    int swapIndex = curIndex;               // 定义调整的节点索引

    // 判断左右孩子是否小于当前元素,如果是把swapIndex赋值为孩子索引
    if (leftChildIndex < minHeap.size() && minHeap[leftChildIndex] < minHeap[swapIndex])
        swapIndex = leftChildIndex;
    if (rightChildIndex < minHeap.size() && minHeap[rightChildIndex] < minHeap[swapIndex])
        swapIndex = rightChildIndex;

    // 判断交换索引和当前索引是不是一样,如果不一样说明要交换,然后继续SiftDown,直到到最后一个节点
    if (curIndex != swapIndex)
    {
        HeapSwap(minHeap, curIndex, swapIndex);
        HeapSiftDown(minHeap, swapIndex);
    }
}
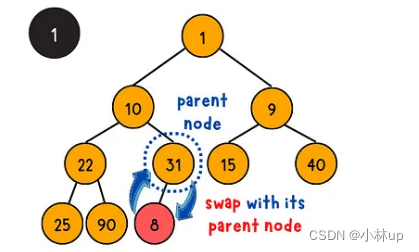
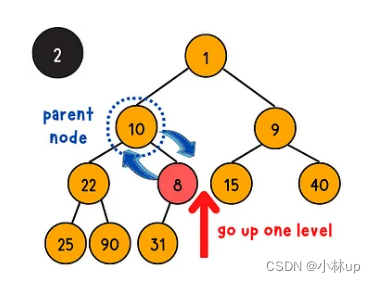
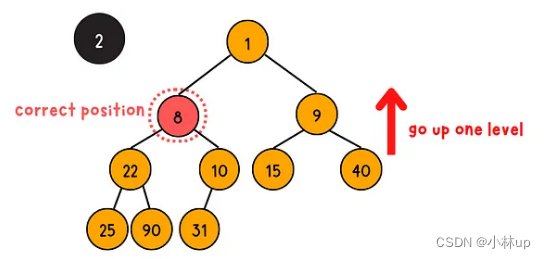
2.2 上浮操作
上浮操作是通过上浮的方式把一个完全二叉树调整为堆,具体的步骤是将它与它的父亲节点比较大小,如果不满足小顶堆的性质(父亲的节点的值大于等于当前节点的值),当前节点与父亲节点交换位置(否则不满足堆的性质),递归的完成这个过程。(时间复杂度是log(n))
我们类似上浮操作定义一个swapIndex,记录需要交换调整的节点索引,如果需要调整,这个索引是父亲节点的索引,这个过程要注意判断边界条件:
void HeapSiftUp(vector<int> &minHeap, int curIndex)
{
    int parentIndex = (curIndex - 1) / 2;//父亲节点的索引
    int swapIndex = curIndex;// 定义调整的节点索引

	// 判断左右孩子是否小于当前元素,如果是把swapIndex赋值为孩子索引
    if (parentIndex >= 0 && minHeap[curIndex] < minHeap[parentIndex])
        swapIndex = parentIndex;
    // 判断交换索引和当前索引是不是一样,如果不一样说明要交换,然后继续SiftUp,直到到最后一个节点
    if (curIndex != swapIndex)
    {
        HeapSwap(minHeap, curIndex, swapIndex);
        HeapSiftUp(minHeap, swapIndex);
    }
}
2.3 给定一个数组建堆
建堆有上浮和下浮两种方法:
如果是下浮的方法,可以直接从最后一个不是叶节点的节点开始往上下浮(叶子节点没有左右孩子一定不需要交换)。这里使用了前面堆索引性质的第四条:
设数组的长度为
len,最后一个非叶子节点的索引是(len-2)/2
void HeapBuild(vector<int> &array)
{
    int lastNoLeafIndex = (array.size() - 2) / 2;
    for (int i = lastNoLeafIndex; i >= 0; i--)//从最后一个不是叶节点的节点开始往上下浮
        HeapSiftDown(array, i);
}
如果是上浮的方法,则从索引为1节点开始往下上浮(根节点没有父亲节点一定不需要交换)。
void HeapBuild(vector<int> &array)
{
    for (int i = 1; i < array.size(); ++i)//从索引为1节点开始往下上浮
        HeapSiftUp(array, i);
}
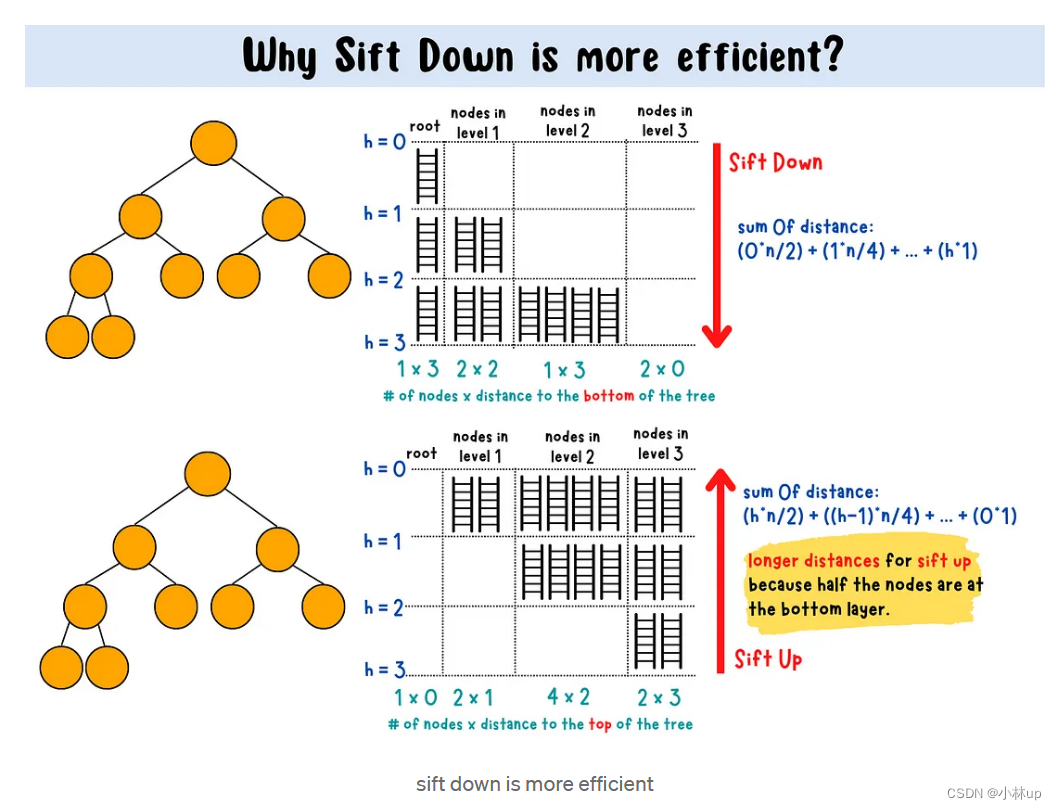
使用下浮建堆的时间复杂度是O(n),而使用上浮建堆的时间复杂度是O(nlogn),建议使用下浮建堆。关于复杂度参考How can building a heap be O(n) time complexity?
2.4 Pop操作
pop操作是把根节点弹出返回,并重新调整剩余元素构成的数组为堆,数组的长度为len,这里我们把根节点和最后一个节点交换,中间要保留根节点的值,然后把数组调整为len-1(因为弹出一个元素了),重新用下浮调整为堆,然后返回堆的根节点的值。时间复杂度是log(n)
int HeapPop(vector<int> &minHeap)
{
    int value = minHeap[0];//保留堆的根节点的值
    int len = minHeap.size();//记录堆的大小
    HeapSwap(minHeap, 0, len - 1);//把堆的根节点和最后一个节点交换
    minHeap.resize(len - 1);//调整数组长度为len-1
    HeapSiftDown(minHeap, 0);//下浮调整为堆
    return value;//返回堆的根节点的值
}
2.5 Push操作
push操作是在数组末尾加入元素num,然后重新调整成堆。相比pop操作,push操作就简单很多了,我们先在数组末尾加入元素num,然后从最后一个元素的索引开始使用上浮即可。时间复杂度是log(n)
void HeapPush(vector<int> &minHeap, int num)
{
    minHeap.push_back(num);//在数组末尾加入元素num
    HeapSiftUp(minHeap, minHeap.size() - 1);//从最后一个元素的索引开始使用上浮
}
测试:
完整代码:
#include <iostream>
#include <vector>
using namespace std;

void HeapSiftDown(vector<int> &minHeap, int curIndex);
void HeapSiftUp(vector<int> &minHeap, int curIndex);
void HeapSwap(vector<int> &minHeap, int curIndex, int swapIndex);
void HeapBuild(vector<int> &array);
void HeapPush(vector<int> &minHeap, int num);

void HeapBuild(vector<int> &array)
{
    int lastNoLeafIndex = (array.size() - 2) / 2;
    for (int i = lastNoLeafIndex; i >= 0; i--)
        HeapSiftDown(array, i);
}

void HeapSiftDown(vector<int> &minHeap, int curIndex)
{
    int leftChildIndex = 2 * curIndex + 1;
    int rightChildIndex = 2 * curIndex + 2;
    int swapIndex = curIndex;

    if (leftChildIndex < minHeap.size() && minHeap[leftChildIndex] < minHeap[swapIndex])
        swapIndex = leftChildIndex;
    if (rightChildIndex < minHeap.size() && minHeap[rightChildIndex] < minHeap[swapIndex])
        swapIndex = rightChildIndex;

    if (curIndex != swapIndex)
    {
        HeapSwap(minHeap, curIndex, swapIndex);
        HeapSiftDown(minHeap, swapIndex);
    }
}

void HeapSiftUp(vector<int> &minHeap, int curIndex)
{
    int parentIndex = (curIndex - 1) / 2;
    int swapIndex = curIndex;
    if (parentIndex >= 0 && minHeap[curIndex] < minHeap[parentIndex])
        swapIndex = parentIndex;

    if (curIndex != swapIndex)
    {
        HeapSwap(minHeap, curIndex, swapIndex);
        HeapSiftUp(minHeap, swapIndex);
    }
}
void HeapSwap(vector<int> &minHeap, int curIndex, int swapIndex)
{
    int t = minHeap[curIndex];
    minHeap[curIndex] = minHeap[swapIndex];
    minHeap[swapIndex] = t;
}

int HeapPop(vector<int> &minHeap)
{
    int value = minHeap[0];
    int len = minHeap.size();
    HeapSwap(minHeap, 0, len - 1);
    minHeap.resize(len - 1);
    HeapSiftDown(minHeap, 0);
    return value;
}

void HeapPush(vector<int> &minHeap, int num)
{
    minHeap.push_back(num);
    HeapSiftUp(minHeap, minHeap.size() - 1);
}

int main()
{
    vector<int> array{9, 31, 40, 22, 10, 15, 1, 25, 91};
    cout << "The origin array is " << endl;
    for (auto &t : array)
        cout << t << " ";
    cout << endl
         << "---------------------------------------------------" << endl;

    // 建堆
    HeapBuild(array);
    cout << "After build the heap, the array is " << endl;
    for (auto &t : array)
        cout << t << " ";
    cout << endl
         << "---------------------------------------------------" << endl;

    // pop元素
    int top = HeapPop(array);
    cout << "The pop value is " << top << endl;
    cout << "After pop, the array is " << endl;
    for (auto &t : array)
        cout << t << " ";
    cout << endl
         << "---------------------------------------------------" << endl;

    // push元素
    HeapPush(array, 1);
    cout << "After push, the array is " << endl;
    for (auto &t : array)
        cout << t << " ";
    cout << endl
         << "---------------------------------------------------" << endl;
}
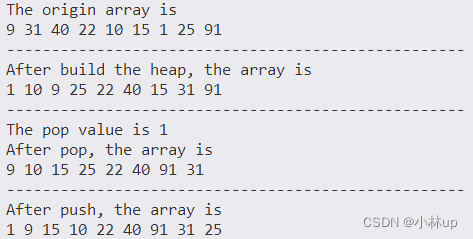
可以自行印证上面满足小顶堆。大顶堆的思路和小顶堆的思路差不多。读者可以自己实现一下。
3. 堆的相关使用
3.1 堆排序
堆排序基本的思路是:
- 初始化:数组建堆
- 数组的根节点和堆的最后一个节点交换
- 剩余元素重新排成堆(堆的长度减1),然后继续第2步操作直到数组的长度为1
这里也放一个算法导论的截图(不过它的根节点的索引是1),思路是差不多的:

我们这里使用小顶堆,小顶堆的根节点是最小值,每次第2步和后面的节点做交换,所以最后排序是从大到小(最小值根节点都放到数组的后面)。
前面的建堆是对整个数组来说的,但是对于堆排序,我们需要划定要排序数组的范围,所以我们对建堆和下浮两个操作另外定义一个函数:
HeapSiftDown函数
注意这里的数组越界处理改为了传入的heapLength,我们只需要对0-heapLength-1范围的数组做下浮的操作
void HeapSiftDown(vector<int> &minHeap, int curIndex, int heapLength)
{
    int leftChildIndex = 2 * curIndex + 1;  // 左孩子节点的索引
    int rightChildIndex = 2 * curIndex + 2; // 右孩子节点的索引
    int swapIndex = curIndex;               // 定义和当前索引交换的索引

    // 判断左右孩子是否小于当前元素,如果是把swapIndex换给孩子索引,注意这里的数组越界处理改为了传入的heapLength
    if (leftChildIndex < heapLength && minHeap[leftChildIndex] < minHeap[swapIndex])
        swapIndex = leftChildIndex;
    if (rightChildIndex < heapLength && minHeap[rightChildIndex] < minHeap[swapIndex])
        swapIndex = rightChildIndex;

    // 判断交换索引和当前索引是不是一样,如果不一样说明要交换,继续SiftDown,直到到最后一个节点
    if (curIndex != swapIndex)
    {
        HeapSwap(minHeap, curIndex, swapIndex);
        HeapSiftDown(minHeap, swapIndex, heapLength);
    }
}
HeapBuild函数
注意这里的计算最后一个非叶子节点的索引使用了传入的heapLength,相当于对0-heapLength-1范围的数组建堆
void HeapBuild(vector<int> &array, int heapLength)
{
    int lastNoLeafIndex = (heapLength - 2) / 2;//注意这里最后一个非叶子节点的索引使用的是传入的heapLength
    for (int i = lastNoLeafIndex; i >= 0; i--)
        HeapSiftDown(array, i, heapLength);
}
OK我们可以写堆排序了,传入一个数组:
void HeapSort(vector<int> &array)
{
    int heapLength = array.size();//建堆的长度
    int len = array.size();//数组的长度
    HeapBuild(array, heapLength);
    for (int i = len - 1; i >= 1; --i)//遍历到索引1就行,索引0不需要遍历,因为只有一个数了
    {
        HeapSwap(array, 0, i);//把索引0(根节点)和索引i节点交换
        heapLength--;//建堆的长度减1
        HeapBuild(array, heapLength);//再次对0~heapLength-1的数组建堆
    }
}
测试堆排序
#include <iostream>
#include <vector>
using namespace std;
void HeapBuild(vector<int> &array, int heapLength);
void HeapSort(vector<int> &array);

void HeapBuild(vector<int> &array, int heapLength)
{
    int lastNoLeafIndex = (heapLength - 2) / 2;//注意这里最后一个非叶子节点的索引使用的是传入的heapLength
    for (int i = lastNoLeafIndex; i >= 0; i--)
        HeapSiftDown(array, i, heapLength);
}
void HeapSort(vector<int> &array)
{
    int heapLength = array.size();//建堆的长度
    int len = array.size();//数组的长度
    HeapBuild(array, heapLength);
    for (int i = len - 1; i >= 1; --i)//遍历到索引1就行,索引0不需要遍历,因为只有一个数了
    {
        HeapSwap(array, 0, i);//把索引0(根节点)和索引i节点交换
        heapLength--;//建堆的长度减1
        HeapBuild(array, heapLength);//再次对0~heapLength-1的数组建堆
    }
}
int main()
{
    vector<int> array{9, 31, 40, 22, 10, 15, 1, 25, 91};
    cout << "The origin array is " << endl;
    for (auto &t : array)
        cout << t << " ";
    cout << endl
         << "---------------------------------------------------" << endl;


    // sort元素
    HeapSort(array);
    cout << "After sort, the array is " << endl;
    for (auto &t : array)
        cout << t << " ";
    return 0;
}
可以看到从大到小进行了排序,如果用大顶堆,就是从小到大排序。

3.2 优先队列
优先级队列虽然也叫队列,但是和普通的队列还是有差别的。普通队列出队顺序只取决于入队顺序,而优先级队列的出队顺序总是按照元素自身的优先级。可以理解为,优先级队列是一个排序后的队列。
堆和优先级队列非常相似,一个堆就可以看作一个优先级队列。往优先级队列中插入一个元素,就相当于往堆中插入一个元素;从优先级队列中取出优先级最高的元素,就相当于取出堆顶元素(大顶堆–最大值;小顶堆–最小值)。不过优先级我们还可以自己额外定义。C++有priority_queue来实现,具体可以看c++优先队列(priority_queue)用法详解。
所以优先队列有两个操作,分别是pop弹出和push加入,pop即弹出根节点,push即把新的元素加入优先队列,两种操作过后要保证剩余的元素构成的还是一个堆。直接使用前面所说的pop和push操作即可。
4. 典型例题
347. 前 K 个高频元素
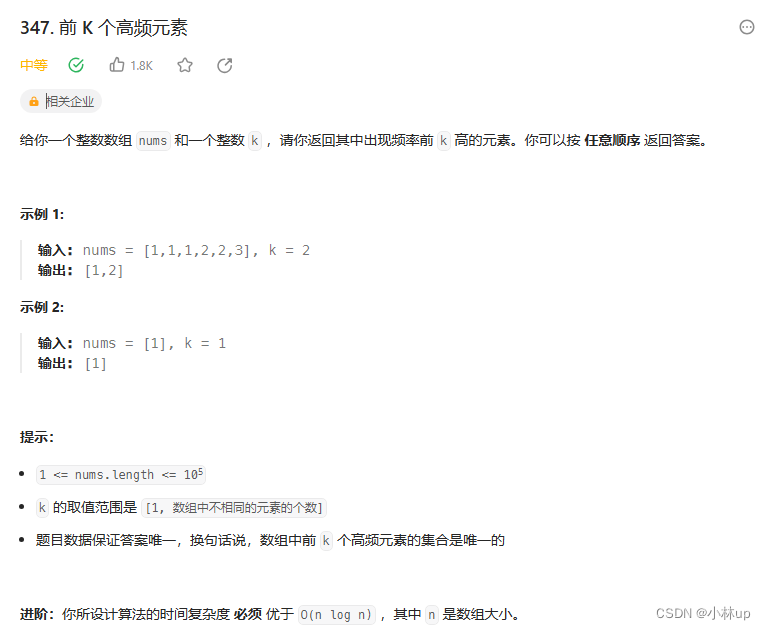
前K个元素,先用哈希表记录元素的频率,然后可以使用小根堆,如果队列元素超过K可以弹出根节点(最小的元素),遍历完以后,队列里剩下的就是前K大的元素。
class Solution {
public:
    static bool cmp(pair<int, int>& a, pair<int, int>& b)
    {
        return a.second > b.second;
    }
    vector<int> topKFrequent(vector<int>& nums, int k) {
        vector<int> ans;
        unordered_map<int, int> mp;
        for (auto& t: nums)
            mp[t]++;
        priority_queue<pair<int, int>, vector<pair<int, int>>, decltype(&cmp)> que(cmp);
        for (auto it = mp.begin(); it != mp.end(); ++it)
        {
            que.push(*it);
            if (que.size() > k)
                que.pop();
        }
        while (!que.empty())
        {
            ans.push_back(que.top().first);
            que.pop();
        }
        return ans;
    }
};
关于priority_queue的比较函数cmp也可以使用仿函数:
class Solution {
public:
    class cmp {
    public:
        bool operator() (const pair<int, int> &lhs, const pair<int, int> &rhs) {
            return lhs.second > rhs.second;
        }
    };
    vector<int> topKFrequent(vector<int>& nums, int k) {
        vector<int> ans;
        unordered_map<int, int> mp;
        for (auto& t: nums)
            mp[t]++;
        priority_queue<pair<int, int>, vector<pair<int, int>>, cmp> que;
        for (auto it = mp.begin(); it != mp.end(); ++it)
        {
            que.push(*it);
            if (que.size() > k)
                que.pop();
        }
        while (!que.empty())
        {
            ans.push_back(que.top().first);
            que.pop();
        }
        return ans;
    }
};
内置类型比如int的话cmp可以直接使用greater<int>(小根堆)和less<int>(大根堆),如果比较自定义的Node类型,可以在Node里重载<:
#include <queue>
#include <iostream>
using namespace std;
struct Node
{
    int x, y;
    bool operator<(const Node &rhs) const
    {
        return this->x > rhs.x; // 用x比较,这里是>,是小根堆
    }
};
int main()
{
    priority_queue<Node> que;
    que.push(Node{1, 2});
    que.push(Node{2, 1});
    que.push(Node{4, 2});
    while (!que.empty())
    {
        cout << que.top().x << " " << que.top().y << endl;
        que.pop();
    }
}

215. 数组中的第K个最大元素
和上题类似,我们使用一个小顶堆,遍历完整个数组,最后剩下的根节点就是第K大元素了。
class Solution {
public:

    int findKthLargest(vector<int>& nums, int k) {
        priority_queue<int, vector<int>, greater<int>> que;
        for (auto& t:nums)
        {
            que.push(t);
            if (que.size() > k)
            {
                que.pop();
            }
        }
        return que.top();
    }
};
295. 数据流的中位数
维护一个大根堆和一个小根堆,大根堆queMin记录小于等于中位数的那些数,小根堆queMax记录大于中位数的那些数。
大根堆queMin: 大<-小
小根堆queMax:小->大
findMedian:小根堆的元素个数比大根堆的元素的个数大1或两者相等,如果是奇数直接取小根堆的根节点元素,如果是偶数取两个堆的根节点的平均值(注意返回是double,所以除以2不行,要除以2.0)
addNum:由于小根堆的元素个数比大根堆元素个数大1或两者相等,所以我们优先处理小根堆:
- 如果queMax的维度和queMin的维度是一样的,那么先往queMax里push num,然后queMin添加queMax的堆顶元素,queMax弹出元素。
- 如果queMax的维度比queMin的维度小(这时候是小1),那么先往queMin里push num,然后queMax添加queMin的堆顶元素,queMin弹出元素。
class MedianFinder {
public:
    MedianFinder() {

    }

    void addNum(int num) {
        if (queMin.size() == queMax.size())
        {
            queMax.push(num);
            queMin.push(queMax.top());
            queMax.pop();
        }
        else
        {
            queMin.push(num);
            queMax.push(queMin.top());
            queMin.pop();
        }
    }

    double findMedian() {
        if (queMin.size() > queMax.size())
            return queMin.top();
        return (queMin.top() + queMax.top()) / 2.0;
    }
private:
    priority_queue<int, vector<int>, less<int>> queMin;
    priority_queue<int, vector<int>, greater<int>> queMax;

};

/**
 * Your MedianFinder object will be instantiated and called as such:
 * MedianFinder* obj = new MedianFinder();
 * obj->addNum(num);
 * double param_2 = obj->findMedian();
 */


 33万+
33万+


 被折叠的 条评论
为什么被折叠?
被折叠的 条评论
为什么被折叠?
 到【灌水乐园】发言


