


 该博客介绍了如何扩展Unity的太空射击游戏,包括添加敌人、更多障碍物、背景滚动等。内容涵盖创建敌机、实现敌机射击、背景滚动的实现以及将游戏移植到移动端的初步步骤,涉及触摸和加速计输入的处理。
Part 4 Extending Space Shooter
EXTENDING SPACE SHOOTER: ENEMIES, MORE HAZARDS, SCROLLING BG…
We will be covering how to add enemies with very basic manoeuvring and shooting, additional hazards of different types and scrolling the background.
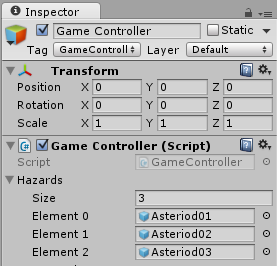
通过复制Asteroid GameObject和替换子GameObject,添加另外两种类型的陨石,更改他们的Collider以适应各自的形状。
Update Scripts : GameController.cs
using UnityEngine;
using UnityEngine.SceneManagement;
using System.Collections;

public class GameController : MonoBehaviour
{
    public GameObject[] hazards;    // 数组,用来存放 各种小行星
    public Vector3 spawnValues;     // 通过Inspector来设置spawnValues,继而在SpawnWaves中设置spawnPosition
    public int hazardCount;         // 每一波的小行星数量
    public float spawnWait;         // 相邻两个小行星的生成时间间隔
    public float startWait;         // a short pause after the game starts for the player to get ready
    public float waveWait;          // 相邻两波之间的时间间隔

    public GUIText scoreText;       // We will feed information to these labels as the game progresses.
    public GUIText restartText;
    public GUIText gameOverText;

    private bool gameOver;
    private bool restart;
    private int score;

    void Start()
    {
        gameOver = false;
        restart = false;
        gameOverText.text = "";
        restartText.text = "";
        score = 0;      // starting value
        UpdateScore();
        StartCoroutine(SpawnWaves());
    }

    void Update()
    {
        if(restart)
        {
            if(Input.GetKeyDown(KeyCode.R))
            {
            //    Application.LoadLevel(Application.loadedLevel);     // restart the game
                SceneManager.LoadScene("_Scenes/main");         // 重新加载这个 Scene     Loads the scene by its name or index in Build Settings.
            }
        }
    }

    IEnumerator SpawnWaves()
    {
        yield return new WaitForSeconds(startWait);
        while(true)
        {
            for (int i = 0; i < hazardCount; i++)
            {
                GameObject hazard = hazards[Random.Range(0, hazards.Length)];   // 随机从数组 hazards 中选取一个元素 hazard,NICE
                Vector3 spawnPosition = new Vector3(Random.Range(-spawnValues.x, spawnValues.x), spawnValues.y, spawnValues.z);
                Quaternion spawnRotation = Quaternion.identity;
                Instantiate(hazard, spawnPosition, spawnRotation);
                yield return new WaitForSeconds(spawnWait);
            }
            yield return new WaitForSeconds(waveWait);
            if(gameOver)            // 游戏结束的时候,询问是否重来
            {
                restartText.text = "Press 'R' for Restart";
                restart = true;
                break;              // 结束这个 spawnwaves 循环
            }
        }
    }

    public void AddScore(int scoreValue)
    {
        score += scoreValue;
        UpdateScore();
    }

    void UpdateScore()
    {
        scoreText.text = "Score: " + score;
    }

    public void GameOver()      // 如同 AddScore 一样,此函数可以由别的GameObject调用。
    {
        gameOverText.text = "Game Over!";
        gameOver = true;
    }
}
- something about c# Array
- something about Array Class
// declares and instantiates arrays
// arrays.cs
using System;
class DeclareArraysSample
{
    public static void Main()
    {
        // Single-dimensional array
        int[] numbers = new int[5];

        // Multidimensional array
        string[,] names = new string[5,4];

        // Array-of-arrays (jagged array)
        byte[][] scores = new byte[5][];

        // Create the jagged array
        for (int i = 0; i < scores.Length; i++)
        {
            scores[i] = new byte[i+3];
        }

        // Print length of each row
        for (int i = 0; i < scores.Length; i++)
        {
            Console.WriteLine("Length of row {0} is {1}", i, scores[i].Length);
        }
    }
}

//Output
//Length of row 0 is 3
//Length of row 1 is 4
//Length of row 2 is 5
//Length of row 3 is 6
//Length of row 4 is 7
- scrolling the background
两个部分:a scrolling texture and two particle systems
- drag StarField(contains two particle systems) prefab on to Hierarchy.
- duplicate the Background and drag it on to Background, make it a child game object.
- In the scene view, select Background (1) and hold down “K” and drag it to move it. And we get that
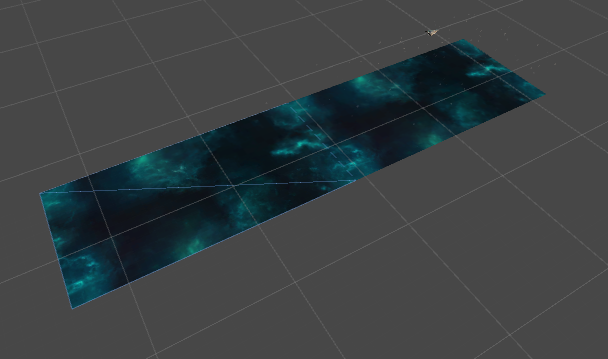
- use script to control the scrolling of the background.
// BGScroller.cs
using UnityEngine;
using System.Collections;

public class BGScroller : MonoBehaviour
{
    public float scrollSpeed;       // 背景图片滚动的速度
    public float tileSizeZ;         // 此处设置为背景图片的长度
    private Vector3 startPosition;

    void Start()
    {
        startPosition = transform.position;
    }

    void Update()
    {
        float newPosition = Mathf.Repeat(Time.time * scrollSpeed, tileSizeZ);   // 类似于 模 操作,但可以作用于浮点数
        transform.position = startPosition + Vector3.forward * newPosition;     // 沿着z轴方向移动
    }
}
Add Enemys!!!!!!!!!!!!
- Create an empty gameobect named Enemy Ship to set the logic stuff(set the position.z to 9, so we can see it in the game view), and drag model vehicle_enemyShip on to it to be it’s child gameobject.
- turn the vehicle_enemyShip 180 around y axies ,not the Enemy Ship gameobject.
- add engines_enemy to Enemy Ship GameObject to be it’s child.
- add RigidBody and Collider components ,drag DestroyByContact.cs on to Enemy Ship.
- set the Enemy Ship to shoot.
- create Spot Spawn as a child gameobject of Enemy Ship and drag Bolt prefab on to it.
- Shot Spawn need to rotation 180. 这样子弹的方向就是向下的,不会向上飞。
- 复制 material fx_bolt_orange,修改之,得到 material fx_bolt_cyan。用 fx_bolt_cyan 修改 VFX的 material,方便的是 Bolt中的逻辑设置适用于此。
- drag DestroyByContact.cs to Bolt Enemy, modify it.
        if(other.CompareTag("Boundary") || other.CompareTag("Enemy")) // 当 other 的 tag 是 Boundary 的时候,跳过,是 Enemy 的时候也跳过,因为 DestroyByContact.cs 只附加到了 Enemy 类型的 GameObject 上。
        {
            return;
        }

        if(explosion != null)       // 当我们有一个 explosion 的时候,explosion。没有的时候,不 explosion。
        {
            Instantiate(explosion, transform.position, transform.rotation);
}- drag Bolt Enemy to Prefabs
- …
- drag Mover.cs to Enemy Ship to move it.
- add EvasiveManeuver.cs to Enemy Ship, edit it
using UnityEngine;
using System.Collections;

public class EvasiveManeuver : MonoBehaviour
{
    public float dodge;     // 中文释义:躲避
    public float smoothing;
    public float tilt;
    public Vector2 startWait;
    public Vector2 maneuverTime;
    public Vector2 maneuverWait;
    public Boundary boundary;

    private float targetManeuver;       // a point on the x axies. So the Enemy will move left or right
    private float currentSpeedZ;        // z方向的当前速度
    private Rigidbody rb;

    void Start()
    {
        rb = GetComponent<Rigidbody>();
        currentSpeedZ = rb.velocity.z;
        Debug.Log("currentSpeedZ = " + currentSpeedZ);
        StartCoroutine(Evade());
    }

    IEnumerator Evade()
    {
        yield return new WaitForSeconds(Random.Range(startWait.x, startWait.y)); // 等候一个随机的时间

        while (true)
        {
            targetManeuver = Random.Range(1, dodge) * -Mathf.Sign(transform.position.x);    // 当Enemy在左侧的时候会向右dodge,在右侧的时候向左dodge
            yield return new WaitForSeconds(Random.Range(maneuverTime.x, maneuverTime.y));
            targetManeuver = 0;                 // set it back
            yield return new WaitForSeconds(Random.Range(maneuverWait.x, maneuverWait.y));
        }
    }

    void FixedUpdate()
    {
        float newManeuver = Mathf.MoveTowards(rb.velocity.x, targetManeuver, Time.deltaTime * smoothing);
        rb.velocity = new Vector3(newManeuver, 0.0f, currentSpeedZ);
        // Clamp the position of Enemy
        rb.position = new Vector3
        (
            Mathf.Clamp(rb.position.x, boundary.xMin, boundary.xMax),
            0.0f,
            Mathf.Clamp(rb.position.z, boundary.zMin, boundary.zMax)
        );
        // set tilt
        rb.rotation = Quaternion.Euler(0.0f, 0.0f, rb.velocity.x * -tilt);
    }
}
something else
添加了两个新特性:
- 让 enemy 朝着 player 的方向走
- 增加 player 的炮筒数目
MOBILE DEVELOPMENT: CONVERTING SPACE SHOOTER TO MOBILE
Link to the video
In this session we will be taking the Space Shooter tutorial and adding mobile devices to the possible build targets. We will cover touch and accelerometer input, build target defines, and more. Tutor - Adam Buckner
- use unity remote apk to link your android device to computer, to use it to control, and you need to use USB to link both of them before.
- 通过旋转手机让飞机上下飞行
// Done_PlayerController.cs
using UnityEngine;
using System.Collections;

[System.Serializable]
public class Done_Boundary
{
    public float xMin, xMax, zMin, zMax;
}

public class Done_PlayerController : MonoBehaviour
{
    public float speed;
    public float tilt;
    public Done_Boundary boundary;

    public GameObject shot;
    public Transform shotSpawn;
    public float fireRate;

    private float nextFire;
    private Quaternion calibrationQuaternion;

    void Start()
    {
        CalibrateAccelerometer();
    }

    void Update()
    {
        if (Input.GetButton("Fire1") && Time.time > nextFire)
        {
            nextFire = Time.time + fireRate;
            Instantiate(shot, shotSpawn.position, shotSpawn.rotation);
            GetComponent<AudioSource>().Play();
        }
    }

    // Uesd to calibrate the Input.acceleration input           ??????????????
    void CalibrateAccelerometer()
    {
        Vector3 acceleratioinSnapshot = Input.acceleration;
        Quaternion rotationQuaternion = Quaternion.FromToRotation(new Vector3(0.0f, 0.0f, -1.0f), acceleratioinSnapshot);
        calibrationQuaternion = Quaternion.Inverse(rotationQuaternion);
    }

    // Get the 'calibrated' value from the Input
    Vector3 FixedAcceleration(Vector3 acceleration)
    {
        Vector3 fixedAcceleration = calibrationQuaternion * acceleration;
        return fixedAcceleration;
    }

    void FixedUpdate ()
    {
        //float moveHorizontal = Input.GetAxis ("Horizontal");
        //float moveVertical = Input.GetAxis ("Vertical");

        //Vector3 movement = new Vector3 (moveHorizontal, 0.0f, moveVertical);
        Vector3 accelerationRaw = Input.acceleration;
        Vector3 acceleration = FixedAcceleration(accelerationRaw);
        Vector3 movement = new Vector3(acceleration.x, 0.0f, acceleration.y);
        GetComponent<Rigidbody>().velocity = movement * speed;

        GetComponent<Rigidbody>().position = new Vector3
        (
            Mathf.Clamp (GetComponent<Rigidbody>().position.x, boundary.xMin, boundary.xMax),
            0.0f,
            Mathf.Clamp (GetComponent<Rigidbody>().position.z, boundary.zMin, boundary.zMax)
        );

        GetComponent<Rigidbody>().rotation = Quaternion.Euler (0.0f, 0.0f, GetComponent<Rigidbody>().velocity.x * -tilt);
    }


}
movement, add touch pad area.
- Create a UI/image GameObject. a Canvas object and a EventSystem GameObject has been created automatically.
- 我们要的效果是,在这块【!!加图】区域内,当你touch的时候,就可以接着根据你手指的方向来移动飞船,而不是添加joystick来完成。也就是用手指的相对最开始点的运动来设置飞船的运动方向。(和速度??)
- 当有第二个手指的时候,会跟着第二个手指的控制,这不好,。我们要在有一个手指的时候,忽略其他的touch。
fire, add touch pad area.
- 编译,运行
Finally 游戏成功运行在我的小米上了。哈哈哈
有些代码还不是很懂:


 1657
1657

 被折叠的 条评论
为什么被折叠?
被折叠的 条评论
为什么被折叠?
 到【灌水乐园】发言


