


 本文详细分析了Android中输入事件从InputDispatcherThread发送到View结构树的过程。首先,InputChannel通过sendMessage将事件发送,接着在WindowManagerService的addWindow方法中创建InputChannel。通过一步步跟踪源码,发现事件最终由ViewRootImpl的WindowInputEventReceiver读取,并通过事件回调逐级分发到View结构树中,完成事件处理。
通过上一节的分析,我们发现InputDispatcherThread使用InputChannel的sendMessage方法发送了一条消息,但是我们不知道谁在接收这条消息。因此,这一节我们的目标很明确,弄懂”是谁在接收消息,然后这条消息是怎么分发到View的结构树中的”。(注:分析使用的Android源码版本为6.0)
上一节我们说InputChannel的本质是linux本地套接字,因为它内部使用socketpair()函数创建了一对套接字描述符,我们说持有这一对描述符的进程就可以使用各自的套接字描述符来与另一方通信。InputManager中显然是已经有一个InputChannel的实例了,我们sendMessage就是使用的它,那么另外一方在哪里呢?
我们在Android源码下搜索openInputChannelPair方法看看都有谁在使用它:
通过搜索我们发现在WindowManagerService的addWindow方法中有创建InputChannel的相关逻辑:
    public int addWindow(Session session, IWindow client, int seq,
            WindowManager.LayoutParams attrs, int viewVisibility, int displayId,
            Rect outContentInsets, Rect outStableInsets, Rect outOutsets,
            InputChannel outInputChannel) {
            ...
            if (outInputChannel != null && (attrs.inputFeatures
                    & WindowManager.LayoutParams.INPUT_FEATURE_NO_INPUT_CHANNEL) == 0) {
                String name = win.makeInputChannelName();
                InputChannel[] inputChannels = InputChannel.openInputChannelPair(name);
                win.setInputChannel(inputChannels[0]);
                inputChannels[1].transferTo(outInputChannel);

                mInputManager.registerInputChannel(win.mInputChannel, win.mInputWindowHandle);
            }
            ...

        return res;
    }
这里确实使用openInputChannelPair创建了一对InputChannel实例,这个方法我们上一篇文章中已经分析过,这里就不分析了。可是,这里能不能知道是谁在套接字的另一端接收事件呢?下面,我们一步步分析它。
在我的博客:一步步追踪Dialog的创建流程(一)一文中,我们得出了三条结论:
1.DecorView是根View.
2.ViewRootImpl中的setView方法使得DecorView和ViewRootImpl紧密相关。
3.WindowManagerService中的addWindow最终实现了Window的添加。
为了方便查看addWindow方法的调用过程,我已经绘制了如下简单的时序图:
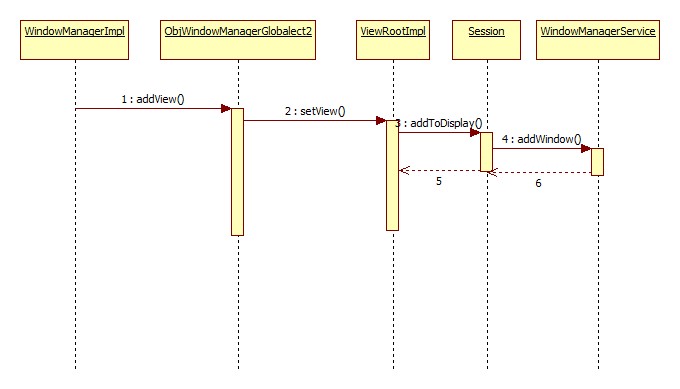
下面,我们从源码着手分析下这个过程:
想必Activity也是类似的,addWindow最终向系统添加我们自己创建的window。回顾下Dialog的创建流程,我们知道非常核心的一句代码就是通过调用WindowManagerImpl的addView把view添加到window中去,下面是addView的源码:
    @Override
    public void addView(@NonNull View view, @NonNull ViewGroup.LayoutParams params) {
        applyDefaultToken(params);
        **mGlobal.addView(view, params, mDisplay, mParentWindow);**
    }
进一步调用WindowManagerGlobal.java类中的addView方法:
    public void addView(View view, ViewGroup.LayoutParams params,
            Display display, Window parentWindow) {
            ...
            root = new ViewRootImpl(view.getContext(), display);

            view.setLayoutParams(wparams);

            mViews.add(view);
            mRoots.add(root);
            mParams.add(wparams);
        }
    // do this last because it fires off messages to start doing things
        try {
            **root.setView(view, wparams, panelParentView);**
        } catch (RuntimeException e) {
            // BadTokenException or InvalidDisplayException, clean up.
            synchronized (mLock) {
                final int index = findViewLocked(view, false);
                if (index >= 0) {
                    removeViewLocked(index, true);
                }
            }
            throw e;
        }
进一步调用ViewRootImpl的setView方法:
    public void setView(View view, WindowManager.LayoutParams attrs, View panelParentView) {
    ...
  try {
                    mOrigWindowType = mWindowAttributes.type;
                    mAttachInfo.mRecomputeGlobalAttributes = true;
                    collectViewAttributes();
                    **res = mWindowSession.addToDisplay(mWindow, mSeq, mWindowAttributes,
                            getHostVisibility(), mDisplay.getDisplayId(),
                            mAttachInfo.mContentInsets, mAttachInfo.mStableInsets,
                            mAttachInfo.mOutsets, mInputChannel);**
                } catch (RemoteException e) {
                    mAdded = false;
                    mView = null;
                    mAttachInfo.mRootView = null;
                    mInputChannel = null;
                    mFallbackEventHandler.setView(null);
                    unscheduleTraversals();
                    setAccessibilityFocus(null, null);
                    throw new RuntimeException("Adding window failed", e);
                } finally {
                    if (restore) {
                        attrs.restore();
                    }
                }
                ...
                   **if (mInputChannel != null) {
                    if (mInputQueueCallback != null) {
                        mInputQueue = new InputQueue();
                        mInputQueueCallback.onInputQueueCreated(mInputQueue);
                    }
                    mInputEventReceiver = new WindowInputEventReceiver(mInputChannel,
                            Looper.myLooper());**
                }
                ...
进一步调用Session.java中的addToDisplay:
    @Override
    public int addToDisplay(IWindow window, int seq, WindowManager.LayoutParams attrs,
            int viewVisibility, int displayId, Rect outContentInsets, Rect outStableInsets,
            Rect outOutsets, InputChannel outInputChannel) {
        return mService.addWindow(this, window, seq, attrs, viewVisibility, displayId,
                outContentInsets, outStableInsets, outOutsets, outInputChannel);
    }
然后调用到WindowManagerService.java下的addWindow方法:
    public int addWindow(Session session, IWindow client, int seq,
            WindowManager.LayoutParams attrs, int viewVisibility, int displayId,
            Rect outContentInsets, Rect outStableInsets, Rect outOutsets,
            InputChannel outInputChannel) {
            ...
            if (outInputChannel != null && (attrs.inputFeatures
                    & WindowManager.LayoutParams.INPUT_FEATURE_NO_INPUT_CHANNEL) == 0) {
                **String name = win.makeInputChannelName();
                InputChannel[] inputChannels = InputChannel.openInputChannelPair(name);
                win.setInputChannel(inputChannels[0]);
                inputChannels[1].transferTo(outInputChannel);
                mInputManager.registerInputChannel(win.mInputChannel, win.mInputWindowHandle);**
            }
            ...
}
从上面调用上面的addWindow的调用关系分析中,我们会发现mInputChannel是在ViewRootImpl中创建并传递给WindowManagerService的addWindow方法的,也就是说套接字的另一端其实是ViewRootImpl持有的。ViewRootImpl的setView中有下面代码非常关键:
                if (mInputChannel != null) {
                    if (mInputQueueCallback != null) {
                        mInputQueue = new InputQueue();
                        mInputQueueCallback.onInputQueueCreated(mInputQueue);
                    }
                    mInputEventReceiver = new WindowInputEventReceiver(mInputChannel,
                            Looper.myLooper());
                }
这个在前面的setView代码中已经贴过了,但是没有分析,现在把它拿出来分析。
这里做了两件事情:
1.创建了一个InputQueue,它表示一个输入事件队列并设置事件回调。
2.创建一个WindowInputEventReceiver的实例负责读取事件。
因此,目前的关键就是WindowInputEventReceiver到底是怎么读取事件的。
下面我们就从WindowInputEventReceiver开始着手,分析事件到底怎么一步步递交给View结构树的,为了方便跟踪源码,我们可以参考如下时序图:
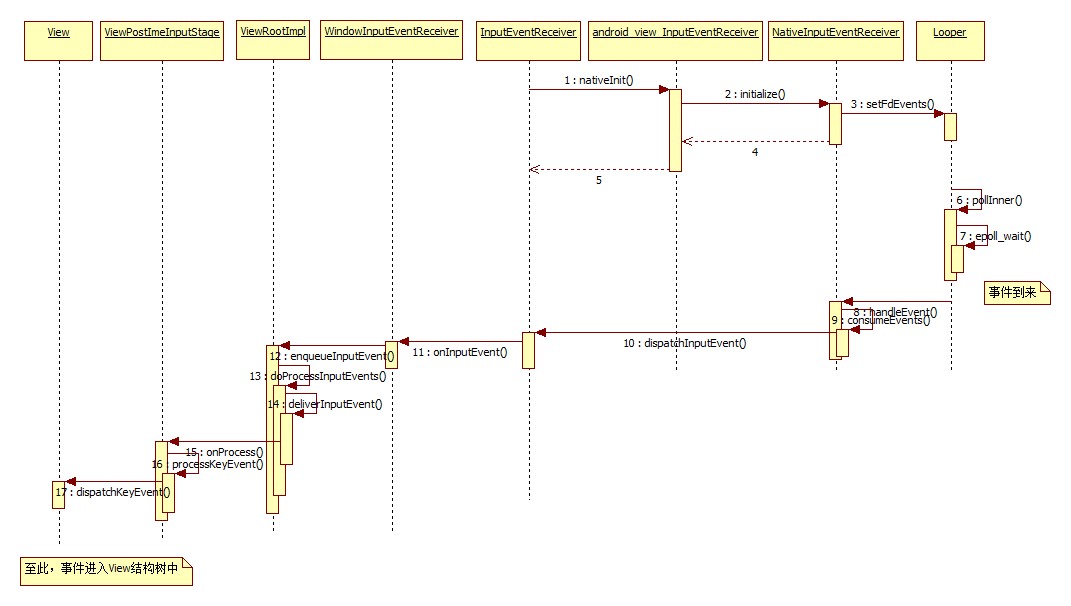
接下来,还是从源码着手分析,分析的切入点自然回事WindowInputEventReceiver的构造方法了:
WindowInputEventReceiver构造函数如下:
  final class WindowInputEventReceiver extends InputEventReceiver {

        public WindowInputEventReceiver(InputChannel inputChannel, Looper looper) {
            super(inputChannel, looper);
        }
可以看到它并没有做什么,但是它继承了InputEventReceiver类,我们看下InputEventReceiver类的构造方法:
    public InputEventReceiver(InputChannel inputChannel, Looper looper) {
        if (inputChannel == null) {
            throw new IllegalArgumentException("inputChannel must not be null");
        }
        if (looper == null) {
            throw new IllegalArgumentException("looper must not be null");
        }

        mInputChannel = inputChannel;
        mMessageQueue = looper.getQueue();
        mReceiverPtr = nativeInit(new WeakReference<InputEventReceiver>(this),
                inputChannel, mMessageQueue);

        mCloseGuard.open("dispose");
    }
关键是调用了nativeInit方法,
 最低0.47元/天 解锁文章


 1381
1381

 被折叠的 条评论
为什么被折叠?
被折叠的 条评论
为什么被折叠?
 到【灌水乐园】发言


