


利用轮廓检测,我们可以检测物体的边界,并在图像中轻松定位。这通常是许多有趣应用的第一步,如图像前景提取、简单图像分割、检测和识别。
无人看管物体检测:公共场所的任何无人看管物体一般都被视为可疑物体。一种有效而安全的解决方案是:(利用背景抽取法形成轮廓,检测无人看管物体)
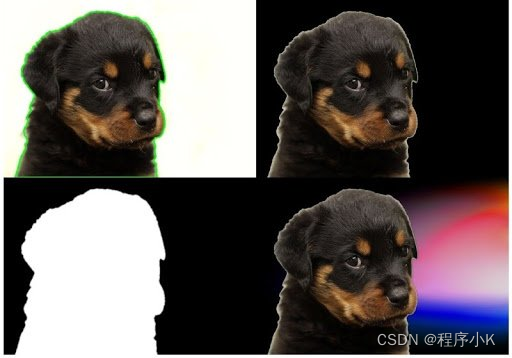
背景/前景分割:要将一幅图像的背景替换为另一幅图像的背景,需要执行图像前景提取(类似于图像分割)。使用轮廓线是进行分割的一种方法。更多详情,请参阅本帖。以下图片展示了此类应用的简单示例:
1、什么是轮廓线
当我们将物体边界上的所有点连接起来时,就得到了一条轮廓线。通常,一个特定的轮廓是指具有相同颜色和强度的边界像素。OpenCV 可以非常方便地在图像中查找和绘制轮廓线。它提供了两个简单的函数:
findContours()drawContours()
此外,它还有两种不同的轮廓检测算法:
CHAIN_APPROX_SIMPLECHAIN_APPROX_NONE
我们将在下面的示例中详细介绍这些算法。下图展示了这些算法如何检测简单物体的轮廓。
2、在 OpenCV 中检测和绘制轮廓的步骤
1.读取图像并将其转换为灰度格式 。
将图像转换为灰度格式非常重要,因为这将为下一步做好准备。将图像转换为单通道灰度图像对于阈值处理非常重要,而阈值处理又是轮廓检测算法正常工作的必要条件。
2.应用二进制阈值处理
在寻找轮廓时,首先要对灰度图像应用二进制阈值或 Canny 边缘检测。在这里,我们将应用二进制阈值处理。将图像转换为黑白图像,突出显示感兴趣的物体,便于轮廓检测算法处理。阈值处理使图像中物体的边界完全变白,所有像素都具有相同的强度。现在,算法可以从这些白色像素中检测出物体的边界。注:值为 0 的黑色像素被视为背景像素,会被忽略。
这一步可能会出现一个问题。如果我们使用的是 R(红)、G(绿)或 B(蓝)等单通道图像,而不是灰度(阈值)图像,该怎么办?在这种情况下,轮廓检测算法将无法正常工作。正如我们之前所讨论的,该算法会寻找边界和相似强度的像素来检测轮廓。二值图像比单一(RGB)彩色通道图像更能提供这些信息。在本博客的后面部分,我们将介绍仅使用单一 R、G 或 B 通道而非灰度和阈值图像时的结果图像。
3.查找轮廓
使用 findContours() 函数检测图像中的轮廓。
4.在原始 RGB 图像上绘制轮廓线。
确定轮廓后,使用 drawContours() 函数在原始 RGB 图像上叠加轮廓。
3、使用Opencv进行查找和绘制轮廓
(1)二值化处理
Python:
import cv2

# read the image
image = cv2.imread('input/image.jpg')

# convert the image to grayscale format
img_gray = cv2.cvtColor(image, cv2.COLOR_BGR2GRAY)
# apply binary thresholding
ret, thresh = cv2.threshold(img_gray, 150, 255, cv2.THRESH_BINARY)
# visualize the binary image
cv2.imshow('Binary image', thresh)
cv2.waitKey(0)
cv2.imwrite('image_thres.jpg', thresh)
cv2.destroyAllWindows()
使用 threshold() 函数对图像应用二进制阈值。任何值大于 150 的像素都将被设置为 255(白色)。生成图像中的所有剩余像素都将设置为 0(黑色)。阈值 150 是一个可调整的参数,因此您可以尝试使用。
C++:
#include<opencv2/opencv.hpp>
#include <iostream>

using namespace std;
using namespace cv;

int main() {
   // read the image
   Mat image = imread("input/image_1.jpg");
  // convert the image to grayscale format
  Mat img_gray;
  cvtColor(image, img_gray, COLOR_BGR2GRAY);
  // apply binary thresholding
  Mat thresh;
  threshold(img_gray, thresh, 150, 255, THRESH_BINARY);
  imshow("Binary mage", thresh);
  waitKey(0);
  imwrite("image_thres1.jpg", thresh);
  destroyAllWindows();
}
(2)轮廓查找
从 findContours() 函数开始。该函数有三个必备参数。
- image:上一步获得的二进制输入图像image。
- mode:模式:这是轮廓检索模式。我们提供的是 RETR_TREE,这意味着算法将从二值图像中检索所有可能的轮廓。还有更多的轮廓检索模式,我们也将一一讨论。有关这些选项的更多详情,请点击此处。
- method:定义轮廓逼近方法。在本例中,我们将使用 CHAIN_APPROX_NONE。虽然这种方法比 CHAIN_APPROX_SIMPLE 稍慢,但我们将使用这种方法存储所有轮廓点。
(3)绘制轮廓
使用 drawContours() 函数将轮廓叠加到 RGB 图像上。该函数有四个必填参数和几个可选参数。以下前四个参数为必填参数。
-image(图像):这是输入的 RGB 图像,您要在上面绘制轮廓。
- contours(轮廓线):表示从 findContours() 函数中获取的轮廓。
- contourIdx:轮廓线点的像素坐标,列在获取的轮廓线中。使用此参数,您可以指定列表中的索引位置,以准确显示您要绘制的轮廓点。提供负值将绘制所有轮廓点。
- color:表示要绘制的轮廓点的颜色。我们将绘制绿色的点。
- thickness (厚度):这是轮廓点的厚度。
Python:
# detect the contours on the binary image using cv2.CHAIN_APPROX_NONE
contours, hierarchy = cv2.findContours(image=thresh, mode=cv2.RETR_TREE, method=cv2.CHAIN_APPROX_NONE)

# draw contours on the original image
image_copy = image.copy()
cv2.drawContours(image=image_copy, contours=contours, contourIdx=-1, color=(0, 255, 0), thickness=2, lineType=cv2.LINE_AA)

# see the results
cv2.imshow('None approximation', image_copy)
cv2.waitKey(0)
cv2.imwrite('contours_none_image1.jpg', image_copy)
cv2.destroyAllWindows()
C++:
// detect the contours on the binary image using cv2.CHAIN_APPROX_NONE
vector<vector<Point>> contours;
vector<Vec4i> hierarchy;
findContours(thresh, contours, hierarchy, RETR_TREE, CHAIN_APPROX_NONE);
// draw contours on the original image
Mat image_copy = image.clone();
drawContours(image_copy, contours, -1, Scalar(0, 255, 0), 2);//-1绘制所有轮廓点
imshow("None approximation", image_copy);
waitKey(0);
imwrite("contours_none_image1.jpg", image_copy);
destroyAllWindows();
4、使用单通道:红、绿或蓝图像进行轮廓检测
以下是在检测轮廓时分别使用红、绿、蓝通道的一些结果,仅供参考。我们在之前的轮廓检测步骤中讨论过这个问题。以下是同一幅图像的 Python 和 C++ 代码。
Python:
import cv2

# read the image
image = cv2.imread('input/image.jpg')

# B, G, R channel splitting
blue, green, red = cv2.split(image)

# detect contours using blue channel and without thresholding
contours1, hierarchy1 = cv2.findContours(image=blue, mode=cv2.RETR_TREE, method=cv2.CHAIN_APPROX_NONE)

# draw contours on the original image
image_contour_blue = image.copy()
cv2.drawContours(image=image_contour_blue, contours=contours1, contourIdx=-1, color=(0, 255, 0), thickness=2, lineType=cv2.LINE_AA)
# see the results
cv2.imshow('Contour detection using blue channels only', image_contour_blue)
cv2.waitKey(0)
cv2.imwrite('blue_channel.jpg', image_contour_blue)
cv2.destroyAllWindows()

# detect contours using green channel and without thresholding
contours2, hierarchy2 = cv2.findContours(image=green, mode=cv2.RETR_TREE, method=cv2.CHAIN_APPROX_NONE)
# draw contours on the original image
image_contour_green = image.copy()
cv2.drawContours(image=image_contour_green, contours=contours2, contourIdx=-1, color=(0, 255, 0), thickness=2, lineType=cv2.LINE_AA)
# see the results
cv2.imshow('Contour detection using green channels only', image_contour_green)
cv2.waitKey(0)
cv2.imwrite('green_channel.jpg', image_contour_green)
cv2.destroyAllWindows()

# detect contours using red channel and without thresholding
contours3, hierarchy3 = cv2.findContours(image=red, mode=cv2.RETR_TREE, method=cv2.CHAIN_APPROX_NONE)
# draw contours on the original image
image_contour_red = image.copy()
cv2.drawContours(image=image_contour_red, contours=contours3, contourIdx=-1, color=(0, 255, 0), thickness=2, lineType=cv2.LINE_AA)
# see the results
cv2.imshow('Contour detection using red channels only', image_contour_red)
cv2.waitKey(0)
cv2.imwrite('red_channel.jpg', image_contour_red)
cv2.destroyAllWindows()
C++:
#include<opencv2/opencv.hpp>
#include <iostream>

using namespace std;
using namespace cv;

int main() {
   // read the image
   Mat image = imread("input/image_1.jpg");

   // B, G, R channel splitting
   Mat channels[3];
   split(image, channels);

   // detect contours using blue channel and without thresholding
   vector<vector<Point>> contours1;
   vector<Vec4i> hierarchy1;
   findContours(channels[0], contours1, hierarchy1, RETR_TREE, CHAIN_APPROX_NONE);
   // draw contours on the original image
   Mat image_contour_blue = image.clone();
   drawContours(image_contour_blue, contours1, -1, Scalar(0, 255, 0), 2);
   imshow("Contour detection using blue channels only", image_contour_blue);
   waitKey(0);
   imwrite("blue_channel.jpg", image_contour_blue);
   destroyAllWindows();

   // detect contours using green channel and without thresholding
   vector<vector<Point>> contours2;
   vector<Vec4i> hierarchy2;
   findContours(channels[1], contours2, hierarchy2, RETR_TREE, CHAIN_APPROX_NONE);
   // draw contours on the original image
   Mat image_contour_green = image.clone();
   drawContours(image_contour_green, contours2, -1, Scalar(0, 255, 0), 2);
   imshow("Contour detection using green channels only", image_contour_green);
   waitKey(0);
   imwrite("green_channel.jpg", image_contour_green);
   destroyAllWindows();

   // detect contours using red channel and without thresholding
   vector<vector<Point>> contours3;
   vector<Vec4i> hierarchy3;
   findContours(channels[2], contours3, hierarchy3, RETR_TREE, CHAIN_APPROX_NONE);
   // draw contours on the original image
   Mat image_contour_red = image.clone();
   drawContours(image_contour_red, contours3, -1, Scalar(0, 255, 0), 2);
   imshow("Contour detection using red channels only", image_contour_red);
   waitKey(0);
   imwrite("red_channel.jpg", image_contour_red);
   destroyAllWindows();
}
实验结果可见,我们使用红蓝绿单通道图像应用轮廓检测算法时,无法正确找到轮廓。这是因为它无法正确检测到物体的边界,而且像素之间的强度差异也不明确。因此,我们更倾向于使用灰度图像和二进制阈值图像来检测轮廓。
findContours() 方法CHAIN_APPROX_SIMPLE和 CHAIN_APPROX_NONE。
CHAIN_APPROX_SIMPLE 算法会压缩轮廓线上的水平、垂直和对角线线段,只留下它们的端点。这意味着沿直线路径的任何点都将被忽略,我们将只留下端点。例如,沿矩形绘制一条轮廓线。除了四个角点外,所有轮廓点都将被忽略。这种方法比 CHAIN_APPROX_NONE 更快,因为算法无需存储所有点,使用的内存更少,因此执行时间更短。
如果仔细观察,CHAIN_APPROX_NONE 和 CHAIN_APPROX_SIMPLE 的输出几乎没有差别。 这是为什么呢?这要归功于 drawContours() 函数。虽然 CHAIN_APPROX_SIMPLE 方法通常会产生较少的点,但 drawContours() 函数会自动连接相邻的点,即使它们不在轮廓线列表中,也会将它们连接起来。


 4881
4881

 被折叠的 条评论
为什么被折叠?
被折叠的 条评论
为什么被折叠?
 到【灌水乐园】发言


