slack 聊天机器人
重点 (Top highlight)
In this post, we’ll take a look at how you can utilize Symanto’s sentiment model to create a Slack bot with Node.js.
在本文中,我们将介绍如何利用Symanto的情感模型通过Node.js创建Slack机器人。
By the end of this tutorial, you’ll know how to setup a Slack bot and analyze the user’s writing style with Symanto’s Psycholinguistic Text Analytics API to understand different aspects of their messages: The language of the message, general sentiment, emotions the user has expressed, and even how users talk. For example, whether they share personal feelings or express objective and factual information.
在本教程结束时,您将知道如何设置一个Slack机器人并使用Symanto的Psycholinguistic Text Analytics API分析用户的书写风格,以了解其消息的不同方面: 信息的语言,一般情感,用户表达的情感,甚至用户的交谈方式 。 例如,他们是否分享个人感受或表达客观和事实信息。
Our final application will look like this:
我们的最终应用程序将如下所示:

设置 (The setup)
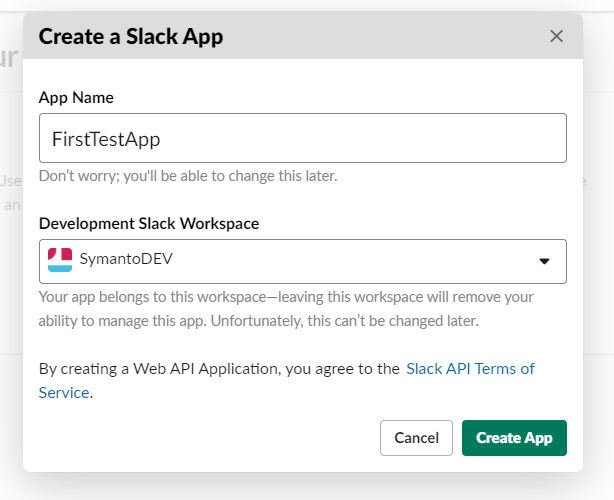
First, we’ll need to create a new Slack app. Let’s go to the Slack API portal and click “Create an App”. Give your new app a name; we’ll call this one “FirstTestApp” for now. Then, select your Slack Workspace where you want to create your new app.
首先,我们需要创建一个新的Slack应用。 让我们转到Slack API门户 ,然后单击“创建应用程序”。 给您的新应用起个名字; 我们现在将其称为“ FirstTestApp” 。 然后,选择要在其中创建新应用程序的Slack Workspace。

Next, click “OAuth & Permissions” from the left menu and scroll down to “Scopes” to add the following OAuth Scopes for Bot Token Scopes:
接下来,点击左侧菜单中的“ OAuth和权限”,然后向下滚动至“范围”,为Bot令牌范围添加以下OAuth范围:
chat:write (to allow the bot to send messages)
chat:write (允许机器人发送消息)
channels:history (to allow the bot to view messages on public channels that the bot has been added to)
频道:历史记录 (以允许漫游器在其已添加到的公共频道上查看消息)
users:read (to read the users’ info to access their usernames)
用户:读取 (读取用户的信息以访问其用户名)

Once that’s done, scroll back up and click the button “Install App to Workspace” and allow the app to request permissions to access your workspace. You’ll receive a “Bot User OAuth Access Token”. Copy this token and save it for later.
完成后,向上滚动并单击“将应用程序安装到工作区”按钮,并允许该应用程序请求访问您的工作区的权限。 您将收到一个“ Bot用户OAuth访问令牌” 。 复制此令牌并保存以备后用。
Next, navigate to “Basic Information” and save the “Signing Secret Key” too.
接下来,导航至“基本信息”并保存“签名密钥”。
创建您的node.js项目 (Create your node.js project)
First, create a new folder named “FirstTestApp”. In this folder, create a new file named “.env” and copy&paste the following settings:
首先,创建一个名为“ FirstTestApp”的新文件夹。 在此文件夹中,创建一个名为“ .env”的新文件,然后复制并粘贴以下设置:
Next, add your Signing Secret Key to SLACK_SIGNING_SECRET and your Bot User OAuth Access Token to SLACK_ACCESS_TOKEN. Finally, get your free API key by signing up to Symanto’s developer portal and paste it to API_KEY.
接下来,将您的签名秘密密钥添加到SLACK_SIGNING_SECRET,并将您的Bot用户OAuth访问令牌添加到SLACK_ACCESS_TOKEN。 最后,通过注册Symanto的开发人员门户网站获取免费的API密钥并将其粘贴到API_KEY。
Download node.js if you haven’t yet, open the node.js command tool and navigate to the root of your development folder. Type “npm init” and answer the questions to create a package.json file. Then, open package.json and add “start” : “node index.js” to the scripts section.
如果尚未下载node.js ,请打开node.js命令工具并导航到开发文件夹的根目录。 输入“ npm init”并回答问题以创建package.json文件。 然后,打开package.json并将“ start”:“ node index.js”添加到脚本部分。
The next step is to install the necessary project dependencies using npm install:
下一步是使用npm install安装必要的项目依赖项:
- Axios (Promise based HTTP client for the browser and node.js) Axios(用于浏览器和node.js的基于Promise的HTTP客户端)
- Express (A minimal and flexible Node.js web application framework that provides a robust set of features for web and mobile applications) Express(最小且灵活的Node.js Web应用程序框架,为Web和移动应用程序提供了一组强大的功能)
- Body-parser (Parse incoming request bodies in a middleware before your handlers) 正文解析器(在处理程序之前解析中间件中的传入请求正文)
- Dotenv (Dotenv is a zero-dependency module that loads environment variables from a .env file) Dotenv(Dotenv是一个零依赖模块,可从.env文件加载环境变量)
Your package.json should look something like this:
您的package.json应该看起来像这样:
Then, create a new file “index.js” in your root directory. Copy the following code into your file:
然后,在您的根目录中创建一个新文件“ index.js”。 将以下代码复制到您的文件中:
Let’s start our server by typing npm start.
让我们通过键入npm start来启动服务器。
创建请求URL (Create request URL)
Now that we started our server, let’s create the request URL which Slack uses to send HTTP POST requests when events occur.
现在我们启动了服务器,让我们创建请求URL,Slack在事件发生时使用该URL发送HTTP POST请求。
First, navigate to “Event Subscriptions” on the Slack API portal and enable events.
首先,在Slack API门户上导航到“事件订阅”并启用事件。
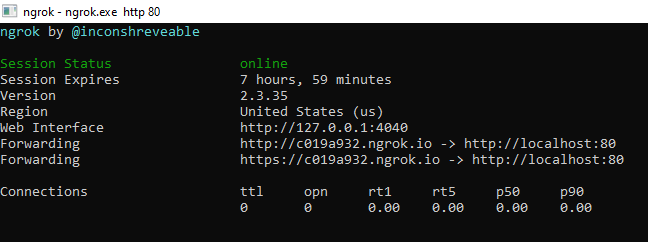
If you haven’t already, download and install ngrok to create the request URL. Ngrok creates a secure URL to your localhost server. Please note that this URL is only valid for a short period of time and should be used only for testing purposes. Open the ngrok terminal and type “ngrok.exe http 80” to expose port 80. It should look something like this:
如果尚未安装,请下载并安装ngrok来创建请求URL。 Ngrok为您的本地主机服务器创建一个安全URL。 请注意,此URL仅在短时间内有效,并且仅应用于测试目的。 打开ngrok终端,然后键入“ ngrok.exe http 80”以暴露端口80。它看起来应该像这样:

Copy either the http or the https forwarding link and paste it into the “Request URL” field followed by /events. It should be verified now. Next, scroll down and click “Add Bot User Event” to add message.channels.
复制http或https转发链接,并将其粘贴到“请求URL”字段中,然后粘贴/ events。 现在应该进行验证。 接下来,向下滚动并单击“添加Bot用户事件”以添加message.channels。

Great! We have our server running and connected to Slack. Let’s connect the bot to the API.
大! 我们正在运行服务器并连接到Slack。 让我们将机器人连接到API。
调用Symanto的Text Analytics API (Call Symanto’s Text Analytics API)
In this part, I’ll show you how you can call the sentiment endpoint of the text analytics API to determine the users’ sentiment. If you want to find out more about all the different endpoints Symanto’s Text Analytics API provide, visit Symanto’s developer portal and API documentation.
在这一部分中,我将向您展示如何调用文本分析API的情感端点来确定用户的情感。 如果您想了解Symanto的Text Analytics API提供的所有不同端点的更多信息,请访问Symanto的开发人员门户和API文档 。
Let’s get started. We use the axios library to make a post request. Here is the sample code of the analyzeTextByDLApi function which gets a text and calls the sentiment endpoint.
让我们开始吧。 我们使用axios库发出发布请求。 这是analyticsTextByDLApi函数的示例代码,该函数获取文本并调用情感终点。
Then, we can call this function in the event call back, this event is raised when a user writes something in a channel.
然后,我们可以在事件回调中调用此函数,当用户在通道中写入内容时会引发此事件。
As you can see in the code, after calling Symanto’s sentiment detection endpoint, we call the Slack API to post the results in the slack channel (chat.postmessage).
如您在代码中所见,调用Symanto的情感检测端点后,我们调用Slack API将结果发布到Slack通道(chat.postmessage)中。
Now, you can run your node.js app and add the bot to one of your channels. Let’s test it out: Write something in the channel and see how it works.
现在,您可以运行您的node.js应用并将该机器人添加到您的一个渠道中。 让我们对其进行测试:在通道中写一些东西,看看它是如何工作的。

Congratulations, you did a great job! You’ve just built your first Slack bot using Symanto’s Text Analytics API.
恭喜,您做得很好! 您刚刚使用Symanto的Text Analytics API构建了第一个Slack机器人。
结语 (Wrap up)
So that’s it! That’s the simplest path from nothing, to a working Slack app applying Symanto’s Psycholinguistic Text Analytics API. You have learned how to create a bot in Slack and how to call the sentiment endpoint.
就是这样了! 这是从零到使用Symanto的Psycholinguistic Text Analytics API正常工作的Slack应用程序的最简单方法。 您已经了解了如何在Slack中创建漫游器以及如何调用情感端点。
I recommend you take a look at the language detection endpoint to automatically detect the language of a user’s message before sending it to one of the other endpoints. Also, play around with the emotion or personality detection to build more advanced capabilities. Happy coding!
我建议您先查看一下语言检测端点,以在将其发送到其他端点之一之前自动检测用户消息的语言。 此外,还可以进行情绪或个性检测,以构建更高级的功能。 编码愉快!
slack 聊天机器人


 1115
1115

 被折叠的 条评论
为什么被折叠?


