


ros系统操纵机器人
Bonus: Also contains details on how to generate labels and learn semantic instance segmentation.
奖励:还包含有关如何生成标签和学习语义实例分割的详细信息。
This article contains descriptions of:
本文包含以下内容的描述:
- How to efficiently generate labels for 3D key-points and instance segmentation ? 如何有效地为3D关键点和实例分割生成标签?
- How to learn 3D key-points and instance segmentation ? 如何学习3D关键点和实例分割?
- How to use 3D key-points in pick and place / contact rich manipulation tasks ? 如何在拾取和放置/联系丰富的操纵任务中使用3D关键点?
为什么要学习3D关键点? (Why learn 3D key points ?)
Consider the problem of hanging any mug by handle on a rack. How can we go about solving this task using robotic manipulator ?
考虑一下用手柄将任何杯子挂在架子上的问题。 我们该如何使用机器人操纵器解决此任务?
There are a few options:
有几种选择:
Demonstration and end-end learning: Collect several examples of hanging a mug on a rack, with different mugs / different back grounds / different initial conditions etc. and use Imitation Learning or Inverse RL to train the policy. but what’s a good input representation for this policy ? Although, there are some impressive demos of using raw sensor data (RGB / RGBD) as input to the policy, you could most likely benefit by using some intermediate state representation in terms of sample efficiency.
演示和端到端学习:收集几个将杯子挂在架子上的示例,它们具有不同的杯子/不同的背景/不同的初始条件等,并使用模仿学习或Inverse RL来训练策略。 但是此政策的良好输入代表是什么? 尽管在使用原始传感器数据(RGB / RGBD)作为策略输入方面有一些令人印象深刻的演示,但就采样效率而言,使用某些中间状态表示很可能会带来好处。
State estimation and planning: You could choose to estimate the state of the cup and use an optimization based planner to get the cup to target state. One caveat is that this is NOT a feedback policy and we’ll see how k-PAM 2.0 extends this idea to a feedback policy based on 3d key-points.
状态估计和计划:您可以选择估计杯子的状态,并使用基于优化的计划程序来使杯子达到目标状态。 一个警告是,这不是反馈策略,我们将看到k-PAM 2.0如何将这一思想扩展到基于3d关键点的反馈策略。
In both cases, we need (or benefit from) object state, and we will focus on literature that use 3D key-points as this intermediate representation.
在这两种情况下,我们都需要对象状态(或从中受益),并且我们将专注于使用3D关键点作为此中间表示形式的文献。
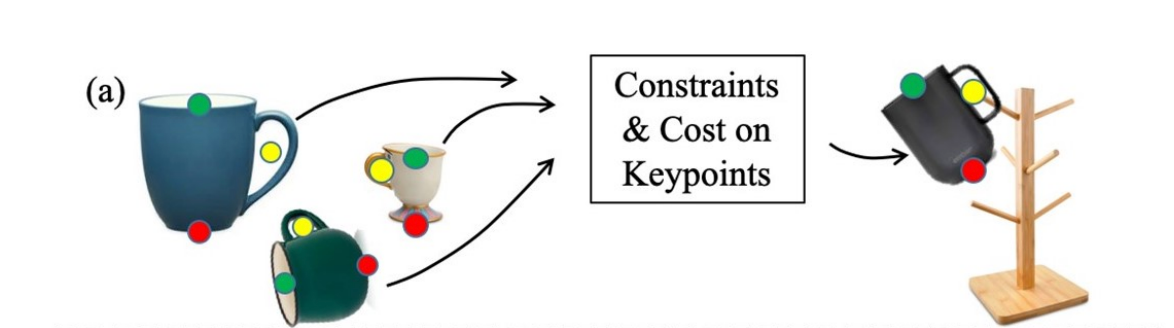
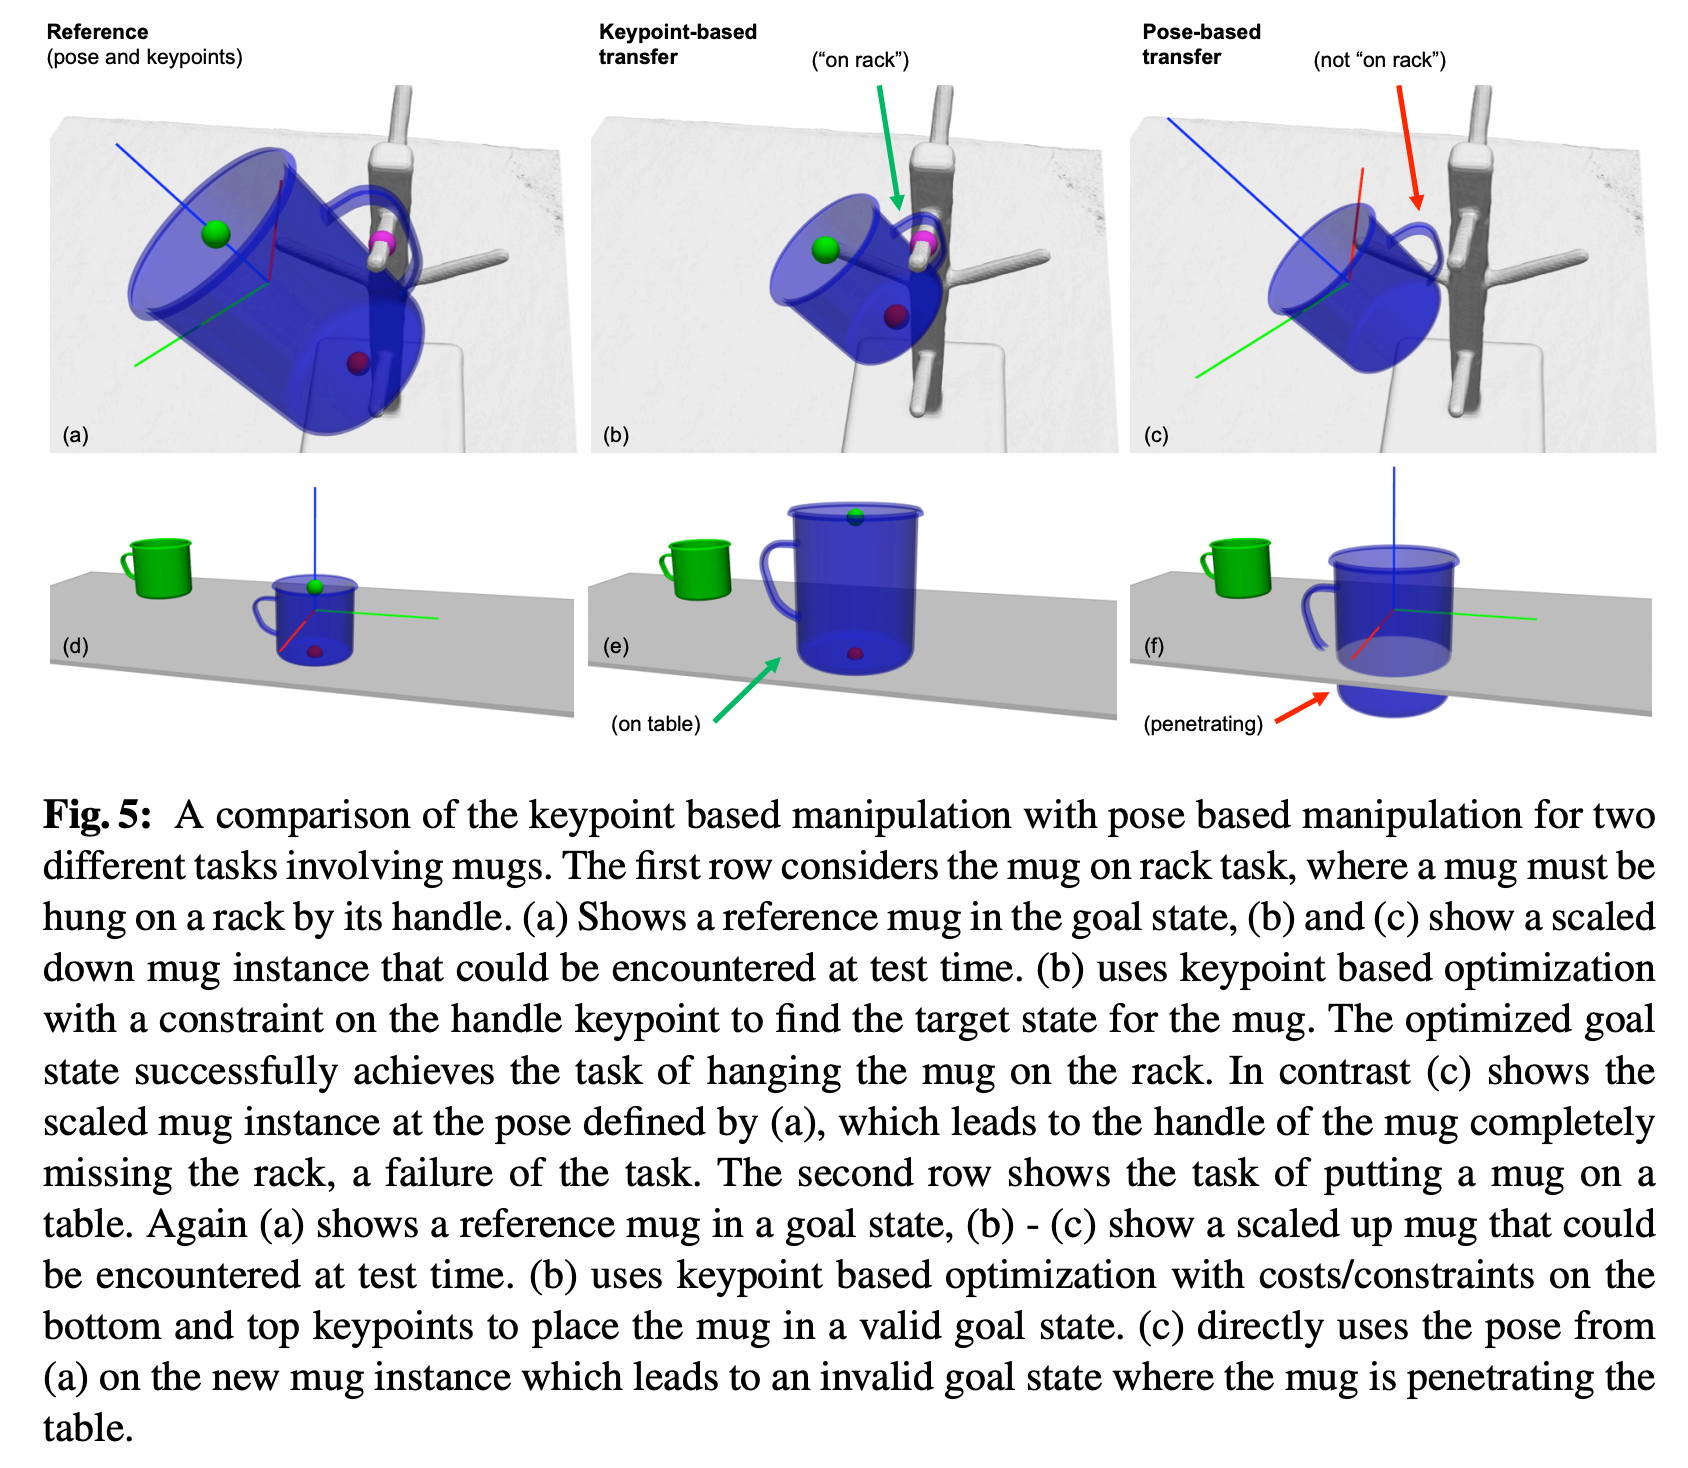
Specifying the state based on 3D target object poses is common practice, however this fails to generalize to all cups with different sizes and holder shapes as illustrated below:
基于3D目标物体的姿势来指定状态是一种常见的做法,但是这不能推广到所有具有不同尺寸和支架形状的杯子,如下图所示:
Also, we will see with k-PAM 2.0 how these key-points are used for feedback control in contact rich manipulation such as peg in hole insertion / usb insertion / wiping the white board etc.
同样,我们将通过k-PAM 2.0看到如何将这些关键点用于丰富接触操作中的反馈控制,例如插入Kong中的销钉/ usb插入/擦拭白板等。
Using 3D key-points as intermediate state comes at the cost of a key-point detector. Lets first discuss how to efficiently (in terms of human time)generate these 3D key-point labels and how to train a 3D key point detector.
使用3D关键点作为中间状态需要付出关键点检测器的代价。 让我们首先讨论如何有效地(根据人类时间)生成这些3D关键点标签,以及如何训练3D关键点检测器。
如何获得3D关键点标签? (How to get 3D key point labels ?)
(and instance segmentation labels)
(以及实例细分标签)
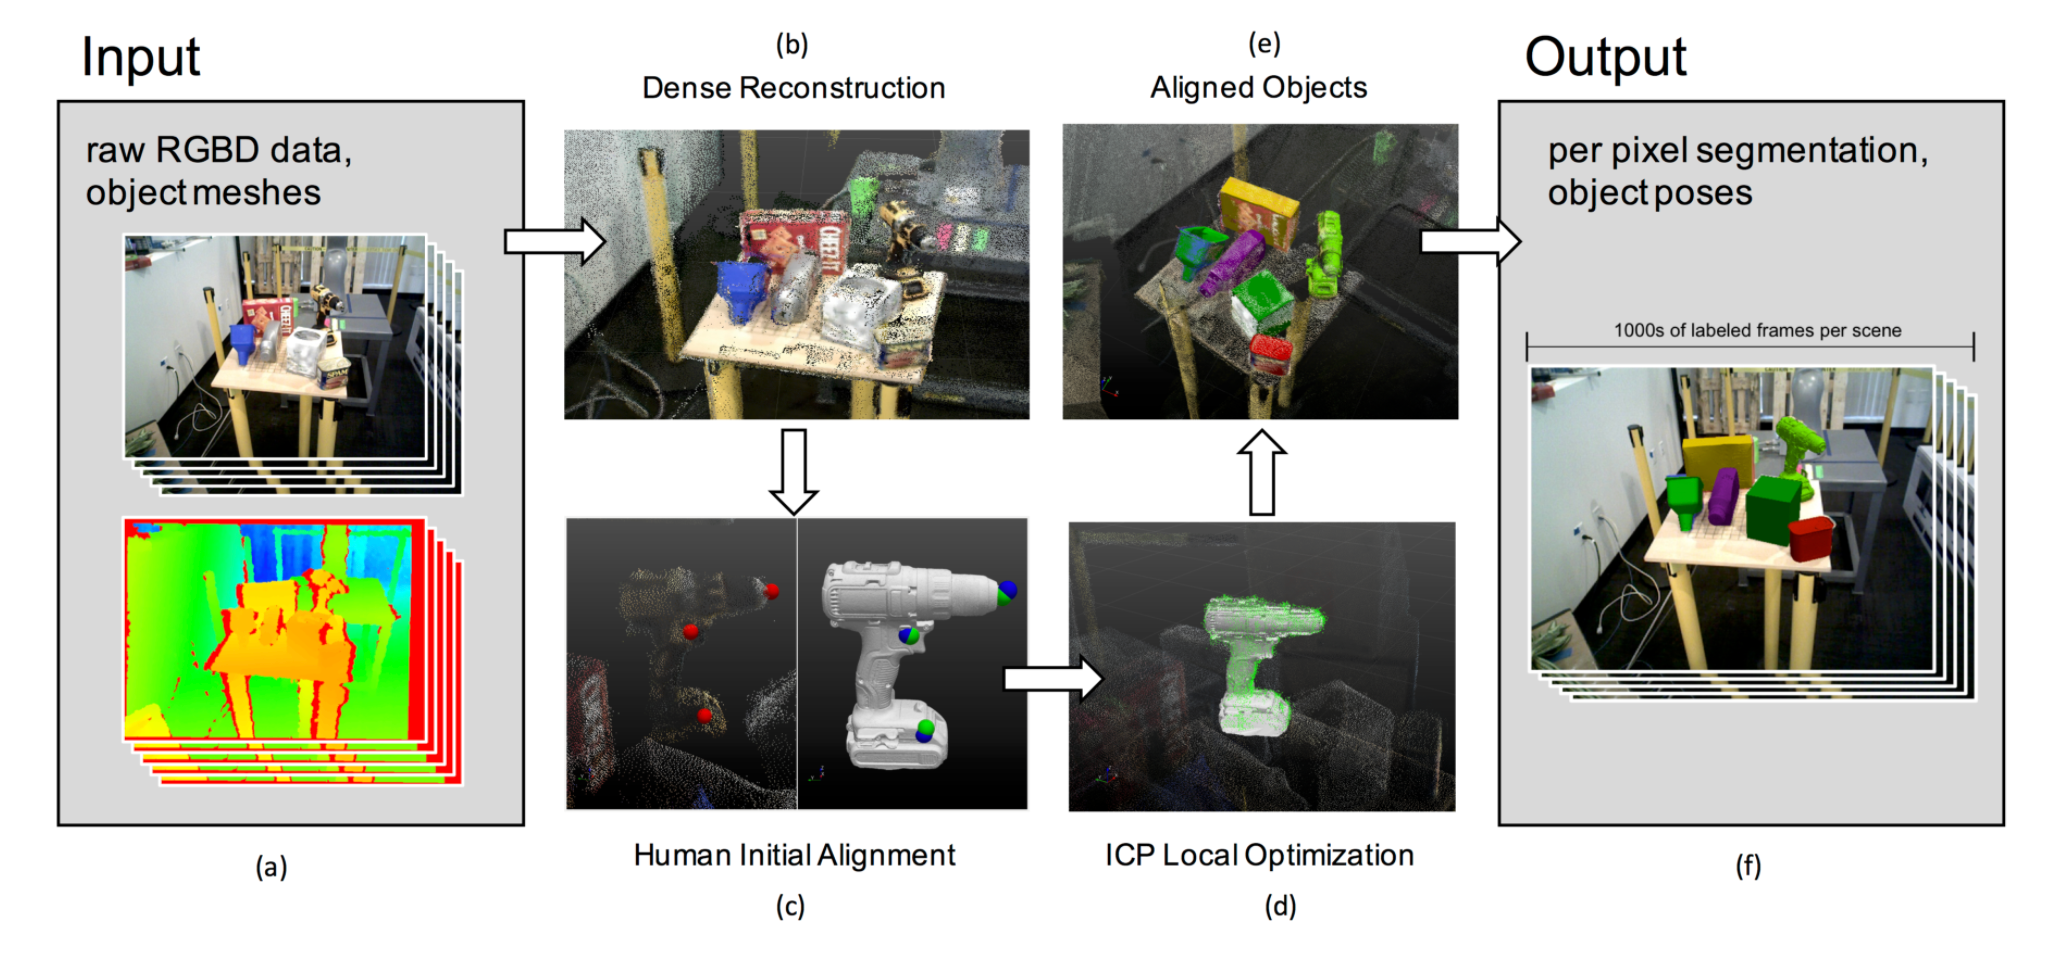
LabelFusion exploits 3D dense reconstruction of the scene to generate segmentation masks and object poses. A known object mesh is aligned to 3D constructed scene first by using human labelled manual registration and then refined further by ICP (Iterative Closest Point) algorithm. Since the camera poses of scene is also estimated by 3D dense reconstruction algorithm, label fusion uses these camera poses to label the object masks and object pose for each frame in the scene. The process is illustrated below:
LabelFusion利用场景的3D密集重建来生成分割蒙版和对象姿势。 已知的对象网格首先通过使用人工标记的手动配准与3D构造的场景对齐,然后通过ICP(迭代最近点)算法进一步完善。 由于场景的摄像机姿态也可以通过3D密集重建算法进行估算,因此标签融合使用这些摄像机姿态为场景中每个帧标记对象蒙版和对象姿态。 该过程如下图所示:
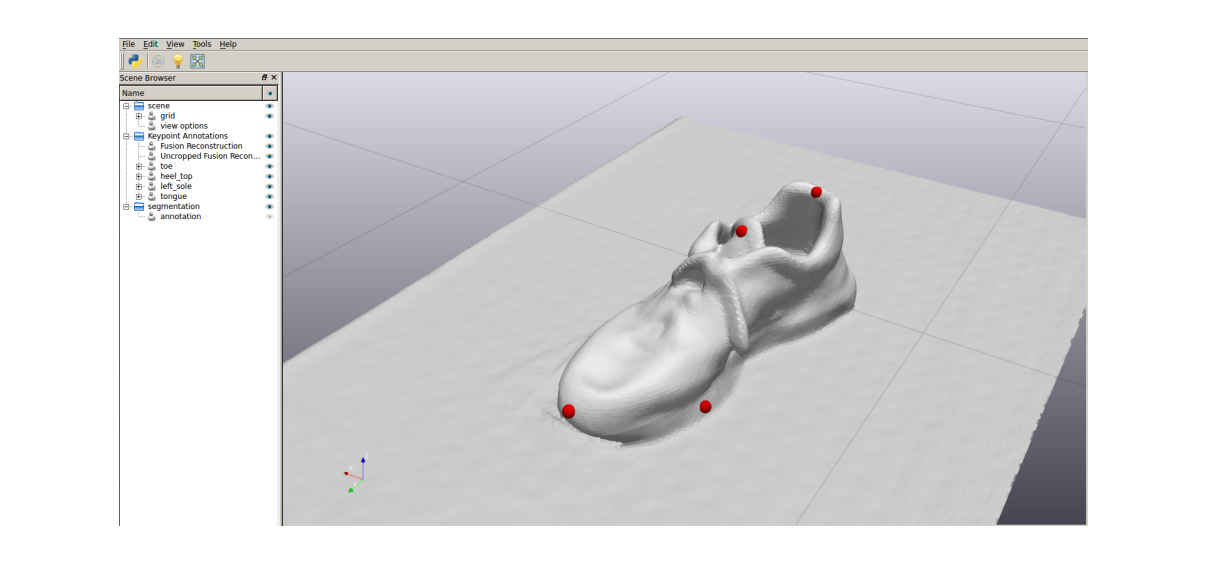
The same idea of using the 3D reconstruction to label 3D key-points on an object mesh and transforming these labels to each camera pose can be used to generate the 3D key-point labels for each depth images illustrated below. Also notice that this doesn’t necessarily need pre-built 3D meshes.
使用3D重建在对象网格上标记3D关键点并将这些标记转换为每个相机姿态的相同想法可用于为以下所示的每个深度图像生成3D关键点标签。 另请注意,这不一定需要预先构建的3D网格。
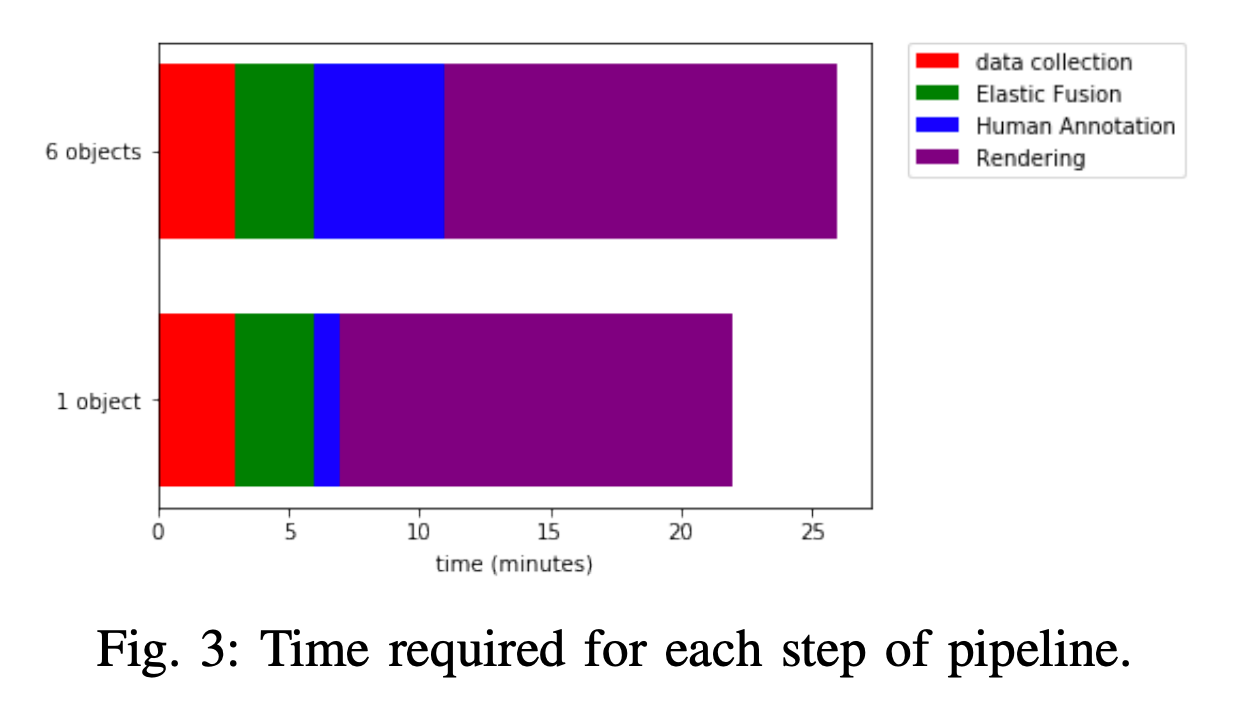
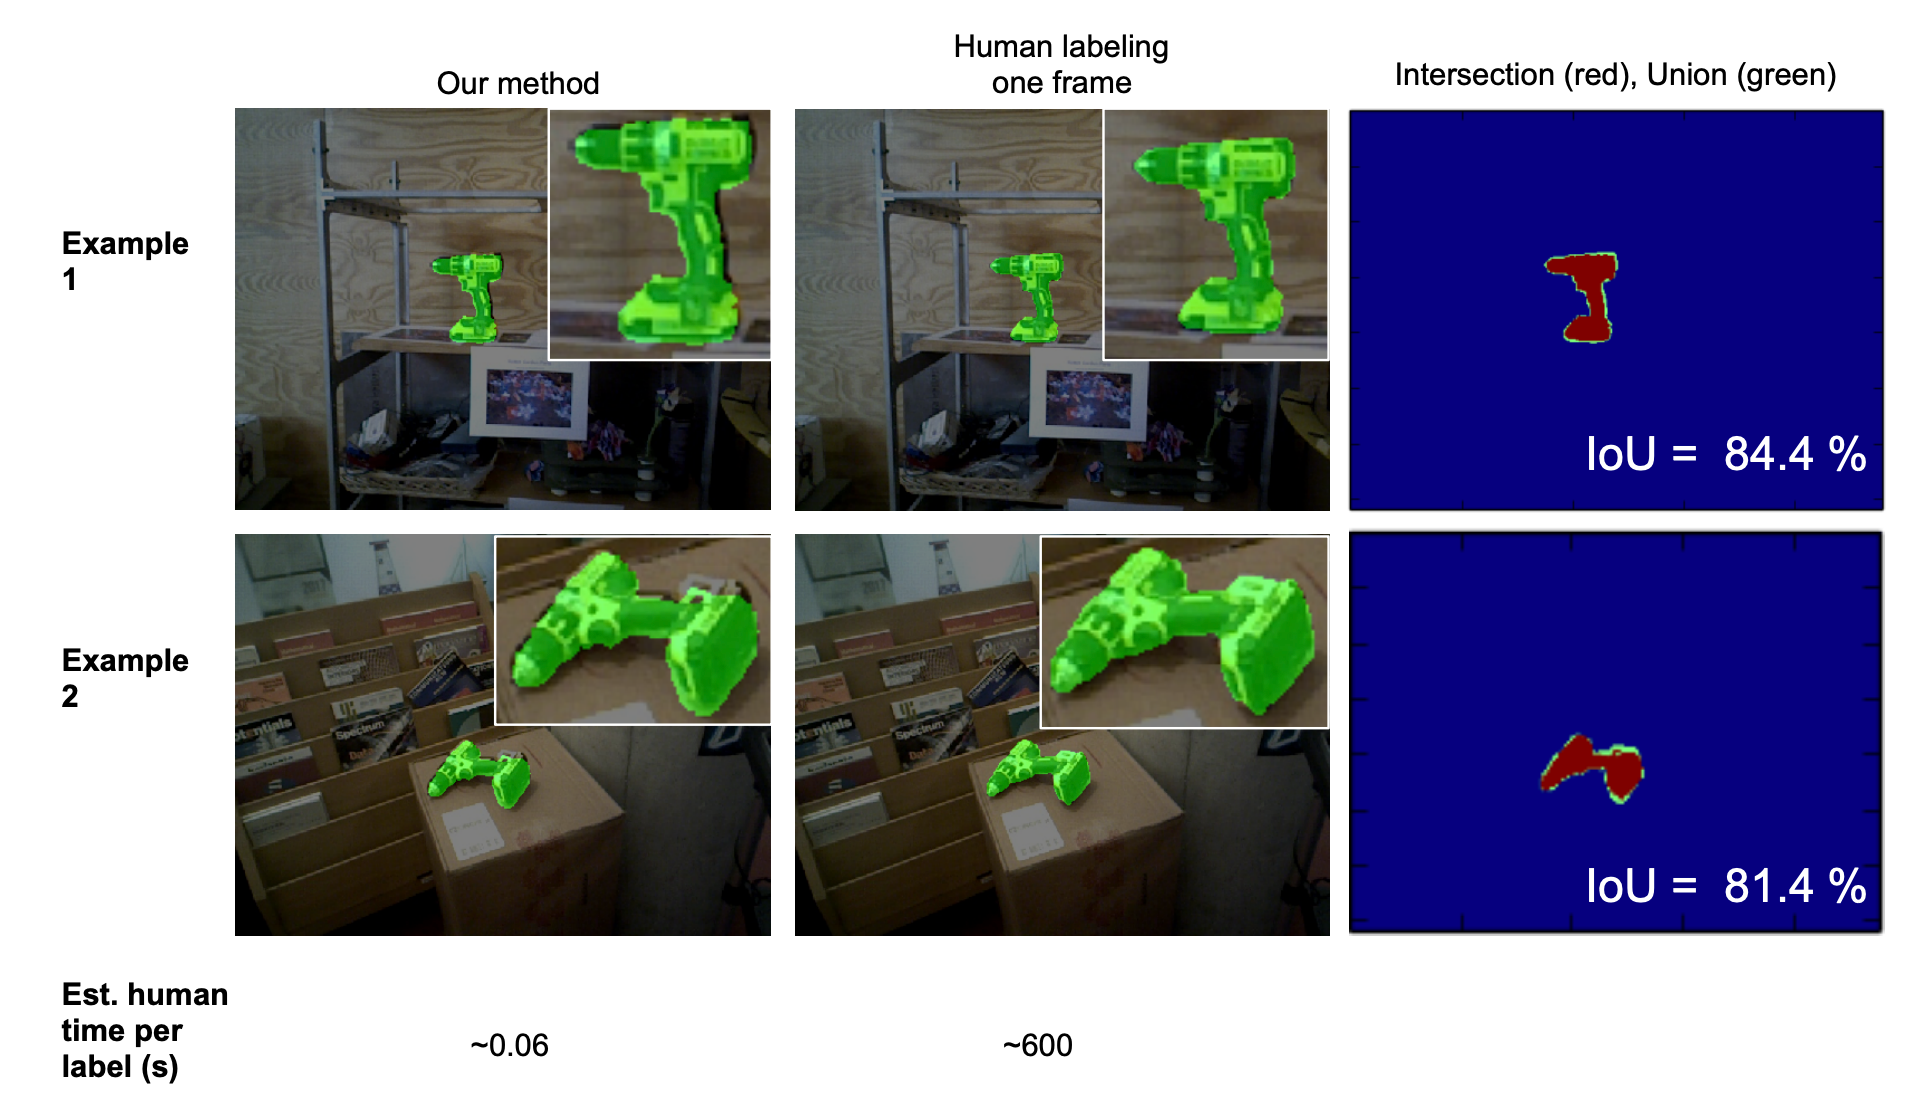
The advantage of labelling on 3D reconstruction and projecting to each frame makes for efficient use of annotators time. As illustrated below for objects segmentation this is almost 10k time more efficient than per frame labelling. LabelFusion collects segmentation scenes in different backgrounds and multi-object scenes and the diagram below shows the total time of label generation per scene.
在3D重建上加标签并投影到每个帧的优点是可以有效利用注释器时间。 如下图所示,对于对象分割,其效率比每帧标记高出近1万倍。 LabelFusion收集不同背景和多对象场景中的分割场景,下图显示了每个场景生成标签的总时间。
The authors were able to generate 1 million+ segmentation labels in a few days (without crowdsourcing) and 100k+ 3D key-point labels with few hours of annotation time.
作者能够在几天内(无需众包)生成100万个以上的细分标签,并在数小时的注释时间内生成10万多个3D关键点标签。
如何学习3D关键点? (How to learn 3D key points ?)
(and panoptic segmentation)
(以及全景分割)
First, let’s understand how panoptic segmentation works and later we’ll see how that is extended for 3D key-points detection.
首先,让我们了解全景分割的工作原理,然后我们将了解如何将其扩展到3D关键点检测。
Panoptic segmentation combines two types of segmentations:
全景细分结合了两种类型的细分:
Semantic segmentation: To tell different objects types apart, eg: mugs vs plates vs background.
语义分割:区分不同的对象类型,例如:杯子vs盘子vs背景。
Instance segmentation: To tell different instances of object apart, eg: different plates in a pile of plates.
实例分割:区分对象的不同实例,例如:一堆板中的不同板。
Illustration of panoptic segmentation architecture:
全景分割架构插图:
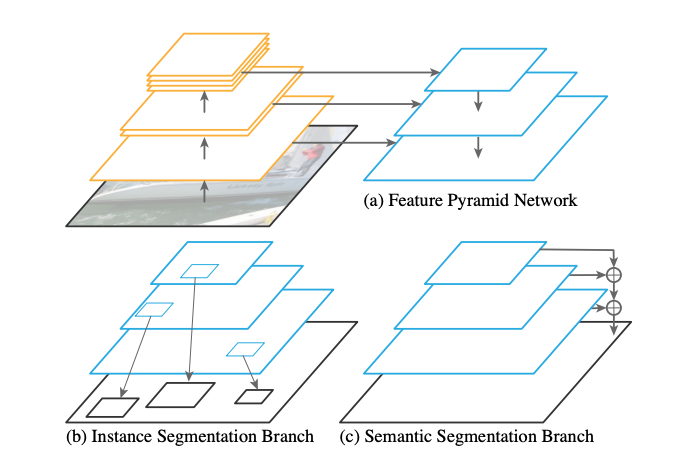
Feature Pyramid Network (FPN): The FPN is used to extract rich multi-scale features which is then used for segmentation tasks.
特征金字塔网络(FPN): FPN用于提取丰富的多尺度特征,然后将其用于分割任务。
Semantic Segmentation: For semantic segmentation, the combined multi-scale feature map from FPN is upsampled (c) to input image size and for each original pixel a class is predicted. Per pixel cross entropy loss w.r.t ground truth segmentation is used for training.
语义分割:对于语义分割,将来自FPN的组合多尺度特征图进行上采样(c)以输入图像大小,并为每个原始像素预测一个类别。 每个像素的交叉熵损失与地面真值分割一起用于训练。
Instance Segmentation: The shared FPN features are used to propose ROI (Regions of Interest → Bounding boxes that correspond to foreground object irrespective of the class eg: all soccer kids and the ball as shown below.).
实例分割:共享的FPN功能用于建议ROI(感兴趣区域→与前景对象相对应的边界框,与类别无关,例如:所有足球孩子和球,如下所示)。
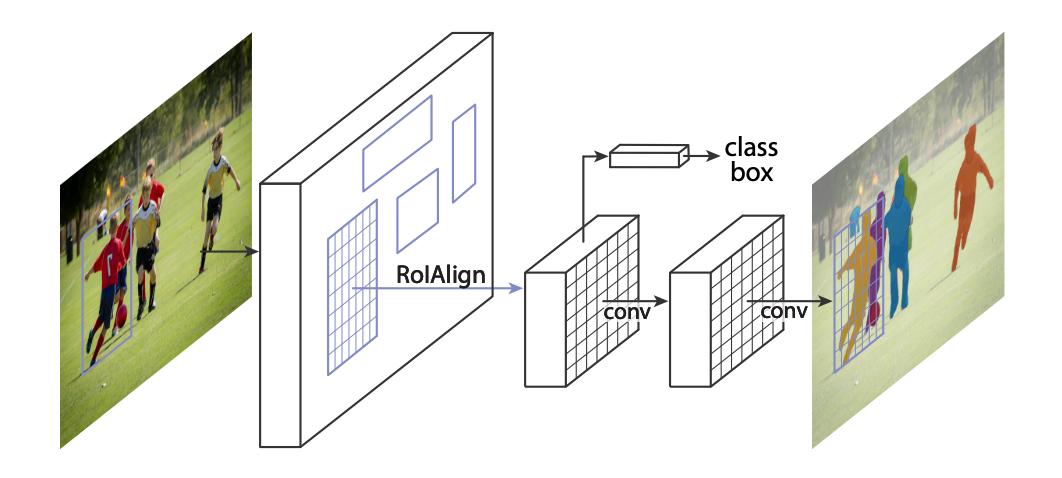
For each predicted ROI bounding box, the corresponding FPN feature is extracted using RoIAlign operator (Bilinear sampling of FPN features per ROI), these RoI features are used to perform:
对于每个预测的ROI边界框,使用RoIAlign运算符(每个ROI的FPN特征的双线性采样)提取相应的FPN特征,这些RoI特征用于执行以下操作:
Classification: Each RoI must correspond to one of the foreground classes or background Eg: soccer player vs ball vs background.
分类:每个RoI必须对应于前景类或背景之一,例如:足球运动员vs球vs背景。
Bounding box refinement: A tighter bounding box around each object for more accurate detection.
边界框优化:每个对象周围的边界框更紧密,可进行更准确的检测。
Instance mask prediction: A separate FCN (Fully Convolutional Network), predicts object masks for each object type independently (using sigmoid) and the mask corresponding to the foreground class is used as the instance mask.
实例遮罩预测:单独的FCN(完全卷积网络),针对每个对象类型独立地预测对象遮罩(使用Sigmoid),并将与前景类相对应的遮罩用作实例遮罩。
Learning 2D key points using Mask-RCNN
使用Mask-RCNN学习2D关键点
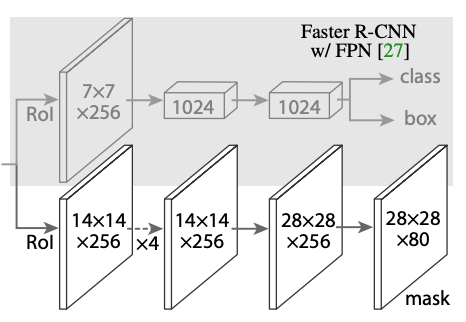
Key-point prediction: For each RoI feature, another mask branch is added and the output channels correspond to each of K key-points. The visible 2D key-point is encoded as heat map across the m² region. Soft-max loss over each m² region is used for training the key-point detector.
关键点预测:对于每个RoI功能,将添加另一个mask分支,并且输出通道对应于K个关键点中的每一个。 可见的2D关键点被编码为整个m²区域的热图。 每个m²区域的最大软最大损耗用于训练关键点检测器。
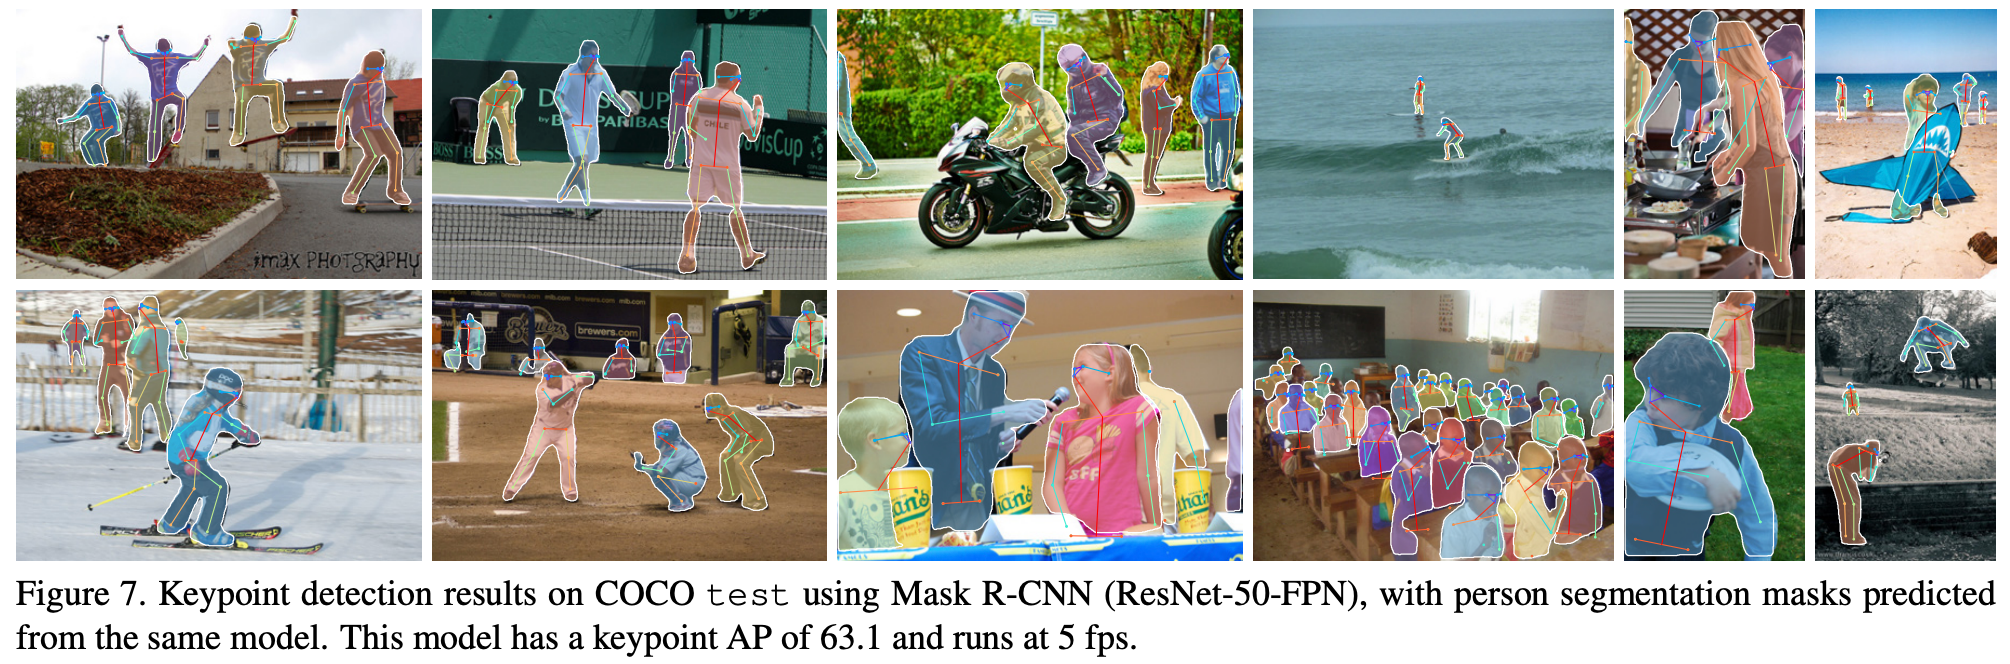
The example below shows 2D instance segmentation and human joint key-points predicted by mask-RCNN.
下面的示例显示了mask-RCNN预测的2D实例分割和人体关节关键点。
Learning 3D key points
学习3D关键点
For 3D key-point detection, in addition to 2D key-points described above we also need to predict depth of each key-point and need to accurately predict the occluded key-points as well.
对于3D关键点检测,除了上述2D关键点之外,我们还需要预测每个关键点的深度,并且还需要准确地预测被遮挡的关键点。
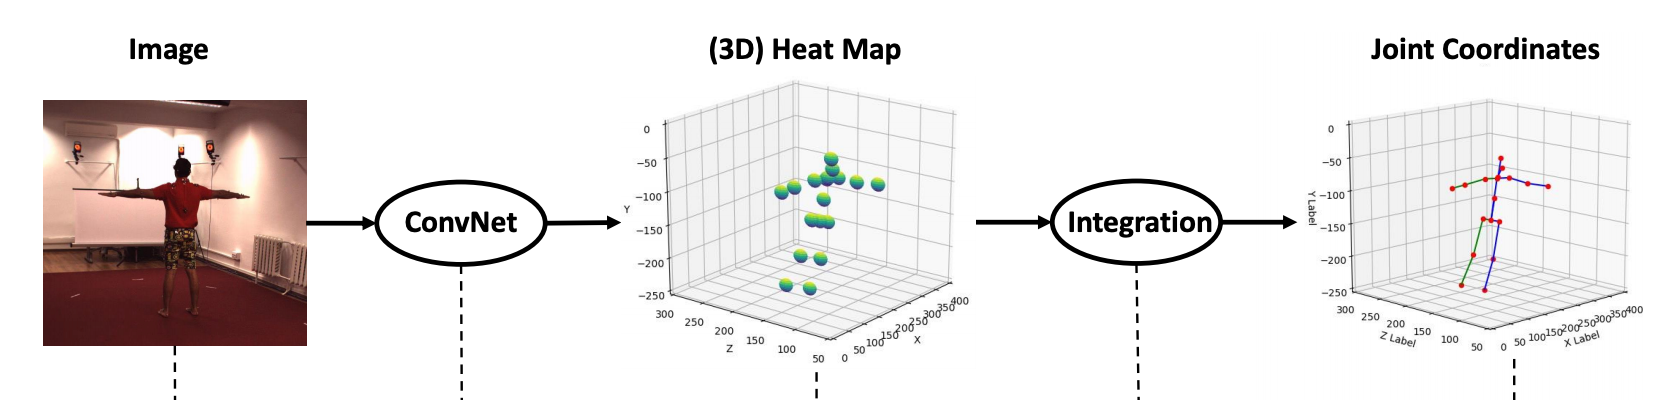
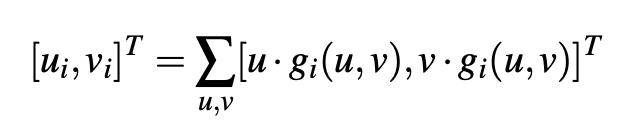
Integral human pose uses expectation (integration) over the predicted heat map instead of taking the maximal index after soft-max to make the key-point detection loss differentiable.
整体人体姿势在预测的热图上使用期望值(积分),而不是在soft-max之后采用最大值指标以使关键点检测损失可区分。
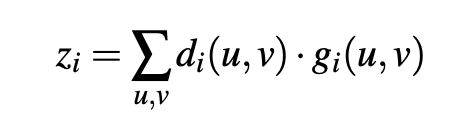
For each ROI, a 2D spatial key-point location as heat-map g_i(u, v) and depth d_i(u, v) are predicted, where u, v are in image coordinates. Notice, that we will regress all key-points irrespective of the occlusions.
对于每个ROI,将预测2D空间关键点位置(如热图g_i(u,v)和深度d_i(u,v)),其中u,v在图像坐标中。 请注意,无论遮挡如何,我们都会回归所有关键点。
Since most of robotic manipulation systems include RGBD images, the depth regression part is much easier compared to RGB only. 3D Key-points in the image fame is computed by taking expectation over the spatial heat-map. These key-point are transformed to world frame using known camera intrinsic and camera extrinsic.
由于大多数机器人操纵系统都包括RGBD图像,因此与仅RGB相比,深度回归部分要容易得多。 图像帧中的3D关键点是通过对空间热图的期望值来计算的。 这些关键点可以使用已知的相机固有和相机外部特性转换为世界框架。
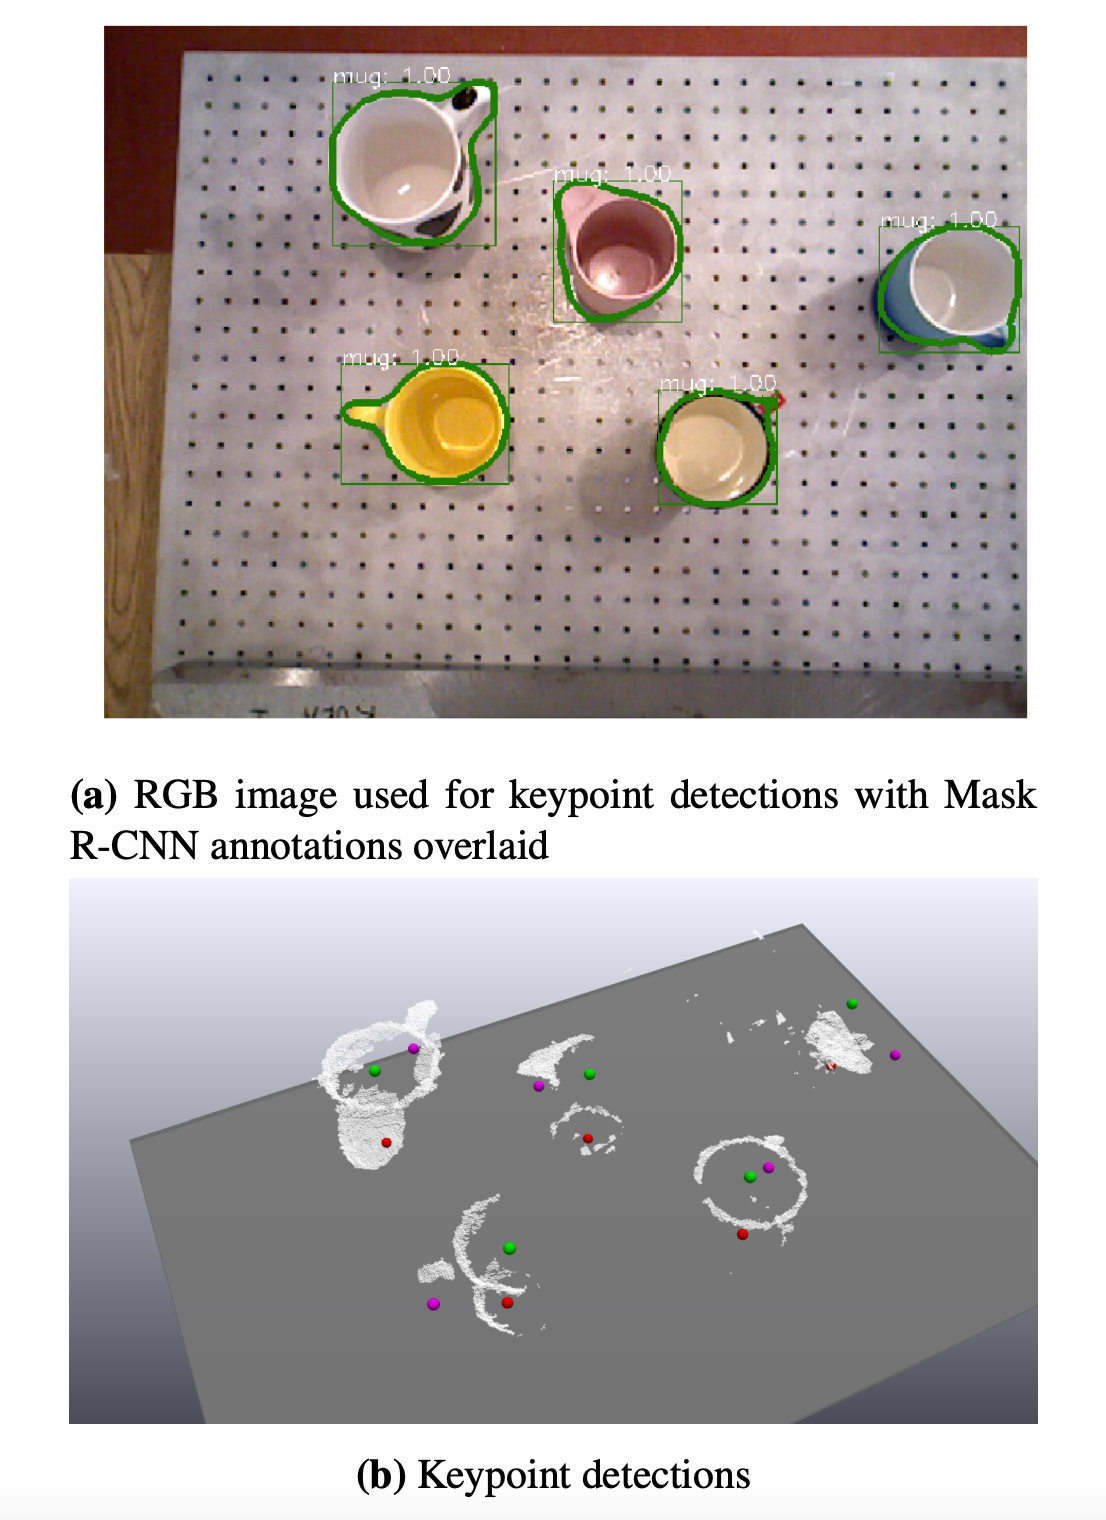
Example instance mask prediction and 3D key-points predicted by k-PAM 1.0 for mugs.
k-PAM 1.0为杯子预测的示例实例蒙版预测和3D关键点。
如何使用3D关键点进行操纵? (How to use 3D key points for manipulation ?)
We’ll see a few ways of utilizing 3D key-points based representations in manipulation pipelines:
我们将看到在操纵管线中利用基于3D关键点的表示形式的几种方法:
- To specify pick and place tasks on a category of objects. 在对象类别上指定拾取和放置任务。
- To perform feedback control for contact rich manipulation tasks on a category of objects. 对对象类别上的接触丰富的操纵任务执行反馈控制。
The common theme in the following work is that preselected 3D key-points are used as object representation and they can be detected on a large number of objects with significant variations in shape / color using the methods described above.
以下工作的共同主题是将预选的3D关键点用作对象表示,并且可以使用上述方法在形状/颜色有明显变化的大量对象上检测到它们。
k-PAM 1.0 (k-PAM 1.0)
k-PAM uses the semantic key-points for pick and place application where the target pose of the object matters such as mug placed upright on a tabletop for ANY mug.
k-PAM使用语义关键点进行拾取和放置应用,其中对象的目标姿势很重要,例如将马克杯直立放置在任何马克杯的桌面上。
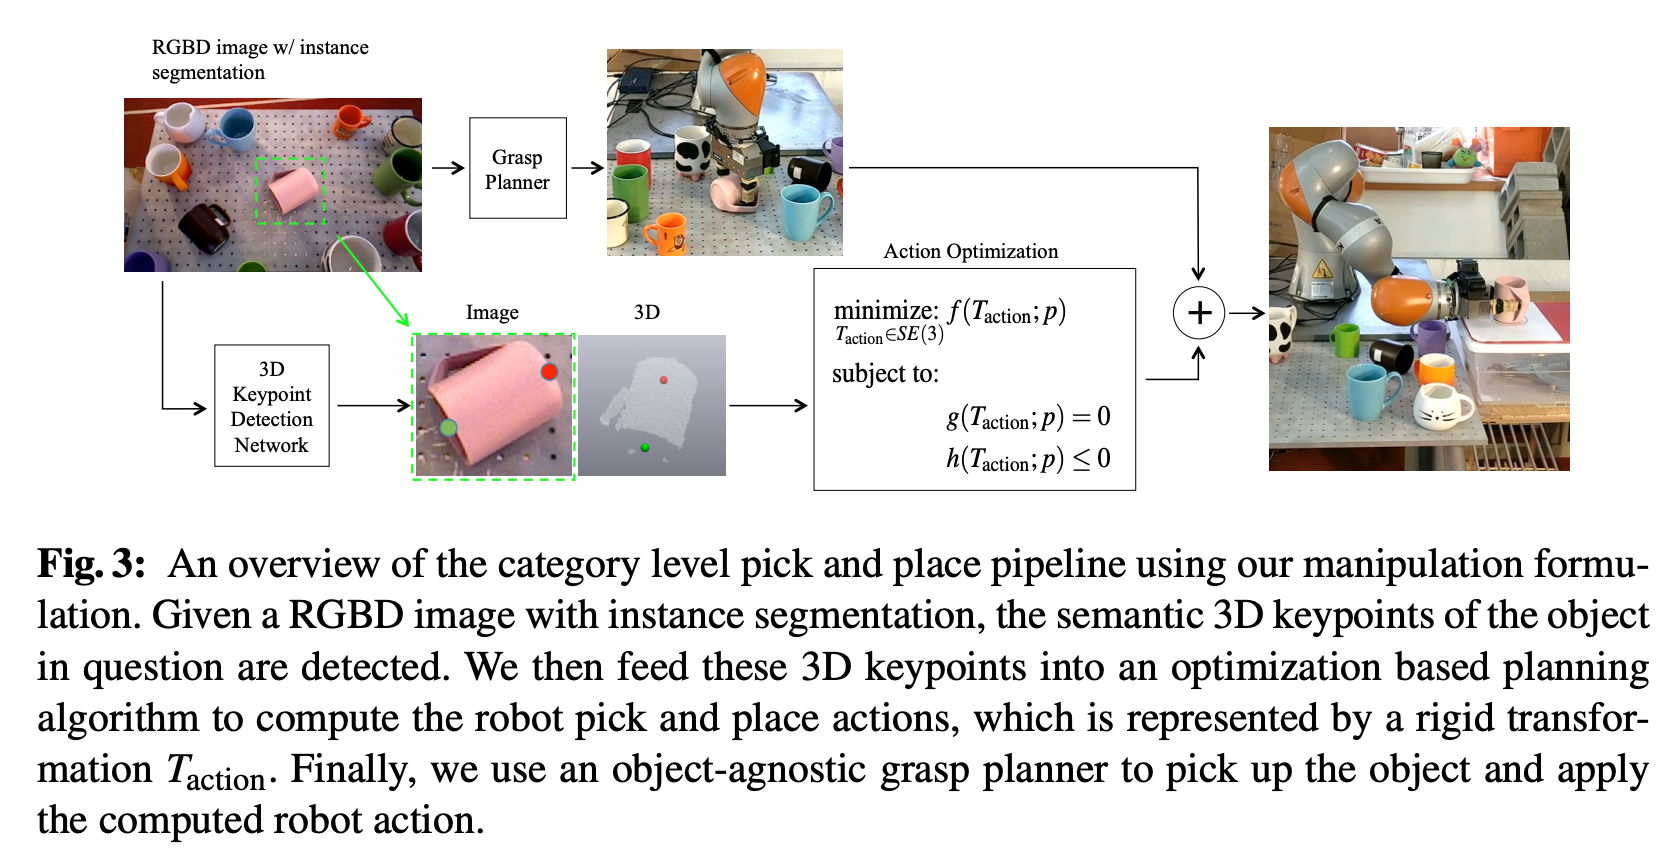
3D semantic key-points are used in two ways in k-PAM pipeline:
3D语义关键点在k-PAM管道中以两种方式使用:
指定抓取点 (Specifying the grasp points)
Since there are many regions on the object that are graspable, key points can be used to specify which regions to try and grasp. There are a large number of ways ( millions ) of ways to grasp an object and this is multi-modal (i.e many regions could result in similar grasp stability), trying to narrow the regions to grasp for a category of objects could actually simplify the problem for grasp planner. But in addition to grasp point, the local dense geometry & collisions needs to be taken into account for grasp planning.
由于对象上有许多可抓握的区域,因此关键点可用于指定要尝试抓握的区域。 有多种方法(数百万种)来抓取对象,并且这是多模式的(即,许多区域可能导致类似的抓握稳定性),尝试缩小区域以抓取一类对象实际上可以简化抓取对象的过程。规划师的问题。 但是,除了把握点外,还需要考虑局部密集的几何形状和碰撞,以进行把握规划。
指定目标 (Specifying the targets)
First lets see how to specify the pick and place task with key-points using an example of keeping the mug upright:
首先,让我们以保持杯子直立为例,了解如何通过关键点指定拾取和放置任务:
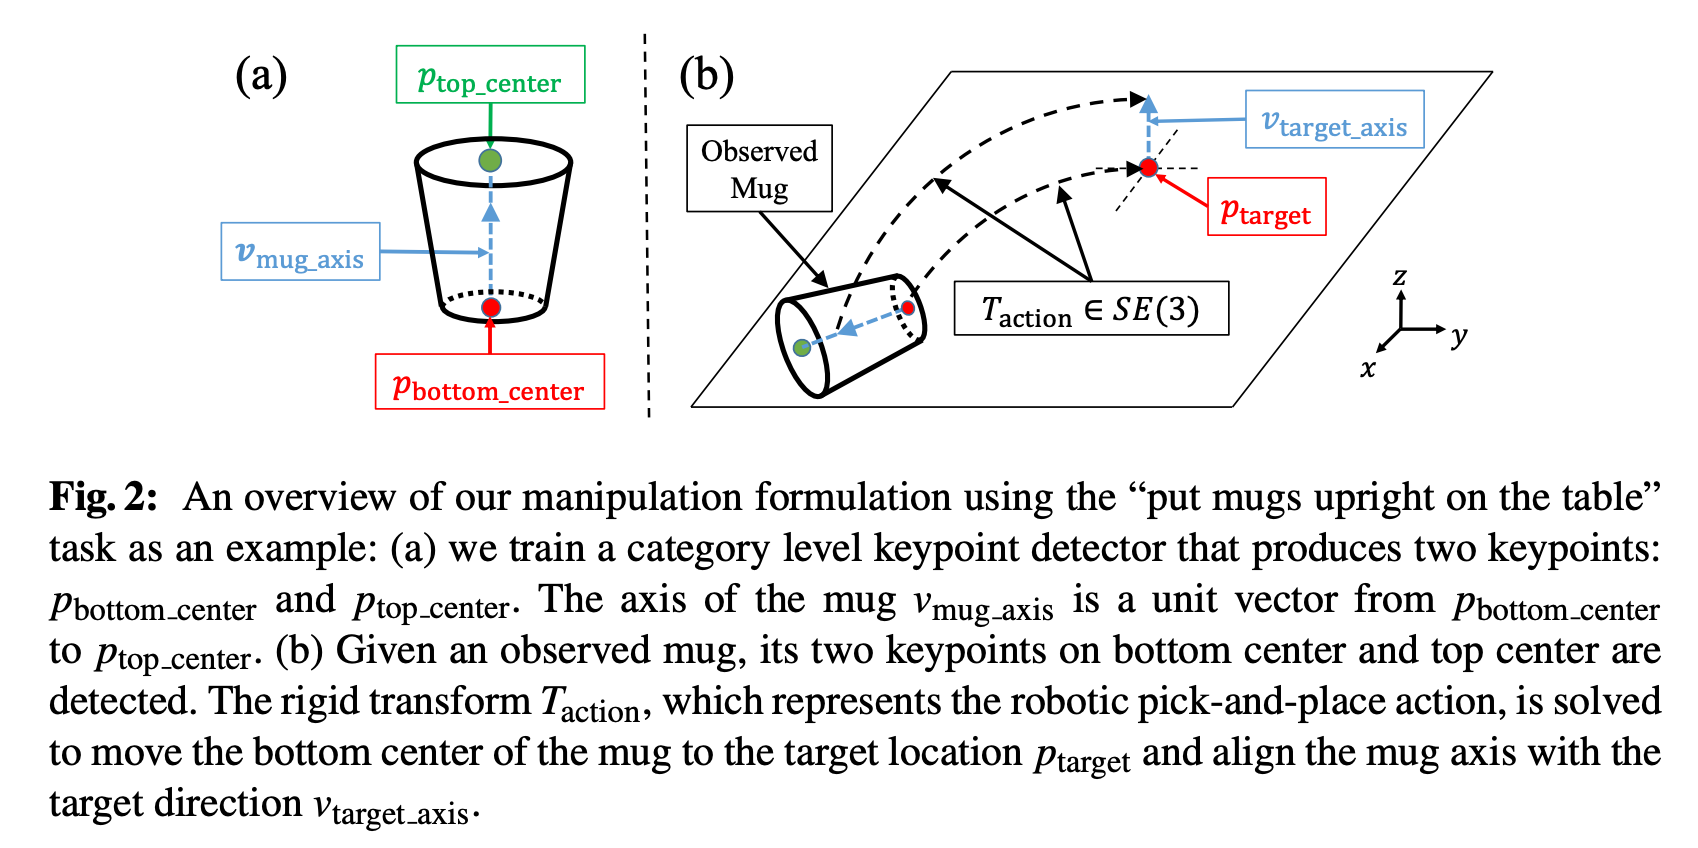
- Upright constraint was specified as below: 直立约束指定如下:
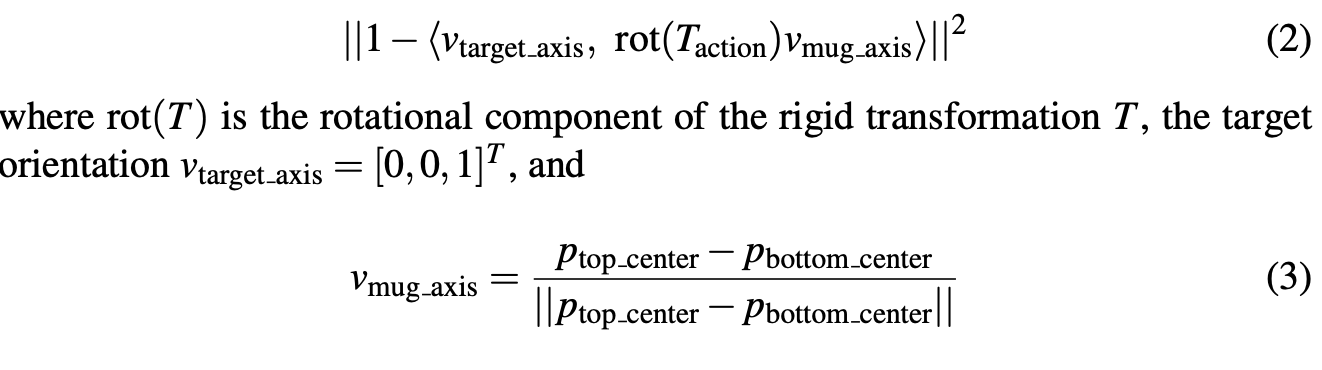
If we grasp the mug in the observed position and the grasp is tight, keeping the mug upright can be specified as transforming key-points p_i from their observed position p_i to their target position T_{action} * p_i. So the entire pick and place can be specified using a rigid transform T_{action} on the 3D semantic key-points on a category of objects.
如果我们将杯子抓住在观察位置并且握紧,则可以指定保持杯子直立,将关键点p_i从其观察位置p_i转换为目标位置T_ {action} * p_i。 因此,可以在对象类别的3D语义关键点上使用刚性变换T_ {action}来指定整个拾取和放置位置。
In general, costs and constraints can be specified as T_{action} being decision variables of following optimization problem.
通常,可以将成本和约束条件指定为T_ {action},它是后续优化问题的决策变量。
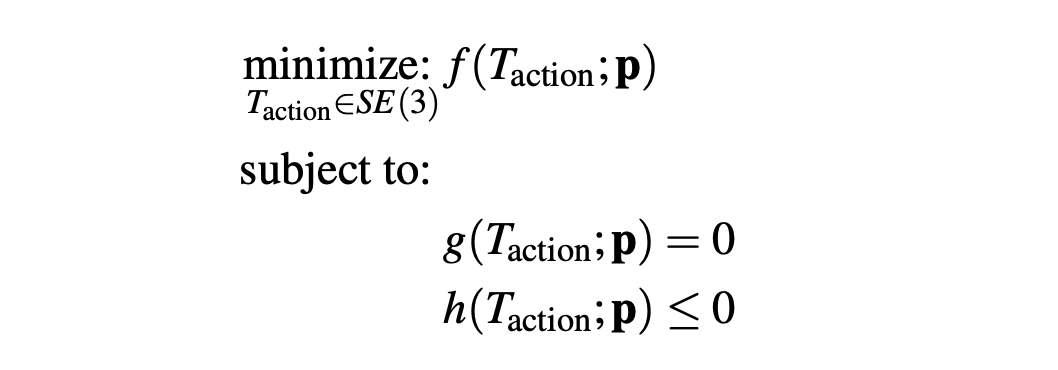
Here are some example costs and constraints:
以下是一些成本和约束示例:
- L2 distance cost on key-points. L2距离在关键点上的成本。

- Half-plane constraint on key-points (eg: mug / show should be above the table). 对关键点的半平面约束(例如:杯子/表演应在桌子上方)。

- Point to plane distance cost. 点到平面的距离成本。

- T_{action} should be within the robot reachability and avoid collisions. This is common constraint across all tasks performed in k-PAM 1.0 T_ {action}应该在机器人可及范围内,并避免碰撞。 这是在k-PAM 1.0中执行的所有任务的共同约束
Let’s use these costs and constraints to understand how following tasks were specified using key-points on shoes and mugs:
让我们使用这些成本和约束条件来理解如何使用鞋子和杯子上的关键点指定以下任务:
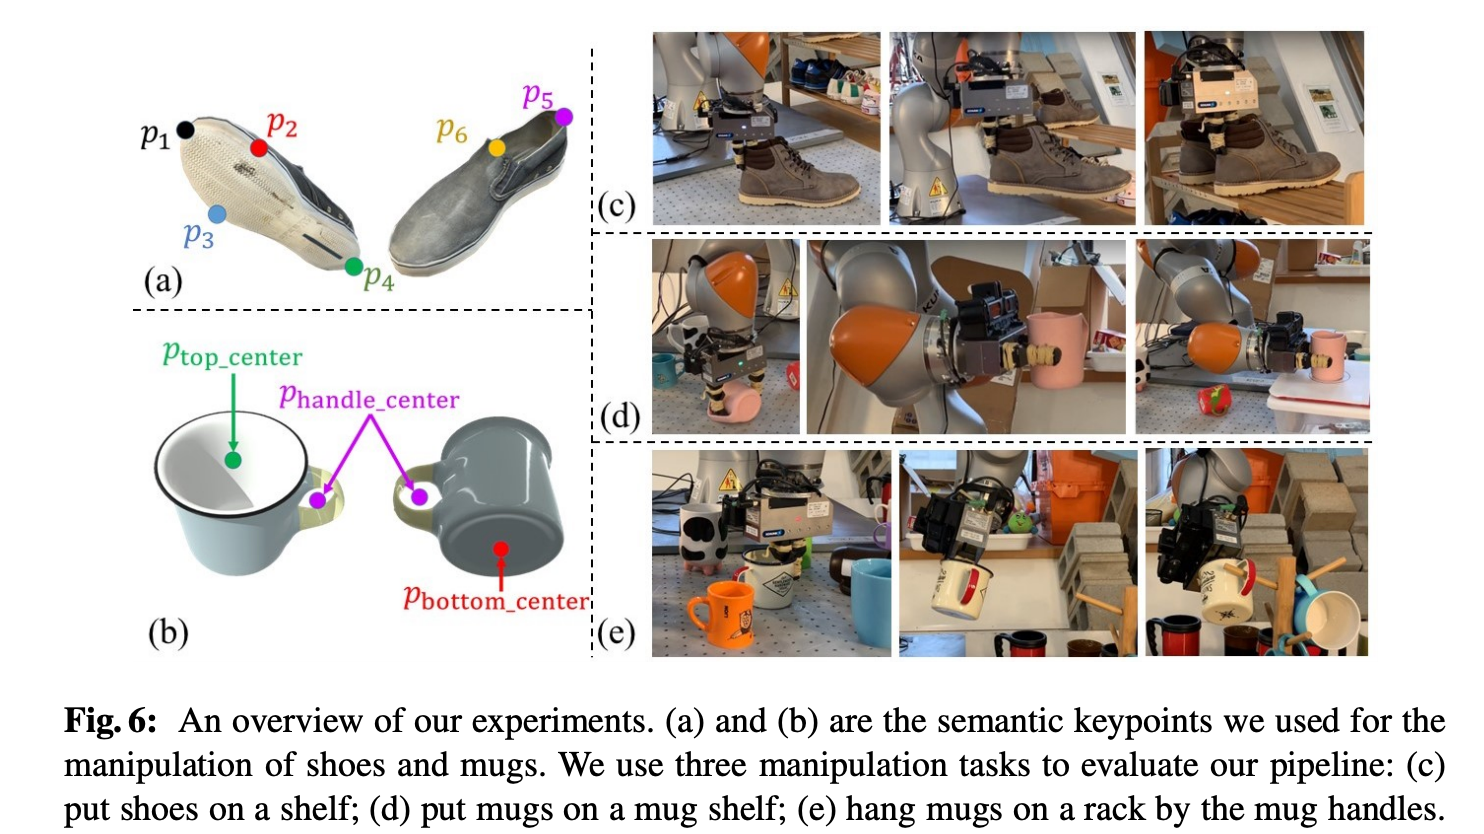
Shoes on rack: The following costs and constraints were used for pick and place the shoe on rack:
架子上的鞋子:以下成本和约束条件用于将鞋子拾取和放置在架子上:
- L2 distance cost on shoe key-points p1, p2, p3, p4 to their target position on the rack. 鞋子关键点p1,p2,p3,p4到机架上目标位置的L2距离成本。
- Point to plane cost on p2, p3 and p4 to the resting plane on the rack since the sole needs to be resting on the rack. 将p2,p3和p4上的平面成本指向机架上的静止平面,因为鞋底需要放在机架上。
- Half-plane constraint on all key-points for non-penetration. 对所有非穿透关键点的半平面约束。
In addition, the shoe is grasped around the key-point p5.
另外,将鞋子抓住关键点p5。
Mugs on shelf: The following costs and constraints were used for pick and place of mug on shelf.
架子上的杯子:以下费用和约束条件用于杯子上架子的取放。
- L2 constraint (instead of cost) on all key points to target position. 对目标位置的所有关键点都采用L2约束(而不是成本)。
- Upright constraint on the key-points p_{top_center} and p_{bottom_center}. 对关键点p_ {top_center}和p_ {bottom_center}的直立约束。
Mugs on rack: The following costs and constraints were used for hanging the mug by handle on a rack. To avoid the collision between mug and rack, T_{approach} was offset from T_{action} along the rack axis.
杯子放在架子上:通过把手在架子上悬挂杯子,使用了以下成本和约束。 为避免杯子与架子发生碰撞,T_ {approach}沿架子轴线从T_ {action}偏移了。
- L2 constraint p_{handle_center} to target position on rack handle. L2约束p_ {handle_center}到机架手柄上的目标位置。
- L2 cost on p_{top_center} & p_{bottom_center} to their nominal position. L2在p_ {top_center}和p_ {bottom_center}上的成本达到其标称位置。
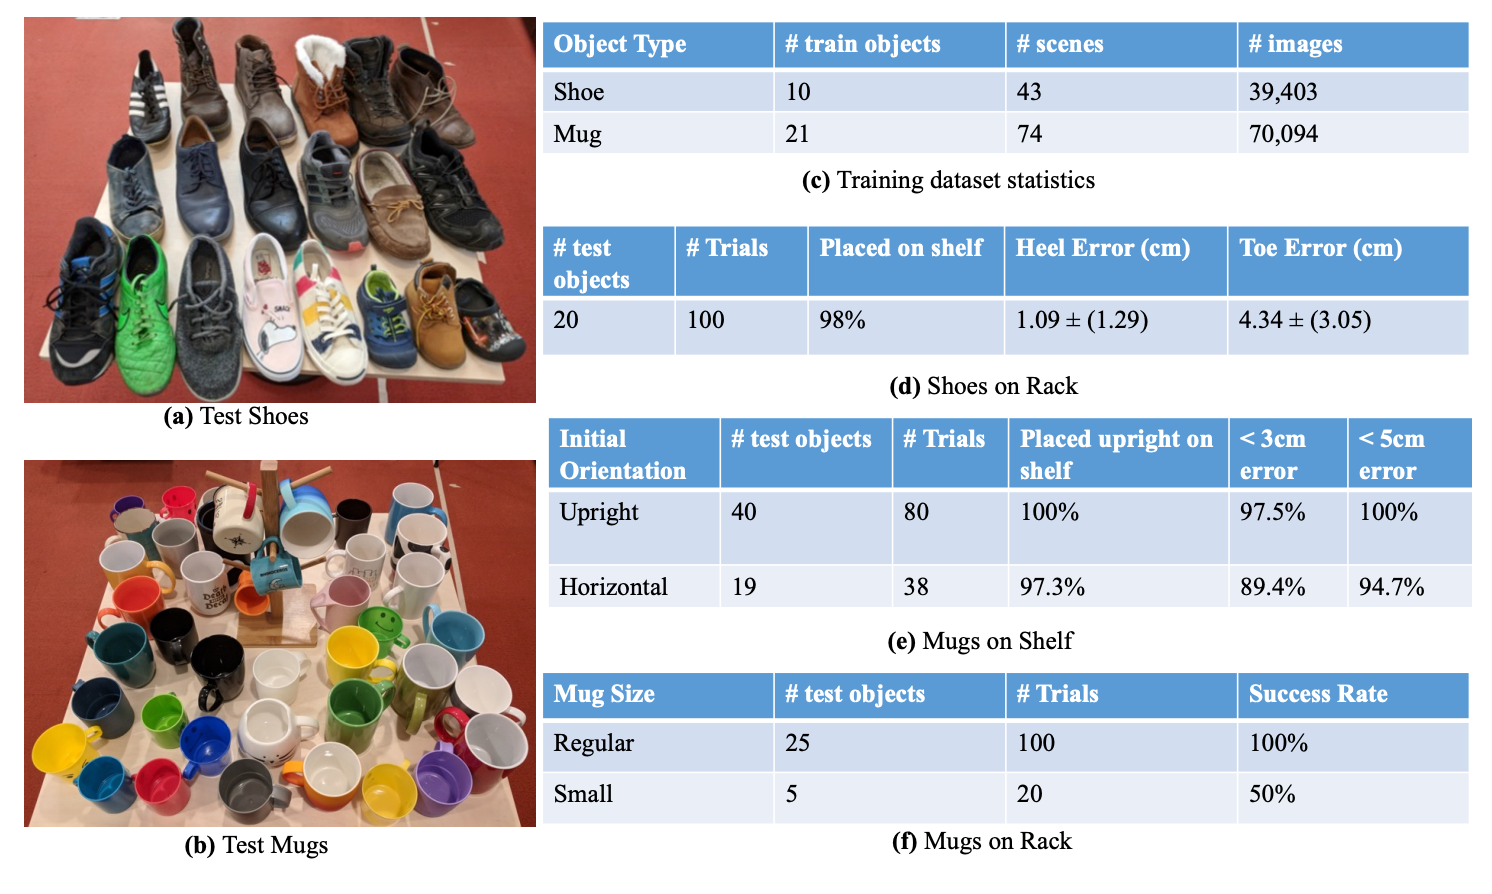
The table below shows the success rate of various tasks specified using the above key-point based representation:
下表显示了使用上述基于关键点的表示形式指定的各种任务的成功率:
反馈控制可用于丰富的任务 (Feedback control for contact rich tasks)
k-PAM 2.0 (k-PAM 2.0)
k-PAM 2.0 extends the k-PAM 1.0 to perform contact rich manipulation tasks illustrated below by adding a feedback controller on the detected key-points.
通过在检测到的关键点上添加反馈控制器,k-PAM 2.0扩展了k-PAM 1.0,以执行以下所示的丰富接触操作任务。
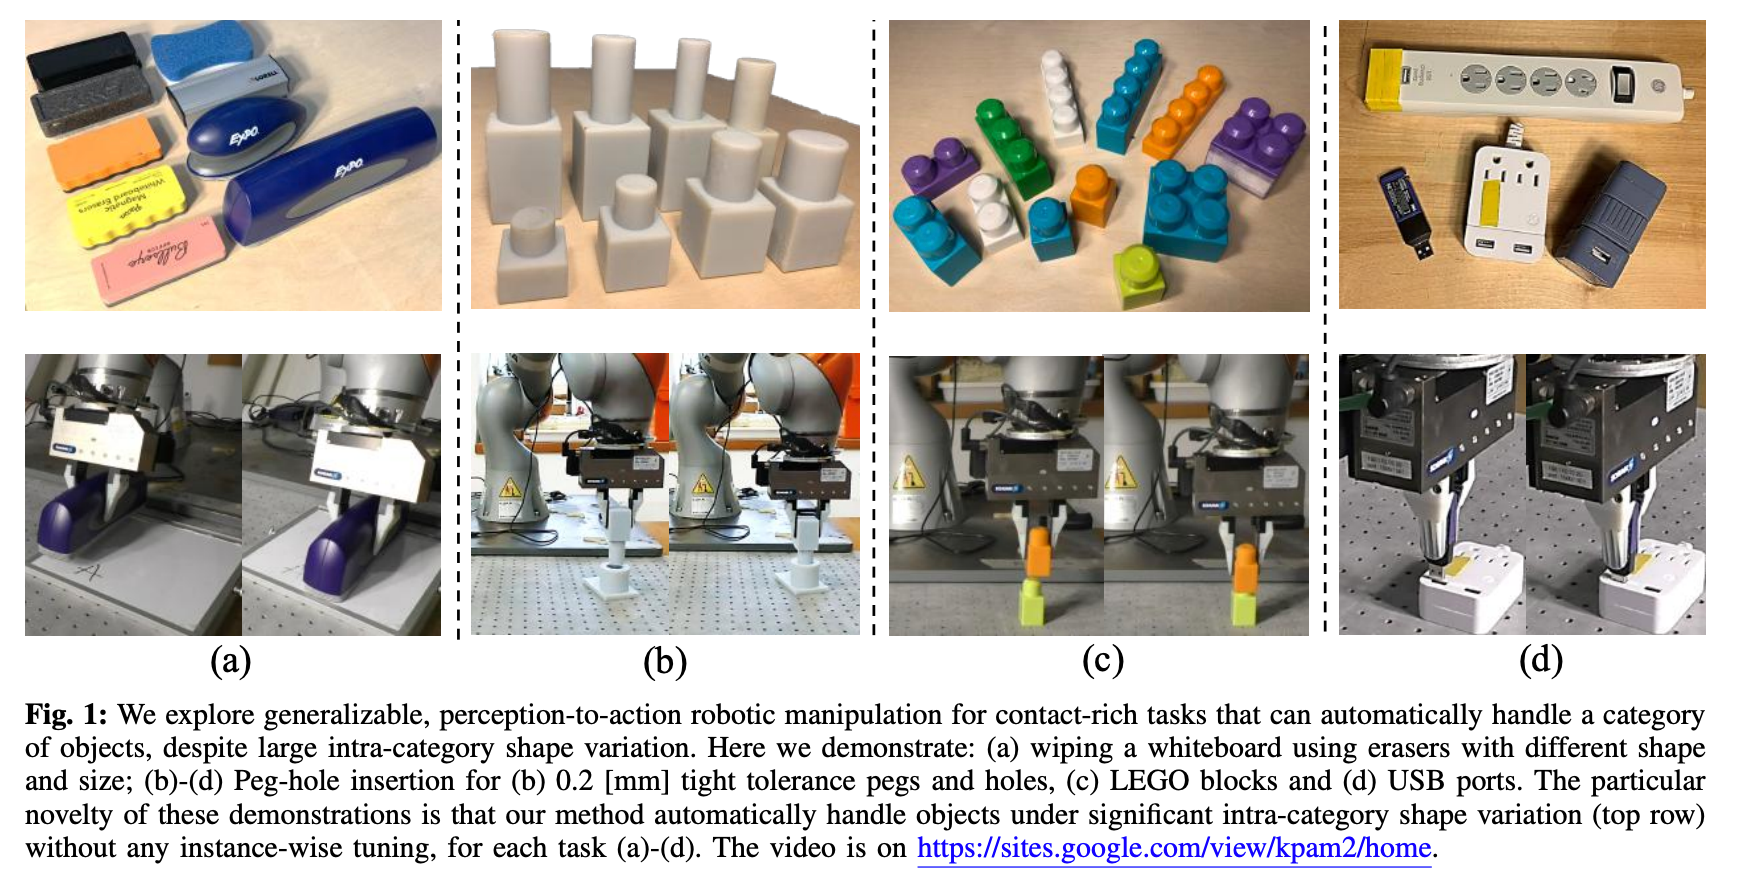
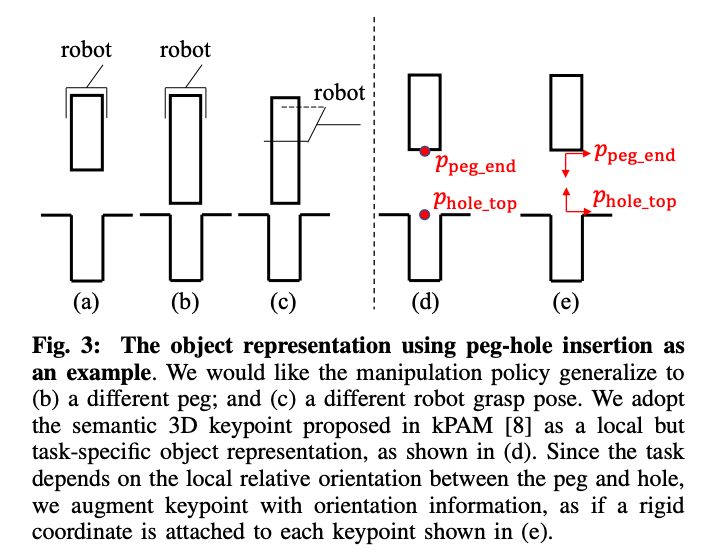
In addition, it requires the same feedback controller to work not only when there is significant intra category shape variation, but also when the grasps are different. This requirement is satisfied by adding orientation to key-points. The main motivation for using the key-point poses as opposed to global pose is that 3D key-point poses are local co-ordinate representation of the object geometry that’s relevant to the tasks and ignores other geometrics variations in the category such as size and shape of USB sticks on top.
此外,它要求同一个反馈控制器不仅在类别内部形状变化显着时,而且在抓握方式不同时也要工作。 通过向关键点添加方向来满足此要求。 使用关键点姿势而不是全局姿势的主要动机是3D关键点姿势是与任务相关的对象几何的局部坐标表示,并且忽略类别中的其他几何变化,例如大小和形状顶部的USB棒。
k-PAM 1.0 was used to place the peg in the initial condition before the closed loop policy was executed for peg insertion.
在执行闭环策略以插入钉子之前,使用k-PAM 1.0将钉子置于初始状态。
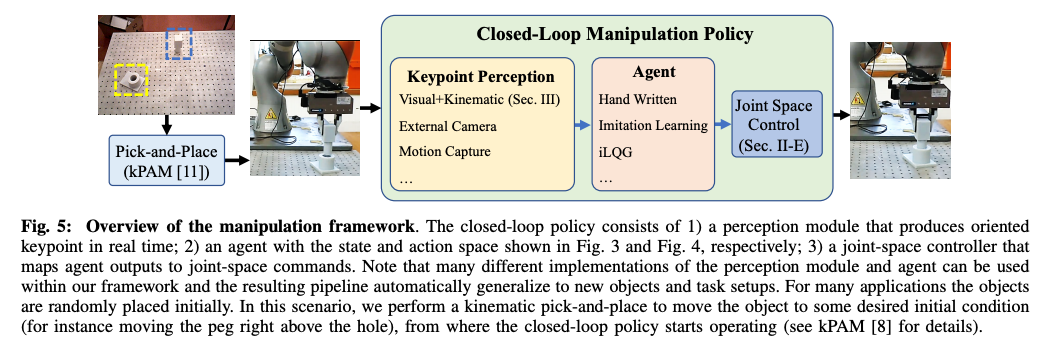
k-PAM 2.0 assumes a manipulator with force / torque sensing at the end-effector. Which is then used to compute the force and torque at the key-point which is used as input to the feedback agent. Since the 3D oriented key-point detector already provides the transform from gripper to the key-point and object is assumed to be static w.r.t gripper, forward kinematics is used to track the key-point in real-time.
k-PAM 2.0假定操纵器的末端执行器具有力/扭矩感应。 然后将其用于计算关键点上的力和扭矩,该关键点用作反馈代理的输入。 由于面向3D的关键点检测器已经提供了从抓取器到关键点的转换,并且假定对象为静态抓取器,因此使用正向运动学实时跟踪关键点。

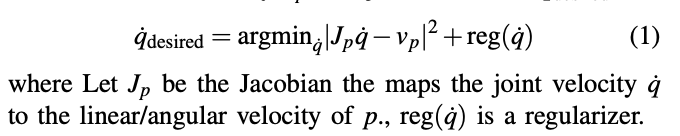
The agent outputs the desired linear and angular velocity as shown below, which is then used generate the joint velocity commands using the 3D oriented key-point Jacobian :
该代理将输出所需的线速度和角速度,如下所示,然后将其用于通过3D定向关键点Jacobian生成关节速度命令:
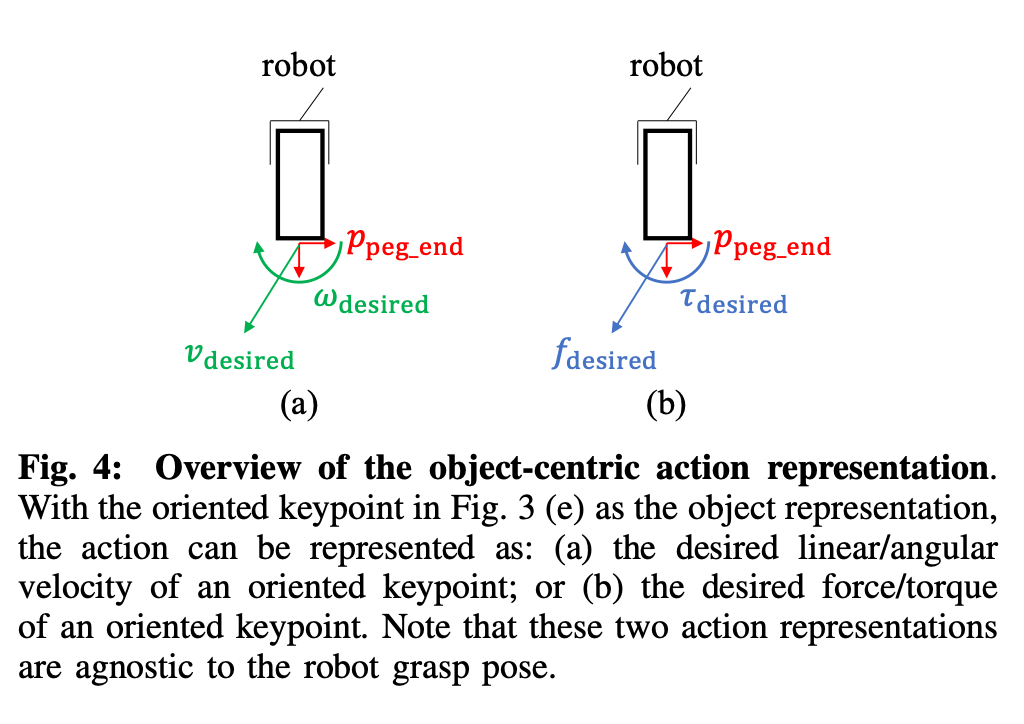
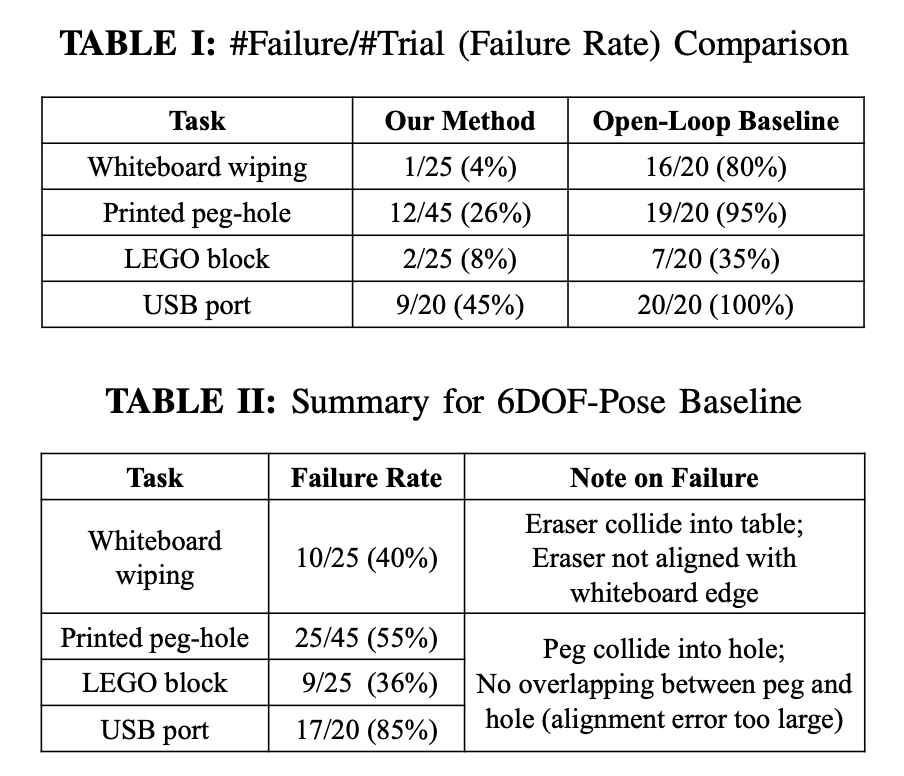
The feedback control policy based on 3D oriented key-points significantly out performs the open-loop policy as shown in Table I and pose based policy as shown in Table II
基于面向3D的关键点的反馈控制策略显着执行表I中所示的开环策略和表II中所示的基于姿势的策略
Conclusion: We have very good perception systems that can detect 3D key-points on objects with significant intra-category shape and visual variations and methods like k-PAM / k-PAM 2.0 can offload these inter-category complexity of the task to a robust perception system and specify the task / feedback control policy on top to accomplish some fairly non-trivial real world manipulation tasks.
结论:我们拥有非常好的感知系统,可以检测具有明显类别内形状和视觉变化的对象上的3D关键点,并且诸如k-PAM / k-PAM 2.0之类的方法可以将这些类别间的任务复杂性转移到强大的功能上感知系统并在顶部指定任务/反馈控制策略,以完成一些相当平凡的现实世界操作任务。
ros系统操纵机器人


 6万+
6万+


 被折叠的 条评论
为什么被折叠?
被折叠的 条评论
为什么被折叠?
 到【灌水乐园】发言


