


raspberry pi
Block malicious advertisements, AKA malvertisements, using Pi-hole and a Raspberry Pi.
使用Pi-hole和Raspberry Pi阻止恶意广告,AKA恶意广告。
Advertising is not inherently malicious. It helps promote new products and businesses, generates revenue for content creators, and increases competition. These benefits are shared among consumers and companies alike.
广告并非天生就具有恶意。 它有助于推广新产品和业务,为内容创作者创造收入,并增加竞争。 这些好处在消费者和公司之间共享。
Unfortunately, bad actors take advantage of advertisements to infect your devices with malware. Malvertising, or malicious advertising, is the use of online, malicious advertisements to spread malware and compromise systems (Samarasinghe, 2020). Clicking a malicious online advertisement can infect your device and compromise your data.
不幸的是,不良行为者会利用广告利用恶意软件感染您的设备。 恶意广告或恶意广告是指使用在线恶意广告来传播恶意软件并破坏系统( Samarasinghe,2020年 )。 点击恶意的在线广告可能会感染您的设备并破坏您的数据。
In this article, we will walk through how to use a DNS sinkhole called Pi-hole to block internet advertisements on a Raspberry Pi running Raspberry Pi OS.
在本文中,我们将逐步介绍如何使用称为Pi-hole的DNS 漏洞来阻止运行Raspberry Pi OS的Raspberry Pi上的互联网广告。
Pi-hole acts as a DNS sinkhole for several advertising domains. Some domains are known to be malicious and will be blocked at the network level. This is beneficial since you do not need to configure any settings at the individual device level. Your entire network will benefit from Pi-hole if configured correctly.
Pi-hole充当多个广告域的DNS漏洞。 已知某些域是恶意的,并且将在网络级别被阻止。 这是有益的,因为您无需在单个设备级别上配置任何设置。 如果配置正确,您的整个网络将从Pi-hole中受益。
步骤1 —下载Pi-hole (Step 1 — Download Pi-hole)
The first step is to download Pi-hole from the Pi-hole GIT repository. Run the following command to clone the repository.
第一步是从Pi-hole GIT存储库下载Pi-hole。 运行以下命令以克隆存储库。
Note: There is “One-Step Automated Install” offered from the vendor. This process involves piping a script from the internet and automatically running it on your machine. This is NOT considered a cybersecurity best practice as it does not allow you to review the scripts that are running. Although this is a trusted resource, it’s best to not get into this habit.
注意:供应商提供了“一步自动安装”。 此过程涉及从Internet整理脚本并在计算机上自动运行它。 这不被视为网络安全最佳实践,因为它不允许您查看正在运行的脚本。 尽管这是一种值得信赖的资源,但是最好不要养成这种习惯。
pi@raspberrypi:~ $ git clone --depth 1 https://github.com/pi-hole/pi-hole.git Pi-holeCloning into 'Pi-Hole'...
...
Unpacking objects: 100% (98/98), done.
pi@raspberrypi:~ $
Pi-hole should now be downloaded and placed into a newly created directory named Pi-hole. Run the following command to verify the directory has been created.
现在应下载Pi-hole,并将其放置在新创建的名为Pi-hole的目录中。 运行以下命令以验证目录已创建。
pi@raspberrypi:~ $ ls -l
total 40
drwxr-xr-x  2 pi pi 4096 May 27 02:18 Bookshelf
drwxr-xr-x  2 pi pi 4096 May 27 02:31 Desktop
drwxr-xr-x  2 pi pi 4096 May 27 02:31 Documents
drwxr-xr-x  2 pi pi 4096 May 27 02:31 Downloads
drwxr-xr-x  2 pi pi 4096 May 27 02:31 Music
drwxr-xr-x  2 pi pi 4096 May 27 02:31 Picturesdrwxr-xr-x 10 pi pi 4096 Jun 30 20:26 Pi-hole
drwxr-xr-x  2 pi pi 4096 May 27 02:31 Public
drwxr-xr-x  2 pi pi 4096 May 27 02:31 Templates
drwxr-xr-x  2 pi pi 4096 May 27 02:31 Videos
pi@raspberrypi:~ $
Run the following command to verify the files are present in the Pi-hole directory.
运行以下命令以验证文件是否存在于Pi-hole目录中。
pi@raspberrypi:~ $ ls -l Pi-hole/
total 124
drwxr-xr-x 6 pi pi  4096 Jun 30 20:26  advanced
drwxr-xr-x 2 pi pi  4096 Jun 30 20:26 'automated install'
-rwxr-xr-x 1 pi pi    20 Jun 30 20:26  autotest
drwxr-xr-x 2 pi pi  4096 Jun 30 20:26 'block hulu ads'
-rw-r--r-- 1 pi pi  2489 Jun 30 20:26  CONTRIBUTING.md
-rwxr-xr-x 1 pi pi 29096 Jun 30 20:26  gravity.sh
-rw-r--r-- 1 pi pi 14204 Jun 30 20:26  LICENSE
drwxr-xr-x 2 pi pi  4096 Jun 30 20:26  manpages
-rwxr-xr-x 1 pi pi 15135 Jun 30 20:26  pihole
-rw-r--r-- 1 pi pi 17213 Jun 30 20:26  README.md
-rw-r--r-- 1 pi pi   105 Jun 30 20:26  requirements.txt
-rw-r--r-- 1 pi pi   107 Jun 30 20:26  setup.py
drwxr-xr-x 2 pi pi  4096 Jun 30 20:26  test
-rw-r--r-- 1 pi pi   384 Jun 30 20:26  tox.ini
pi@raspberrypi:~ $
We are now ready to begin the install.
现在,我们准备开始安装。
第2步-安装PiKong (Step 2 — Install Pi-hole)
Installing Pi-hole is quite effortless and only requires us to run the install script located in the Pi-hole/automated\ install directory/.
安装Pi-hole非常容易,只需要我们运行Pi-hole / automated \ install目录/中的安装脚本即可。
Run the following command to change into the ‘automated install’ directory.
运行以下命令以切换到“自动安装”目录。
Note: Files and directories in Linux containing spaces will be escaped using a backslash or wrapped in single quotes.
注意:Linux中包含空格的文件和目录将使用反斜杠转义或用单引号引起来。
pi@raspberrypi:~ $ cd Pi-hole/automated\ installpi@raspberrypi:~/Pi-hole/automated install $We can validate what directory we are in by either looking after the semi-colon or running the following command.
我们可以通过分号或运行以下命令来验证我们所在的目录。
pi@raspberrypi:~/Pi-hole/automated install $ pwd
/home/pi/Pi-hole/automated install
Let’s list out the contents of this directory using the following command.
让我们使用以下命令列出该目录的内容。
pi@raspberrypi:~/Pi-hole/automated install $ ls -l
total 124
-rwxr-xr-x 1 pi pi 116023 Jun 30 20:26 basic-install.sh
-rwxr-xr-x 1 pi pi   7891 Jun 30 20:26 uninstall.sh
pi@raspberrypi:~/Pi-hole/automated install $
There is a basic-install script that we will run to install Pi-hole.
我们将运行一个基本安装脚本来安装Pi-hole。
Note: It is best practice to look at the script you are going to run. Although this is a trusted source you should always be aware of what you are going to run on your machine. Use your preferred text editor to view the script.
注意:最佳做法是查看要运行的脚本。 尽管这是一个受信任的来源,但是您应该始终了解要在计算机上运行的内容。 使用您喜欢的文本编辑器来查看脚本。
Run the following command to begin the installation process.
运行以下命令以开始安装过程。
pi@raspberrypi:~/Pi-hole/automated install $ sudo bash basic-install.shThe script will begin to run some basic checks before it brings us into an installation screen.
在将脚本带入安装屏幕之前,该脚本将开始运行一些基本检查。
[✓] Root user check.;;,.
        .ccccc:,.
         :cccclll:.      ..,,
          :ccccclll.   ;ooodc
           'ccll:;ll .oooodc
             .;cll.;;looo:.
                 .. ','.
                .',,,,,,'.
              .',,,,,,,,,,.
            .',,,,,,,,,,,,....
          ....''',,,,,,,'.......
        .........  ....  .........
        ..........      ..........
        ..........      ..........
        .........  ....  .........
          ........,,,,,,,'......
            ....',,,,,,,,,,,,.
               .',,,,,,,,,'.
                .',,,,,,'.
                  ..'''.[✓] Disk space check
[✓] Update local cache of available packages[i] It is recommended to update your OS after installing the Pi-hole![i] Installer Dependency checks...
  [✓] Checking for dhcpcd5
  [✓] Checking for git
  [✓] Checking for iproute2
  [✓] Checking for whiptail
The Pi-hole automated installer screen will appear.
将出现“ Pi-hole自动安装程序”屏幕。
Select OK.
选择确定。

The next screen lets us know that Pi-hole is free and open-source software.
下一个屏幕让我们知道Pi-hole是免费的开源软件。
Select OK.
选择确定。

The next screen tells us that Pi-hole is a server and needs a static IP address to function properly.
下一个屏幕告诉我们Pi-hole是一台服务器,需要一个静态IP地址才能正常运行。
Note: This does not refer to a static public IP address. This refers to the IP addresses on your local network. We will cover this step after the Pi-hole installer has finished.
注意:这不是指静态公共IP地址。 这是指您本地网络上的IP地址。 Pi-hole安装程序完成后,我们将介绍此步骤。
Select OK.
选择确定。

We are now prompted to choose an interface.
现在提示我们选择一个接口。
It is recommended that your Raspberry Pi is connected via an Ethernet cable instead of WiFi. While WiFi will be slower than Ethernet, I have tested both and have not seen a noticeable performance impact.
建议您通过以太网电缆而不是WiFi连接Raspberry Pi。 虽然WiFi的速度将比以太网慢,但我已经对这两者进行了测试,但尚未看到明显的性能影响。
Tip: Try switching to Ethernet if you experience performance issues over WiFi.
提示:如果您在WiFi上遇到性能问题,请尝试切换到以太网。
Select the option beginning with “eth” if you are using a wired connection.
如果使用有线连接,请选择以“ eth”开头的选项。
Select the option beginning with “wlan” if you are using a wireless connection.
如果使用无线连接,请选择以“ wlan”开头的选项。

We will now be prompted to select an upstream DNS provider.
现在将提示我们选择上游DNS提供商。
An upstream DNS provider is who your Pi-hole will query when it needs to convert domain names to IP addresses. While there are a variety of upstream providers we will choose Google.
上游DNS提供商是您的Pi-hole在需要将域名转换为IP地址时将查询的人。 尽管有许多上游提供商,但我们将选择Google。
Feel free to do your research on DNS providers to make an informed selection.
随时对DNS提供程序进行研究,以做出明智的选择。
Select Google (ECS).
选择Google(ECS)。
Select OK.
选择确定。

The next screen displayed allows us to choose which third-party block lists Pi-hole will utilize. You can add custom lists after the installation through the Web user interface (WebUI). We will leave the defaults selected.
在下一个显示的屏幕上,我们可以选择Pi-hole将使用的第三方阻止列表。 您可以在安装后通过Web用户界面(WebUI)添加自定义列表。 我们将保留默认设置。
Select OK.
选择确定。

We will now be prompted to choose IP versions. We will keep the defaults and select both, but feel free to make the selection based on your network.
现在将提示我们选择IP版本。 我们将保留默认值并选择两者,但随时可以根据您的网络进行选择。
Select OK.
选择确定。

The next screen will ask us if we’d like to keep the current network settings as the static IP address for the Pi-hole.
下一个屏幕将询问我们是否要将当前网络设置保留为PiKong的静态IP地址。
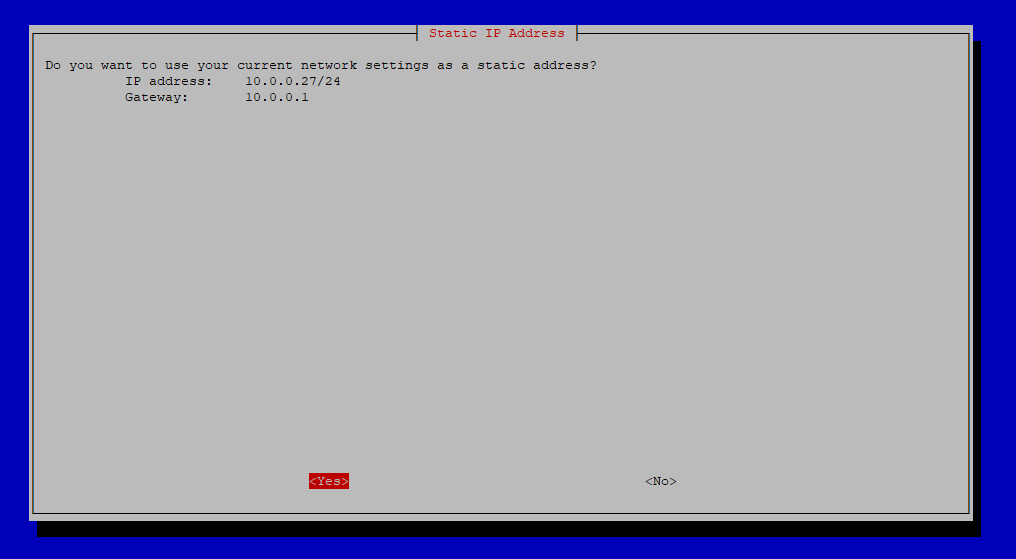
The 10.0.0.27/24 address was assigned by DHCP via my router. I’ll need to ensure that this address stays reserved for my Raspberry Pi.
DHCP通过我的路由器分配了10.0.0.27/24地址。 我需要确保为我的Raspberry Pi保留该地址。
To do this, I need to go into the LAN settings on my router. From there, I can reserve IP addresses for devices on my network. Most routers can do this.
为此,我需要进入路由器的LAN设置。 从那里,我可以为网络上的设备保留IP地址。 大多数路由器都可以做到这一点。
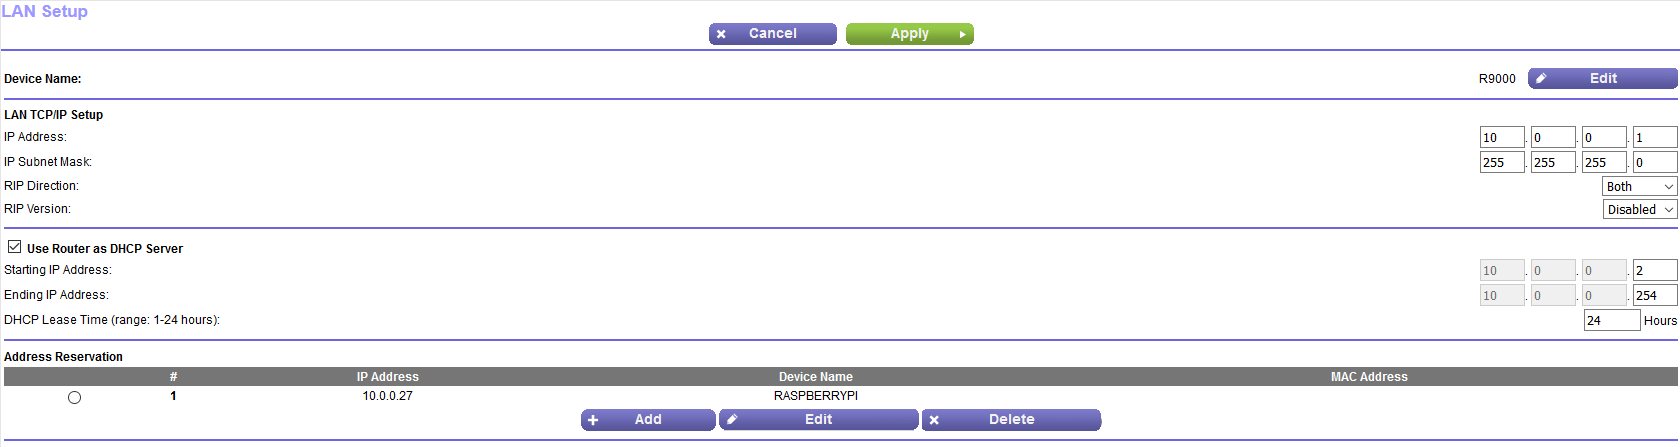
I now have this IP address tied to the MAC address of my Raspberry Pi. If my router or the Raspberry Pi are rebooted this IP address will be reassigned to my Raspberry Pi due to the reservation.
现在,我将此IP地址绑定到Raspberry Pi的MAC地址。 如果我的路由器或Raspberry Pi重新启动,由于保留,该IP地址将重新分配给我的Raspberry Pi。
Note: If you do not reserve the IP address chosen in this step for your Raspberry Pi, you may run into issues when your devices reboot. The address may be assigned to another device.
注意:如果您没有为Raspberry Pi保留在此步骤中选择的IP地址,则设备重启时可能会遇到问题。 该地址可以分配给另一个设备。
Select Yes on the Pi-hole installer screen.
在“ Pi-hole安装程序”屏幕上选择“是”。
We are now presented with an IP Conflict screen. Since we already reserved the IP address for our Raspberry Pi we can continue past this screen.
现在,我们将看到一个IP冲突屏幕。 由于我们已经为Raspberry Pi保留了IP地址,因此我们可以继续通过该屏幕。
If you were not able to reserve an IP address then read through this screen and take note of the potential issues.
如果您无法保留IP地址,请通读此屏幕并注意潜在的问题。
Select OK.
选择确定。

The next screen will ask if we’d like to install the web admin interface. It is highly recommended you do this so you can see the statistics, logging, and admin user interface through a web browser.
下一个屏幕将询问我们是否要安装Web管理界面。 强烈建议您执行此操作,以便可以通过Web浏览器查看统计信息,日志记录和管理用户界面。
Select OK.
选择确定。

Pi-hole can install a web server that runs the admin interface (lighttpd). It is recommended you select “On” unless you have an existing web server running.
Pi-hole可以安装运行管理界面(lighttpd)的Web服务器。 除非您有运行中的Web服务器,否则建议您选择“开”。
Note: The web interface will only be accessible from your network unless configured otherwise.
注意:除非另有配置,否则只能从网络访问Web界面。
Select OK.
选择确定。

The next screen will ask if we’d like to enable the logging of queries. It is recommended to select “On” to have Pi-hole collect logs.
下一个屏幕将询问我们是否要启用查询记录。 建议选择“开”以使Pi-hole收集日志。
Select OK.
选择确定。

We will now be asked to select privacy settings for FTL. FTL, or Faster Than Light, is a custom program developed by the Pi-hole team that reads the Pi-hole logs, stores them in RAM, and makes them accessible to the WebUI. This allows queries to be returned very quickly since they are stored in RAM.
现在将要求我们为FTL选择隐私设置。 FTL或Faster Than Light是Pi-hole团队开发的自定义程序,该程序读取Pi-hole日志,将其存储在RAM中,并使WebUI可以访问它们。 由于查询存储在RAM中,因此可以非常快速地返回查询。
Note: More information on FTL can be found at https://docs.pi-hole.net/ftldns/privacylevels/
注意:有关FTL的更多信息,请访问https://docs.pi-hole.net/ftldns/privacylevels/
Your selection depends on your privacy tolerance. If you are okay with allowing Pi-hole to access domain and client information you can select “Show everything”. Otherwise, choose an option that fits your needs. In this guide, we will select “Show everything”.
您的选择取决于您的隐私容忍度。 如果可以允许Pi-hole访问域和客户信息,则可以选择“显示所有内容”。 否则,请选择适合您需求的选项。 在本指南中,我们将选择“显示所有内容”。
Select OK.
选择确定。

The script will continue to run and install several packages including their dependencies. The required services are automatically enabled.
该脚本将继续运行并安装几个软件包,包括其依赖项。 所需的服务会自动启用。
One last window from the automated installer is now displayed. Key information, including the URL to the web interface and password, are shown on the screen.
现在显示自动安装程序的最后一个窗口。 屏幕上显示关键信息,包括Web界面的URL和密码。
Note: Please take note of this information. It is possible to reset your Pi-hole password from the terminal. See additional notes at the end of this article.
注意:请注意此信息。 可以从终端重置您的Pi-hole密码。 请参阅本文末尾的其他说明。
The installation is now complete but there are still more steps!
现在,安装已完成,但是还有更多步骤!

步骤3 —更新您的DNS (Step 3 — Updating Your DNS)
Pi-hole is running but our internet traffic is still utilizing the DNS server that is configured in our router.
Pi-hole正在运行,但我们的互联网流量仍在使用路由器中配置的DNS服务器。
We need to log in to our router and change the DNS server to the IP address that we configured for Pi-Hole.
我们需要登录到路由器,并将DNS服务器更改为我们为Pi-Hole配置的IP地址。

I included a secondary DNS server that points to 1.1.1.1. This is the DNS address from Cloudflare. There is no charge to use this address. If the Raspberry Pi every turns off or fails, your router will fall back to the secondary DNS server.
我包括了一个指向1.1.1.1的辅助DNS服务器。 这是Cloudflare的DNS地址。 使用该地址是免费的。 如果Raspberry Pi每次关闭或出现故障,您的路由器将退回到辅助DNS服务器。
Note: Multiple companies offer free DNS services. Research them and choose which one meets your needs. Users often have differing performance depending on their location.
注意:多家公司提供免费的DNS服务。 研究它们,然后选择满足您需求的一个。 用户经常根据其位置而具有不同的性能。
Our router should now be using the Pi-hole as its DNS server.
我们的路由器现在应该将Pi-hole用作其DNS服务器。
第4步-访问WebUI (Step 4 — Accessing the WebUI)
Pi-hole comes with a WebUI that allows us to customize settings and view statistics on domains that were blocked.
Pi-hole带有一个WebUI,可让我们自定义设置并查看被阻止域的统计信息。
Open a web browser and connect to the IP address of your Pi-hole/admin. In this guide, we would connect to http://10.0.0.27/admin/.
打开网络浏览器,然后连接到Pi-hole / admin的IP地址。 在本指南中,我们将连接到http://10.0.0.27/admin/ 。
The WebUI shows us statistics as soon as we access the page.
访问页面后,WebUI就会向我们显示统计信息。

Pi-hole is showing statistics on the following data:
Pi-hole正在显示有关以下数据的统计信息:
Total Queries — The number of queries Pi-hole has processed. You won’t be able to see this information per device. The 2 clients shown are the Pi-hole itself and your router. All queries will pass through your router.
查询总数-Pi -hole已处理的查询数。 您将无法在每个设备上看到此信息。 显示的2个客户端是Pi-hole本身和您的路由器。 所有查询将通过您的路由器。
Queries Blocked — The number of queries that were on the default blocklists during installation.
阻止的查询 -安装期间默认阻止列表上的查询数。
Percent Blocked — Queries Blocked divided by Total Queries.
被阻止的百分比 -被阻止的查询除以总查询。
Domains on Blocklist — The number of domains on the default blocklists.
阻止列表中的域-默认阻止列表中的域数。
Clicking Login allows us to access more information on the Pi-hole. You will be prompted to provide the password created during installation.
单击“登录”可以使我们访问PiKong的更多信息。 系统将提示您提供安装过程中创建的密码。
Enter your password and click Log In.
输入密码,然后单击登录。

There are several more options available once you log in. We will not go through all of the options and configurations available.
登录后,还有更多可用选项。我们将不介绍所有可用选项和配置。
Note: There is a help button at the bottom of the navigation pane that can assist with detailed troubleshooting.
注意:导航窗格底部有一个帮助按钮,可以帮助您进行详细的故障排除。

注意事项 (Things to Keep in Mind)
- Not all domains are malicious. Please keep in mind that websites generate ad revenue from you visiting their site. If you frequent a trusted site, please consider adding their domains to the Pi-hole whitelist. 并非所有域都是恶意的。 请记住,网站通过您访问其网站而产生广告收入。 如果您经常访问受信任的站点,请考虑将其域添加到Pi-hole白名单中。
- Blocking domains with Pi-hole may cause some sites to not function properly. If this happens, you will need to go into the logs and look for the blocked traffic. There is a button to whitelist domains on-the-fly. 使用Pi-hole阻止域可能会导致某些站点无法正常运行。 如果发生这种情况,您将需要进入日志并查找被阻止的流量。 有一个按钮可以将网域即时加入白名单。
- You can revert your router settings to another DNS server if you choose to stop using Pi-hole. 如果您选择停止使用Pi-hole,则可以将路由器设置恢复到其他DNS服务器。
- The admin password to the WebUI can be updated by running the following command from the terminal. You will be prompted to type in your new password. 可以通过从终端运行以下命令来更新WebUI的管理员密码。 系统将提示您输入新密码。
pi@raspberrypi:~/Pi-hole/automated install $ pihole -a -p结语 (Wrapping Up)
Congrats! Pi-hole is now officially up and running and is actively blocking domains.
恭喜! Pi-hole现在正式启动并正在运行,并且正在积极阻止域。
Pi-hole is a great way to keep your data and devices safe from malicious advertising. Following this guide ensures that any devices connected to your network will have these protections applied.
Pi-hole是保护您的数据和设备免受恶意广告侵扰的一种好方法。 遵循本指南可确保连接到网络的所有设备都将应用这些保护。
If you have any questions feel free to Tweet or PM me @mrkmety
如果您有任何疑问,请随时发推文或PM @mrkmety
raspberry pi


 5075
5075


 被折叠的 条评论
为什么被折叠?
被折叠的 条评论
为什么被折叠?
 到【灌水乐园】发言


