


计算机视觉课
Note from author :
作者注:
This tutorial is the foundation of computer vision delivered as “Lesson 5” of the series, there are more Lessons upcoming which would talk to the extend of building your own deep learning based computer vision projects. You can find the complete syllabus and table of content here
本教程是本系列“第5课”中提供的计算机视觉的基础,接下来还将有更多课程与构建基于深度学习的计算机视觉项目相关。 您可以在此处找到完整的课程提纲和目录
Target Audience : Final year College Students, New to Data Science Career, IT employees who wants to switch to data science Career .
目标受众 :最后一年的大学生,数据科学职业新手,想要转用数据科学职业的IT员工。
Takeaway : Main takeaway from this article :
外卖 :本文的主要外卖:
Image Classification Using Machine Learning
使用机器学习进行图像分类
Image Classification : Machine Learning way vs Deep Learning way
图像分类:机器学习方式与深度学习方式
影像分类 (Image Classification)
By definition, Image classification is a process of applying computer vision and machine learning algorithms to extract the meaning from an image.
根据定义,图像分类是应用计算机视觉和机器学习算法从图像中提取含义的过程。
By and large,Image classification is nothing but assigning a label to an image from a set of pre-defined categories. The FIG 5.1 depicts the difference between an image classification to other process that we can do on an image using computer vision.
总体而言,图像分类不过是为一组预定义类别中 的图像分配标签 。 图5.1描述了图像分类与我们可以使用计算机视觉对图像进行的其他处理之间的区别。
This means, we pass an image to the algorithm and the algorithm returns a label in the form of a string from a pre-defined set of categories as shown in the first quadrant ((a) Image Classification) of the FIG 5.1. The other quadrants in the above FIG 5.1 are some of the other things that we can do in computer vision by using machine learning and deep learning. We will look into them as we move forward in the course.
这意味着,我们将图像传递给算法,并且该算法从预定义的类别集中以字符串形式返回标签,如图5.1的第一象限((a)图像分类)所示。 上图5.1中的其他象限是我们可以通过使用机器学习和深度学习在计算机视觉中完成的其他一些操作。 我们将在前进的过程中对它们进行调查。
Let us assume a set of pre-defined categories : Categories ={cat,fish,elephant}
让我们假设一组预定义的类别: 类别= {cat,fish,elephant}
Then we input the below image FIG 5.2 to the Image Classification system:
然后我们将下面的图像图5.2输入到图像分类系统:
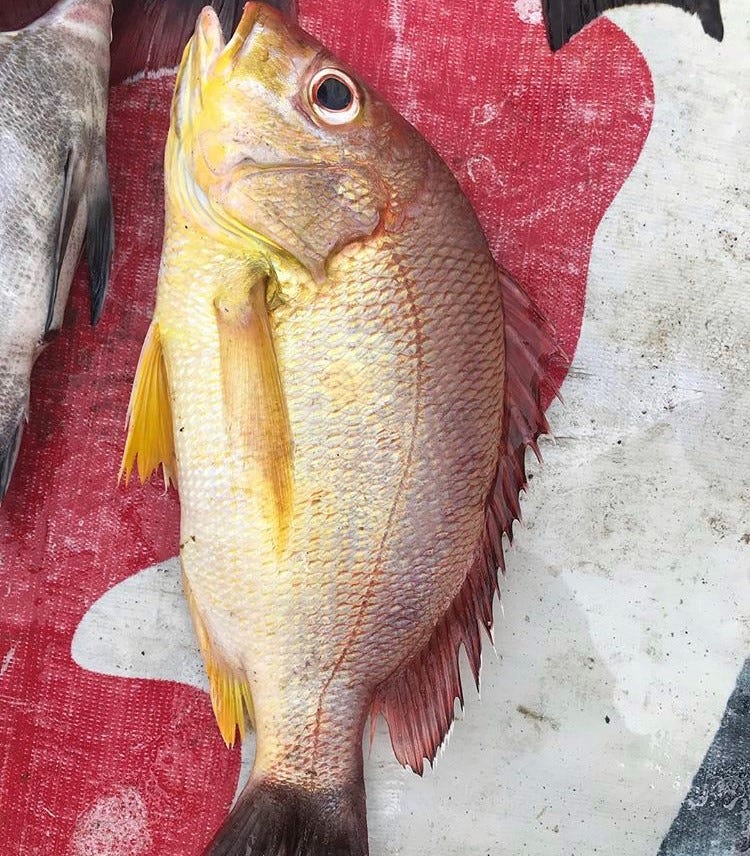
The Image Classification system outputs a label from the set of categories = {cat,fish, elephant} — in this case,fish.
图像分类系统从类别集中输出标签:{猫,鱼,大象}-在这种情况下为fish 。
Our Image Classification system could also assign multiple labels to the image via probabilities, such as cat: 0%, fish: 99% and elephant: 0%
我们的图像分类系统还可以通过概率为图像分配多个标签,例如猫:0%,鱼:99%,大象:0%
The above approach is known as Supervised Learning, where our input data consists of the image data and the labels associated with each image, allowing us to train/teach our classifier what each category looks like. Here, the pre-defined set of categories we saw earlier are the labels.
上面的方法称为监督学习,其中我们的输入数据包括图像数据 和 与每个图像相关联的标签 ,从而使我们能够训练/教导分类器每个类别的外观。 这里,我们之前看到的预定义类别集是标签。
The training datasets of the above Image Classification system would looks like in FIG 5.3:
上述图像分类系统的训练数据集如图5.3所示:

Image Classification System:
图像分类系统:
lets see some of the steps involved in assigning a label to an image from a set of pre-defined labels. ie, Building an Image Classifier
让我们看看通过一组预定义标签为图像分配标签所涉及的一些步骤。 即,建立图像分类器
Step 1: Creating your dataset
步骤1:建立资料集
Step 2: Splitting the dataset into training and testing dataset
步骤2:将资料集分为训练和测试资料集
Step 3: Feature Extraction
步骤3:特征提取
Step 4: Training your classification model
步骤4:训练分类模型
Step 5: Evaluating your classifier
步骤5:评估分类器

Creating your dataset
创建数据集
First step in creating a Image Classification pipeline is to create a dataset relevant to the problem, we are trying to solve. The dataset will contain the image itself and the label associated with each image.
创建图像分类管道的第一步是创建与我们要解决的问题相关的数据集。 数据集将包含图像本身以及与每个图像关联的标签。
In the above example as shown in the FIG 5.3, the dataset should be uniformly distributed. If we have twice the number of cat images than fish images, and five times the number of elephant images than cat images, then our classifier will become naturally biased to “overfitting” into these heavily-represented categories.
在上述示例中,如图5.3所示,数据集应均匀分布。 如果我们的猫图像数量是鱼图像的两倍,大象图像的数量是猫图像的五倍,那么我们的分类器将自然偏向于“过度拟合”到这些代表性较高的类别中。
There is no thumb rule available to define the volume of dataset. In case of dataset with less volume in deep learning, we employ a technique called Transfer Learning. We will see more about Transfer Learning going forward in this course.
没有可用的经验法则来定义数据集的数量。 对于深度学习中数据量较小的数据集,我们采用了一种称为转移学习的技术。 我们将在本课程中进一步了解有关转移学习的内容。
Splitting the dataset into training and testing dataset
将数据集分为训练和测试数据集
We split the dataset into a Training and Testing set. Training set is used to by our classifier to learn what each category looks like by making predictions on the input data and then corrected when the predictions are wrong.Testing set is used to evaluate the performance of the classifier by validating the predicted labels vs the actual labels from testing set to draw a confusion matrix and derive the accuracy.
我们将数据集分为训练和测试集。 分类器习惯使用训练集来通过对输入数据进行预测来了解每个类别的外观,然后在预测错误时进行校正。测试集用于通过验证预测标签与实际值来评估分类器的性能测试集中的标签以绘制混淆矩阵并得出准确性。
The testing set has to be entirely independent from the training set, as we are only going to used for validation to check the performance of our classifier.
测试集必须完全独立于训练集,因为我们将仅用于验证来检查分类器的性能。
The split is size of testing and training set are up-to the developer to decide,some of the common split sizes are:
划分是测试的大小,训练集由开发人员决定,一些常见的划分大小是:
Training : Testing :: 66.7% : 33.3% | Training : Testing :: 75%: 25% | Training : Testing :: 90%: 10%
培训:测试:: 66.7%:33.3%| 培训:测试:: 75%:25%| 培训:测试:: 90%:10%

Feature Extraction
特征提取
We need to extract features to abstractly quantify and represent each image.
我们需要提取特征以抽象地量化和表示每个图像。
Images are represented as matrix of pixels as we learnt in the first few lessons in this course, sometimes we may even use the raw pixel intensities of the images themselves as feature vectors.
在本课程的前几课中,我们将图像表示为像素矩阵,有时甚至可以将图像本身的原始像素强度用作特征向量。
But in most cases in a Machine Learning approach, we tend to use the following feature extractors to quantify an image as feature vectors.
但是在大多数情况下,在机器学习方法中,我们倾向于使用以下特征提取器将图像量化为特征向量。
- Color Histograms 彩色直方图
- Histogram of Oriented Gradients 定向梯度直方图
- Local Binary Patterns 本地二进制模式
- Hu Moments 胡时刻
- Keypoint Detectors : BRISK, FAST, STAR etc… 关键点检测器:BRISK,FAST,STAR等…
- Local Invariant Descriptors : SIFT, SURF etc… 局部不变描述符:SIFT,SURF等…
- Binary Descriptors : BRIEF, FREAK etc… 二进制描述符:Brief,FREAK等…
However, we don’t take this trouble of converting an image to feature vector in a Deep Learning approach. Because in deep learning approach using CNN (Convolution Neural Network algorithm) end-to-end model the network takes the trouble of exacting its feature vectors in its hidden layers. We will see about them in details going forward in this course.
但是,在深度学习方法中,我们不会遇到将图像转换为特征向量的麻烦。 因为在使用CNN(卷积神经网络算法)端到端模型的深度学习方法中,网络要在其隐藏层中精确计算其特征向量会遇到麻烦。 在本课程中,我们将详细介绍它们。
So, You don’t have to bother much about the Machine Learning way of doing Image Classification, but its to good to know them exist. Because this course is intended to focus on Computer Vision using Deep Learning.
因此,您不必为进行图像分类的机器学习方法而烦恼,但是很高兴知道它们的存在。 因为本课程旨在侧重于使用深度学习的计算机视觉。
Training your classification model
训练您的分类模型
Since this lesson on Image Classification is a Machine Learning specific one, we can use the following machine learning algorithms to distinguish between categories.
由于本课程的图像分类是一门机器学习的特定课程,因此我们可以使用以下机器学习算法来区分类别。
- Support Vector Machines 支持向量机
- Logistic Regression 逻辑回归
- Decision Tree 决策树
- Random Forests 随机森林
- K-Nearest Neighbor K最近邻居
One of the above machine learning algorithm takes the extracted feature vectors as input and outputs label associated to that image.
上述机器学习算法之一将提取的特征向量作为输入并输出与该图像相关联的标签。
Don’t worry, if the Machine Learning algorithms are new to you. We will dive deep into the machine learning algorithms in the next lesson.
如果您对机器学习算法不陌生,请不用担心。 在下一课中,我们将深入研究机器学习算法。
Evaluating your classifier
评估分类器
Lastly, we evaluate the labels that the machine learning algorithm outputs. We compare the predicted labels vs the ground-truth labels from our testing set.
最后,我们评估机器学习算法输出的标签。 我们将测试集中的预测标签与真实标签进行比较。
The ground-truth labels represent what the category actually is. From there, we can compute the number of predictions our classifier got right and compute aggregate reports such as precision, recall, and f-measure, which are used to quantify the performance of our classifier as a whole. As shown below:
真实标签表示类别的实际含义。 从那里,我们可以计算分类器正确的预测数,并计算汇总报告,例如精度,召回率和f-measure ,这些报告用于量化分类器整体的性能。 如下所示:

图像分类:机器学习方式与深度学习方式 (Image Classification : Machine Learning way vs Deep Learning way)
In this article we saw the Machine Learning way of doing Image Classification. where we follow the five steps of converting the images to a feature vector and pass it on to a Machine Learning Algorithm to obtain labels associated with each image as output.
在本文中,我们看到了进行图像分类的机器学习方法。 在此,我们执行将图像转换为特征向量的五个步骤,并将其传递给机器学习算法,以获取与每个图像相关的标签作为输出。

However, In an end-to-end Deep Learning we approach the Image Classification in an entirely different way. The steps involved in a deep learning approach is given below
但是,在端到端深度学习中,我们以完全不同的方式处理图像分类。 深度学习方法涉及的步骤如下
Step 1: Creating your dataset
步骤1:建立资料集
Step 2: Splitting the dataset into training and testing dataset
步骤2:将资料集分为训练和测试资料集
Step 3: Training your Network
步骤3:训练您的网路
Step 4: Evaluating your classifier
步骤4:评估分类器
Yes, we are skipping the Feature Extraction step. We don’t need to convert the images to a feature vector.
是的,我们正在跳过功能提取步骤。 我们不需要将图像转换为特征向量。

The reason for this is because CNNs are end-to-end models. We present the raw input data (pixels) to the network. The network then learns filters inside its hidden layers that can be used to discriminate amongst object classes. The output of the network is then a probability distribution over class labels.
原因是因为CNN是端到端模型。 我们将原始输入数据(像素)呈现给网络。 然后,网络学习其隐藏层内部的过滤器,这些过滤器可用于区分对象类别。 然后,网络的输出是类别标签上的概率分布。
One of the exciting aspects of using CNNs is that we no longer need to fuss over hand-engineered features — we can let our network learn the features instead. However, this trade off does come at a cost. Training CNNs can be a non-trivial process, so be prepared to spend considerable time familiarizing yourself with the experience and running many experiments to determine what does and does not work.
使用CNN的令人兴奋的方面之一是,我们不再需要对手工设计的功能大惊小怪-我们可以让我们的网络学习这些功能。 但是,这种权衡确实要付出代价。 训练CNN可能是不平凡的过程,因此请准备花费大量时间来熟悉经验并进行许多实验以确定什么有效和无效。
This course “Computer Vision using Deep Learning” is done with a deep learning mindset. Going forward, we will get into details of Neural Network and Convolution Neural Networks.
本课程“使用深度学习的计算机视觉”以深度学习的心态完成。 展望未来,我们将深入探讨神经网络和卷积神经网络 。
To read the other Lessons from this course, Jump to this article to find the complete syllabus and table of contents
要阅读本课程的其他课程,请跳至本文以查找完整的课程提纲和目录
— — — — — — — — — — -> Click Here
— — — — — — — — — — — —> 单击此处
翻译自: https://medium.com/swlh/computer-vision-tutorial-lesson-5-91001d1a4183
计算机视觉课


 6685
6685

 被折叠的 条评论
为什么被折叠?
被折叠的 条评论
为什么被折叠?
 到【灌水乐园】发言


