


jupyter cloud
Once upon a time in the XYZ123 Company,
很久以前在XYZ123公司,
Anton: “Hi boss, I’ve finished this churn prediction model. We’ve exceeded our accuracy target!”
安东:“老板,我已经完成了这个流失预测模型。 我们已经超出了准确性目标!”
Budi: “Wow cool, Anton! We could generate a list of customers that has high churn probability and send it to our CRM systems on a daily basis. Let’s start this next week!
布迪:“哇,安东! 我们可以生成具有高流失率的客户列表,并将其每天发送到我们的CRM系统。 下周开始吧!
Anton: “uhm, I’m not sure we could do that next week”
安东:“嗯,我不确定我们下周能做到这一点”
Budi: “Why? you said that you’ve already finished it”
布迪:“为什么? 你说你已经完成了”
Anton: “Yes I’ve finished it, but it’s only the modeling part. I need to talk with our ML Engineers to convert my Jupyter Notebook code to Production Ready code. Not only that, we still need to create the scheduling, monitoring, and …”
安东:“是的,我已经完成了,但这只是建模的一部分。 我需要与我们的机器学习工程师联系,将我的Jupyter Notebook代码转换为生产就绪代码。 不仅如此,我们仍然需要创建计划,监视和……”
Budi: “Okay okay, so when will all of that be ready?”
布迪:“好吧,那一切什么时候准备好?”
Anton: “If we’re lucky, maybe a month from now”
安东:“如果幸运的话,也许从现在开始一个月”
Budi: “… Could we just run that notebook thing periodically?”
布迪:“……我们可以定期运行笔记本内容吗?”
Is the conversation above familiar to you?
上面的对话对您来说熟悉吗?
Are you still in the place where it’s hard to deploy Machine Learning code to Production?
您是否还在难以将机器学习代码部署到生产环境中?
As Data Scientists, we often lose momentum when our code stuck in the long deployment process. The situation/business context might change in the future, which cause our model needs to be tuned again. For example, in the Fraud Detection field, Fraudsters could adapt & change their behavior later, which then makes our production model unable to catch those Fraudsters (with new behavior).
作为数据科学家,当我们的代码陷入漫长的部署过程中时,我们常常会失去动力。 将来情况/业务环境可能会发生变化,这导致我们的模型需要再次调整。 例如,在“欺诈检测”字段中,欺诈者可以稍后适应和更改其行为,这使我们的生产模型无法捕获那些具有新行为的欺诈者。
Because of that, we need a pipeline that could enable us to deploy, schedule and run Machine Learning code easily (and fast!).
因此,我们需要一个管道,使我们能够轻松(快速)部署,调度和运行机器学习代码。
The simplest thing is we could just schedule our notebook directly. This approach is already made possible by Netflix. Netflix had created an open source tool called Papermill, which is a tool for parameterizing and executing Jupyter Notebooks.
最简单的事情是我们可以直接安排笔记本电脑。 Netflix已经使这种方法成为可能。 Netflix创建了一个名为Papermill的开源工具,该工具用于参数化和执行Jupyter Notebooks。
This also become much easier if we are in the Cloud Environment. We could even have Serverless Architecture for this case.
如果我们在Cloud Environment中,这也变得容易得多。 在这种情况下,我们甚至可以拥有无服务器架构 。
Inspired from this Google Cloud Blog: https://cloud.google.com/blog/products/ai-machine-learning/let-deep-learning-vms-and-jupyter-notebooks-to-burn-the-midnight-oil-for-you-robust-and-automated-training-with-papermill, here is what we have in Blibli:
受此Google Cloud博客的启发: https : //cloud.google.com/blog/products/ai-machine-learning/let-deep-learning-vms-and-jupyter-notebooks-to-burn-the-midnight-oil针对您的健壮和自动化的造纸厂培训 ,这是我们在Blibli中拥有的:
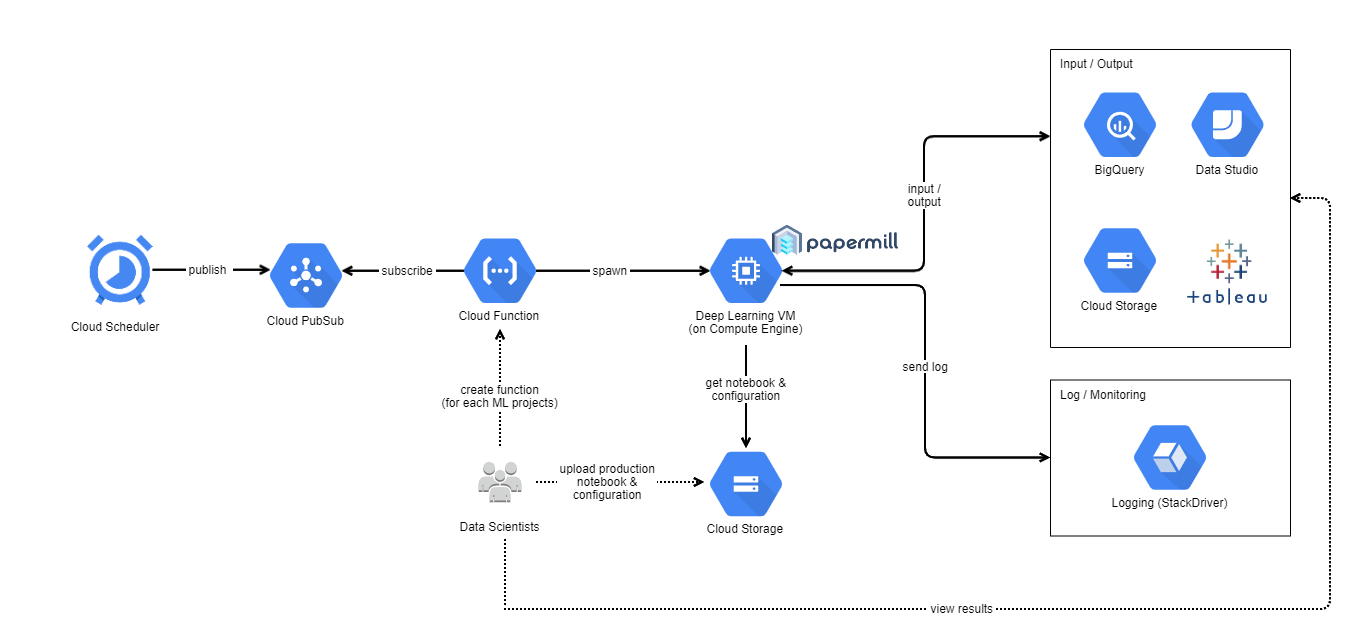
云端排程器 (Cloud Scheduler)
We could setup cron job scheduler using Google Cloud Scheduler. The job will send message to Pub/Sub topic.
我们可以使用Google Cloud Scheduler设置cron作业计划程序。 作业会将消息发送到发布/订阅主题。

云发布/订阅 (Cloud Pub/Sub)
Messages from Cloud Scheduler are stored here. It will be listened by Cloud Function.
来自Cloud Scheduler的消息存储在此处。 Cloud Function将监听它。

云功能 (Cloud Function)
We could setup function in Google Cloud Function. The function will be triggered when there is any new event/message in Google Cloud Pub/Sub Topic.
我们可以在Google Cloud Function中设置功能。 当Google Cloud Pub / Sub主题中有任何新事件/消息时,将触发该功能。
This Function will create Compute Engine (based on our configuration, which consist of Deep Learning VM Image name, Zone, Machine Type, GPU Type, etc.).
此功能将创建Compute Engine(基于我们的配置,其中包括深度学习VM映像名称,区域,机器类型,GPU类型等)。
Here is the code example in our Google Cloud Function:
这是我们的Google Cloud Function中的代码示例 :
import base64
from googleapiclient import discovery
import pytz
import datetime


#-------------------- Configurations --------------------
GCP_PROJECT = "sample-gcp-project"
GCS_BUCKET_PATH = "gs://sample-gcp-bucket"
STARTUP_SCRIPT_URL = "https://storage.googleapis.com/.../notebook_executor.sh" #not a complete url, please specify startup script yourself


PROJECT_NAME = "project-name-1"
NOTEBOOK_NAME = "notebook-project-1.ipynb"
DLVM_IMAGE_PROJECT = "deeplearning-platform-release"
DLVM_IMAGE_FAMILY = "tf2-2-0-cu100"
ZONE = "us-west1-b"
MACHINE_TYPE = "n1-highmem-8"
MACHINE_NAME = PROJECT_NAME
BOOT_DISK_SIZE = "200GB"
GPU_TYPE = "nvidia-tesla-k80"
GPU_COUNT = 1
INSTALL_NVIDIA_DRIVER = True


def create_instance():


    # Create the Cloud Compute Engine service object
    compute = discovery.build('compute', 'v1')

    image_response = compute.images().getFromFamily(
        project=DLVM_IMAGE_PROJECT, family=DLVM_IMAGE_FAMILY).execute()
    source_disk_image = image_response['selfLink']


    # Configure the machine
    machine_type_with_zone = "zones/%s/machineTypes/%s" % (ZONE,MACHINE_TYPE)

    today_date = datetime.datetime.now(pytz.timezone('Asia/Jakarta'))


    gcs_input_notebook = "%s/notebooks/%s/current/%s" % (GCS_BUCKET_PATH,PROJECT_NAME,NOTEBOOK_NAME)
    gcs_output_folder = "%s/outputs/%s/%s/%s/%s/" % (GCS_BUCKET_PATH,PROJECT_NAME,today_date.year,today_date.month,today_date.day)
    gcs_parameters_file= "%s/notebooks/%s/current/%s" % (GCS_BUCKET_PATH,PROJECT_NAME,"params.yaml")
    gcs_requirements_txt= "%s/notebooks/%s/current/%s" % (GCS_BUCKET_PATH,PROJECT_NAME,"requirements.txt")


    accelerator_type = "projects/%s/zones/%s/acceleratorTypes/%s" % (GCP_PROJECT,ZONE,GPU_TYPE)


    config = {
        'name': MACHINE_NAME,
        'machineType': machine_type_with_zone,


        # Specify the boot disk and the image to use as a source.
        'disks': [
            {
                'boot': True,
                'autoDelete': True,
                'initializeParams': {
                    'sourceImage': source_disk_image,
                },
                'boot-disk-size': BOOT_DISK_SIZE
            }
        ],

        # Specify a network interface with NAT to access the public
        # internet.
        'networkInterfaces': [{
            'network': 'global/networks/default',
            'accessConfigs': [
                {'type': 'ONE_TO_ONE_NAT', 'name': 'External NAT'}
            ]
        }],


        'guestAccelerators': [{
            'acceleratorType':accelerator_type,
            'acceleratorCount':GPU_COUNT
        }],


        'scheduling': {
            'onHostMaintenance': 'TERMINATE'
        },


        # Allow the instance to access cloud storage and logging.
        'serviceAccounts': [{
            'email': 'default',
            'scopes': [
                'https://www.googleapis.com/auth/cloud-platform'
            ]
        }],


        # Metadata is readable from the instance and allows you to
        # pass configuration from deployment scripts to instances.
        'metadata': {
            'items': [{
                # Startup script is automatically executed by the
                # instance upon startup.
                'key': 'startup-script-url',
                'value': STARTUP_SCRIPT_URL
            }, {
                'key': 'input_notebook',
                'value': gcs_input_notebook
            }, {
                'key': 'output_notebook',
                'value': gcs_output_folder
            }, {
                'key': 'requirements_txt',
                'value': gcs_requirements_txt
            }, {
                'key': 'parameters_file',
                'value': gcs_parameters_file
            }, {
                'key': 'install-nvidia-driver',
                'value': INSTALL_NVIDIA_DRIVER
            }]
        }
    }


    return compute.instances().insert(
        project=GCP_PROJECT,
        zone=ZONE,
        body=config).execute()


def execute(event, context):
    """Triggered from a message on a Cloud Pub/Sub topic.
    Args:
         event (dict): Event payload.
         context (google.cloud.functions.Context): Metadata for the event.
    """

    # We don't really need the content of pubsub message
    # pubsub_message = base64.b64decode(event['data']).decode('utf-8')


    resp = create_instance()
    return str(resp)
note: you should add google-api-python-client dependency to requirements.txt
注意:您应该将Google-api-python-client依赖项添加到requirements.txt
深度学习VM(在Google Compute Engine上) (Deep Learning VM (on Google Compute Engine))
Google provides preconfigured VMs for Machine Learning / Deep Learning applications. Papermill is already installed in that VM too. For more information related to Deep Learning VM, you could check on its documentation: https://cloud.google.com/ai-platform/deep-learning-vm/docs/introduction.
Google为机器学习/深度学习应用程序提供了预先配置的VM。 Papermill也已经安装在该VM中。 有关深度学习VM的更多信息,您可以查看其文档: https : //cloud.google.com/ai-platform/deep-learning-vm/docs/introduction 。
After Compute Engine is created, startup script will be executed(we have defined where to get the startup script, from STARTUP_SCRIPT_URL configuration in Cloud Function).
创建Compute Engine之后,将执行启动脚本(我们已经从Cloud Function中的STARTUP_SCRIPT_URL配置中定义了从何处获取启动脚本)。
For starter, you could use the startup script example that is provided by Google: https://raw.githubusercontent.com/GoogleCloudPlatform/ml-on-gcp/master/dlvm/tools/scripts/notebook_executor.sh. Note: We found that startup script from Google is not enough for our cases, so we modified some parts for internal use.
对于初学者,您可以使用Google提供的启动脚本示例: https : //raw.githubusercontent.com/GoogleCloudPlatform/ml-on-gcp/master/dlvm/tools/scripts/notebook_executor.sh 。 注意 :我们发现Google的启动脚本不足以满足我们的情况,因此我们修改了一些部分以供内部使用。
Basically, the startup script will install all required libraries. Then it will run notebook there. After that, it will upload all the results to Google Cloud Storage. At the end, the script will shut down the compute engine itself.
基本上,启动脚本将安装所有必需的库。 然后它将在那里运行笔记本。 之后,它将所有结果上传到Google Cloud Storage。 最后,脚本将关闭计算引擎本身。
结论 (Conclusion)
We are aware that this pipeline is not perfect. There are a lot of things that need to be built around it, such as Workflow Management, CI/CD tools, proper ML Monitoring tools, etc. However, having this pipeline has helped us in speeding up our process in doing POCs, deploying simple ML tasks, and even for doing hyper parameter tuning in parallel.
我们知道该管道并不完美。 围绕它需要构建很多东西,例如工作流管理,CI / CD工具,适当的ML监控工具等。但是,拥有此管道可以帮助我们加快执行POC的过程,简化部署过程。 ML任务,甚至用于并行执行超参数调整。
jupyter cloud


 1157
1157

 被折叠的 条评论
为什么被折叠?
被折叠的 条评论
为什么被折叠?
 到【灌水乐园】发言


