


 本文介绍了如何从头开始创建卷积神经网络模型,详细阐述了构建过程,旨在帮助读者理解深度学习中的卷积神经网络及其在计算机视觉任务中的应用。
卷积神经网络模型 创建
In recent years, Convolutional Neural Networks have been the first choice for Image processing in Machine Learning projects. Let’s look at how Convolutional Neural Networks work and try to create one for ourselves.
近年来 ,卷积神经网络已经在机器学习项目图像处理的首选。 让我们看看卷积神经网络如何工作,并尝试为自己创建一个。
什么是卷积神经网络? (What are Convolutional Neural Networks?)
Convolutional Neural Networks are an optimized type of neurons, that can extract features from a n-dimensional array.
卷积神经网络是神经元的一种优化类型,可以从n维数组中提取特征。
Here is how a Convolutional Neural Network functions:
这是卷积神经网络的功能:
Step 1: A filter is generated.
步骤1:生成过滤器。
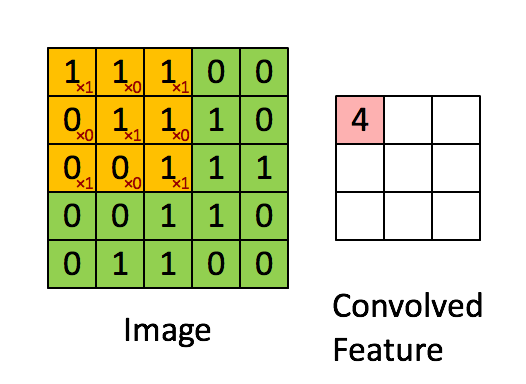
Step 2: The filter is applied on every part of the image, even in overlapped regions. (Look at animation above for visual aid).
步骤2:将滤镜应用于图像的每个部分,即使在重叠区域也是如此。 (请参见上面的动画以获取视觉帮助)。
Step 3: Multiply the filter weights by the region covered by the filter.
步骤3:将过滤器权重乘以过滤器覆盖的区域。
Step 4: Sum all the values together.
步骤4:将所有值加在一起。
With these four steps, a full forward pass of a Convolutional layer is complete.
通过这四个步骤,完成了卷积层的完整前移。
通过代码: (Going Through The Code:)
步骤1 | 依存关系: (Step 1| Dependencies:)
import numpy as np
from matplotlib import pyplot as pltdef sigmoid(x):
    return 1/(1+np.exp(-x))def sigmoid_p(x):
    return sigmoid(x)*(1 -sigmoid(x))def relu(x):
    return np.maximum(x, 0)def relu_p(x):
    return np.heaviside(x, 0)def deriv_func(z,function):
    if function == sigmoid:
        return sigmoid_p(z)
    elif function == relu:
        return relu_p(z)
Basically any Machine Learning project requires numpy and matplotlib, whether that be directly or indirectly. Numpy is nessecary to manipulate arrays and make calculations, Matplotlib is to plot graphs. The activation functions are described above, the program would still function if you added more activation functions, as long as you included the derivative function as well.
基本上,任何机器学习项目都需要numpy和matplotlib,无论是直接还是间接的。 Numpy是操纵数组和进行计算的必要对象,Matplotlib是绘制图形。 激活功能如上所述,如果您添加了更多激活功能,则该程序仍然可以运行,只要您还包括派生功能。
步骤2 | 定义神经网络: (Step 2| Define Neural Network:)
class NeuralNetwork:
    def __init__(self,network):
        self.weights = []
        self.activations = []
        self.network = network
        for layer in network:
            input_size = layer[0]
            output_size = layer[1]
            activation = layer[2]
            layer_type = layer[3]
            other_args = layer[4:]
            index = network.index(layer)
            if layer_type == 'Conv':
                filter_size = other_args[0]
                self.weights.append(np.random.randn(filter_size,filter_size))
            elif layer_type == 'Dense':
                self.weights.append(np.random.randn(input_size,output_size))
            self.activations.append(activation)
Although this is a Convolutional Neural Network, I also wanted to add normal layers just to make the Neural Network more flexible. Feel free to delete some of the argument indexing if you are only going to use convolutional layers.
尽管这是一个卷积神经网络,但我也想添加常规图层,只是为了使神经网络更加灵活。 如果只打算使用卷积层,则可以删除一些参数索引。
步骤3 | 传播神经网络: (Step 3| Propagate Neural Network:)
def conv_operation(data,weights):
    return sum(data.flatten()*weights.flatten())def propagate(self,data):
        Zs = []
        As = []
        for j in range(len(data)):
            As_temp = []
            Zs_temp = []
            As_temp.insert(0,X[j])
            input_data = data[j]
            for i in range(len(self.weights)):
                if self.network[i][3] == 'Conv':
                    shape = self.weights[i].shape[0]
                    deres = []
                    for y in range(len(input_data)):
                        if y +shape > len(input_data):
                            break
                        for x in range(len(input_data[0])):
                            if x +shape > len(input_data[0]):
                                break
                            bbox = (x,y,x+shape,y+shape)
                            data = bounding_box(bbox[0],bbox[1],bbox[2],bbox[3],input_data)
                            deres.append(conv_operation(data,self.weights[i]))
                    deres = np.array(deres)
                    length = int(np.sqrt(len(deres)))
                    deres = np.reshape(deres,(length,length))
                    z = deres
                    a = self.activations[i](deres)
                    input_data = a
                elif self.network[i][3] == 'Dense':
                    z = np.dot(input_data,self.weights[i])
                    a = self.activations[i](z)
                As_temp.append(a)
                Zs_temp.append(z)
            As.append(As_temp)
            Zs.append(Zs_temp)
            true_As = []
            true_Zs = []
            for j in range(len(As[0])):
                As_term = []
                for i in range(len(As)):
                    As_term.append(As[i][j])
                true_As.append(np.array(As_term))
            for j in range(len(Zs[0])):
                Zs_term = []
                for i in range(len(Zs)):
                    Zs_term.append(Zs[i][j])
                true_Zs.append(np.array(Zs_term))
        return true_As,true_Zs
I had quite a hard time coming up with this part of the program, as the arrays are not structured in a way in which it was easy to access both vertical and horizontal data at the same time. Here is a list of ideas that I tried:
对于程序的这一部分,我很难过,因为数组的结构并不易于同时访问垂直和水平数据。 以下是我尝试过的一些想法:
- Make an array that contains the values in columns, and another that contains the value in rows. 创建一个包含以列为单位的值的数组,另一个包含以行为单位的值的数组。
This failed because it was still too complicated to choose the right rows and right columns.
之所以失败,是因为选择正确的行和正确的列仍然太复杂。
- Flatten the list and find the relevant terms. 整理列表并找到相关术语。
This failed because there were too many underlying algorithms that I had to create to find the relevant terms to index the right part of the program.
这失败了,因为我不得不创建太多的基础算法来找到相关的术语来索引程序的正确部分。
The idea that I went with was the bounding box idea:
我接受的想法是边界框想法:
def bounding_box(x_1,y_1,x_2,y_2,data):
    bounding_data = []
    for i in range(y_1,y_2):
        bounding_data.append(data[i][x_1:x_2])
    return np.asarray(bounding_data)
When given a bounding box of coordinates, it scales through the y coordinates and then finds the relevant square of numbers.
给定坐标的边界框时,它将缩放y坐标,然后找到相关的数字平方。
I apologize that the other code is not very concise, because it needed to work for all filter sizes and I wanted it to be as robust as possible.
抱歉,其他代码不是很简洁,因为它需要适用于所有过滤器大小,并且我希望它尽可能健壮。
步骤4 | 训练神经网络: (Step 4| Train Neural Network:)
ef gradient_descent(self, learning_rate,network, x, y, iterations):
        loss = []
        orig_x = x
        for i in range(iterations):
            As,Zs = neural_network.propagate(x)
            loss.append(np.square(sum(y - As[-1])))
            g_wm = [0] * len(self.weights)
            for z in range(len(g_wm)):
                a_1 = As[z].T
                pre_req = (y-As[-1])*2
                z_index = 0
                weight_index = 0
                for i in range(0,z*-1 + len(network)):
                    if i % 2 == 0:
                        z_index -= 1
                        if self.activations[z]:
                            pre_req = pre_req * deriv_func(Zs[z_index],self.activations[z])
                        else:
                            pre_req = pre_req * Zs[z_index]
                    else:
                        weight_index -= 1
                        pre_req = np.dot(pre_req,self.weights[weight_index].T)
                pre_req = np.dot(a_1,pre_req)
                g_wm[z] = pre_req
            for i in range(len(self.weights)):
                if self.network[i][3] == 'Conv':
                    g_wm[i] = np.reshape(g_wm[i],(self.network[i][-1],self.network[i][-1]))
                if self.network[i][3] == 'Dense':
                    g_wm[i] = np.reshape(g_wm[i],(self.network[i][0],self.network[i][1]))
                g_wm[i] *= learning_rate
                self.weights[i] += g_wm[i]
        return np.asarray(loss)
Training a Convolutional Network is not too different from normal training as the variables are basically the same. However, I have to drastically change the shape of the final weight gradients, as convolutional layers create many nested lists.
训练卷积网络与正常训练没有太大区别,因为变量基本相同。 但是,由于卷积层会创建许多嵌套列表,因此我必须彻底更改最终权重梯度的形状。
步骤5 | 完成! (Step 5| Complete!)
network = [[None,None,sigmoid,'Conv',3],[1,1,sigmoid,'Dense']]
neural_network = NeuralNetwork(network)
loss = neural_network.gradient_descent(0.1,network,X, y, 10000)
loss = np.reshape(loss,(loss.shape[0],))
plt.plot(loss)
Run this code to run the full program.
运行此代码以运行完整程序。
结果: (Results:)
I would say that the project worked out very well!
我想说这个项目效果很好!

The loss significantly decreased over time but eventually slowed near zero!
随着时间的流逝,损失明显减少,但最终减慢到接近零!
结论: (Conclusions:)
Alot of people ask me: Why do you create Machine Learning projects from scratch? You could spend that time to make a much more effective model using Keras! There are three reasons why I make models from scratch:
很多人问我:为什么您要从头开始创建机器学习项目? 您可以花时间使用Keras制作更有效的模型! 我从头开始制作模型的三个原因:
- It’s a challenge. 这是一个挑战。
I always like a little challenge that adds some pressure into the system. Creating machine learning algorithms is not easy but they are really rewarding when they work.
我总是喜欢一个小挑战,它给系统增加了一些压力。 创建机器学习算法并不容易,但是当它们起作用时,它们确实是有意义的。
- It helps me to understand a concept better. 它帮助我更好地理解一个概念。
When just adding a few arguments to a list you are not exposed the nuances of a Machine Learning algorithm. When making it from Scratch you understand a lot more: from the computational intensity to the training process.
仅在列表中添加一些参数时,您不会暴露机器学习算法的细微差别。 从头开始制作时,您会了解更多:从计算强度到训练过程。
- It allows me to put my own twist on the algorithms. 它使我可以对算法进行自己的修改。
If I tried to change the Keras source code, it could affect everything. With my own code in which I have direct access, and I know exactly what part performs what function to the program.
如果我尝试更改Keras源代码,则可能会影响所有内容。 通过我自己的代码,我可以直接访问其中的代码,并且我确切地知道哪个部分对程序执行什么功能。
感谢您阅读我的文章! (Thank you for reading my article!)
翻译自: https://medium.com/analytics-vidhya/creating-convolutional-neural-networks-from-scratch-6daaa6b9eea0
卷积神经网络模型 创建


 288
288

 被折叠的 条评论
为什么被折叠?
被折叠的 条评论
为什么被折叠?
 到【灌水乐园】发言


