


接上文 : https://zhuanlan.zhihu.com/p/128682162
浮雕视差贴图:
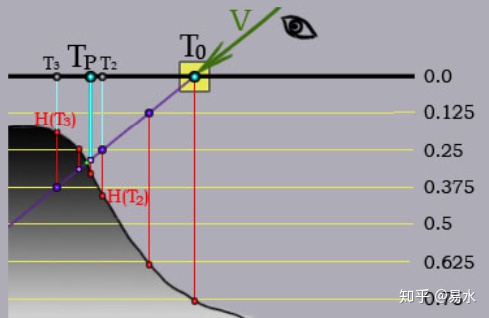
浮雕视差贴图是陡峭视差贴图的进阶版.并允许GLSLshader更加精确地找到偏移的UV坐标.首先您要使用陡峭视差贴图.然后shader中会有两层的深度(最后采样的两层),而V和表面的交点坐落于这两层之间.如下图这两个图层在纹理坐标T3和T2的位置.现在您能使用二叉搜索来提高精度.二叉搜索的每一次迭代都能使得精度调高2.
下图为浮雕视差的原理:
- 在经过陡峭视差算法之后,我们知道了纹理坐标T2和T3,V和曲面的实际交点在绿点位置.
- 让当下每层的UV坐标偏移量和高度除以2.
- 将T3以计算后的UV坐标偏移量沿着V相反的方向移动(向着T2).以当前层高度减少层深度.
- (*)采样高度图.将当前每层的UV偏移量和高度除以2.
- 如果采样高度大于层深度.那么以当前每层高度来增加层深度.并以当前的UV偏移量让当前UV坐标沿着V偏移.
- 如果从纹理中采样的高度小于层深度,那么按照当下的层高减少层深度,并且以当下的偏移量来沿着V反向移动UV坐标.
- 按照设定的次数重复步骤(*)处的二叉搜索.
- 最后一次搜索的纹理坐标就是浮雕视差的结果
以下是浮雕视差的实现:
vec2 parallaxMapping(in vec3 V, in vec2 T, out float parallaxHeight)
{
   // determine required number of layers
   const float minLayers = 10;
   const float maxLayers = 15;
   float numLayers = mix(maxLayers, minLayers, abs(dot(vec3(0, 0, 1), V)));

   // height of each layer
   float layerHeight = 1.0 / numLayers;
   // depth of current layer
   float currentLayerHeight = 0;
   // shift of texture coordinates for each iteration
   vec2 dtex = parallaxScale * V.xy / V.z / numLayers;

   // current texture coordinates
   vec2 currentTextureCoords = T;

   // depth from heightmap
   float heightFromTexture = texture(u_heightTexture, currentTextureCoords).r;

   // while point is above surface
   while(heightFromTexture > currentLayerHeight)
   {
      // go to the next layer
      currentLayerHeight += layerHeight;
      // shift texture coordinates along V
      currentTextureCoords -= dtex;
      // new depth from heightmap
      heightFromTexture = texture(u_heightTexture, currentTextureCoords).r;
   }

   ///
   // Start of Relief Parallax Mapping

   // decrease shift and height of layer by half
   vec2 deltaTexCoord = dtex / 2;
   float deltaHeight = layerHeight / 2;

   // return to the mid point of previous layer
   currentTextureCoords += deltaTexCoord;
   currentLayerHeight -= deltaHeight;

   // binary search to increase precision of Steep Paralax Mapping
   const int numSearches = 5;
   for(int i=0; i<numSearches; i++)
   {
      // decrease shift and height of layer by half
      deltaTexCoord /= 2;
      deltaHeight /= 2;

      // new depth from heightmap
      heightFromTexture = texture(u_heightTexture, currentTextureCoords).r;

      // shift along or agains vector V
      if(heightFromTexture > currentLayerHeight) // below the surface
      {
         currentTextureCoords -= deltaTexCoord;
         currentLayerHeight += deltaHeight;
      }
      else // above the surface
      {
         currentTextureCoords += deltaTexCoord;
         currentLayerHeight -= deltaHeight;
      }
   }

   // return results
   parallaxHeight = currentLayerHeight;    return currentTextureCoords;
}
视差闭塞贴图(POM)
视差闭塞贴图是陡峭视差贴图的另外一种进阶版本,浮雕视差应用二叉搜索来提升结果精度,但是过多的迭代次数会使性能下降.POM意在获得比浮雕视差更好的性能,并提供比陡峭视差更好的结果,但是POM的结果要比浮雕视差稍差一些.
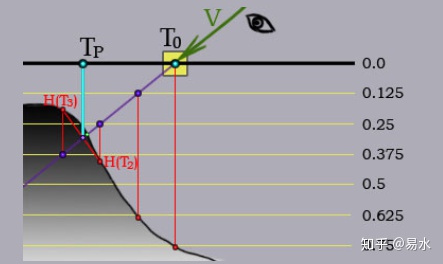
POM简单在陡峭视差的结果之间进行插值.请看下图.POM使用了位于交点之后的层深度(0.375,也就是陡峭视差停止的位置),上一个H(T2)和下一个H(T3)为采样深度.就如同您从图片中看到的.POM的结果点位于向量V与H(T3)H(T2)连线的交点.该点已经足够接近真是的交点(绿标记点).
计算流程如下:
- nextHeight = HT3 - currentLayerHeight;
- prevHeight = HT2 - (currentLayerHeight - layerHeight)
- weight = nextHeight / (nextHeight - prevHeight)//这`里nextHeight为负数,分母分子都是负数,最后的weight是正的
- TP = TT2 * weight + TT3 * (1.0 - weight)
POM以相对较少的高度图采样次数获得较好的结果.但是POM相对浮雕视差舍去了高度图中细节.对于高度图中的突然变化可能产生不正确的结果.
下面是POM在shader中的实现函数:
vec2 parallaxMapping(in vec3 V, in vec2 T, out float parallaxHeight)
{
   // determine optimal number of layers
   const float minLayers = 10;
   const float maxLayers = 15;
   float numLayers = mix(maxLayers, minLayers, abs(dot(vec3(0, 0, 1), V)));

   // height of each layer
   float layerHeight = 1.0 / numLayers;
   // current depth of the layer
   float curLayerHeight = 0;
   // shift of texture coordinates for each layer
   vec2 dtex = parallaxScale * V.xy / V.z / numLayers;

   // current texture coordinates
   vec2 currentTextureCoords = T;

   // depth from heightmap
   float heightFromTexture = texture(u_heightTexture, currentTextureCoords).r;

   // while point is above the surface
   while(heightFromTexture > curLayerHeight)
   {
      // to the next layer
      curLayerHeight += layerHeight;
      // shift of texture coordinates
      currentTextureCoords -= dtex;
      // new depth from heightmap
      heightFromTexture = texture(u_heightTexture, currentTextureCoords).r;
   }

   ///

   // previous texture coordinates
   vec2 prevTCoords = currentTextureCoords + texStep;

   // heights for linear interpolation
   float nextH = heightFromTexture - curLayerHeight;
   float prevH = texture(u_heightTexture, prevTCoords).r
                           - curLayerHeight + layerHeight;

   // proportions for linear interpolation
   float weight = nextH / (nextH - prevH);

   // interpolation of texture coordinates
   vec2 finalTexCoords = prevTCoords * weight + currentTextureCoords * (1.0-weight);

   // interpolation of depth values
   parallaxHeight = curLayerHeight + prevH * weight + nextH * (1.0 - weight);

   // return result
   return finalTexCoords;
}
视差贴图的自阴影
您可以应用类似于陡峭视差的算法来确定像素是否在阴影之内.您需要搜索的不是在表面之下,而是之上的采样点.当然偏移UV坐标的方向也要沿着光的方向(L)而不是摄像机(V).灯光矢量L必须和V一样在切线空间.能够直接用来指定偏移UV的方向.自投影计算的结果阴影因子范围在[0,1],这个值后面用来调整漫反射和高光的强度 .
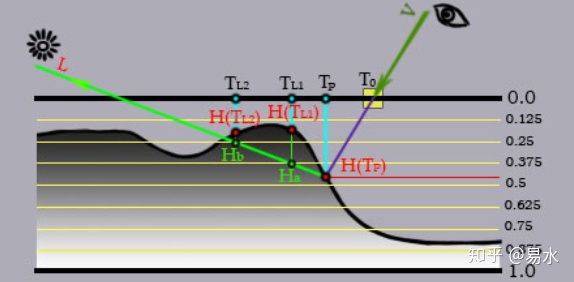
计算硬阴影您必须沿着灯光的方向检测值直到表面下的第一个点.如果点在 表面之下那么阴影因子为0,否则为1.举个栗子.在下一张图中.H(TL1)小于层深度Ha,那么这个点在表面之下.阴影因子为 0.如果L没有点在表面之下,那么该像素就在灯光下,阴影因子等于1.阴影的质量很大程度取决于层数.调整比例值(Scale控制视差程度的)和灯光与法线的角度.会使得阴影出现锯齿甚至更加糟糕.
软阴影考虑沿灯光L的多个值.仅考虑曲面下的点.局部阴影因子为当前深度和采样深度的差,您还必须考虑到点和像素之间的距离.所以局部阴影因子要乘以(1 - stepIndex/numberOfSteps).为了计算最后的阴影因子您必须在局部阴影中求最大值.因此这就是计算软阴影的阴影因子的公式:

以下是软阴影的阴影因子计算流程:
- 设置阴影影子值为0.步进次数为4.
- 沿着L步进到Ha,Ha比H(TL1)小.因此点在表面之下.计算局部阴影因子 Ha- H(TL1).这是第一次检查.而检查总次数为4.考虑到像素到点距离的影响.局部阴影因子要乘以(1 - 1/4).储存局部阴影因子.
- 沿着L步进到Hb,Hb比H(TL2)小.因此点在表面之下.计算局部阴影因子 Hb- H(TL2).这是第二次检查.而检查总次数为4.考虑到像素到点距离的影响.局部阴影因子要乘以(1 - 2/4).储存局部阴影因子.
- 沿着L继续步进.点在表面之上.
- 沿着L继续步进.点也在表面之上.
- 顶点在0.0层之上.停止沿着L的步进采样.
- 选择局部阴影因子中的最大值作为最后的阴影因子.
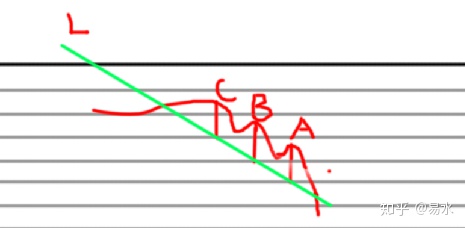
(非翻译部分)局部阴影的乘法系数(1 - stepIndex/numberOfSteps)个人感觉描述它成采样点附近表面突起的距离系数来更合适.而不是像素到该点的距离.越远的突点对该点的阴影影响越小.如下图靠近采样点步进的ABC位置刚好有三个小峰挡着光线,那么这三个点都对采样点的阴影有贡献.但是最近的点贡献肯定最大.较远的点贡献最小.它们相对L的高度一样(layerHeight - heightFromTexTure),而A点最近,那么局部阴影因子最大值就在A点,但如果C点这个位置的峰非常高那么遮挡光纤效果好那么最大值就是它.
下面的代码片段包含了自阴影实现的shader函数:
float parallaxSoftShadowMultiplier(in vec3 L, in vec2 initialTexCoord,
                                       in float initialHeight)
{
   float shadowMultiplier = 1;

   const float minLayers = 15;
   const float maxLayers = 30;

   // calculate lighting only for surface oriented to the light source
   if(dot(vec3(0, 0, 1), L) > 0)
   {
      // calculate initial parameters
      float numSamplesUnderSurface = 0;
      shadowMultiplier = 0;
      float numLayers = mix(maxLayers, minLayers, abs(dot(vec3(0, 0, 1), L)));
      float layerHeight = initialHeight / numLayers;
      vec2 texStep = parallaxScale * L.xy / L.z / numLayers;

      // current parameters
      float currentLayerHeight = initialHeight - layerHeight;
      vec2 currentTextureCoords = initialTexCoord + texStep;
      float heightFromTexture = texture(u_heightTexture, currentTextureCoords).r;
      int stepIndex = 1;

      // while point is below depth 0.0 )
      while(currentLayerHeight > 0)
      {
         // if point is under the surface
         if(heightFromTexture < currentLayerHeight)
         {
            // calculate partial shadowing factor
            numSamplesUnderSurface += 1;
            float newShadowMultiplier = (currentLayerHeight - heightFromTexture) *
                                             (1.0 - stepIndex / numLayers);
            shadowMultiplier = max(shadowMultiplier, newShadowMultiplier);
         }

         // offset to the next layer
         stepIndex += 1;
         currentLayerHeight -= layerHeight;
         currentTextureCoords += texStep;
         heightFromTexture = texture(u_heightTexture, currentTextureCoords).r;
      }

      // Shadowing factor should be 1 if there were no points under the surface
      if(numSamplesUnderSurface < 1)
      {
         shadowMultiplier = 1;
      }
      else
      {
         shadowMultiplier = 1.0 - shadowMultiplier;
      }
   }
   return shadowMultiplier;
}


 422
422

 被折叠的 条评论
为什么被折叠?
被折叠的 条评论
为什么被折叠?
 到【灌水乐园】发言


