


总览
本教程显示了使用深度数据测量真实世界距离的简单方法。
	## Note: 测量真实世界中物体的维度是深度相机的一个明显的应用之一。此样本不是适当的测量工具,而是展示关键概念。
	使用更好的算法可以显著改善测量结果。
在这个教程中你将会学到怎样:
- 在空间上将颜色流与深度对齐(和在rs-align中深度到颜色的对齐相反)
- 利用后处理来处理缺失和噪声的深度数据
- 在2D像素和3D空间中的点之间进行转换
- 利用多核来并行化数据流
- 使用OpenGL在深度之上叠加颜色
预期输出
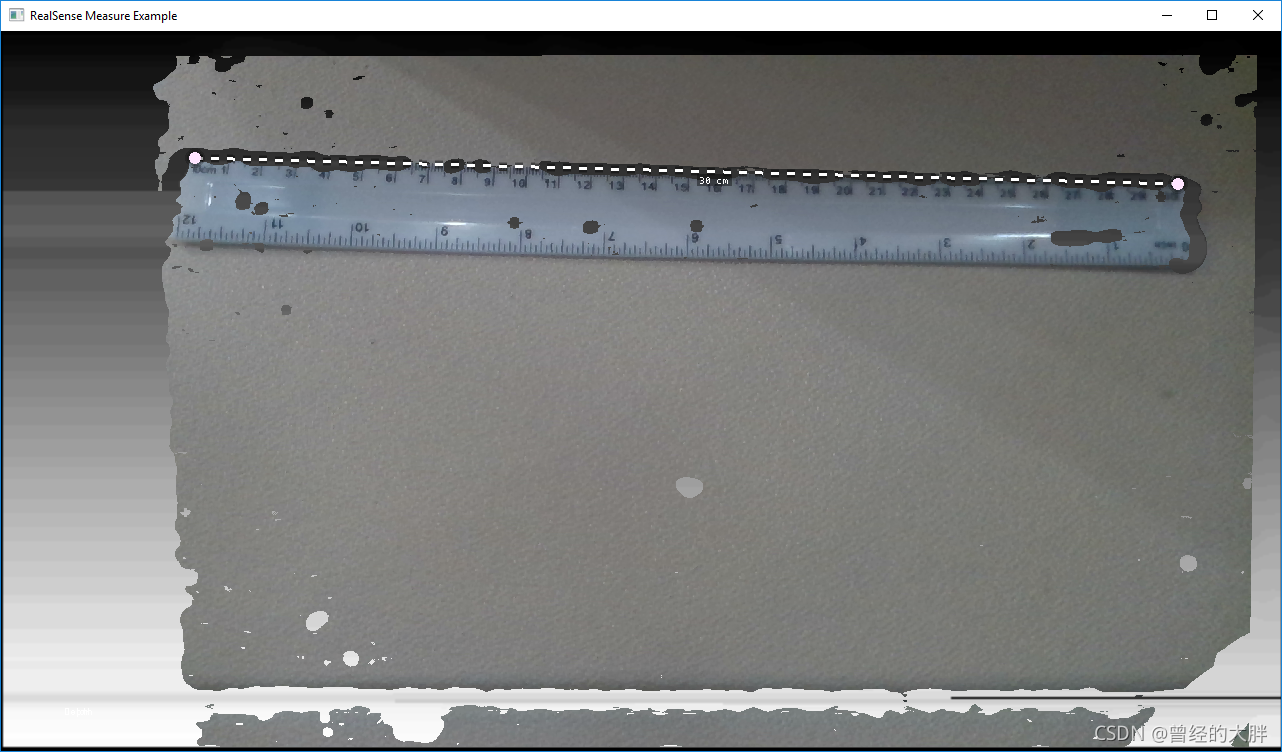
这个例子允许用户测量物理世界中的两个点。
代码总览
深度处理流程
我们通过定义所有的处理块来开始这个例子。我们将要使用
// Colorizer is used to visualize depth data
// Colorizer 用于可视化深度数据
rs2::colorizer color_map;
// Use black to white color map
// 使用黑色到白色颜色映射
color_map.set_option(RS2_OPTION_COLOR_SCHEME, 2.f);
// Decimation filter reduces the amount of data (while preserving best samples)
// 抽取滤波器减小数据的数量(同时保持最佳样本)
rs2::decimation_filter dec;
// If the demo is too slow, make sure you run in Release (-DCMAKE_BUILD_TYPE=Release)
// but you can also increase the following parameter to decimate depth more (reducing quality)
// 如果这个demo太慢,确保你在release中运行(-DCMAKE_BUILD_TYPE=Release)
// 但是你可以同样增加下面的参数来更多的减少深度(降低质量)
dec.set_option(RS2_OPTION_FILTER_MAGNITUDE, 2);
// Define transformations from and to Disparity domain
// 定义从和到时差域的转换
rs2::disparity_transform depth2disparity;
rs2::disparity_transform disparity2depth(false);
// Define spatial filter (edge-preserving)
// 定于空间过滤器(保留边)
rs2::spatial_filter spat;
// Enable hole-filling
// Hole filling is an aggressive heuristic and it gets the depth wrong many times
// However, this demo is not built to handle holes
// (the shortest-path will always prefer to "cut" through the holes since they have zero 3D distance)
// 开启填孔
// 填孔是一个积极的启发性策略,它多次错误地获得深度
// 然而,这个demo不是用于处理填孔的
// (最短的路径总是喜欢切穿这些孔,因为它们的3D距离为零。)
spat.set_option(RS2_OPTION_HOLES_FILL, 5); // 5 = fill all the zero pixels 5 = 填充所有的零像素
// Define temporal filter
// 定义时间过滤器
rs2::temporal_filter temp;
// Spatially align all streams to depth viewport
// We do this because:
//   a. Usually depth has wider FOV, and we only really need depth for this demo
//   b. We don't want to introduce new holes
// 将所有流在空间上对齐到深度视口
// 我们这样做是因为:
//   a. 通常深度有一个更广的FOV,并且对于这个demo我们只需要深度
//   b. 我们不想引入新的洞
rs2::align align_to(RS2_STREAM_DEPTH);
下面,我们为深度+颜色流配置相机管道
// Declare RealSense pipeline, encapsulating the actual device and sensors
// 定义RealSense管道,封装真正的设备和传感器
rs2::pipeline pipe;

rs2::config cfg;
cfg.enable_stream(RS2_STREAM_DEPTH); // Enable default depth //启用默认深度
// For the color stream, set format to RGBA
// To allow blending of the color frame on top of the depth frame
// 对于颜色流,设置格式为RGBA
// 允许在深度帧顶部混合颜色帧
cfg.enable_stream(RS2_STREAM_COLOR, RS2_FORMAT_RGBA8);
auto profile = pipe.start(cfg);
我们的目标是生成没有任何孔的深度,因为这将会对我们的算法构成直接问题。
减少丢失像素的最好方法是让硬件来处理。
D400相机具有我们可以利用的高密度预设。
auto sensor = profile.get_device().first<rs2::depth_sensor>();

// Set the device to High Accuracy preset
// 将设备设置为高密度预设
auto sensor = profile.get_device().first<rs2::depth_sensor>();
sensor.set_option(RS2_OPTION_VISUAL_PRESET, RS2_RS400_VISUAL_PRESET_HIGH_ACCURACY);
给定一个帧集,我们将按顺序应用所有的处理块。
首先我们应用align处理块来将颜色帧对其到深度视口:
// First make the frames spatially aligned
// 首先使帧空间对齐
data = align_to.process(data);
然后,我们应用深度后处理流:
rs2::frame depth = data.get_depth_frame();
// Decimation will reduce the resultion of the depth image,
// closing small holes and speeding-up the algorithm
// 抽取将减少深度图像的结果
// 关闭小孔,并且加速算法
depth = dec.process(depth);
// To make sure far-away objects are filtered proportionally
// we try to switch to disparity domain
// 确保按照比例过滤远处的物体
// 我们尝试转换到视差域
depth = depth2disparity.process(depth);
// Apply spatial filtering
// 应用空间过滤器
depth = spat.process(depth);
// Apply temporal filtering
// 应用时间过滤
depth = temp.process(depth);
// If we are in disparity domain, switch back to depth
// 如果我们在视差域,切回到深度
depth = disparity2depth.process(depth);
// Send the post-processed depth for path-finding
// 发送后处理深度用于路径查找
pathfinding_queue.enqueue(depth);
	所有基于立体的3D相机都具有噪声与距离平方成正比的特性。
	为了抵消这一点,我们将帧转换为视差域,使噪声在距离上更均匀。
	这对我们的结构光相机没有任何作用(因为他们没有这个属性)
我们同样应用标准颜色映射
// Apply color map for visualization of depth
// 应用颜色映射来可视化深度
auto colorized = color_map(depth);
将像素和3D中的点进行转换
要将深度图像中的像素转换为3D点,我们调用rs2_deproject_pixel_to_point C函数(定义在rsutil.h中)
这个函数需要深度内在函数(depths intrinsics),2D像素和距离(米为单位)。这是我们怎样得到深度内部函数(depth intrinsics)的:
auto stream = profile.get_stream(RS2_STREAM_DEPTH).as<rs2::video_stream_profile>();
auto intrinsics = stream.get_intrinsics(); // Calibration data 校准数据
可以使用depth_frame类的get_distance函数获取以米为单位的距离。
过度调用get_distance会导致性能不佳,因为编译器无法跨模块边界进行优化,因此,直接从depth_sensor读取 DEPTH_UNITS选项并使用它将原始深度像素转换为米可能是有益的:
将所有内容放在一起会产生相当冗长的dist_3d函数:
float dist_3d(const rs2_intrinsics& intr, const rs2::depth_frame& frame, pixel u, pixel v)
{
    float upixel[2]; // From pixel //从像素
    float upoint[3]; // From point (in 3D) //从点(3D中)

    float vpixel[2]; // To pixel //到像素
    float vpoint[3]; // To point (in 3D) //到点(3D中)

    // Copy pixels into the arrays (to match rsutil signatures)
    // 将像素拷贝到数组中(匹配rsutil签名)
    upixel[0] = u.first;
    upixel[1] = u.second;
    vpixel[0] = v.first;
    vpixel[1] = v.second;

    // Query the frame for distance
    // Note: this can be optimized
    // It is not recommended to issue an API call for each pixel
    // (since the compiler can't inline these)
    // However, in this example it is not one of the bottlenecks
    // 查询帧的距离
    // 注意:这个可以被优化
    // 不建议为每个像素发出API调用
    // (因为编译器不能内联这些)
    // 然而,在这里例子中它不是瓶颈之一
    auto udist = frame.get_distance(upixel[0], upixel[1]);
    auto vdist = frame.get_distance(vpixel[0], vpixel[1]);

    // Deproject from pixel to point in 3D
    // 将像素反映射到3D中的点
    rs2_deproject_pixel_to_point(upoint, &intr, upixel, udist);
    rs2_deproject_pixel_to_point(vpoint, &intr, vpixel, vdist);

    // Calculate euclidean distance between the two points
    // 计算空间中两个点的欧几里得距离
    return sqrt(pow(upoint[0] - vpoint[0], 2) +
                pow(upoint[1] - vpoint[1], 2) +
                pow(upoint[2] - vpoint[2], 2));
}
在后台线程上运行处理
在此示例中的后处理运算可能相对较慢。为了不阻塞主(UI)线程,我们将有一个专门的线程进行后处理。
视频处理线程
这个线程将消耗来自相机完整帧集,并且会产生包含颜色和着色深度帧的帧集(用于在主线程上渲染):
while (alive)
{
    // Fetch frames from the pipeline and send them for processing
    // 从管道中获取帧,并且发送它们进行处理
    rs2::frameset fs;
    if (pipe.poll_for_frames(&fs))
    {
        // Apply post processing
        // ...
		// 应用后处理过程
		// ...
        // Send resulting frames for visualization in the main thread
        // 发送结果帧,用于在主线程中进行可视化。
        postprocessed_frames.enqueue(data);
    }
}
主线程
主线程是唯一允许用来渲染屏幕的。
它从postprocessed_frames中获取,并且只是展示结果:
while(app) // Application still alive? // 应用仍然存在吗?
{
postprocessed_frames.poll_for_frame(¤t_frameset);
if (current_frameset)
{
auto depth = current_frameset.get_depth_frame();
auto color = current_frameset.get_color_frame();
glEnable(GL_BLEND);
// Use the Alpha channel for blending
// 使用Alpha通道进行混合
glBlendFunc(GL_SRC_ALPHA, GL_ONE_MINUS_SRC_ALPHA);
// First render the colorized depth image
// 首先渲染着色的深度图像
depth_image.render(depth, { 0, 0, app.width(), app.height() });
// Next, set global alpha for the color image to 90%
// (to make it slightly translucent)
// 下一步,将彩色图像的全局alpha设置为90%
// (使其略微半透明)
glColor4f(1.f, 1.f, 1.f, 0.9f);
// Render the color frame (since we have selected RGBA format
// pixels out of FOV will appear transparent)
// 渲染颜色帧(因为我们选择了RGBA格式,超出FOV的像素将会显示为透明)
color_image.render(color, { 0, 0, app.width(), app.height() });
// Render the simple pythagorean distance
// 渲染简单的Pythagorean距离(勾股距离)
render_simple_distance(depth, app_state, app, intrinsics);
// Render the ruler
// 渲染直尺
app_state.ruler_start.render(app);
app_state.ruler_end.render(app);
glDisable(GL_BLEND);
}
}
我们使用glBlendFunc使用颜色alpha通道在深度之上覆盖对其的颜色(流必须是格式RGBA才能工作)。
这个例子演示了一个简单而复杂的处理流程。每个线程都有一些不同的速率,它们都需要同步而不是相互堵塞。
这是使用线程安全的frame_queues作为同步原语和rs2::frame引用计数来实现的,用于跨线程的对象生命周期管理。


 5620
5620

 被折叠的 条评论
为什么被折叠?
被折叠的 条评论
为什么被折叠?
 到【灌水乐园】发言


