


1.0 SA-SSD 环境配置
写在前面:
- SA-SSD 源码地址:https://github.com/skyhehe123/SA-SSD
源码基于mmdetection v1实现。目前,mmdetection已经升级至v2且两个版本相差较大,因此我选择直接使用SA-SSD源码进行复现,后期有需求再考虑将代码移植至v2上- SECOND 源码地址:https://github.com/traveller59/second.pytorch
SA-SSD的主干网络基本参考SECOND- 环境配置参考博客:https://blog.csdn.net/Roland_fire/article/details/107615358
我在实际配置中有参考上述博客,讲得非常细致
Environment
Ubuntu 18.04
Python 3.7
pytorch 1.4.0
torchvision 0.5.0
CUDA 10.0
Dependencies
1. 官方依赖
python3.5+
opencv
shapely
mayavi
spconv (v1.0)
2. 实际安装依赖的过程
1) 基础安装
pip install opencv-python
pip install shapely
pip install mayavi
pip install scikit-image
pip install numba
pip install matplotlib
pip install Cython
pip install terminaltables
pip install tqdm
pip install git+https://github.com/philferriere/cocoapi.git#subdirectory=PythonAPI
pip install pybind11
2) spconv安装
说明:SA-SSD的主干网络基本参考SECOND,因此涉及稀疏3D卷积算法,需要配置spconv环境。
其他说明:在框架mmdetection3d中,已经集成了spconv算子,因此在环境配置上更加方便。不过,mmdetection3d官方代码目前没有SA-SSD算法。
spconv 安装指南:
【官方】:https://github.com/traveller59/spconv
【博客】:https://blog.csdn.net/Roland_fire/article/details/107615358 ("spconv安装"中)
spconv 安装步骤:
1. cmake 安装
spconv 安装过程涉及cmake安装,参考Ubuntu安装cmake
2. spconv安装
 sudo apt-get install libboost-all-dev
 git clone https://github.com/traveller59/spconv.git --recursive
 cd spconv && git checkout 7342772
 python setup.py bdist_wheel
 cd ./dist && pip install *
3. spconv安装过程中,可能出现的错误
python setup.py bdist_wheel报错:
no matching function for call to 'torch::jit::RegisterOperators::RegisterOperators


解决方法:
https://github.com/pytorch/extension-script/issues/6
使用torch::RegisterOperators()替换torch::jit::RegisterOperator()
4. 最终完成spconv安装时,显示界面:

至此,SA-SSD官方所述的依赖已配置完成
Installation
1. mmdet/ops中,编译 C++/CUDA模块
 cd mmdet/ops/points_op
 python setup.py build_ext --inplace
 cd mmdet/ops/iou3d
 python setup.py build_ext --inplace
 cd mmdet/ops/pointnet2
 python setup.py build_ext --inplace
2. ~/.bashrc中,加环境变量
我不确定这一步是否必须,似乎NUMBAPRO已经被废弃了
export NUMBAPRO_CUDA_DRIVER=/usr/lib/x86_64-linux-gnu/libcuda.so
export NUMBAPRO_NVVM=/usr/local/cuda/nvvm/lib64/libnvvm.so
export NUMBAPRO_LIBDEVICE=/usr/local/cuda/nvvm/libdevice
export LD_LIBRARY_PATH=/home/ch511/anaconda3/envs/sassd/lib/python3.7/site-packages/spconv;
3. 安装mmcv
SA-SSD基于mmdetection v1实现,mmcv的版本可能会有讲究。
尝试安装清华镜像里的mmcv版本1.1.6,可以在这里成功使用。
pip install pytest-runner -i https://pypi.tuna.tsinghua.edu.cn/simple
pip install mmcv -i https://pypi.tuna.tsinghua.edu.cn/simple

4. 安装mmdet
即将本地项目中的mmdet加入site-package中,使得项目可以直接调用。
源码中没有setup.py,可以用使用mmdetection的setup.py(将requirement相关注释掉)。我使用的setup.py代码以更新至Github
python setup.py develop

Create Data
1. 下载数据集
(1) Download the 3D KITTI detection dataset from here. Data to download include:
- Velodyne point clouds (29 GB): input data to VoxelNet
- Training labels of object data set (5 MB): input label to VoxelNet
- Camera calibration matrices of object data set (16 MB): for visualization of predictions
- Left color images of object data set (12 GB): for visualization of predictions
(2) 整理数据集成如下目录:
注意创建空的 velodyne_reduced 文件夹,用来放置后续筛选得到的视锥体内的点云数据。
└── KITTI
       ├── training   <-- training data
       |   ├── image_2
       |   ├── label_2
       |   ├── calib
       |   ├── velodyne
       |   └── velodyne_reduced			# empty folder
       └── testing  <--- testing data
       |   ├── image_2
       |   ├── calib
       |   ├── velodyne
       |   └── velodyne_reduced			# empty folder
(3) 下载ImageSets
- 下载地址:https://xiaozhichen.github.io/files/mv3d/imagesets.tar.gz
- 放置位置:放在KITTI目录下
2. 生成数据集
python tools/create_data.py
3. 可能出现的错误
出现该错误说明环境没有问题,但缺失velodyne_reduced文件夹,按上述目录创建空的velodyne_reduced文件夹即可。

4. 最终完成数据生成,显示界面:

Train & Eval
1. 命令
Train Model with single GPU
python ./tools/train.py ./configs/car_cfg.py
Eval Model with single GPU
python ./tools/test.py ./configs/car_cfg.py ./work_dir/checkpoint_epoch_20.pth
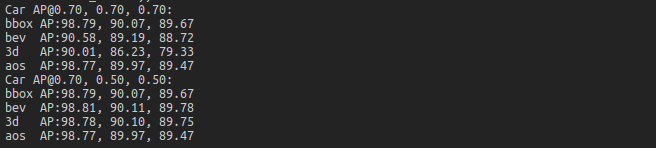
2. 评估结果
训练20 Epoch的结果
3. 可能遇到的问题
运行./tools/train.py报错:
RuntimeError: Expected object of backend CUDA but got backend CPU for sequence element 1 in sequence argument at position #1 ‘tensors’
解决方案:
https://github.com/skyhehe123/SA-SSD/issues/72
写在后面:
SA-SSD的3D数据可视化,见下一篇博客


 3145
3145


 被折叠的 条评论
为什么被折叠?
被折叠的 条评论
为什么被折叠?
 到【灌水乐园】发言


