


点击下方卡片,关注“小白玩转Python”公众号
介绍
在当今世界,先进的监控和安全对于零售企业尤为重要,防止偷窃至关重要。在我的最近项目中,我利用机器学习的强大功能,开发了一个系统,使用YOLOv8姿态估计来检测人体关键点,并使用XGBoost分类器来识别和分类零售环境中的动作。本篇博客介绍了我在实习期间完成的这一令人兴奋的项目的方法和结果。在尝试了使用videoMAE进行物体检测和视频分类之后,我最终选择了这种方法。
背景
姿态估计
姿态估计是一种迷人的计算机视觉技术,能够识别人体上的关键点位置。YOLOv8作为一种先进的物体检测模型,在高效定位这些关键点方面表现出色,是我们项目的完美选择。
动作识别
动作识别涉及基于检测到的动作来分类人类行为。为此,我选择了XGBoost,这是一种以其稳健性和分类任务的准确性著称的强大梯度提升框架。
项目实施
数据收集与准备
我首先使用了一组人类图像来微调YOLOv8姿态估计模型。为了提高准确性,我对数据进行了增强,并收集了在零售环境中表现正常和可疑活动的视频。这一步确保了我们的模型能够很好地应对现实场景。分类是在超过4000张图像上完成的。
使用YOLOv8进行姿态估计
训练YOLOv8以高精度检测关键点是项目的关键部分。尽管在应对不同的光照条件和遮挡方面面临初期挑战,我还是设法微调了模型以提供可靠的结果。
特征提取
由YOLOv8检测到的关键点随后被用于提取表示人类动作的特征。过程从从视频帧中提取图像开始,然后使用YOLOv8姿态进一步从这些帧中提取人类图像。
使用XGBoost进行动作分类
提取的图像被分为两类:“正常”和“可疑”。使用这些特征,我训练了XGBoost分类器以区分这两类。
结合姿态估计和动作识别
整个流程无缝集成了YOLOv8的姿态估计和XGBoost的动作分类,形成了一个能够实时识别活动的稳健系统。
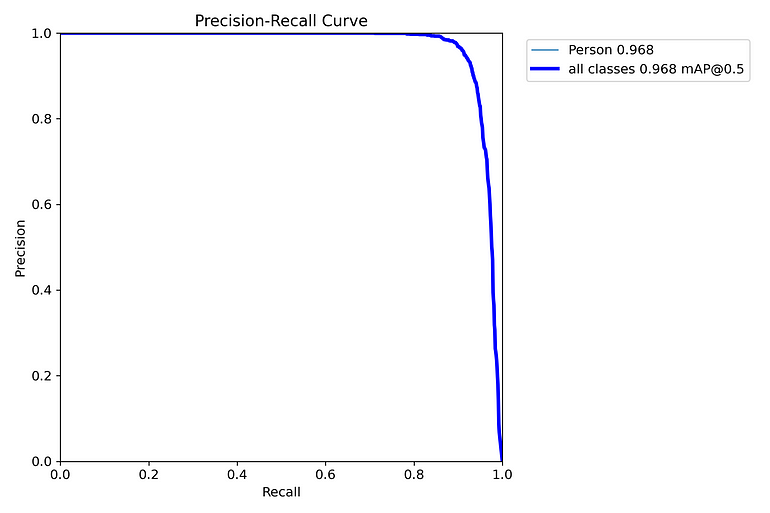
结果
模型性能
集成模型达到了中等准确性,表现出令人印象深刻的精确率和召回率指标。分类准确性达到了约75%,展示了结合姿态估计和动作识别在检测零售环境中可疑活动的有效性。
实施步骤和代码示例
步骤0:微调YOLOv8姿态检测模型
收集相关数据集,进行数据增强并在此数据集上训练YOLOv8预训练模型,以获取最佳权重文件best.pt。
步骤1:从视频中提取图像并将关键点存储在.csv文件中
包括从视频文件中提取图像,然后使用YOLOv8姿态模型进一步提取人类图像。
import cv2
from ultralytics import YOLO
import pandas as pd


model = YOLO("path_to_your_yolov8_best.pt")


video_path = "path_to_your_video"
cap = cv2.VideoCapture(video_path)


frames = cap.get(cv2.CAP_PROP_FRAME_COUNT)
fps = cap.get(cv2.CAP_PROP_FPS)


seconds = round(frames/fps)


frame_total = 400
i = 0
a = 0


all_data = []


while (cap.isOpened()):
  cap.set(cv2.CAP_PROP_POS_MSEC, (i * ((seconds/frame_total)*1000)))
  flag, frame = cap.read()


  if flag == False:
    break
  pa= 'location_you_want_to_save_images'
  image_path = f'{pa}\img_{i}.jpg'
  cv2.imwrite(image_path, frame)


  results = model(frame, verbose=False)


  for r in results:
    bound_box = r.boxes.xyxy  # get the bounding box
    conf = r.boxes.conf.tolist() # get the confident it is a human
    keypoints = r.keypoints.xyn.tolist() # get the every human keypoint


    for index, box in enumerate(bound_box):
      if conf[index] > 0.75:
        x1, y1, x2, y2 = box.tolist()
        pict = frame[int(y1):int(y2), int(x1):int(x2)]
        op = r'path_to_output_folder'
        output_path = f'{op}\person_nn_{a}.jpg'


        data = {'image_name': f'person_nn_{a}.jpg'}


        # Initialize the x and y lists for each possible key
        for j in range(len(keypoints[index])):
            data[f'x{j}'] = keypoints[index][j][0]
            data[f'y{j}'] = keypoints[index][j][1]


        all_data.append(data)
        cv2.imwrite(output_path, pict)
        a += 1


  i += 1


print(i-1, a-1)
cap.release()
cv2.destroyAllWindows()


df = pd.DataFrame(all_data)


csv_file_path = 'location_to_save_csv_file/keypoints.csv'
df.to_csv(csv_file_path, index=False)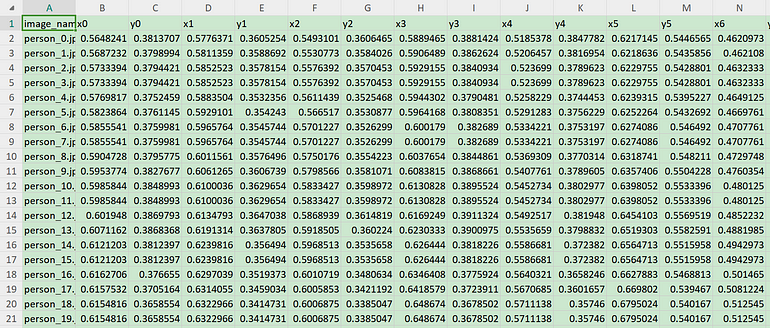
步骤2:划分图像
这一步包括将提取的人类图像分为两个文件夹:“可疑”和“正常”。
步骤3:制作带有目标类别的数据集以训练分类器模型
df = pd.read_csv('location_to_ur_csv_file')


dataset_path = 'One_step_back_from_Location_of_your_new_folder'
sus_path = os.path.join(dataset_path, 'Suspicious')
normal_path = os.path.join(dataset_path, 'Normal')


def get_label(image_name, sus_path, normal_path):
    if image_name in os.listdir(sus_path):
        return 'Suspicious'
    elif image_name in os.listdir(normal_path):
        return 'Normal'
    else:
        return None


df['label'] = df['image_name'].apply(lambda x: get_label(x, sus_path, normal_path))
df.to_csv(f'{dataset_path}dataset.csv', index=False
步骤4:训练分类器
包括训练我们的XGBoost模型以将数据分类为“正常”或“可疑”。
# Read the dataset file made in above step
df = pd.read_csv(r'path_to_your_dataset.csv')


X = df.drop(['label', 'image_name'], axis=1)
y = df['label'].map({'Suspicious': 0, 'Normal': 1})
X_train, X_test, y_train, y_test = train_test_split(X, y, test_size=0.2, random_state=42, stratify=y)


model = xgb.XGBClassifier(n_estimators=50, eval_metric='logloss', objective='binary:logistic', tree_method='hist', eta=0.1, max_depth=3, enable_categorical=True)


model.fit(X_train, y_train)
print(model)


y_pred = model.predict(X_test)


# Evaluate the accuracy
accuracy = accuracy_score(y_test, y_pred)
print(f"Accuracy: {accuracy}")


# Save the trained model
model.save_model("path_to_save_weights\model_weights.json")
步骤5:检测可疑活动
检测视频中可疑活动的最终代码。
def detect_shoplifting(video_path):
model_yolo = YOLO(r'location_you_save_the_yolov8_weight')
model = xgb.Booster()
model.load_model(r'location_you_save_the_xgboost_weight')
cap = cv2.VideoCapture(video_path)
print('Total Frame', cap.get(cv2.CAP_PROP_FRAME_COUNT))
fps = int(cap.get(cv2.CAP_PROP_FPS))
width = int(cap.get(cv2.CAP_PROP_FRAME_WIDTH))
height = int(cap.get(cv2.CAP_PROP_FRAME_HEIGHT))
fourcc = cv2.VideoWriter_fourcc('F', 'M', 'P', '4')
# Generate a unique output path
video_name = os.path.splitext(os.path.basename(video_path))[0]
output_path = fr"path_to_your_output_folder\{video_name}_output.mp4"
out = cv2.VideoWriter(output_path, fourcc, fps, (width, height))
frame_tot = 0
while cap.isOpened():
success, frame = cap.read()
if success:
results = model_yolo(frame, verbose=False)
# Visualize the results on the frame
annotated_frame = results[0].plot(boxes=False)
for r in results:
bound_box = r.boxes.xyxy
conf = r.boxes.conf.tolist()
keypoints = r.keypoints.xyn.tolist()
print(f'Frame {frame_tot}: Detected {len(bound_box)} bounding boxes')
for index, box in enumerate(bound_box):
if conf[index] > 0.75:
x1, y1, x2, y2 = box.tolist()
data = {}
for j in range(len(keypoints[index])):
data[f'x{j}'] = keypoints[index][j][0]
data[f'y{j}'] = keypoints[index][j][1]
df = pd.DataFrame(data, index=[0])
dmatrix = xgb.DMatrix(df)
sus = model.predict(dmatrix)
binary_predictions = (sus > 0.5).astype(int)
print(f'Prediction: {binary_predictions}')
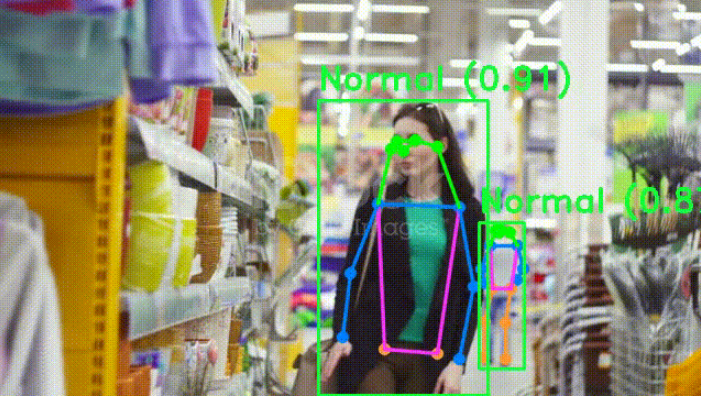
if binary_predictions == 0:
conf_text = f'Suspicious ({conf[index]:.2f})'
cv2.rectangle(annotated_frame, (int(x1), int(y1)), (int(x2), int(y2)), (255, 7, 58), 2)
cv2.putText(annotated_frame, conf_text, (int(x1), int(y1) - 10), cv2.FONT_HERSHEY_DUPLEX, 1.0, (255, 7, 58), 2)
if binary_predictions == 1:
conf_text = f'Normal ({conf[index]:.2f})'
cv2.rectangle(annotated_frame, (int(x1), int(y1)), (int(x2), int(y2)), (57, 255, 20), 2)
cv2.putText(annotated_frame, conf_text, (int(x1), int(y1) - 10), cv2.FONT_HERSHEY_DUPLEX, 1.0, (57, 255, 20), 2)
cv2.imshow('Frame', annotated_frame)
out.write(annotated_frame)
frame_tot += 1
print('Processed Frame:', frame_tot)
if cv2.waitKey(1) & 0xFF == ord("q"):
break
else:
break
cap.release()
out.release()
cv2.destroyAllWindows()
# Example usage:
video_path = r"path_to_sample_video"
detect_shoplifting(video_path)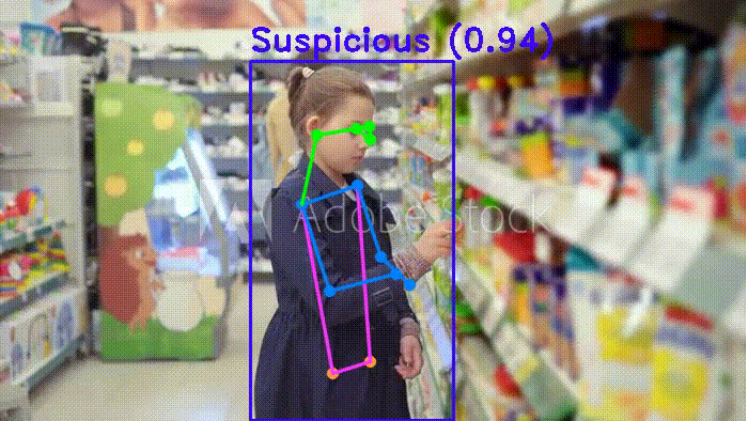
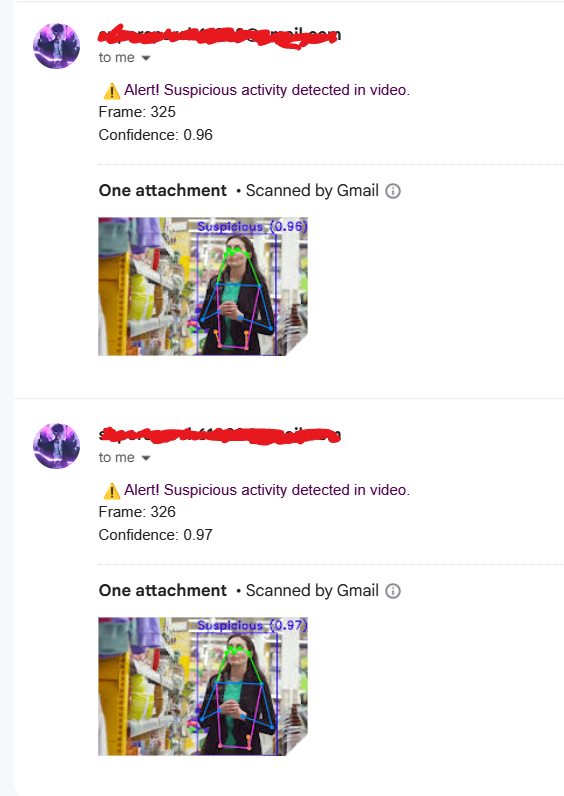
步骤6(可选):添加邮件警报系统
此步骤包括基于置信度阈值添加邮件警报系统。每当置信度水平超过设定的阈值时,它会向用户发送邮件。
def send_email_alert(frame_number, confidence, video_path, frame):
    # Define the SMTP server credentials here
    smtp_server = 'smtp.gmail.com'
    smtp_port = 587
    sender_email = "sender's_email"
    sender_password = "sender's_app_password"
    recipient_email = 'email_of_recipient'


    # Create the email content
    subject = "Shoplifting Alert"
    body = f" ⚠ Alert! Suspicious activity detected in video.\nFrame: {frame_number}\nConfidence: {confidence:.2f}"


    # Set up the MIME
    msg = MIMEMultipart()
    msg['From'] = sender_email
    msg['To'] = recipient_email
    msg['Subject'] = subject
    msg.attach(MIMEText(body, 'plain'))


    # Encode the frame as an image
    _, img_encoded = cv2.imencode('.jpg', frame)
    img_bytes = img_encoded.tobytes()


    # Attach the image
    part = MIMEBase('application', 'octet-stream')
    part.set_payload(img_bytes)
    encoders.encode_base64(part)
    part.add_header('Content-Disposition', f'attachment; filename="frame_{frame_number}.jpg"')
    msg.attach(part)


    # Connect to the SMTP server and send the email
    server = smtplib.SMTP(smtp_server, smtp_port)
    server.starttls()
    server.login(sender_email, sender_password)
    server.send_message(msg)
    server.quit()
    print("Email sent successfully")


# Add below code into Step-5 accordingly...


if binary_predictions == 0:  # Suspicious activity
  if conf[index] >= 0.96: # Threshold
    conf_text = f'Suspicious ({conf[index]:.2f})'
    cv2.rectangle(annotated_frame, (int(x1), int(y1)), (int(x2), int(y2)), (255, 7, 58), 2)
    cv2.putText(annotated_frame, conf_text, (int(x1), int(y1) - 10), cv2.FONT_HERSHEY_DUPLEX, 1.0, (255, 7, 58), 2)
    send_email_alert(frame_tot, conf[index], video_path, annotated_frame)
  elif binary_predictions == 1:  # Normal activity
    conf_text = f'Normal ({conf[index]:.2f})'
    cv2.rectangle(annotated_frame, (int(x1), int(y1)), (int(x2), int(y2)), (57, 255, 20), 2)
    cv2.putText(annotated_frame, conf_text, (int(x1), int(y1) - 10), cv2.FONT_HERSHEY_DUPLEX, 1.0, (57, 255, 20), 2)
示例邮件:
结论
在本项目中,我们成功实现了一个使用YOLOv8进行姿态估计和XGBoost进行动作识别的先进偷窃检测系统。通过基于置信度阈值设置邮件警报系统,我们添加了一个实时通知功能,大大增强了系统的实用性。
主要收获
姿态估计和动作识别:利用YOLOv8和XGBoost检测可疑活动。
实时警报:实现邮件警报系统,立即通知用户潜在的偷窃事件。
综合方法:结合物体检测和动作识别,提高检测准确性。
潜在应用
零售安全:通过提供实时警报增强零售环境的安全措施。
损失预防:通过及时通知减少盗窃及相关损失。
数据驱动的洞察:分析偷窃活动模式以制定预防策略。
参考资料
https://www.kaggle.com/
https://stock.adobe.com/in/
https://www.istockphoto.com/
https://www.shutterstock.com/
https://giphy.com/https://tenor.com/
· END ·
🌟 想要变身计算机视觉小能手?快来「小白玩转Python」公众号!
回复“Python视觉实战项目”,解锁31个超有趣的视觉项目大礼包!🎁
本文仅供学习交流使用,如有侵权请联系作者删除


 97
97

 被折叠的 条评论
为什么被折叠?
被折叠的 条评论
为什么被折叠?
 到【灌水乐园】发言


