


参考-知乎-ViT论文及代码解读-ICLR2021:Transformer用于视觉分类也有很好的性能
论文链接:2021-ICLR-An Image is Worth 16x16 Words: Transformers for Image Recognition at Scale
整体方法概述
ViT其实就是使用Transformer进行图像分类的一次成功的尝试。

两个关键点:
-
Transformer的输入需要是一维的tokens;
因此ViT对输入图像的处理方式是:将图像进行切块,然后直接将图像块的线性映射成一维的tokens,作为Transformer的输入。 -
并且ViT额外添加了一个用于分类的token [class] ,Encoder对特征处理之后,只需要将该分类token [class] 输入到MLP预测头实现分类。
模型详细结构

整个ViT的模型结构可以分成如下几部分:
- 输入图像的预处理
- 多层Transformer编码器
- MLP分类头
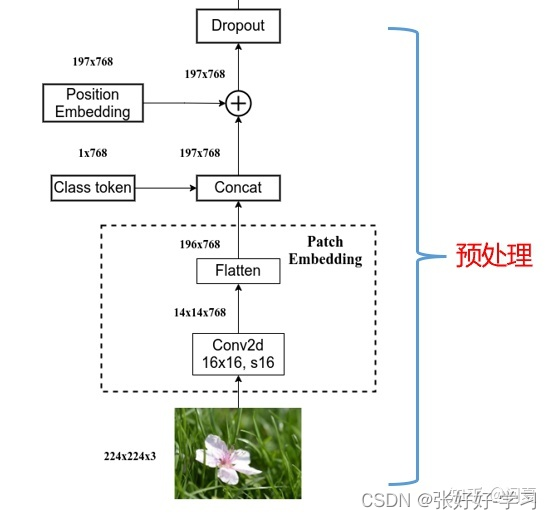
预处理模块
- 输入图片【224×224×3】首先进行一次卷积,
卷积核大小为16×16×768,16表示要划分的图像patch的大小,768是卷积核的输出通道的大小(768=16×16×3),也就是通过卷积操作,将图像patch映射成一维的向量。 - 卷积之后的维度为14×14×768,在空间维度上尽进行Flatten,因此变成196×768,也就是得到了196个称为768的token.
- 然后,添加一个用于分类的token【class】,维度是1×768,在图像tokens的前面,因此整体输入变成了197个tokens。
- 在tokens上添加位置embedding:Position Embedding维度为197×768,直接加到对应的tokens的数值上即可。
class PatchEmbed(nn.Module):
"""
2D Image to Patch Embedding,二维图像patch Embedding
"""
def __init__(self, img_size=224, patch_size=16, in_c=3, embed_dim=768, norm_layer=None):
super().__init__()
img_size = (img_size, img_size) # 图片尺寸224*224
patch_size = (patch_size, patch_size) #下采样倍数,一个grid cell包含了16*16的图片信息
self.img_size = img_size
self.patch_size = patch_size
# grid_size是经过patchembed后的特征层的尺寸
self.grid_size = (img_size[0] // patch_size[0], img_size[1] // patch_size[1])
self.num_patches = self.grid_size[0] * self.grid_size[1] #path个数 14*14=196
# 通过一个卷积,完成patchEmbed
self.proj = nn.Conv2d(in_c, embed_dim, kernel_size=patch_size,stride=patch_size)
# 如果使用了norm层,如BatchNorm2d,将通道数传入,以进行归一化,否则进行恒等映射
self.norm = norm_layer(embed_dim) if norm_layer else nn.Identity()
def forward(self, x):
B, C, H, W = x.shape #batch,channels,heigth,weigth
# 输入图片的尺寸要满足既定的尺寸
assert H == self.img_size[0] and W == self.img_size[1], \
f"Input image size ({H}*{W}) doesn't match model ({self.img_size[0]}*{self.img_size[1]})."
# proj: [B, C, H, W] -> [B, C, H,W] , [B,3,224,224]-> [B,768,14,14]
# flatten: [B, C, H, W] -> [B, C, HW] , [B,768,14,14]-> [B,768,196]
# transpose: [B, C, HW] -> [B, HW, C] , [B,768,196]-> [B,196,768]
x = self.proj(x).flatten(2).transpose(1, 2)
x = self.norm(x)
return x
Transformer编码模块
Encoder block主要包含两个部分:多头注意力模块和MLP模块

Multi-head attention
对于输入querys首先经过一个linear层获取qkv;
然后将qkv分别在(length维度上,将C进行划分)划分成nums_head个;
之后进行自注意力的矩阵相乘即可:qk先计算注意力权重α;得到注意力权重后根据权重值对v进行加权求和。
代码如下:
class Attention(nn.Module):
"""
muti-head attention模块,也是transformer最主要的操作
"""
def __init__(self,
dim, # 输入token的dim,768
num_heads=8, #muti-head的head个数,实例化时base尺寸的vit默认为12
qkv_bias=False,
qk_scale=None,
attn_drop_ratio=0.,
proj_drop_ratio=0.):
super(Attention, self).__init__()
self.num_heads = num_heads
head_dim = dim // num_heads #平均每个head的维度
self.scale = qk_scale or head_dim ** -0.5 #进行query操作时,缩放因子
# qkv矩阵相乘操作,dim * 3使得一次性进行qkv操作
self.qkv = nn.Linear(dim, dim * 3, bias=qkv_bias)
self.attn_drop = nn.Dropout(attn_drop_ratio)
self.proj = nn.Linear(dim, dim) #一个卷积层
self.proj_drop = nn.Dropout(proj_drop_ratio)
def forward(self, x):
# [batch_size, num_patches + 1, total_embed_dim] 如 [bactn,197,768]
B, N, C = x.shape # N:197 , C:768
# qkv进行注意力操作,reshape进行muti-head的维度分配,permute维度调换以便后续操作
# qkv(): -> [batch_size, num_patches + 1, 3 * total_embed_dim] 如 [b,197,2304]
# reshape: -> [batch_size, num_patches + 1, 3, num_heads, embed_dim_per_head] 如 [b,197,3,12,64],在这一步中实现了muti-head操作
# permute: -> [3, batch_size, num_heads, num_patches + 1, embed_dim_per_head]
qkv = self.qkv(x).reshape(B, N, 3, self.num_heads, C // self.num_heads).permute(2, 0, 3, 1, 4)
# qkv的维度相同,[batch_size, num_heads, num_patches + 1, embed_dim_per_head]
q, k, v = qkv[0], qkv[1], qkv[2] # make torchscript happy (cannot use tensor as tuple)
# transpose: -> [batch_size, num_heads, embed_dim_per_head, num_patches + 1]
# @: multiply -> [batch_size, num_heads, num_patches + 1, num_patches + 1]
attn = (q @ k.transpose(-2, -1)) * self.scale #矩阵相乘操作
attn = attn.softmax(dim=-1) #每一path进行softmax操作
attn = self.attn_drop(attn)
# [b,12,197,197]@[b,12,197,64] -> [b,12,197,64]
# @: multiply -> [batch_size, num_heads, num_patches + 1, embed_dim_per_head]
# 维度交换 transpose: -> [batch_size, num_patches + 1, num_heads, embed_dim_per_head]
# reshape: -> [batch_size, num_patches + 1, total_embed_dim]
x = (attn @ v).transpose(1, 2).reshape(B, N, C)
x = self.proj(x) #经过一层卷积
x = self.proj_drop(x) #Dropout
return x
MLP
MLP就是一个两层感知机,
class Mlp(nn.Module):
"""
MLP as used in Vision Transformer, MLP-Mixer and related networks
"""
def __init__(self, in_features, hidden_features=None, out_features=None,
act_layer=nn.GELU, # GELU是更加平滑的relu
drop=0.):
super().__init__()
out_features = out_features or in_features #如果out_features不存在,则为in_features
hidden_features = hidden_features or in_features #如果hidden_features不存在,则为in_features。论文中hidden_features升维为原来的4倍
self.fc1 = nn.Linear(in_features, hidden_features) #fc层1
self.act = act_layer() #激活
self.fc2 = nn.Linear(hidden_features, out_features) #fc层2
self.drop = nn.Dropout(drop)
def forward(self, x):
x = self.fc1(x)
x = self.act(x)
x = self.drop(x)
x = self.fc2(x)
x = self.drop(x)
return x
Transformer整体代码
内部包括多头注意模块+MLP模块,并且每个块都进行了残差连接。
class Block(nn.Module):
"""
基本的Transformer模块
"""
def __init__(self,
dim,num_heads, mlp_ratio=4.,
qkv_bias=False, qk_scale=None, drop_ratio=0.,
attn_drop_ratio=0., drop_path_ratio=0.,
act_layer=nn.GELU, norm_layer=nn.LayerNorm):
super(Block, self).__init__()
self.norm1 = norm_layer(dim) #norm层
self.attn = Attention(dim, num_heads=num_heads, qkv_bias=qkv_bias, qk_scale=qk_scale,
attn_drop_ratio=attn_drop_ratio, proj_drop_ratio=drop_ratio)
# NOTE: drop path for stochastic depth, we shall see if this is better than dropout here
# 代码使用了DropPath,而不是原版的dropout
self.drop_path = DropPath(drop_path_ratio) if drop_path_ratio > 0. else nn.Identity()
self.norm2 = norm_layer(dim) #norm层
mlp_hidden_dim = int(dim * mlp_ratio) #隐藏层维度扩张后的通道数
# 多层感知机
self.mlp = Mlp(in_features=dim, hidden_features=mlp_hidden_dim, act_layer=act_layer, drop=drop_ratio)
def forward(self, x):
x = x + self.drop_path(self.attn(self.norm1(x))) # attention后残差连接
x = x + self.drop_path(selfpython'.mlp(self.norm2(x))) # mlp后残差连接
return x
分类头
分类头很简单,就是取特征层如197* 768的第一个向量,即1*768,再对此进行线性全连接层进行多分类即可。
# self.num_features=768
# num_classes为分类任务的类别数量
self.head = nn.Linear(self.num_features, num_classes) if num_classes > 0 else nn.Identit


 1076
1076

 被折叠的 条评论
为什么被折叠?
被折叠的 条评论
为什么被折叠?
 到【灌水乐园】发言


