


添加噪声的方式大致分为两种,一种是每张图像在任意timestep都加入一样的均匀噪声,另一种是按照timestep添加不同程度的噪声
一、在任意timestep都加入一样的noise
batch_size = 32

x_start = torch.rand(batch_size,3,256,256)
noise = torch.randn_like(x_start)
x_noisy = x_start + noise

print(x_noisy)
二、按照timestep添加不同程度的noise
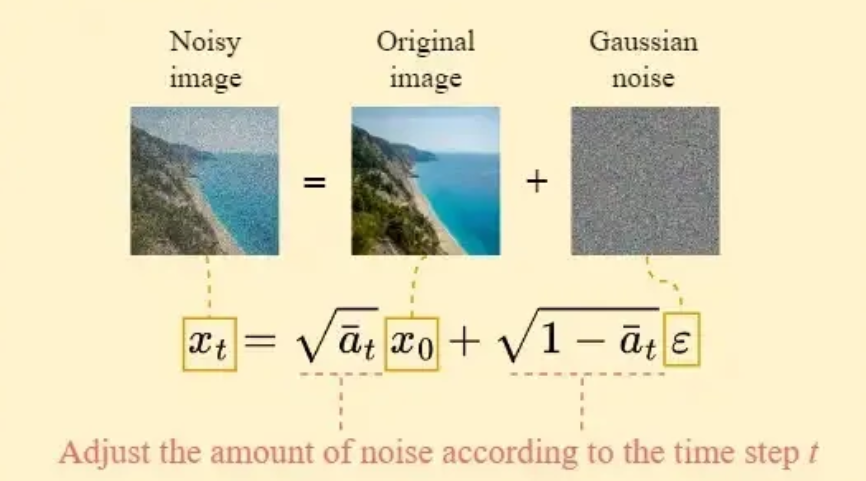
插入的方式有很多:(linear、cosine、sqrt_linear、sqrt),不论哪种方式插入noise,都是按照以下的公式进行的噪声插入,只不过是β在每个timestep的值不一样,从而造成不同timestep有不同程度的噪声
这里的x0可以是不同的东西,加入噪声可以有多种应用,例如最常见的输入图像(bz, 3, 256, 256)【经典的diffusion论文】、输入图像经过pretrain encoder后的表征(bz, 512, 1, 1)【RCG论文】...
1、最简单的写法(linear)
通过线性的方式(torch.linspace)插入noise
import torch
## ----------------------------- 确定超参数的值 ----------------------------- ##
num_steps = 100
# 制定每一步的beta
betas = torch.linspace(-6, 6, num_steps)
betas = torch.sigmoid(betas) * (0.5e-2 - 1e-5) + 1e-5
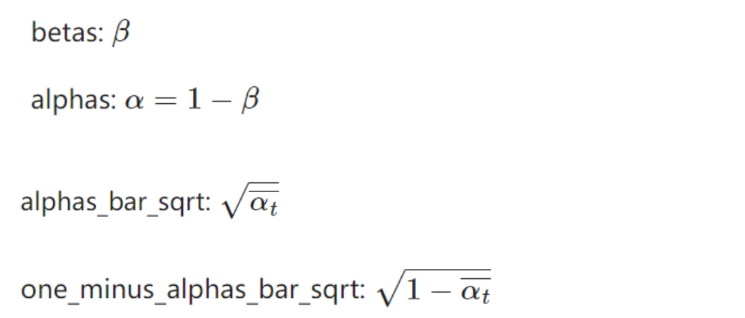
alphas = 1 - betas
alphas_prod = torch.cumprod(alphas, 0)
# 定义调整noise的常量
alphas_bar_sqrt = torch.sqrt(alphas_prod)
one_minus_alphas_bar_sqrt = torch.sqrt(1 - alphas_prod)
## ----------------------------- 确定扩散前向过程任意时刻的采样值 x[t]: x[0] + t --> x[t] ----------------------------- ##
def q_x(x_0, t):
    """
    x[0] + t --> x[t]
    :param x_0:初始数据
    :param t:任意时刻
    """
    noise = torch.randn_like(x_0)
    # 取出在某个时刻t所对应的alphas_t、alphas_1_m_t的值
    alphas_t = alphas_bar_sqrt[t]
    alphas_1_m_t = one_minus_alphas_bar_sqrt[t]
    x_t = alphas_t * x_0 + alphas_1_m_t * noise
    return x_t


batch_size = 32
x_start = torch.rand(batch_size,3,256,256)
# 给x_start加上在timestep 65 的时候噪声
x_noisy = q_x(x_start, 65)
一文弄懂 Diffusion Model(DDPM)+ 代码实现-CSDN博客
2、可选不同的β策略
不同的β策略
import torch
from inspect import isfunction
from functools import partial
import numpy as np


to_torch = partial(torch.tensor, dtype=torch.float32)
def make_beta_schedule(schedule, n_timestep, linear_start=1e-4, linear_end=2e-2, cosine_s=8e-3):
    """
    设置β的调度值
    """
    if schedule == "linear":
        betas = (torch.linspace(linear_start ** 0.5, linear_end ** 0.5, n_timestep, dtype=torch.float64) ** 2)
    elif schedule == "cosine":
        timesteps = (torch.arange(n_timestep + 1, dtype=torch.float64) / n_timestep + cosine_s)
        alphas = timesteps / (1 + cosine_s) * np.pi / 2
        alphas = torch.cos(alphas).pow(2)
        alphas = alphas / alphas[0]
        betas = 1 - alphas[1:] / alphas[:-1]
        betas = np.clip(betas, a_min=0, a_max=0.999)
    elif schedule == "sqrt_linear":
        betas = torch.linspace(linear_start, linear_end, n_timestep, dtype=torch.float64)
    elif schedule == "sqrt":
        betas = torch.linspace(linear_start, linear_end, n_timestep, dtype=torch.float64) ** 0.5
    else:
        raise ValueError(f"schedule '{schedule}' unknown.")
    return betas.numpy()
定义超参数
betas = make_beta_schedule(schedule="linear", n_timestep=1000, linear_start=0.0015, linear_end=0.0195, cosine_s=0.008)

alphas = 1. - betas
alphas_cumprod = np.cumprod(alphas, axis=0)
alphas_cumprod = to_torch(alphas_cumprod)
sqrt_alphas_cumprod = to_torch(np.sqrt(alphas_cumprod))
sqrt_one_minus_alphas_cumprod = to_torch(np.sqrt(1. - alphas_cumprod))


batch_size = 32
# x_start = torch.rand(batch_size,512,1,1)
x_start = torch.rand(batch_size,3,256,256)
noise = torch.randn_like(x_start)
t = torch.randint(0, 1000, (batch_size,)).long()


def exists(x):
    return x is not None


def default(val, d):
    if exists(val):
        return val
    return d() if isfunction(d) else d


def extract_into_tensor(a, t, x_shape):
    b, *_ = t.shape
    out = a.gather(-1, t)
    return out.reshape(b, *((1,) * (len(x_shape) - 1)))


def q_sample(x_start, t, noise=None):
    noise = default(noise, lambda: torch.randn_like(x_start))
    return (extract_into_tensor(sqrt_alphas_cumprod, t, x_start.shape) * x_start +
            extract_into_tensor(sqrt_one_minus_alphas_cumprod, t, x_start.shape) * noise)


x_noisy = q_sample(x_start=x_start, t=t, noise=noise)


 1086
1086

 被折叠的 条评论
为什么被折叠?
被折叠的 条评论
为什么被折叠?
 到【灌水乐园】发言


