


 【本系列文章系学习 唐福幸《Unity ShaderLab 新手宝典》的笔记,包含个人理解,如有错误欢迎批评指出透明效果7.3.6 半透明物体的双面渲染7.3.6 半透明物体的双面渲染上一节
【本系列文章系学习 唐福幸《Unity ShaderLab 新手宝典》的笔记,包含个人理解,如有错误欢迎批评指出
透明效果
一句话总结:双面渲染显示效果更加真实,思路在于先剔除正面渲染,再剔除背面渲染,两个Pass混合即可得到。
7.3.6 半透明物体的双面渲染
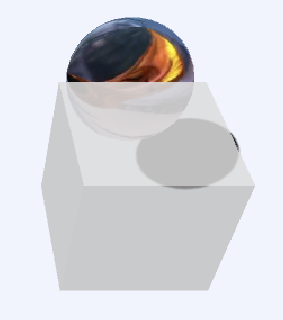
前面的渲染效果存在一个问题:当一个完全透明的物体只有单面渲染,就会忽略掉物体背面,如下:
单面渲染:
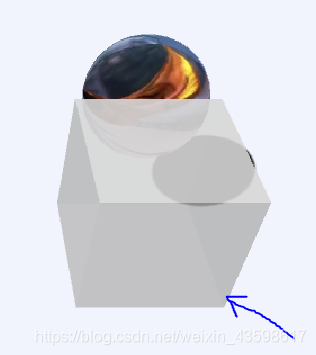
双面渲染:
之前的Cull可以用来剔除几何体的正面和背面(正面指第一个平行光照射的方向)
- 如果关掉(Cull Off)那么缓存中没有深度信息,会导致正面和背面的绘制顺序有误。
- 如果先剔除背面,再剔除正面,会导致背面图像会叠加在正面上。
- 所以只能先剔除正面,再剔除背面,两个Pass混合之后,渲染出来的效果才是正确的。(两次Pass渲染显然更加耗费性能)
代码模板如下:
Shader "Chapter7/TransImg3"
{

    Properties
    {

        _MainColor("Main Color",Color)=(1,1,1,1)
    }
    SubShader
    {

        Tags
        {

            "Queue" = "Transparent"
            "RenderType" = "Transparent"
            "IgnoreProjector" = "True"
        }
        Pass
        {

            Tags{
   "Lighting" = "ForwardBase"}
            Cull Front
            ZWrite Off
            Blend SrcAlpha OneMinusSrcAlpha

            CGPROGRAM
            //代码。。。。。。。。。。。
            ENDCG
        }

        Pass
        {

            Tags{
   "Lighting" = "ForwardBase"}
            Cull Back
            ZWrite Off
            Blend SrcAlpha OneMinusSrcAlpha

            CGPROGRAM
            //代码。。。。。。。。。。。
            ENDCG
        }
    }
    FallBack "Diffuse"//显示阴影
}
颜色透明代码:
Shader "Chapter7/TransImg3"
{

    Properties
    {

        _MainColor("Main Color",Color)=(1,1,1,1)
    }
 最低0.47元/天 解锁文章


 868
868


 被折叠的 条评论
为什么被折叠?
被折叠的 条评论
为什么被折叠?
 到【灌水乐园】发言


