


FLANN 是快速最临近邻搜索包的简称Fast_Library_for_Approximate_Nearest_Neighbors的简称。它是一个对大数据集和高维特征进行最近邻搜索的算法的集合。
特点:在面对大数据集时它的效果要好于 BFMatcher。
使用FLANN算法进行匹配时,需要传入两个字典作为参数。这两个字典是为了确定要使用的算法和其他相关参数等。
- 第一个字典是 IndexParams。对于SIFT 和SURF 等算法我们可以传入的参数是: indexparams = dict(algorithm = F LANNINDEXKDTREE, trees = 5)
- 第二个字典是 SearchParams。用它来指定递归遍历的次数。值越高结果越准确,但是消耗的时间也越多。如果想修改这个值,传入参数searchparams = dict(checks = 100)。
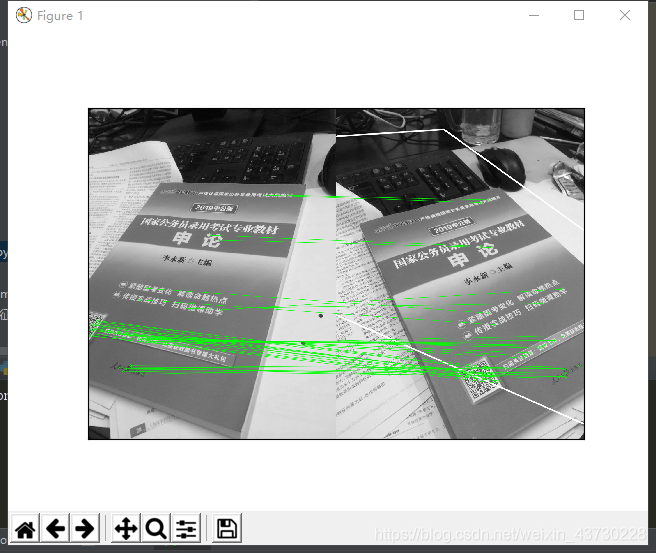
使用一个查询图像,在其中找到一些特征点(关键点),我们又在另一幅图像中也找到了一些特征点,最后对这两幅图像之间的特征点进行匹配。简单来说就是:我们在一张杂乱的图像中找到了一个对象(的某些部分)的位置。这些信息足以帮助我们在目标图像中准确的找到(查询图像)对象。
可以使用 calib3d 模块中的 cv2.findHomography()函数。如果将这两幅图像中的特征点集传给这个函数,他就会找到这个对象的透视图变换。然后就可以使用函数cv2.perspectiveTransform() 找到这个对象了。至少要 4 个正确的点才能找到这种变换。
我们已经知道在匹配过程可能会有一些错误匹配,而这些错误会影响最终结果。为了解决这个问题,算法使用 RANSAC 和 LEAST_MEDIAN(可以通过参数来设定)。所以好的匹配提供的正确的估计被称为 inliers,剩下的被称为outliers cv2.findHomography() 返回一个掩模,这个掩模确定了 inlier 和outlier 点。
代码如下图所示:
import cv2
from matplotlib import pyplot as plt
import numpy as np

MIN_MATCH_COUNT = 10

img1 = cv2.imread('shu1.jpg', 0)
img2 = cv2.imread('shu2.jpg', 0)

sift = cv2.xfeatures2d.SIFT_create()
kp1, des1 = sift.detectAndCompute(img1, None)
kp2, des2 = sift.detectAndCompute(img2, None)

FLANN_INDEX_KDTREE = 0
indexParams = dict(algorithm=FLANN_INDEX_KDTREE, trees=5)
searchParams = dict(checks=50)

flann = cv2.FlannBasedMatcher(indexParams, searchParams)

matches = flann.knnMatch(des1, des2, k=2)

good = []
for m, n in matches:
    if m.distance < 0.7 * n.distance:
        good.append(m)

if len(good) > MIN_MATCH_COUNT:
    src_pts = np.float32([kp1[m.queryIdx].pt for m in good]).reshape(-1, 1, 2)
    dst_pts = np.float32([kp2[m.trainIdx].pt for m in good]).reshape(-1, 1, 2)
    M, mask = cv2.findHomography(src_pts, dst_pts, cv2.RANSAC, 5.0)

    matchesMask = mask.ravel().tolist()
    h, w = img1.shape
    pts = np.float32([[0, 0], [0, h - 1], [w - 1, h - 1], [w - 1, 0]]).reshape(-1, 1, 2)
    dst = cv2.perspectiveTransform(pts, M)

    img2 = cv2.polylines(img2, [np.int32(dst)], True, 255, 3, cv2.LINE_AA)
else:
    print("Not Enough")
    matchesMask = None

drawParams = dict(matchColor=(0, 255, 0),
                  singlePointColor=None,
                  matchesMask=matchesMask,
                  flags=2
                  )
resultImage = cv2.drawMatches(img1, kp1, img2, kp2, good, None, **drawParams)
plt.xticks([]), plt.yticks([])
plt.imshow(resultImage), plt.show()
运行结果如图所示:


 6073
6073

 被折叠的 条评论
为什么被折叠?
被折叠的 条评论
为什么被折叠?
 到【灌水乐园】发言


